Walls are often overlooked in interior design, yet they represent one of the most significant opportunities to transform a space from ordinary to extraordinary. More than mere structural boundaries, walls serve as blank canvases waiting to be transformed into focal points that define the character and atmosphere of our homes. Whether you’re drawn to the clean lines of modern minimalism, the warmth of rustic textures, or the bold statements of contemporary patterns, the right wall treatment can dramatically alter how a room feels and functions.
The beauty of thoughtful wall design lies in its versatility and impact. A well-executed wall treatment can make a small room feel expansive, add architectural interest to a bland space, or create a sense of warmth and intimacy in an otherwise cold environment. From the practical integration of storage solutions to the artistic expression of gallery walls, from the tactile richness of natural materials to the sophisticated drama of bold color choices, wall design ideas encompass an incredible range of possibilities that cater to every aesthetic preference and functional need.
In this comprehensive guide, we’ll explore twenty-seven distinctive wall design ideas that demonstrate the transformative power of creative wall treatments. Each concept showcases different materials, techniques, and styles—from vertical wood slat installations and upholstered fabric panels to statement tile work and innovative storage solutions. Whether you’re planning a complete room renovation or simply seeking to refresh a single wall, these professionally-curated ideas will inspire you to reimagine the potential of your walls and create spaces that truly reflect your personal style while enhancing your daily living experience.
1. Modern Vertical Wood Slat Wall Installation
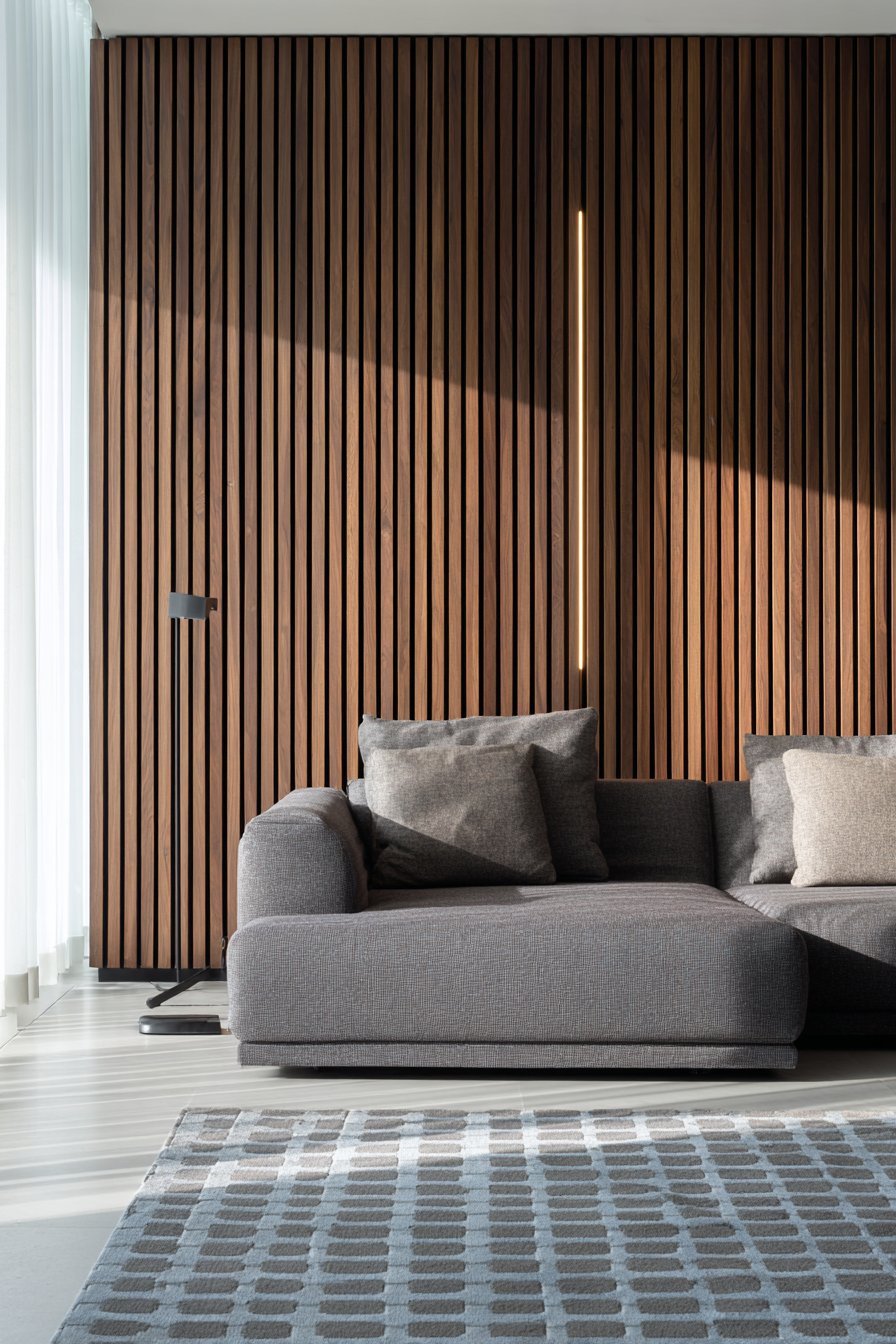
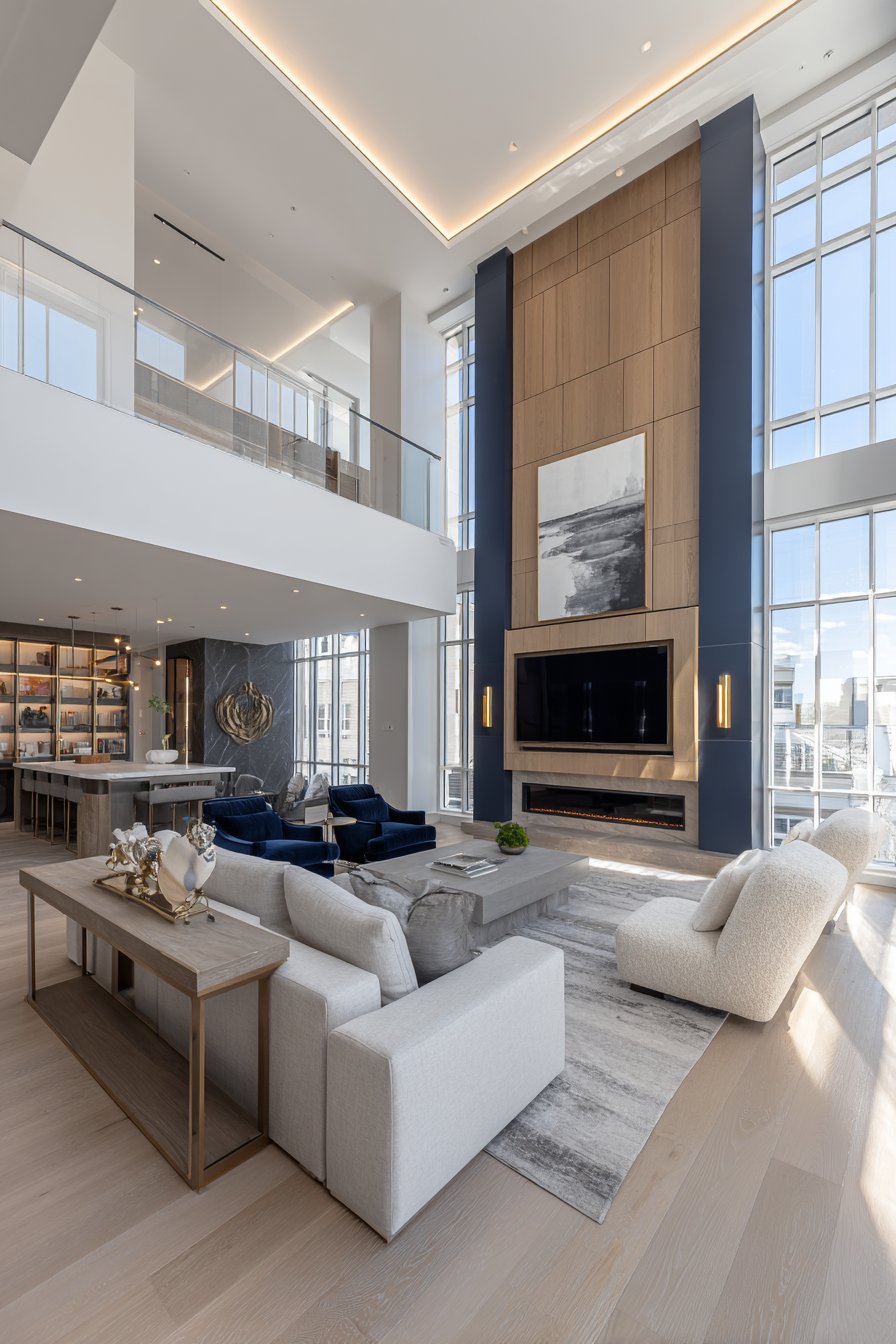
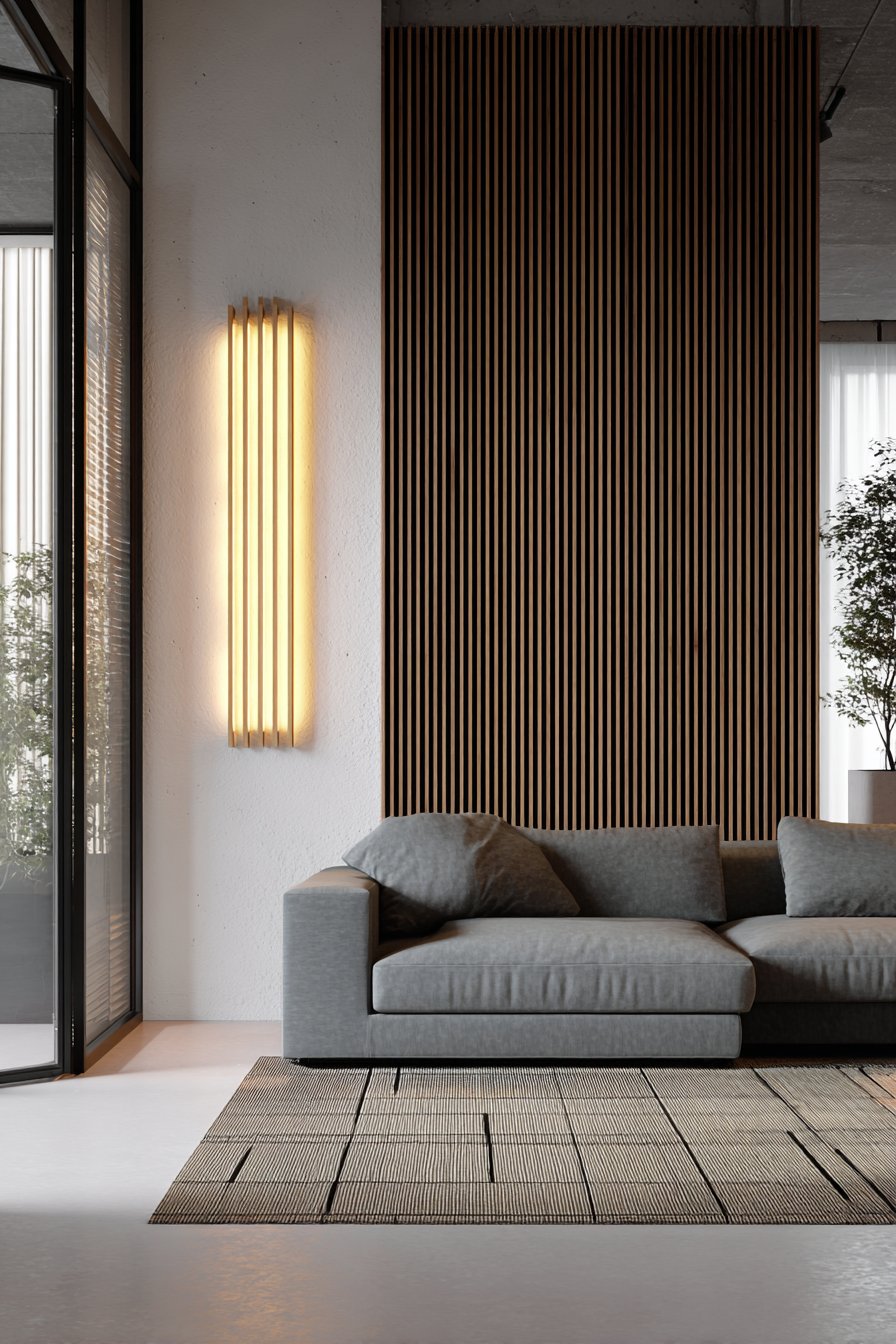
The contemporary living room featuring vertical wood slat wall design ideas brings a sophisticated architectural element that instantly elevates the space. Natural walnut panels create stunning depth and visual texture when mounted against a pristine white background, with carefully calculated spacing that allows light and shadow to interact throughout the day. This installation demonstrates how wall design ideas can transform a simple flat surface into a dynamic focal point that draws the eye and anchors the entire room’s aesthetic.
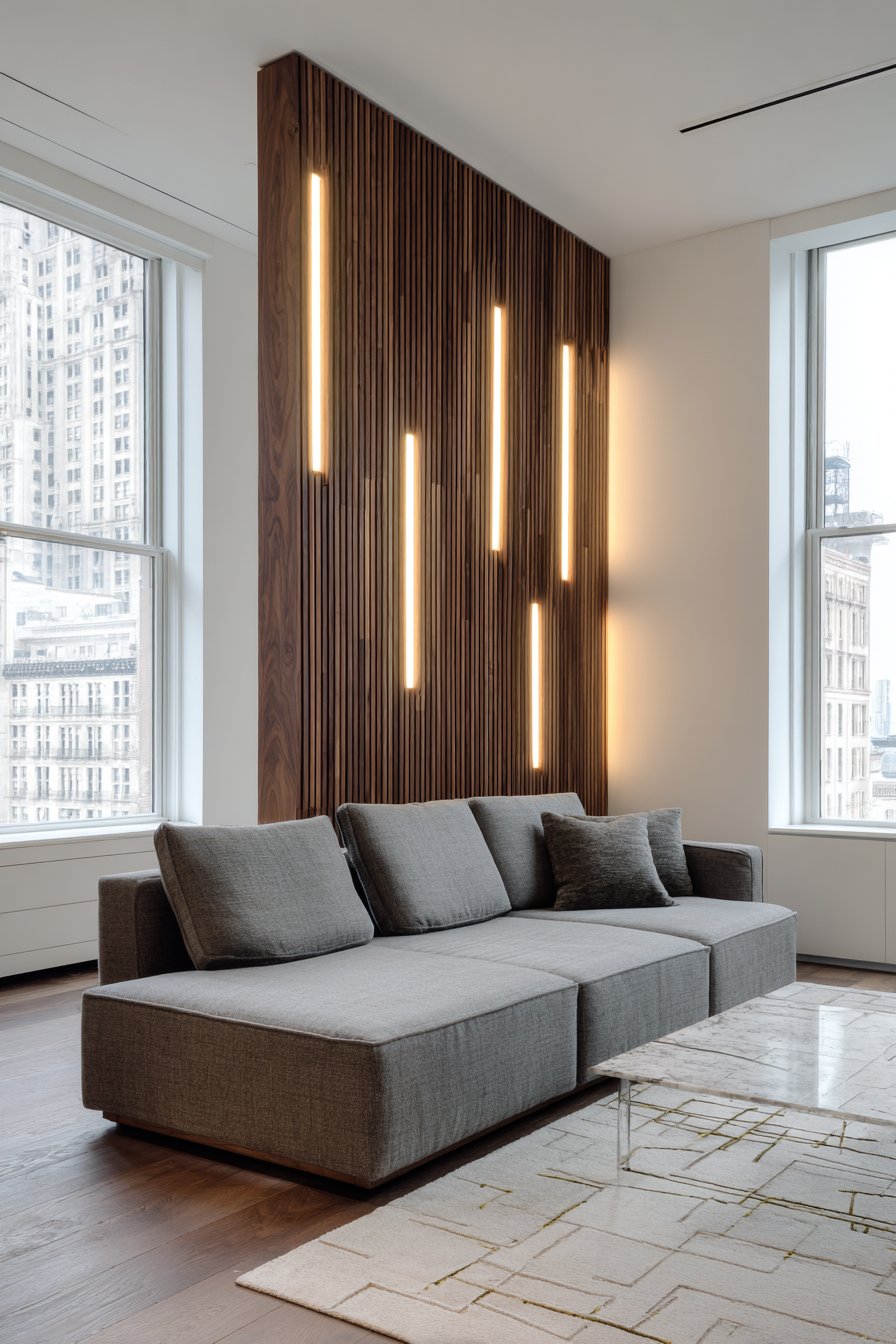
The integration of LED lighting strips between select slats represents thoughtful design that extends functionality beyond daylight hours. These illuminated channels cast a gentle ambient glow during evenings, highlighting the natural wood grain while creating an atmosphere of warmth and relaxation. The interplay between the organic texture of walnut and the clean simplicity of white walls exemplifies how contrasting elements can work harmoniously in modern interior design.
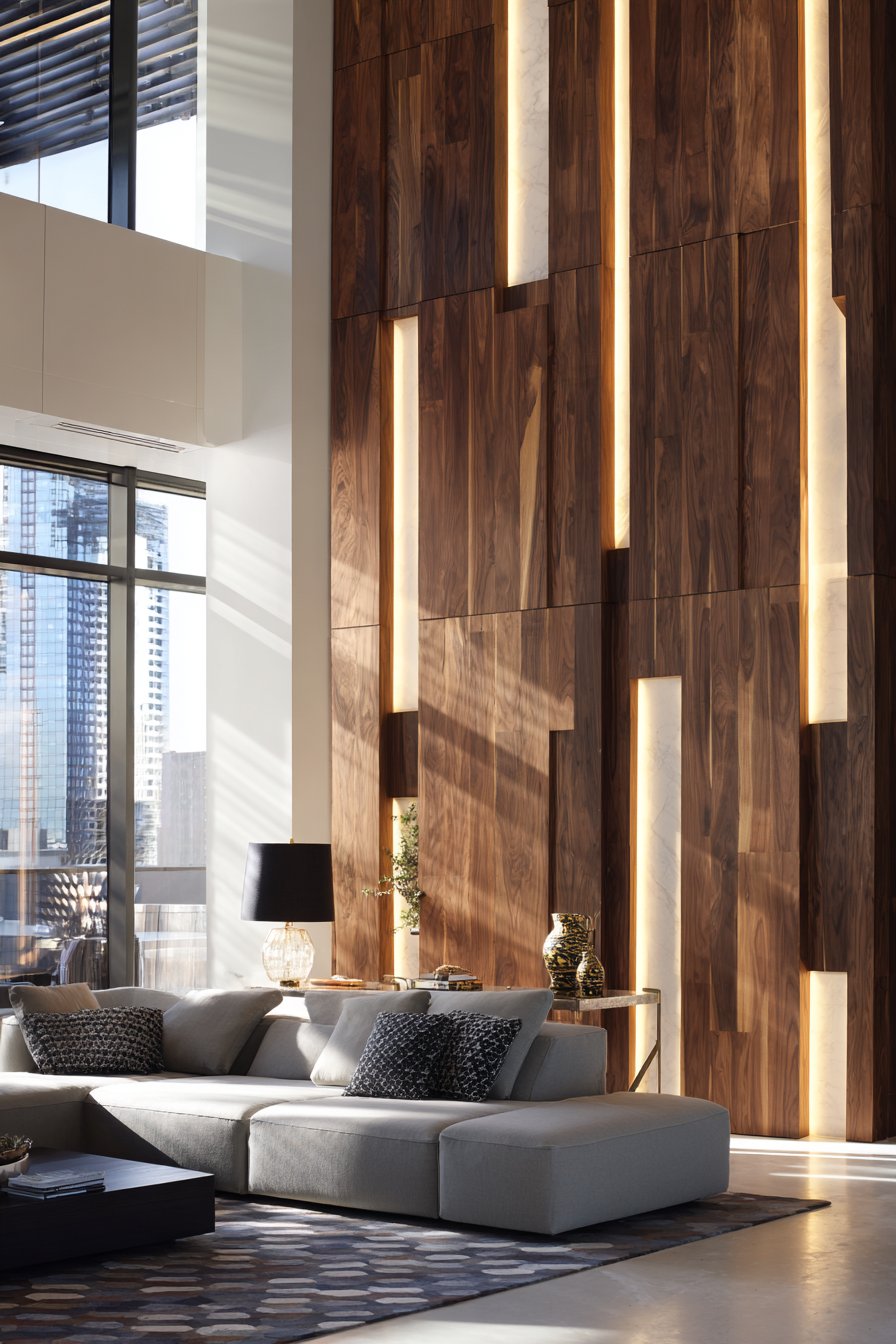
Positioned in front of this architectural feature, a contemporary gray sectional sofa provides comfortable seating while allowing the wall treatment to remain the room’s star attraction. The geometric area rug introduces pattern at floor level, creating visual balance without competing with the vertical emphasis of the slat design. Wide-angle interior photography captures how natural light from adjacent windows creates constantly shifting patterns of illumination and shadow across the wood surface, making this wall a living element that changes character throughout the day.
Key Design Tips: Choose wood species with prominent grain patterns like walnut or oak to maximize visual interest. Maintain consistent spacing between slats using a template for professional results. Install slats over a backer board to ensure stability and ease of LED integration. Position this treatment on walls opposite windows to capture natural light play. Consider the room’s ceiling height when determining slat length—floor-to-ceiling installation creates maximum impact. Use matte finish paint on background walls to prevent glare and keep focus on wood texture.
2. Luxurious Upholstered Fabric Headboard Wall
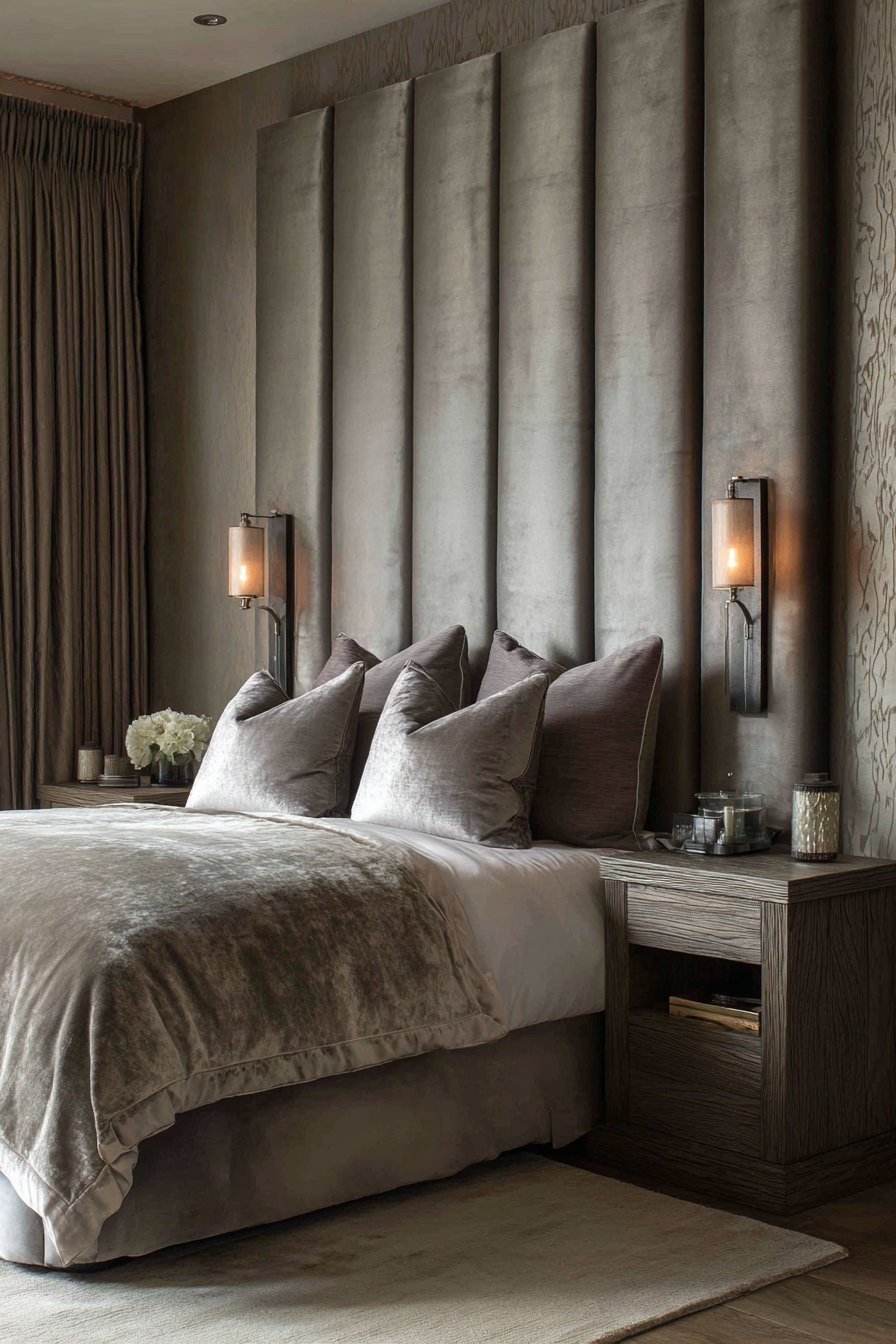
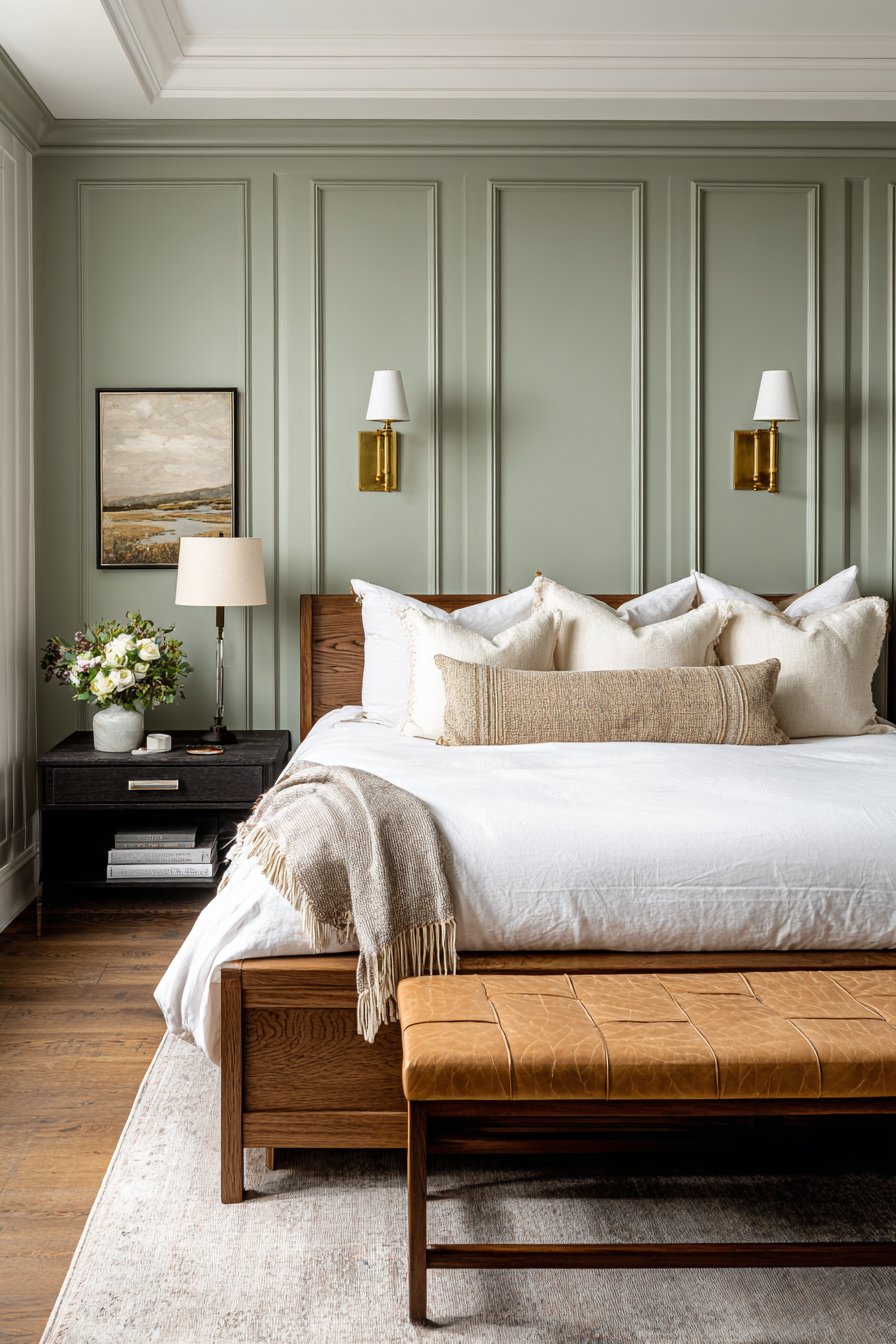
Sophisticated bedroom wall design ideas reach new heights with a dramatic floor-to-ceiling upholstered fabric installation that transforms the entire headboard wall into a luxurious tactile experience. Soft dove gray linen extends vertically with subtle channeling and covered buttons, creating the kind of hotel-inspired aesthetic that turns a bedroom into a personal sanctuary. This padded wall treatment demonstrates how wall design ideas can incorporate both visual appeal and functional comfort, providing a soft surface for reading in bed while dramatically elevating the room’s overall ambiance.

The vertical channeling with covered button details adds dimensional interest that catches light differently throughout the day, creating subtle shadows that enhance the wall’s three-dimensional quality. This technique, borrowed from high-end hospitality design, brings an element of sophistication that feels both opulent and approachable. The choice of linen fabric provides texture without pattern, allowing the material itself to become the design statement while maintaining versatility for changing bedding and decor.
Brass wall-mounted reading lights flank the bed symmetrically, their warm metallic finish complementing the soft gray upholstery while providing focused task lighting. Natural oak nightstands introduce organic warmth that prevents the gray palette from feeling too cool, creating perfect balance between contemporary elegance and inviting comfort. Professional interior photography captured during golden hour showcases how natural light interacts with the fabric’s texture, emphasizing the tactile quality and dimensional depth that makes this wall treatment so compelling.
Key Design Tips: Select high-quality upholstery-grade fabric that can withstand regular cleaning and maintain its appearance over time. Work with a professional upholsterer to ensure proper padding density for both appearance and durability. Install plywood backing before upholstering to create a solid foundation for the padded panels. Use foam with appropriate density—too soft will appear lumpy, too firm won’t show proper channeling. Plan button placement carefully to create visual rhythm that complements the room’s proportions. Consider fire-retardant treated fabrics for enhanced safety, especially in bedrooms.
3. Curated Gallery Wall Arrangement

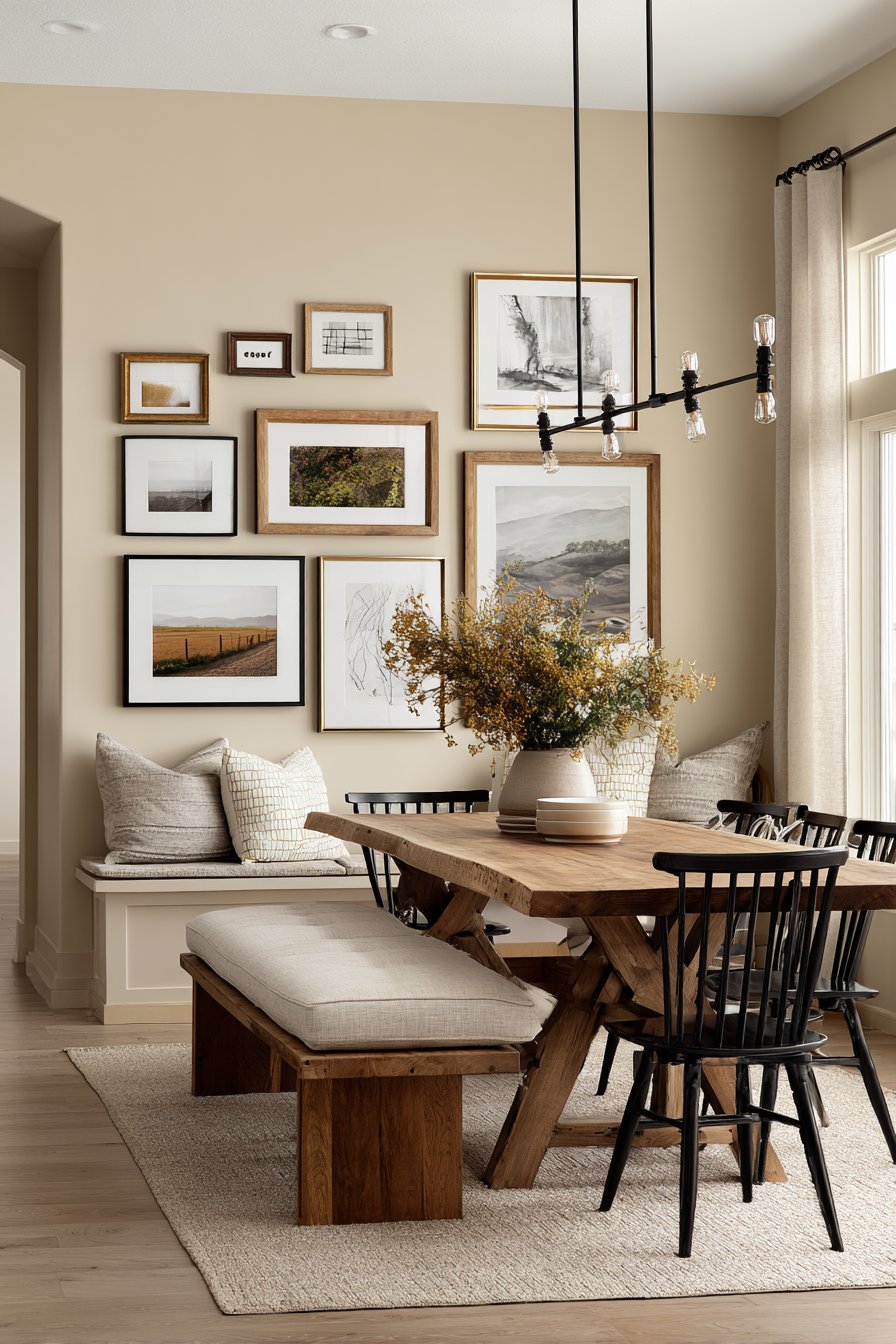
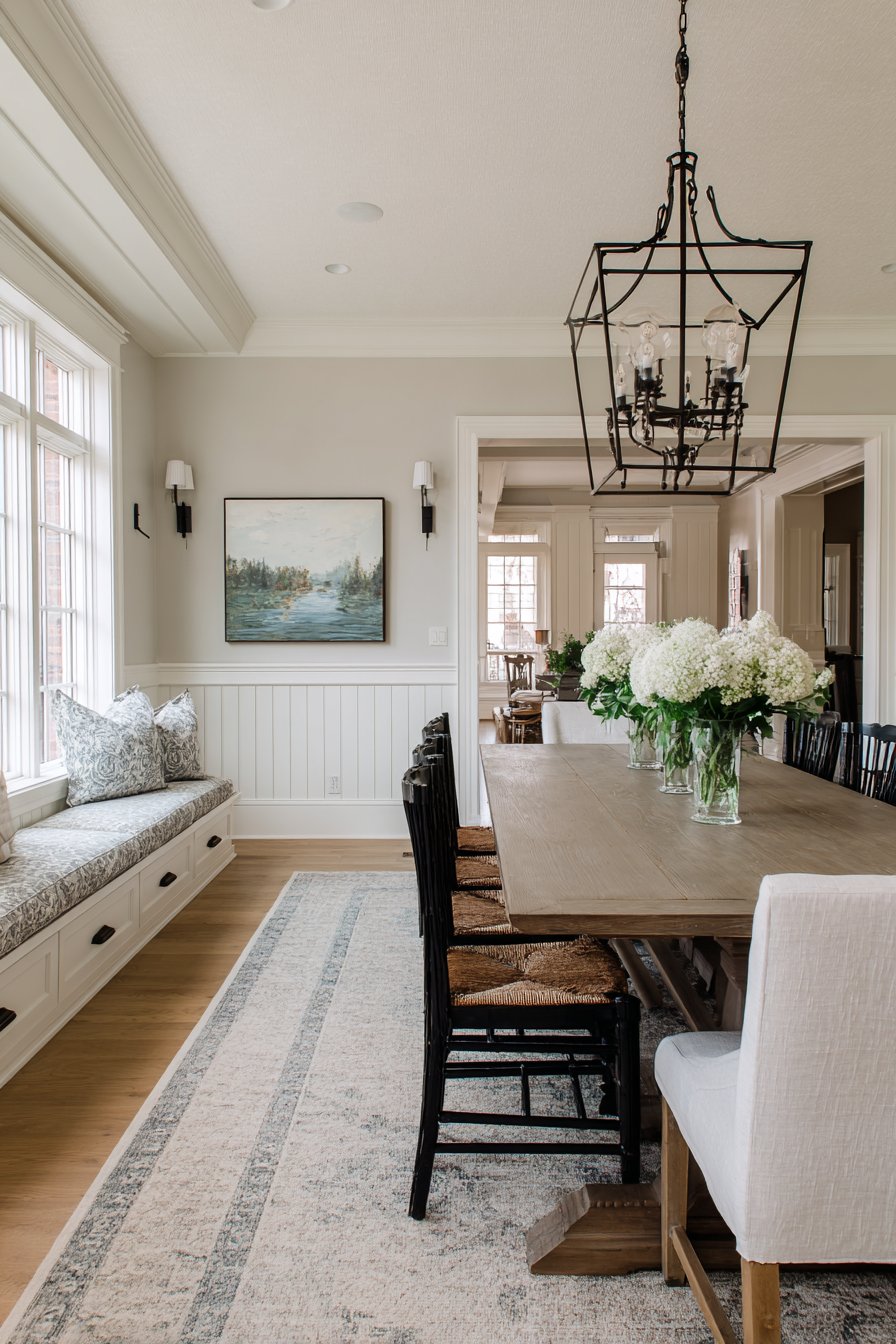
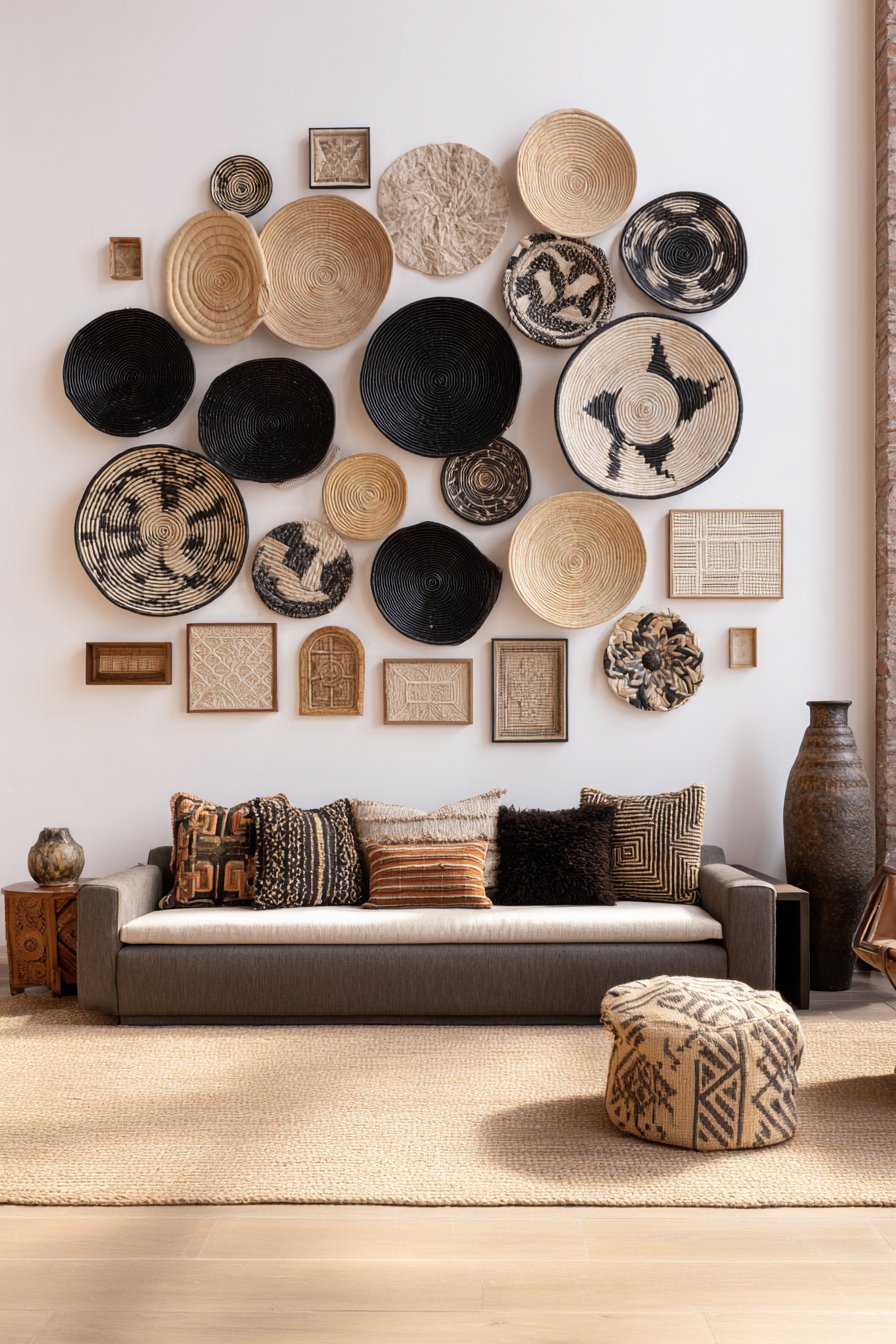
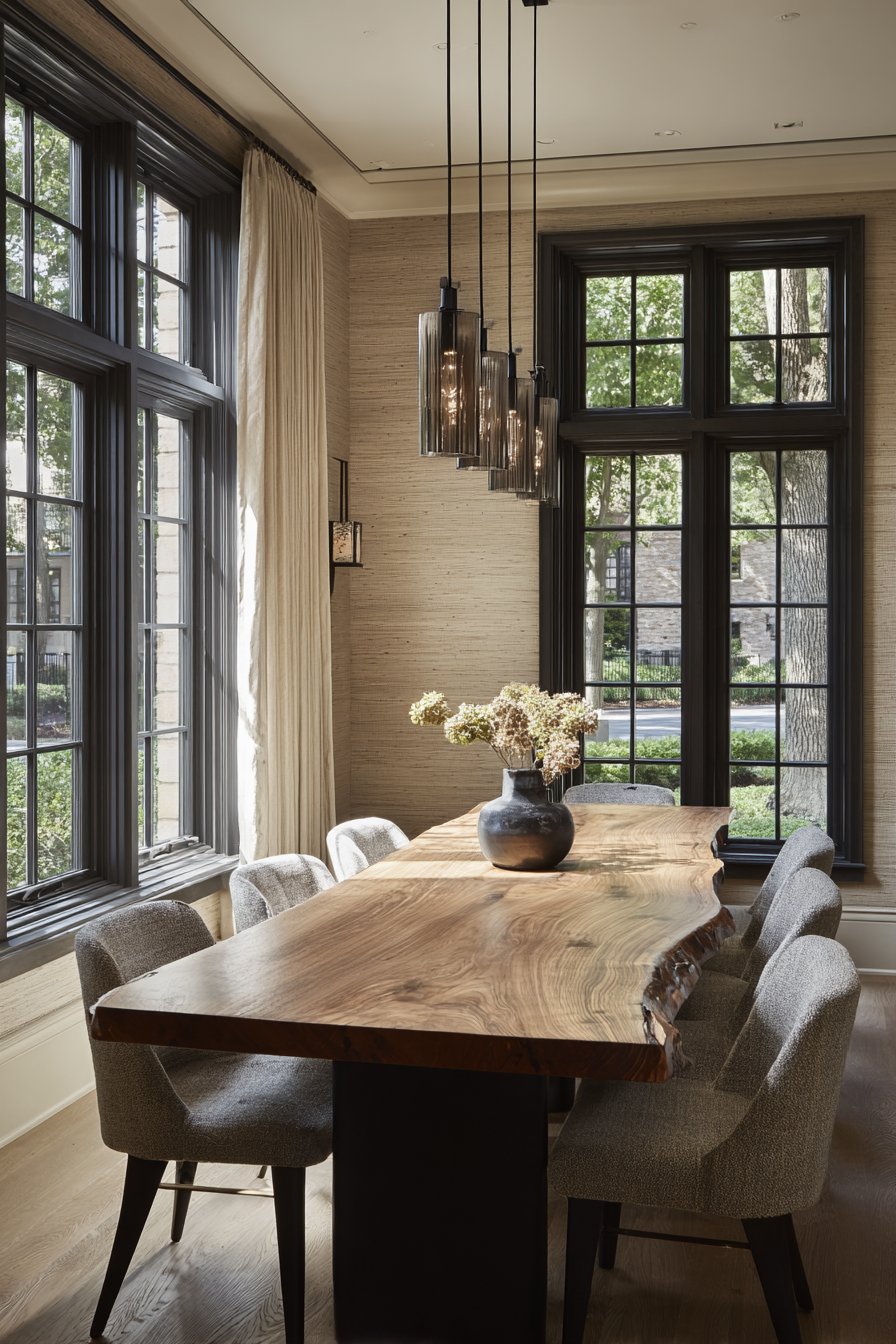
The dining room showcasing wall design ideas through a masterfully arranged gallery wall demonstrates how collections of artwork can transform a simple painted surface into a dynamic visual story. This mixed-frame installation features varying sizes of prints, photographs, and abstract art pieces in black, natural wood, and brass finishes, creating an asymmetrical layout that feels both intentional and organic. The warm beige painted wall provides a neutral backdrop that allows each piece to shine while creating cohesion across the diverse collection.
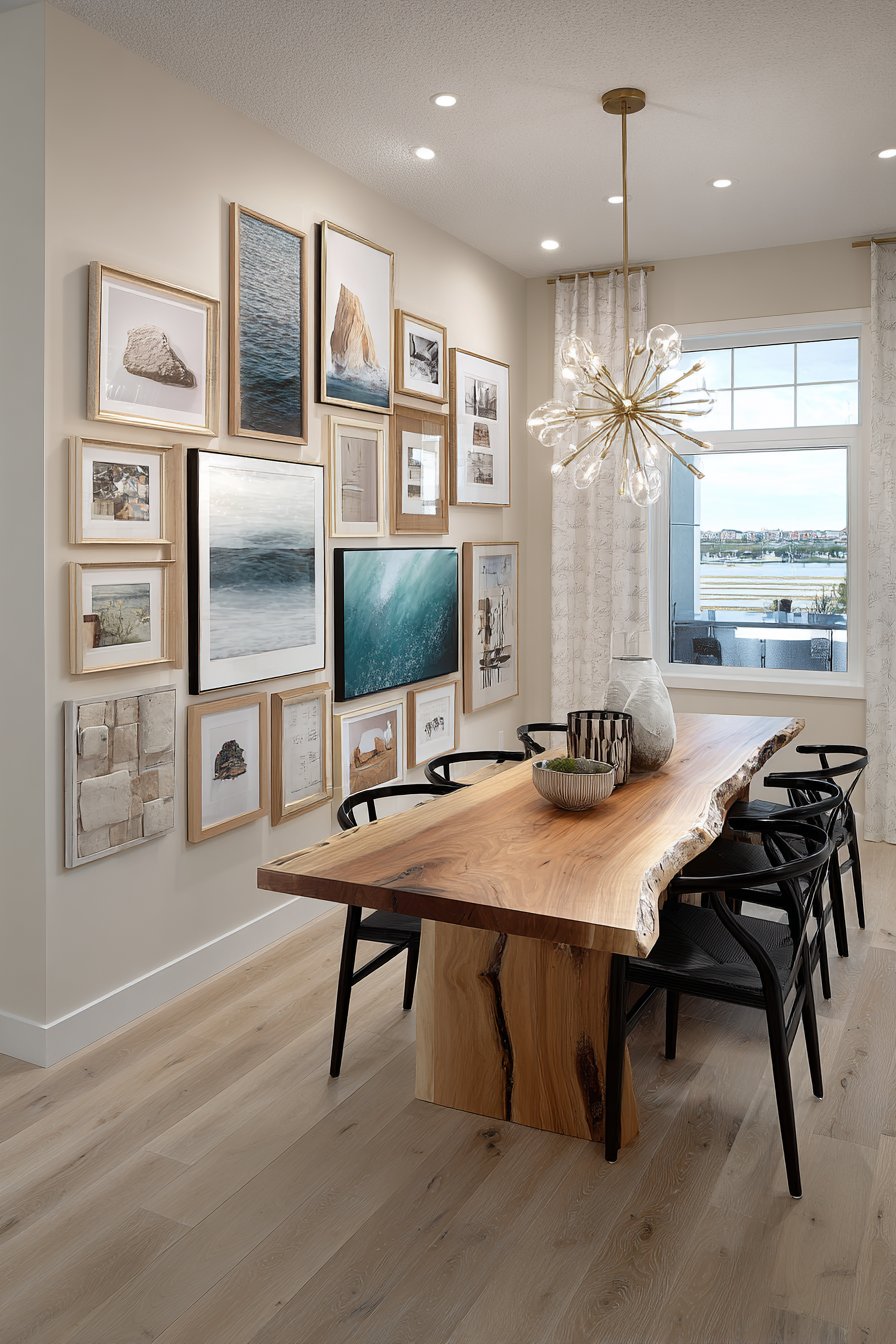
Gallery walls represent one of the most personal expressions of wall design ideas, offering flexibility to evolve over time as tastes change and new pieces are acquired. This particular arrangement follows professional gallery wall principles, balancing visual weight distribution so that larger pieces anchor the composition while smaller works fill spaces without creating clutter. The mixed frame finishes add another layer of visual interest, with metallic brass catching light differently than matte black or natural wood, creating subtle focal points throughout the arrangement.
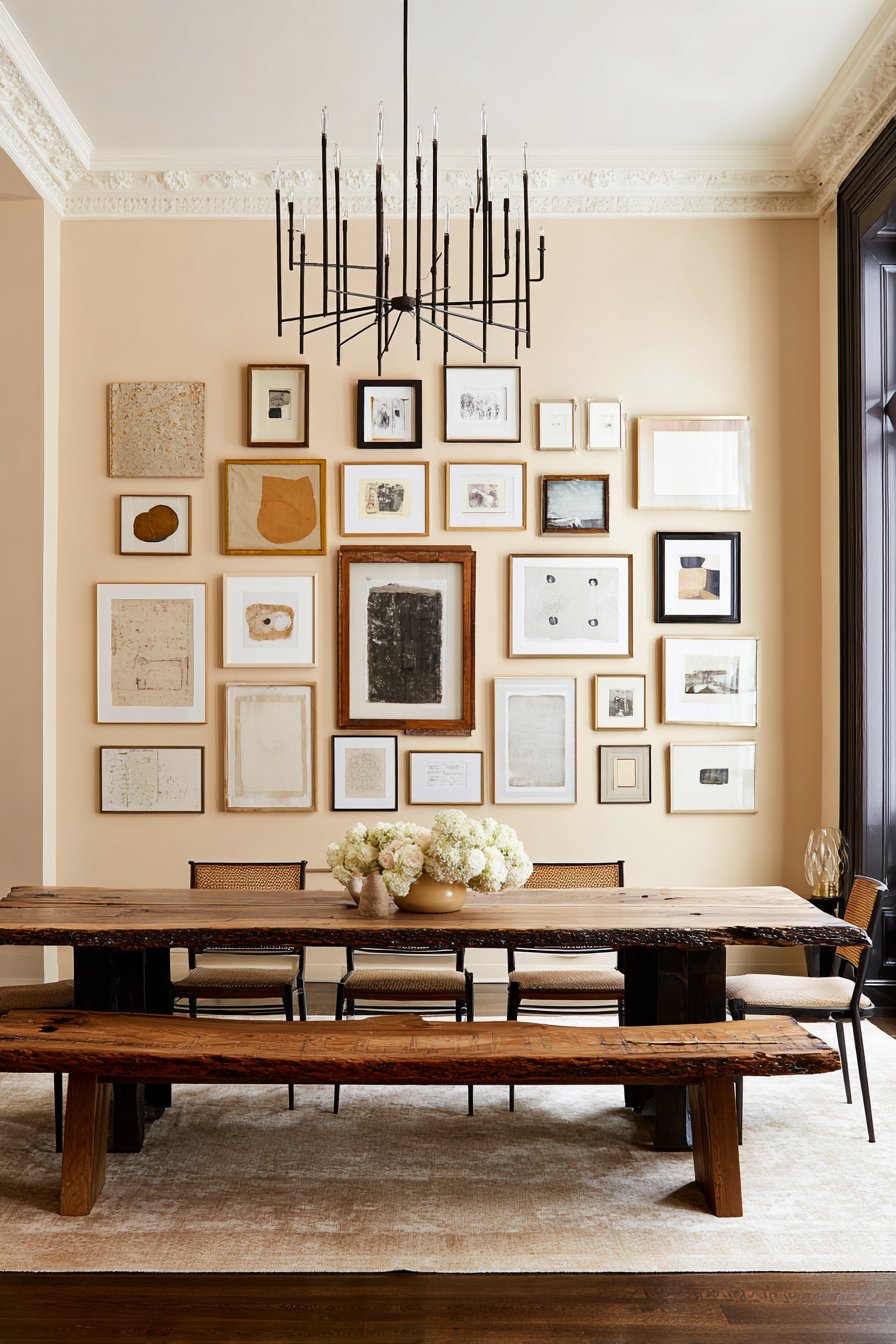
A live-edge wooden dining table centers the room beneath modern chandelier lighting, grounding the eye-level art display while the natural wood edge echoes the organic quality of the wooden frames above. The composition demonstrates how gallery walls should relate to furniture placement—in this case, the arrangement’s width roughly corresponds to the table below, creating visual harmony between wall treatment and room furnishings. Interior design photography with detail focus captures the careful curation of art selection and frame variety, with soft natural lighting preventing glare on glass surfaces while highlighting the distinct character of each frame’s finish and texture.
Key Design Tips: Layout all pieces on the floor first to experiment with arrangements before committing to wall placement. Maintain consistent spacing between frames—typically 2-3 inches works for most gallery walls. Use a level and measuring tape religiously to ensure professional-looking results. Start with the largest or most important piece as your anchor, then build around it. Consider the negative space between frames as part of the design. Hang pieces at eye level as a general rule, with the center of the grouping approximately 57-60 inches from the floor. Use proper hanging hardware rated for each piece’s weight to prevent accidents.
4. Floor-to-Ceiling Built-In Shelving System
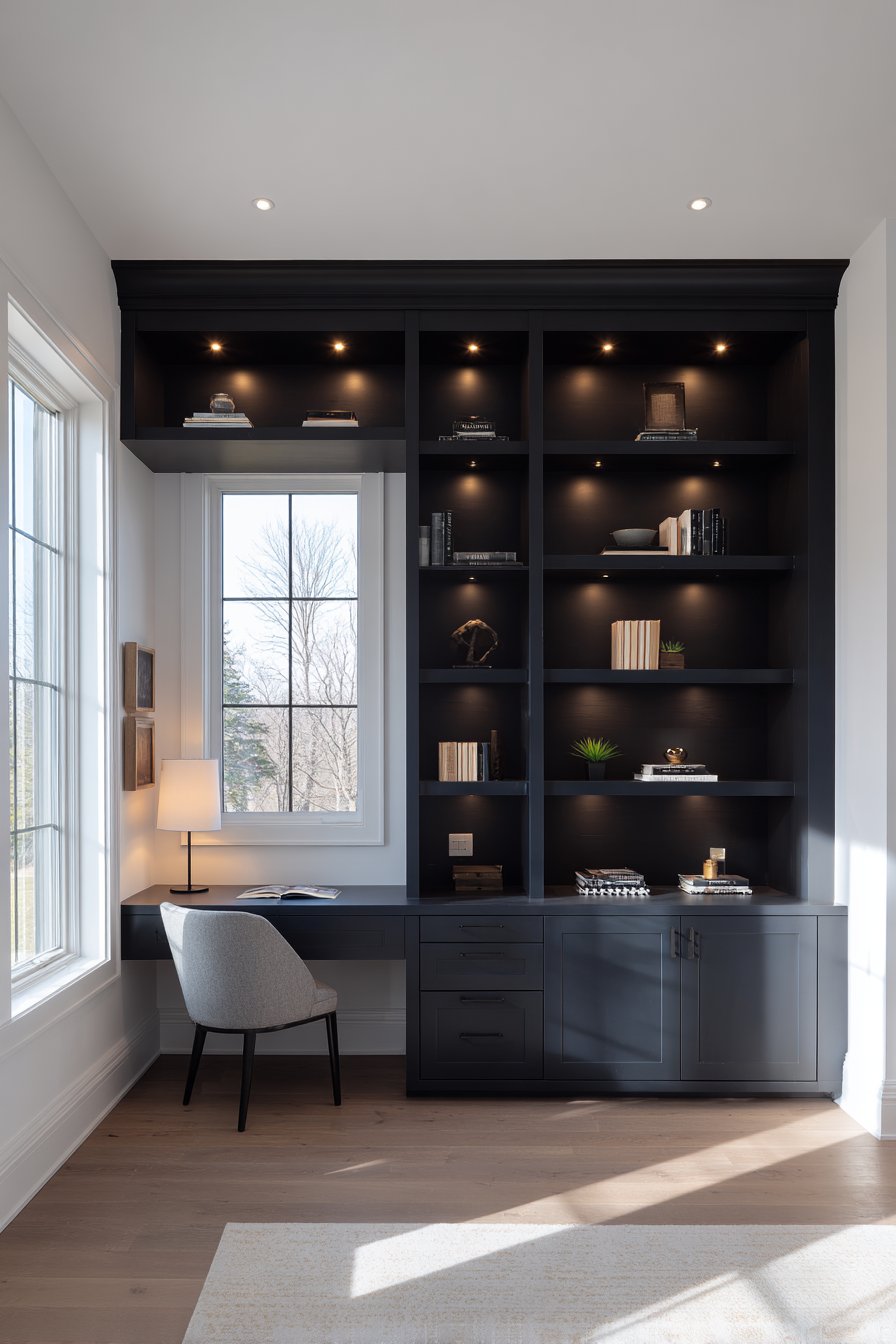
Contemporary home office wall design ideas find their ultimate expression in custom floor-to-ceiling built-in shelving that combines closed storage, open display, and integrated workspace in one cohesive installation. The matte charcoal finish creates sophisticated backdrop for books and decorative objects while the integrated LED strip lighting on each shelf level adds both functionality and atmospheric ambiance. This wall treatment exemplifies how wall design ideas can merge aesthetic appeal with practical organization, turning an entire wall into a hardworking element that serves multiple purposes.
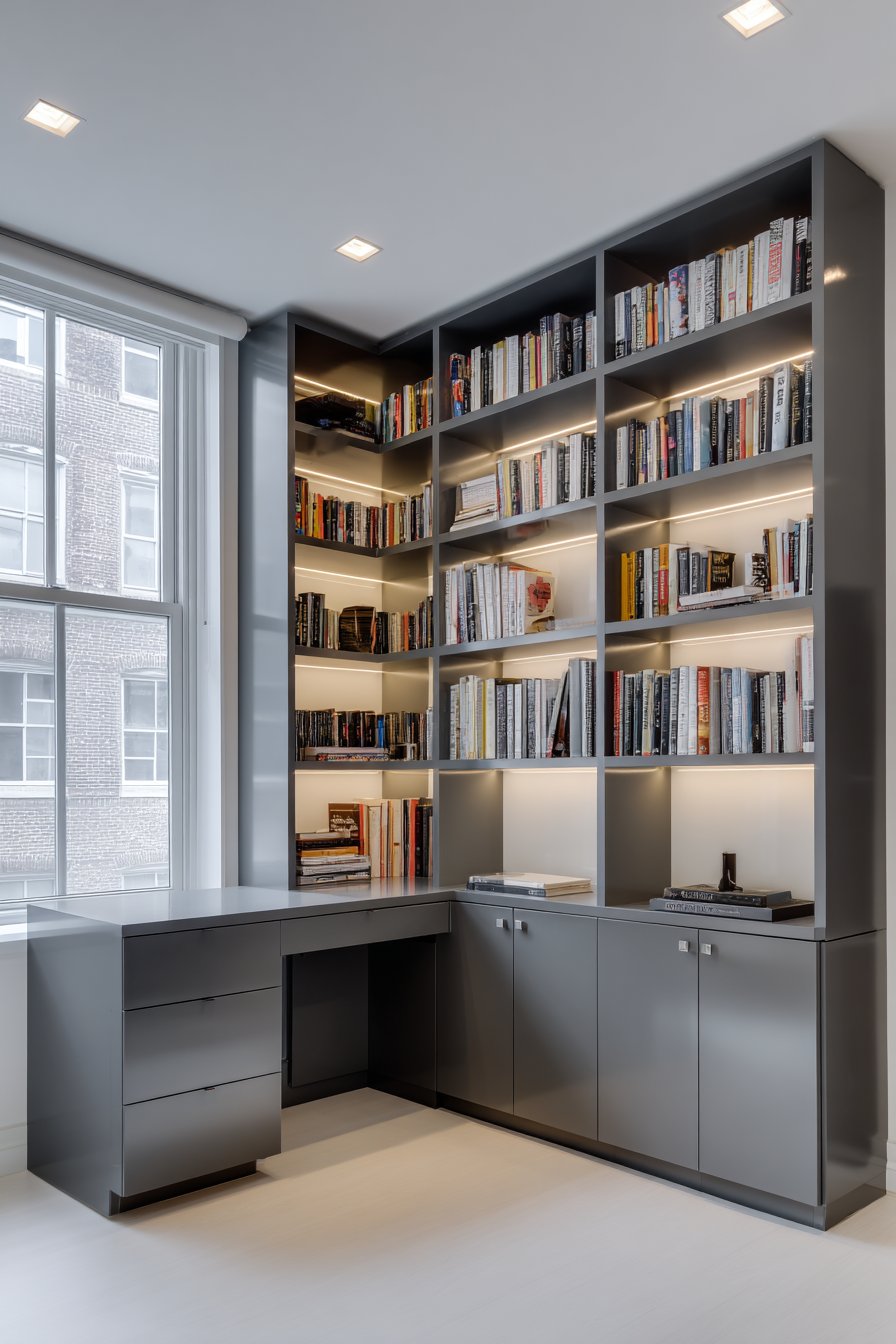
The millwork’s thoughtful design includes closed lower cabinets that conceal office supplies, paperwork, and equipment, maintaining visual calm at eye level where open shelving displays carefully curated items. A small floating desk extends seamlessly from the shelving unit, demonstrating efficient space utilization that maximizes functionality without requiring additional floor space. The white walls surrounding the built-in create dramatic contrast that makes the charcoal installation read as a distinct architectural element rather than simply painted cabinetry.
Recessed lighting overhead ensures adequate task illumination for work activities, complementing the shelf lighting system to create layered illumination that adapts to different needs throughout the day. Wide-angle interior photography captures the impressive scale of this floor-to-ceiling installation, showing how custom millwork can completely transform a room’s character while providing exceptional storage capacity. Natural daylight from a nearby window adds warmth to the space, preventing the dark finish from feeling heavy while highlighting the organized display of books and objects that give the office personality and lived-in charm.
Key Design Tips: Plan shelving depth based on what you’ll store—books need 10-12 inches, while decorative objects often need less. Include adjustable shelving wherever possible to accommodate changing needs. Wire for electrical outlets within the built-in to power devices and lighting without visible cords. Use quality soft-close hardware on all doors and drawers for a premium feel. Consider varying shelf heights to prevent monotony and accommodate items of different sizes. Paint or finish built-ins in a color distinct from walls to create architectural presence. Install backing material that can support heavier items without sagging over time.
5. Vertical Large-Format Tile Installation
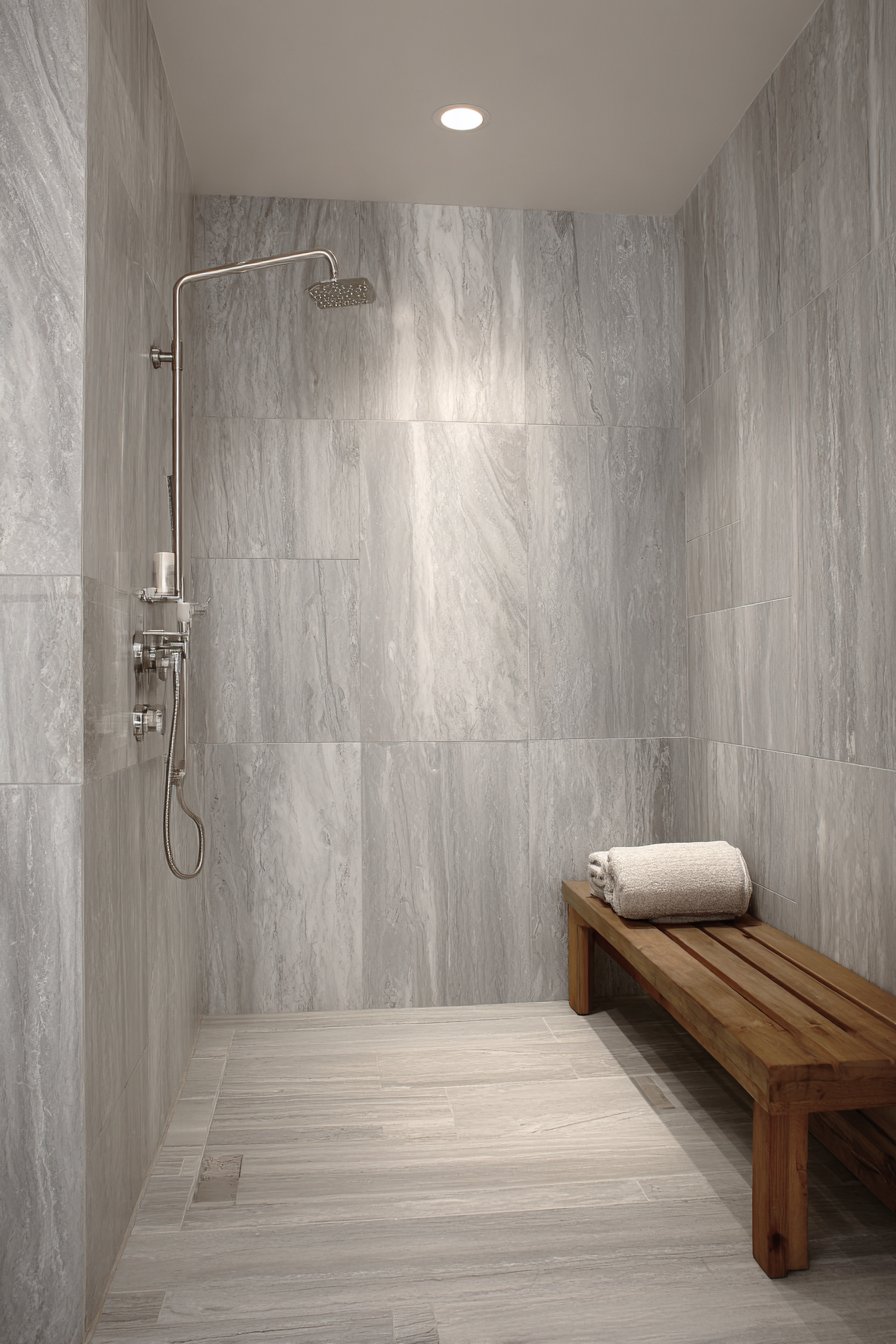
Master bathroom wall design ideas achieve modern sophistication through large-format porcelain tiles in soft gray with subtle marble veining, installed in a vertical stacked pattern that creates contemporary visual flow. This installation demonstrates how wall design ideas in wet spaces can balance practical waterproofing needs with high-end aesthetic appeal. The tiles extend floor-to-ceiling in the walk-in shower area, creating seamless continuity that makes the space feel larger while showcasing the beauty of the material selection.

The vertical stacking pattern represents a departure from traditional horizontal or offset tile layouts, creating strong vertical lines that draw the eye upward and emphasize the bathroom’s height. This contemporary installation technique, combined with minimal grout lines made possible by large-format tiles, results in a sleek, almost seamless appearance that feels more like natural stone slabs than individual tiles. The soft gray coloring with delicate veining provides visual interest without overwhelming, maintaining the serene atmosphere essential to successful bathroom design.
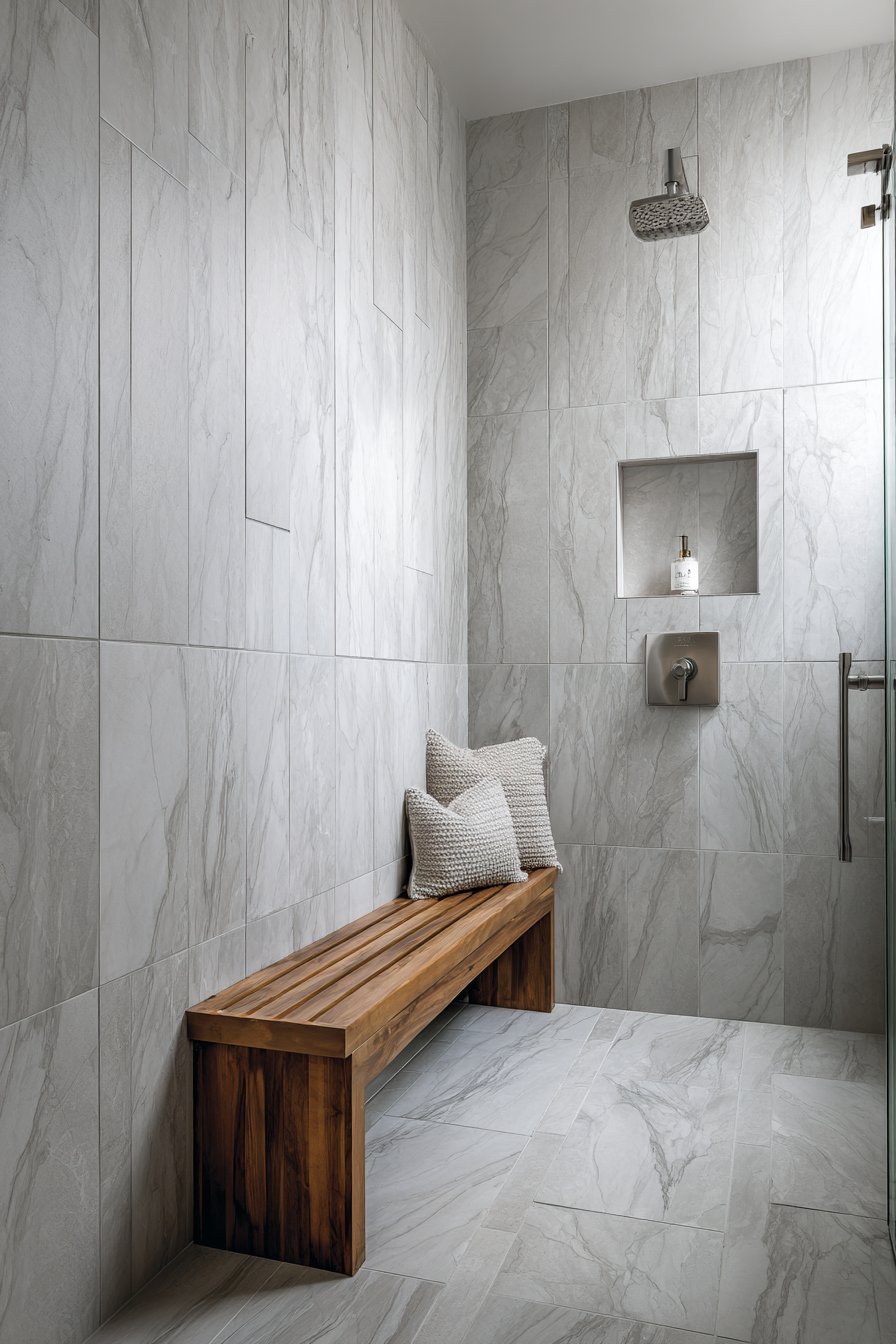
Brushed nickel fixtures and a rainfall showerhead complement the cool gray tones while adding subtle metallic shimmer that catches light beautifully against the tile surface. A floating teak bench introduces warm organic contrast, its rich honey tones preventing the gray palette from feeling cold while providing practical seating. Professional interior photography with balanced exposure captures the tile pattern precision and veining detail, with soft diffused lighting highlighting the smooth porcelain surface and subtle color variations that make each tile unique while maintaining overall cohesion.
Key Design Tips: Choose tiles at least 12×24 inches for authentic large-format impact—even larger sizes like 24×48 create more dramatic effect. Ensure substrate is perfectly flat before installation as large tiles show every imperfection. Use leveling systems during installation to prevent lippage between tiles. Select rectified tiles with precise edges for tighter grout lines and cleaner appearance. Consider matching grout color closely to tile to minimize grout line visibility. Plan tile layout to avoid narrow cuts in visible areas. Seal grout in wet areas even when using porcelain tiles to prevent staining and simplify cleaning.
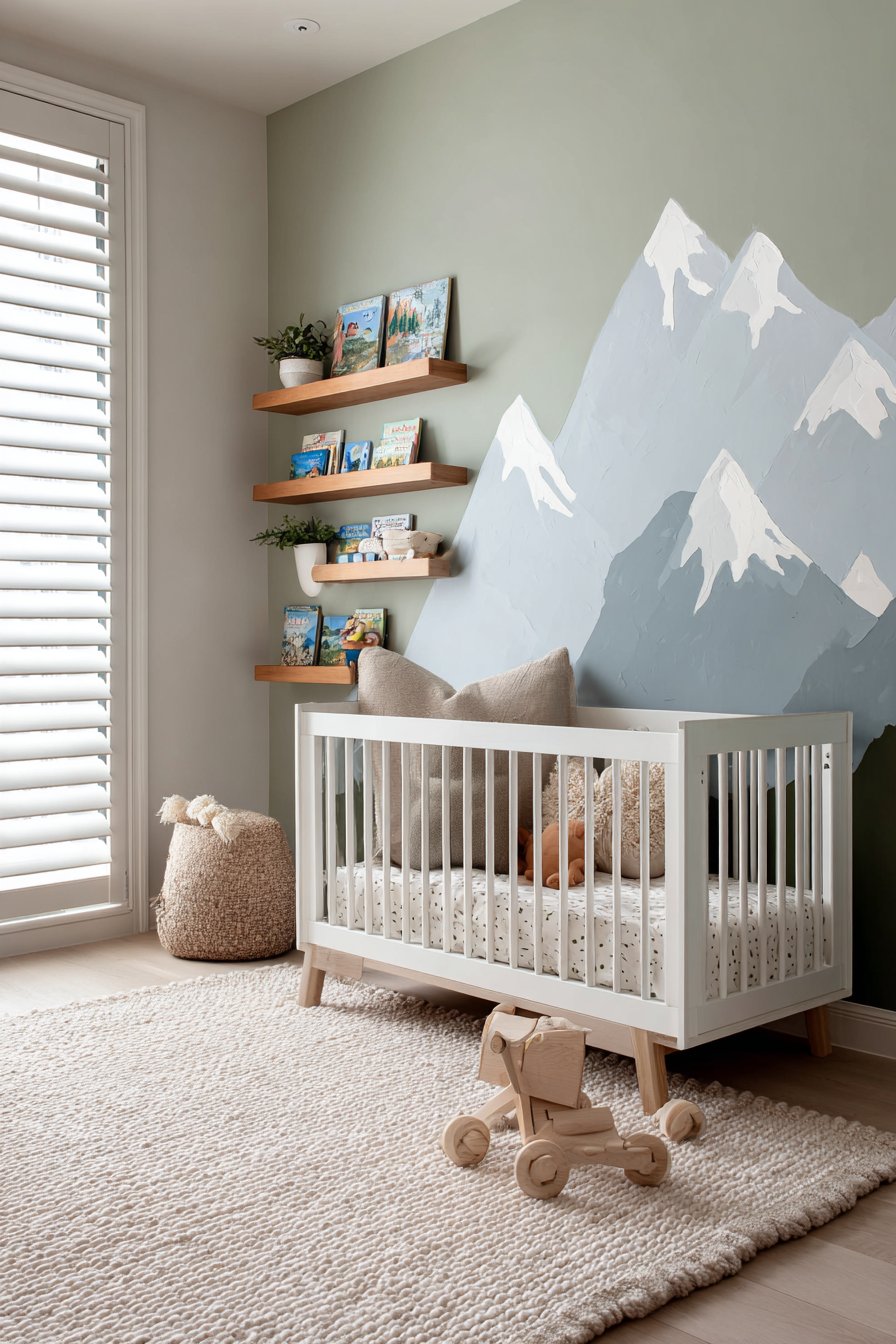
6. Hand-Painted Mountain Mural
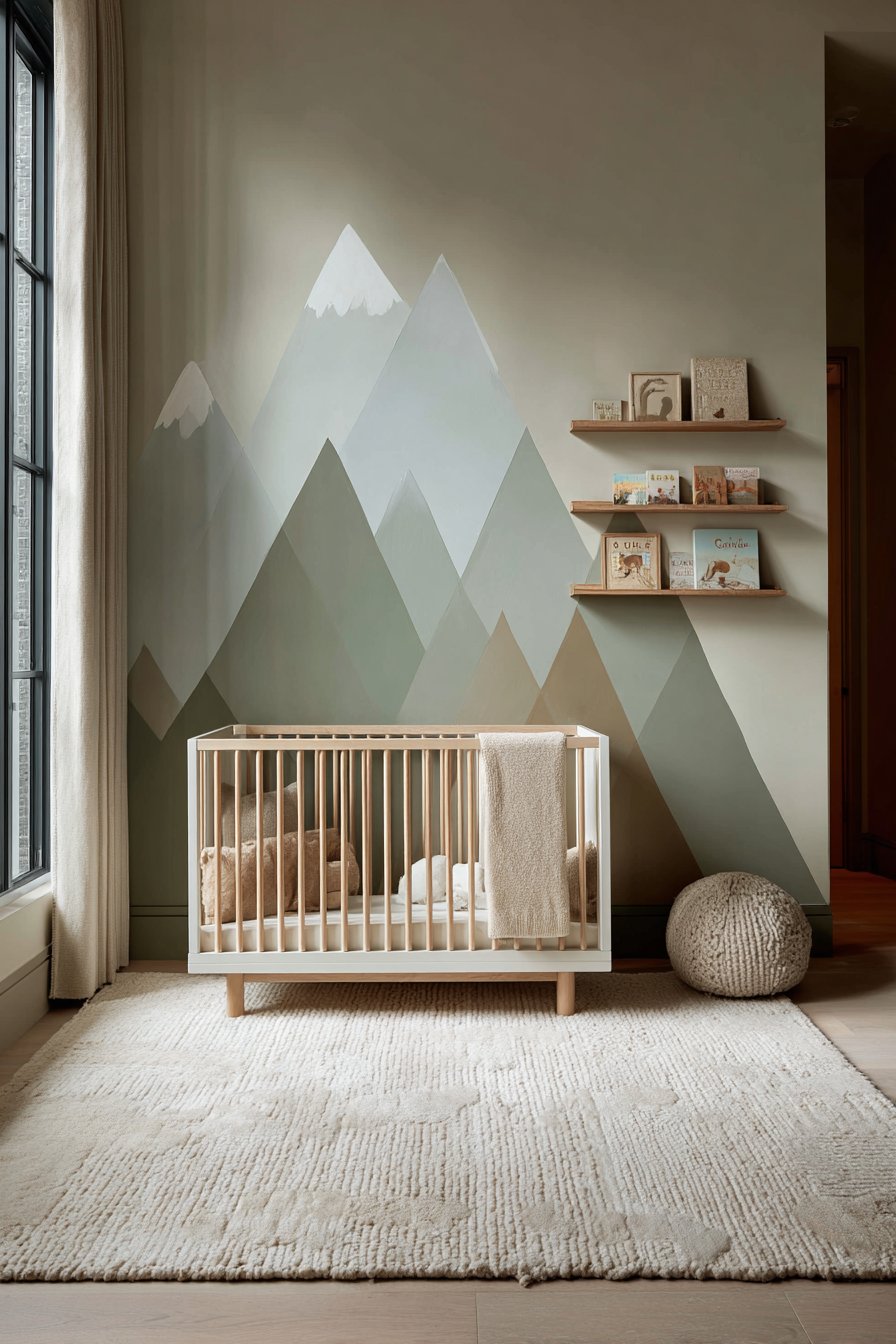
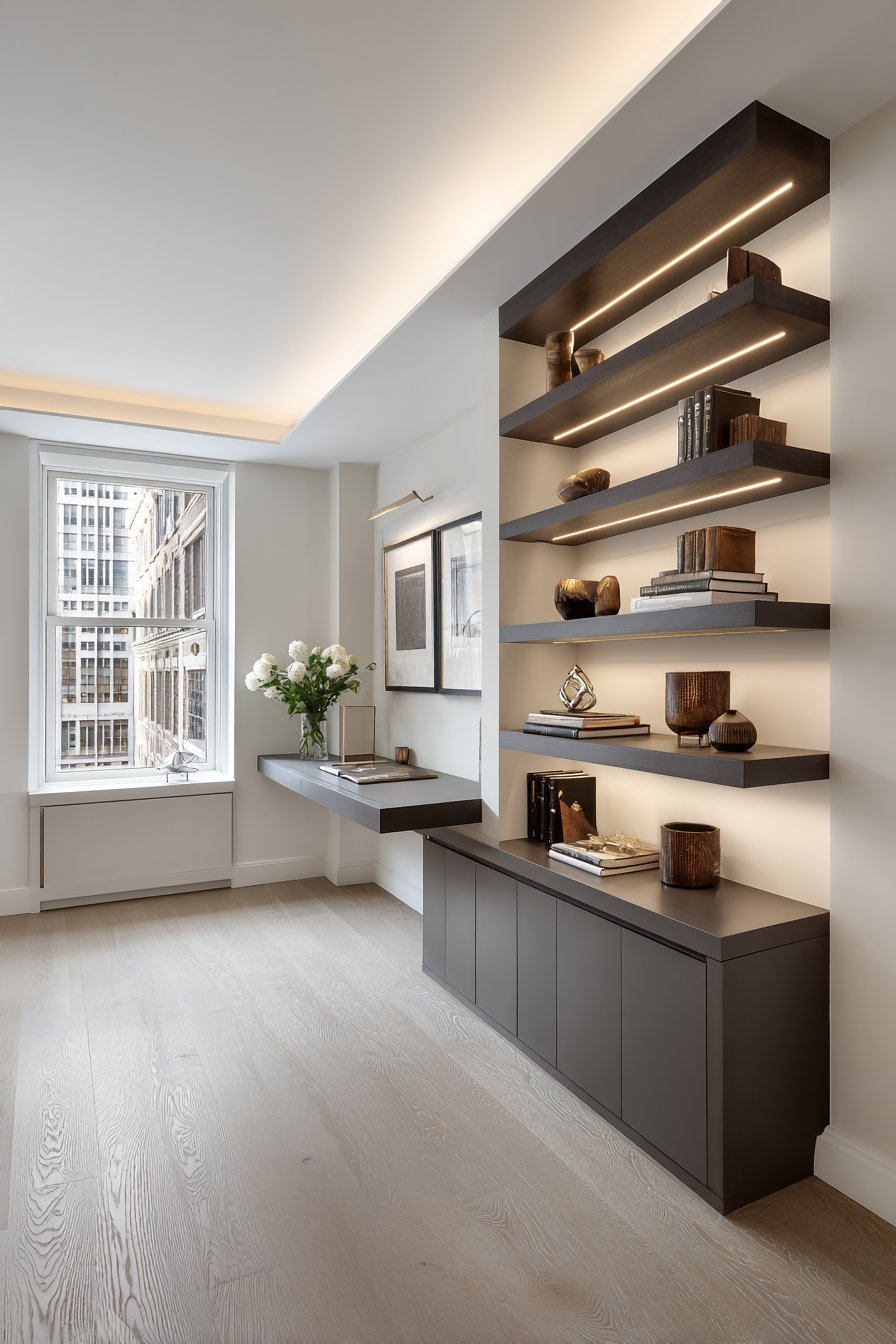
Modern nursery wall design ideas embrace whimsy and serenity through a hand-painted mountain mural featuring soft sage green, dusty blue, and warm taupe tones that create a peaceful backdrop for early childhood. This stylized mountain range extends across the main wall behind a white crib, demonstrating how wall design ideas can set the entire mood for a space through custom artwork that grows with the child. The gentle color palette and simplified forms make this mural appropriate for infants while remaining sophisticated enough to transition through toddler years.
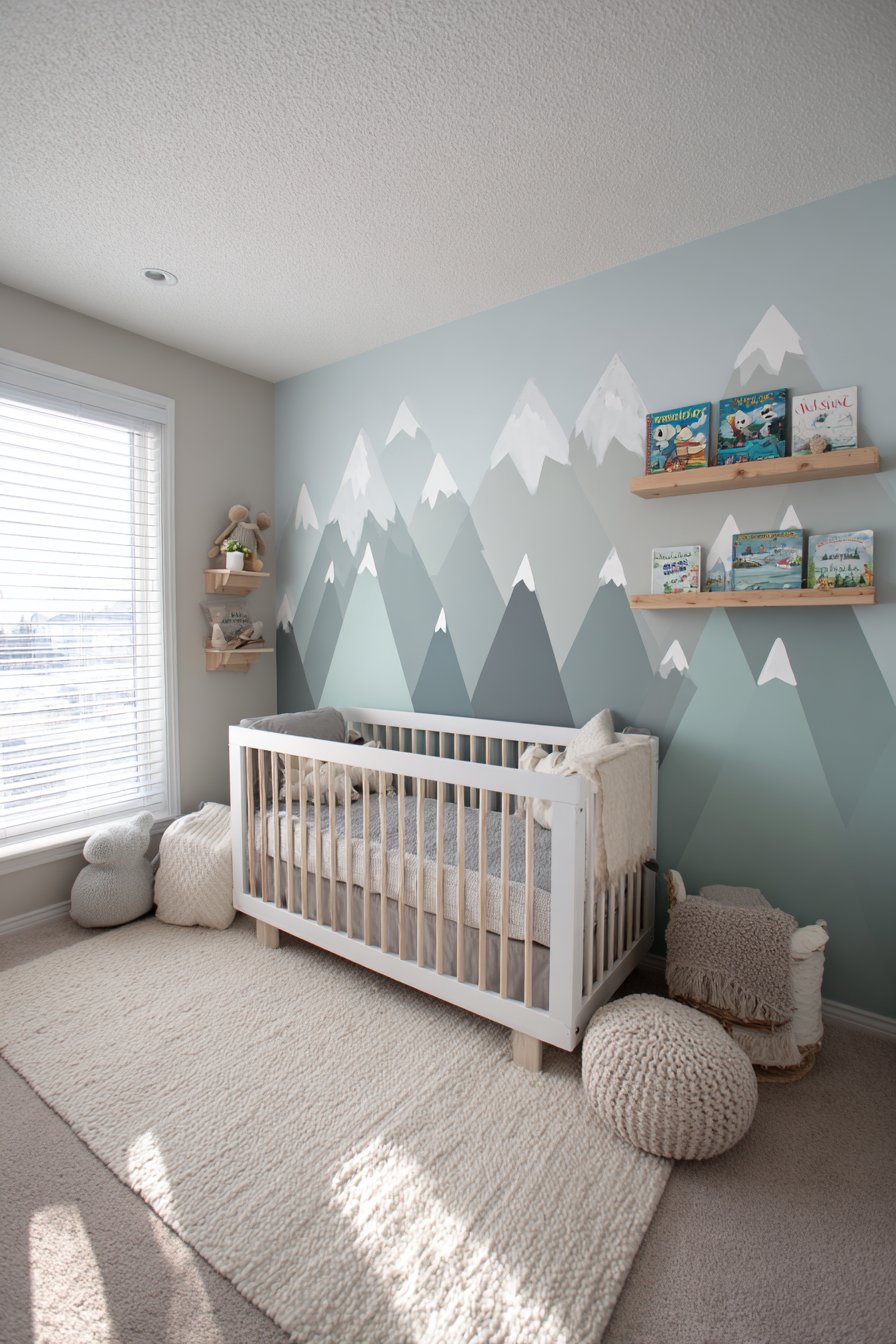
Natural wood floating shelves interrupt the mural at strategic heights, providing practical display space for children’s books and minimal decor while creating dimensional interest against the flat painted surface. The integration of functional elements into the mural demonstrates thoughtful design that maximizes both form and function. A plush area rug in complementary neutral tones anchors the floor space, introducing soft texture that’s essential for crawling babies and playing toddlers while echoing the mural’s soothing color story.
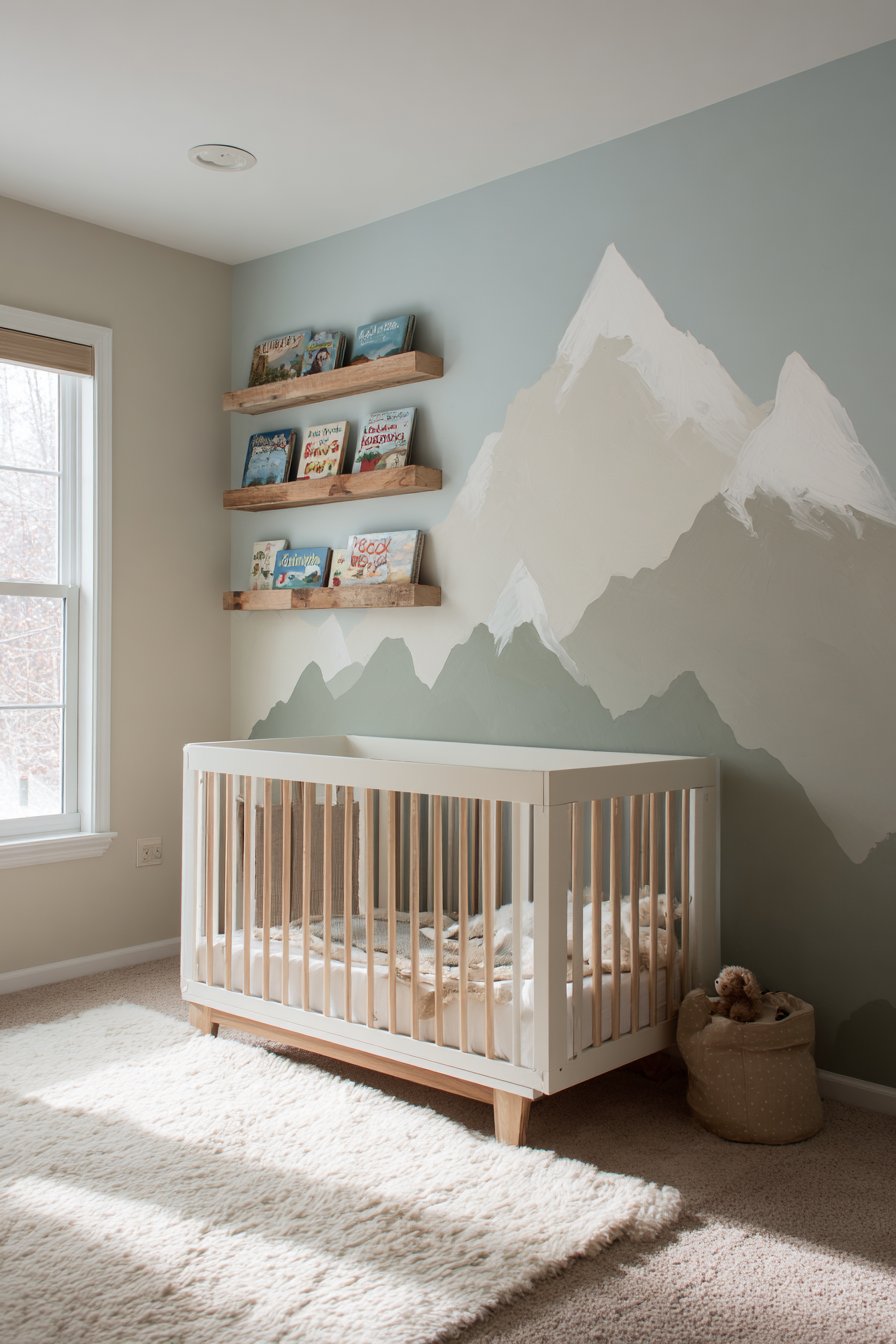
Interior design photography captures the full mural composition with natural window light creating gentle shadows that enhance the painted texture and dimensional quality of the stylized peaks. The wide-angle perspective shows how the mural integrates seamlessly with room furnishings, serving as backdrop rather than overwhelming focal point. This balance is crucial in nursery design where the wall treatment should stimulate without overstimulating, creating an environment that feels both engaging and restful for young children and exhausted parents alike.
Key Design Tips: Use low-VOC or zero-VOC paint formulations in nurseries for air quality and safety. Sketch the design on paper first, then use a projector to outline on the wall for accurate scaling. Work in layers, starting with base colors and adding details once underlying paint is completely dry. Choose washable paint finishes since nursery walls inevitably collect fingerprints and stains. Keep color palette to 3-4 colors maximum to maintain cohesion. Paint murals on smooth walls—texture will show through and affect the final appearance. Consider hiring a professional muralist for complex designs, but simple geometric or organic shapes are DIY-friendly with proper preparation.
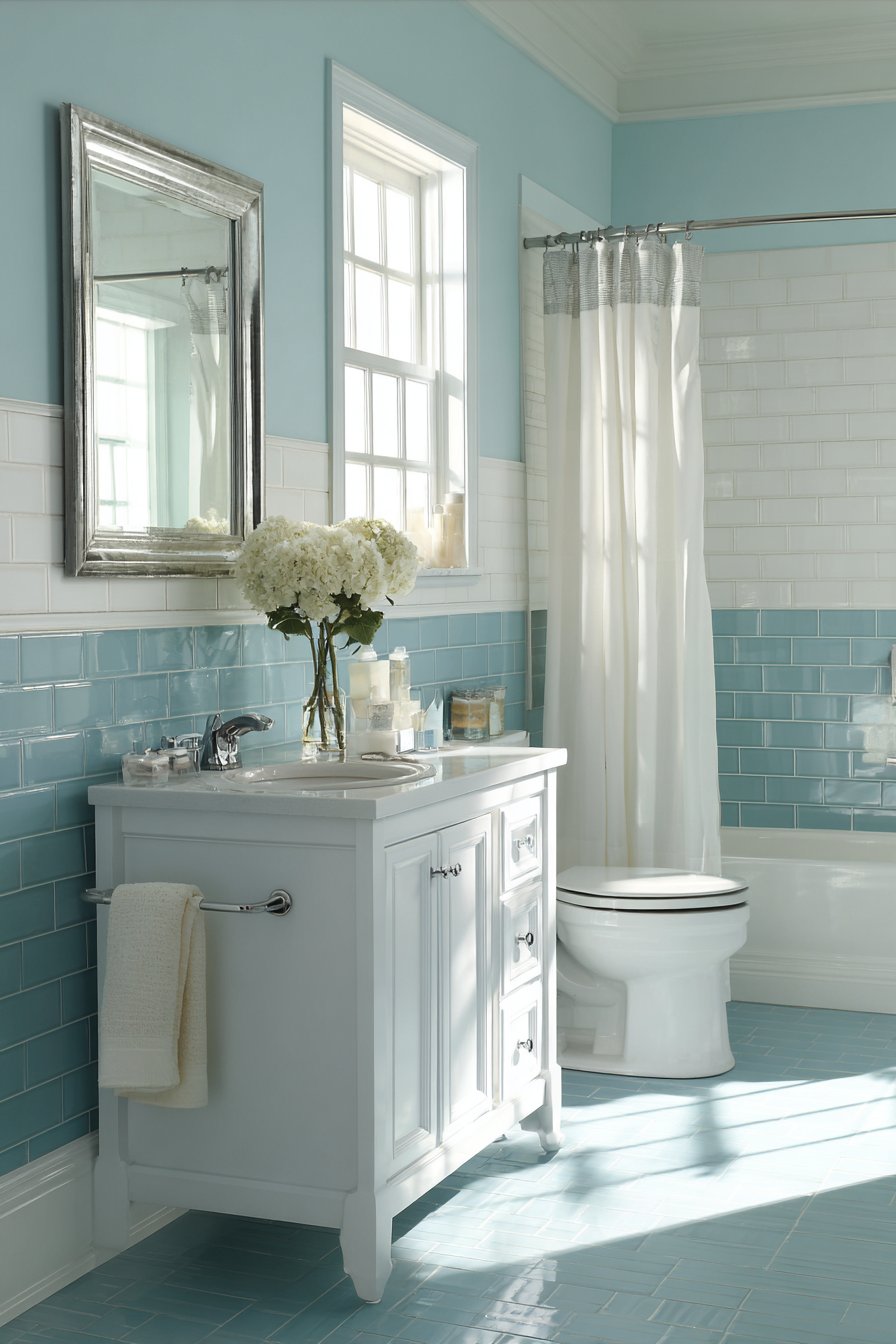
7. Full-Wall Subway Tile Backsplash
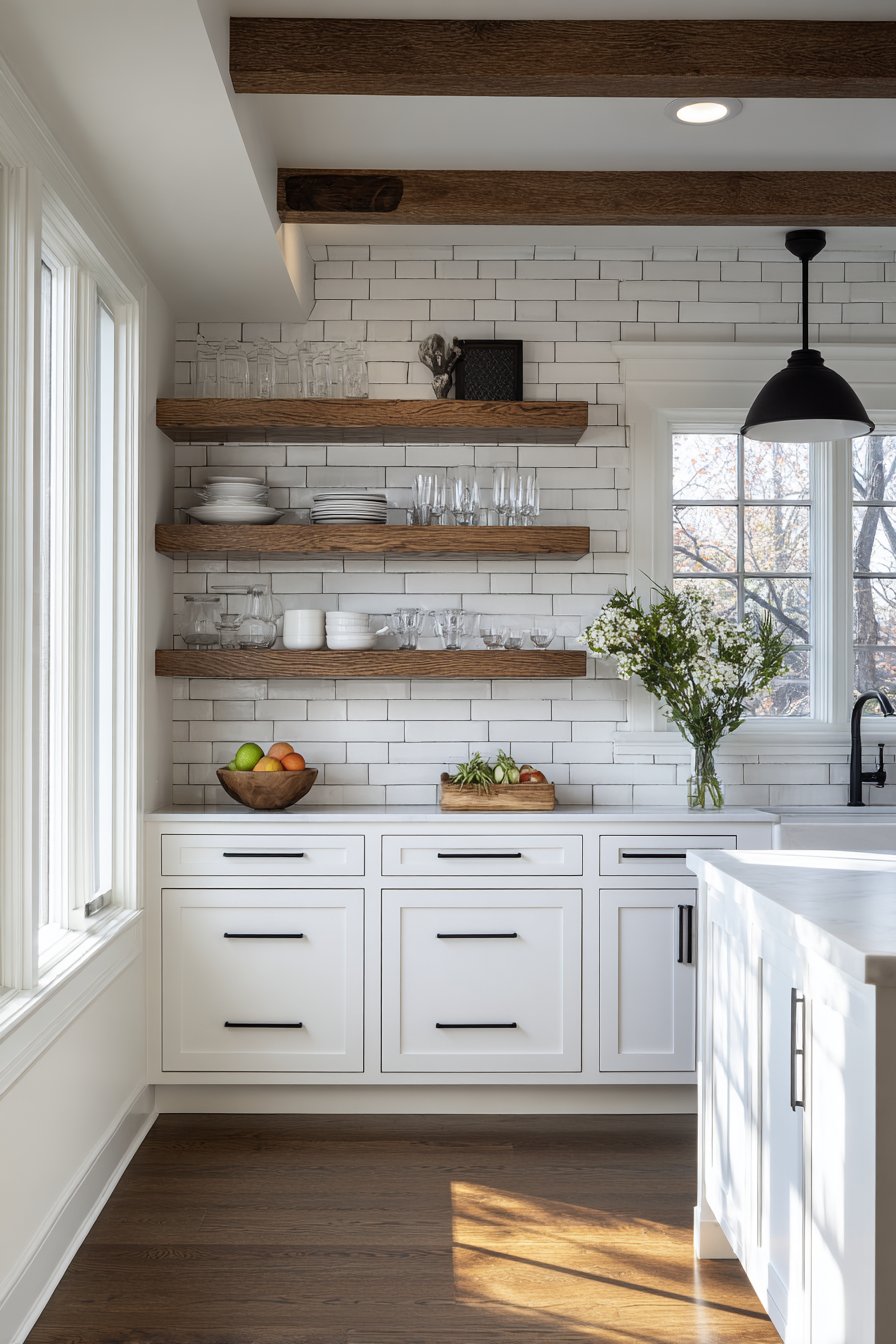
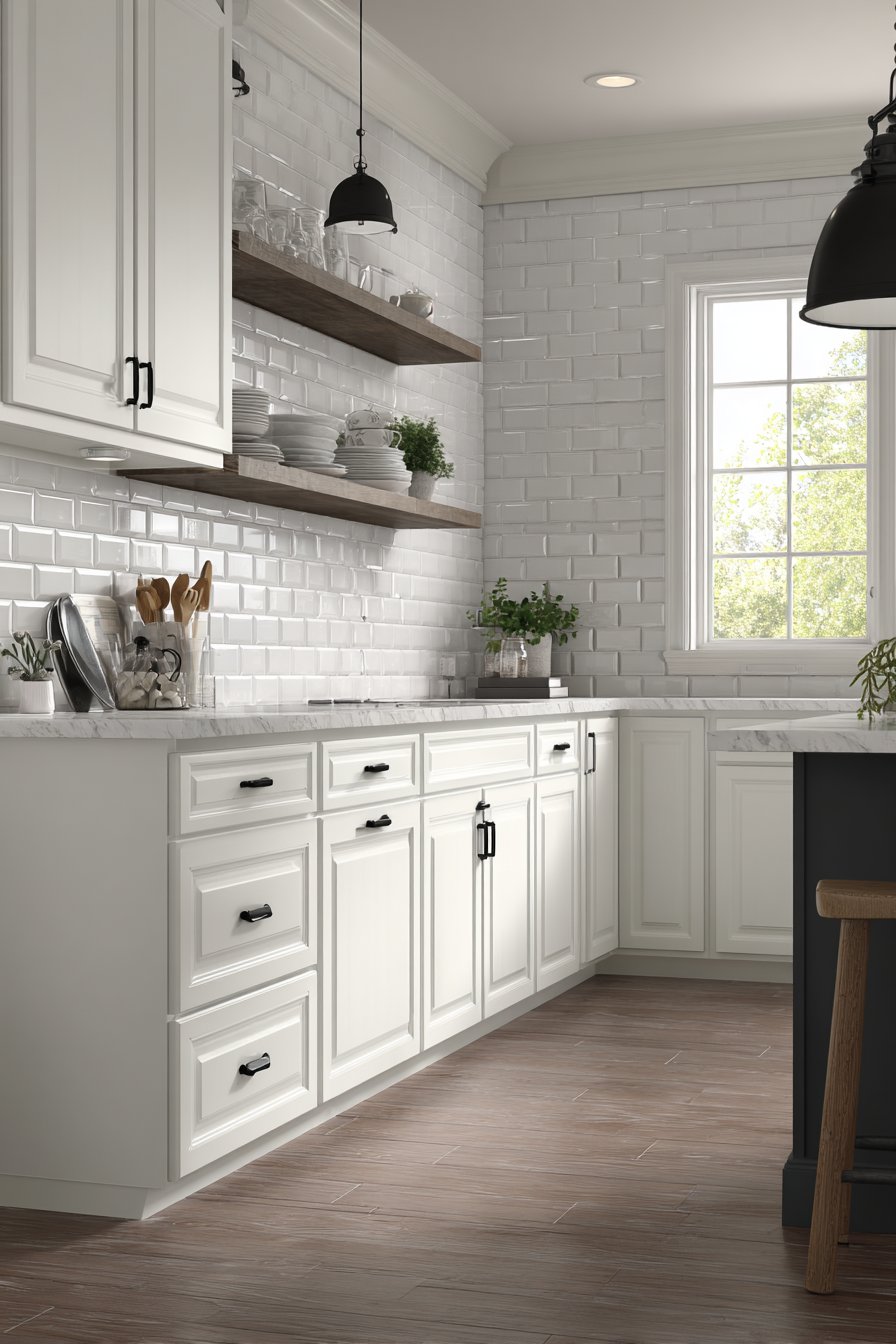
Kitchen wall design ideas achieve timeless appeal through a floor-to-ceiling subway tile backsplash in classic white with contrasting dark gray grout, demonstrating how traditional materials can create fresh impact through thoughtful installation. This expansive tile treatment extends from countertop to ceiling rather than stopping at the typical backsplash height, transforming the entire wall into a clean, bright surface that’s both practical and visually striking. The horizontal brick pattern installation honors subway tile’s heritage while the dramatic scale brings contemporary relevance.
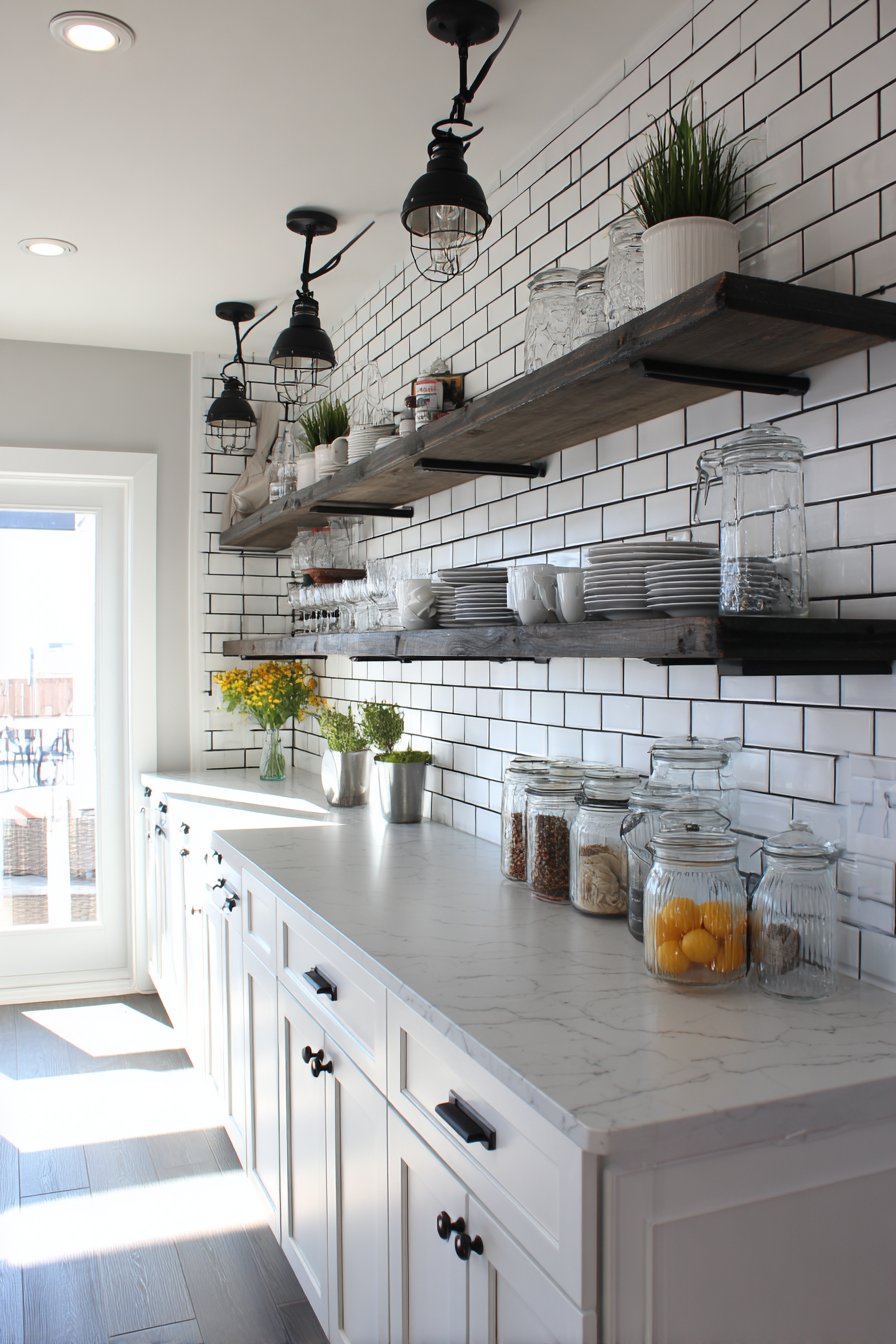
Open wooden shelving interrupts the tile at strategic points, providing practical storage for everyday dishes and glassware while breaking up the expanse of white tile to prevent monotony. This integration of natural wood against crisp white tile introduces warmth that keeps the kitchen from feeling too clinical or stark. Matte black cabinet hardware and pendant lights provide modern contrast that updates the classic tile, proving that wall design ideas can successfully bridge traditional and contemporary aesthetics.
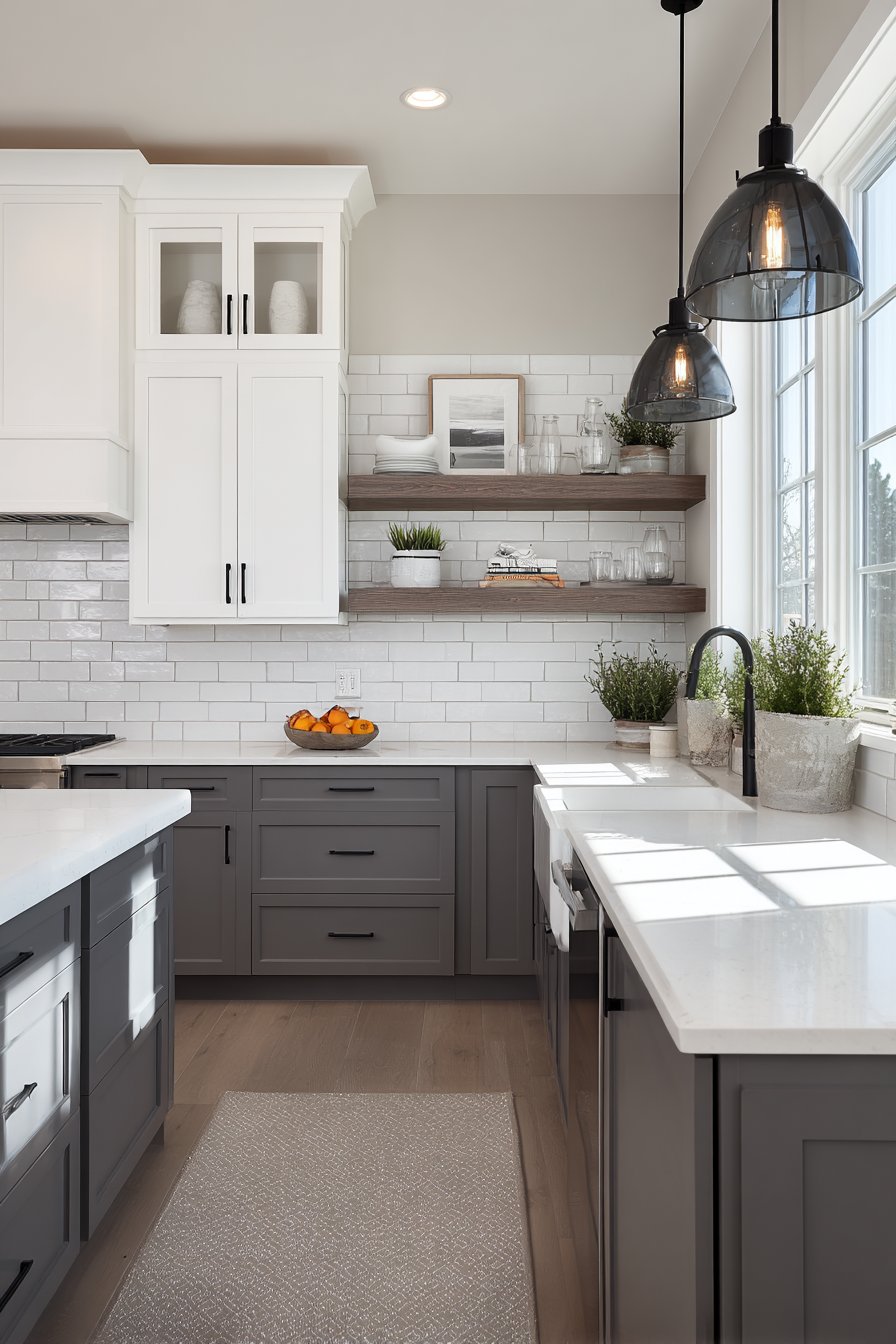
Professional interior photography with balanced exposure captures the precision of tile pattern and grout line consistency, essential elements that separate amateur from professional installations. Natural daylight from an adjacent window highlights the glossy tile surface and creates subtle dimensional shadows in the recessed grout lines, adding texture to what might otherwise be a flat expanse. The generous use of white tile also serves practical purposes, reflecting light throughout the kitchen and creating the illusion of expanded space—benefits that make this wall treatment particularly suitable for smaller kitchens or those with limited natural light.
Key Design Tips: Use tile spacers consistently throughout installation for uniform grout lines. Consider contrasting grout color carefully—it will emphasize grout lines which can either enhance or detract from the overall look. Ensure tiles are level both horizontally and vertically as subway tile patterns make irregularities obvious. Plan tile layout before starting to avoid awkward cuts in visible areas. Apply grout sealer after installation to resist staining, especially important with lighter grout colors. Clean tile surfaces thoroughly before grouting to prevent hazing. Use appropriate thin-set mortar rated for wall installation and your specific tile material.
8. Three-Dimensional Geometric Wall Panels
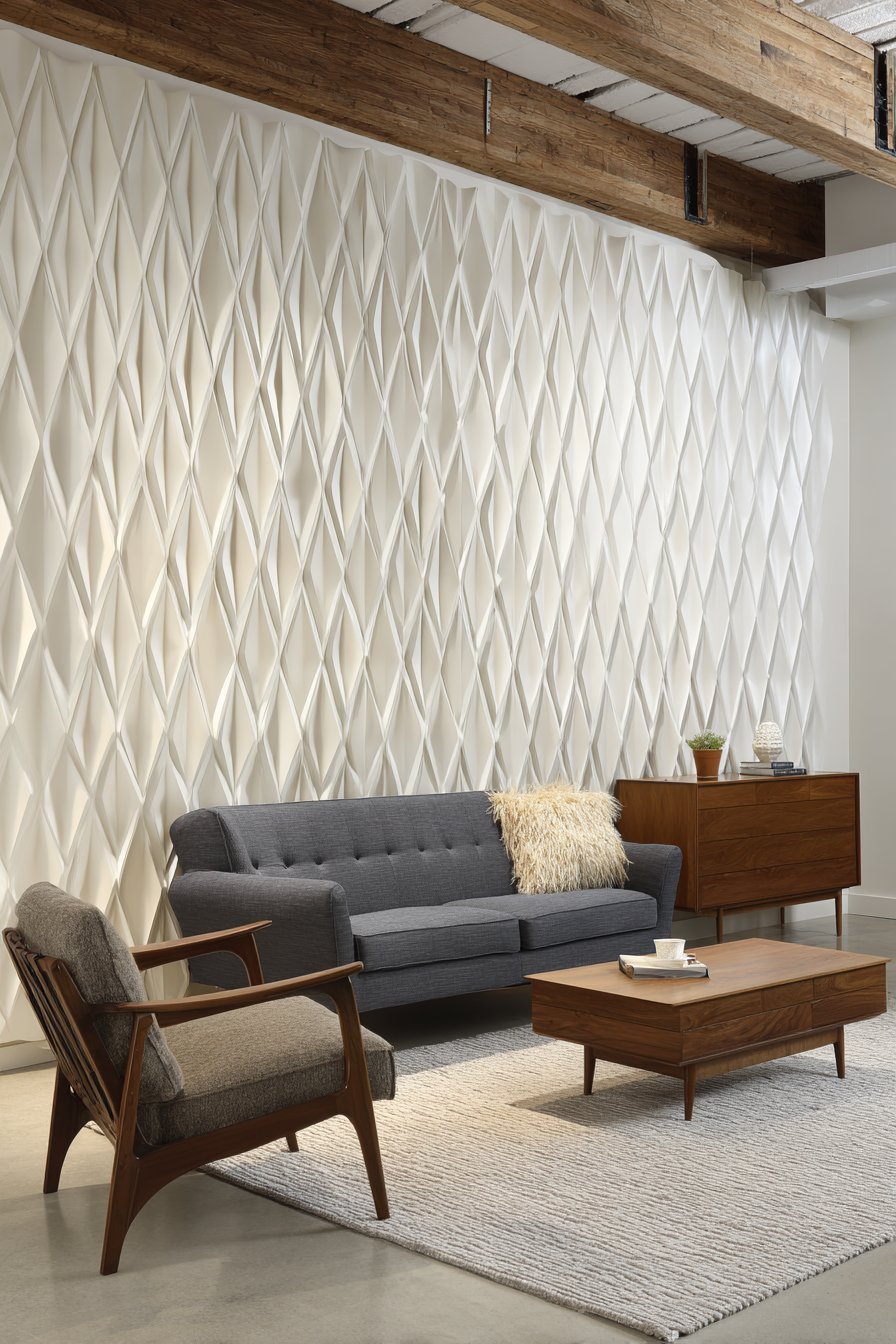
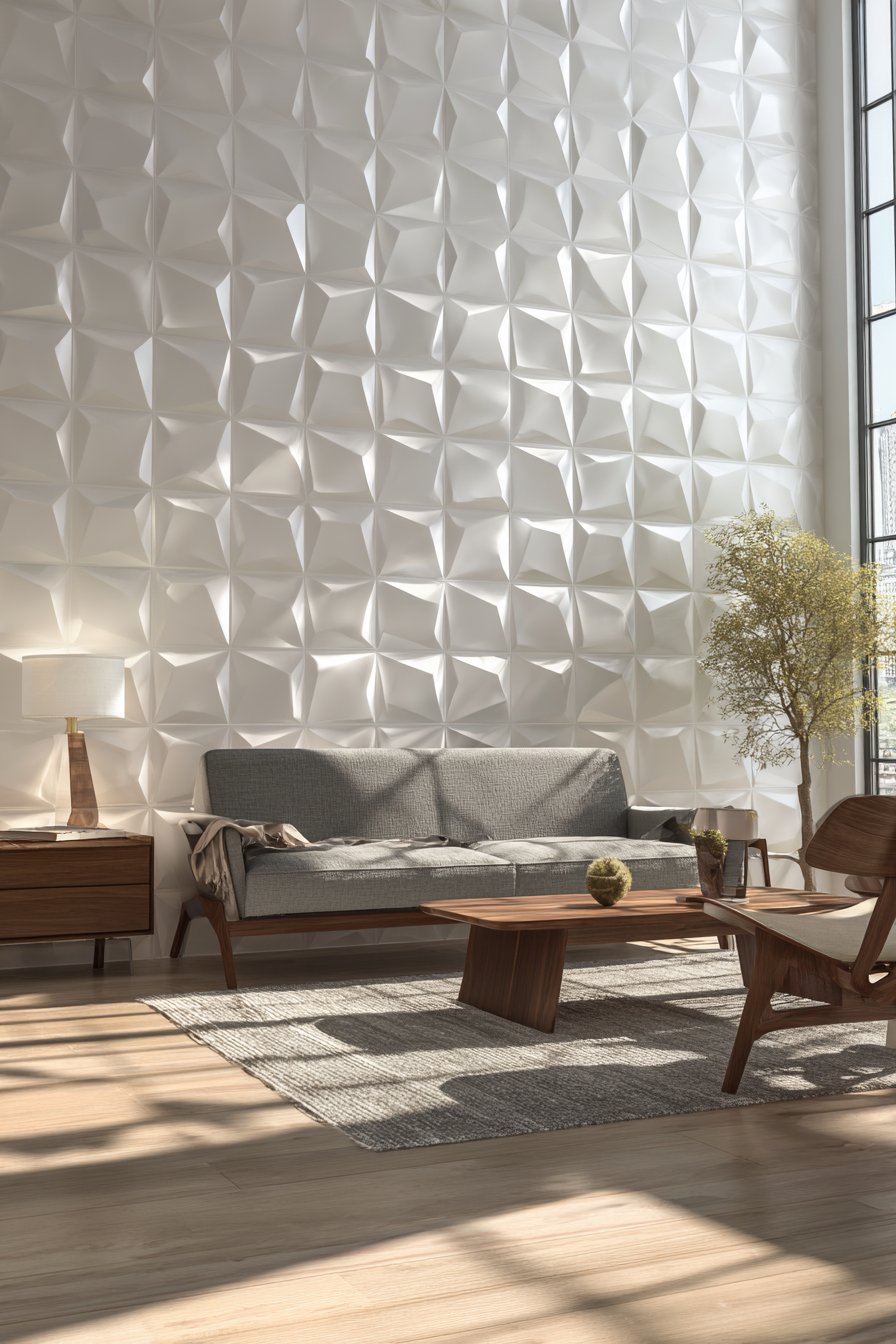
Living room wall design ideas reach architectural heights with textured 3D geometric wall panels in soft white that create dramatic play of light and shadow across the accent wall. These three-dimensional diamond-pattern panels add sculptural interest without introducing color, demonstrating how wall design ideas can achieve impact through form and texture alone. The panels serve as a stunning backdrop for a modern sofa, transforming a flat wall into a dynamic surface that changes character as light conditions shift throughout the day.
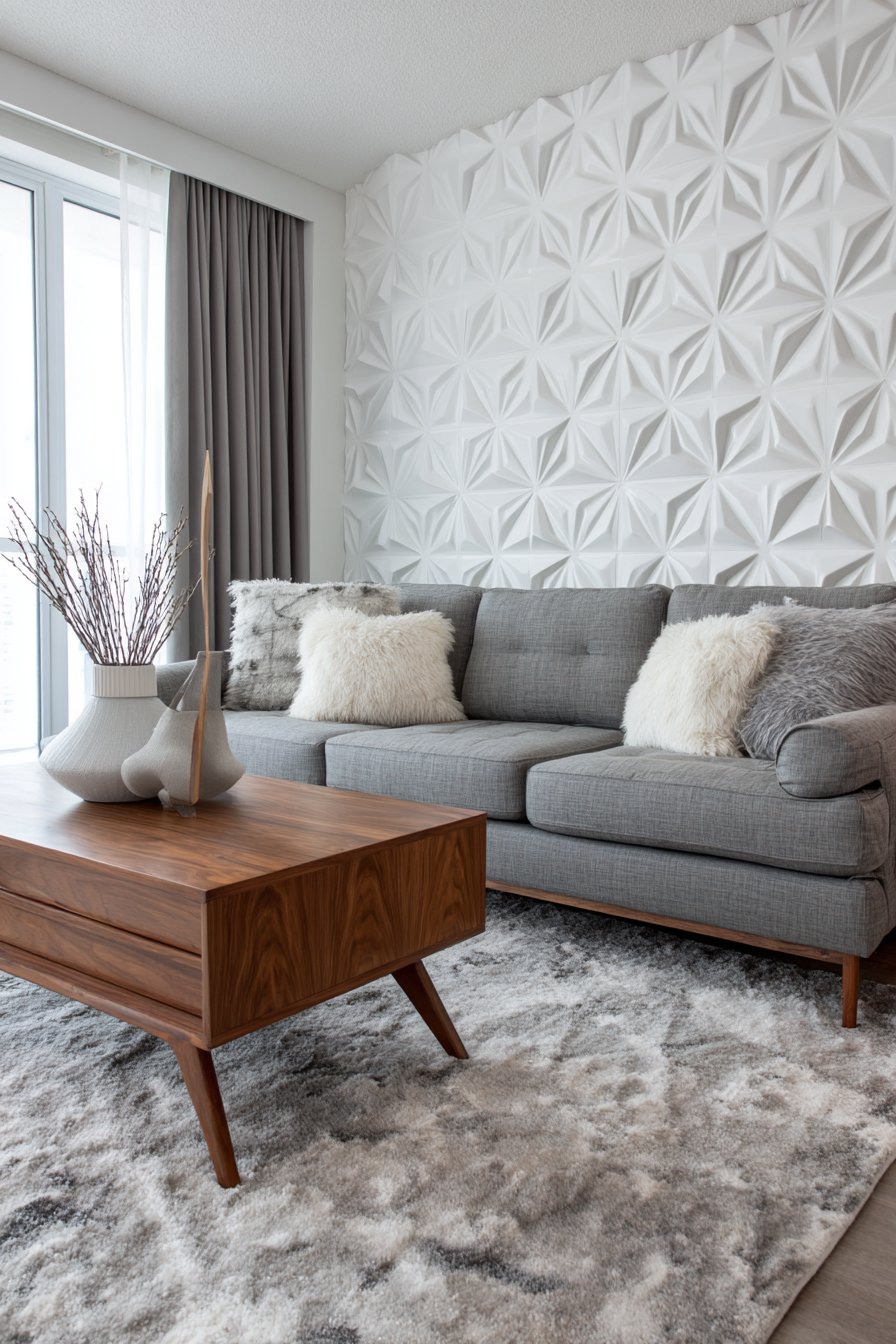
Mid-century modern walnut furniture pieces complement the contemporary wall treatment, their warm organic tones providing perfect counterpoint to the cool white geometric precision of the panels. A wool area rug in warm gray tones grounds the seating area, its soft texture contrasting with the hard architectural quality of the wall panels. This interplay of textures—soft and hard, organic and geometric—creates richness and depth that makes the space feel carefully curated and thoughtfully designed.
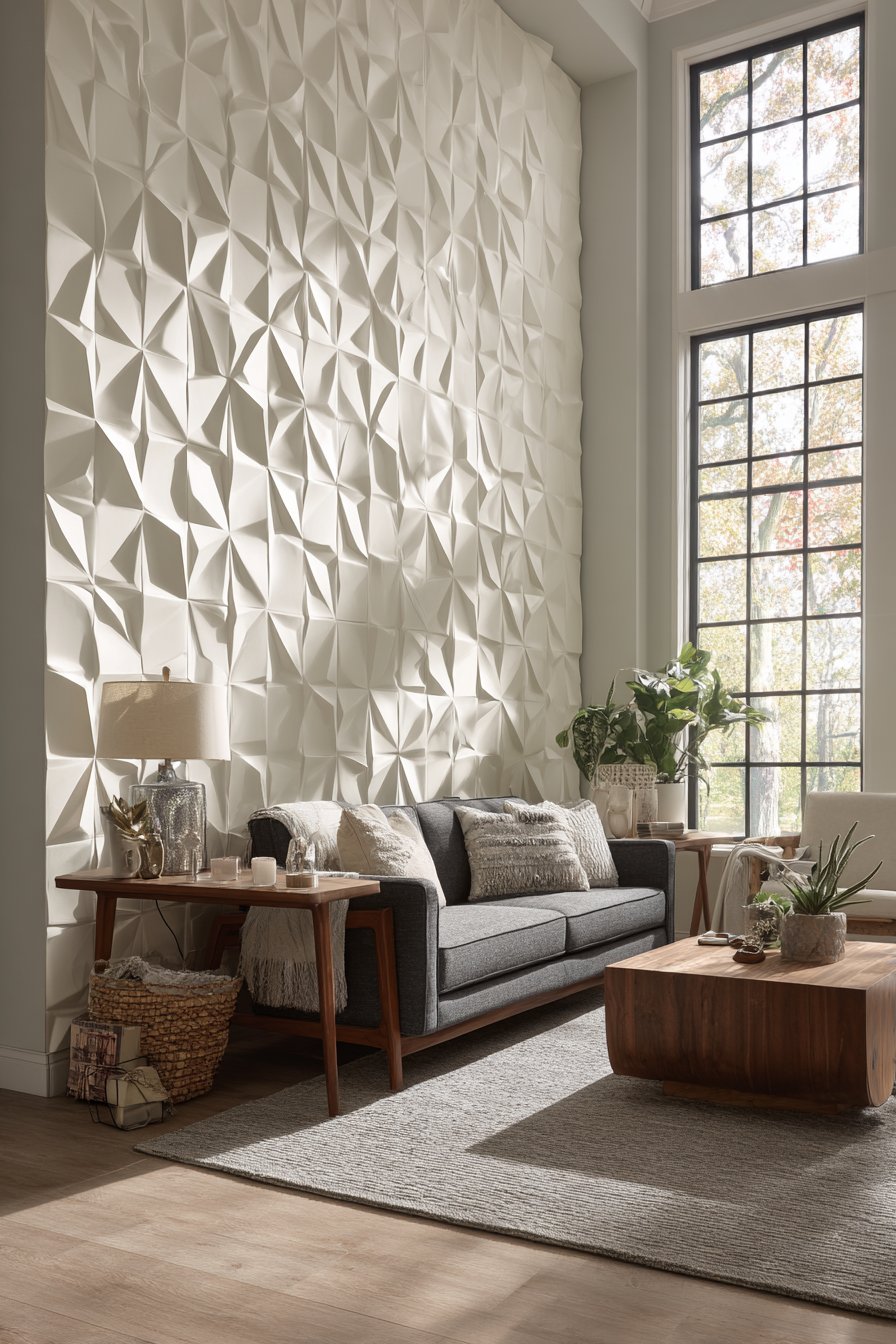
Wide-angle interior design photography captures the full panel installation and the shadow patterns created by natural side lighting, which changes throughout the day to reveal different aspects of the dimensional design. Detail focus on panel edges shows the clean installation and dimensional depth that makes this treatment so effective. The panels’ geometry creates a sense of movement and energy that prevents the monochromatic white palette from feeling flat or boring, proving that successful wall design ideas can deliver visual excitement through form rather than relying solely on color or pattern.
Key Design Tips: Purchase panels from reputable manufacturers to ensure consistent sizing and quality. Install over smooth, flat walls as any imperfections will telegraph through thin panels. Use construction adhesive rated for the panel material weight and follow manufacturer’s installation guidelines precisely. Plan panel layout to create symmetrical pattern or deliberate asymmetry—avoid random placement. Paint panels and walls the same color for seamless integration, or use contrasting colors for bold definition. Consider the light sources in your room when positioning 3D panels as they need directional light to show dimensional effect. Clean 3D panels with compressed air or soft brush as their texture can trap dust in recesses.
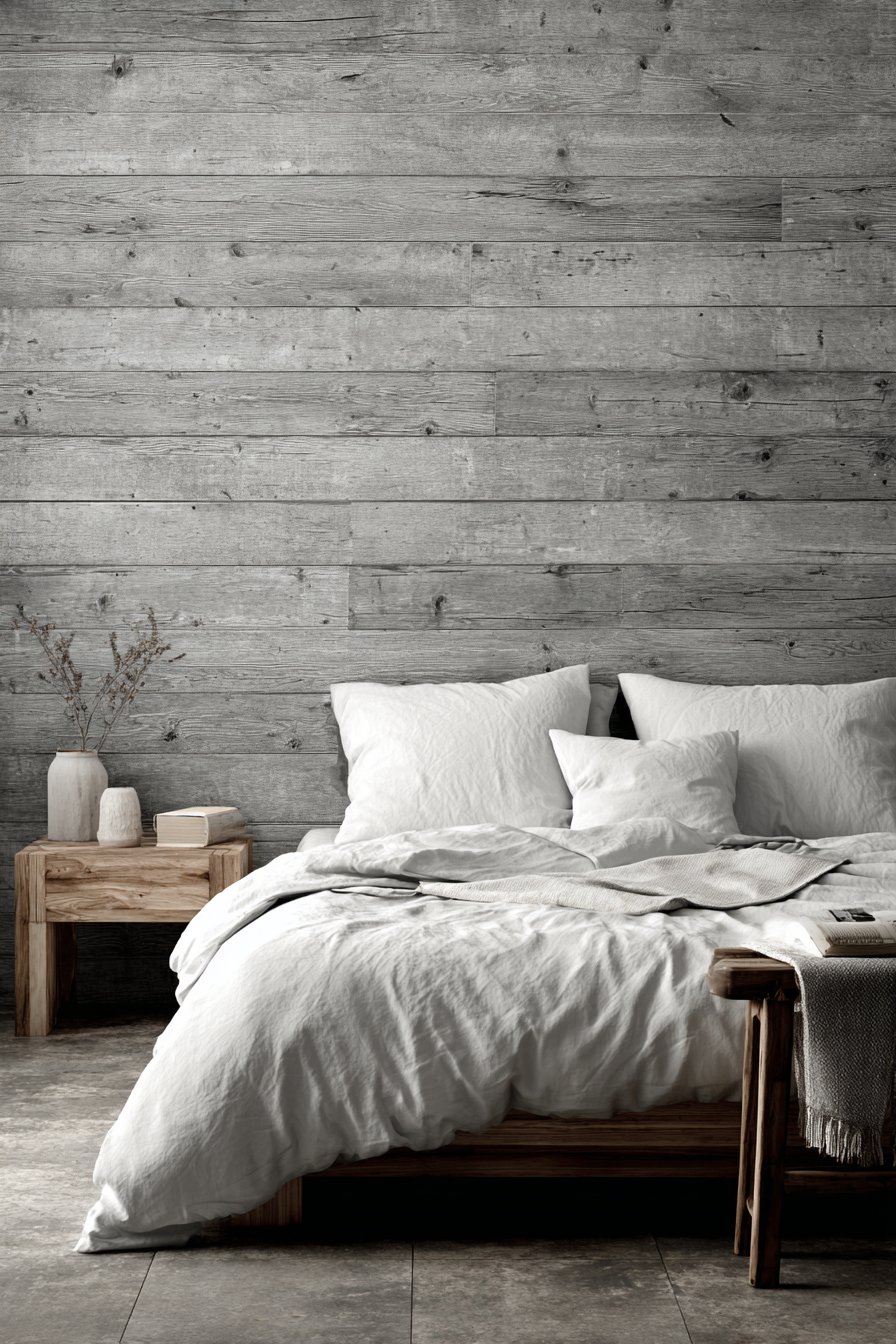
9. Horizontal Wood Plank Paneling
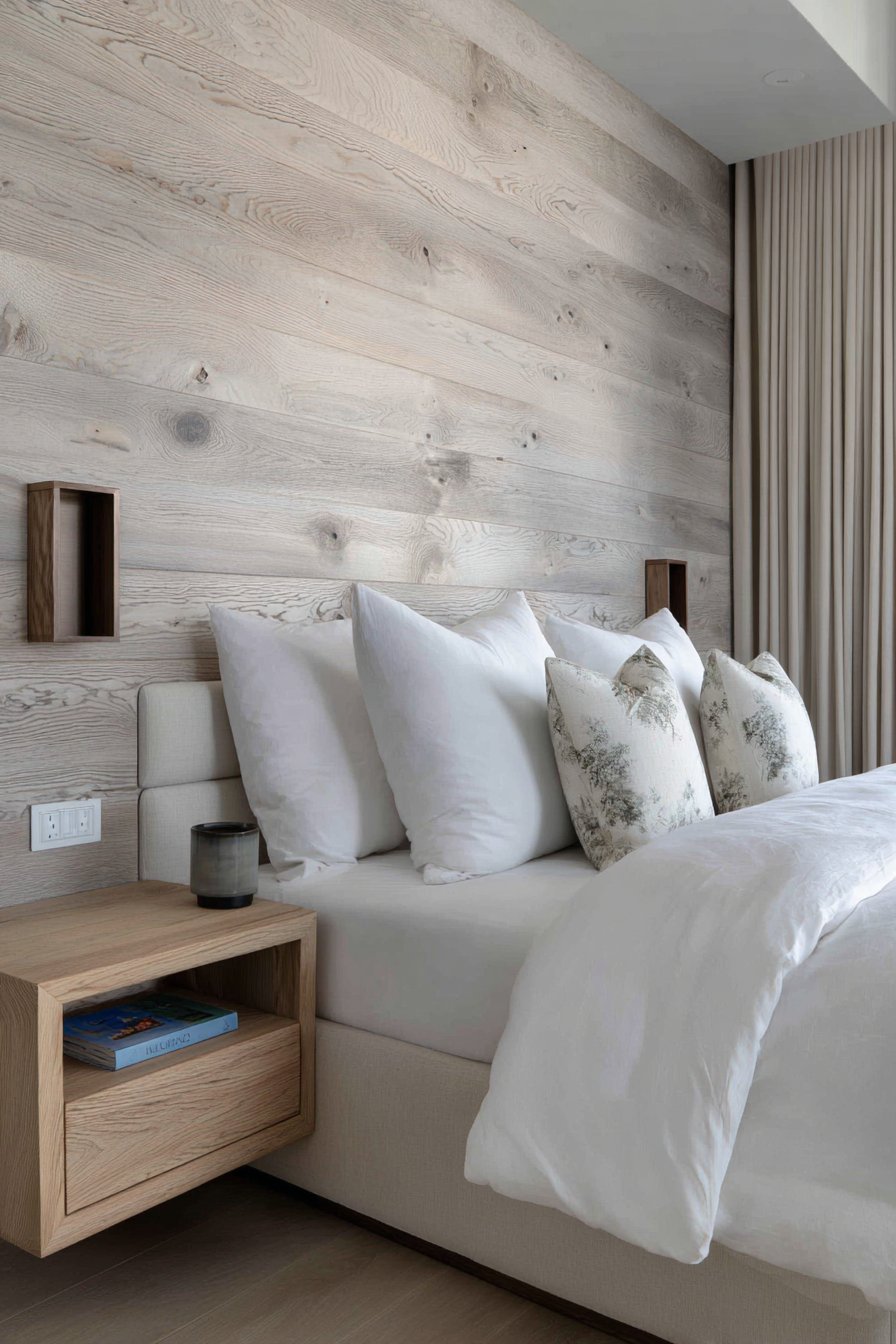
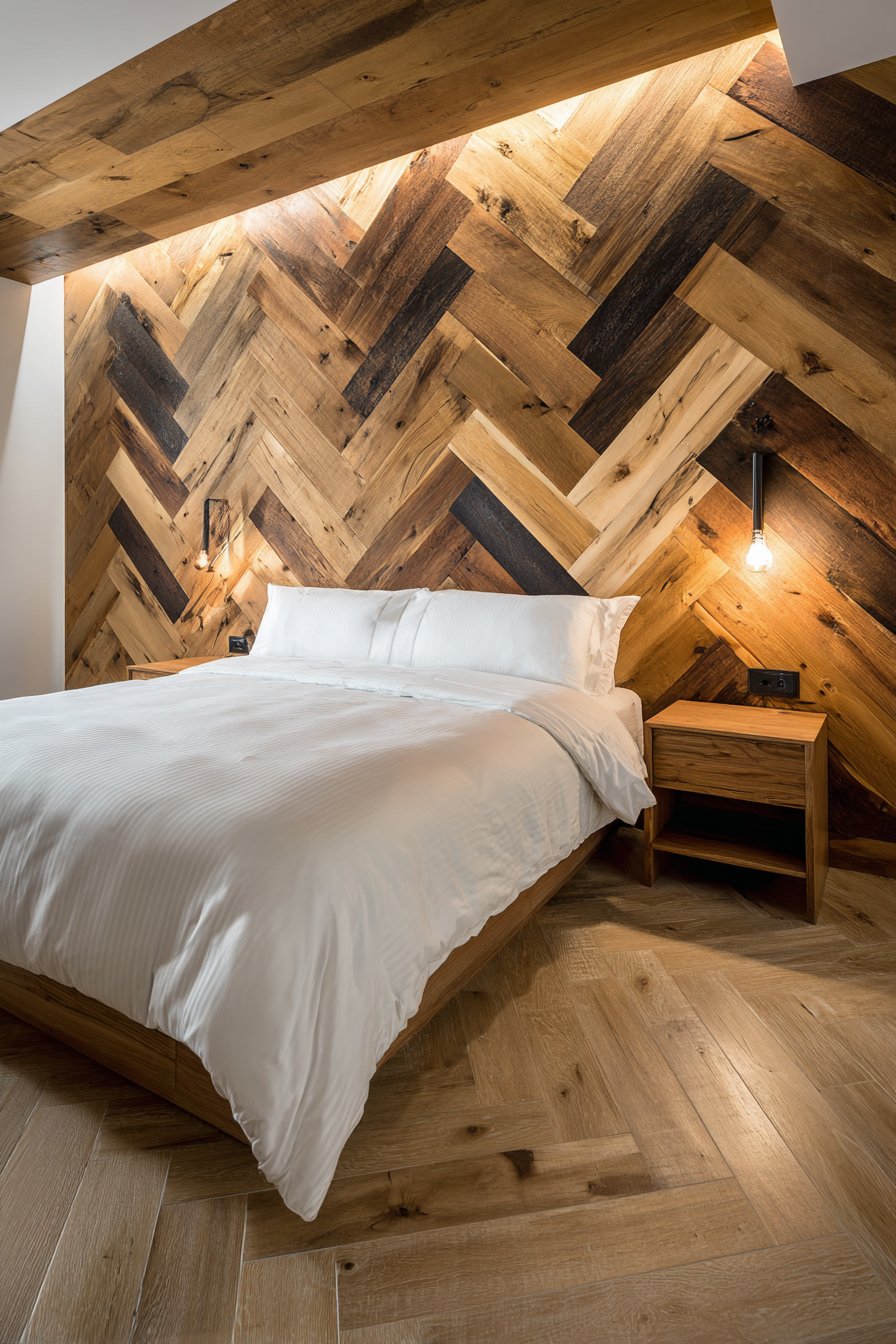
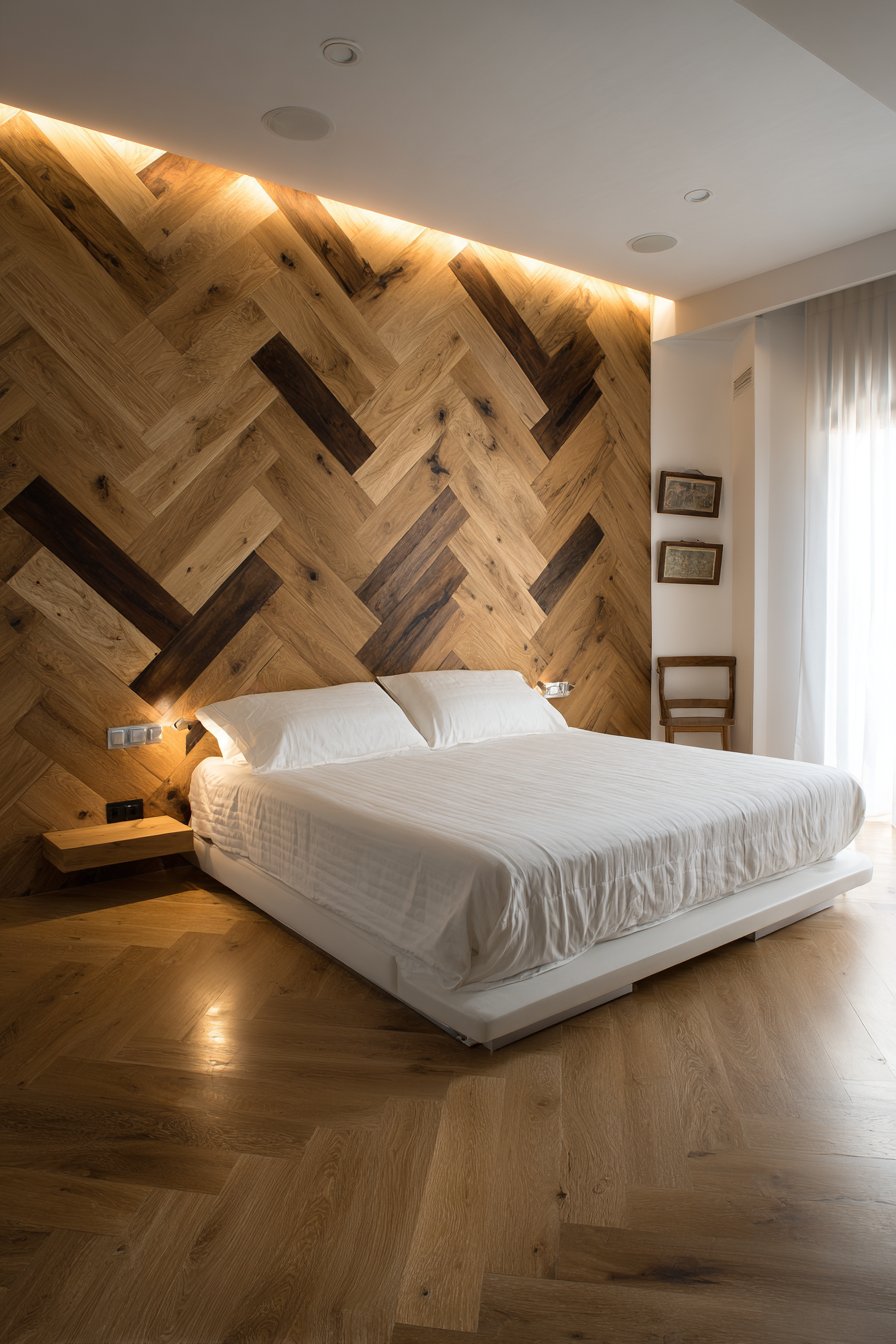
Bedroom wall design ideas embrace casual sophistication through horizontal wood plank paneling in weathered gray finish, extending across the headboard wall with visible wood grain and natural character marks. This installation demonstrates how wall design ideas can introduce organic texture and visual warmth while maintaining contemporary clean-lined aesthetic. The horizontal orientation of the planks creates a sense of expanded width, making the room feel broader while the weathered finish brings relaxed, lived-in character that’s perfectly suited to bedroom tranquility.
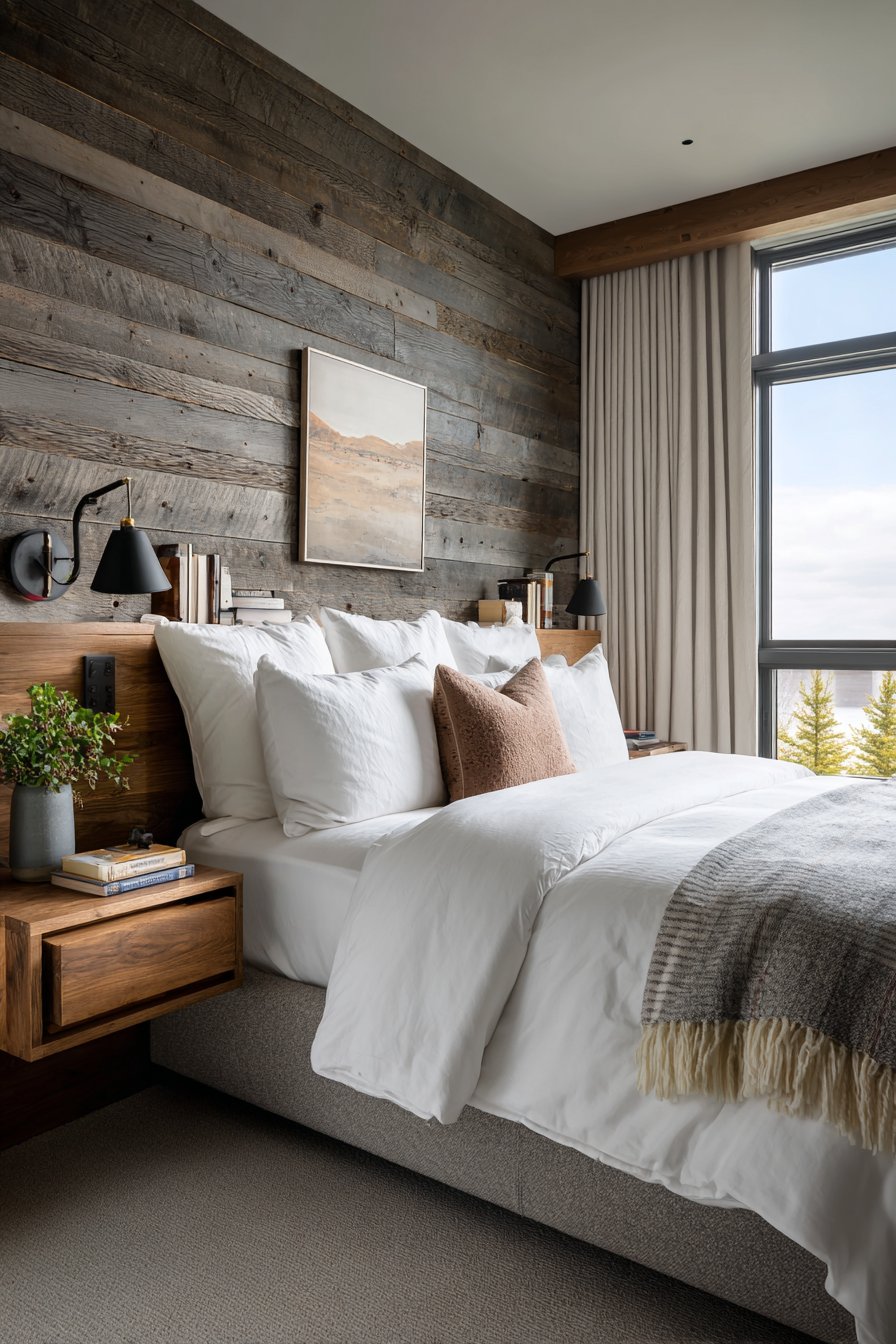
The planks feature authentic wood characteristics including subtle texture and natural knots that add genuine character impossible to replicate with printed or artificial materials. White bedding and natural linen curtains create serene contrast against the gray wood, their crisp freshness balancing the planked wall’s rustic character. Matching wood floating nightstands mount directly to the planked wall, demonstrating how wall treatments can integrate with furniture in seamless, space-efficient ways.
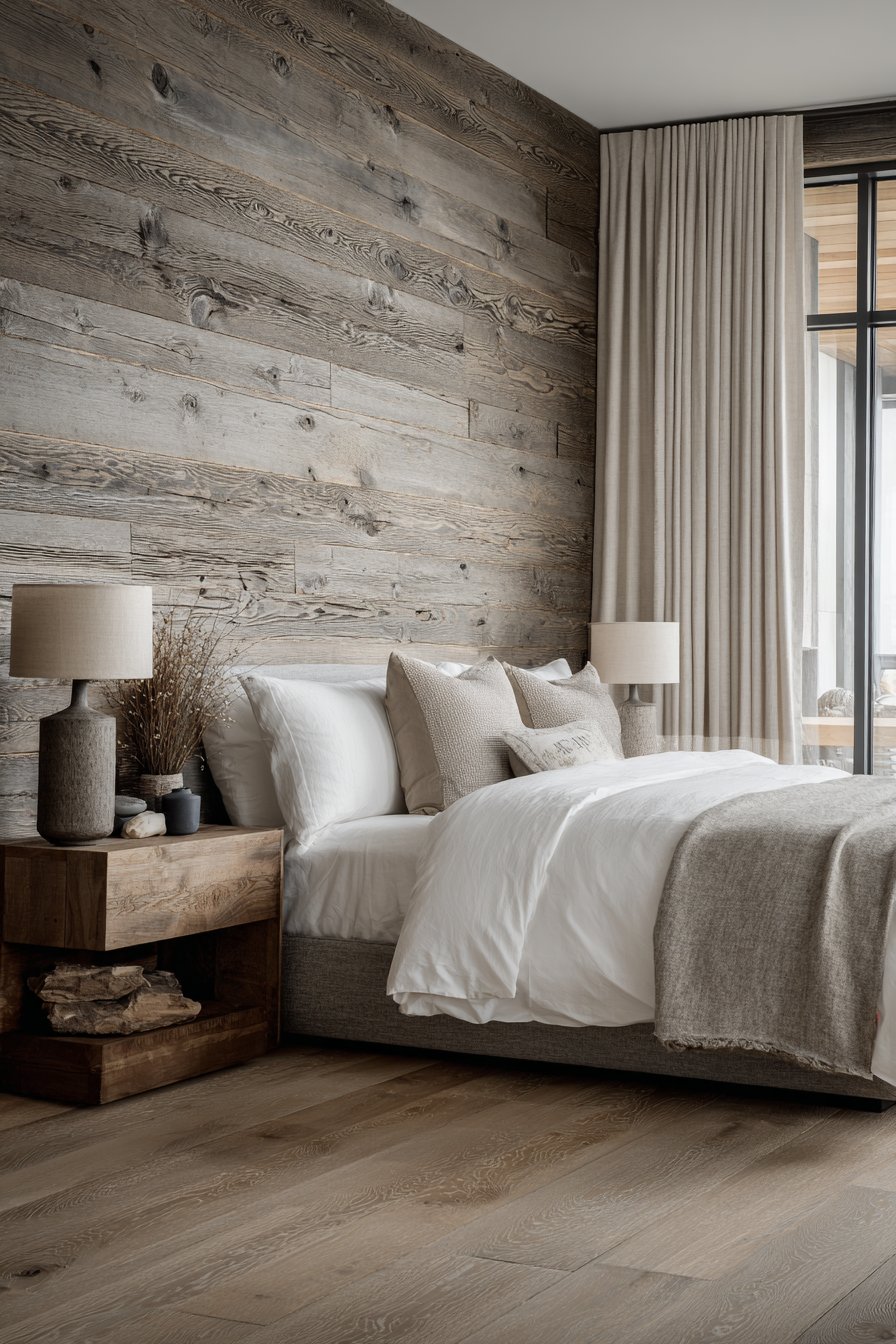
Interior photography with soft natural lighting emphasizes the horizontal lines and wood texture, essential elements that give this treatment its distinctive character. Balanced exposure captures the weathered finish details and grain patterns that make each plank unique while maintaining cohesive overall appearance. The wide-angle view shows how the full wall treatment integrates with room furnishings, demonstrating scale and proportion that helps readers visualize similar applications in their own spaces. This installation proves that wall design ideas don’t require perfect, pristine materials—sometimes weathered, textured surfaces create the most inviting, comfortable atmospheres.
Key Design Tips: Acclimate wood planks to room humidity for at least 48 hours before installation to prevent expansion or contraction after mounting. Use a level religiously when installing horizontal planks as even slight angles become obvious across long runs. Leave small expansion gaps at ends and edges to accommodate wood movement with humidity changes. Consider installing planks over horizontal furring strips for better stability and easier installation. Choose plank widths proportional to room size—wider planks suit larger rooms while narrow planks work better in smaller spaces. Apply finish before installation for easier application and better results. Use blind-nailing or hidden fastening systems for cleanest appearance without visible nail heads.
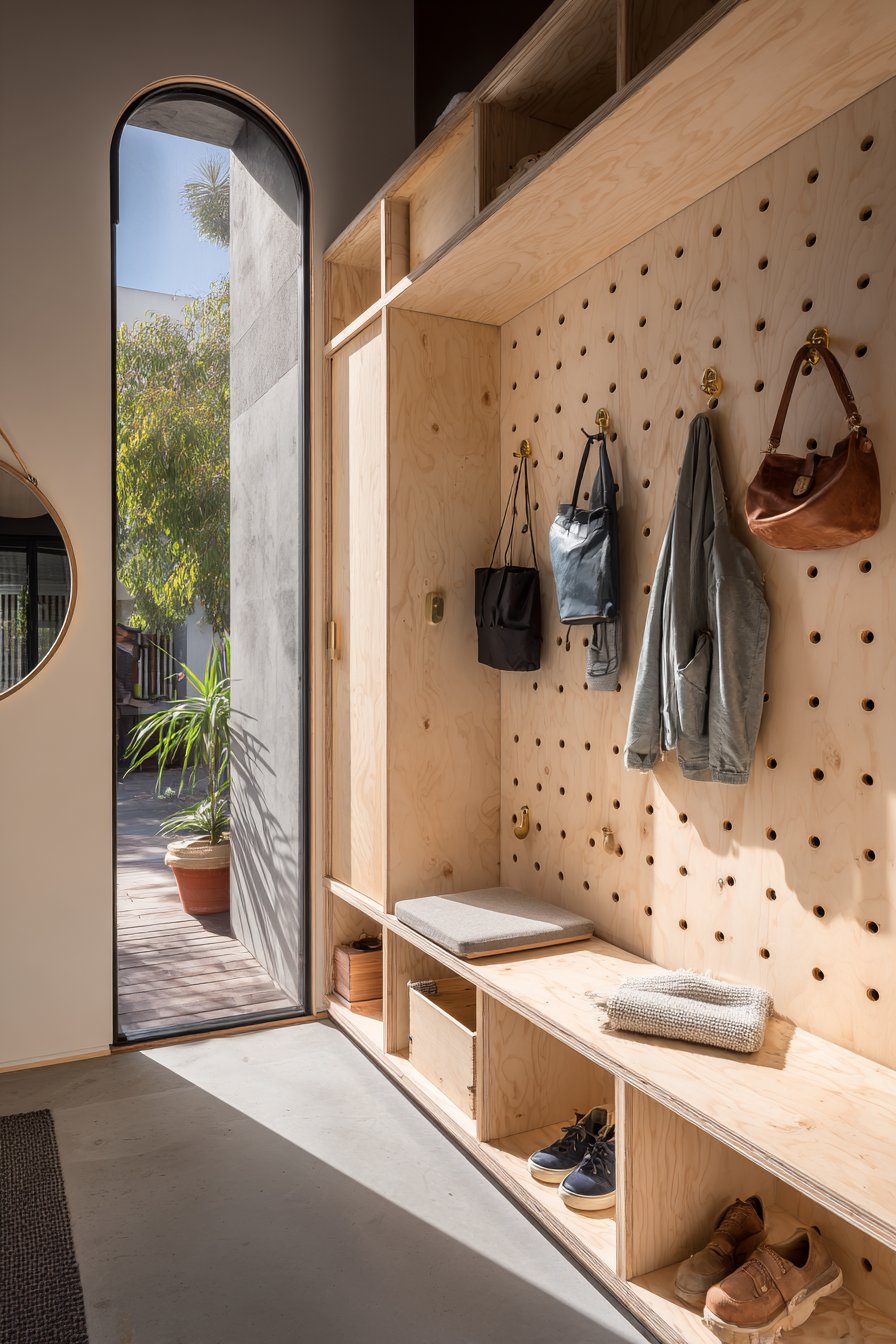
10. Functional Pegboard Wall Organization System
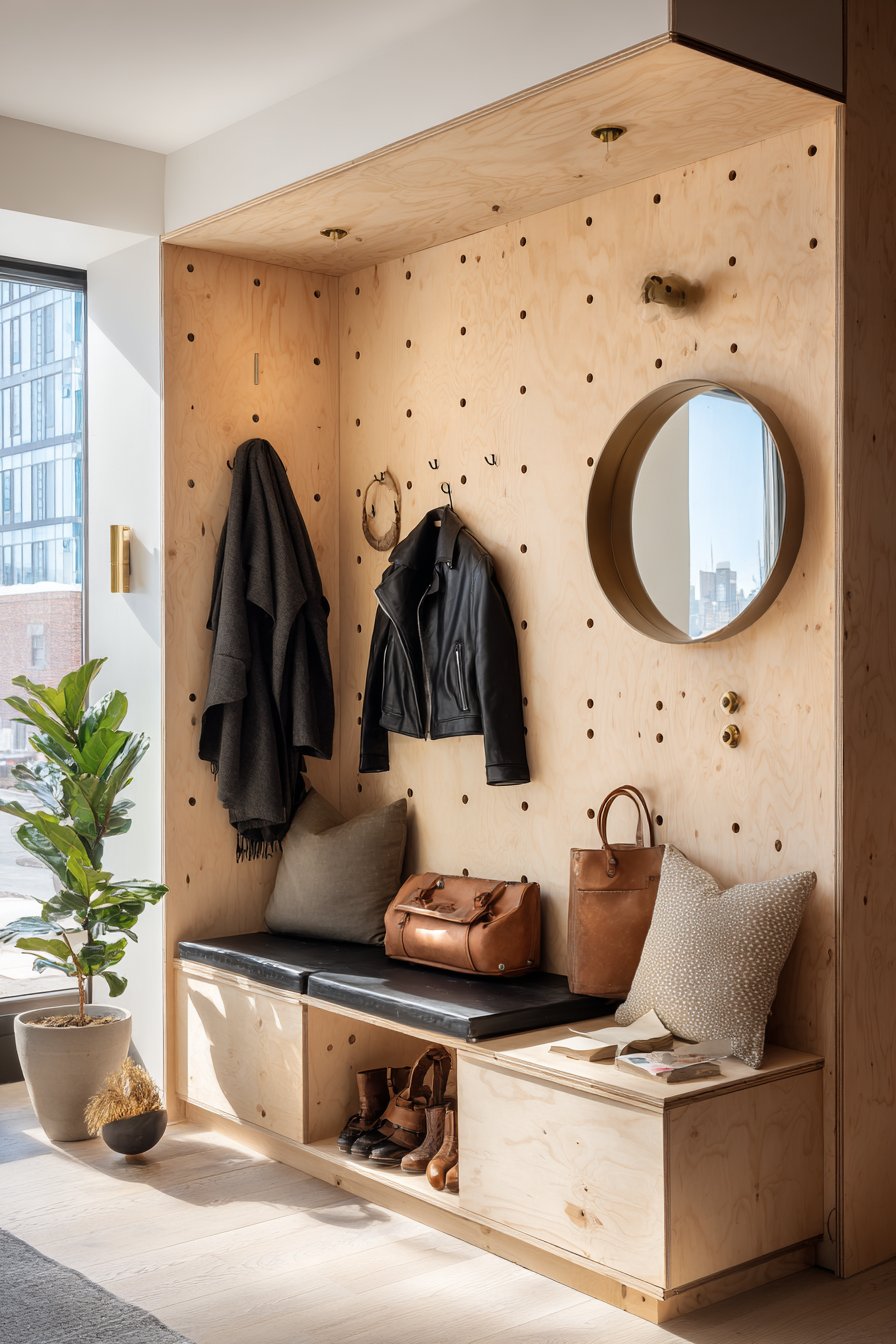
Home entryway wall design ideas prioritize practical organization through a floor-to-ceiling pegboard wall system in natural birch plywood, featuring an organized grid of wooden pegs for hanging coats, bags, and accessories. This installation demonstrates how wall design ideas can be primarily functional while still delivering strong aesthetic impact through material choice and thoughtful composition. The pegboard spans the full wall height with integrated bench seating below that incorporates hidden storage, creating a comprehensive mudroom solution that maximizes vertical space.
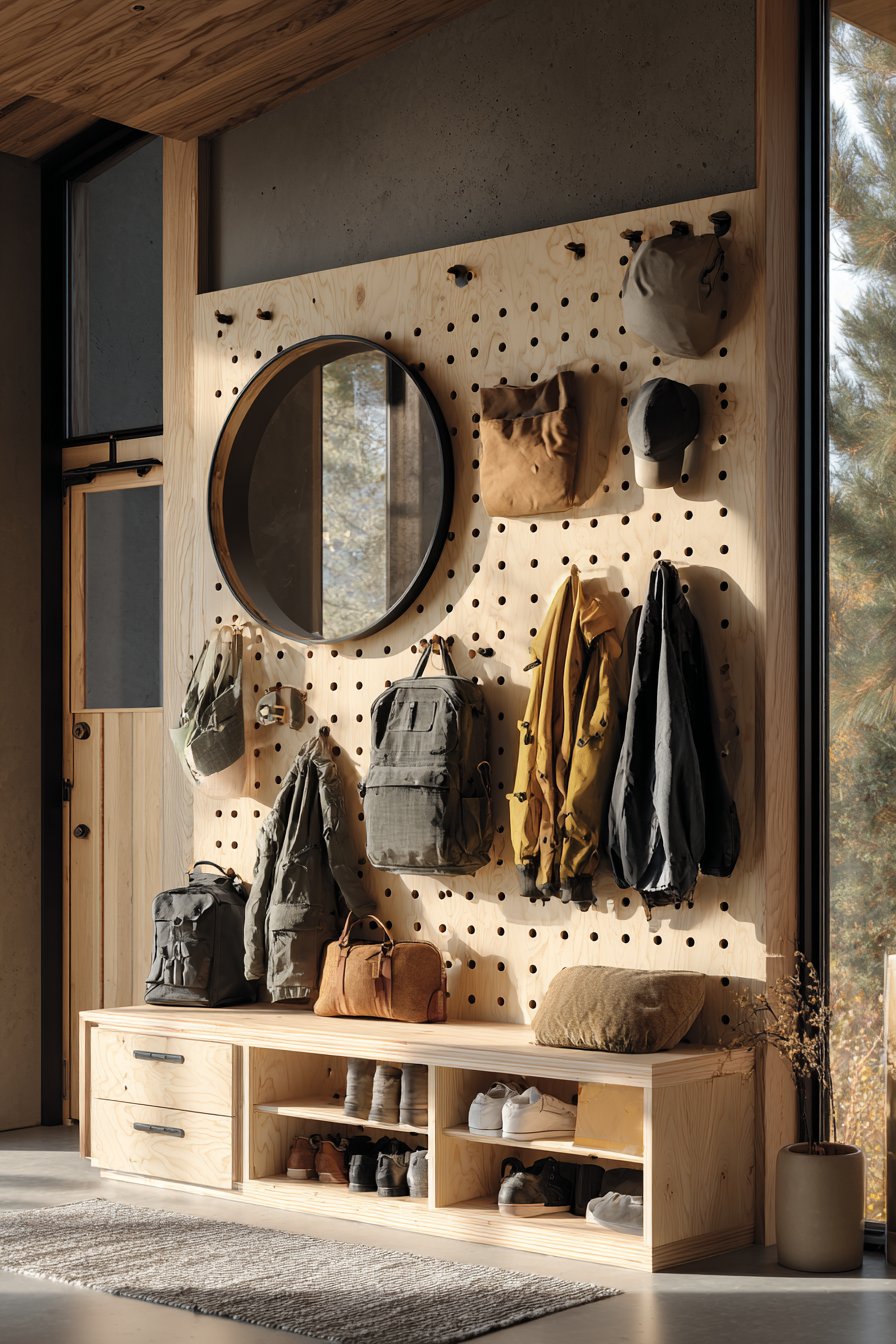
Brass hooks and modern accessories add functional style elements that elevate the utilitarian pegboard concept into sophisticated interior design. The opposite wall features a large round mirror that reflects light and creates the illusion of expanded space—a smart pairing that makes the entry feel larger despite the substantial pegboard installation. The natural birch material brings warmth and Scandinavian simplicity, its light wood tone keeping the space feeling open and welcoming rather than closed-in or cluttered.
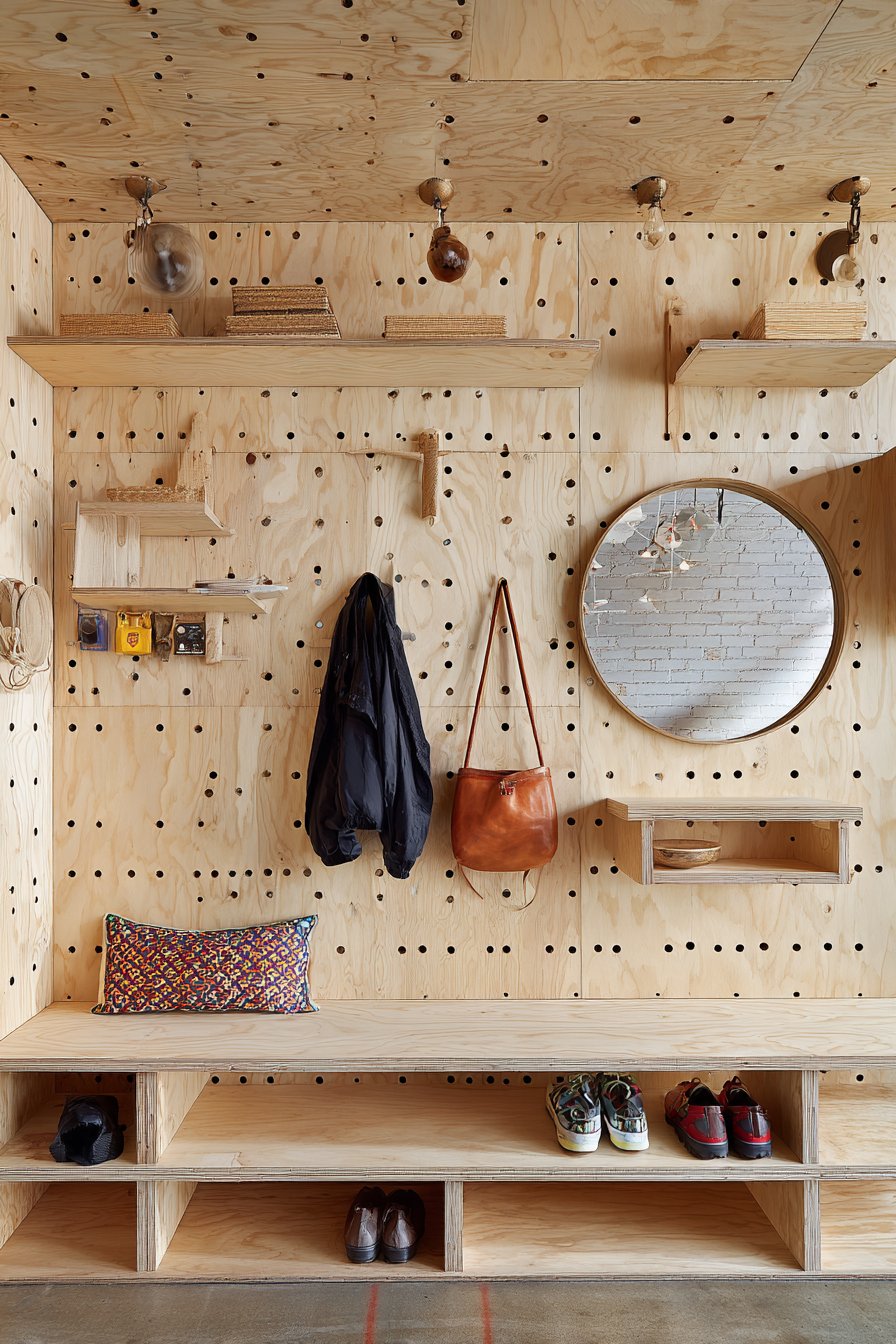
Interior design photography captures the full organizational system with natural daylight highlighting the birch wood grain and the practical arrangement of everyday items. Balanced composition shows both the system’s functionality and aesthetic appeal, demonstrating how well-organized storage can be beautiful rather than merely practical. This entry proves that wall design ideas can solve real problems while contributing positively to a home’s overall design story, turning necessary storage into an attractive architectural feature rather than something to hide away.
Key Design Tips: Choose pegboard with appropriate hole spacing for the pegs you’ll use—standard spacing is often 1 inch on center. Mount pegboard with spacers behind to create clearance for inserting and removing pegs easily. Use metal pegboard brackets or furring strips for strong mounting that can support significant weight. Consider painting pegboard to match walls for subtle integration or contrasting color for bold statement. Mix peg types and lengths to accommodate different items from heavy coats to small accessories. Install pegboard with holes aligned vertically and horizontally for orderly appearance. Seal raw plywood edges before installation to prevent splintering and improve finished appearance.
11. Bold Geometric Wallpaper in Powder Room
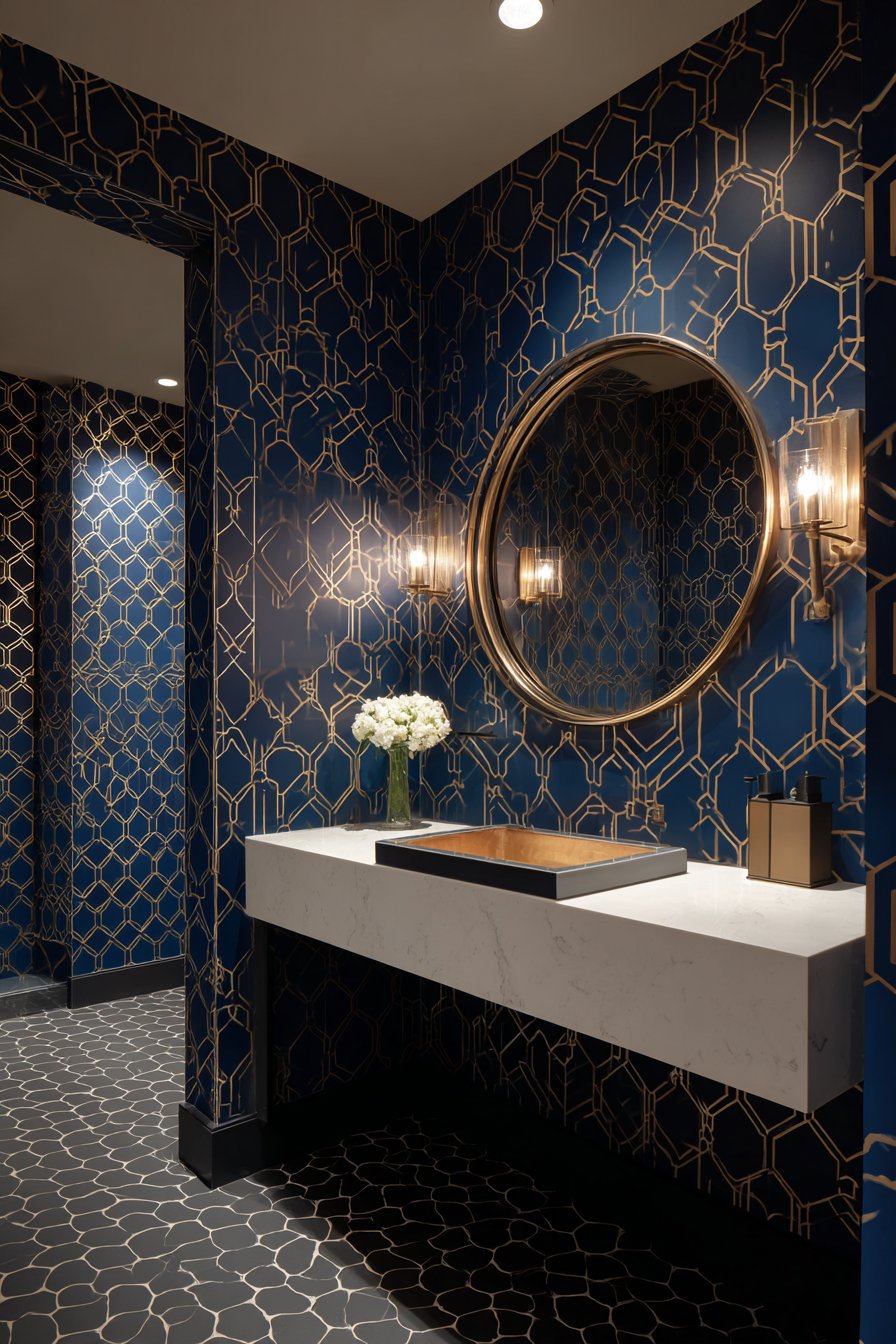
Powder room wall design ideas make dramatic statements through bold geometric wallpaper in navy blue and gold metallic design, creating an intimate jewel-box effect perfect for small spaces. This installation demonstrates how wall design ideas can transform compact rooms into memorable experiences through fearless pattern and color. The dramatic pattern covers all walls, creating immersive environment complemented by a brass-framed round mirror and matching wall sconces that echo the wallpaper’s metallic accents.
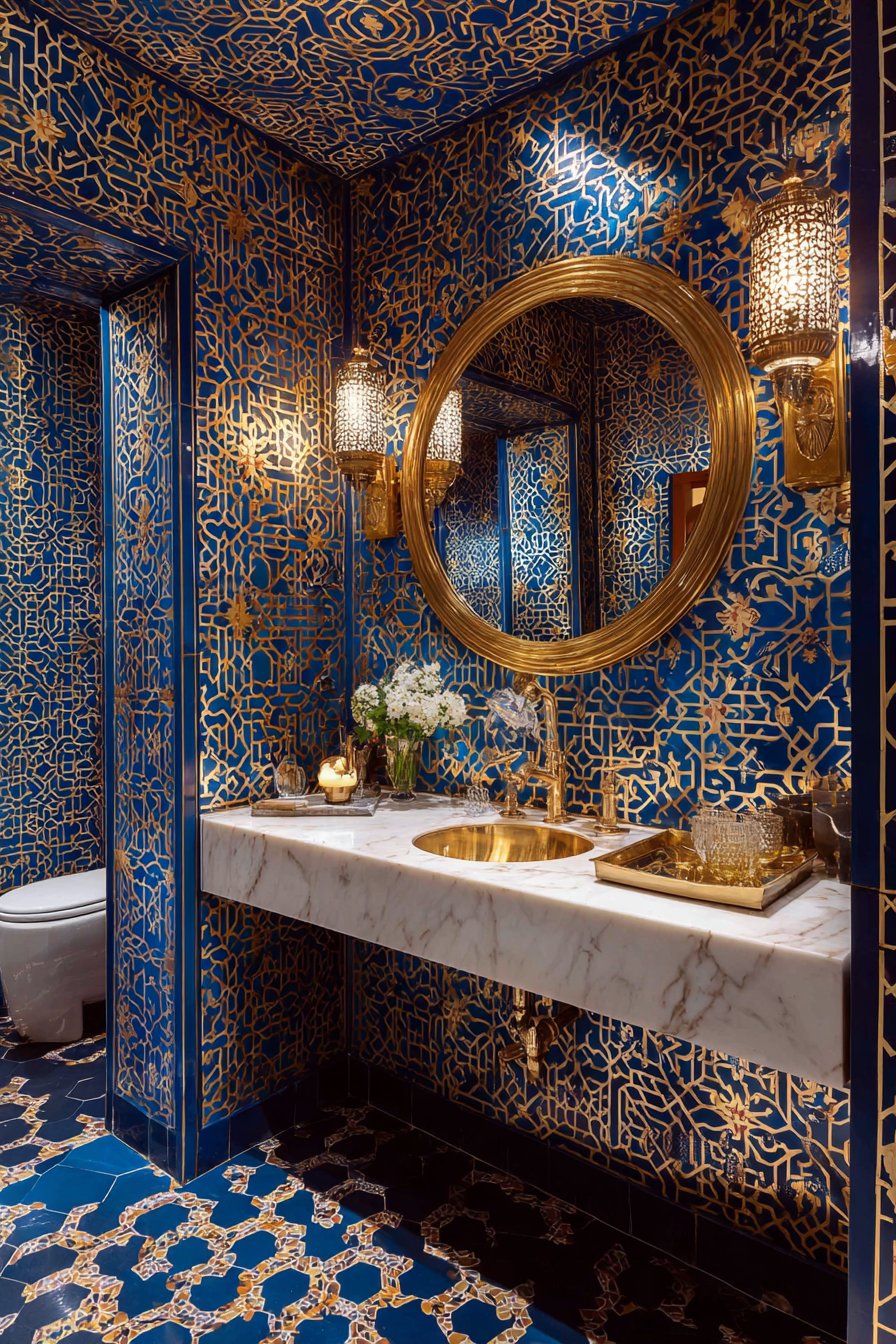
A floating white marble vanity provides visual relief from the bold pattern, its clean simplicity and pristine surface creating necessary breathing room that prevents the space from feeling overwhelming. Black hexagonal floor tiles ground the space while introducing another geometric element that complements rather than competes with the wall pattern. This layering of patterns in different scales and orientations creates sophisticated complexity that reads as intentional rather than chaotic.
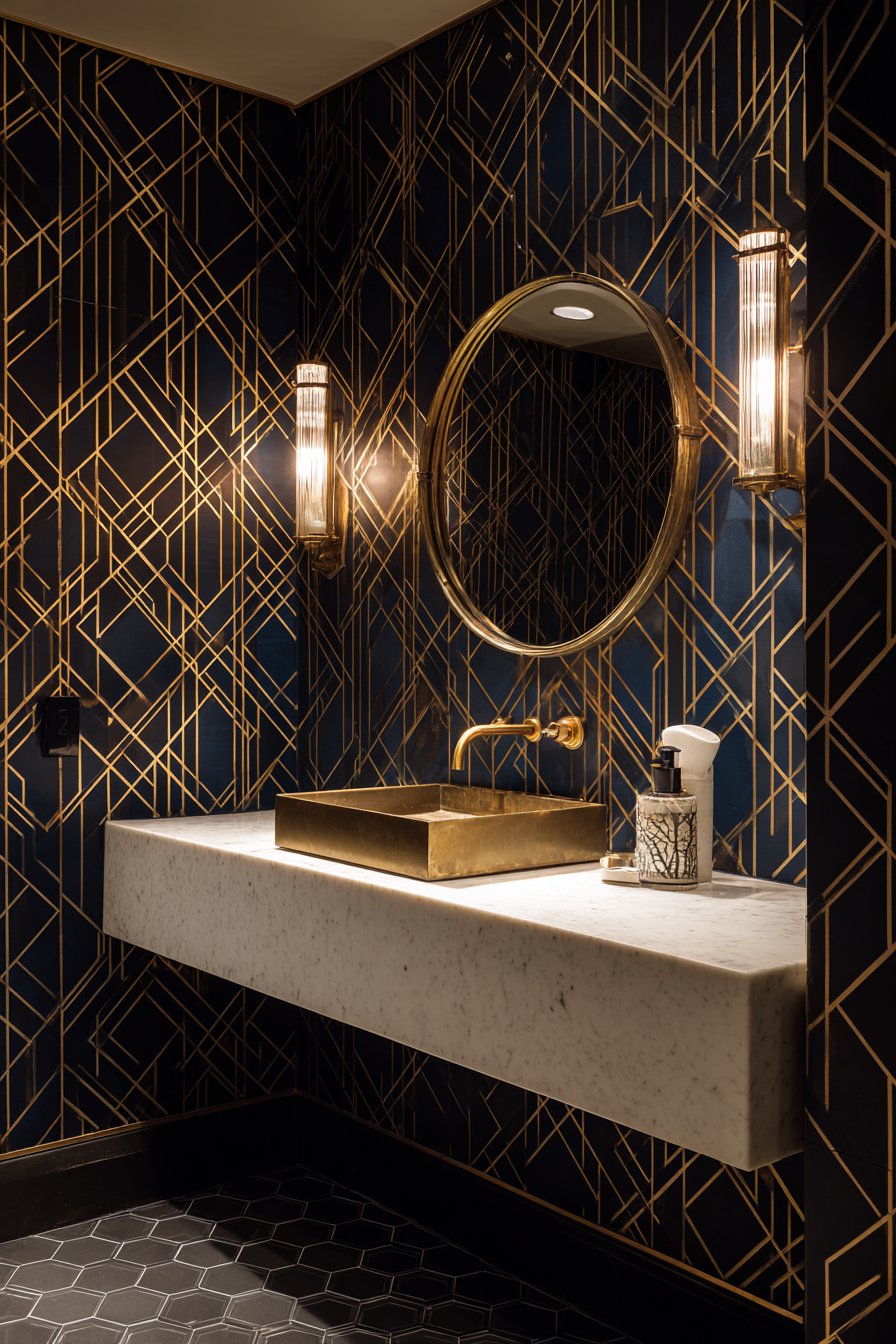
Professional interior photography with balanced lighting captures the wallpaper pattern detail and metallic sheen without washout, a technical challenge given the reflective qualities of metallic wallpaper. Detail shots emphasize the geometric precision and color depth that makes this installation so impactful. The powder room proves that small spaces offer unique opportunities for bold wall design ideas—since guests spend limited time in these rooms, dramatic treatments feel exciting rather than tiresome, and the compact scale means less investment in expensive wallpaper to achieve stunning results.
Key Design Tips: Measure walls precisely and order 10-15% extra wallpaper to account for pattern matching and mistakes. Prepare walls by filling holes, sanding smooth, and priming before hanging wallpaper. Use wallpaper-specific paste or pre-pasted paper and follow manufacturer’s directions exactly. Match patterns carefully at seams—this is where amateur installations show their weaknesses. Use a smoothing tool to eliminate bubbles working from center toward edges. Trim excess carefully with sharp blade against metal straight edge. Consider hiring professional installer for expensive or complex patterns—labor cost is minor compared to wasted materials from mistakes. Allow wallpaper to cure fully before exposing to moisture in bathrooms.
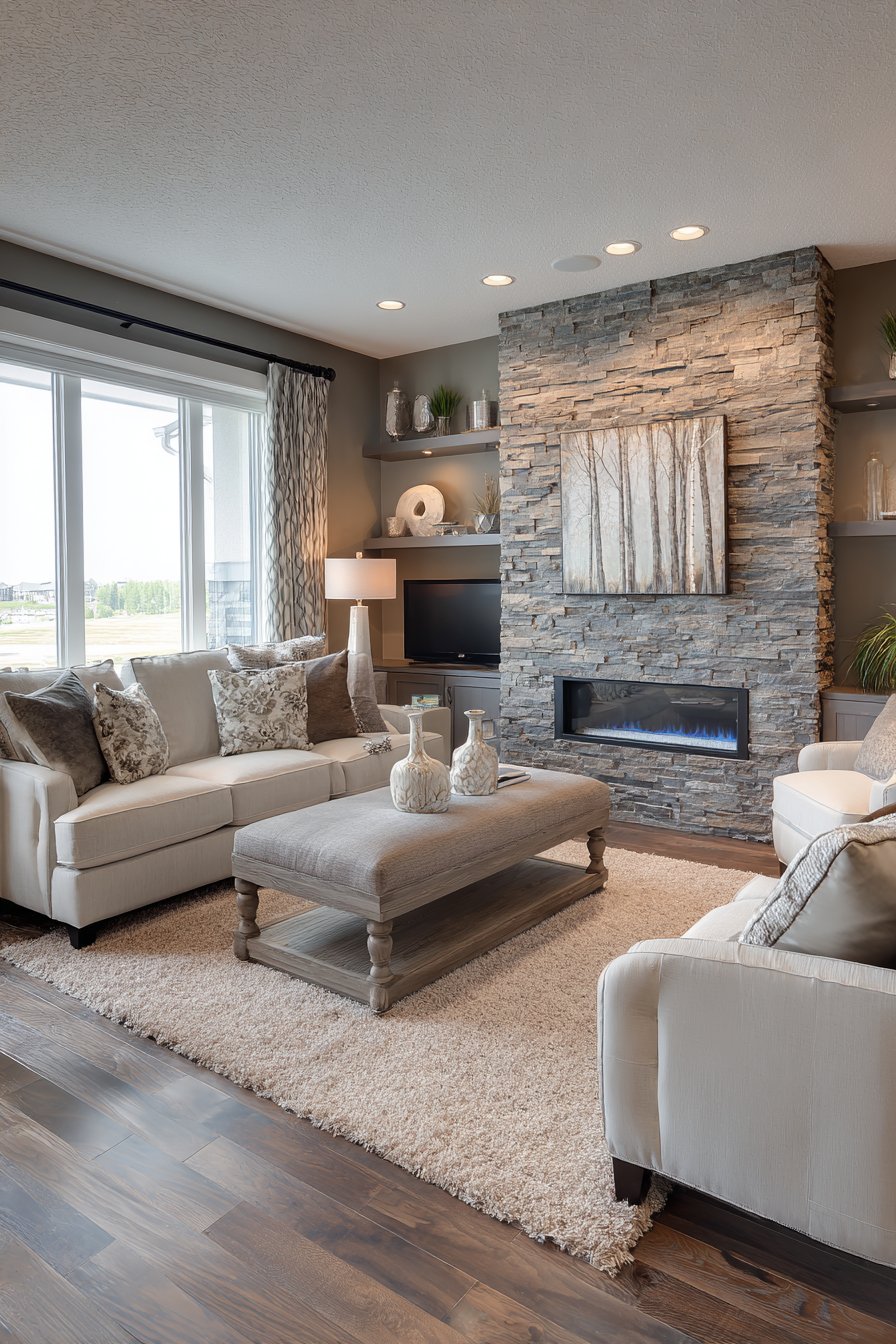
12. Natural Stone Veneer Accent Wall
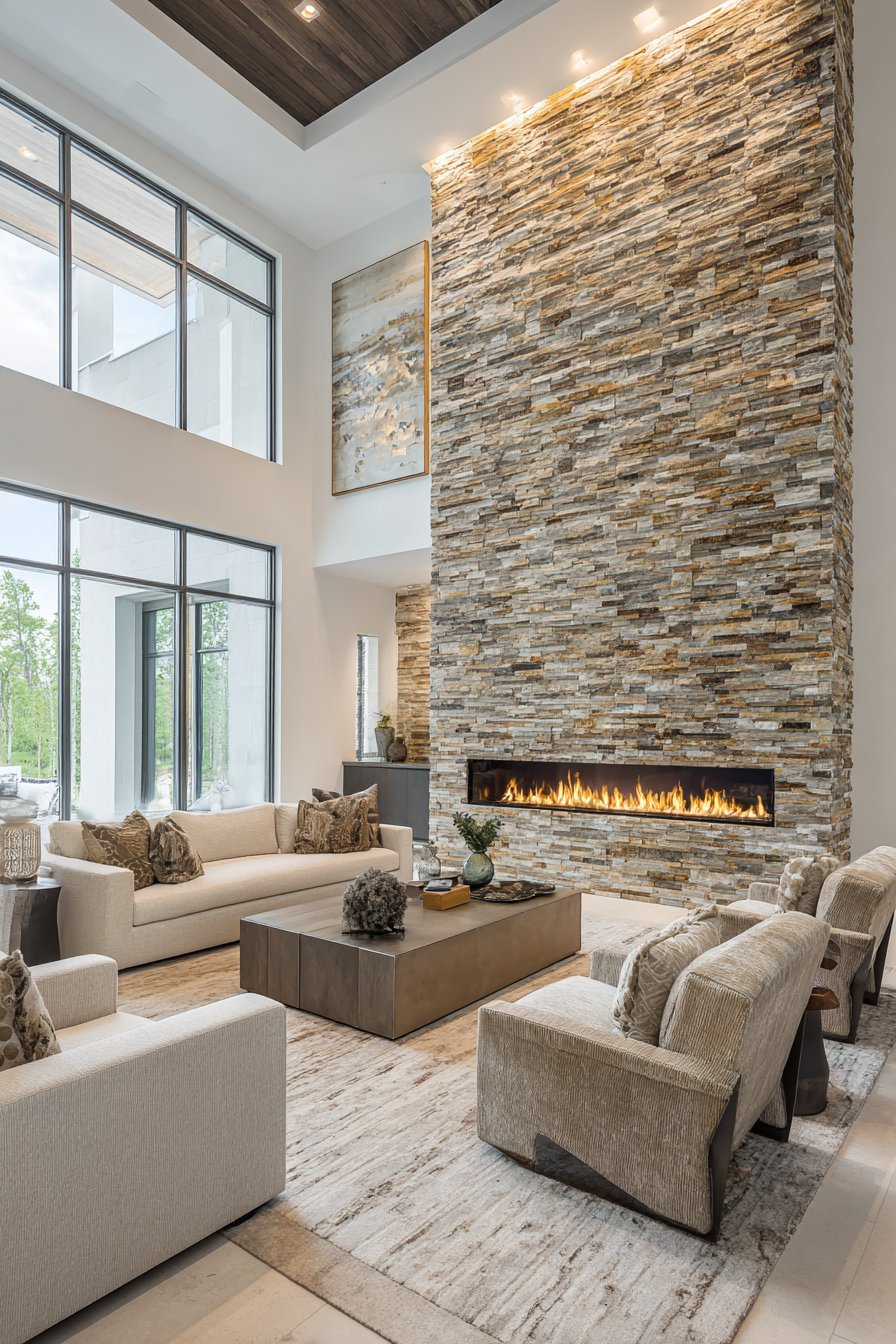
Modern living room wall design ideas achieve organic elegance through floor-to-ceiling stone veneer accent wall in stacked natural ledgestone, creating earthy texture with tones ranging from gray to taupe. This installation demonstrates how wall design ideas can bring outdoor materials inside to create connection with nature while adding substantial architectural presence. A linear gas fireplace integrates seamlessly into the stone wall, its contemporary clean-lined design providing beautiful contrast with the organic stone texture.
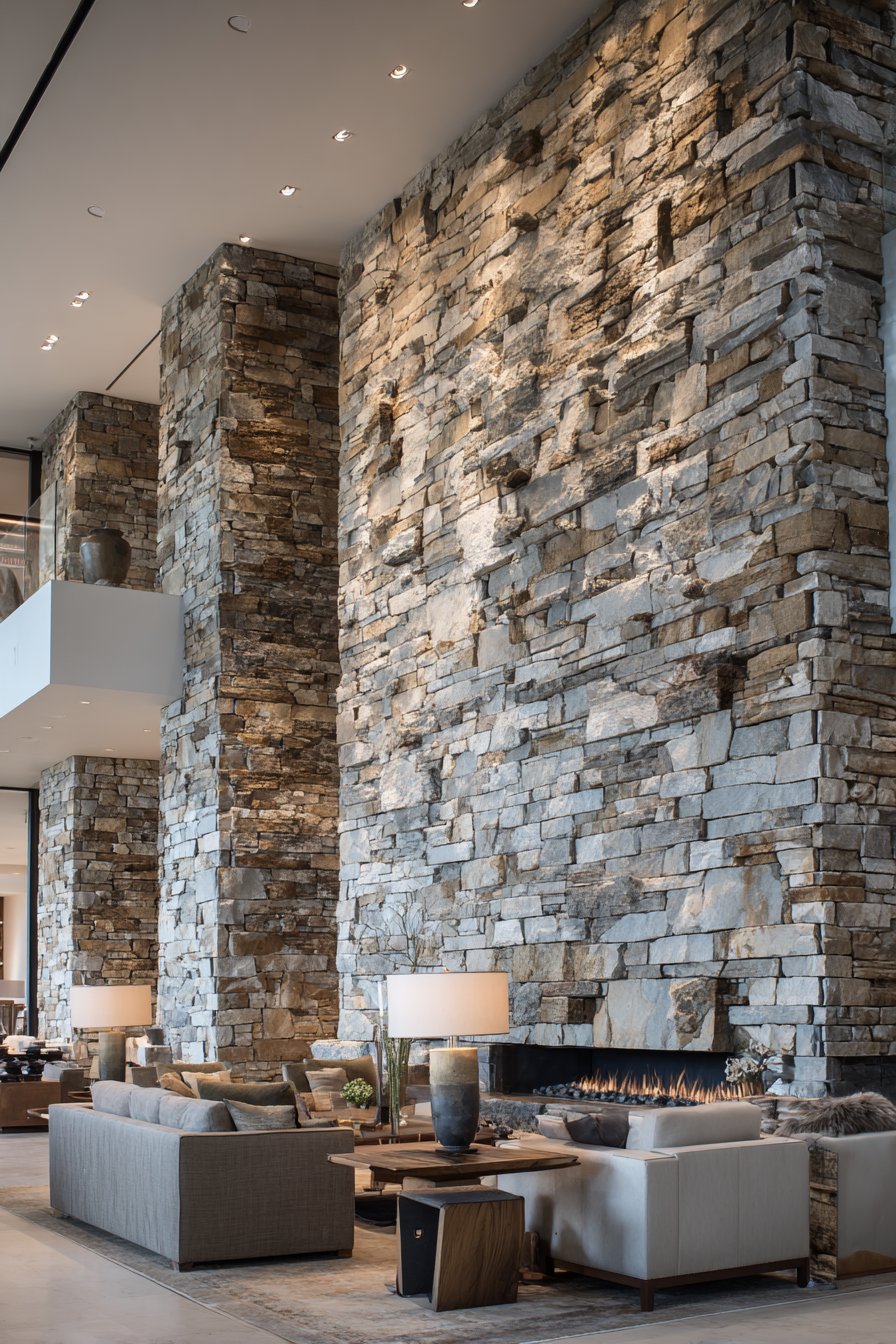
Contemporary furniture in neutral fabrics complements the natural stone texture without competing for attention, allowing the substantial stone wall to serve as the room’s focal point. Recessed lighting installed above the stone wall highlights the dimensional quality of the stacked ledgestone, creating shadows that emphasize texture and make the wall read as even more three-dimensional. This lighting strategy transforms the wall into an illuminated feature that remains compelling even during evening hours.
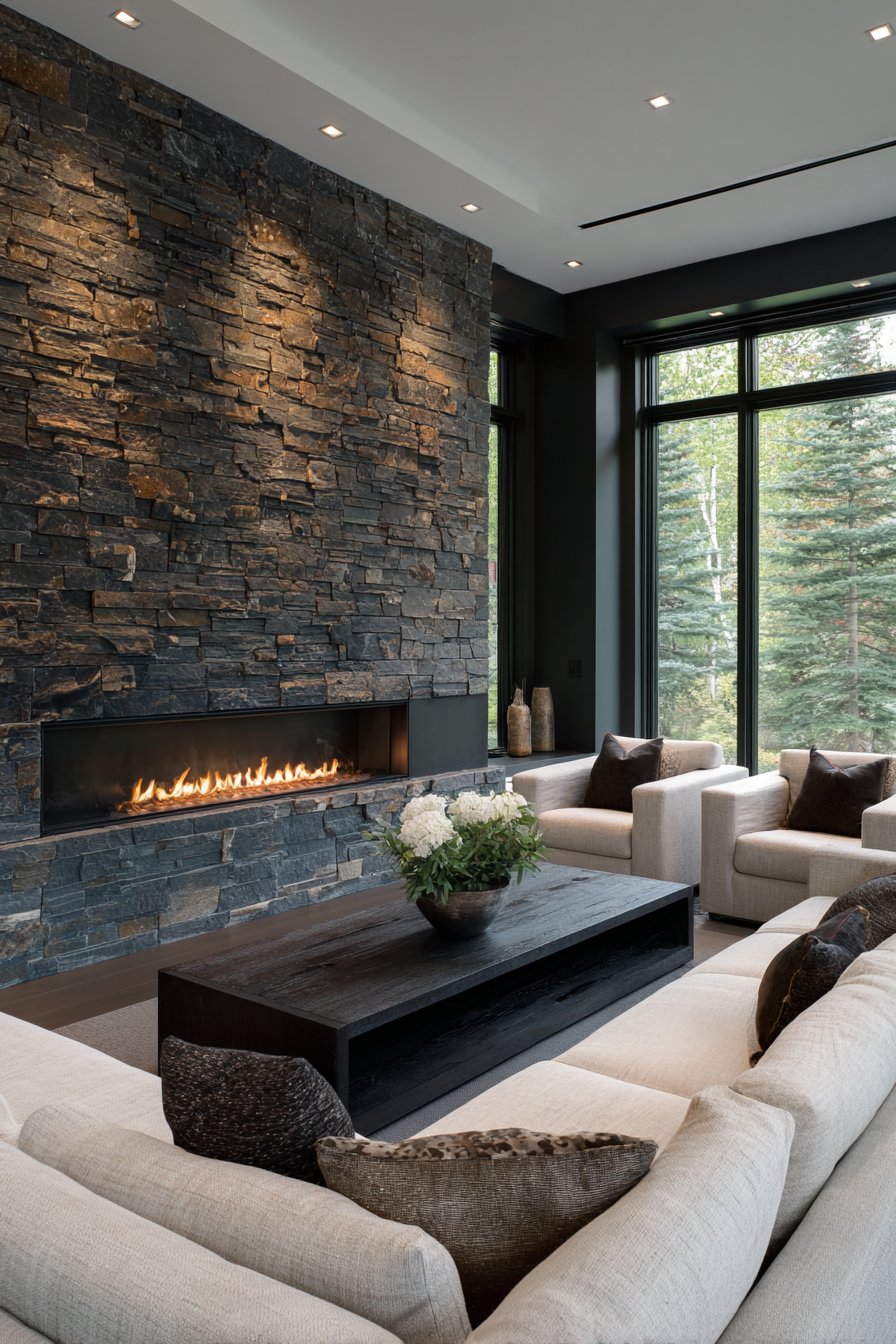
Wide-angle interior design photography captures the full stone installation with balanced exposure showing individual stone texture and color variation that makes natural materials so compelling. Natural ambient lighting creates authentic shadow play between stone layers, revealing the genuine depth of the stacked installation. The stone veneer demonstrates how wall design ideas can introduce natural materials in spaces where full-thickness stone would be impractical, delivering authentic appearance at reduced weight and cost while still achieving the substantial presence and organic beauty of natural stone.
Key Design Tips: Purchase all stone for your project from the same lot to ensure color consistency. Prepare wall surface to be clean, dry, and structurally sound before installing heavy stone veneer. Use appropriate mortar or adhesive rated for the stone weight and your wall type. Start installation from bottom working upward, using level frequently to prevent drift. Mix stones from different boxes during installation to blend color variations naturally. Plan corner installations carefully—use corner pieces where available or cut pieces to create clean corner wraps. Seal natural stone after installation to resist staining and simplify cleaning. Consider moisture resistance when selecting stone for areas near water sources.
13. Classic Board and Batten Wall Treatment
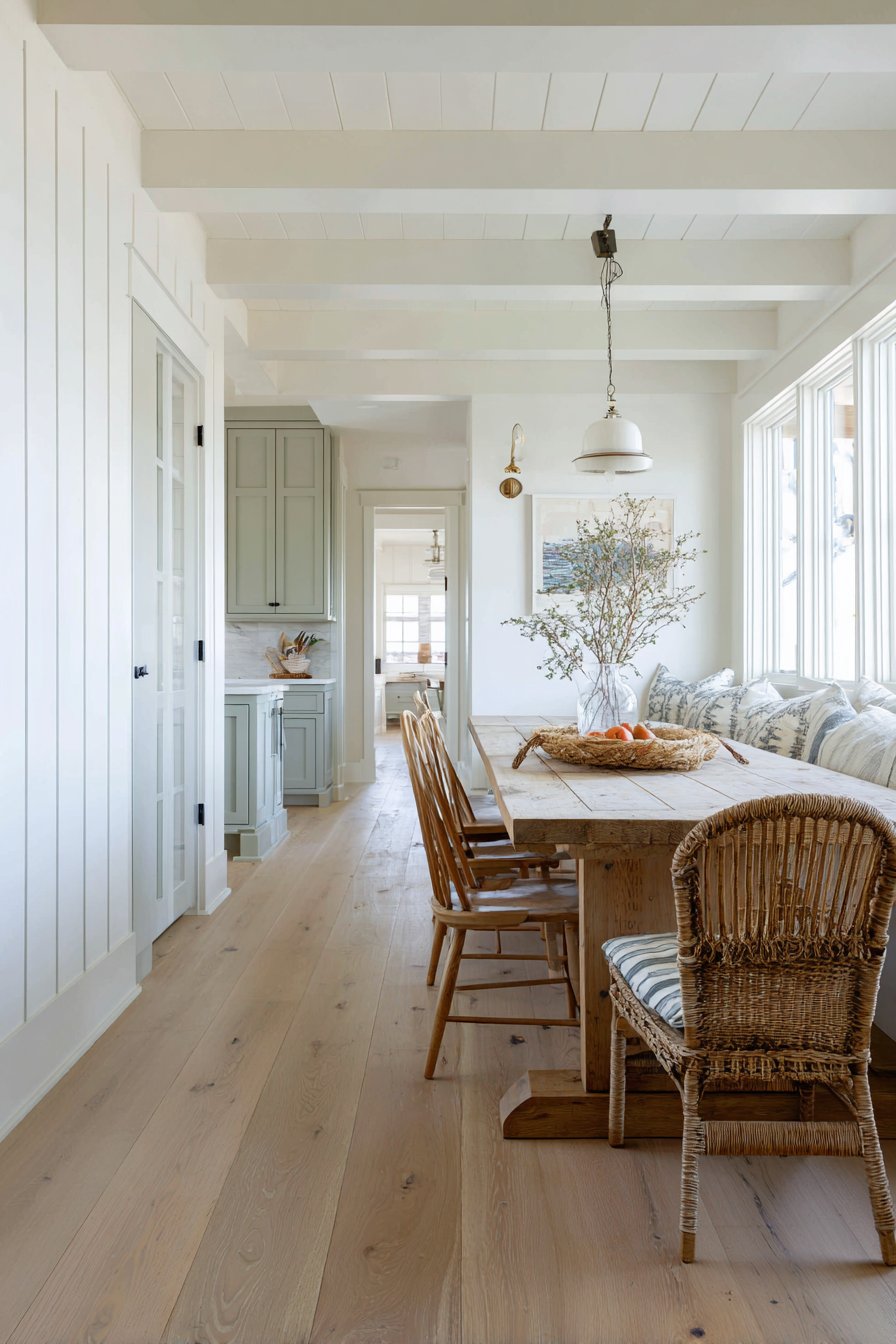
Dining room wall design ideas embrace traditional architecture through board and batten wall treatment in classic white, featuring vertical boards with horizontal battens creating timeless panel details. This wainscoting-style installation extends to chair rail height with painted wall above in soft greige, demonstrating how wall design ideas can add architectural interest to rooms lacking original detail. The traditional panel treatment brings depth and dimension to flat walls while the two-tone color approach adds subtle sophistication.
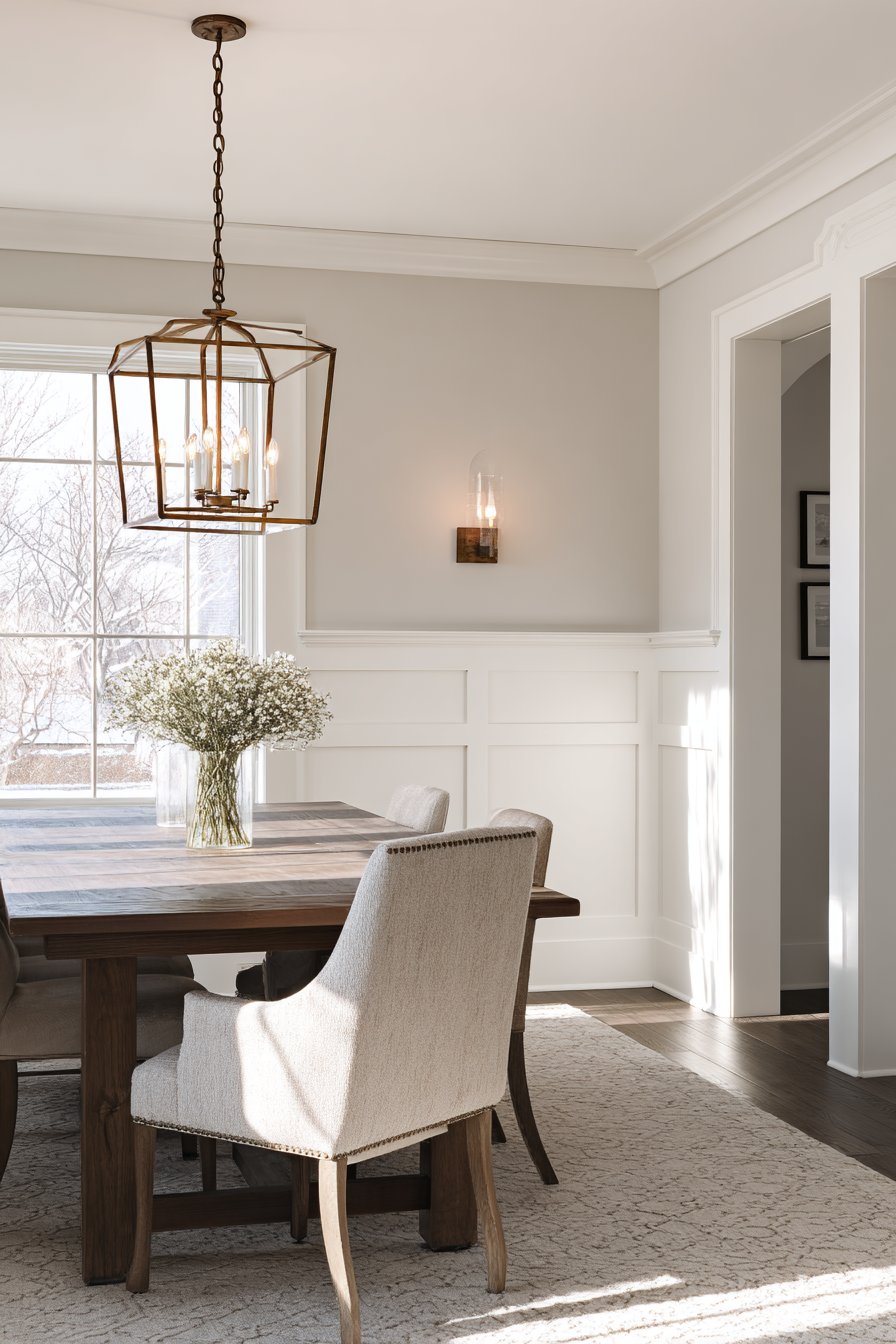
A farmhouse-style dining table with mixed seating anchors the space, its casual character complementing the more formal wall treatment in perfect balance between approachable and refined. Vintage-inspired lighting fixtures echo the traditional wall detail while providing ambient illumination that enhances the room’s warm, welcoming atmosphere. The greige upper wall color introduces warmth without the darkness of deeper colors, creating ideal backdrop for artwork or shelving while maintaining visual connection to the white board and batten below.
Interior photography with natural window light highlights the dimensional shadow lines created by the battens, essential elements that give this treatment its architectural character. Detail focus captures the clean paint finish and precise joinery where boards meet battens—hallmarks of quality installation. This traditional wall treatment demonstrates how wall design ideas can reference historical architecture while remaining relevant in contemporary homes, proving that classic details endure precisely because they add beauty and interest that transcends trends.
Key Design Tips: Plan batten spacing before starting—equal spacing creates formal symmetry while varied spacing can follow wall proportions or furniture placement. Use a level and measuring tape religiously to ensure perfectly plumb vertical boards. Attach boards to studs whenever possible for strongest mounting that won’t sag over time. Caulk all gaps between boards, battens, and walls before painting for seamless appearance. Use primed MDF for paintable applications as it’s more stable than solid wood and costs less. Prime all pieces before installation then touch up and finish coat after mounting. Consider the room’s proportions when determining wainscoting height—typically one-third of wall height works well but adjust for very high or low ceilings.
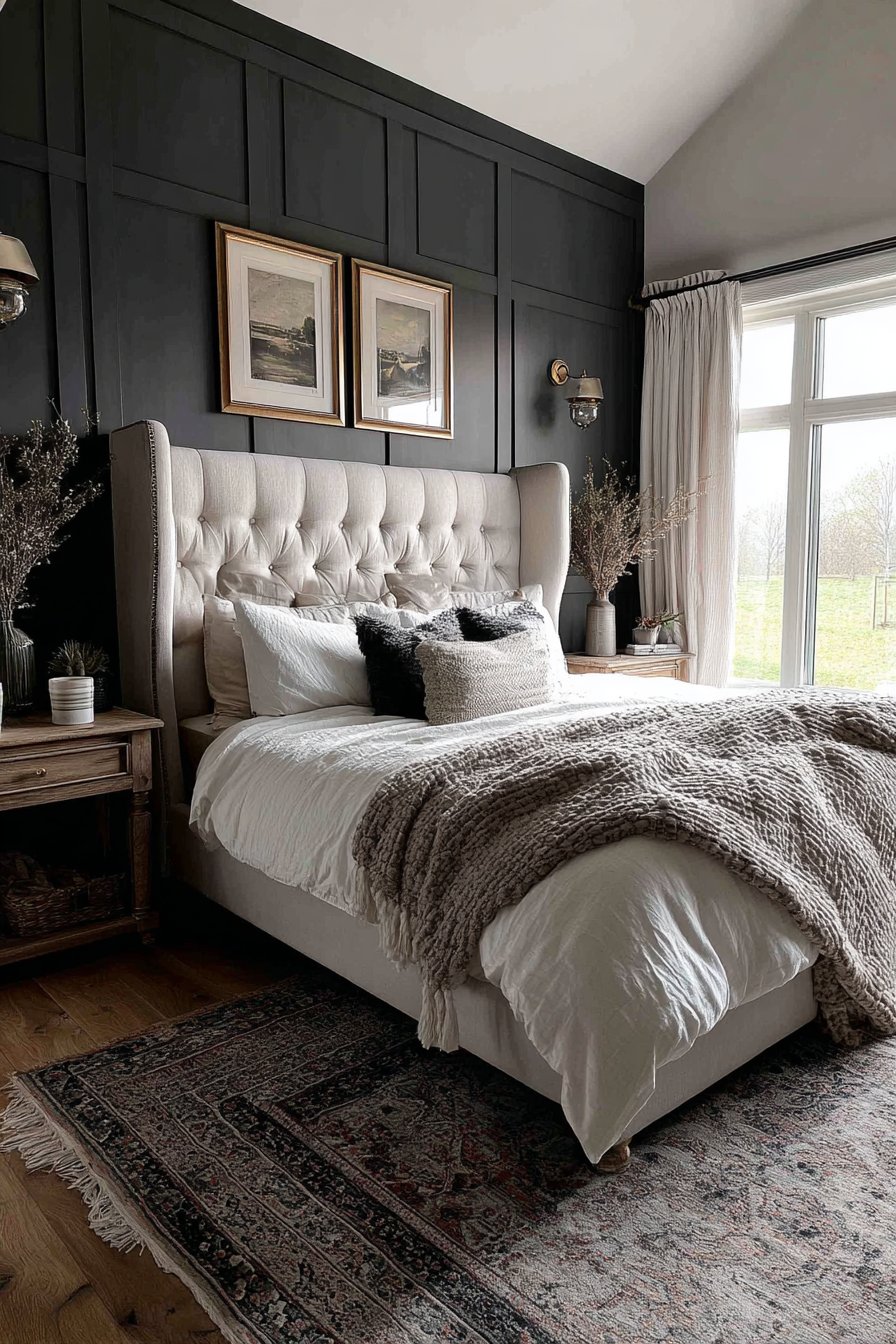
14. Dramatic Dark Accent Wall
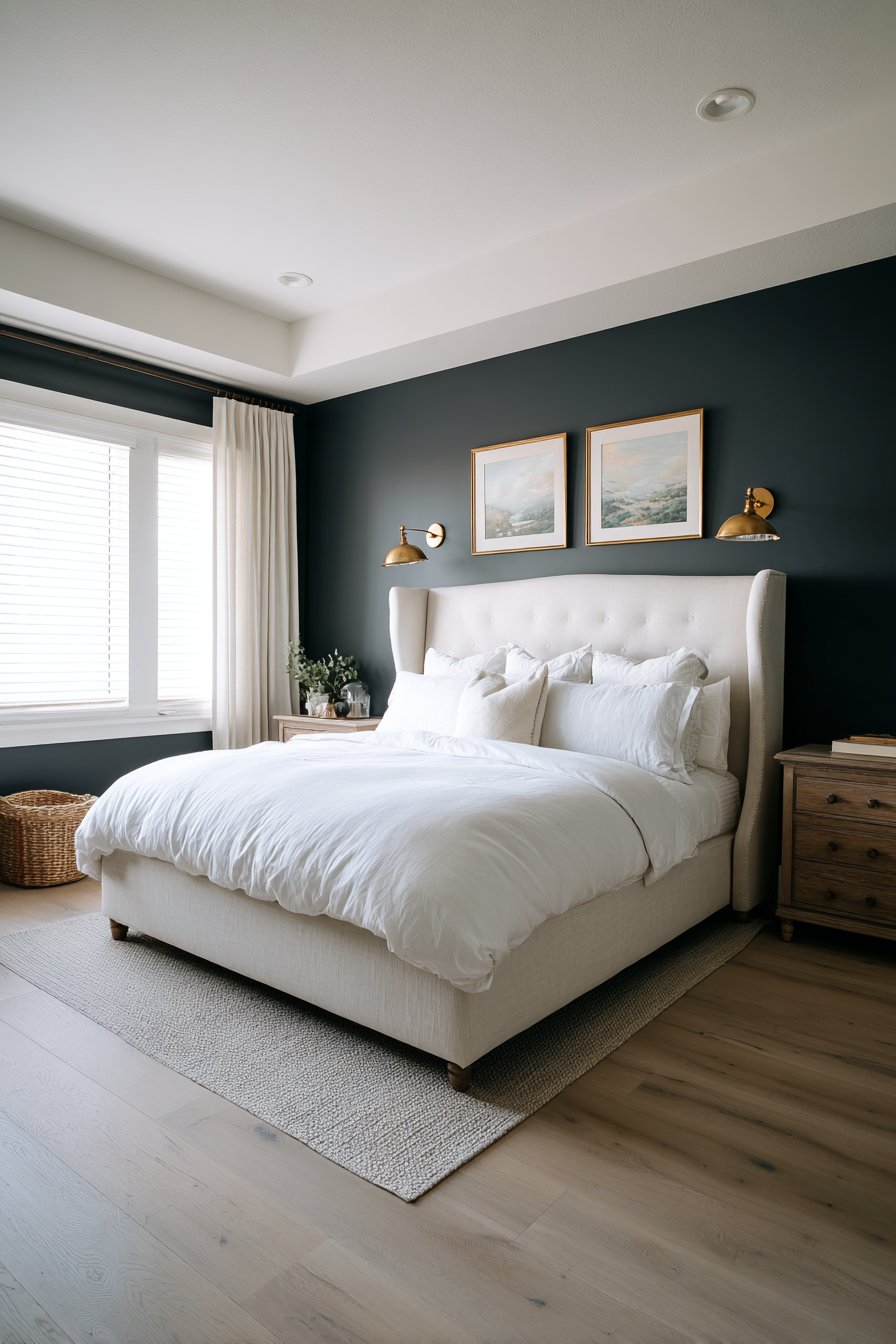
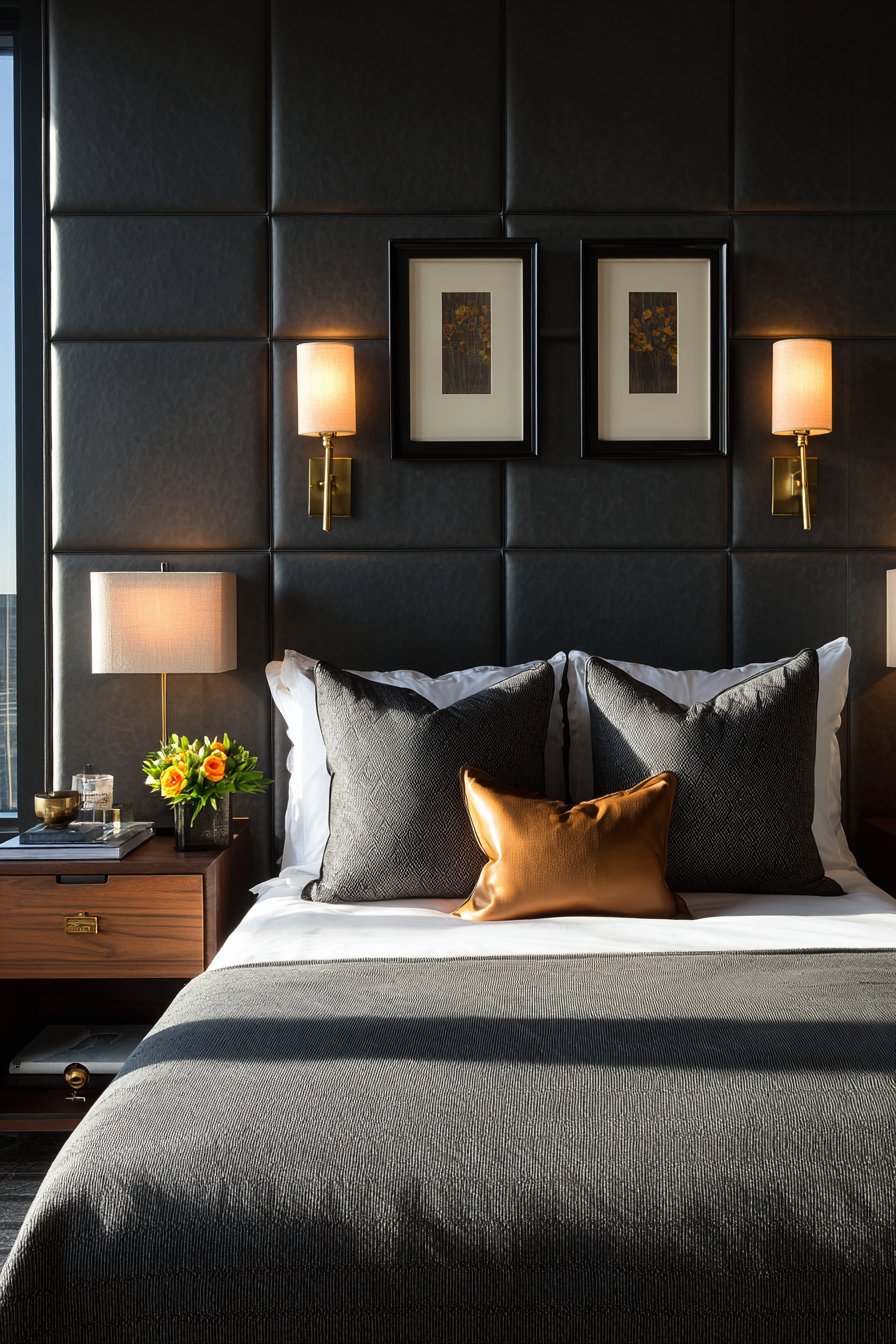
Bedroom wall design ideas create intimate atmosphere through dramatic dark accent wall in deep charcoal paint, serving as backdrop for an upholstered bed with tall wingback headboard in soft cream linen. This installation demonstrates how wall design ideas can use color strategically to create mood and focus attention while white trim maintains brightness and prevents the dark color from feeling oppressive. The dark wall creates a cocoon effect that’s particularly effective in bedrooms where cozy intimacy enhances the room’s primary function.
Brass picture lights mounted above artwork on the dark wall provide focused illumination that creates gallery-quality display while adding warm metallic accents. Light oak flooring and white bedding balance the moody wall color, their brightness preventing the dark paint from dominating the entire room. This careful calibration of light and dark elements creates drama without sacrificing the sense of restful calm essential to successful bedroom design.
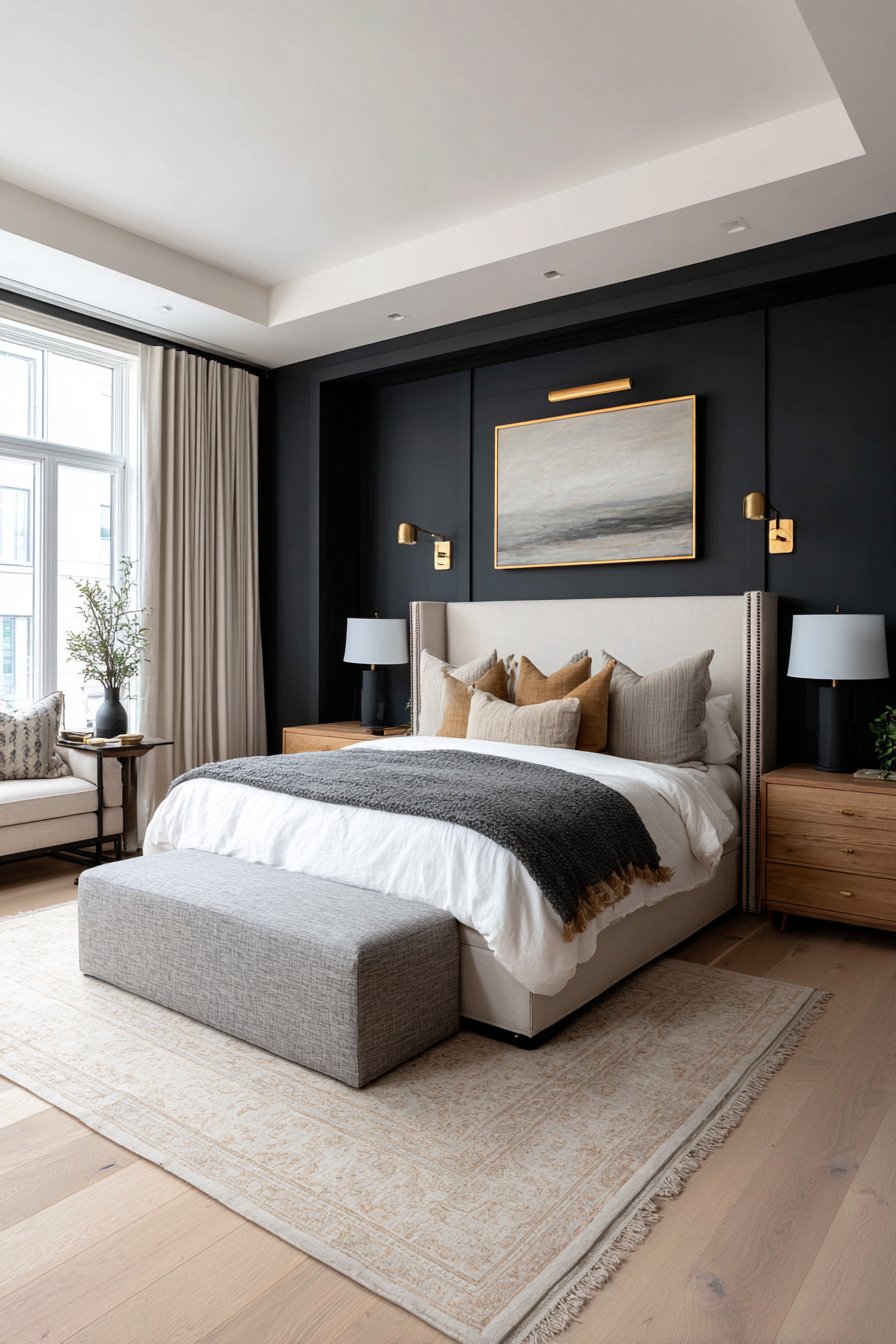
Professional interior photography with balanced exposure captures both the rich dark paint color and the contrast with lighter elements—a technical challenge that requires skilled lighting to show true color depth without losing detail. Soft natural light from sheer curtains provides gentle illumination that prevents the dark wall from feeling heavy or claustrophobic. The installation proves that wall design ideas utilizing dark colors can succeed when balanced with adequate natural light, white trim work, and light-colored furnishings that create essential contrast and visual relief.
Key Design Tips: Choose dark paint colors carefully in various lighting conditions before committing—colors appear different in natural versus artificial light. Prime walls properly before applying dark colors to ensure even coverage and true color. Expect to apply multiple coats of dark paint for uniform, rich color. Use painter’s tape precisely at trim lines as dark paint shows every mistake. Consider matte or eggshell finishes for dark walls as they hide imperfections better than glossy finishes. Balance dark walls with light flooring, trim, and ceiling to prevent room from feeling too dark. Ensure adequate artificial lighting as dark walls absorb rather than reflect light. Touch up dark paint carefully as patches often show even with exact color match.
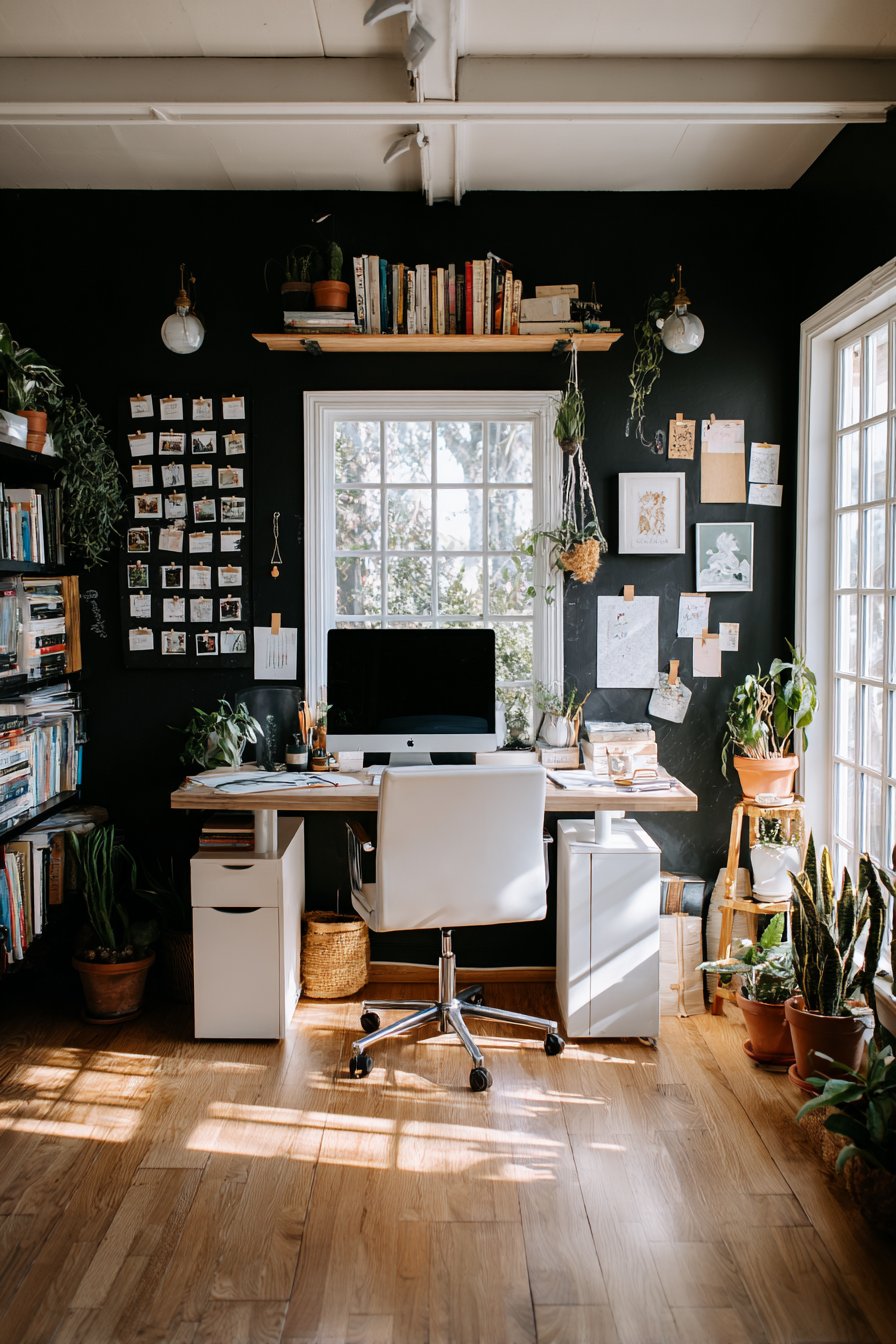
15. Functional Chalkboard Paint Wall
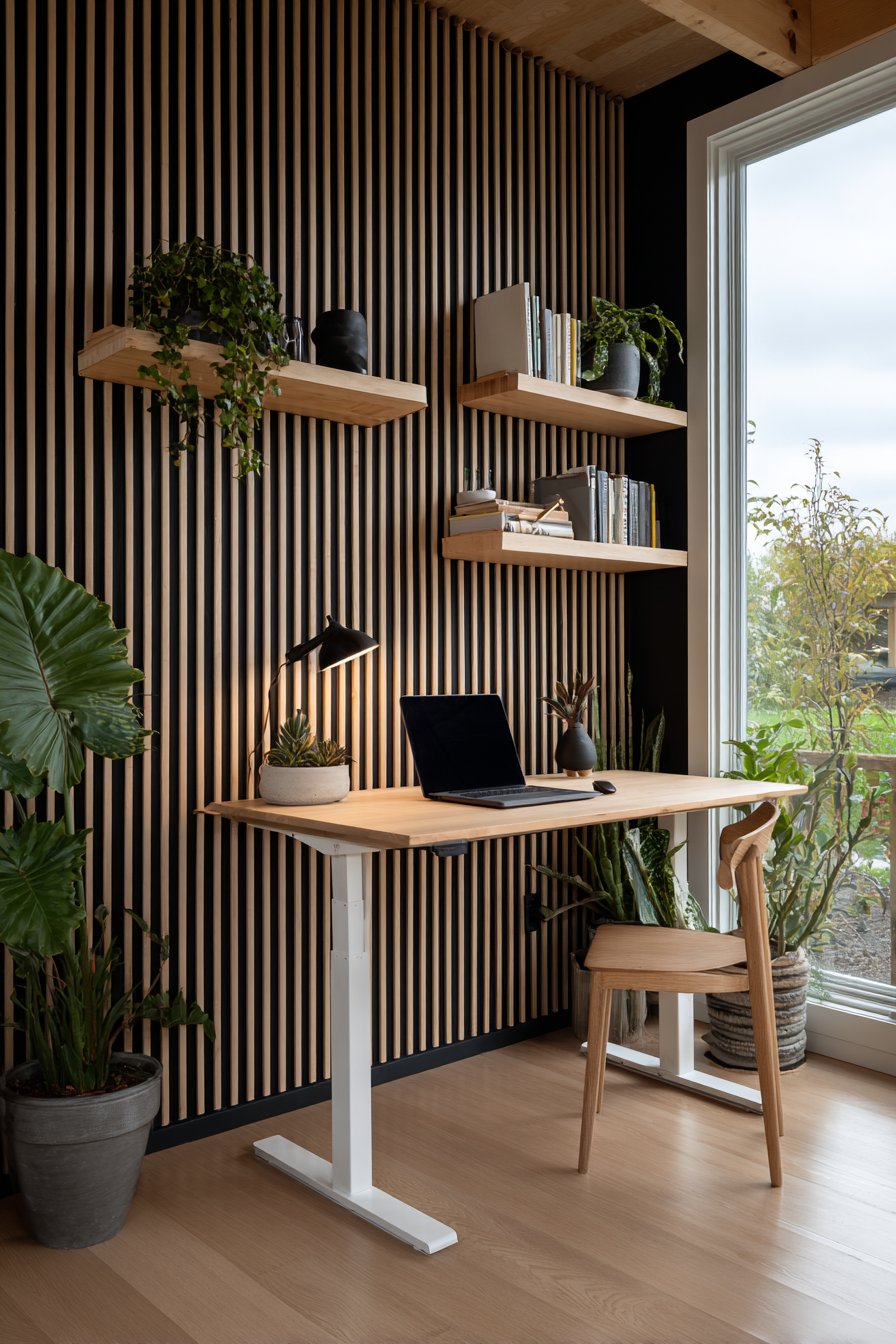
Home office wall design ideas merge creativity with functionality through magnetic chalkboard paint wall in matte black, serving dual purpose as creative surface and sophisticated backdrop. This installation demonstrates how wall design ideas can add interactive elements that support the room’s function while maintaining polished aesthetic. Wooden magnetic strips mount to the wall holding papers and inspiration images, creating flexible display system that evolves with changing projects and needs.
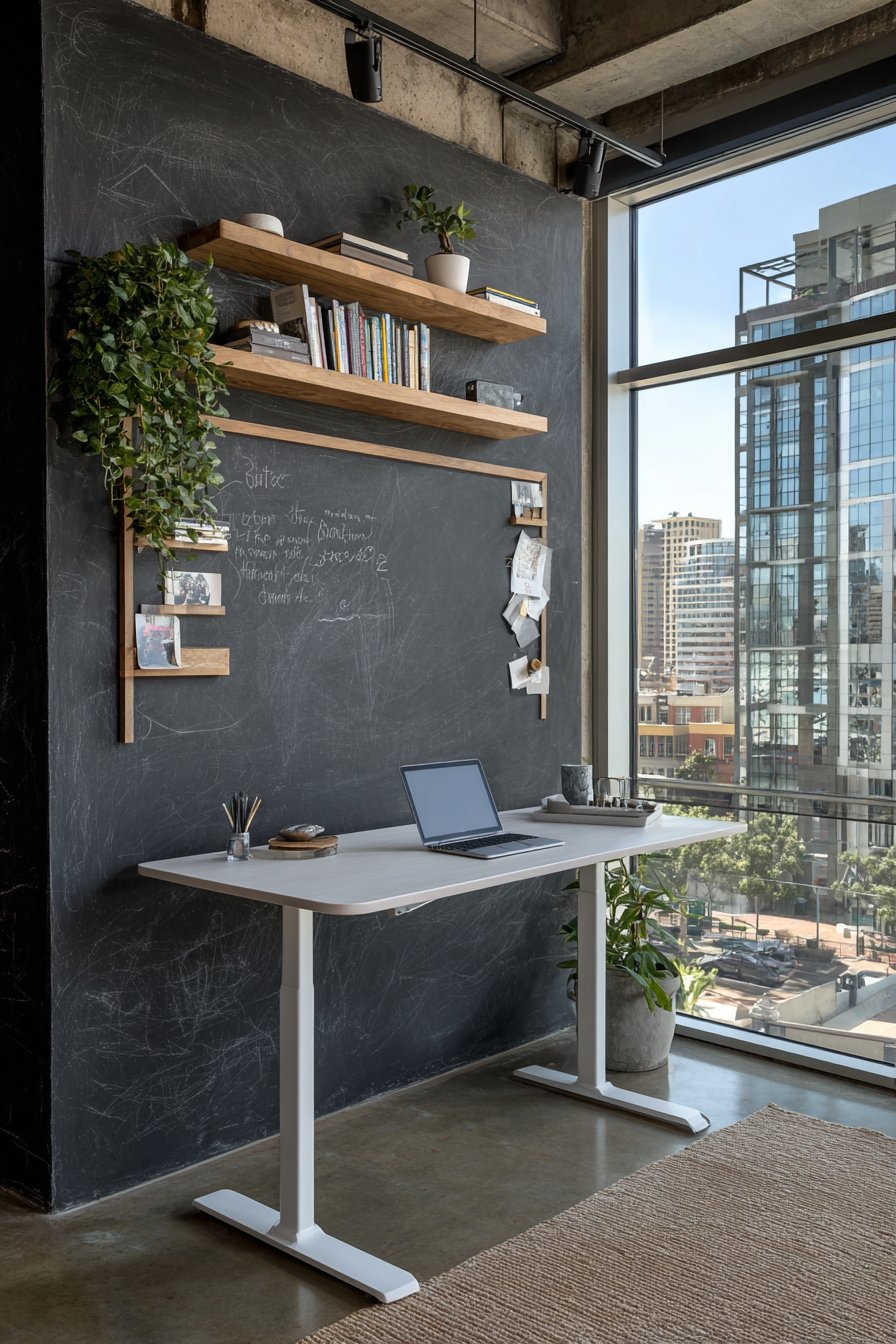
A modern standing desk in white sits in front of the chalkboard wall with minimalist desk accessories, its clean design providing contrast against the dark functional wall. Floating shelves in natural wood flank the chalkboard wall displaying books and plants, their organic warmth preventing the black wall from feeling cold or institutional. The combination of chalkboard surface, magnetic strips, and display shelving creates comprehensive organizational system that keeps workspace functional yet uncluttered.
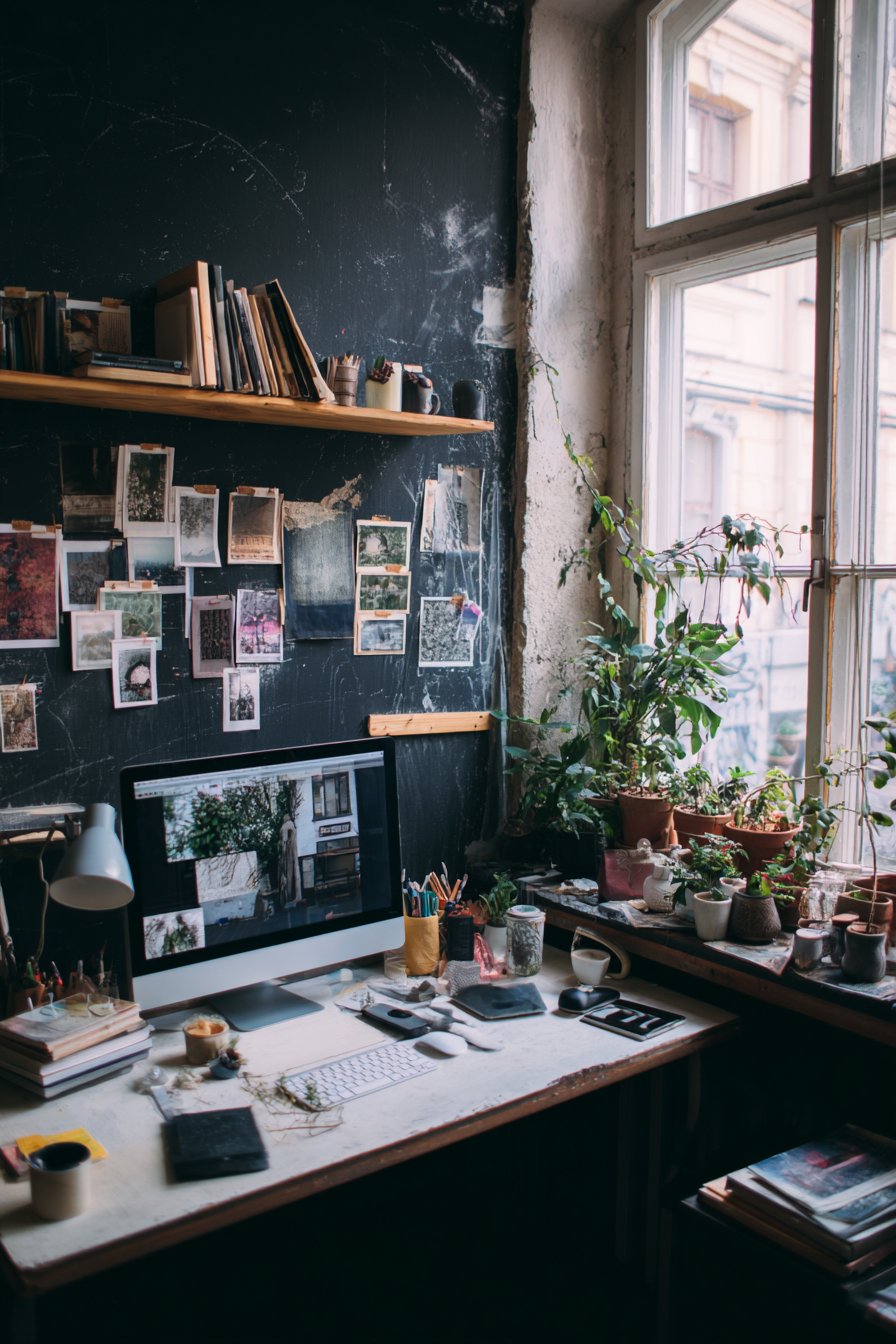
Interior design photography captures the functional creative workspace with balanced lighting showing the matte chalkboard texture and the practical organization system. Natural daylight from large windows ensures the black wall doesn’t overwhelm the space, proving that even dark functional surfaces can work in home offices when balanced with adequate light. This installation demonstrates how wall design ideas can be truly functional rather than purely decorative, supporting work activities while contributing positively to the room’s overall design aesthetic.
Key Design Tips: Apply magnetic primer base coat before chalkboard paint if you want magnetic functionality—chalkboard paint alone is not magnetic. Use multiple coats of chalkboard paint following manufacturer’s recommendations for proper curing and surface quality. Season chalkboard surface before use by rubbing entire surface with side of chalk then erasing—this prevents ghosting from first uses. Choose quality chalk markers for cleaner lines and easier erasing than traditional chalk. Plan wall location carefully considering lighting to avoid glare that makes writing difficult to read. Provide dedicated storage nearby for chalk and erasers to keep supplies accessible. Consider chalkboard paint in colors beyond black for softer, less institutional appearance. Apply polyurethane over chalkboard paint in high-moisture areas for added protection.
16. Industrial Concrete-Look Tile
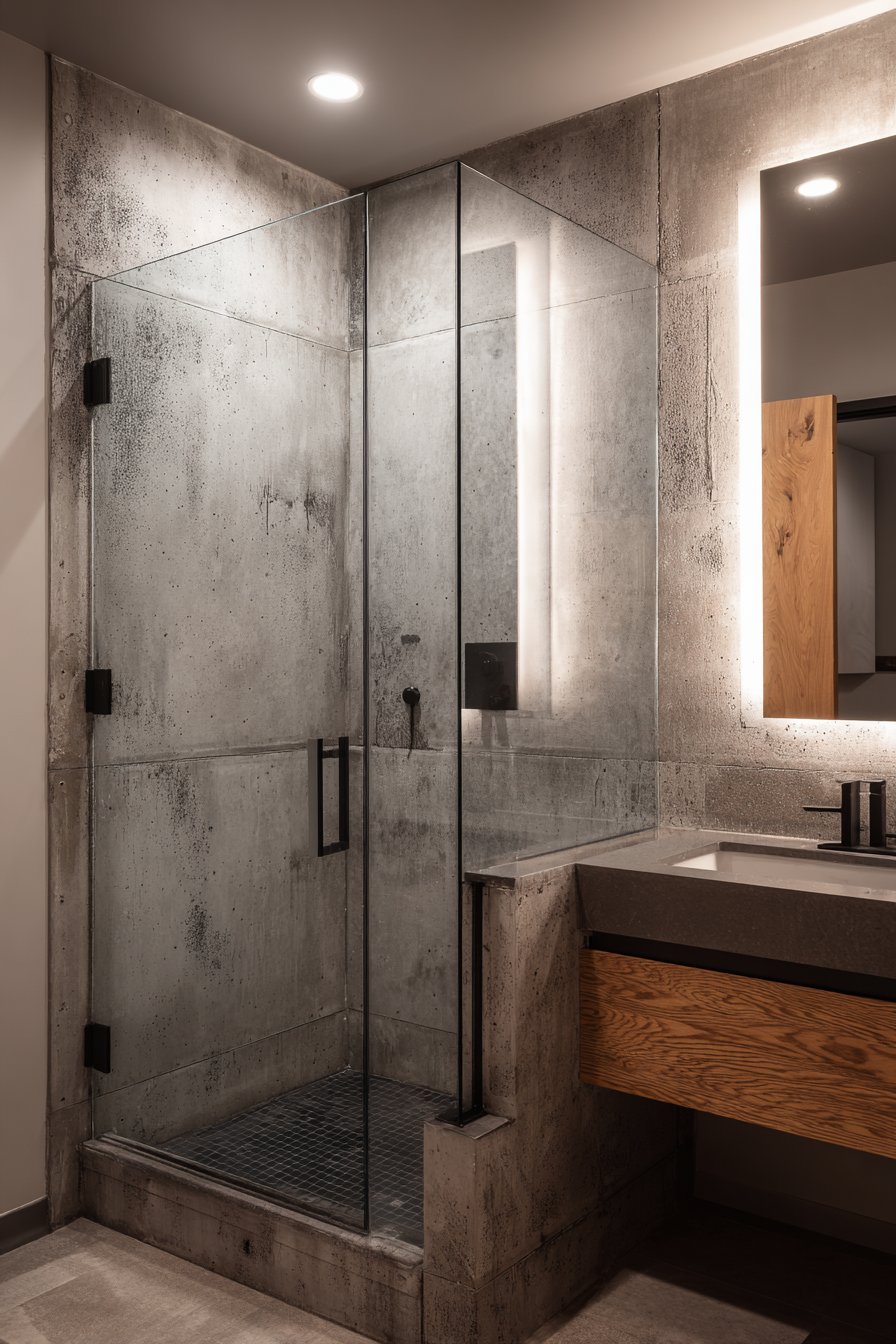
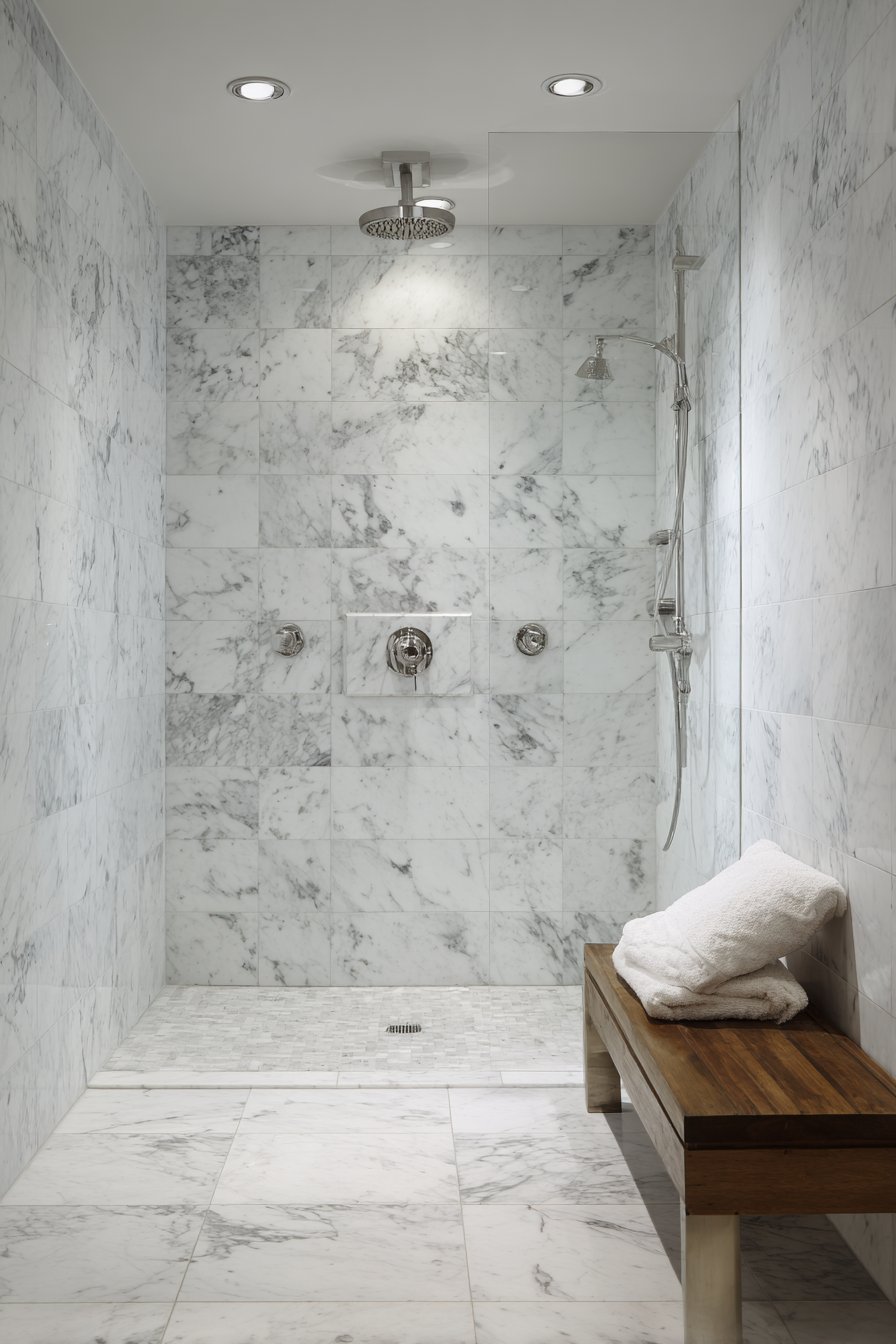
Contemporary bathroom wall design ideas embrace industrial aesthetic through large-format concrete-look porcelain tiles in medium gray with subtle texture variation, installed with minimal grout lines. This installation demonstrates how wall design ideas can reference raw materials like concrete while maintaining the practical benefits of porcelain tile including water resistance and easier maintenance. The industrial-inspired tile covers wet area walls completely, creating seamless modern aesthetic paired with matte black plumbing fixtures and frameless glass shower partition.
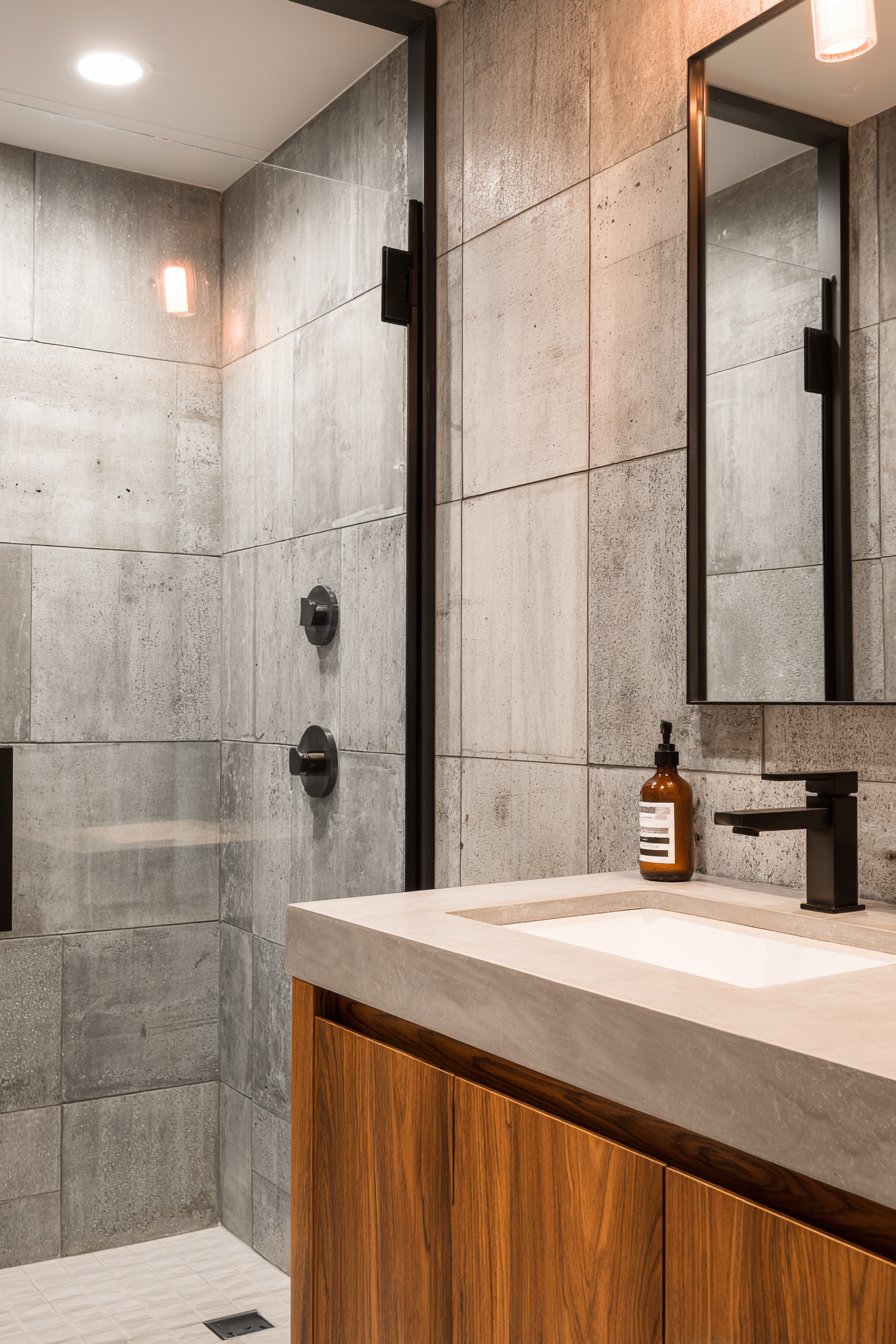
A floating vanity in warm walnut provides essential contrast against the cool gray tile, its rich organic tones preventing the industrial materials from feeling cold or unwelcoming. The combination of concrete-textured tile, black fixtures, and warm wood creates sophisticated material palette that feels both contemporary and timeless. The minimal grout lines possible with large-format tiles enhance the concrete illusion, making the walls appear more like poured concrete than individual tiles.
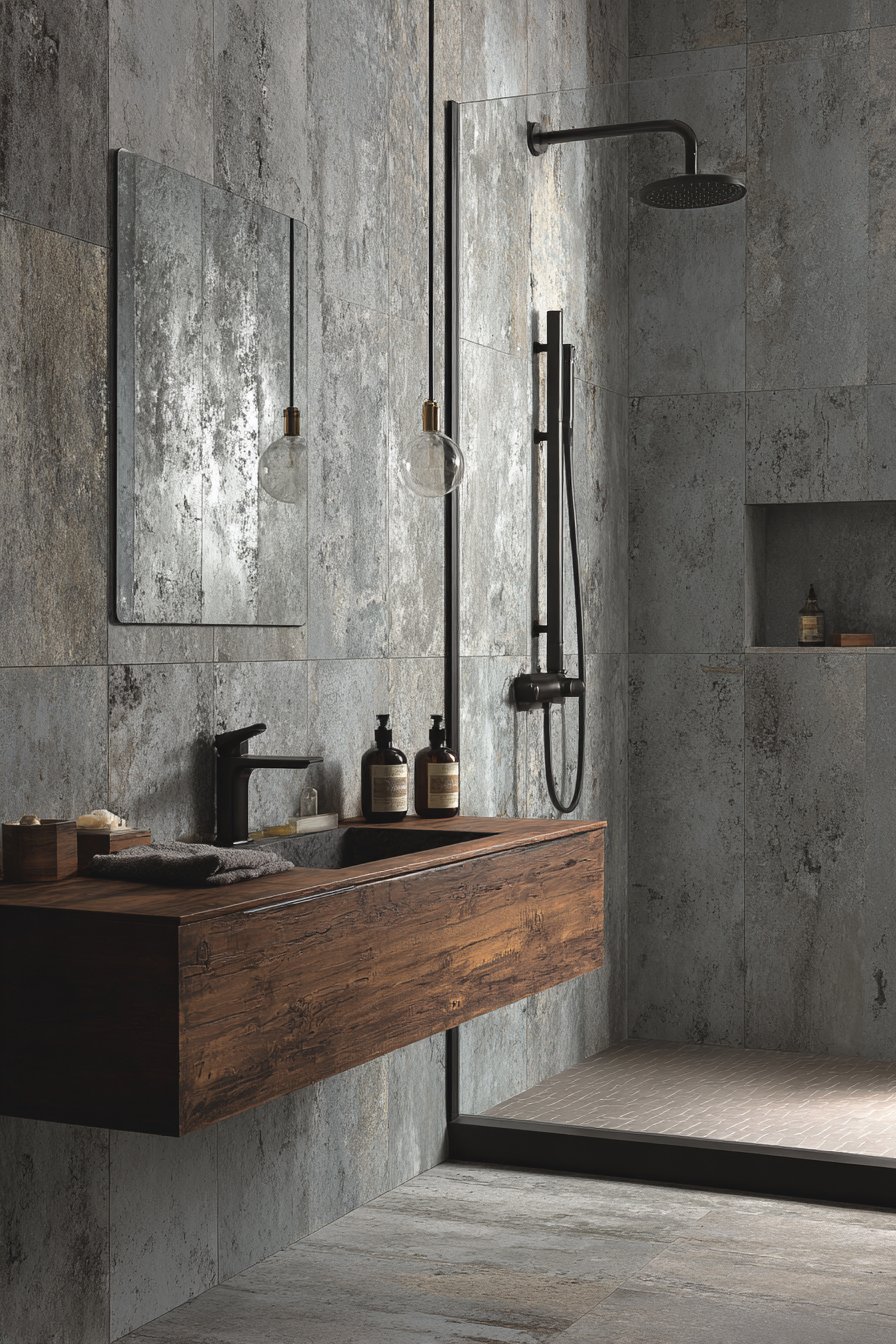
Professional interior photography with balanced exposure captures the concrete texture authenticity and minimal grout lines that make this installation so successful. Soft diffused lighting highlights the surface variations and modern material aesthetic that defines contemporary industrial style. This bathroom proves that wall design ideas can reference utilitarian materials and industrial spaces while still creating comfortable, livable environments suitable for residential applications—the key lies in balancing raw materials with warm elements that humanize the space.

Key Design Tips: Select large-format tiles at least 12×24 inches to reduce grout lines and enhance the concrete-slab appearance. Choose tiles with matte or textured finish rather than glossy for authentic concrete look. Use gray grout closely matched to tile color to minimize grout line visibility. Ensure substrate is perfectly flat before installing large tiles as any imperfections will telegraph through. Consider the full material palette including fixtures, vanity, and accessories to balance industrial cool with necessary warmth. Use leveling systems during installation to prevent lippage between large-format tiles. Seal grout even with porcelain tiles to resist staining and simplify maintenance. Plan tile layout to minimize small cuts in visible areas.
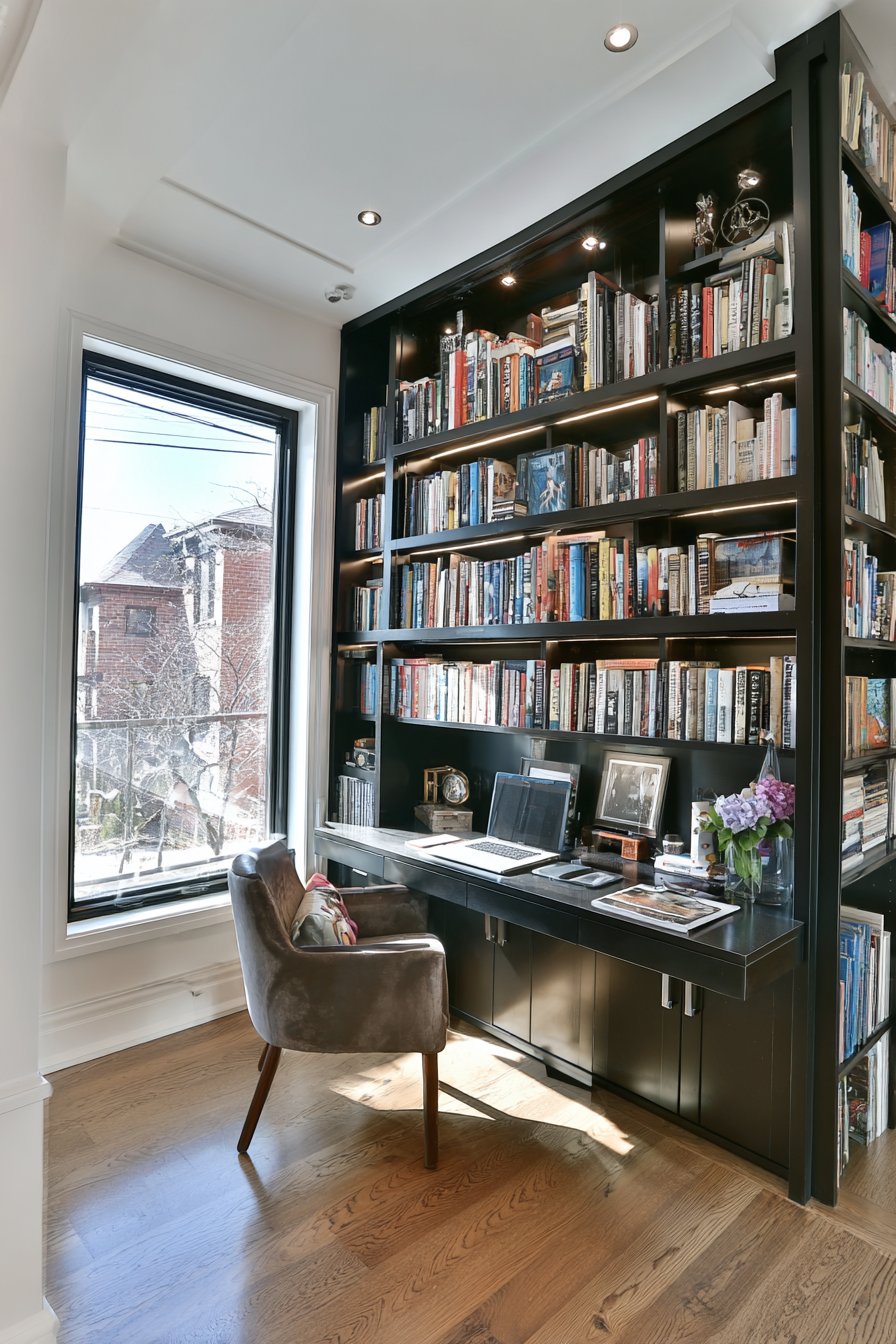
17. Comprehensive Built-In Bookshelf Wall
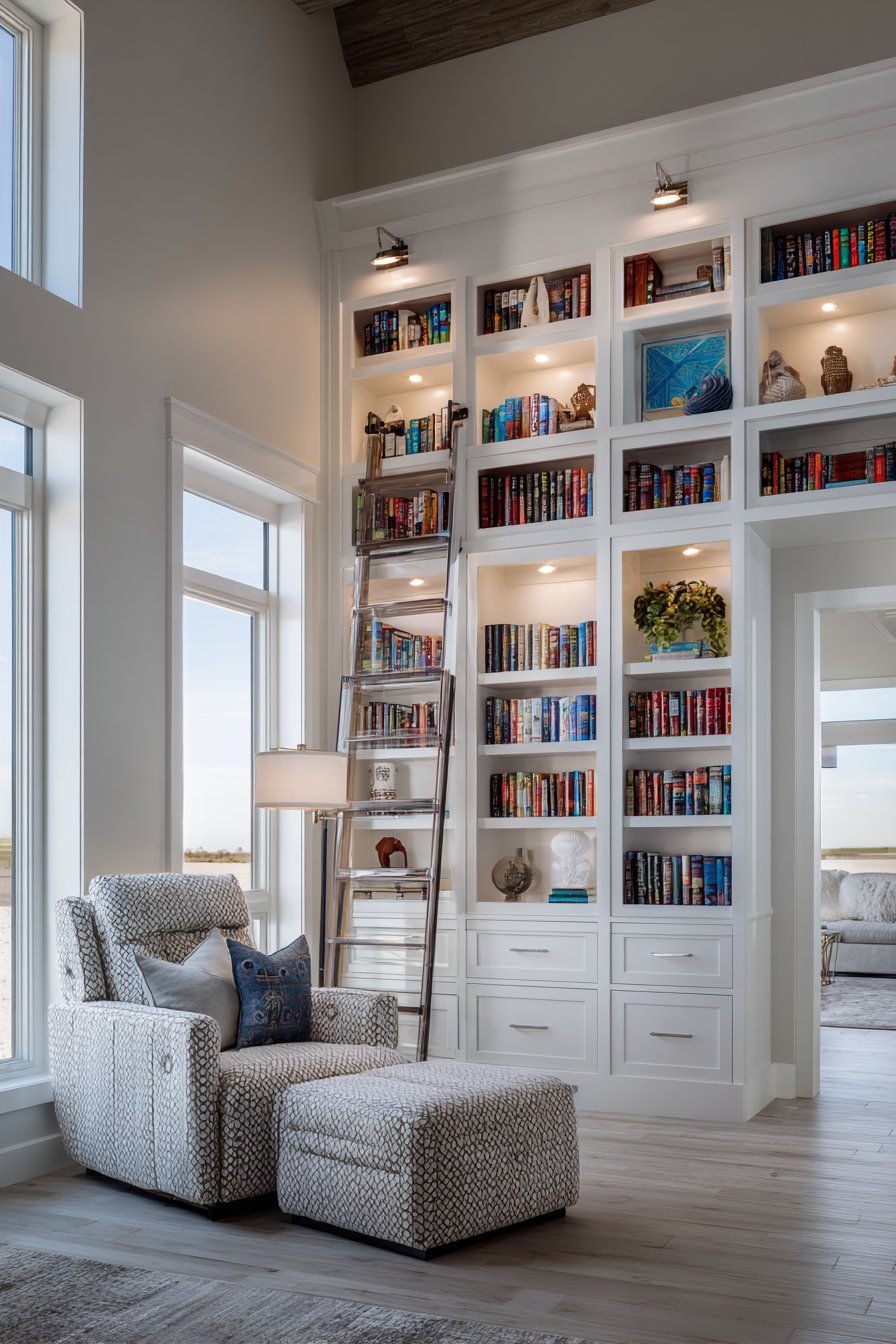
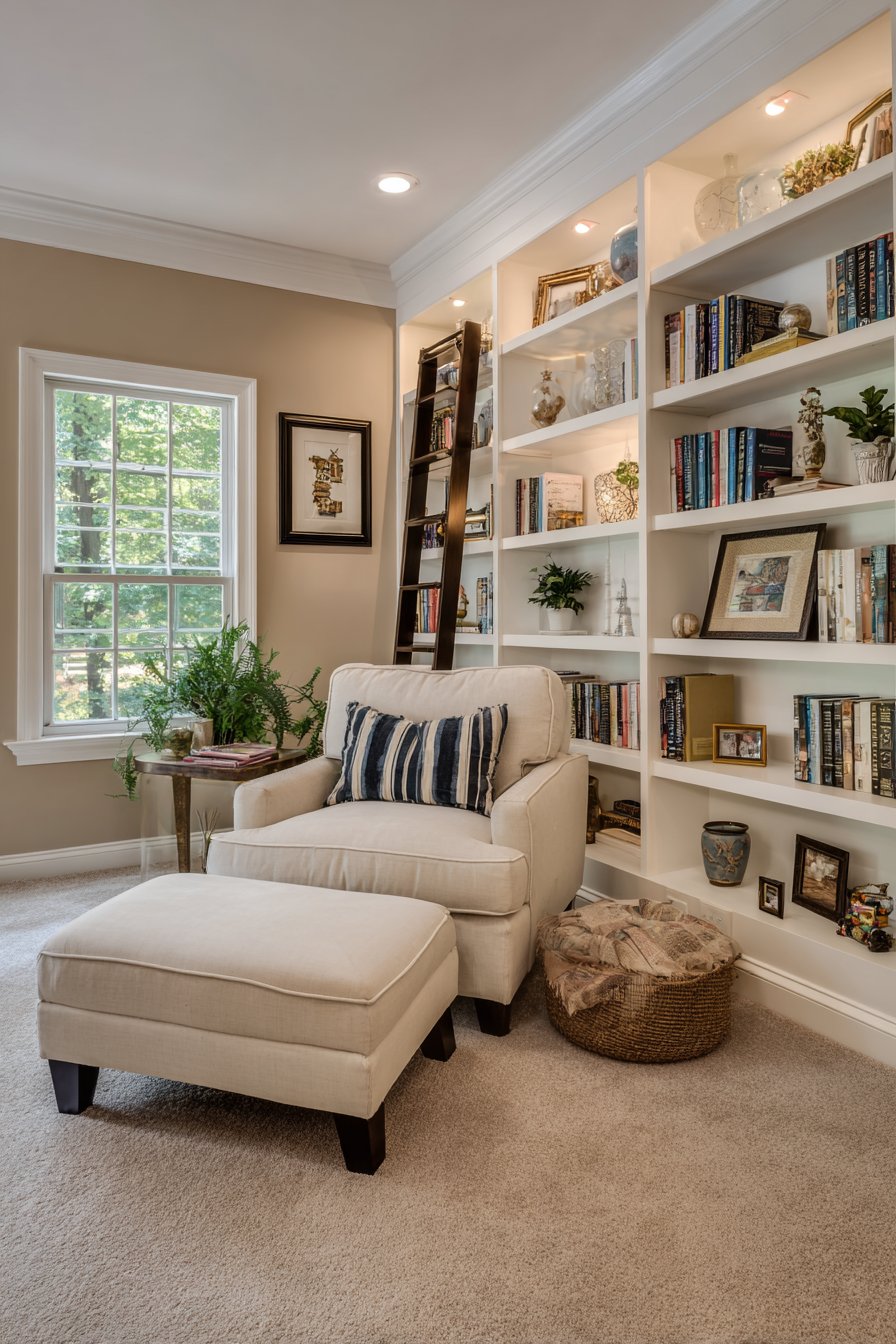
Living room wall design ideas celebrate literary collections through floor-to-ceiling built-in bookshelves in painted white, featuring adjustable shelving filled with color-coordinated books and curated decorative objects. This installation demonstrates how wall design ideas can transform entire walls into functional art that displays personal collections while providing substantial storage. The custom millwork includes integrated ladder hardware for accessing upper shelves and LED puck lighting illuminating each shelf level, details that elevate utilitarian storage into sophisticated architectural feature.
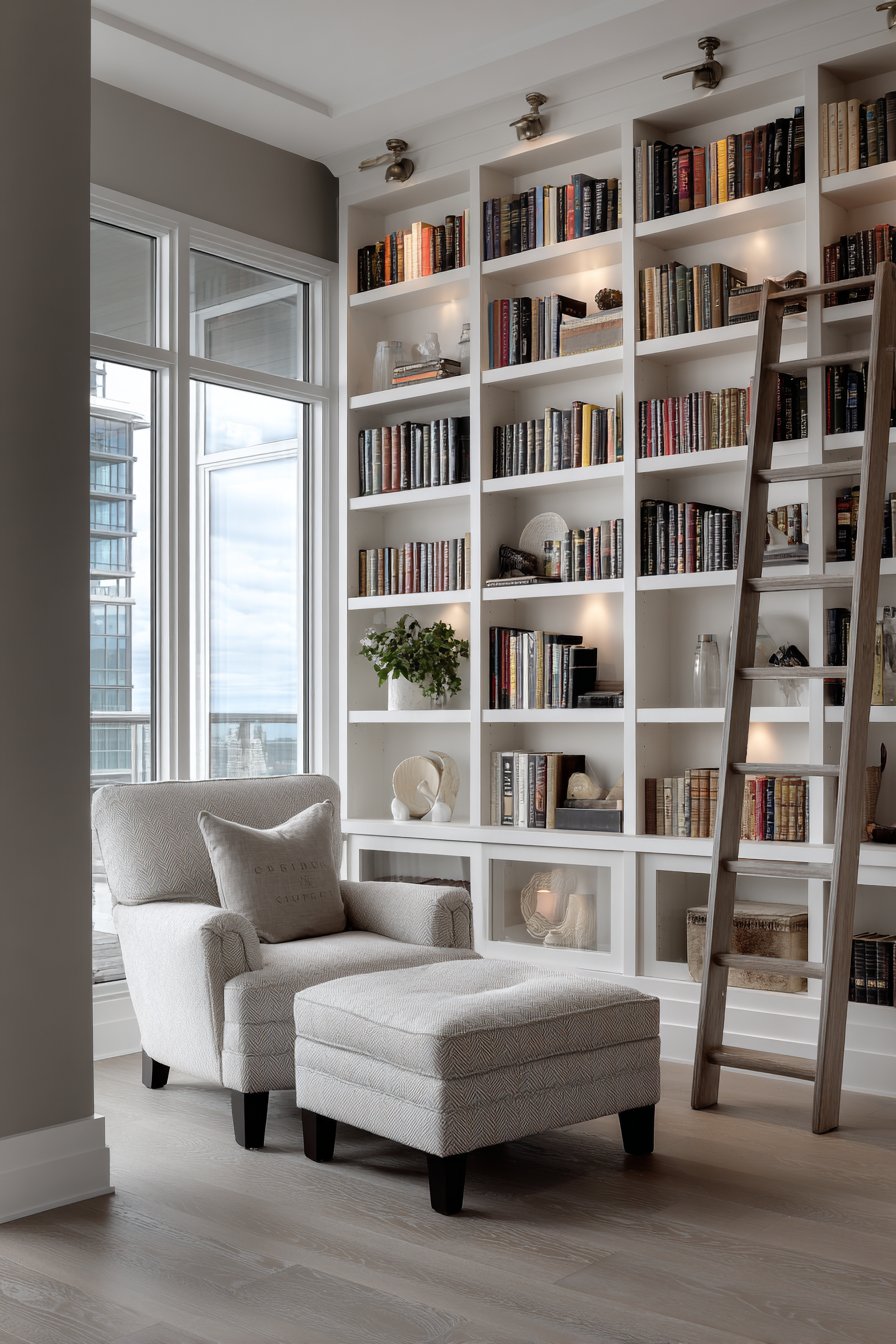
A cozy reading chair and ottoman sit adjacent to the bookshelf wall, creating dedicated reading zone that takes advantage of the book collection’s proximity. The white painted finish keeps the substantial built-in from overwhelming the room, reflecting light and maintaining open feeling despite the wall-to-wall coverage. The adjustable shelving provides flexibility to accommodate books of varying heights alongside decorative objects, creating varied display that prevents monotonous appearance.
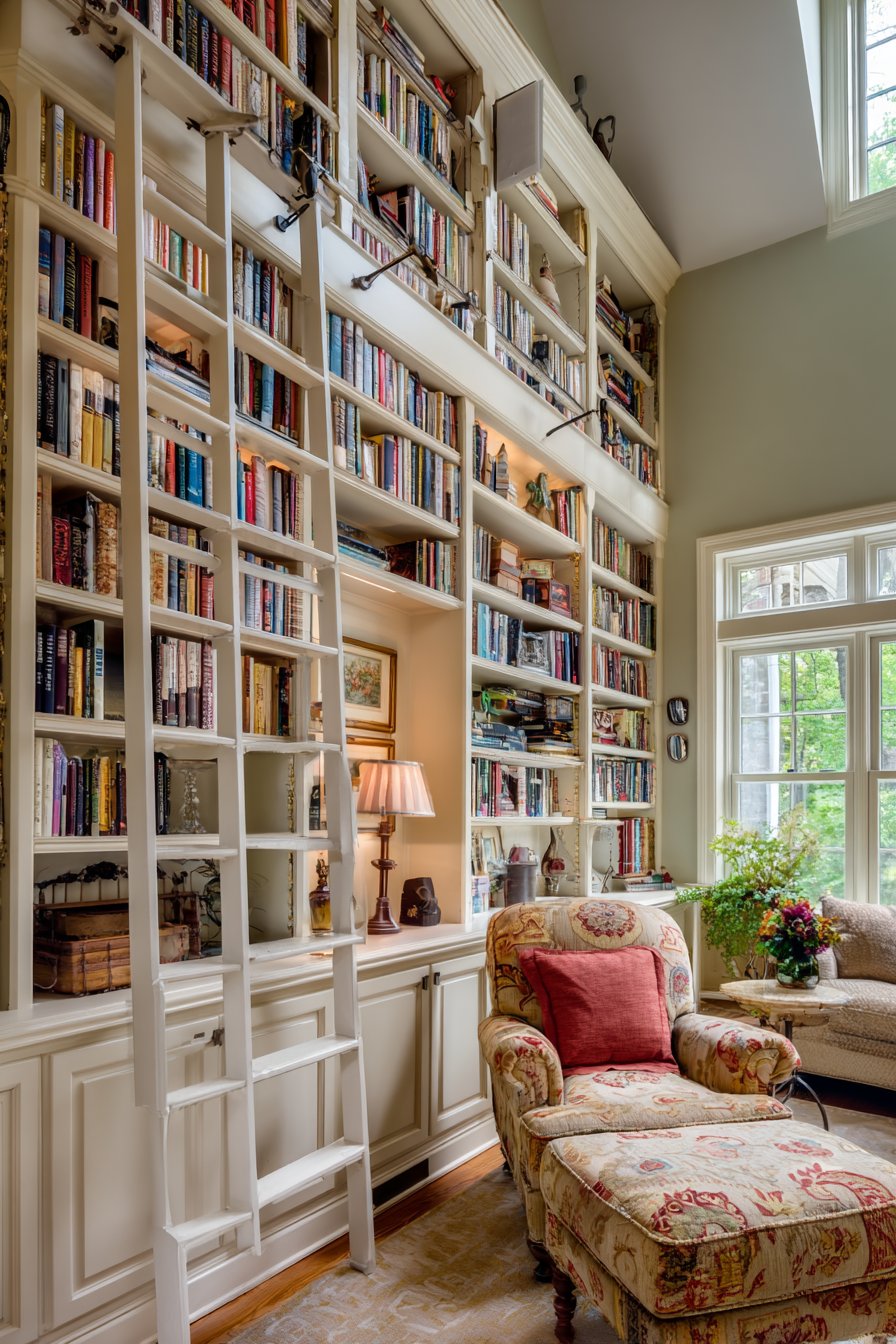
Wide-angle interior design photography captures the impressive floor-to-ceiling scale showing the bookshelf’s substantial storage capacity and architectural presence. Natural window light from an adjacent wall highlights book spines and decorative items arranged on shelves, with balanced exposure showing the integrated lighting details that make evening reading possible. This installation proves that wall design ideas focused on storage can be beautiful rather than merely functional, turning necessary book storage into the room’s defining architectural feature that speaks to the homeowner’s priorities and interests.
Key Design Tips: Plan shelf heights based on your book collection—standard novels need about 10 inches, art books may need 14-16 inches. Include adjustable shelving to accommodate changing collections and different item sizes. Wire for electrical outlets within the built-in to power lighting and devices without visible cords. Use quality LED puck lights or strip lights for even illumination without heat that could damage books. Paint built-ins in lighter colors to prevent them from visually overwhelming the room. Install solid backing material that can support loaded shelves without bowing. Consider including closed storage in lower sections to hide less attractive items while displaying favorites at eye level. Use quality shelf standards and brackets rated for book weight—books are surprisingly heavy when shelves are fully loaded.
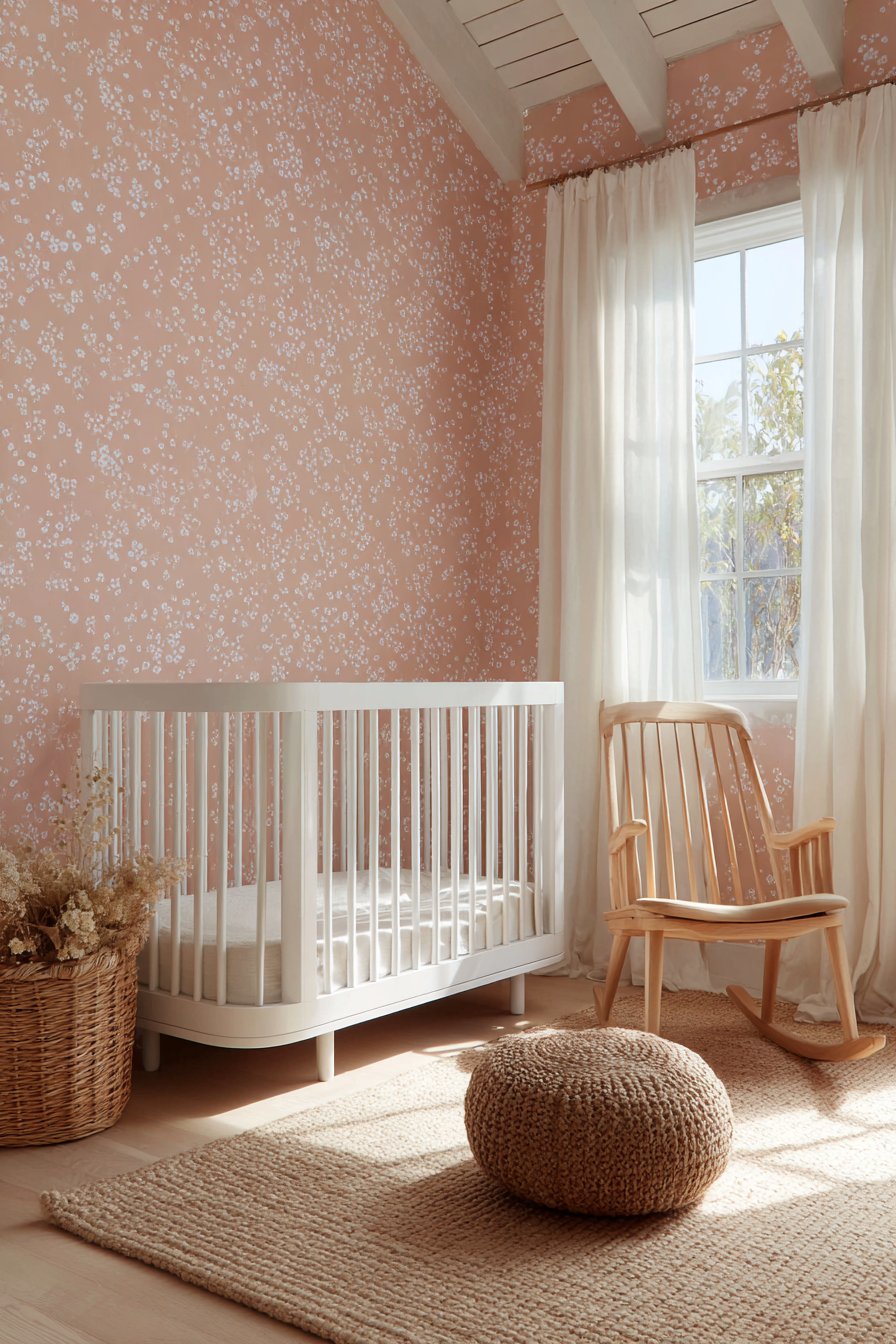
18. Delicate Floral Peel-and-Stick Wallpaper
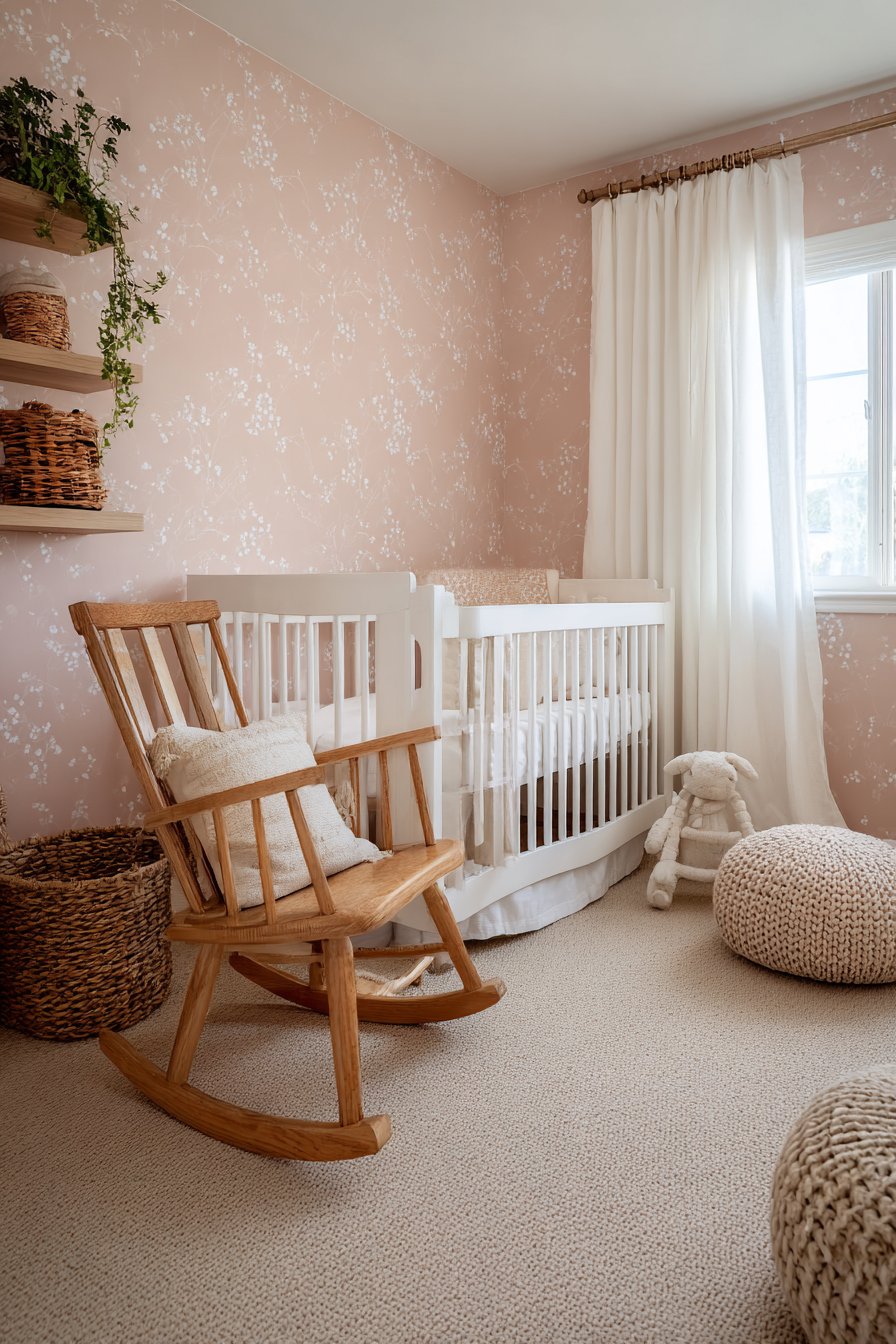
Nursery wall design ideas embrace flexibility through removable peel-and-stick wallpaper in soft blush pink with delicate white floral pattern, creating gentle feminine aesthetic perfect for evolving as children grow. This installation demonstrates how wall design ideas can provide beauty and impact without the permanent commitment of traditional wallpaper, making it ideal for rental properties or rooms that will transition through different life stages. The wallpaper covers the main wall behind a white convertible crib, creating focal point that sets the room’s sweet, peaceful tone.
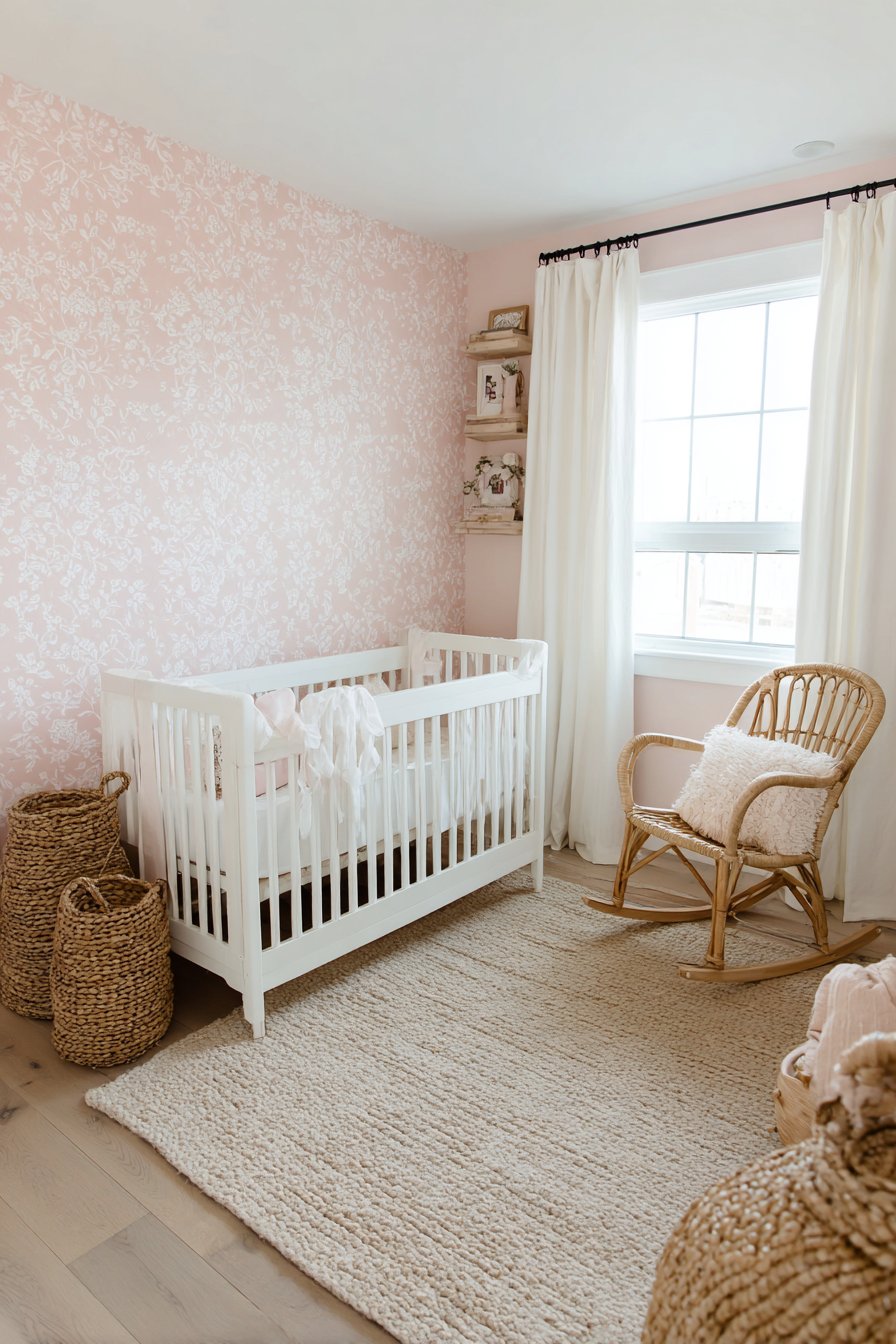
Natural wood rocking chair and woven storage baskets add texture and organic warmth that balances the painted floral pattern, preventing the room from feeling too precious or overly decorated. Sheer white curtains filter natural light, creating soft illumination that enhances the gentle color palette. The removable nature of peel-and-stick wallpaper makes this wall treatment particularly practical for nurseries, allowing parents to update as their child’s needs and preferences change without major renovation.
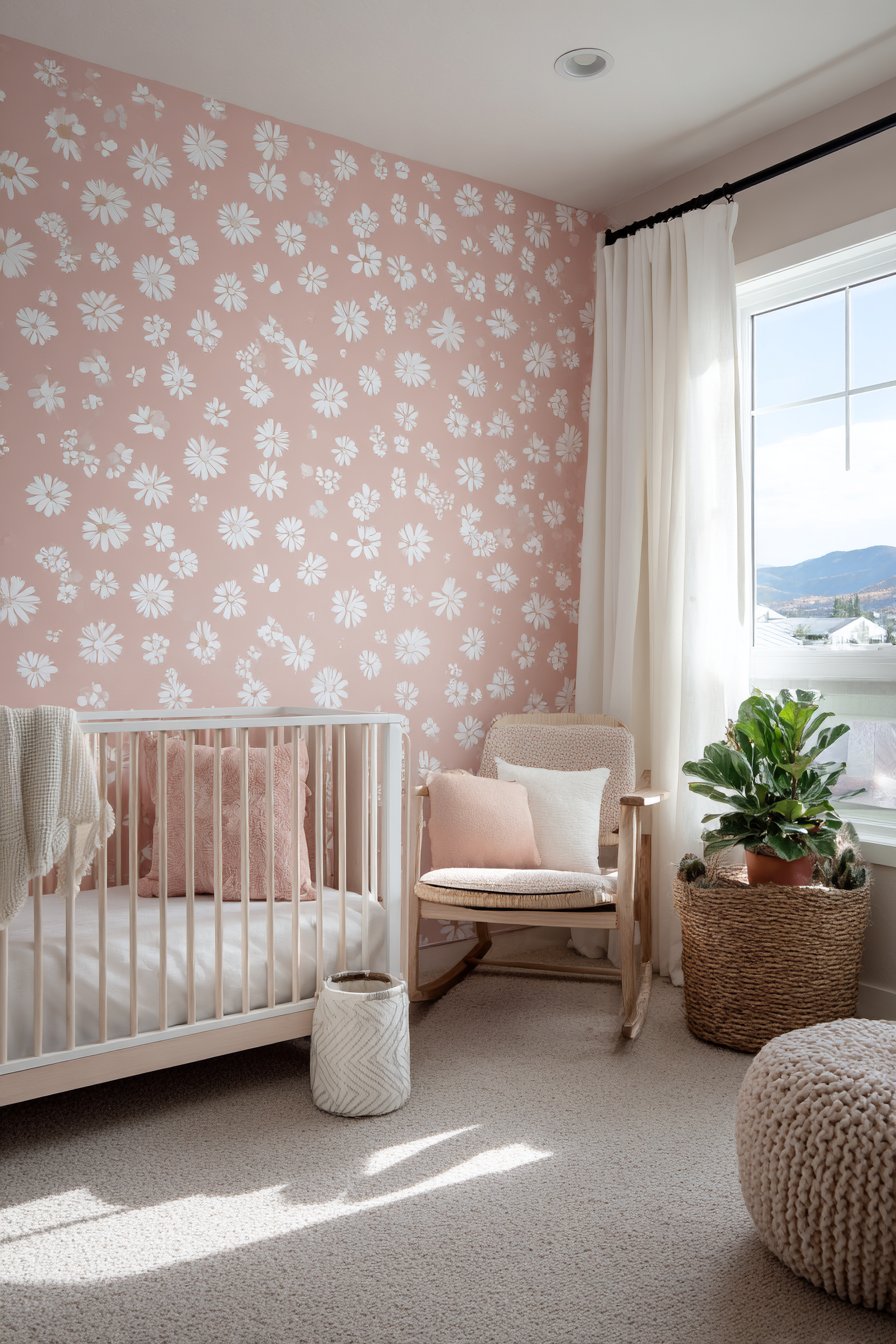
Interior photography captures the wallpaper pattern detail and soft pink coloration with natural daylight, showing how the delicate floral design creates interest without overwhelming. Wide-angle perspective demonstrates how the patterned wall integrates with neutral furnishings, serving as beautiful backdrop that doesn’t compete with the room’s functional elements. Balanced exposure prevents the pink from appearing oversaturated, showing the true soft, subtle coloring that makes this pattern appropriate for a serene nursery environment.
Key Design Tips: Clean walls thoroughly before applying peel-and-stick wallpaper as dust and debris prevent proper adhesion. Measure walls precisely and cut wallpaper slightly oversized to allow for adjustments during installation. Start from top of wall working downward, smoothing as you go to prevent bubbles. Overlap seams slightly then cut through both layers with sharp blade for invisible seam. Use squeegee or smoothing tool to ensure full adhesion especially at edges and seams. Allow wallpaper to settle for 24 hours before trimming excess at ceiling and baseboards. Remove peel-and-stick wallpaper slowly when ready to change, pulling at sharp angle to prevent wall damage. Choose high-quality peel-and-stick products as cheap versions may not adhere well or may damage walls upon removal.
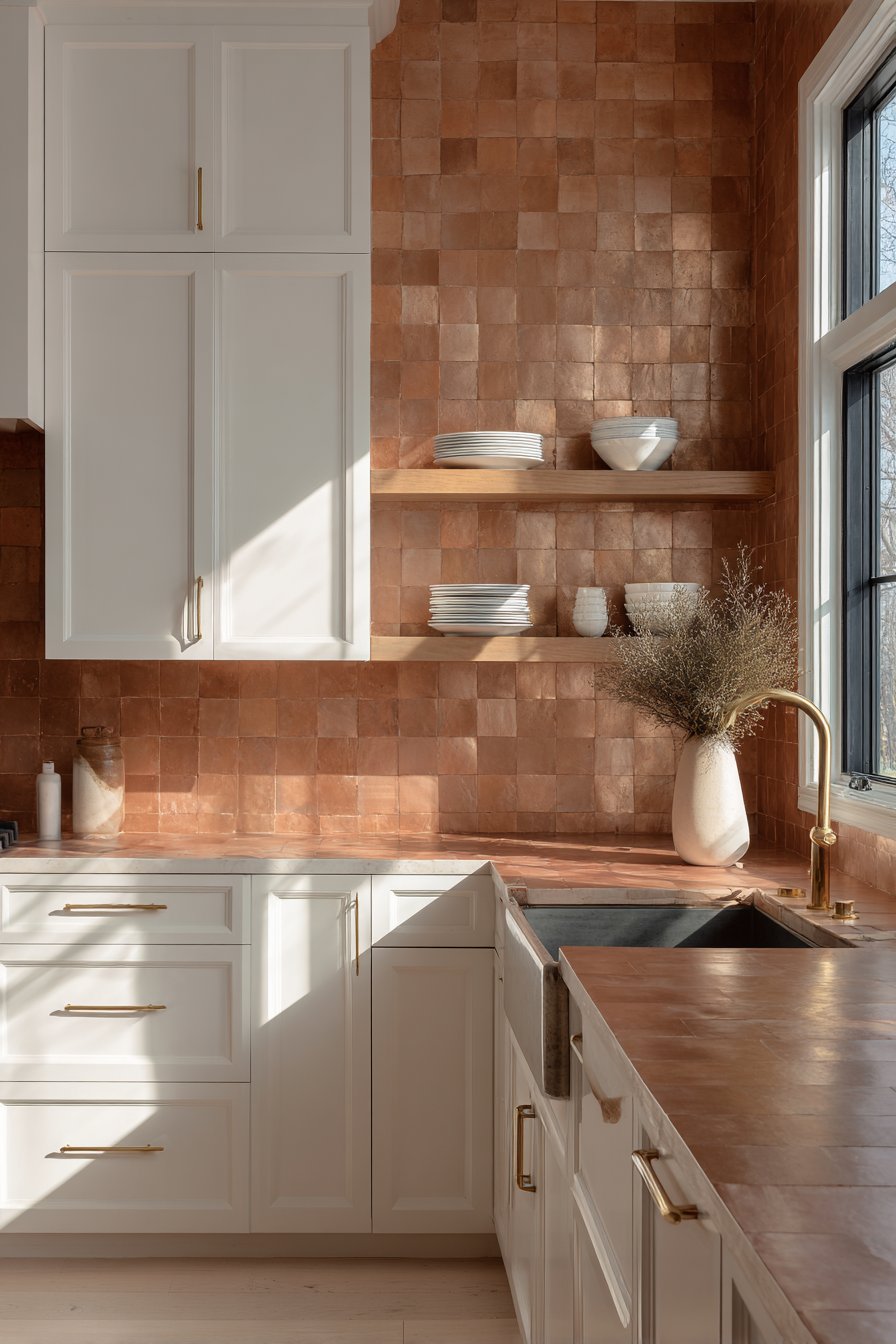
19. Artisanal Terracotta Zellige Tile
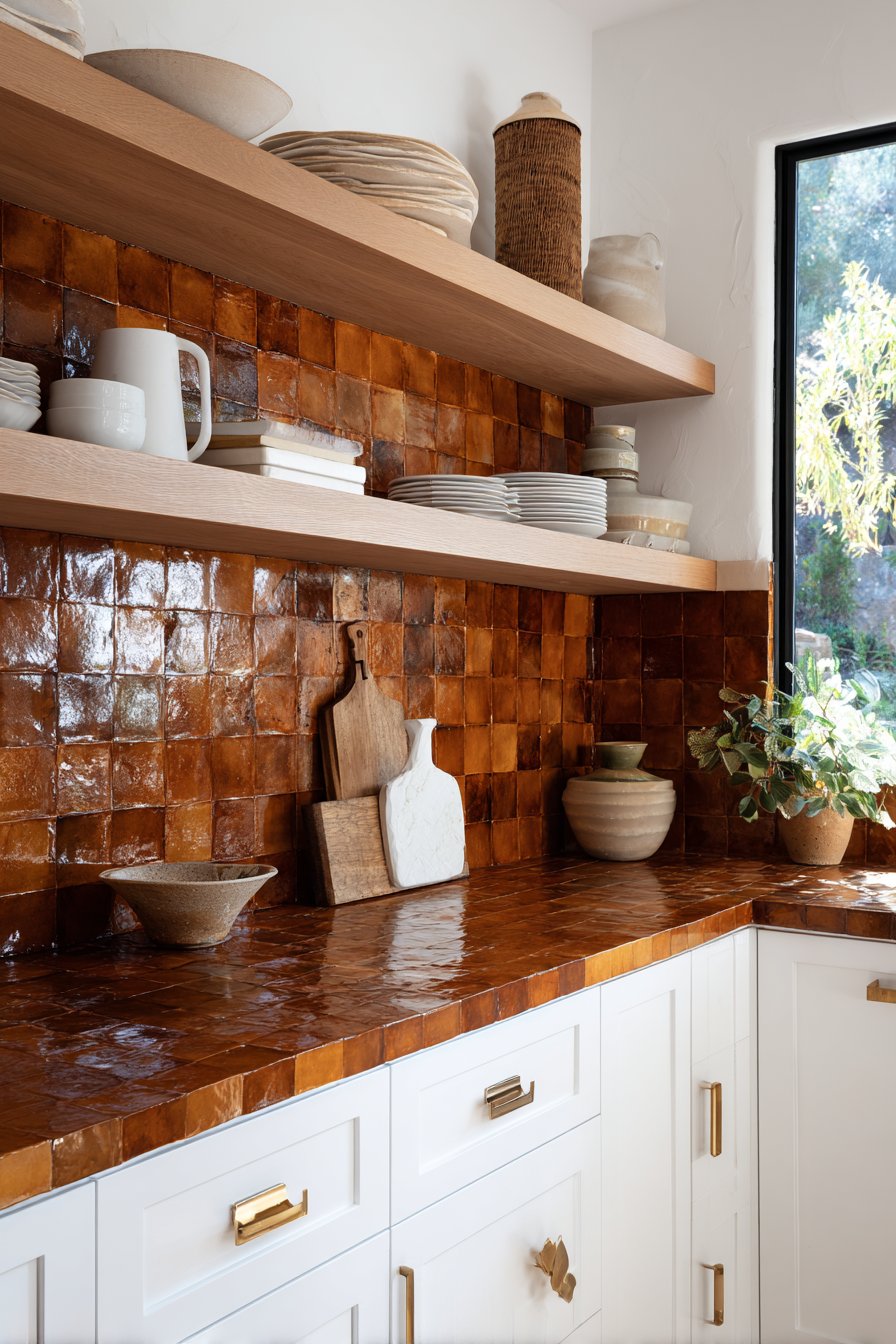
Modern kitchen wall design ideas showcase artisanal character through handmade terracotta zellige tiles featuring subtle color variations and glossy finish. This backsplash installation demonstrates how wall design ideas can introduce authentic handcrafted elements that add warmth and personality to contemporary kitchens. The tiles extend from countertop to upper cabinets in traditional square pattern, their irregular surfaces and color variations creating living quality impossible to achieve with machine-made tiles.
White shaker cabinets and brass hardware complement the warm terracotta tones, creating classic color combination that feels fresh and timeless. Open shelving displays white dishes creating visual breathing room and functional display that breaks up the tile expanse. The handmade quality of zellige tiles means each piece is slightly different in color saturation and surface texture, creating overall effect that’s cohesive yet unique—no two installations look exactly alike.
Professional interior photography with natural window light captures the tile color variations and glossy surface reflections that give zellige its distinctive character. Detail focus shows the handmade texture and subtle irregularities that add authentic charm impossible to replicate with perfectly uniform manufactured tiles. This kitchen proves that wall design ideas incorporating traditional handmade materials can feel completely contemporary when paired with modern cabinetry and fixtures, bridging old-world craftsmanship with current design sensibilities.
Key Design Tips: Order terracotta zellige tiles from a single production batch to ensure color consistency within your project. Expect color variations between tiles—this is characteristic of handmade tiles, not a defect. Work with experienced tile installer familiar with zellige as installation techniques differ from standard tiles. Use white thin-set mortar to prevent dark mortar from showing through translucent tile edges. Seal terracotta tiles before and after grouting to prevent staining from grout and food in kitchen applications. Embrace slight imperfections in tile shape and surface as part of handmade aesthetic. Budget appropriately as authentic handmade zellige tiles cost significantly more than machine-made alternatives. Plan for longer installation time as each tile may need slight adjustments during layout.
20. Sophisticated Wainscoting Panel System
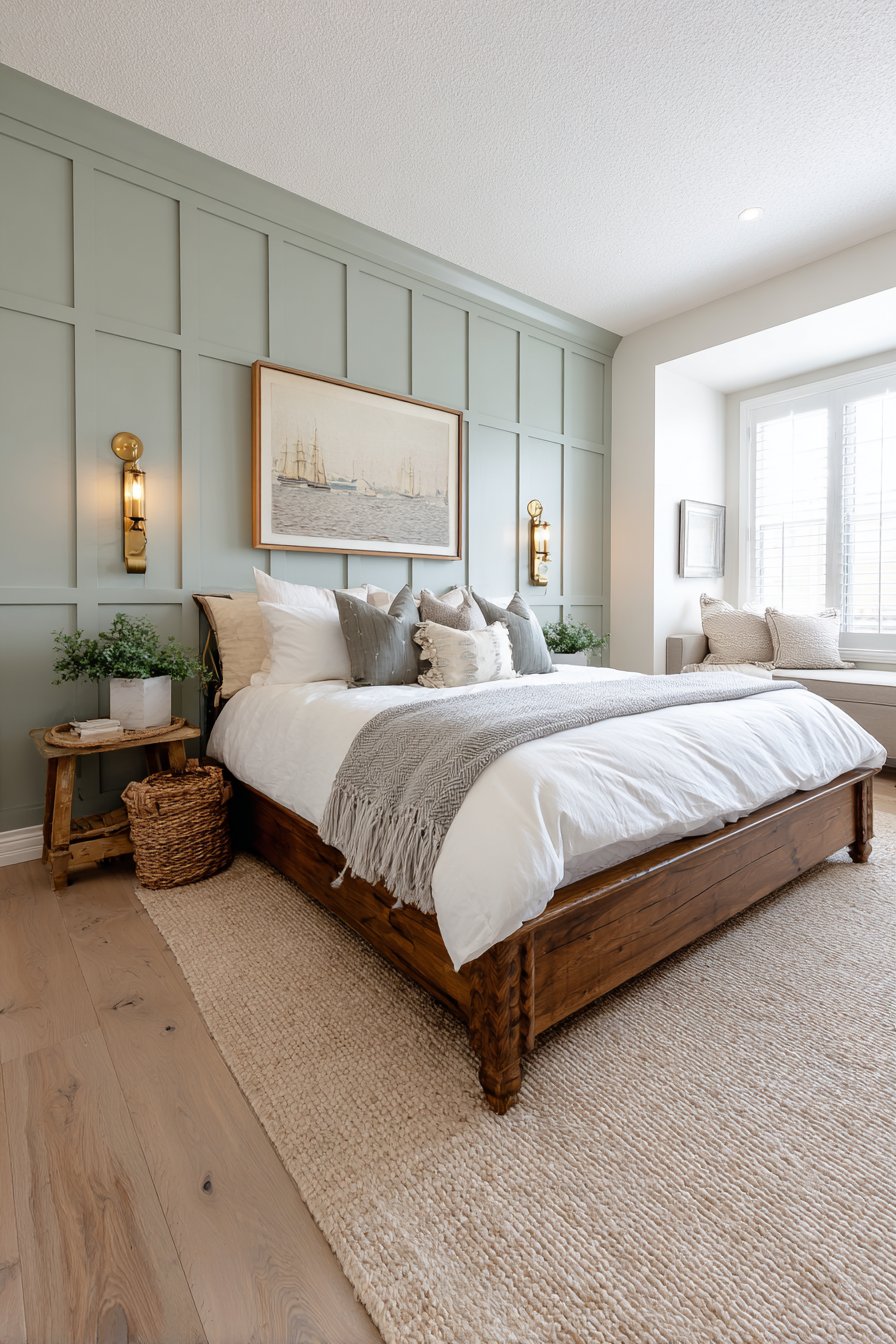
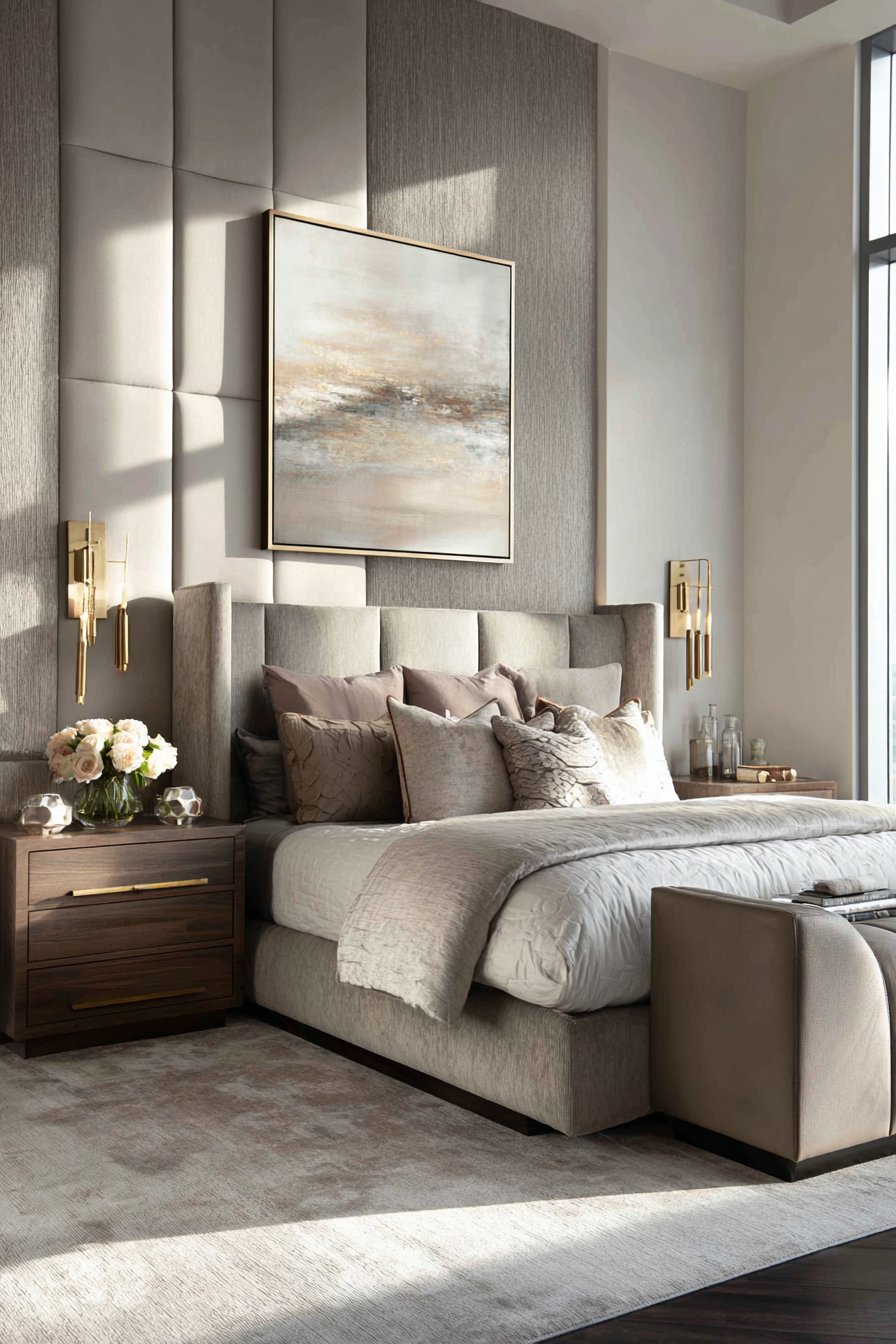
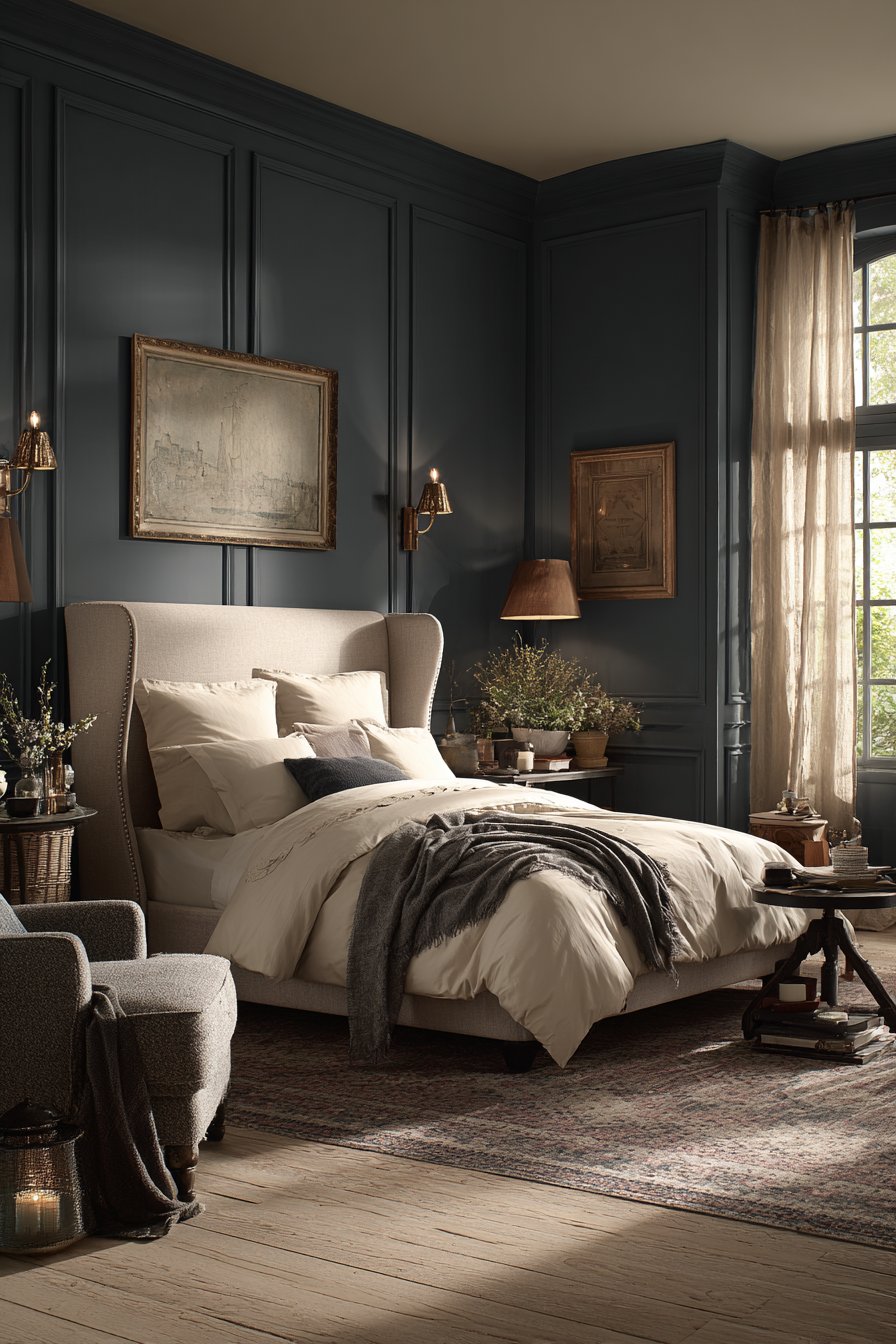
Bedroom wall design ideas reference classical architecture through sophisticated wainscoting panel wall system in soft sage green, featuring raised panel details extending two-thirds up the wall. This installation demonstrates how wall design ideas can add architectural distinction to rooms lacking original character while introducing color in subtle, sophisticated manner. White crown molding defines the transition to pale cream painted wall above, creating elegant two-tone treatment that adds visual interest without overwhelming.
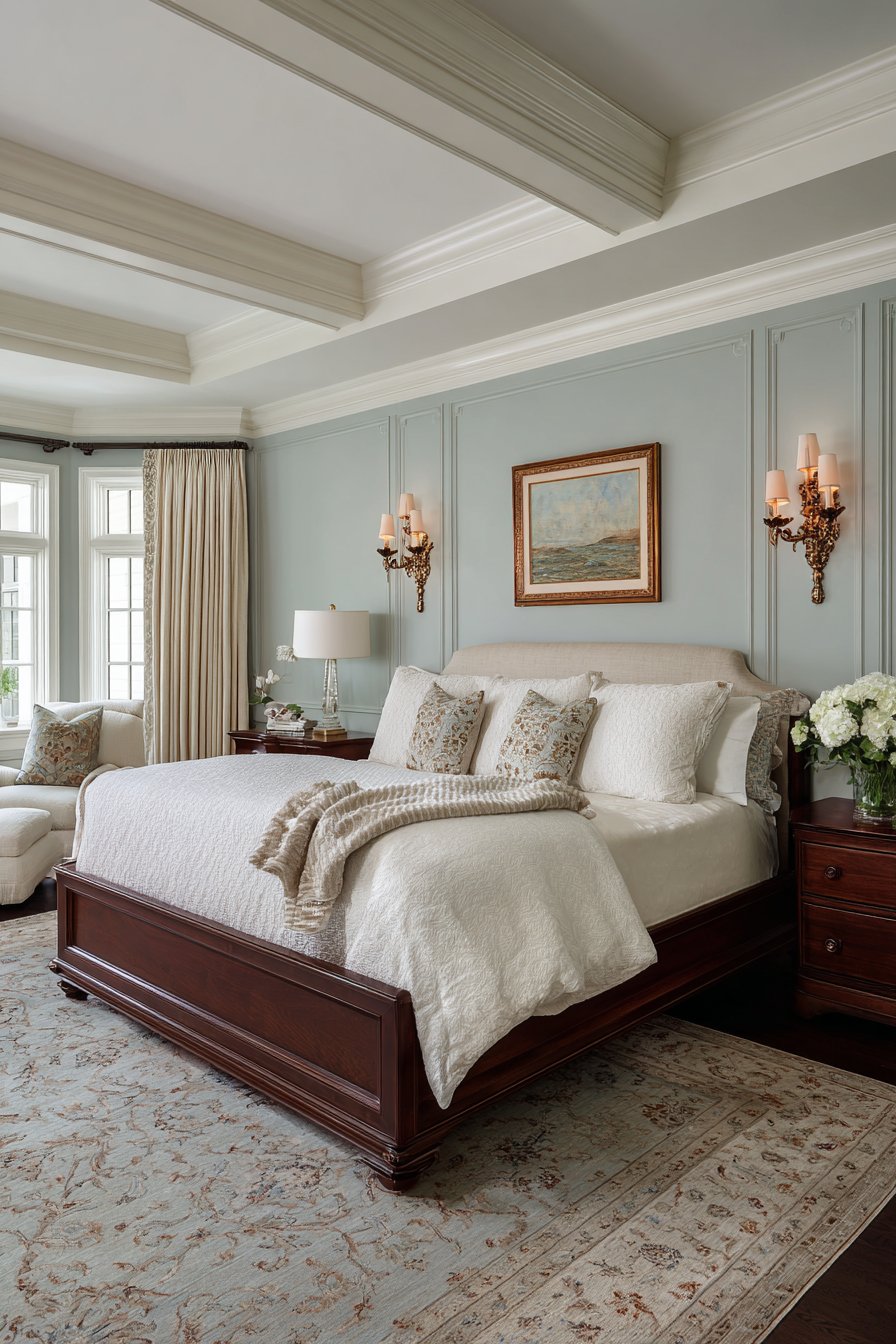
Traditional bed frame in dark wood grounds the space while white bedding keeps the look fresh and prevents the sage green from feeling dated or heavy. Antique brass wall sconces flank the bed providing task lighting while their vintage-inspired design complements the traditional wainscoting. The raised panel details create dimensional shadows that add depth and interest, transforming flat walls into architectural features worthy of historical homes.
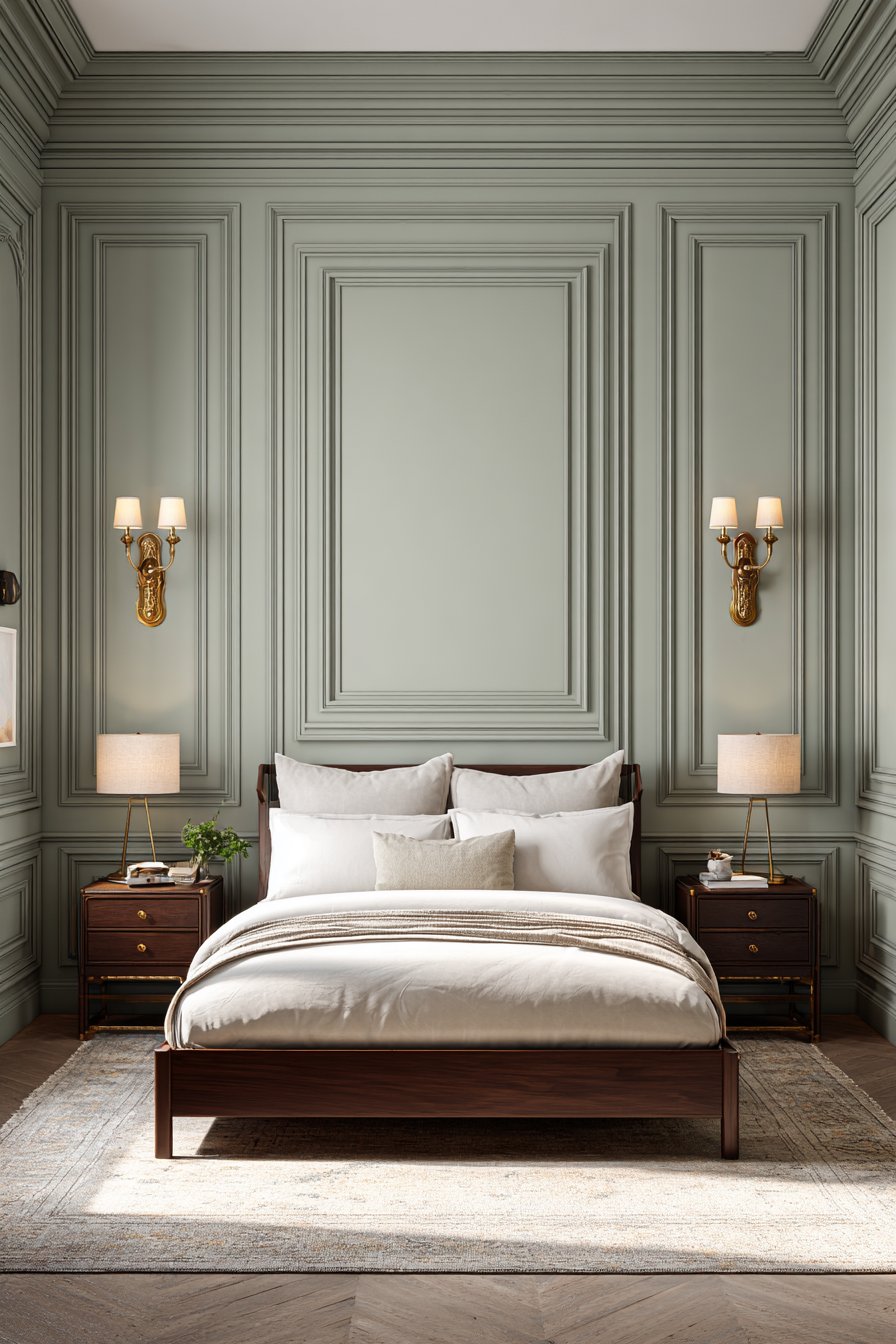
Interior design photography with soft natural lighting highlights the panel depth and shadow lines that give wainscoting its distinctive character. Balanced exposure captures both the sage green painted panels and cream upper wall, showing how the two-tone treatment creates visual interest through color division. Wide-angle view demonstrates the full wall treatment proportion and how the wainscoting height relates to ceiling height and bed placement, providing scale reference helpful for readers planning similar treatments.
Key Design Tips: Determine wainscoting height based on ceiling height—typically one-third of wall height works well but adjust proportions for very high or low ceilings. Use a level constantly during installation to ensure panels remain plumb and straight. Attach panel components to wall studs whenever possible for strongest mounting. Caulk all seams between panel elements and existing walls/trim for seamless painted appearance. Prime all components before installation then apply final paint coats after mounting for best coverage. Choose raised panel styles appropriate to your home’s architecture—simple panels suit contemporary homes while ornate styles fit traditional spaces. Consider using pre-made wainscoting panel systems for easier DIY installation versus building custom from individual components. Paint wainscoting and upper wall in complementary colors that share undertones for cohesive appearance.
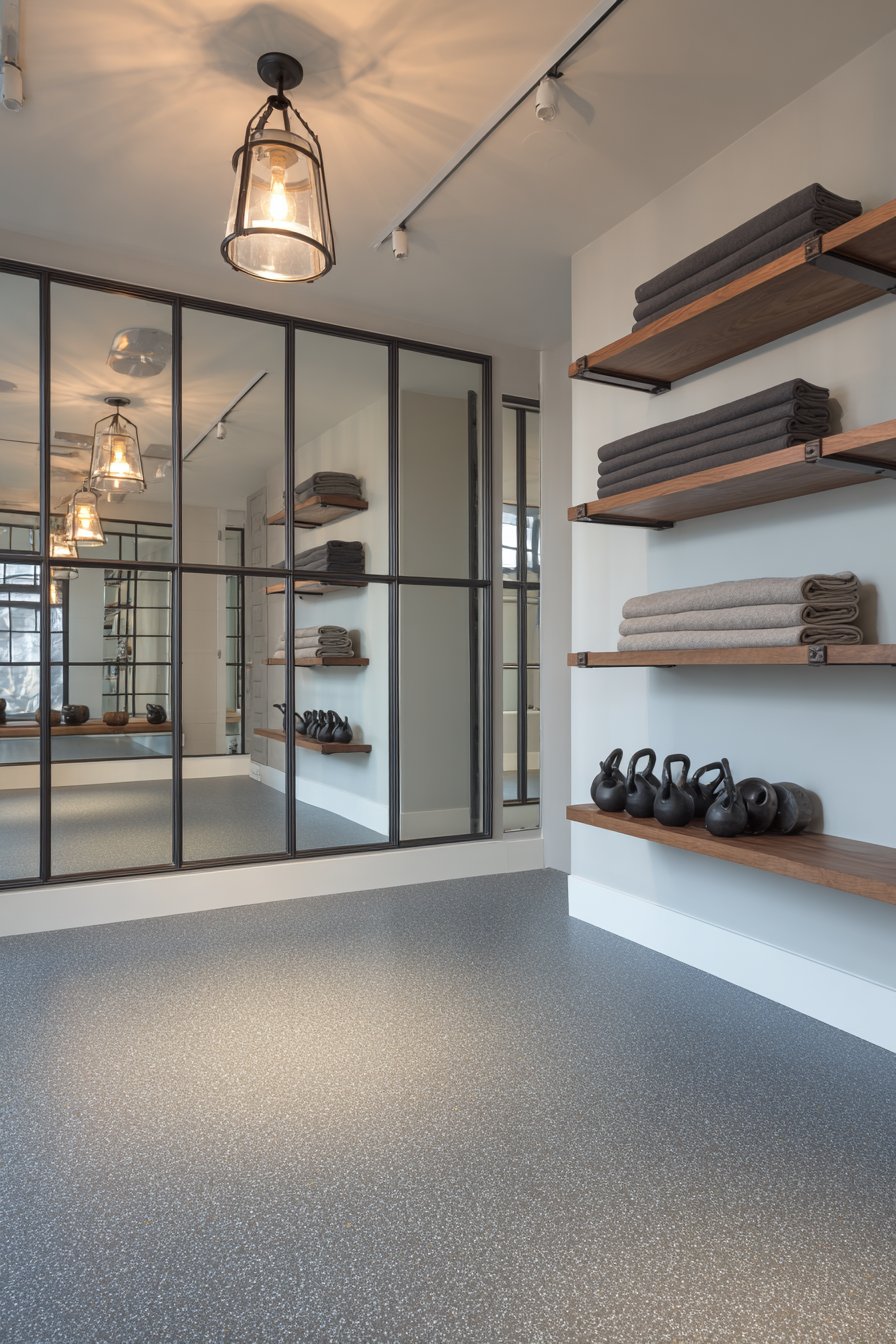
21. Full-Wall Mirror Installation
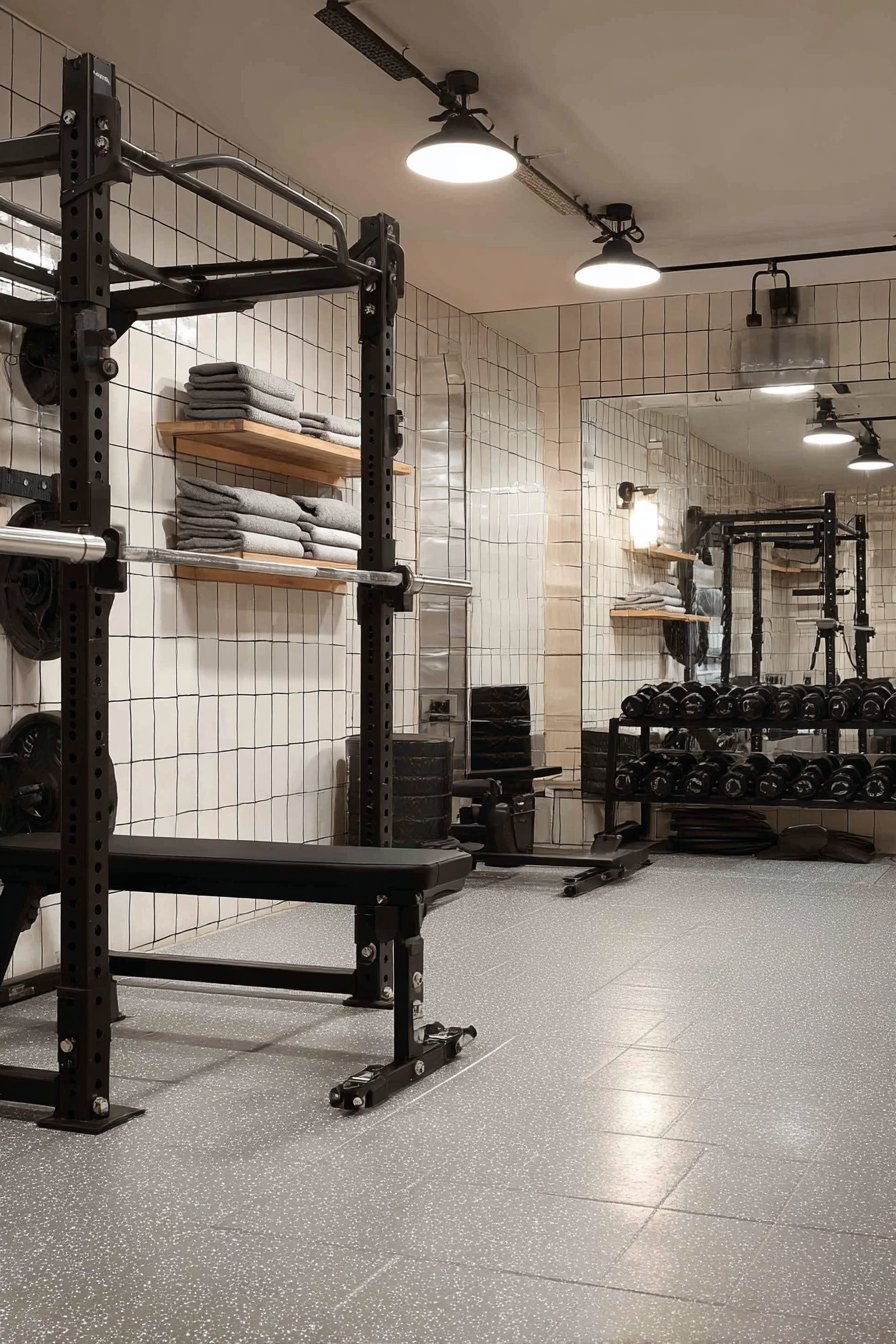
Home gym wall design ideas maximize space perception through large wall-mounted mirrors spanning floor to ceiling, creating spacious feeling while providing functional workout monitoring. This installation demonstrates how wall design ideas can serve primarily practical purposes while contributing significantly to spatial quality and light distribution. The mirrors feature thin black frames creating grid pattern that adds architectural interest while dividing the reflective surface into manageable sections.
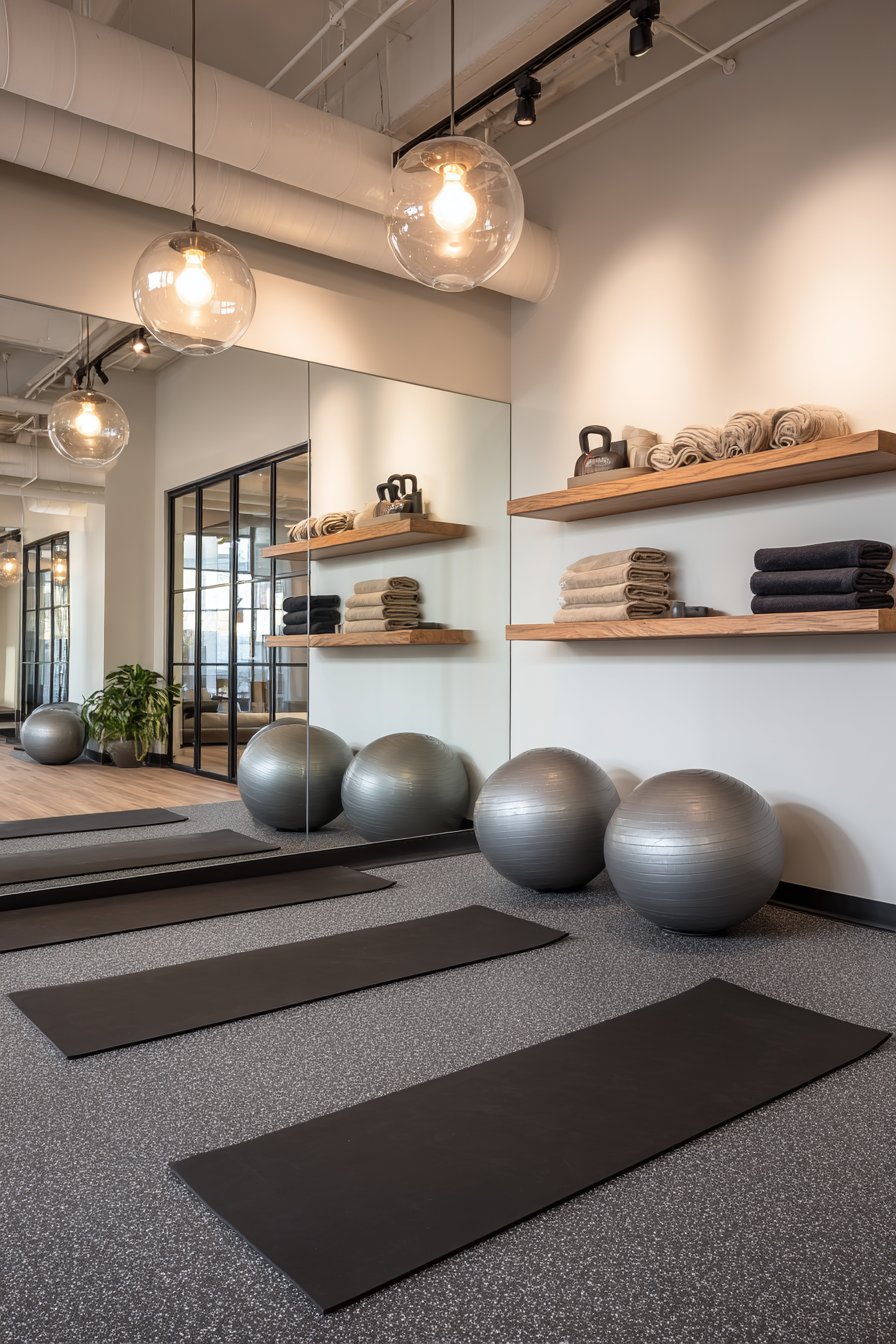
Floating shelves in black metal and wood display folded towels and minimal equipment, providing practical storage without cluttering the space. Rubber flooring in speckled gray provides durable foundation appropriate for gym equipment and high-impact activities. Track lighting overhead ensures bright task illumination essential for safe exercise while preventing harsh shadows that would make using mirrors difficult.
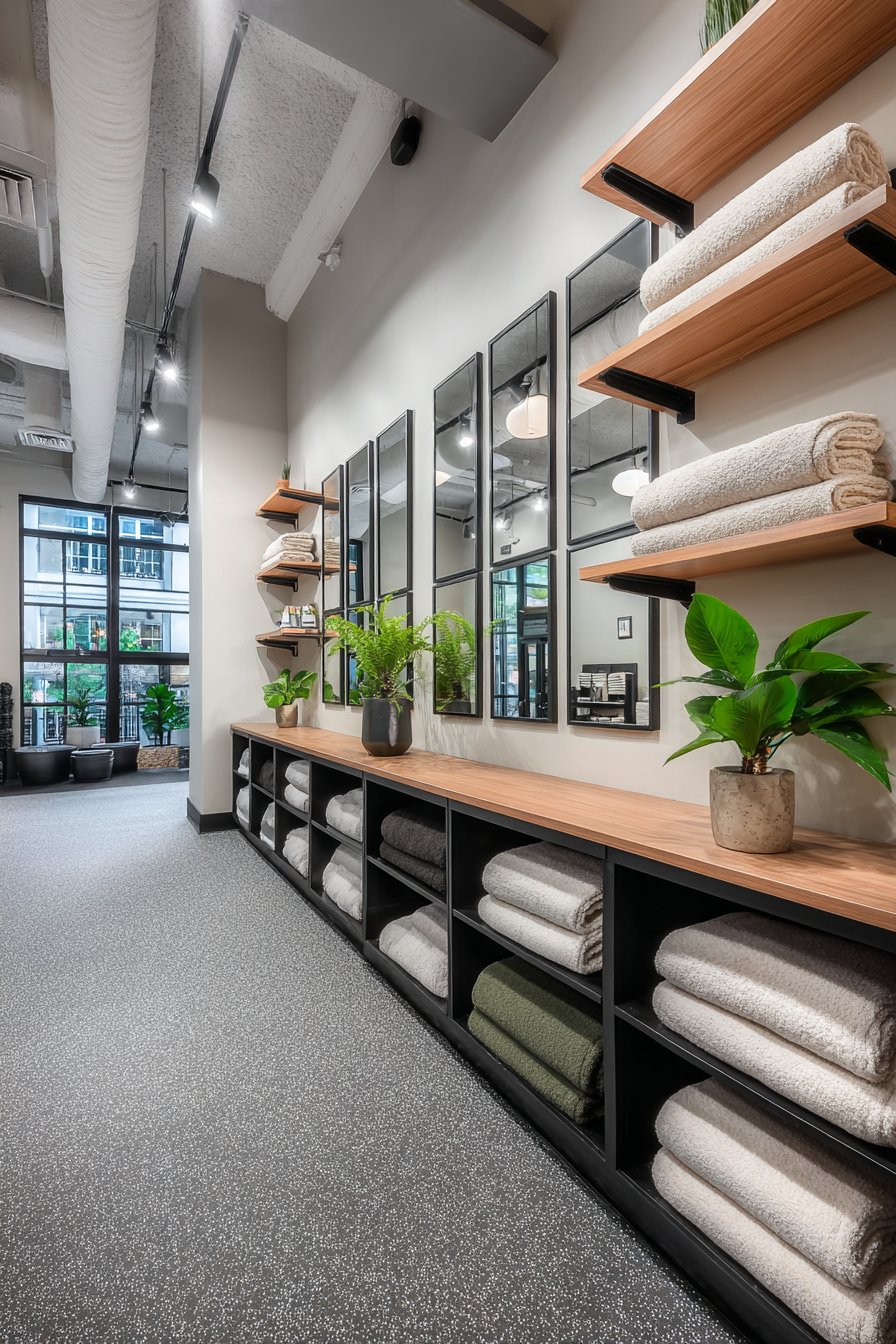
Wide-angle interior design photography captures the full mirror wall installation and reflected space, showing how mirrors effectively double the visual size of the room. Balanced lighting avoids harsh mirror glare while demonstrating the reflective quality that makes mirrors so effective for checking form during workouts. This installation proves that wall design ideas can be primarily functional—in this case, allowing exercisers to monitor their form—while simultaneously solving spatial challenges by making small rooms feel significantly larger through reflection.
Key Design Tips: Purchase mirrors specifically rated for wall mounting rather than thin door mirrors that can distort reflection. Ensure walls can support mirror weight—large mirrors are surprisingly heavy and require solid mounting. Use appropriate wall anchors rated for mirror weight if studs aren’t positioned where needed. Install mirrors with slight gap from floor to accommodate baseboard and prevent floor moisture contact. Consider safety film backing for large mirrors to contain glass if broken. Clean mirrors with appropriate glass cleaner and microfiber cloth to prevent streaking. Plan mirror placement to reflect attractive views rather than cluttered areas. Use professional installers for very large mirror installations as improper mounting creates safety hazard. Frame mirrors or use polished edges for finished appearance and safety.
22. Eclectic Bohemian Collection Wall
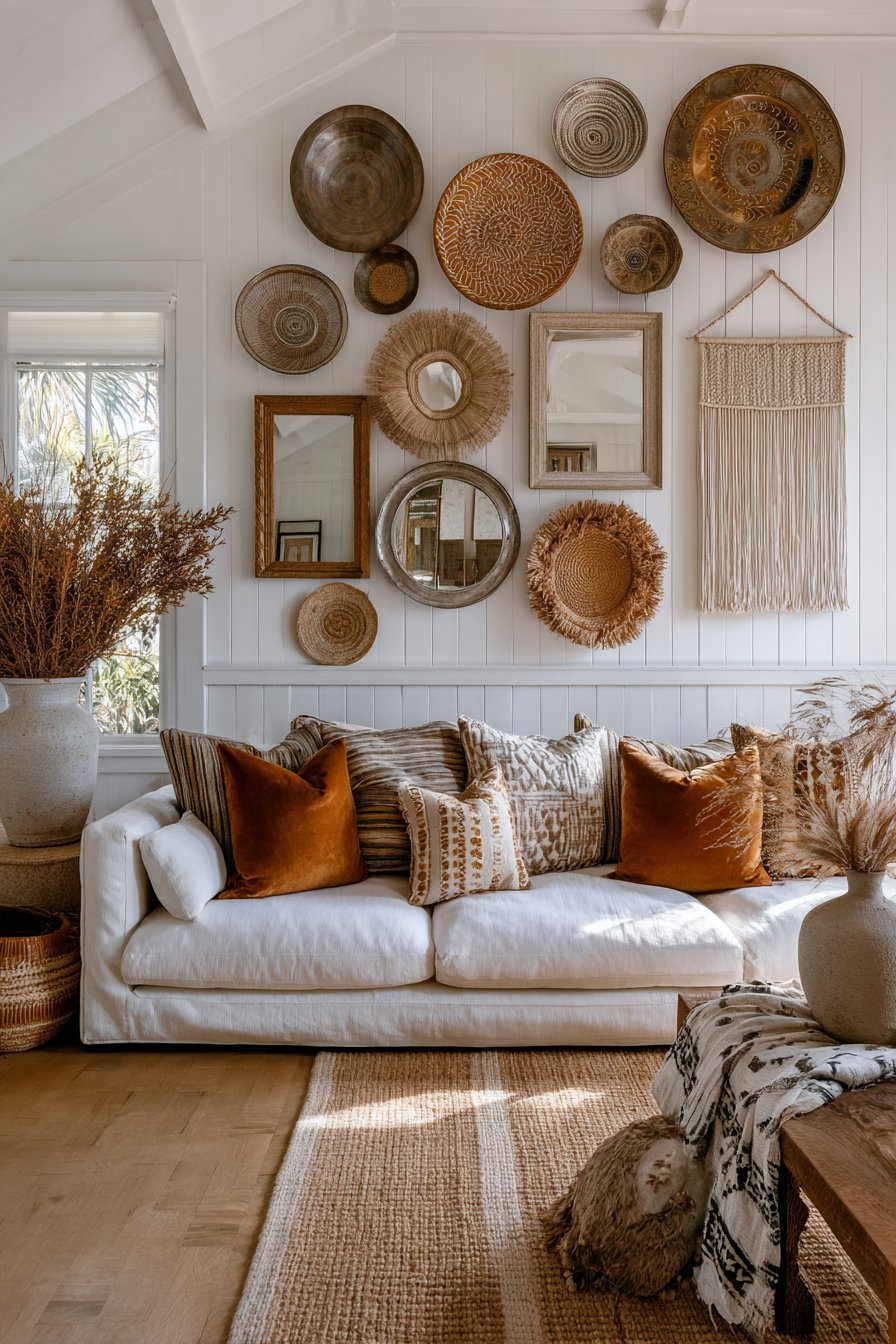
Living room wall design ideas celebrate personal style through eclectic collection wall displaying vintage plates, brass mirrors, woven baskets, and macramé pieces arranged in organic asymmetrical pattern. This installation demonstrates how wall design ideas can showcase collections and treasures in artful arrangement that tells personal story while creating substantial visual impact. The curated collection maintains cohesive earthy color palette despite varying materials and forms, creating unity within diversity.
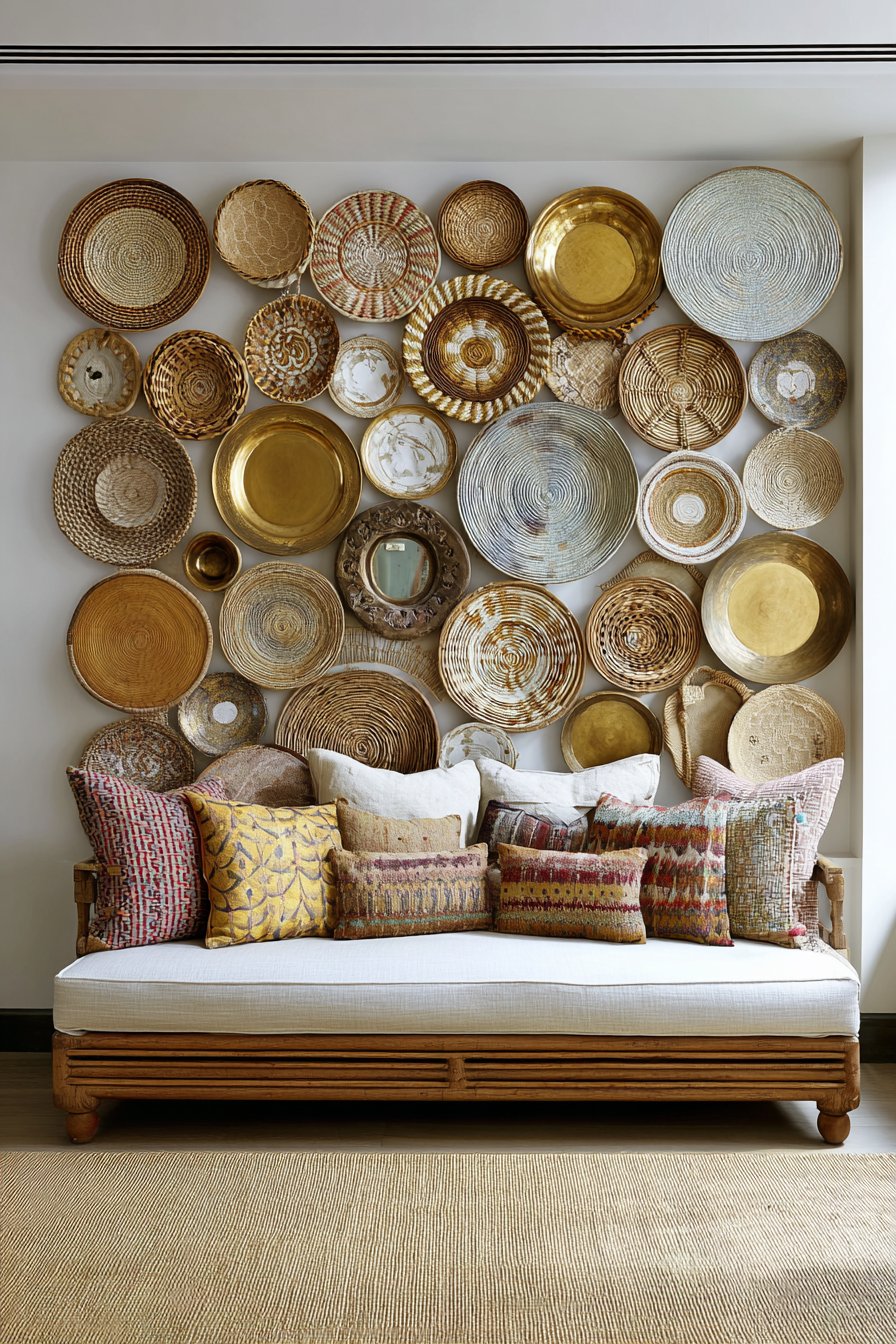
A low-profile sofa with colorful pillows sits below the wall display, its relaxed silhouette complementing the bohemian aesthetic. Natural jute area rug anchors the space with organic texture that echoes the natural materials in the wall collection. The asymmetrical arrangement creates visual interest that draws the eye across the wall, inviting close examination of individual pieces while reading as cohesive composition from distance.
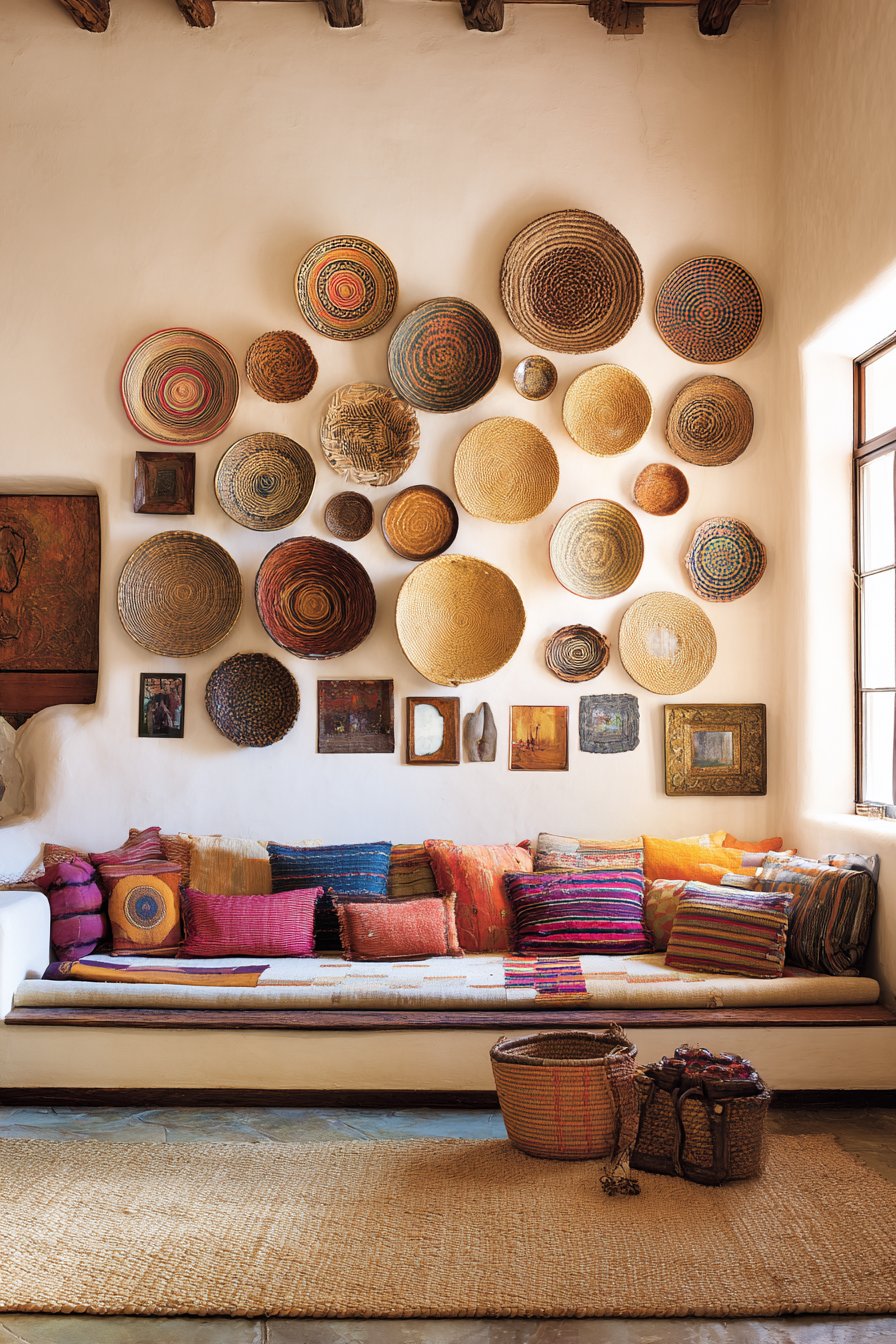
Interior photography with natural window light prevents shadows on wall display items that would obscure their beauty and detail. Balanced exposure captures the variety of textures and materials—smooth brass, rough woven fibers, glazed ceramics—that gives this collection wall its rich, layered quality. Detail shots emphasize individual piece character and the thoughtful arrangement composition that makes collection walls successful rather than cluttered. This installation proves that wall design ideas can incorporate meaningful personal items in ways that honor their individual beauty while creating cohesive artistic statement.
Key Design Tips: Lay out entire collection on floor first to experiment with arrangement before committing to wall. Maintain visual balance by distributing visual weight evenly—avoid clustering all large or heavy pieces in one area. Use various hanging methods appropriate to each item type—plate hangers, picture wire, hooks, or ledges. Install a mix of hanging heights to create rhythm and movement across the wall. Include negative space as part of the design—don’t fill every inch of wall. Consider color distribution to prevent one color from dominating single area. Use template method for complex arrangements—trace items on kraft paper, arrange on wall with tape, then hang items according to template. Start with largest or most important piece, then build collection around it. Update and evolve collection over time as you acquire new pieces or interests change.
23. Natural Grasscloth Wallpaper
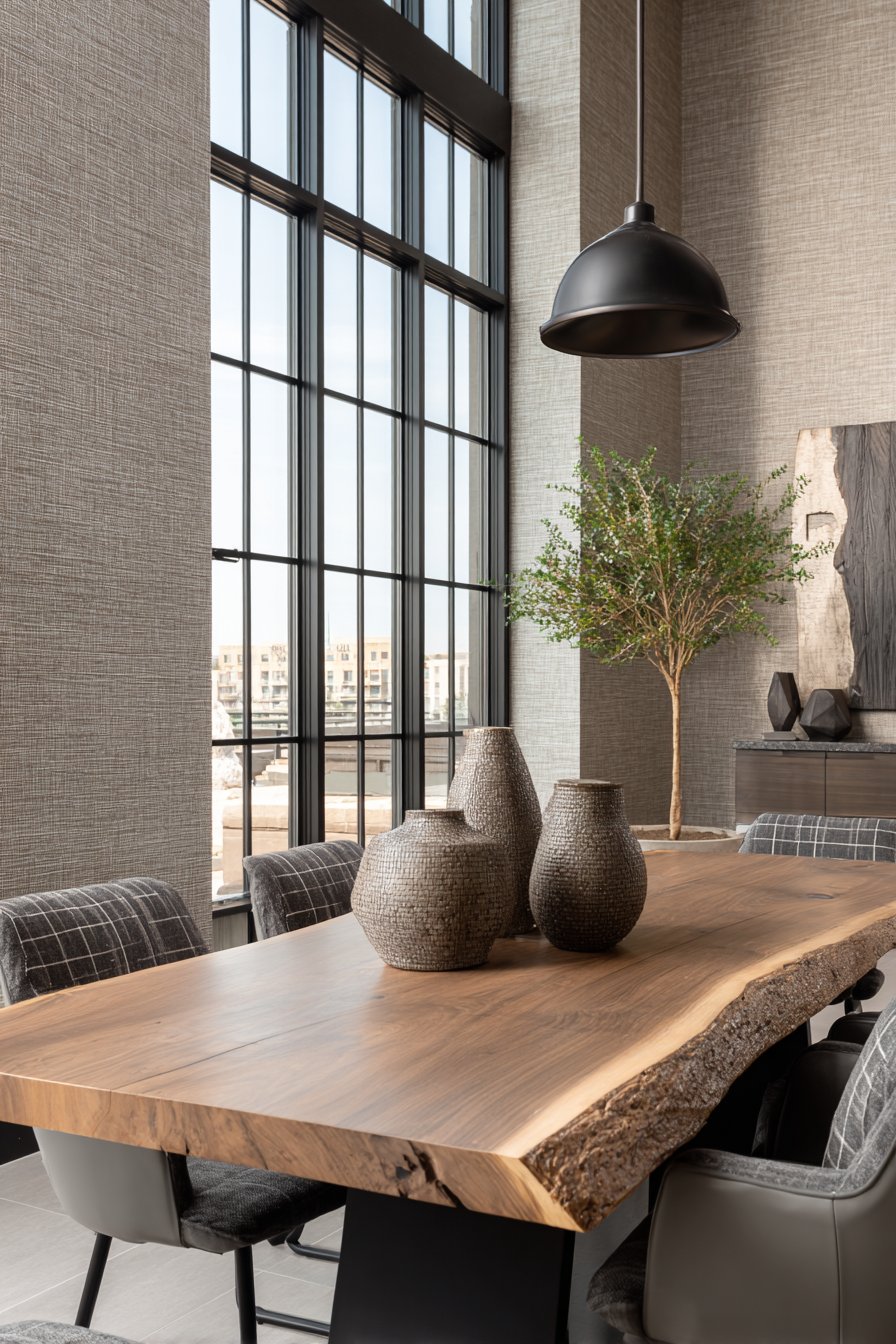
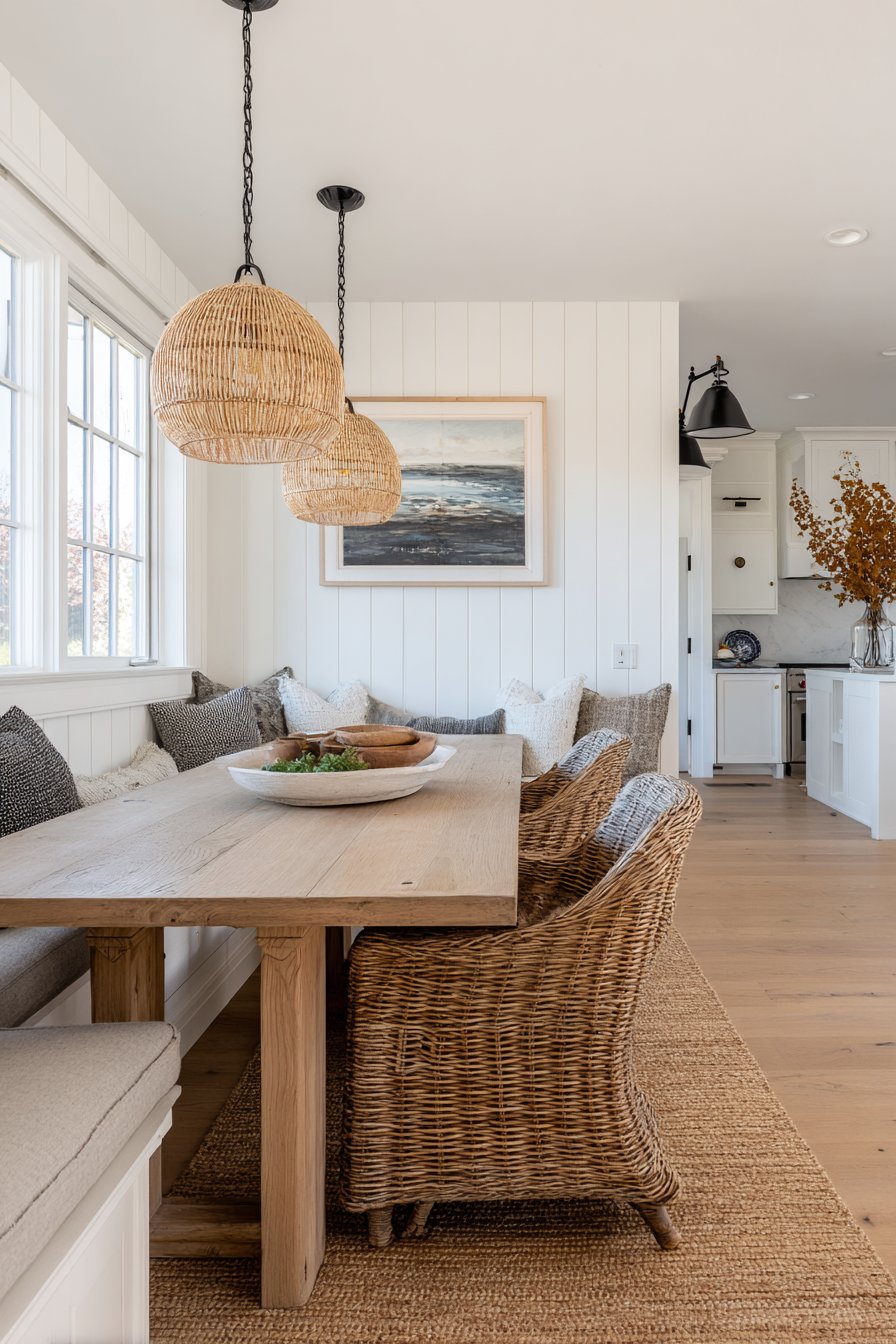
Dining room wall design ideas embrace organic texture through grasscloth wallpaper in natural tan with visible fiber texture, creating sophisticated backdrop that adds subtle interest without pattern distraction. This installation demonstrates how wall design ideas can introduce natural materials in form of wallcovering, bringing organic warmth and tactile richness that painted walls cannot achieve. The grasscloth covers all walls, creating immersive textural experience that serves as neutral foundation for furnishings and decor.
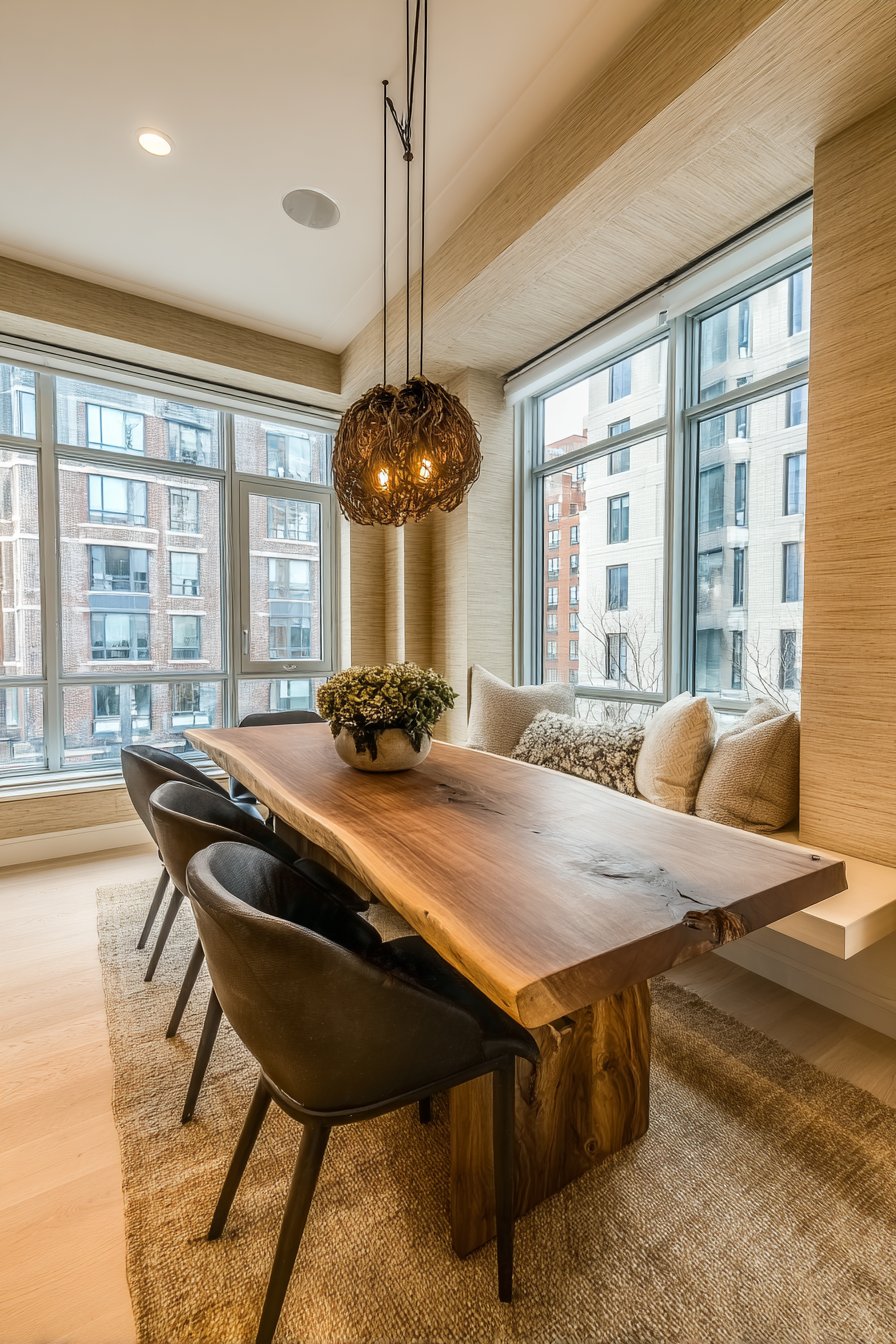
A live-edge wood dining table with modern chairs centers the space, its natural edge echoing the organic quality of the grasscloth walls. Simple pendant lighting in black metal provides focused task illumination above the dining table while maintaining visual simplicity that allows the wall texture to remain prominent. Natural window light emphasizes the grasscloth texture and fiber variations, showing how natural materials change appearance in different lighting conditions.
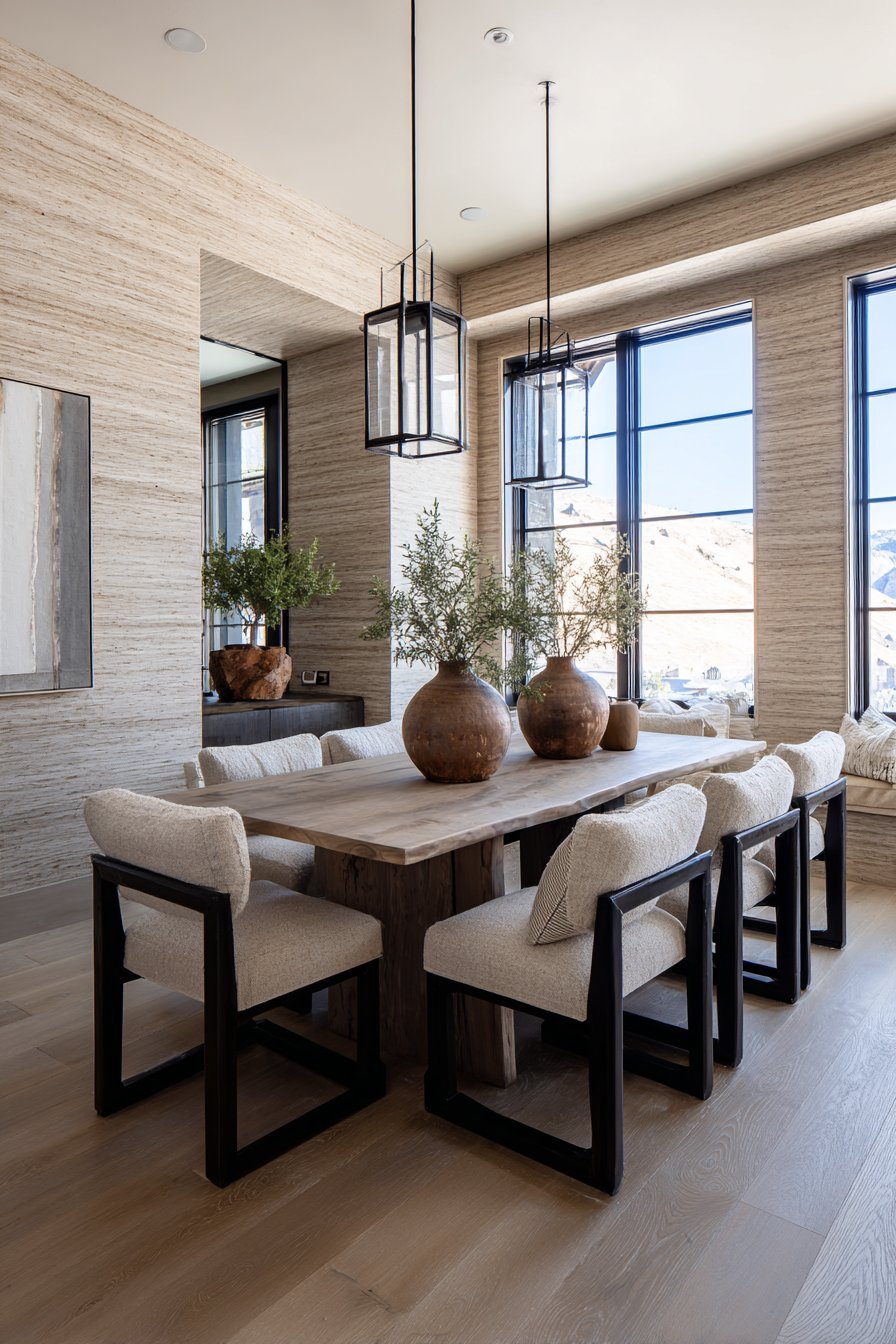
Professional interior photography with balanced exposure captures the wallpaper’s natural texture and coloring, showing the woven grass fibers and organic variations that make each panel unique. Detail focus reveals the individual grass strands and weaving technique that creates the distinctive grasscloth texture. Wide-angle perspective demonstrates how textural walls create warmth and interest throughout the entire room, proving that wall design ideas need not include bold colors or patterns to make significant impact—sometimes subtle natural texture provides all the interest a space needs.
Key Design Tips: Order all grasscloth from single dye lot to ensure color consistency. Accept that seams will be visible with grasscloth—this is characteristic of the material, not installation defect. Use clear wallpaper paste or adhesive recommended by manufacturer to prevent staining natural fibers. Avoid rubbing or excessive smoothing during installation as natural fibers can be damaged. Do not hang grasscloth in high-moisture areas like bathrooms as humidity can cause loosening. Vacuum grasscloth periodically with soft brush attachment to remove dust from textured surface. Repair damaged areas by carefully cutting out section and patching with new piece, carefully matching fiber direction. Expect color variations and natural imperfections as part of authentic grasscloth aesthetic. Consider professional installation as grasscloth requires different techniques than standard wallpaper.
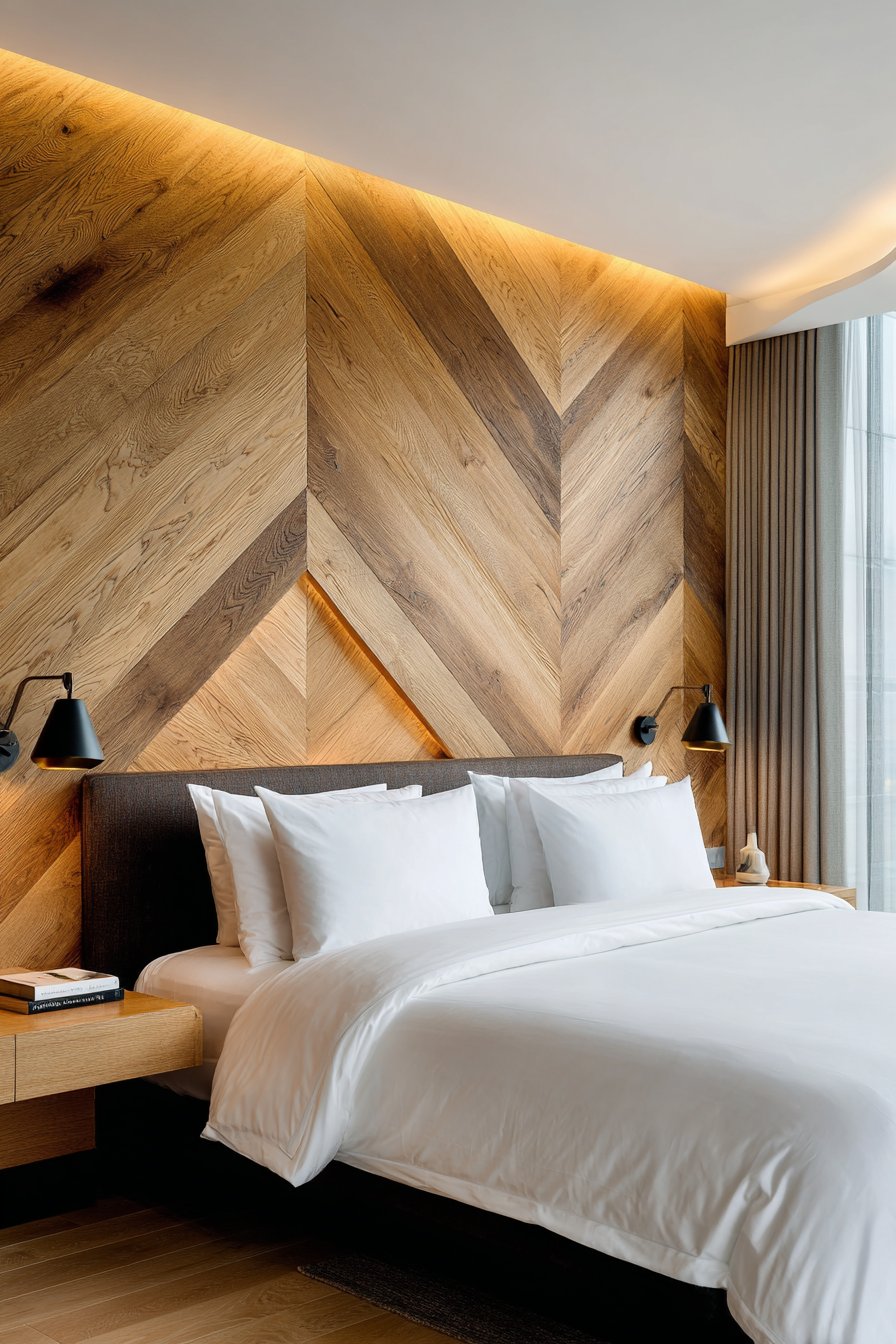
24. Dynamic Herringbone Wood Panel Wall
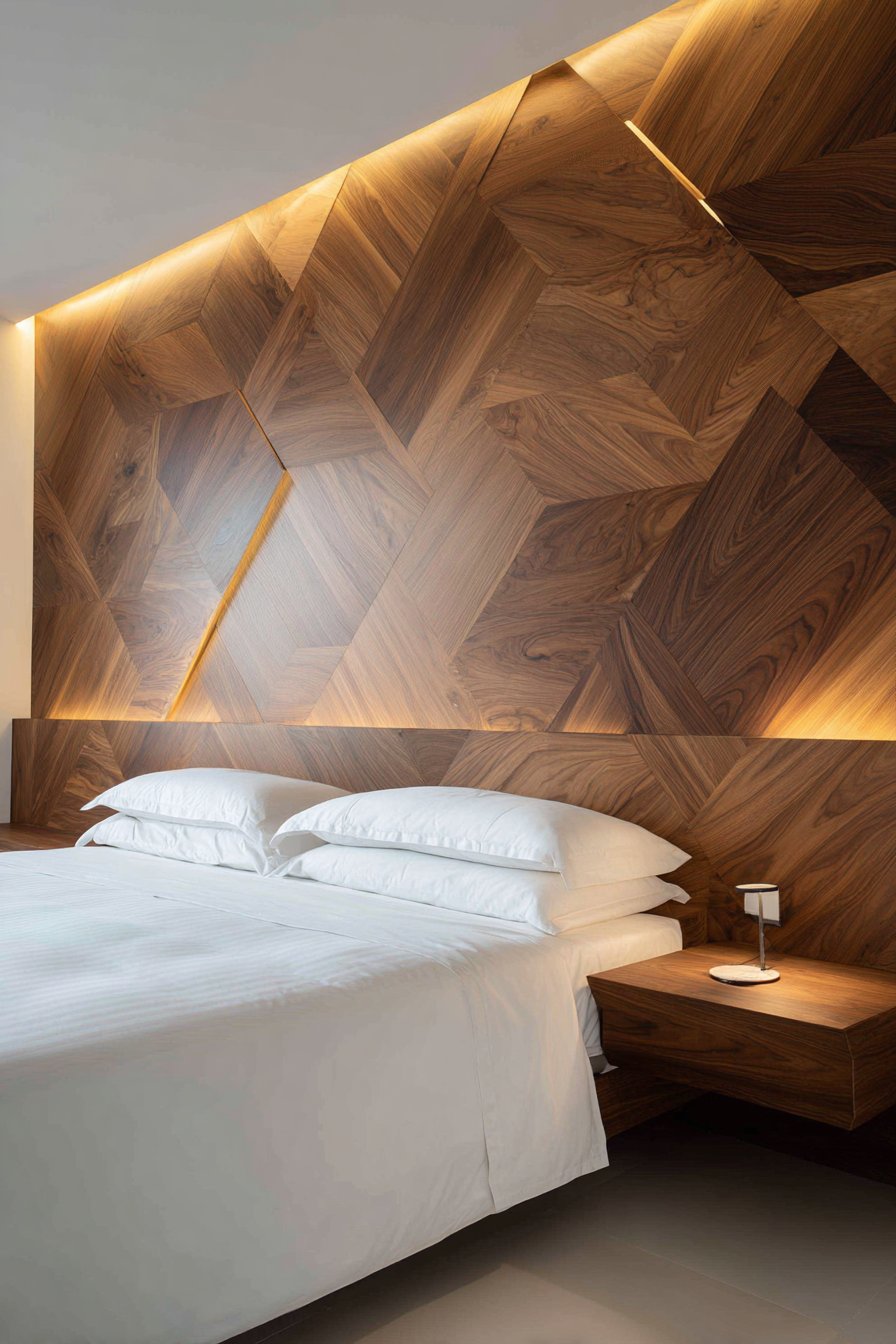
Modern bedroom wall design ideas achieve geometric sophistication through striking herringbone wood panel accent wall in two-tone finish combining natural oak and dark walnut. This installation demonstrates how wall design ideas can create visual complexity through pattern and material combinations that demand precision and planning. The carefully cut planks form perfect herringbone angles creating dynamic pattern that draws focus and serves as bedroom’s primary architectural feature.
White bedding and minimal nightstands keep attention focused on the statement wall, their simplicity providing necessary visual rest against the complex geometric pattern. Integrated LED strip lighting along wall edges provides ambient glow that highlights the wood grain and emphasizes the herringbone pattern during evening hours. The two-tone wood combination creates value contrast that makes the geometric pattern more visible and dramatic than single-tone installations.
Interior design photography captures the herringbone pattern precision and wood tone contrast that makes this installation so striking. Natural daylight highlights the wood grain in both light and dark woods, showing their distinct characters while balanced exposure captures the installation craftsmanship and geometric complexity. This bedroom proves that wall design ideas utilizing pattern can succeed when executed with precision and paired with minimal furnishings that allow the patterned wall to remain the focal point without competition.
Key Design Tips: Create detailed template for herringbone pattern before cutting any wood to ensure proper angles and layout. Cut all pieces precisely at exact angles—even slight variations will show in herringbone pattern. Use wood from same species and finish batch to ensure color consistency within each tone. Consider professional installation unless you have advanced carpentry skills—herringbone is among the most challenging patterns. Install starting from room center working outward to ensure balanced pattern. Use construction adhesive and nails for strongest mounting. Pre-finish wood pieces before installation for easier application and better results. Plan pattern carefully to minimize small cuts at edges and corners. Accept that herringbone installation will take significantly longer than simple plank arrangements.
25. Interactive Magnetic Paint Wall
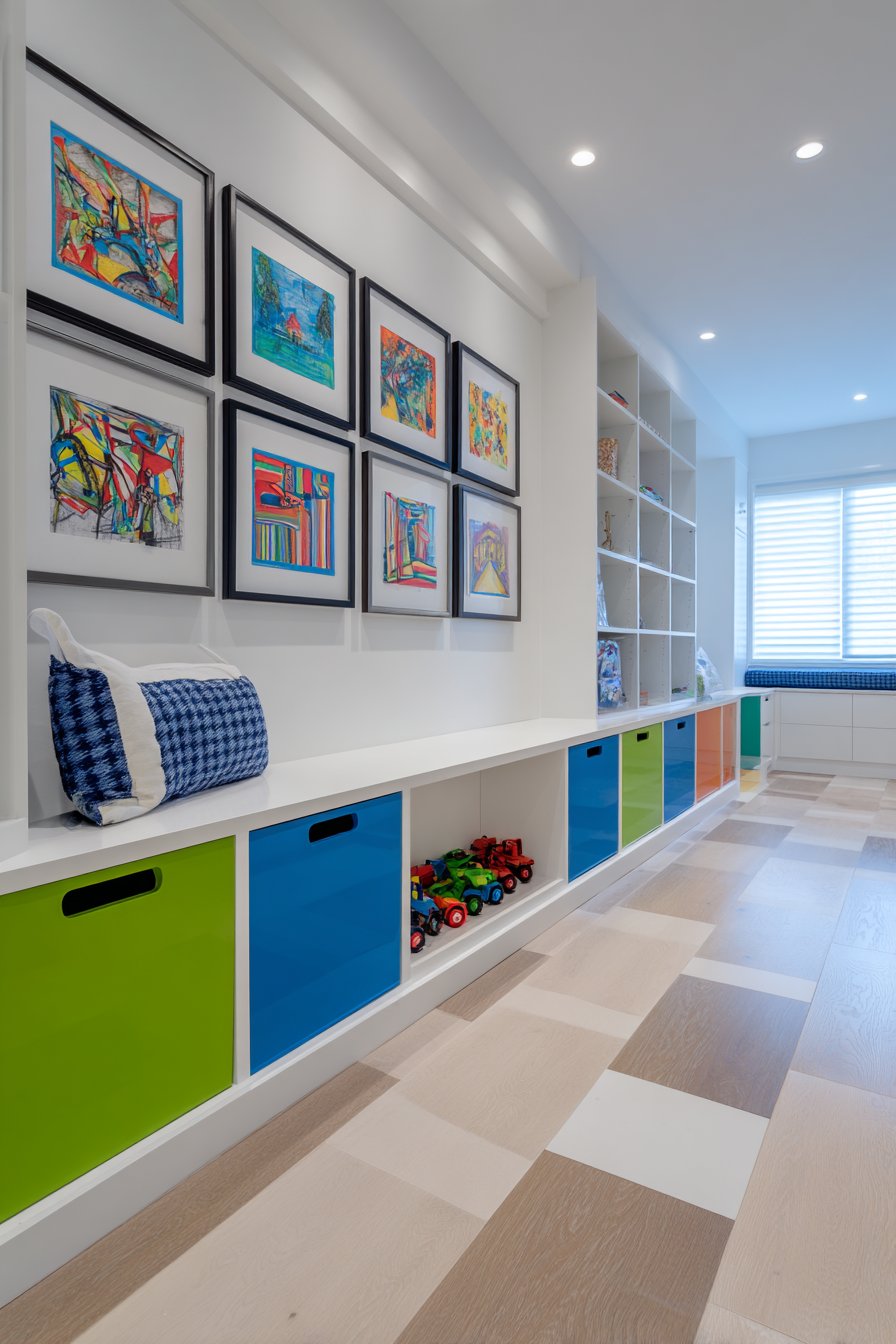
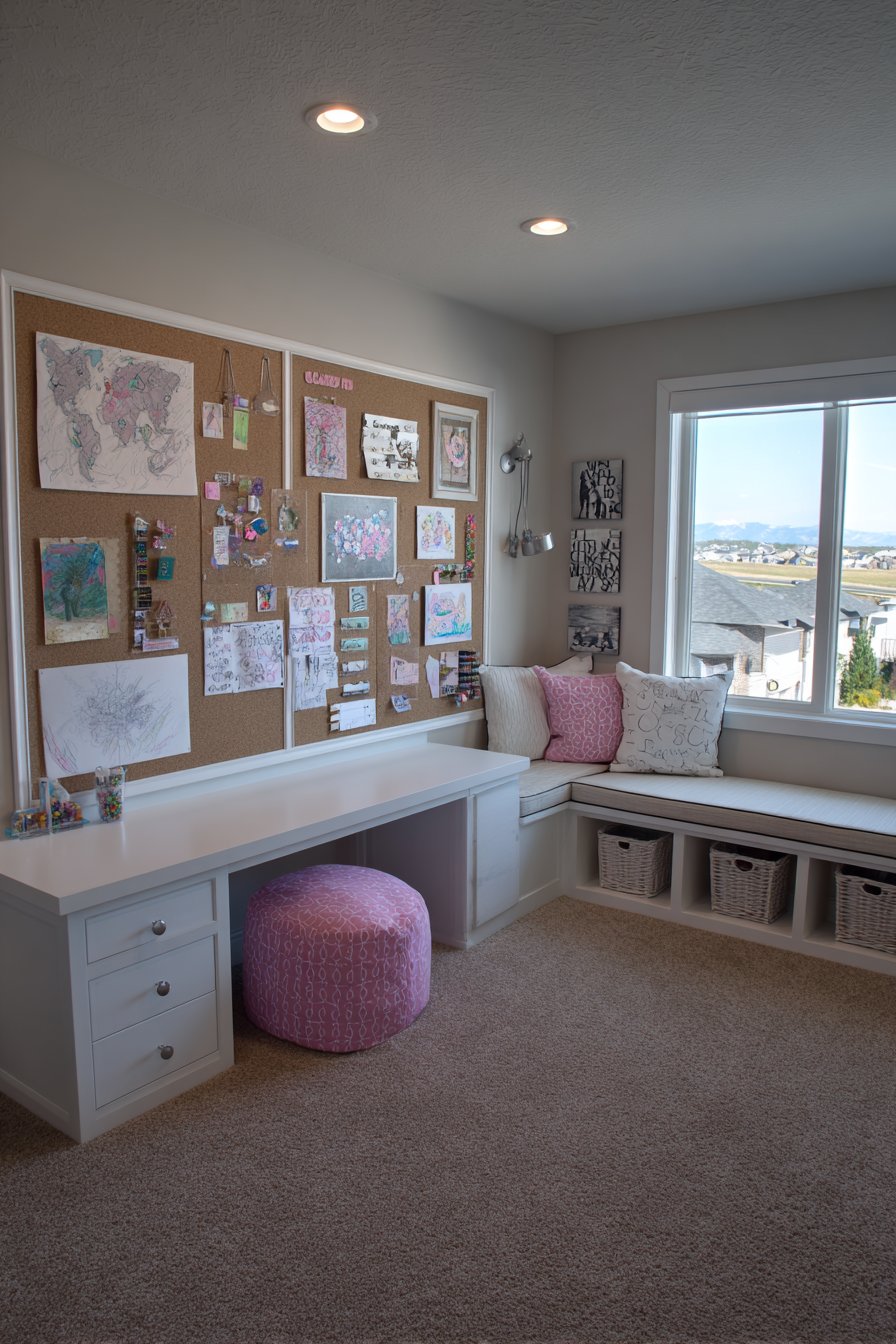
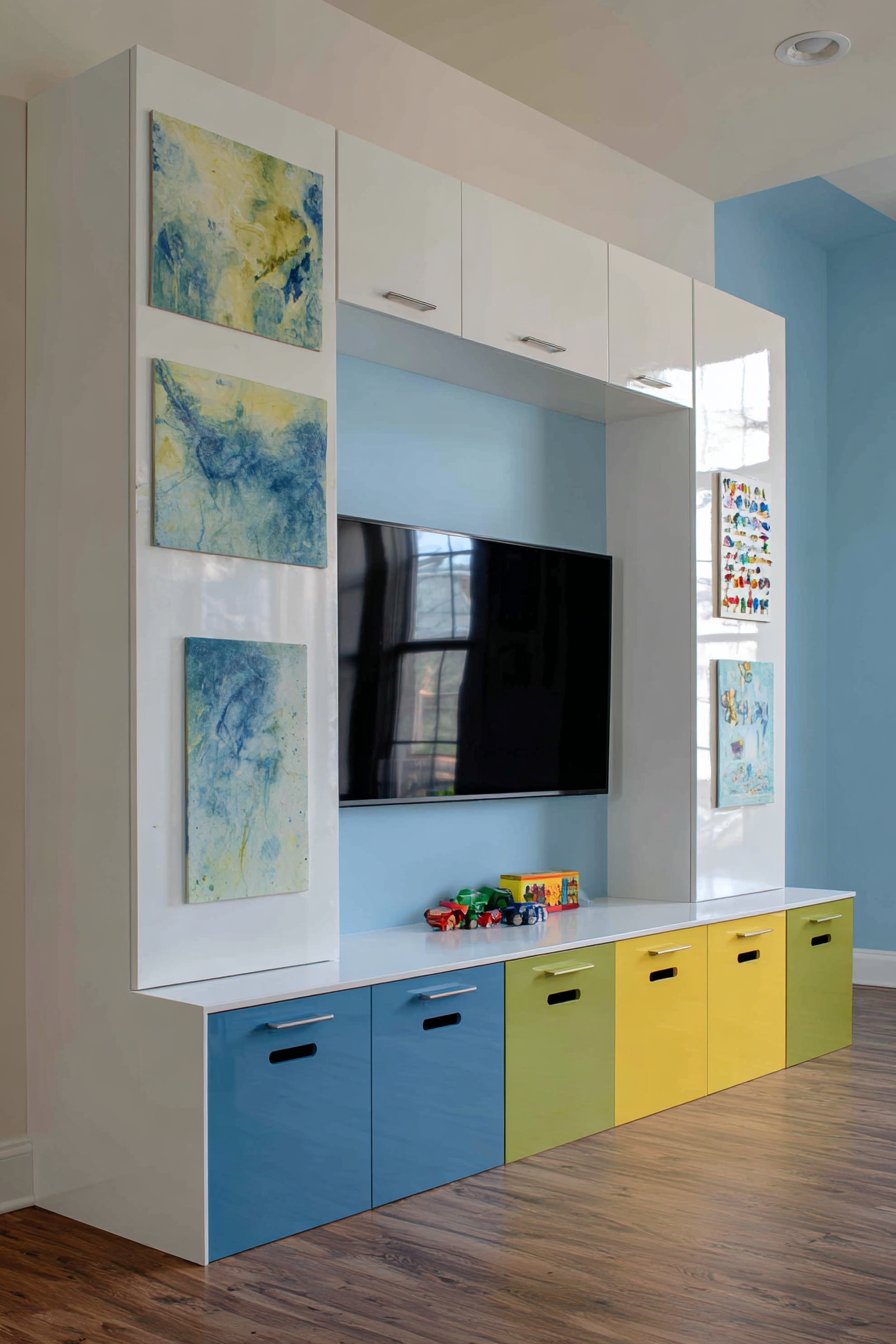
Playroom wall design ideas prioritize function and creativity through magnetic paint base coat topped with bright white semi-gloss, creating surface where children’s artwork and magnetic toys attach easily. This installation demonstrates how wall design ideas can serve children’s developmental needs while maintaining clean aesthetic that doesn’t sacrifice adult design sensibilities. Large cork board sections flank the magnetic wall providing additional pinning surface for papers and artwork that aren’t magnetic.
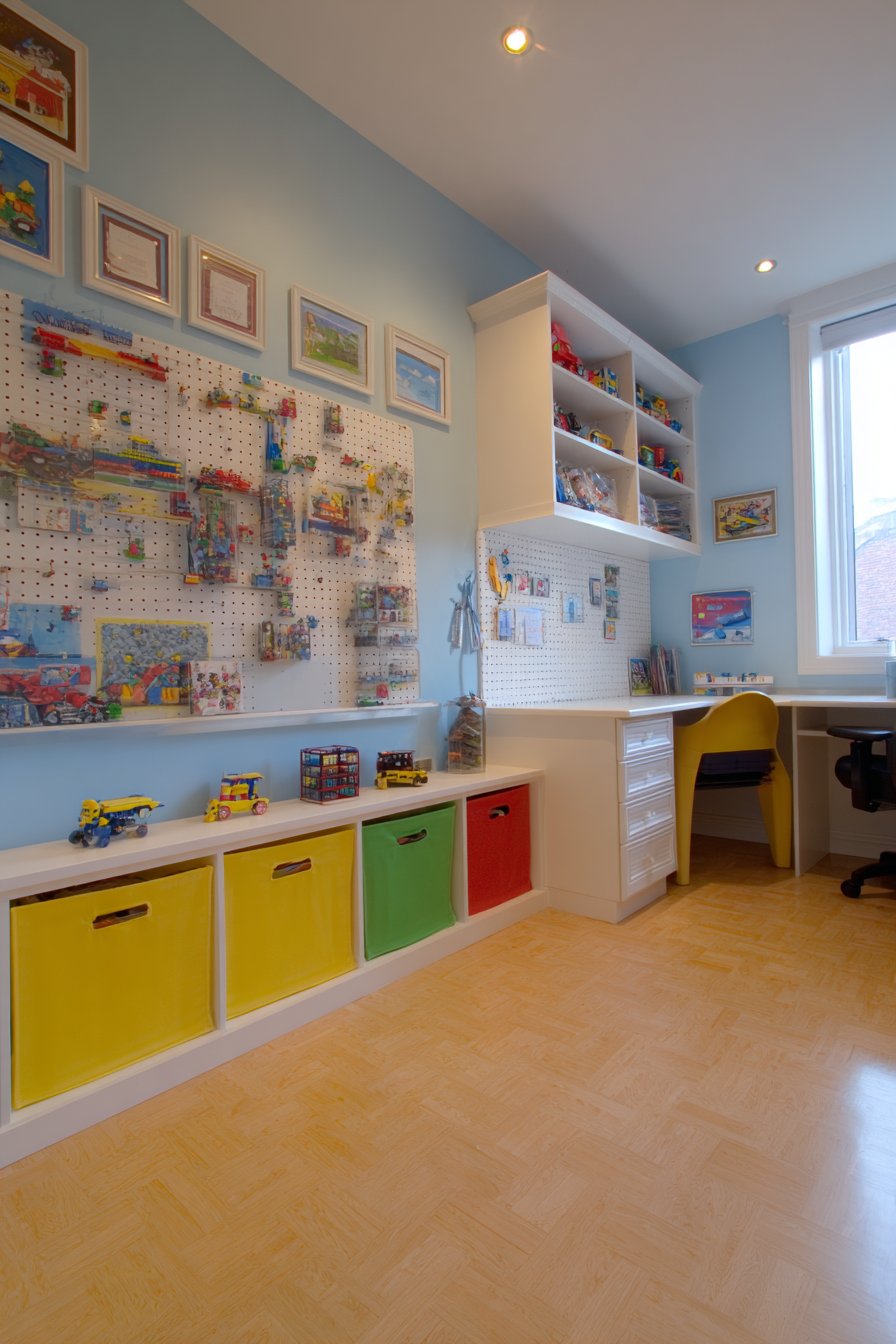
Built-in low storage cubbies run along the base in colorful painted finishes, providing accessible toy storage at child height while introducing cheerful color. Durable laminate flooring handles active play and easy cleanup essential in spaces dedicated to children’s activities. The combination of magnetic surface, cork boards, and low storage creates comprehensive organizational system that keeps playroom functional yet uncluttered.
Wide-angle interior design photography captures the full functional wall system showing how various elements work together to support organized play. Balanced lighting shows the smooth white paint finish over magnetic primer, while composition demonstrates the organizational and creative functions designed for child accessibility. This playroom proves that wall design ideas for children’s spaces can be simultaneously practical, attractive, and supportive of creative development without resorting to cartoon characters or overly childish themes that date quickly as children grow.
Key Design Tips: Apply multiple coats of magnetic primer following manufacturer’s recommendations for proper magnetic strength. Test magnet strength before applying top coat paint—add more magnetic primer coats if needed. Choose semi-gloss or satin paint for top coat as it’s more cleanable than flat finishes essential in playrooms. Plan layout of magnetic areas versus cork boards versus regular wall before starting. Use strong magnets specifically designed for magnetic paint as regular refrigerator magnets may not hold well. Install cork boards properly backed and framed for durability under heavy use. Select low-VOC paints for children’s spaces to maintain air quality. Consider adding whiteboard paint section for washable marker use. Build storage and organization directly into wall systems to maximize floor space for play.
26. Contemporary Two-Tone Paint Treatment
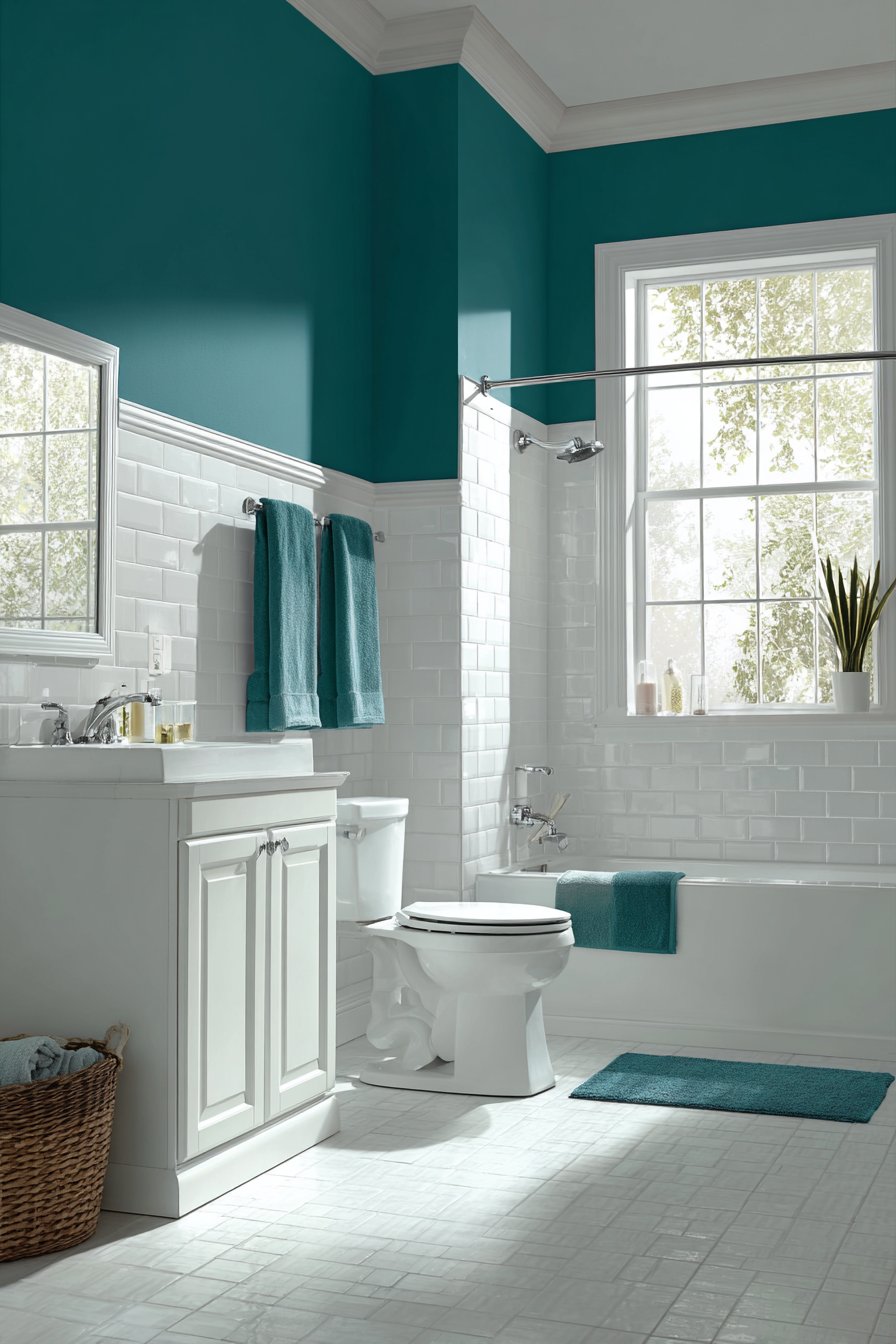
Bathroom wall design ideas achieve architectural interest through two-tone paint treatment creating visual division with horizontal color blocking. This installation demonstrates how wall design ideas can add impact through paint alone without requiring expensive materials or complex installation. The lower half in deep teal and upper half in soft white separated by chair rail molding creates classic proportion that adds sophistication to simple bathroom.
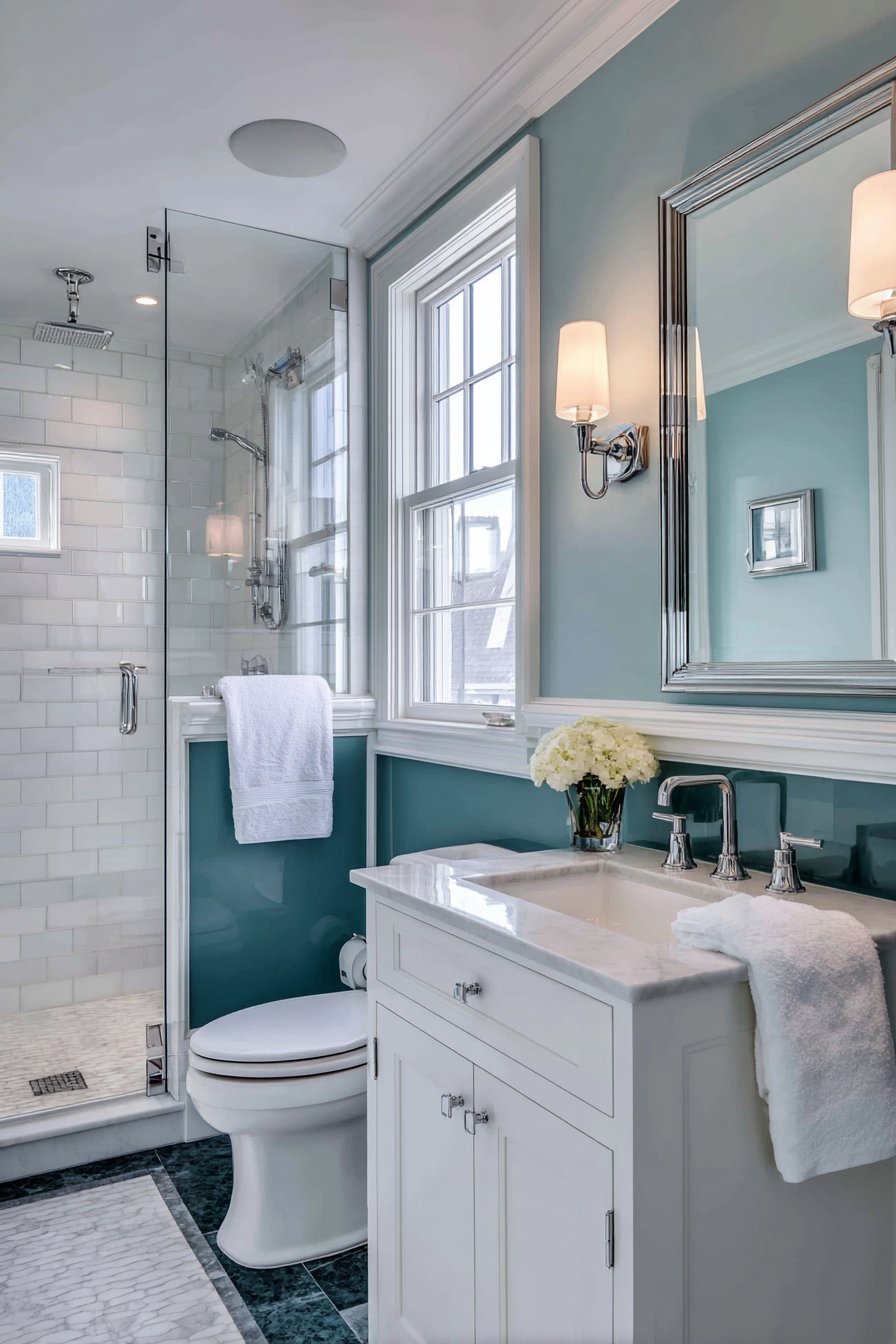
Chrome fixtures and white subway tile shower surround complement the painted walls without competing for attention, allowing the color blocking to serve as the bathroom’s primary design statement. White vanity cabinet keeps the space feeling bright despite the deep teal lower walls. The color division at chair rail height follows traditional architectural proportions that feel balanced and intentional rather than arbitrary.
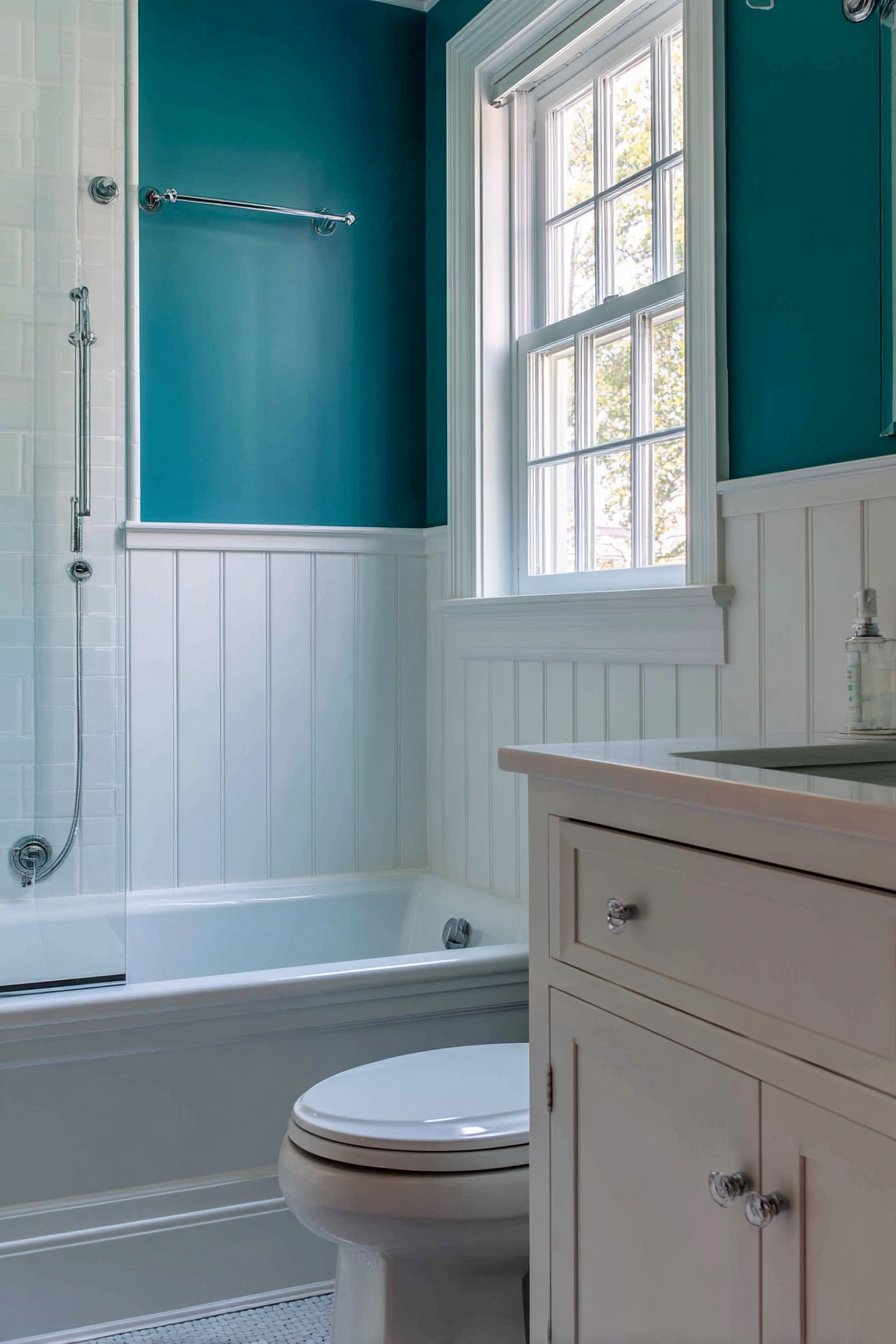
Interior photography with natural window light captures both paint colors accurately, balanced exposure preventing the teal from appearing too dark while showing the crisp white upper walls. Wide-angle view demonstrates the color proportion and molding detail that defines the two-tone treatment, providing scale reference for readers considering similar approaches. This bathroom proves that wall design ideas need not be expensive or complex to deliver significant impact—sometimes thoughtful paint application combined with simple trim work creates all the interest a space needs.
Key Design Tips: Choose paint colors with similar undertones so they feel related despite different hues. Install chair rail at appropriate height—typically 32-36 inches works for standard ceiling heights. Use painter’s tape precisely at trim lines for clean color transitions. Paint the darker color first, then tape and paint lighter color to prevent dark bleeding under tape. Consider matte or eggshell finish for lower walls as these hide imperfections better in high-traffic areas. Use semi-gloss or satin for upper walls in bathrooms to resist moisture. Prime walls before painting especially when using dramatically different colors. Calculate proportion of color division based on ceiling height—aim for roughly one-third to one-half wall height for lower color. Touch up both colors after removing tape for professional results.
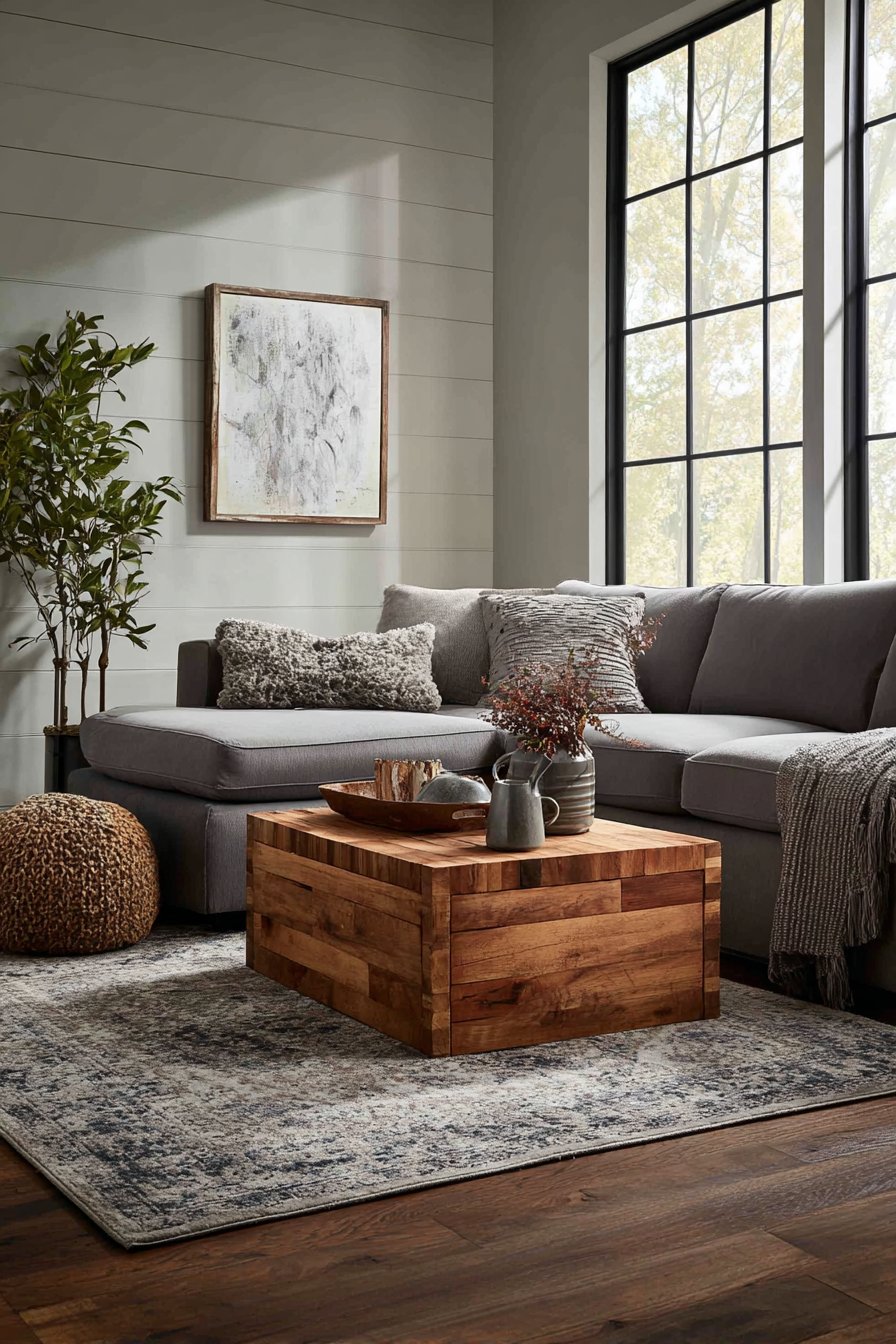
27. Classic Horizontal Shiplap Treatment
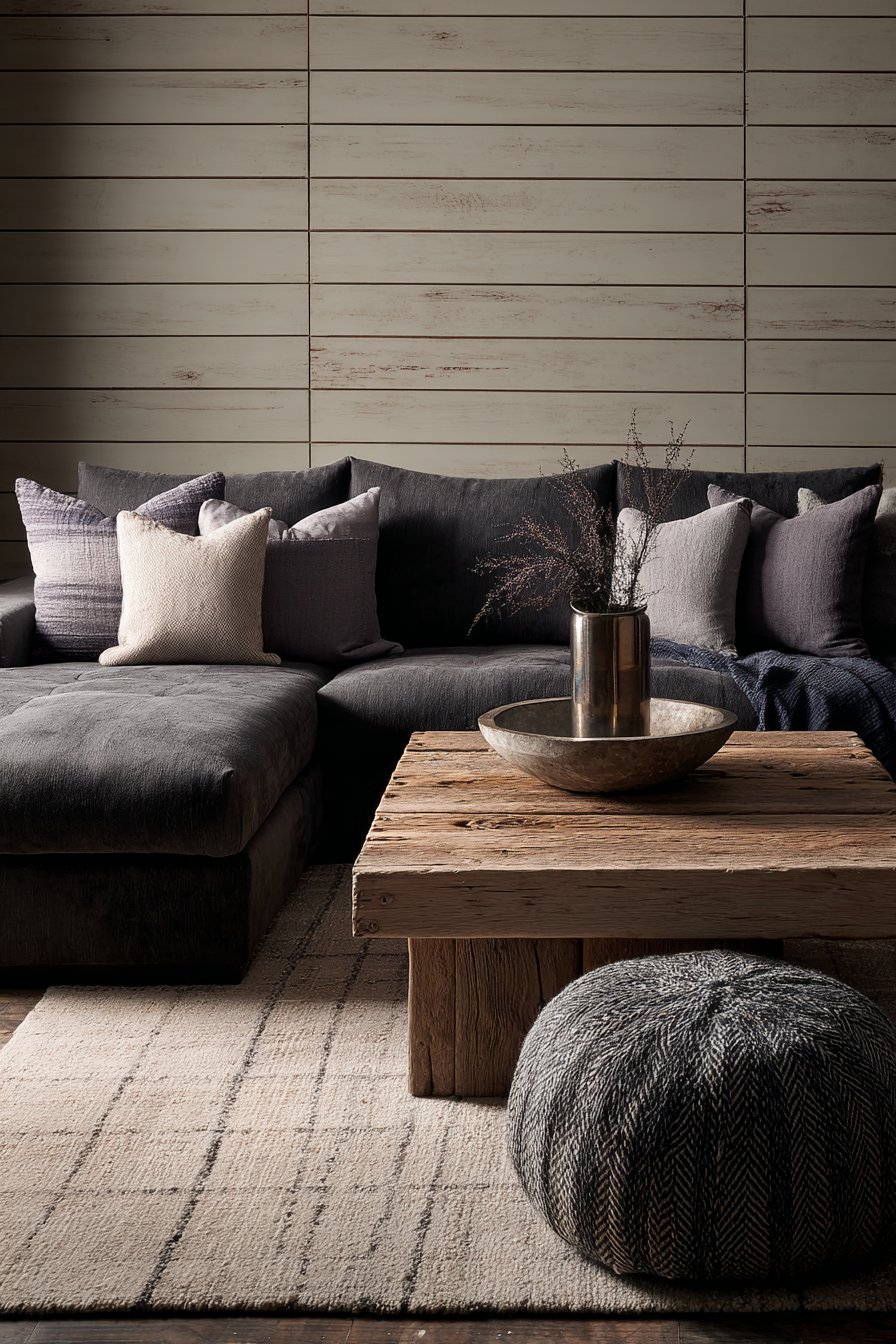
Living room wall design ideas embrace farmhouse charm through modern shiplap wall treatment in horizontal orientation, painted in soft greige creating subtle linear texture. This installation demonstrates how wall design ideas can reference traditional building materials in contemporary applications that feel fresh rather than dated. The shiplap covers the main wall from floor to ceiling with traditional nickel-width spacing between boards creating characteristic shadow lines.
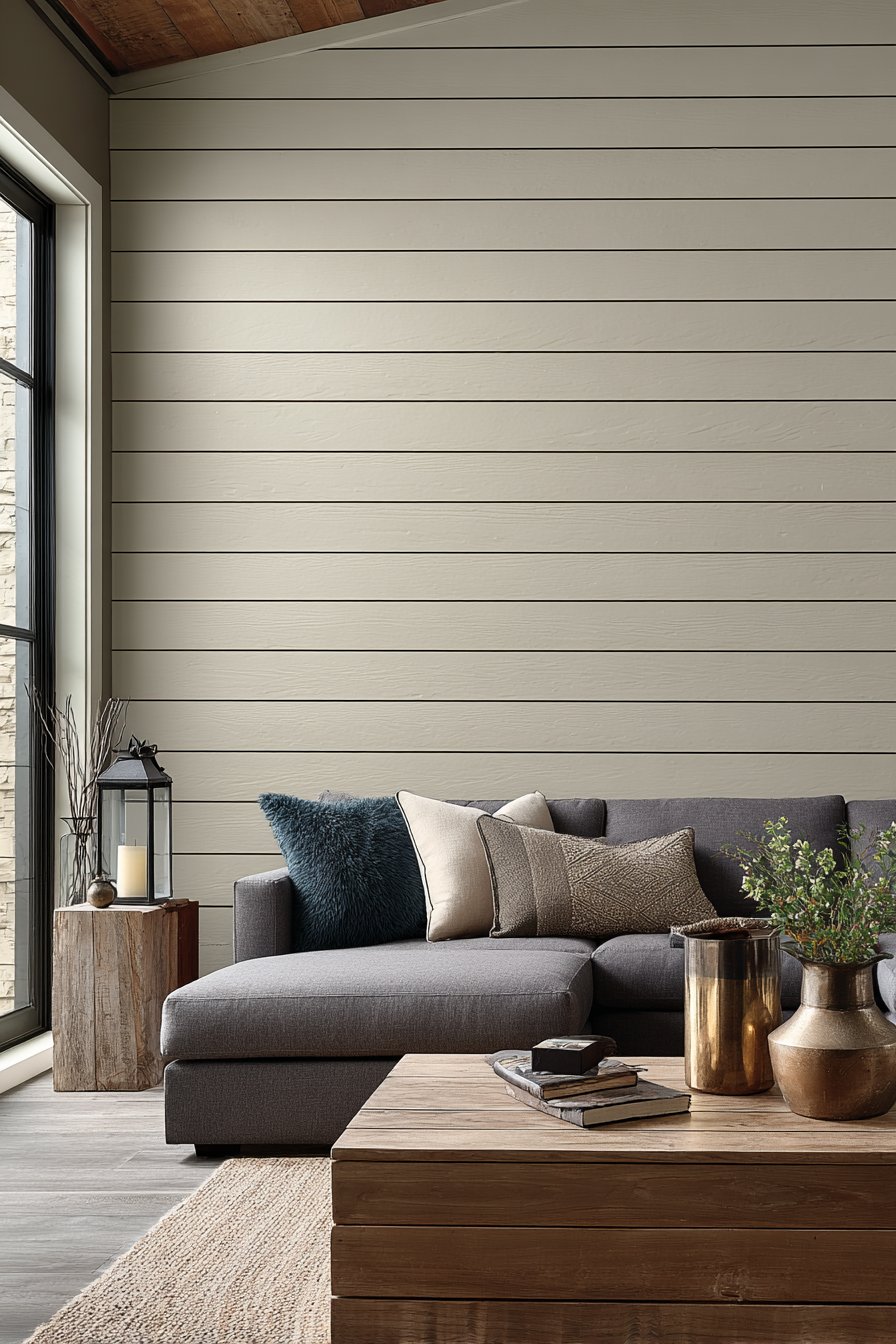
A contemporary sectional in deep gray sits in front of the shiplap wall with mixed metallic accents in decor accessories creating sophisticated material palette. Natural wood coffee table adds warmth that prevents the gray and greige palette from feeling cold. The horizontal orientation of the shiplap creates subtle visual rhythm that adds interest without overwhelming, proving that pattern can be achieved through installation technique as much as through color or material choices.
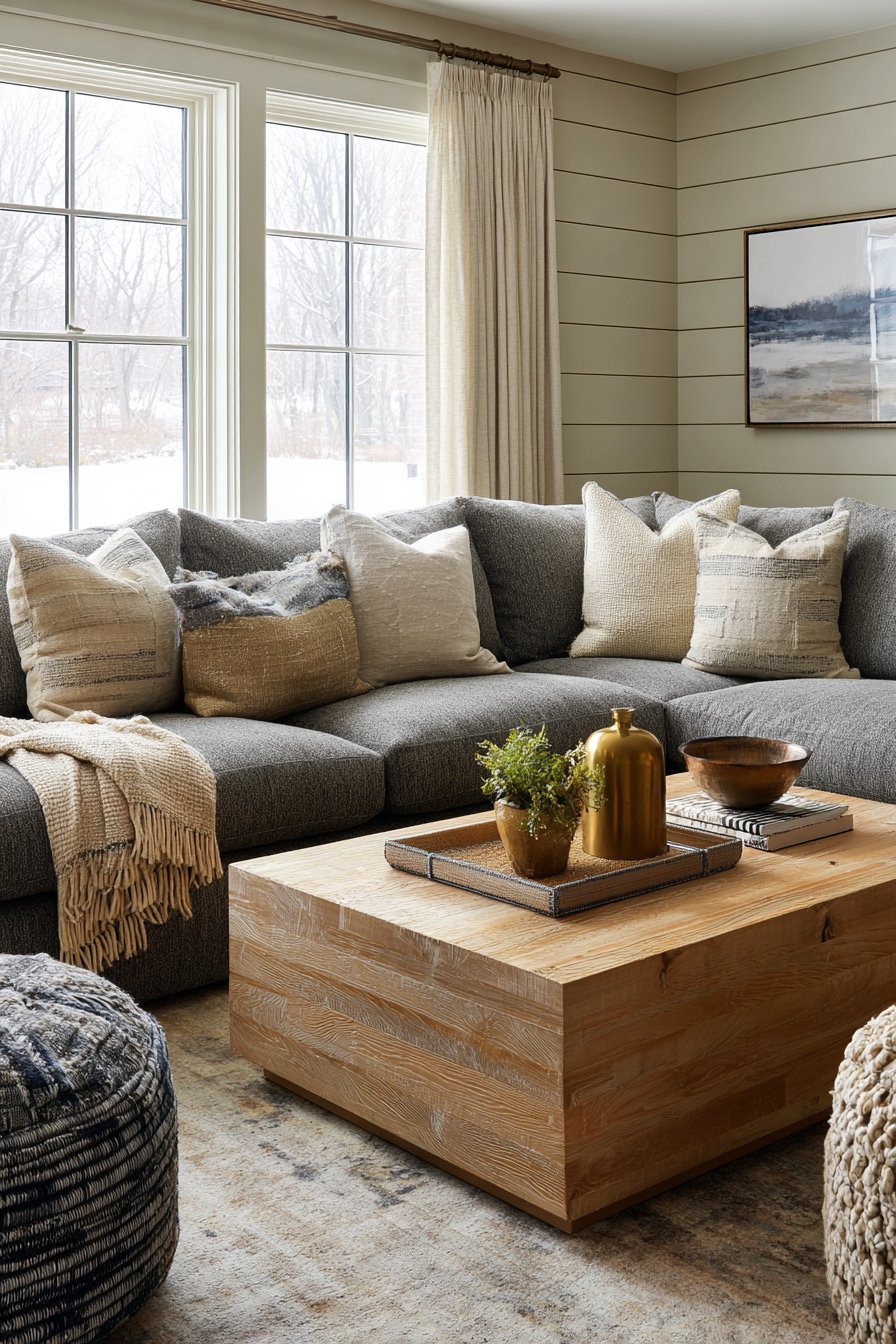
Professional interior photography with side lighting emphasizes the horizontal shadow lines between shiplap boards that give this treatment its distinctive character. Balanced exposure captures the greige paint color and subtle wood texture visible beneath the paint. Wide-angle perspective shows the full wall installation and its integration with modern furnishings, demonstrating how traditional materials can feel completely contemporary when painted in current colors and paired with modern furniture. This living room proves that wall design ideas can successfully bridge traditional and contemporary aesthetics through thoughtful execution and styling.
Key Design Tips: Choose between traditional wood shiplap or MDF alternatives based on budget and desired authenticity. Acclimate wood to room humidity before installation to prevent gaps or buckling after mounting. Use spacers during installation to maintain consistent nickel-width gaps between boards. Nail boards into studs for strongest mounting that won’t sag over time. Fill all nail holes with wood filler before painting for smooth finish. Prime shiplap before installation for easier painting and better coverage. Paint after installation for continuous coverage across boards and gaps. Install boards level using laser level or long carpenter’s level. Plan board layout to minimize short pieces at corners and edges. Consider running shiplap vertically instead of horizontally for different visual effect and emphasis on ceiling height.
Why These Wall Design Ideas Stand Out
These twenty-seven wall design ideas represent the pinnacle of contemporary interior design, each selected for its unique combination of aesthetic appeal, practical functionality, and adaptability to various home styles. What distinguishes these concepts is their foundation in real-world application rather than purely theoretical design—each treatment addresses specific spatial challenges while delivering substantial visual impact that transforms rooms from ordinary to memorable.
The vertical wood slat installation demonstrates how contemporary wall design ideas can introduce organic materials in clean-lined formats that feel sophisticated rather than rustic, perfect for modern homes seeking warmth without traditional styling. The upholstered headboard wall treatment showcases how wall design ideas can merge comfort with luxury, creating hotel-quality ambiance in residential bedrooms through materials typically reserved for furniture. Gallery wall arrangements prove that wall design ideas need not involve construction or installation—sometimes thoughtful curation and precise placement of existing artwork creates the most personal and impactful wall treatments.
Built-in shelving and storage solutions represent wall design ideas at their most functional, transforming wasted vertical space into hardworking organizational systems that eliminate clutter while adding architectural presence. The large-format tile installations showcase how modern materials and installation techniques create seamless, sophisticated surfaces perfect for wet areas without sacrificing style. Hand-painted murals and wallpaper applications demonstrate that wall design ideas can introduce color and pattern in ways that painted walls cannot, creating focal points and setting room moods through artistic expression.
Three-dimensional panel systems and textured treatments exemplify how wall design ideas can achieve impact through form and shadow rather than color alone, adding architectural interest to flat surfaces through geometric precision. Natural stone and wood installations bring exterior materials inside, creating connections to nature that enhance wellbeing while adding authentic texture impossible to replicate with manufactured alternatives. Board and batten, wainscoting, and other traditional millwork treatments prove that historical architectural details remain relevant, adding proportion and refinement to contemporary homes.
Bold accent walls in dark colors or dramatic wallpapers showcase how confident wall design ideas can transform small spaces into jewel-box experiences, creating memorable impressions in powder rooms and intimate spaces. Functional treatments like chalkboard paint, magnetic surfaces, and pegboard systems demonstrate that wall design ideas can be primarily utilitarian while maintaining aesthetic appeal, supporting household organization and creative activities. Mirror installations and two-tone paint treatments prove that sometimes the simplest wall design ideas deliver the most significant impact, using basic materials in thoughtful ways to solve spatial and lighting challenges.
The shiplap, herringbone, and other patterned wood installations showcase technical precision in wall design ideas, creating visual rhythm through meticulous craftsmanship that rewards close examination. Grasscloth and other natural wallcoverings introduce organic texture that adds warmth and interest without bold color or pattern, perfect for spaces requiring subtle sophistication. Collection walls and eclectic arrangements demonstrate how wall design ideas can showcase personal treasures in artful compositions that tell individual stories while creating cohesive design statements.
These wall design ideas span the full spectrum from minimalist simplicity to maximal expression, from traditional architectural details to contemporary innovations, from subtle texture to bold color, from DIY-friendly applications to professional installations requiring specialized skills. What unites them is their shared commitment to transforming walls from architectural necessities into design opportunities—surfaces that define room character, support daily activities, showcase personal style, and create the backdrop against which life unfolds. Each treatment offers lessons in material selection, color theory, spatial proportion, and technical execution that readers can adapt to their specific homes, budgets, and skill levels.
The true value of these wall design ideas lies not in slavish reproduction but in understanding the principles that make each successful—the balance of texture and smoothness, light and shadow, pattern and rest, function and beauty. By studying how these treatments achieve their effects, homeowners and designers can develop informed approaches to their own wall design challenges, creating customized solutions that honor their spaces’ unique characteristics while reflecting personal aesthetic preferences. Whether implementing these ideas exactly as presented or using them as inspiration for hybrid approaches, readers will find endless possibilities for transforming their walls from forgotten surfaces into starring features that elevate entire homes.
Conclusion
Wall design ideas represent one of interior design’s most powerful tools for transformation, offering endless possibilities to alter room character, enhance functionality, and express personal style. From the architectural sophistication of floor-to-ceiling built-ins to the simple impact of two-tone paint, from the organic warmth of natural wood installations to the dramatic flair of bold wallpaper, these twenty-seven concepts demonstrate the remarkable range of approaches available to homeowners seeking to elevate their spaces beyond the ordinary.
The beauty of focusing on wall treatments lies in their substantial impact relative to the effort and investment required. A single well-executed accent wall can completely transform a room’s atmosphere, while comprehensive wall treatments like built-in storage or floor-to-ceiling tile installations solve practical problems while adding architectural distinction. Whether you’re drawn to the clean simplicity of modern geometric panels, the cozy texture of horizontal wood planks, or the personalized charm of gallery wall arrangements, there exists a wall design solution perfectly suited to your space, budget, and skill level.
As you consider implementing these wall design ideas in your own home, remember that the most successful treatments balance aesthetic ambition with practical reality—considering factors like room size, natural light, existing architectural features, and how you actually use each space. Don’t be afraid to start small with removable wallpaper or a painted accent wall before committing to more permanent installations, and always invest time in proper planning and preparation for professional-looking results. Your walls represent blank canvases waiting for transformation—use these ideas as inspiration to create spaces that truly reflect your personality while enhancing your daily living experience.