The ceiling is often called the fifth wall of a room, yet it remains one of the most overlooked elements in kitchen design. In modern home interiors, the kitchen ceiling has evolved from a purely functional surface into a dynamic design feature that can dramatically transform the entire space. Today’s homeowners are discovering that innovative ceiling treatments can add architectural interest, improve lighting quality, create visual height, and establish the overall aesthetic tone of their kitchens. Whether you’re planning a complete kitchen renovation or simply looking to refresh your existing space, modern ceiling ideas offer endless possibilities for elevating your design.
Contemporary kitchen ceiling design encompasses a remarkable range of styles, from minimalist approaches that emphasize clean lines and subtle sophistication to bold architectural statements that become the room’s focal point. The beauty of modern ceiling design lies in its versatility—it can complement any kitchen style, from sleek urban lofts to warm transitional spaces. Modern ceiling treatments also address practical considerations, incorporating improved lighting solutions, better acoustics, and even smart home technology integration. The interplay between form and function has never been more seamless, allowing homeowners to create kitchens that are both visually stunning and highly practical for everyday living.
This comprehensive guide explores twenty-three distinctive modern kitchen ceiling ideas, each offering unique characteristics and design opportunities. From dramatic tray ceilings with integrated lighting to natural wood plank installations, from industrial exposed elements to sophisticated coffered designs, these concepts represent the cutting edge of contemporary kitchen design. Whether your style leans toward minimalist Scandinavian aesthetics, industrial chic, or warm organic modernism, you’ll find inspiration and practical guidance for transforming your kitchen ceiling into a design asset that enhances your entire space. Each concept includes detailed descriptions and actionable design tips to help you successfully implement these ideas in your own home.
1. Sleek Tray Ceiling with LED Perimeter Lighting
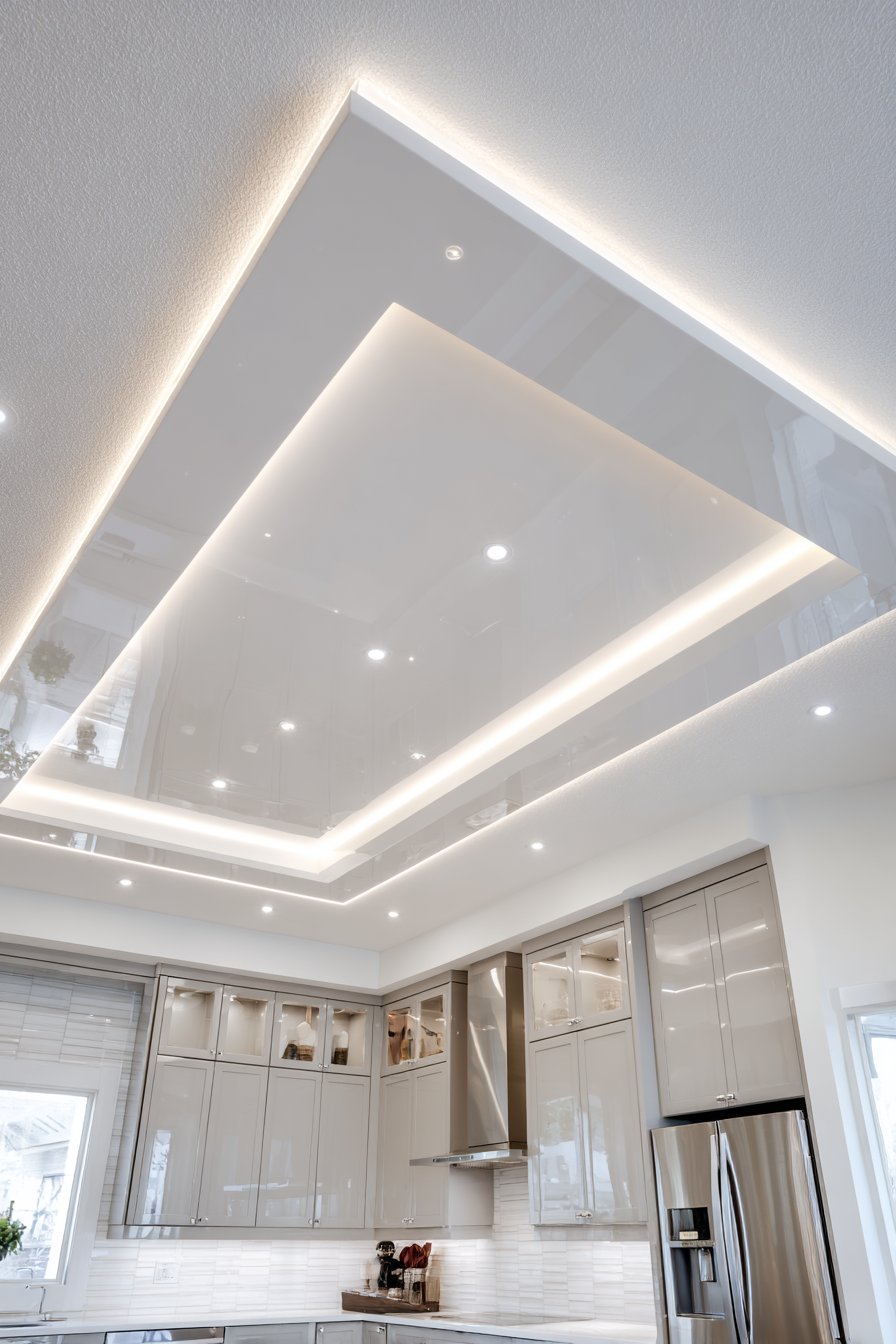
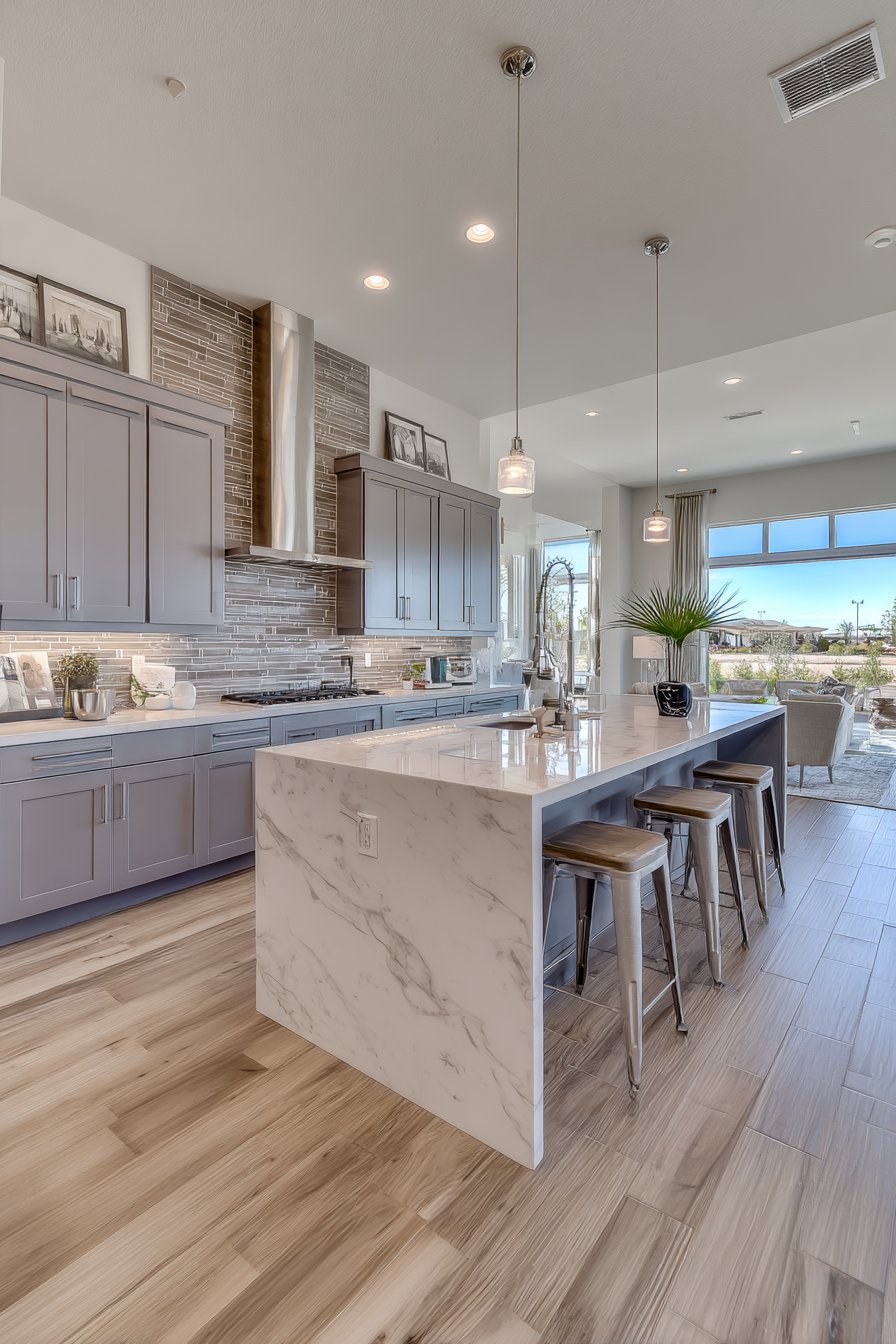
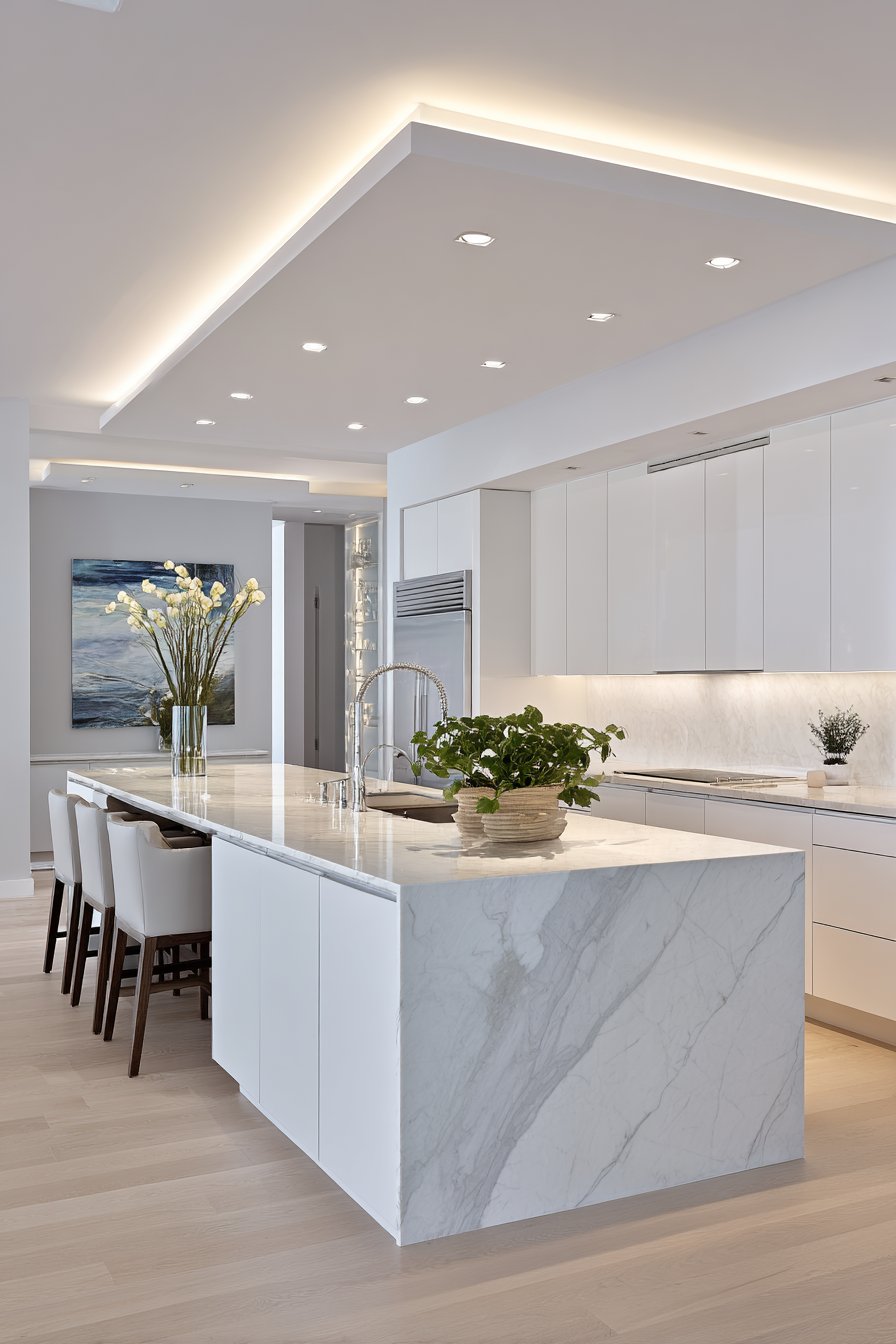
The tray ceiling represents one of the most popular modern ceiling treatments, offering architectural depth without overwhelming the space. This design features a recessed center section that creates a subtle dimensional quality, while concealed LED strip lighting along the perimeter adds both ambient illumination and visual drama. The crisp white finish maintains a clean, contemporary aesthetic that serves as an ideal backdrop for modern kitchen design. The recessed lighting fixtures, finished in brushed nickel, provide focused task lighting exactly where needed for food preparation and cooking activities.

This ceiling treatment works exceptionally well in kitchens with standard eight to nine-foot ceiling heights, as the tray design creates the illusion of additional vertical space. The LED strip lighting can be programmed to different color temperatures and dimming levels, allowing you to adjust the ambiance from bright task-oriented lighting during meal preparation to softer, warmer tones for entertaining. The combination of direct recessed lighting and indirect LED illumination eliminates harsh shadows and creates a balanced, comfortable environment for all kitchen activities.
The success of this design lies in its restraint and precision. The tray depth typically ranges from four to twelve inches, with the perimeter lip measuring two to six inches wide—proportions that create visual interest without appearing heavy or overwhelming. The LED strips remain hidden from direct view, creating a floating effect where light appears to emanate from within the ceiling structure itself. This sophisticated lighting approach has become a hallmark of contemporary interior design, offering both aesthetic appeal and energy efficiency.
Key Design Tips:
- Maintain a tray depth of 6-8 inches for standard ceiling heights to achieve optimal visual impact
- Select LED strips with a color temperature between 2700K-3000K for warm, inviting illumination
- Install dimmable LED drivers to allow flexible lighting control for different times of day and activities
- Paint the recessed tray section in the same white as the perimeter to maintain cohesion while the subtle shadow lines create definition
- Space recessed lights 4-6 feet apart for even task lighting distribution across work surfaces
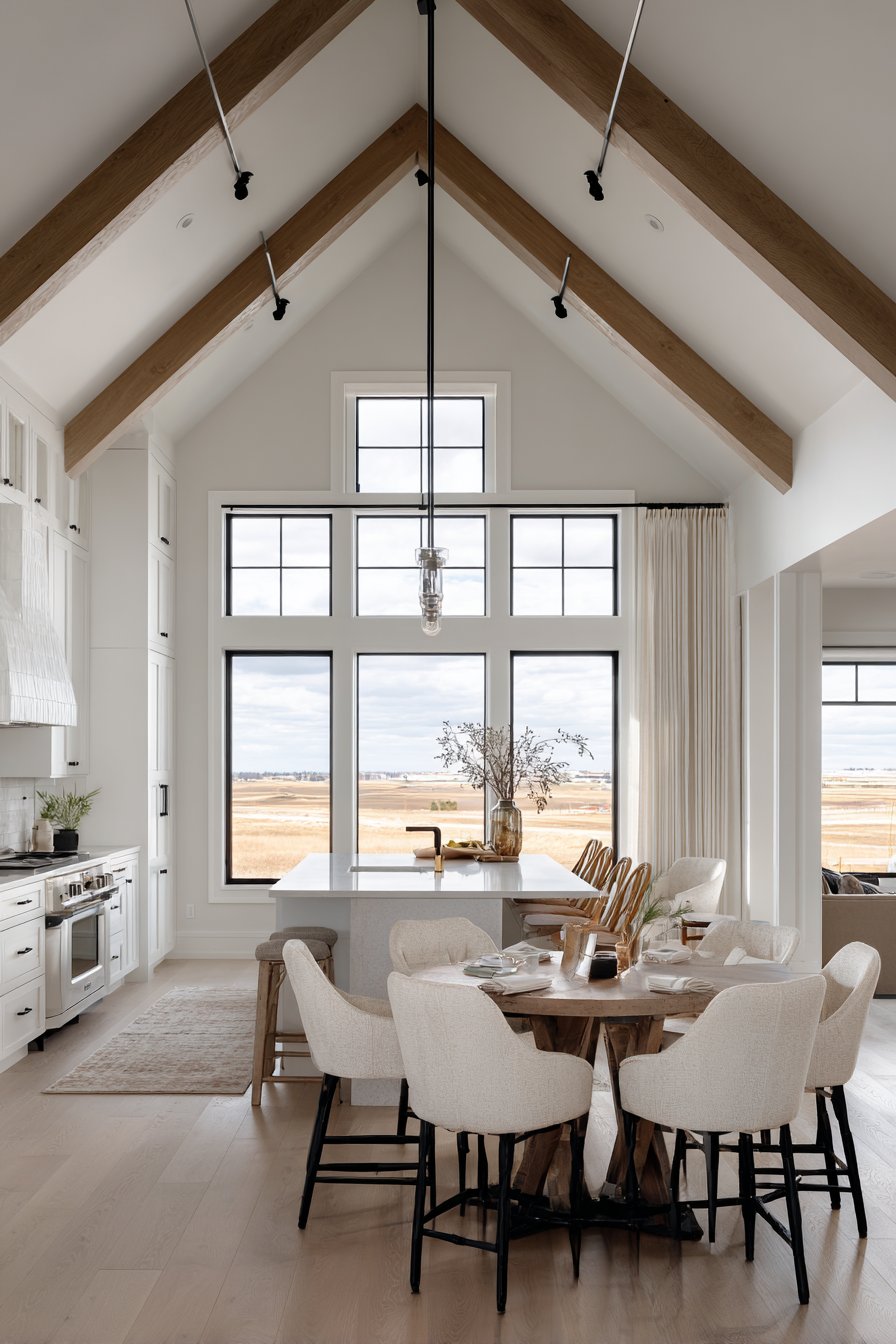
2. Contemporary Exposed Wooden Beam Ceiling
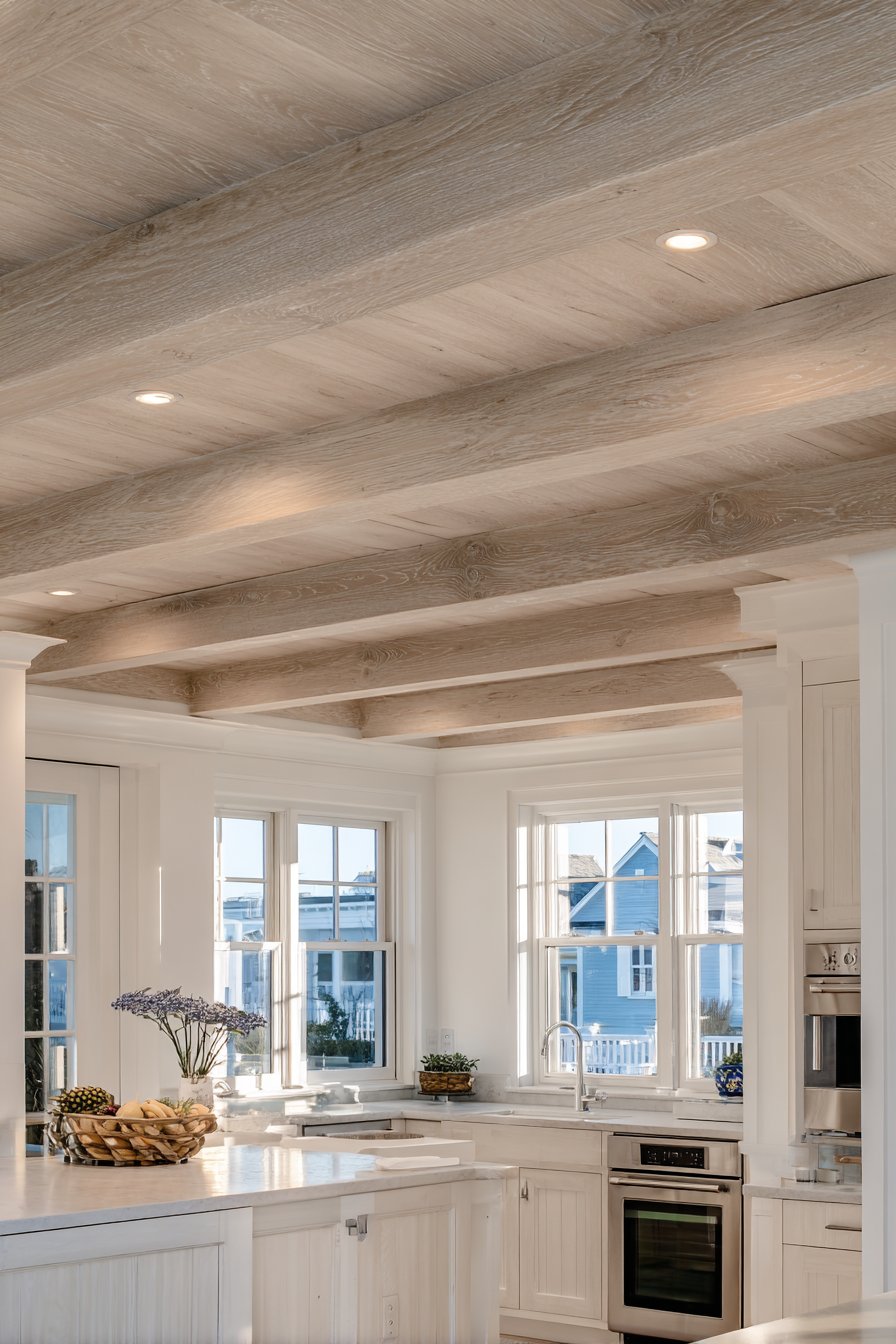
Natural wood brings organic warmth to modern kitchen design, and exposed beams in light oak finish create a stunning contemporary interpretation of this classic architectural element. Unlike traditional rustic beams that appear heavy and dark, these modern beams feature clean, straight lines and a natural light finish that complements rather than dominates the space. The beams run parallel across the ceiling in a linear arrangement, creating rhythm and directional flow while the white painted ceiling between them maintains brightness and openness.
The integration of recessed spotlights between the beams demonstrates how modern design successfully merges aesthetics with functionality. These fixtures provide essential task lighting without interrupting the clean linear pattern established by the beams. The wood tone introduces natural variation and texture, creating visual interest that prevents the minimalist white kitchen below from feeling sterile or cold. This design approach works particularly well in kitchens with contemporary white cabinetry and stainless steel appliances, where the wood ceiling becomes a crucial warming element.
The beauty of this ceiling treatment extends beyond its visual appeal to its versatility in complementing various modern kitchen styles. Whether your kitchen leans toward Scandinavian minimalism, contemporary farmhouse, or transitional design, the exposed beam ceiling adapts beautifully. The key lies in selecting the appropriate beam dimensions and spacing—typically beams measure four to six inches wide by four to eight inches tall, spaced between three to five feet apart. This creates a balanced, proportional appearance that feels intentional rather than arbitrary.
Key Design Tips:
- Choose beams in light oak, ash, or maple for a contemporary feel rather than dark traditional woods
- Maintain consistent beam spacing of 3-4 feet for a rhythmic, organized appearance
- Apply a matte or satin finish to the wood to avoid overly glossy surfaces that can appear artificial
- Mount beams perpendicular to the main kitchen length to visually widen the space, or parallel to emphasize length
- Coordinate beam width with ceiling height—wider beams for higher ceilings, narrower for standard heights
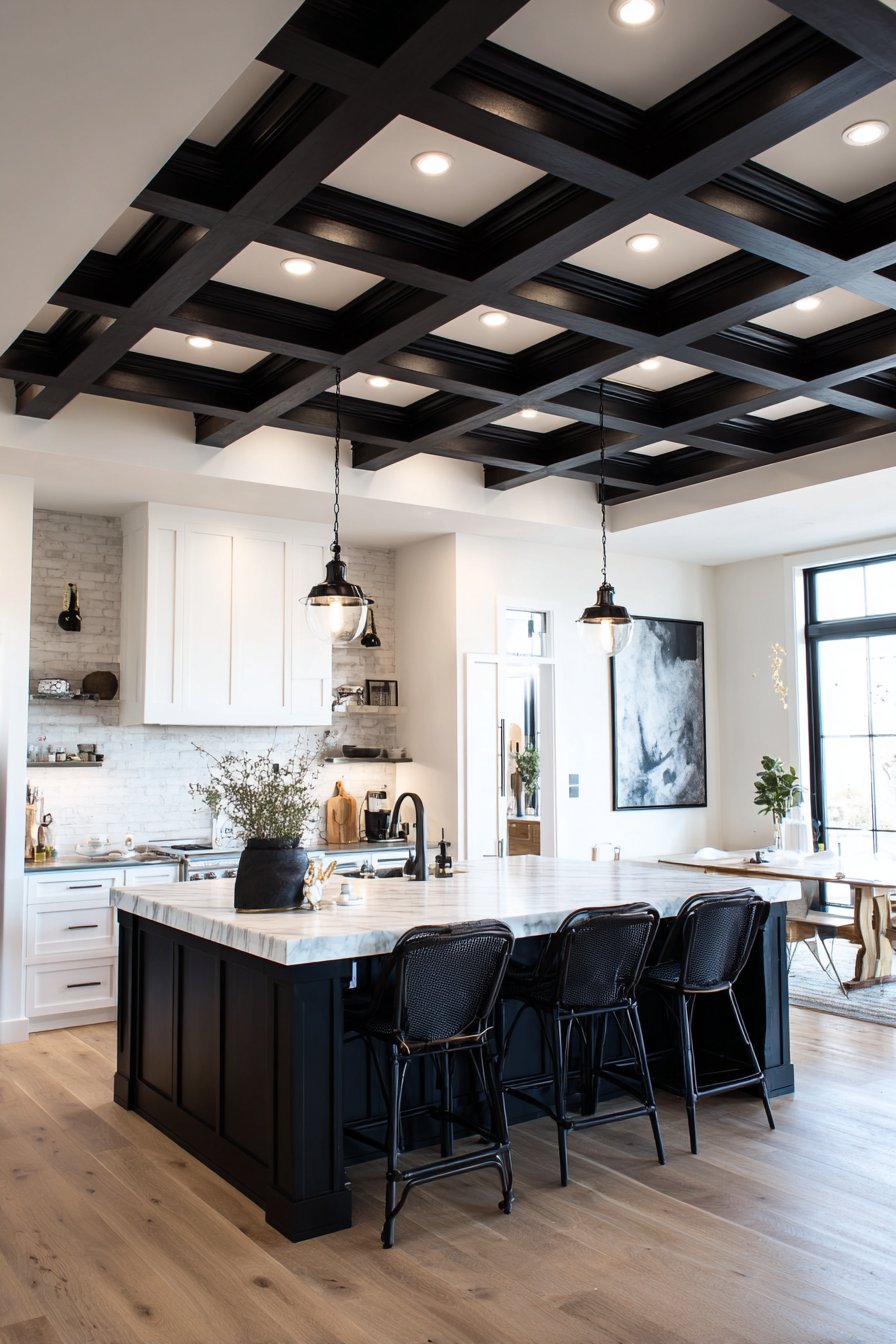
3. Dramatic Black Coffered Ceiling Design
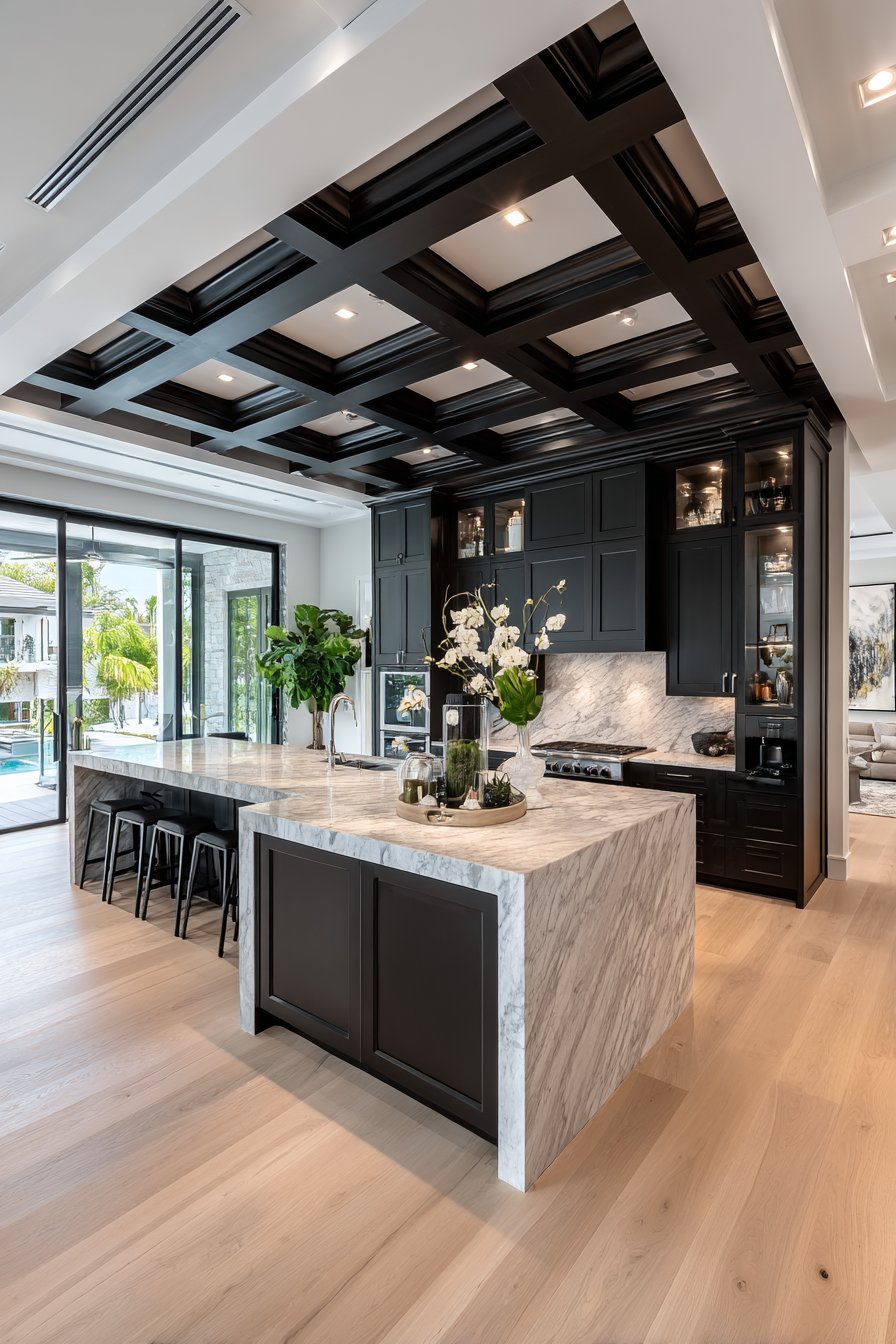
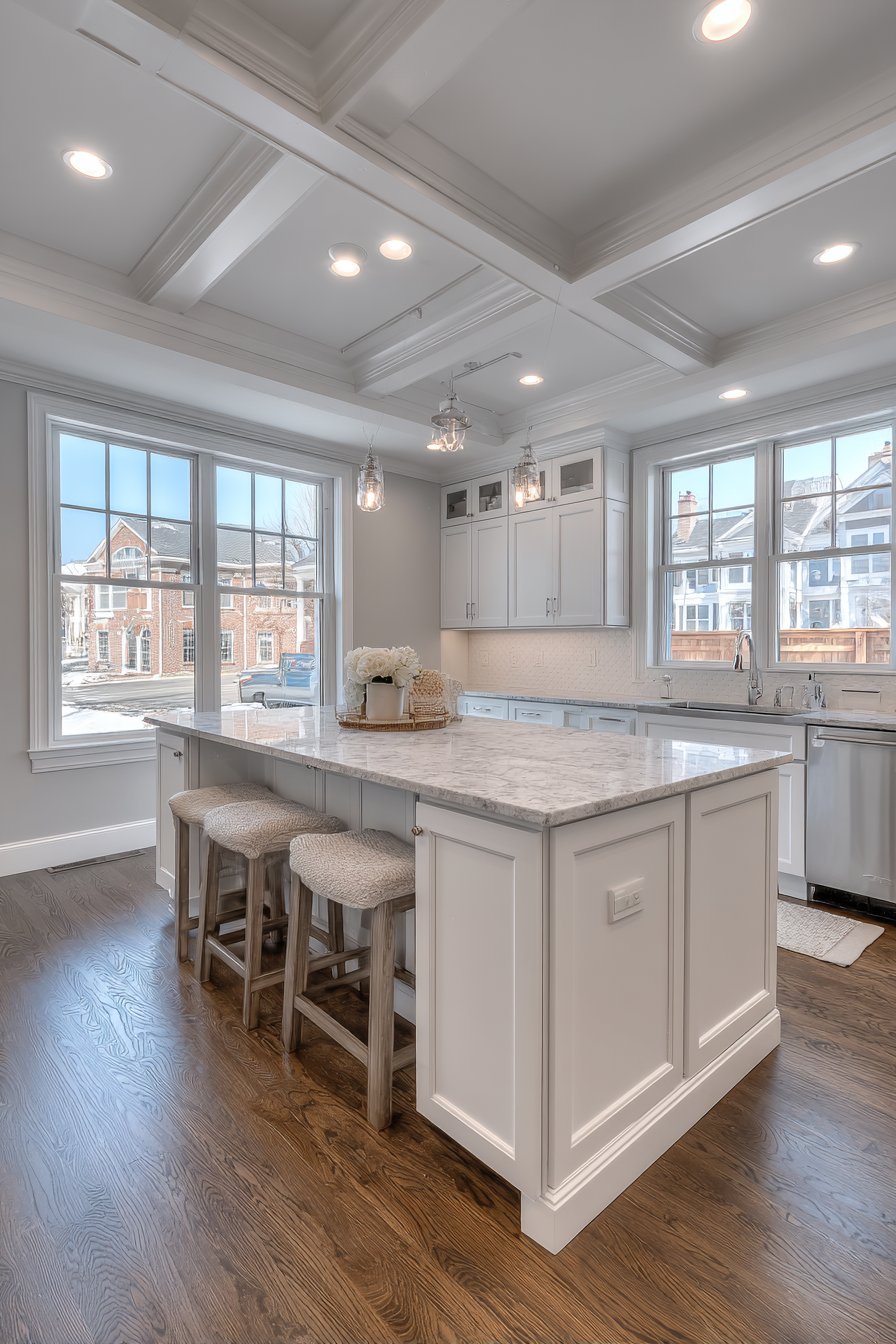
Bold and unexpected, the black coffered ceiling creates stunning visual drama in a modern kitchen. This design features a geometric grid pattern of matte black painted wood frames with recessed white panels, establishing a sophisticated contrast that immediately captures attention. The coffered structure adds architectural complexity and perceived height, while the black color scheme provides a contemporary twist on traditional coffered ceiling design. Minimal recessed lighting integrated into the white panels ensures adequate illumination without cluttering the striking geometric pattern.
The psychological impact of a dark ceiling in a bright white kitchen cannot be overstated. This design approach defies conventional wisdom that ceilings must always be white to maximize light and space. Instead, the black coffered ceiling grounds the room, creating definition and structure while the bright white cabinetry and marble countertops below provide balance and prevent the space from feeling cave-like. The result is a kitchen with genuine design confidence—one that embraces contrast and makes a bold statement about the homeowner’s aesthetic sensibilities.
Implementing a black coffered ceiling requires careful consideration of room proportions and lighting design. This treatment works best in kitchens with ceiling heights of at least nine feet, as the visual weight of the dark color and the depth of the coffers can make lower ceilings feel oppressive. The coffer depth typically ranges from three to six inches, with frame widths between four to eight inches. The geometry should relate proportionally to the room dimensions, creating a harmonious grid that feels planned and intentional rather than arbitrary.
Key Design Tips:
- Reserve black ceiling designs for kitchens with ceiling heights of 9 feet or higher to maintain airiness
- Use matte black paint rather than glossy finishes to create a sophisticated, light-absorbing surface
- Install abundant lighting—both recessed fixtures and under-cabinet lighting—to compensate for light absorption
- Ensure the coffer grid relates to the kitchen layout, aligning frames with islands or major architectural features
- Incorporate at least 60% bright surfaces in the kitchen (white cabinets, light countertops) to balance the dark ceiling
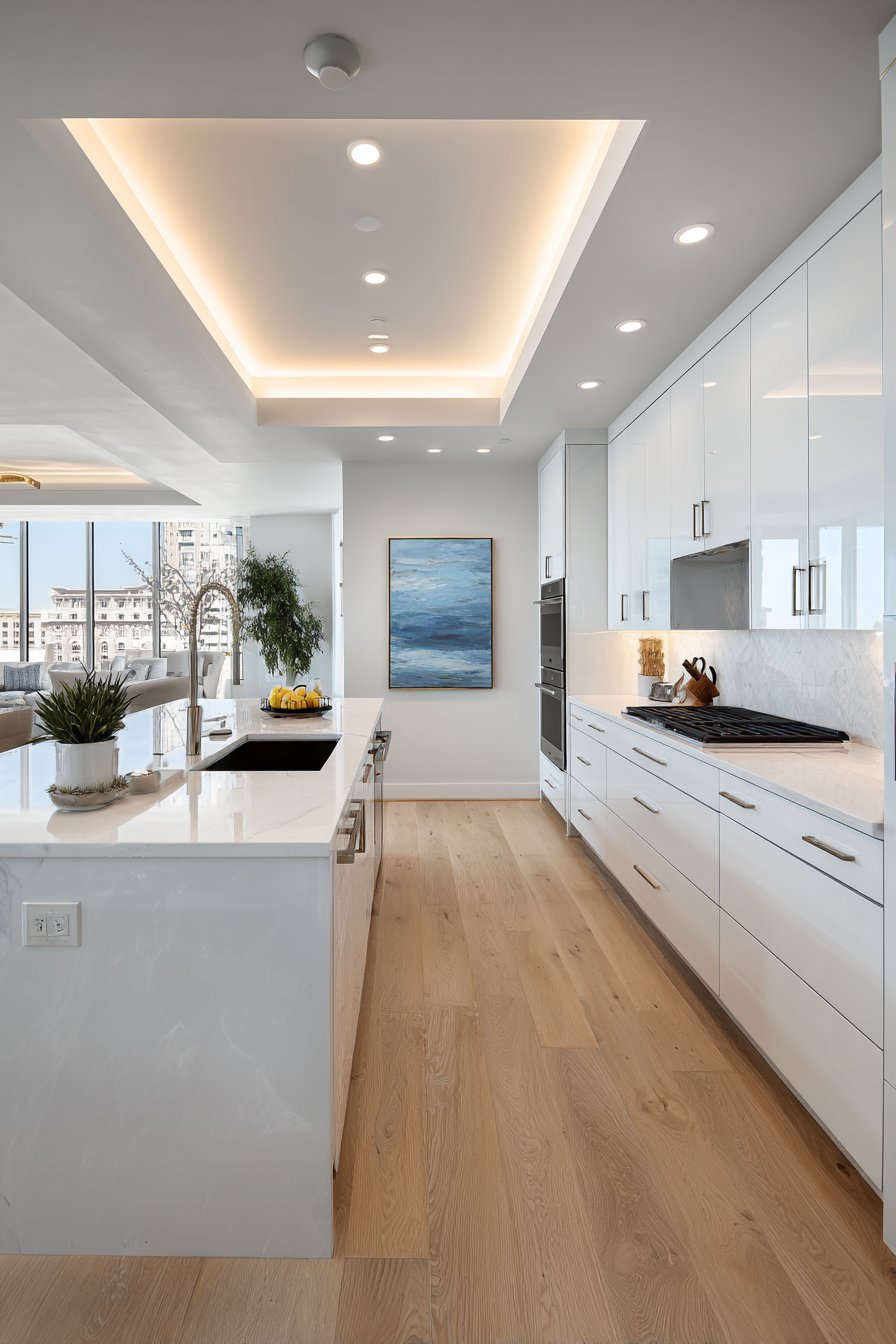
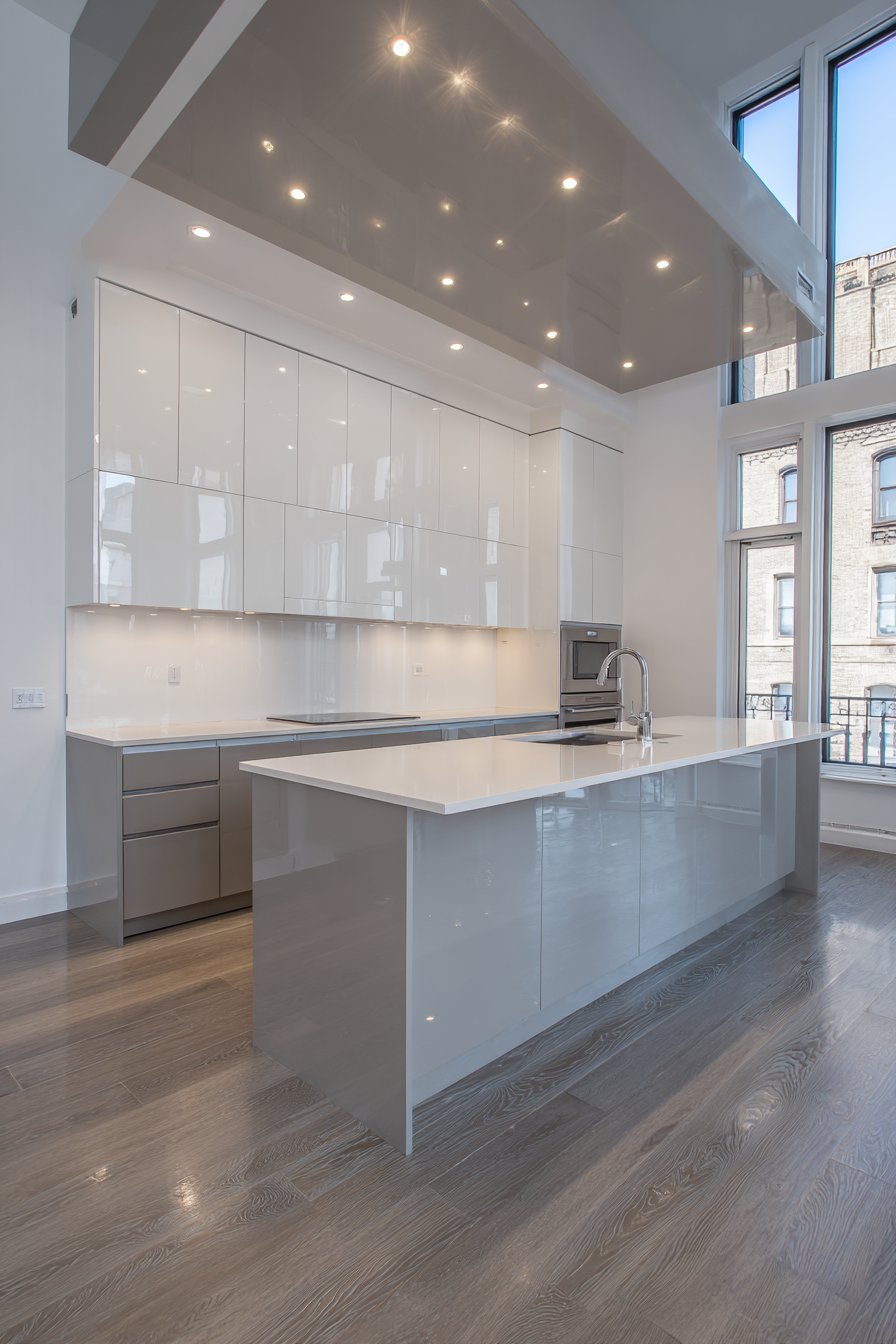
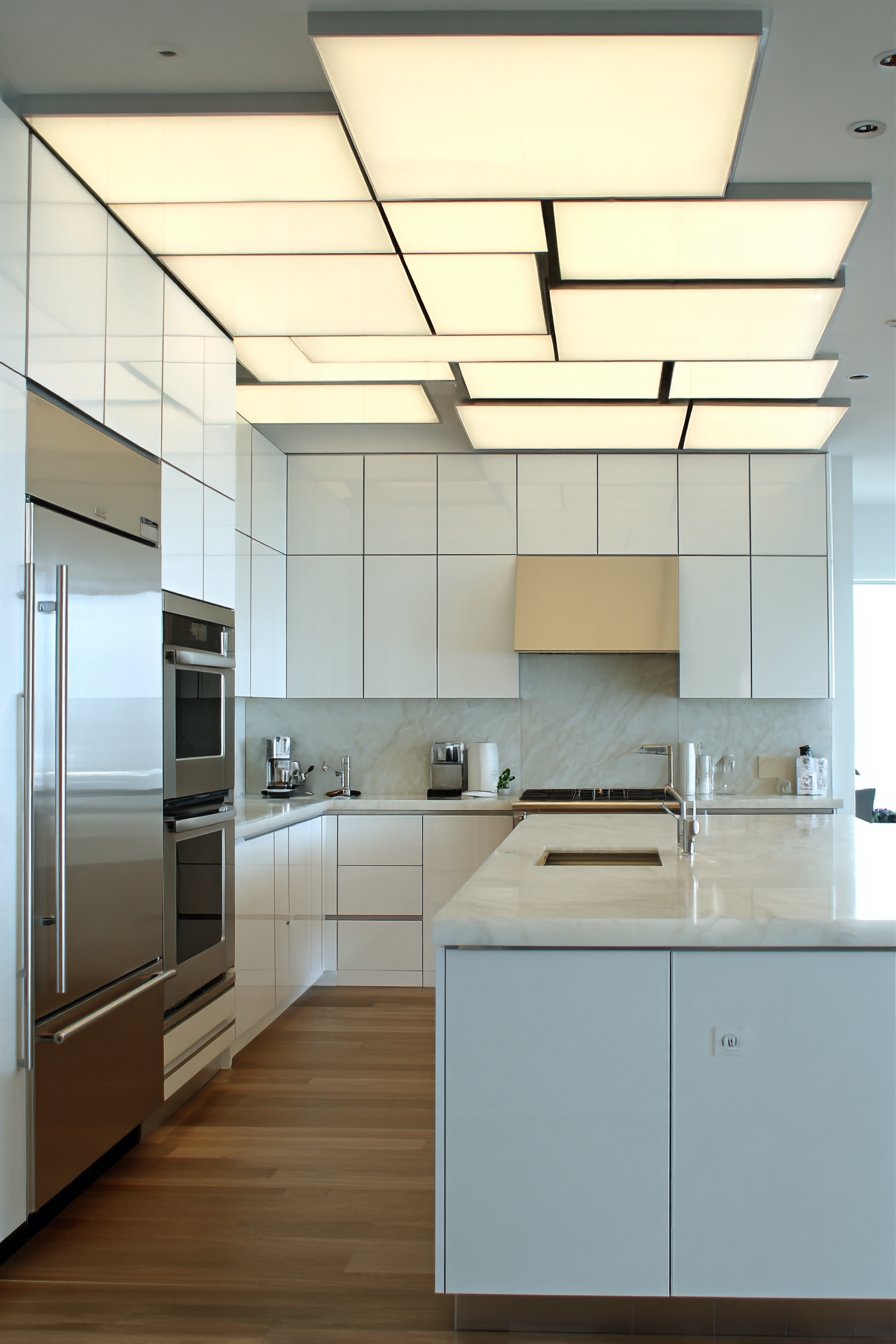
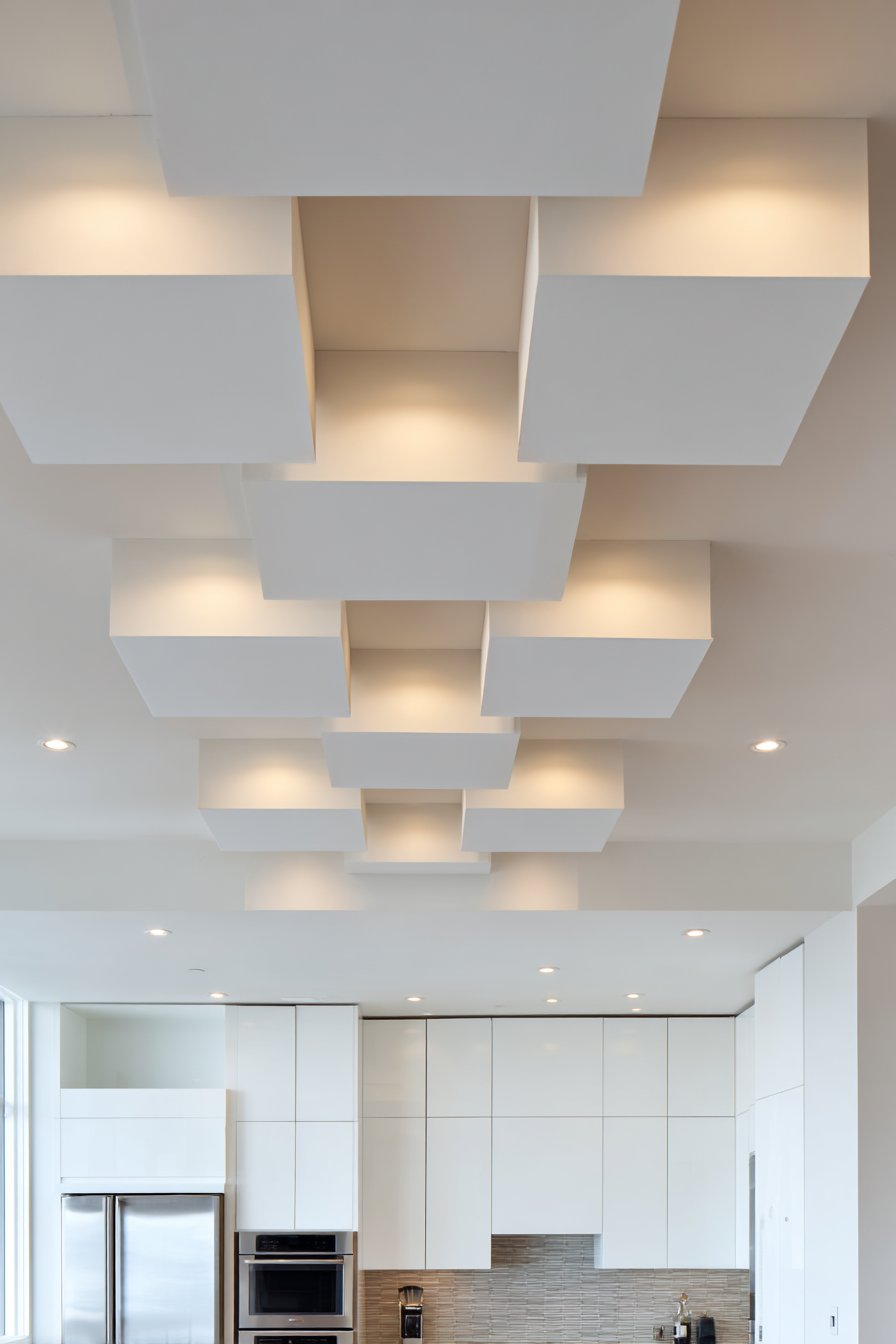
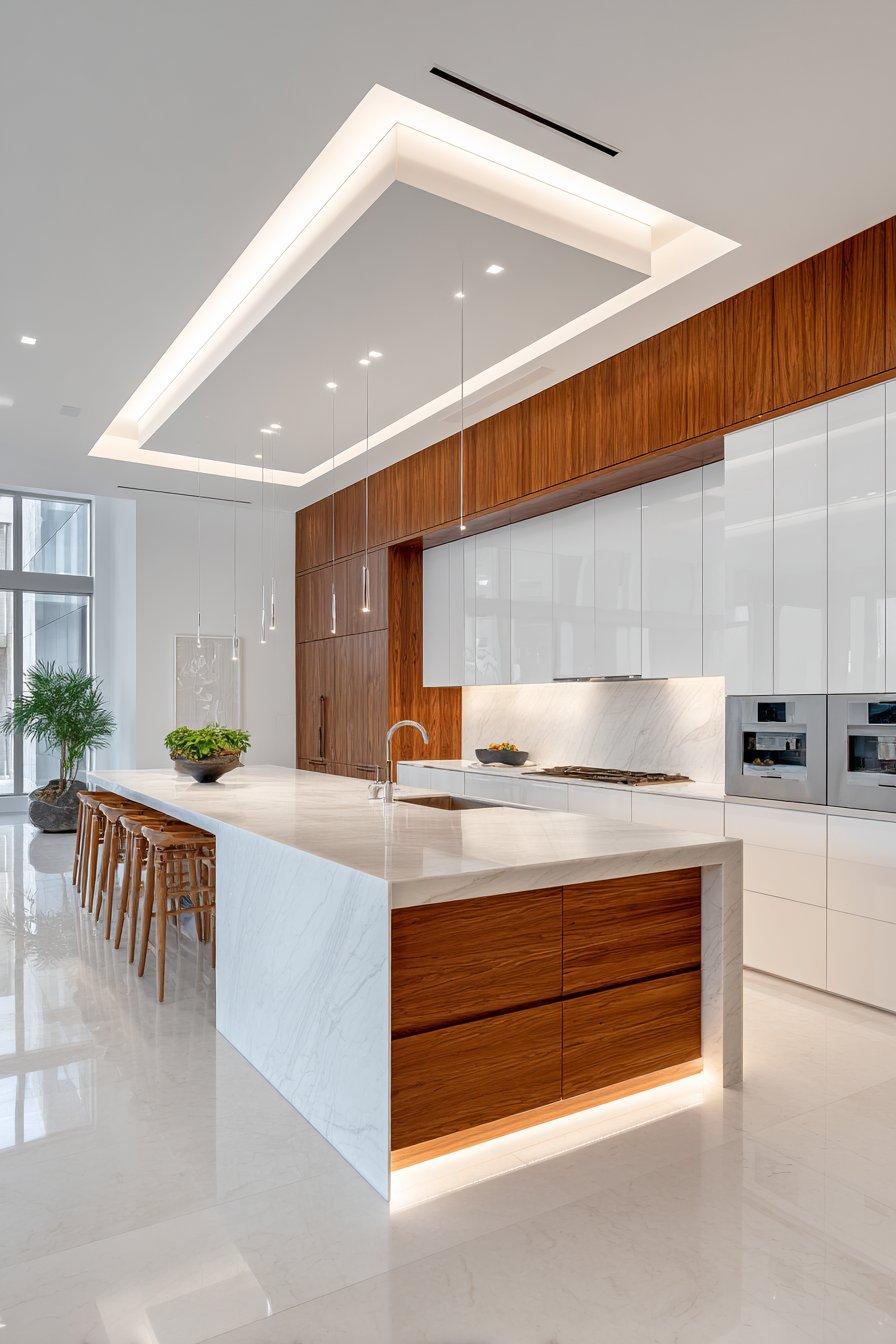
4. Floating Ceiling Panel with Concealed Lighting
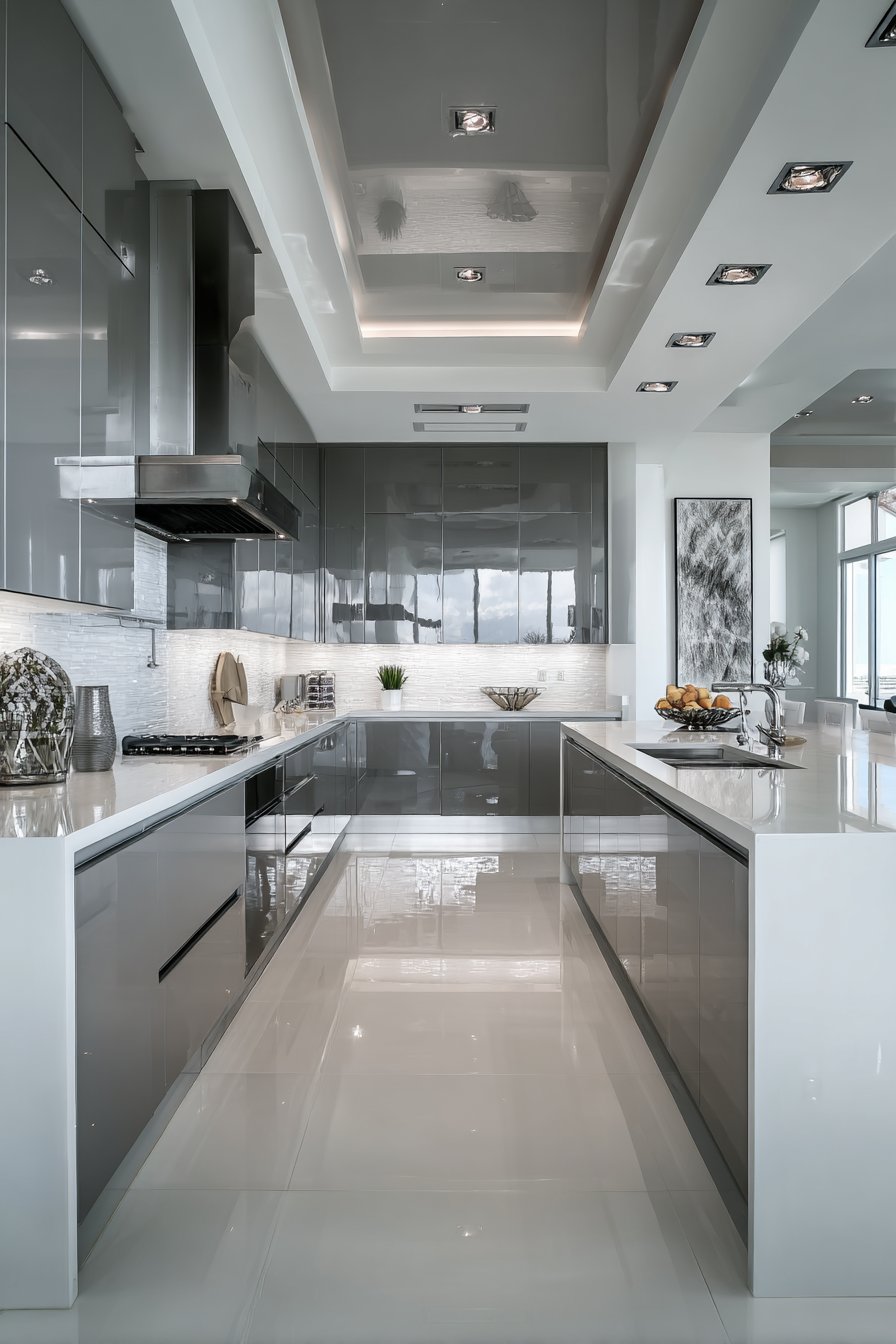
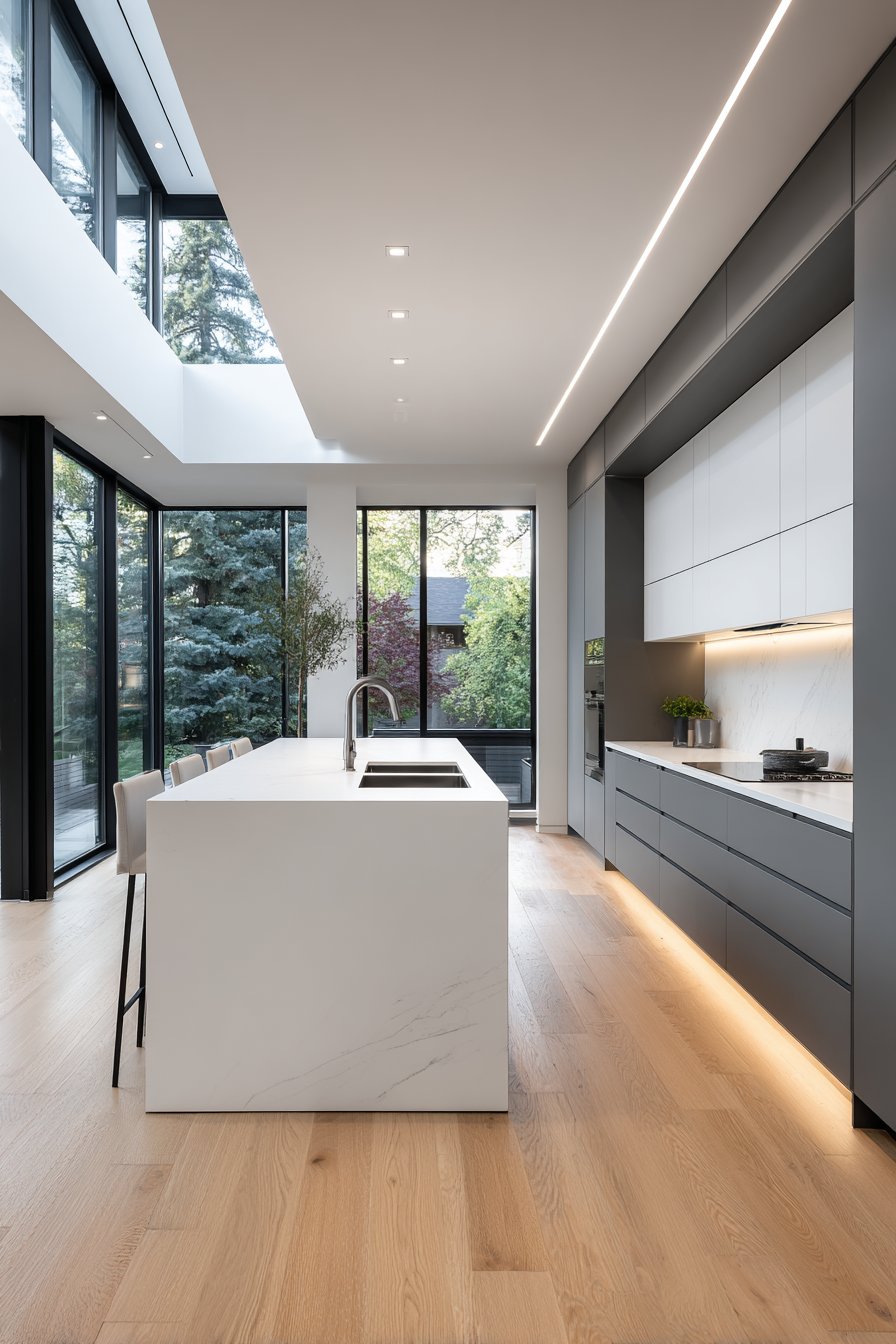
The floating ceiling design represents the pinnacle of modern minimalist architecture, creating a hovering effect that appears to defy gravity. This treatment features a dropped ceiling section with a smooth white finish, surrounded by a subtle gap around the perimeter where warm LED lighting remains hidden from direct view. The main ceiling extends higher in the same white finish, creating a two-level composition that adds architectural interest without introducing busy patterns or heavy visual elements. This design approach exemplifies the modern principle that sophistication emerges from simplicity.
The concealed lighting within the perimeter gap serves multiple functions beyond mere illumination. It visually separates the floating panel from the main ceiling, emphasizing the suspended quality and creating a gentle ambient glow that washes the ceiling surfaces. This indirect lighting approach eliminates harsh shadows and contributes to a calm, serene kitchen atmosphere. The effect is particularly striking in the evening when the ambient ceiling glow contrasts beautifully with focused task lighting over work surfaces and cooking areas.
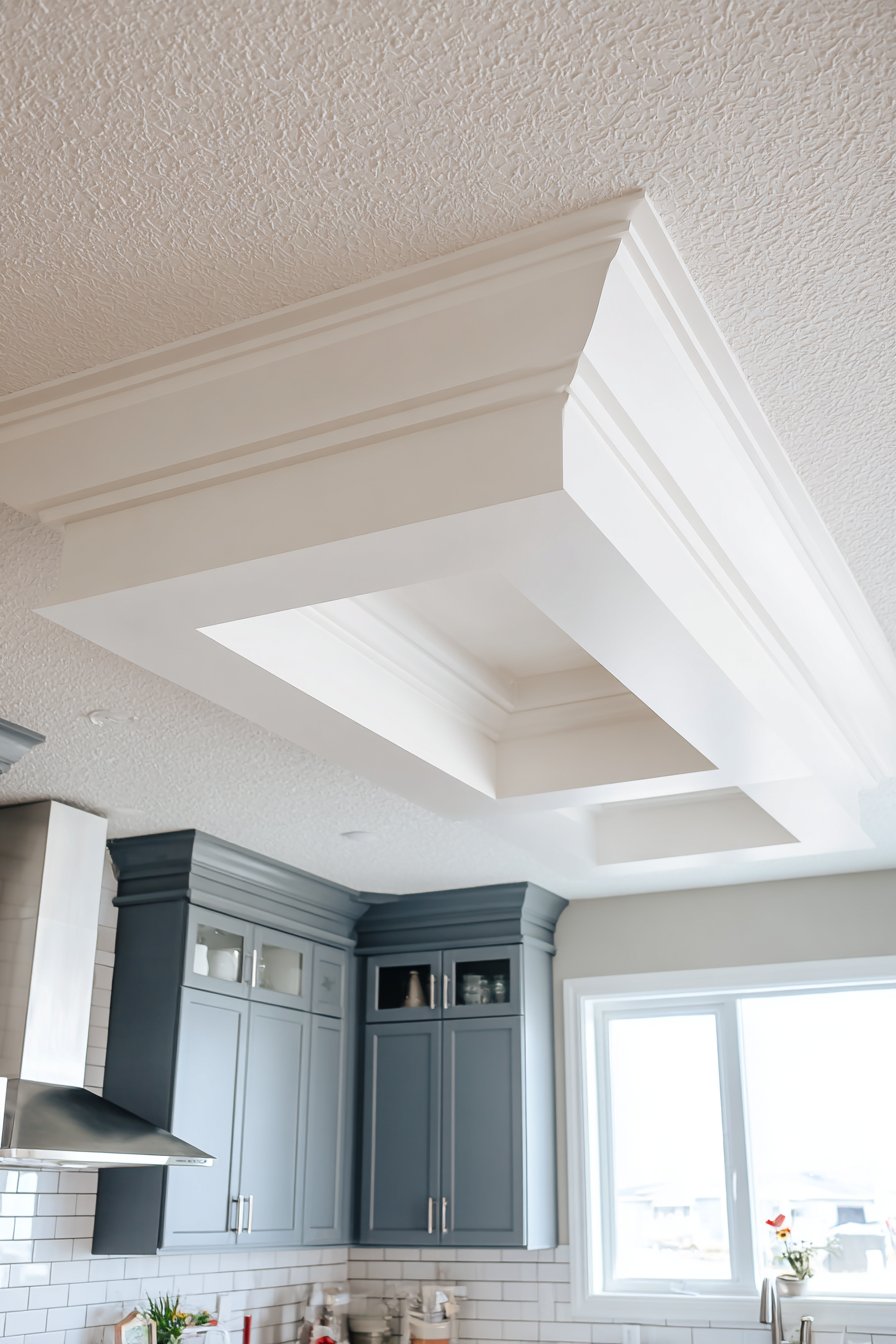
This ceiling treatment integrates seamlessly with contemporary kitchen design featuring grey cabinets and white subway tile backsplash. The neutral palette allows the architectural ceiling feature to command attention without competing with colorful or heavily patterned elements. The floating panel typically measures twelve to eighteen inches thick and can be positioned directly over the island or centered within the kitchen footprint. The perimeter gap usually ranges from two to four inches wide—sufficient to conceal LED strips while creating visible separation.
Key Design Tips:
- Maintain a minimum 12-inch ceiling height difference between the floating panel and main ceiling for clear definition
- Use warm white LED strips (2700K-3000K) in the perimeter gap for inviting ambient illumination
- Size the floating panel to relate proportionally to the kitchen island or dining area below
- Install the LED strips on the upper surface of the gap, directing light upward to create a soft glow
- Connect the LED system to dimmer controls for adjustable atmosphere throughout the day
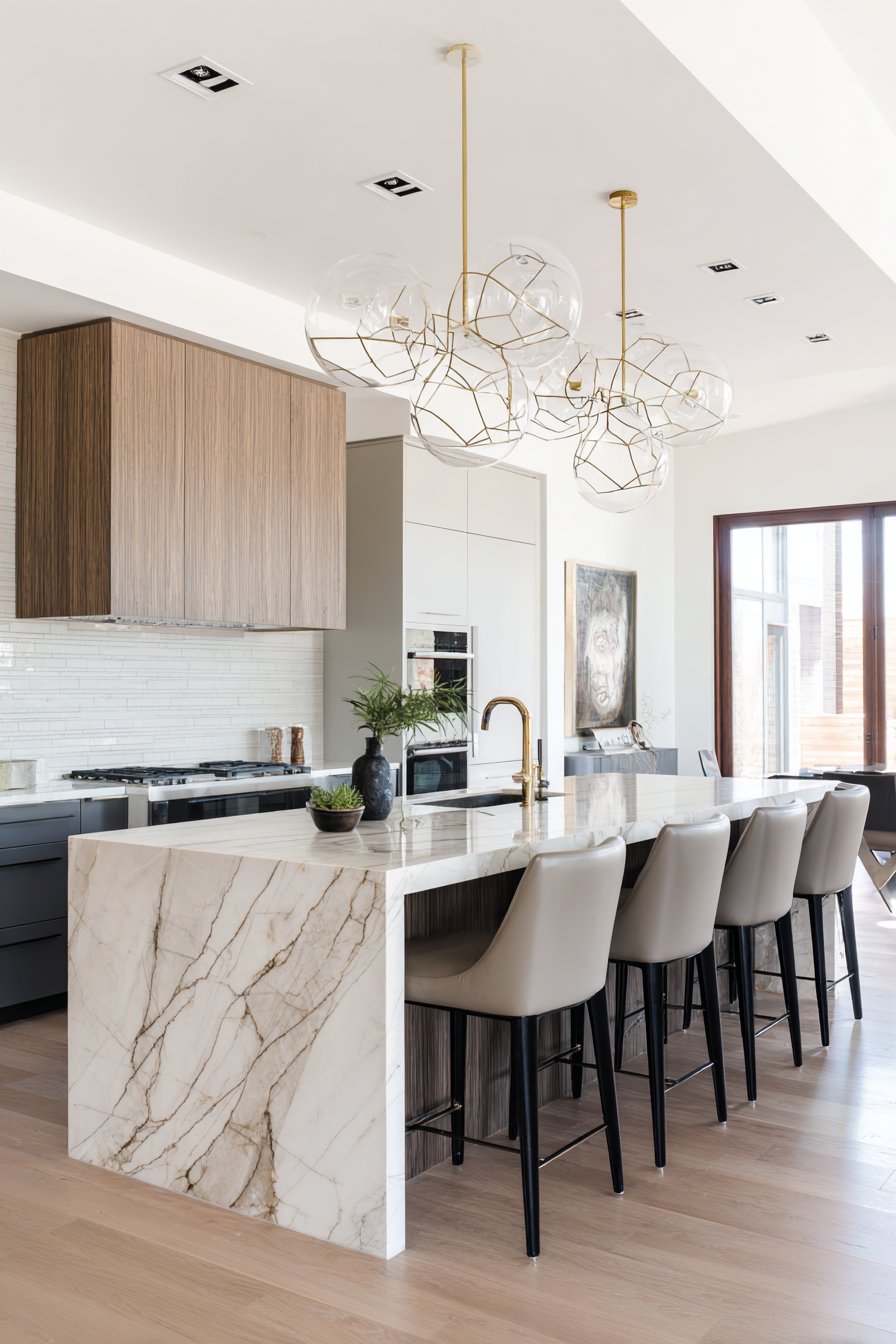
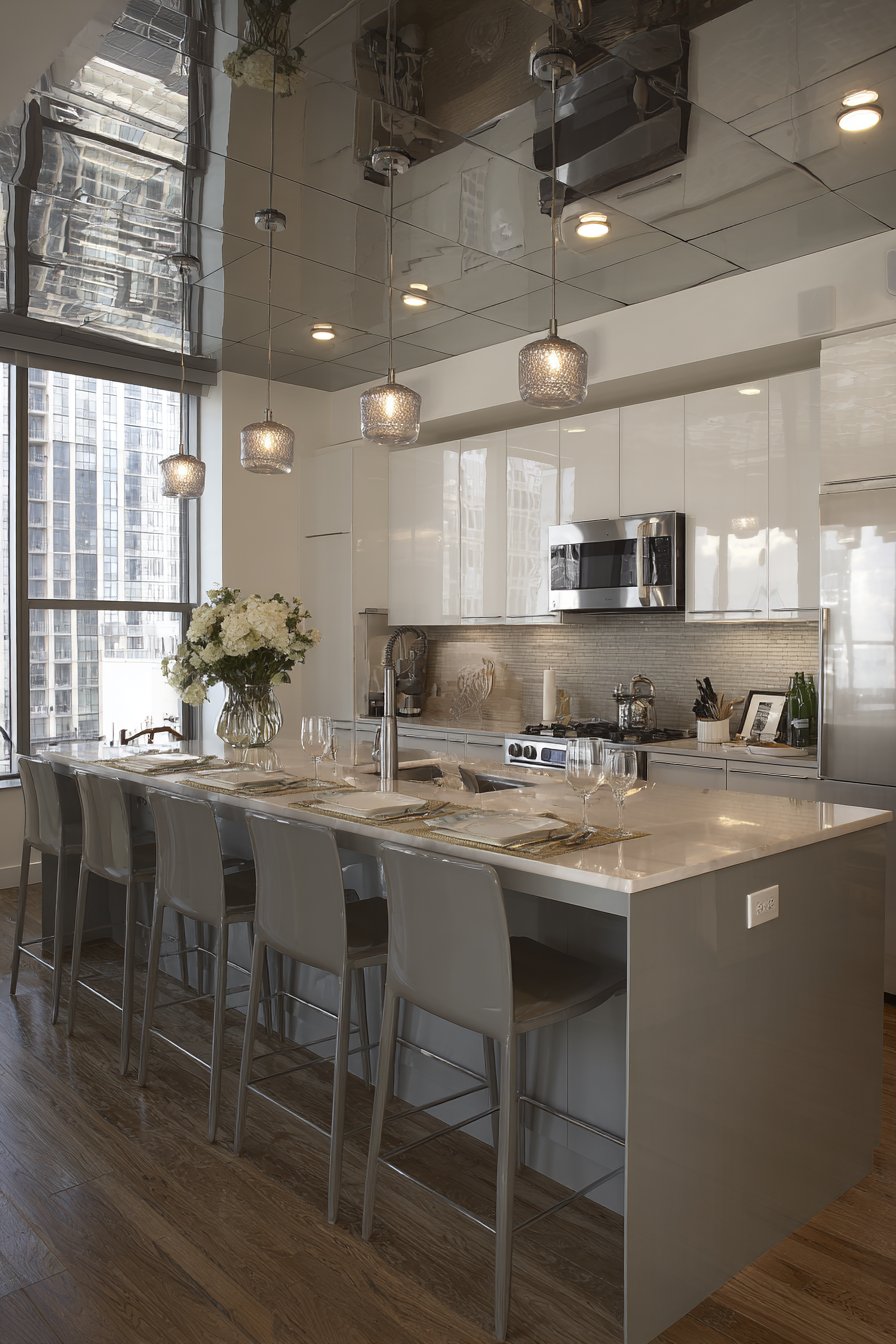
5. Statement Geometric Pendant Cluster as Ceiling Feature
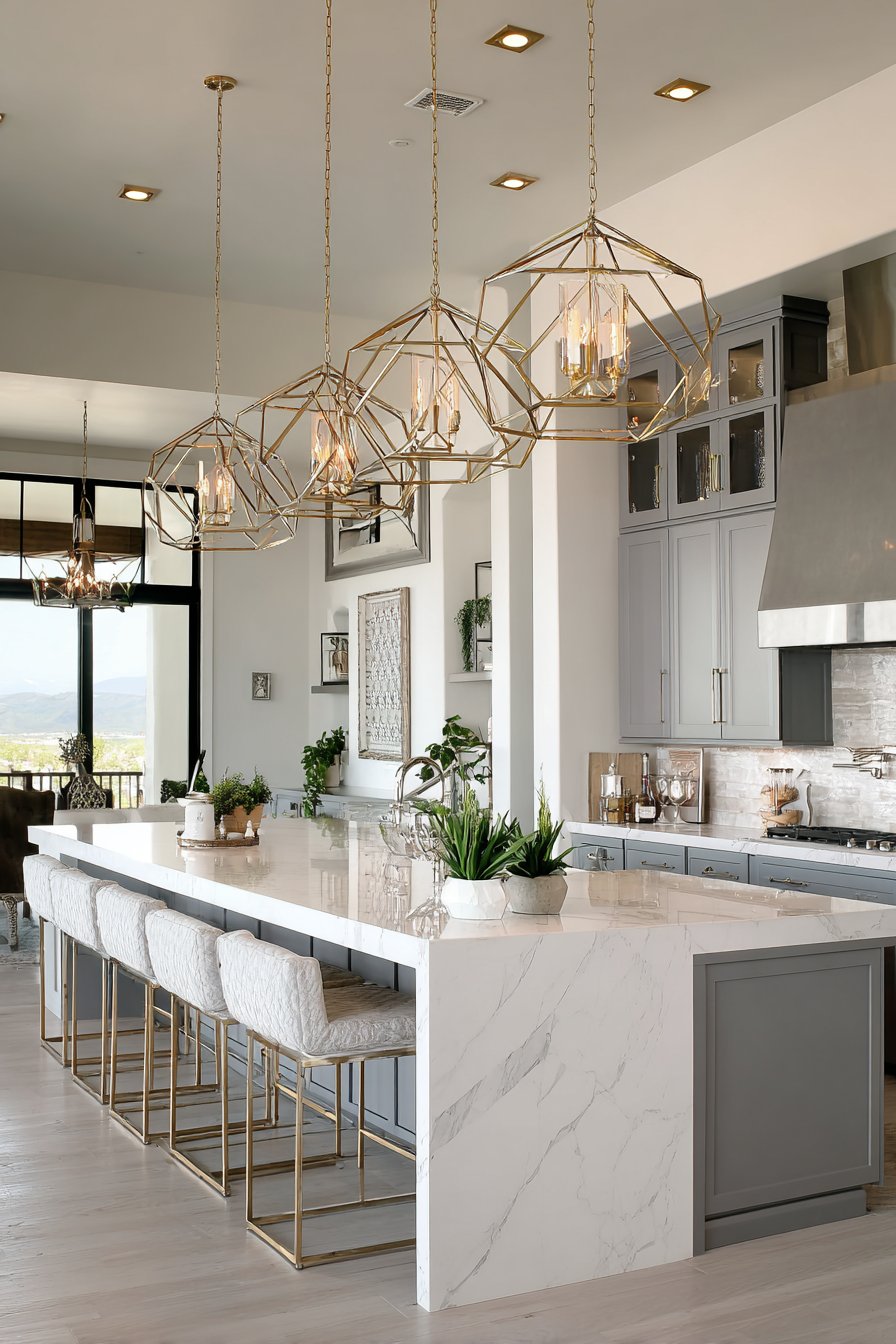
Sometimes the ceiling treatment itself remains minimal to showcase spectacular lighting fixtures that become sculptural ceiling elements. This design features a simple white ceiling with multiple recessed can lights arranged in a grid pattern, providing functional task lighting while a statement geometric pendant light cluster serves as the visual focal point. The pendants feature modern gold and glass construction, combining metallic warmth with transparent elegance. This approach demonstrates how lighting fixtures can transcend their functional purpose to become art installations that define a space.
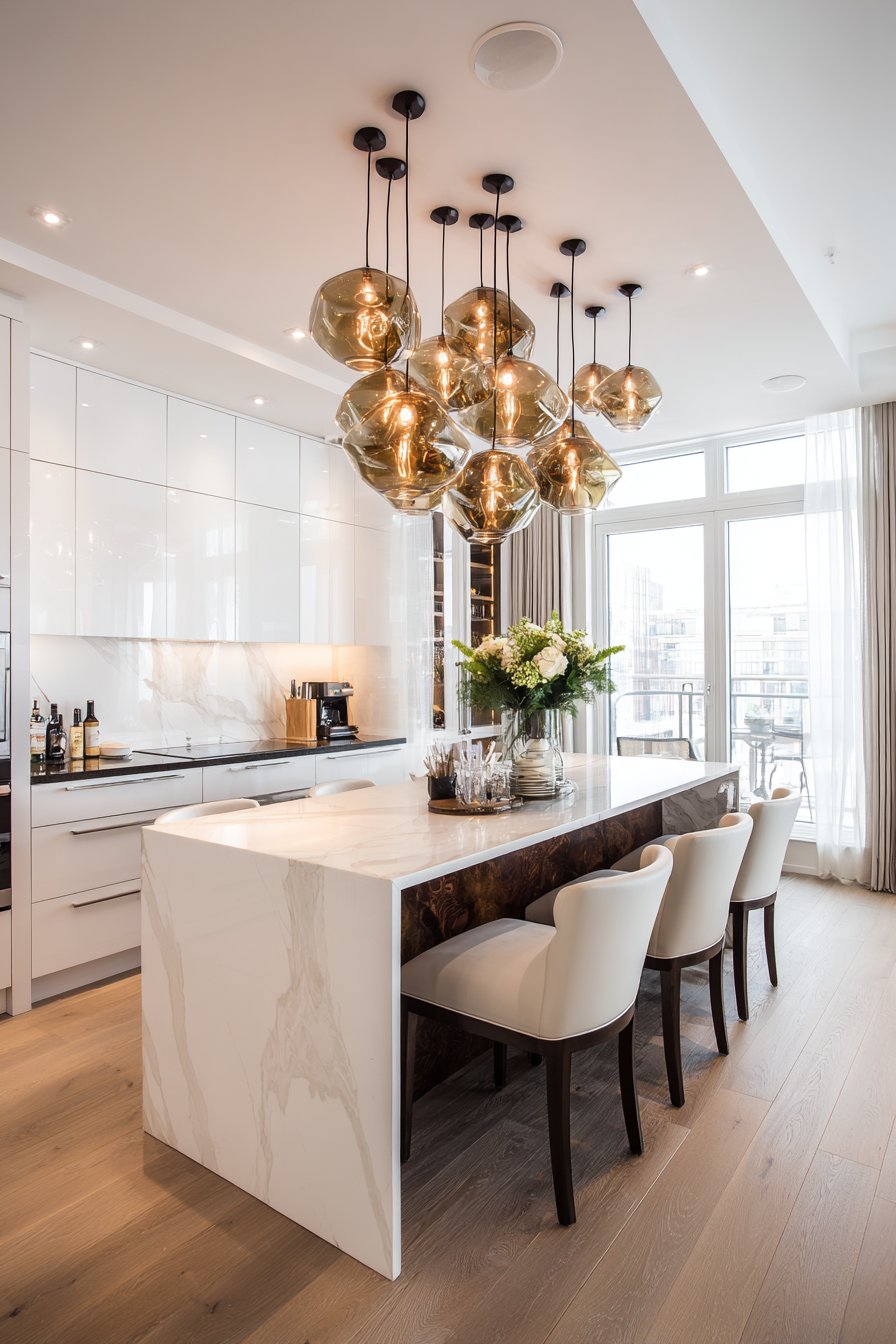
The beauty of this design lies in its strategic simplicity. The white ceiling acts as a clean canvas, free from competing architectural details that might detract from the pendant cluster’s impact. The recessed lights, while numerous, remain visually unobtrusive due to their low-profile trimless design and systematic arrangement. This allows the eye to focus on the pendant cluster suspended above the island, where it becomes both a functional light source and a design statement that establishes the kitchen’s contemporary aesthetic.
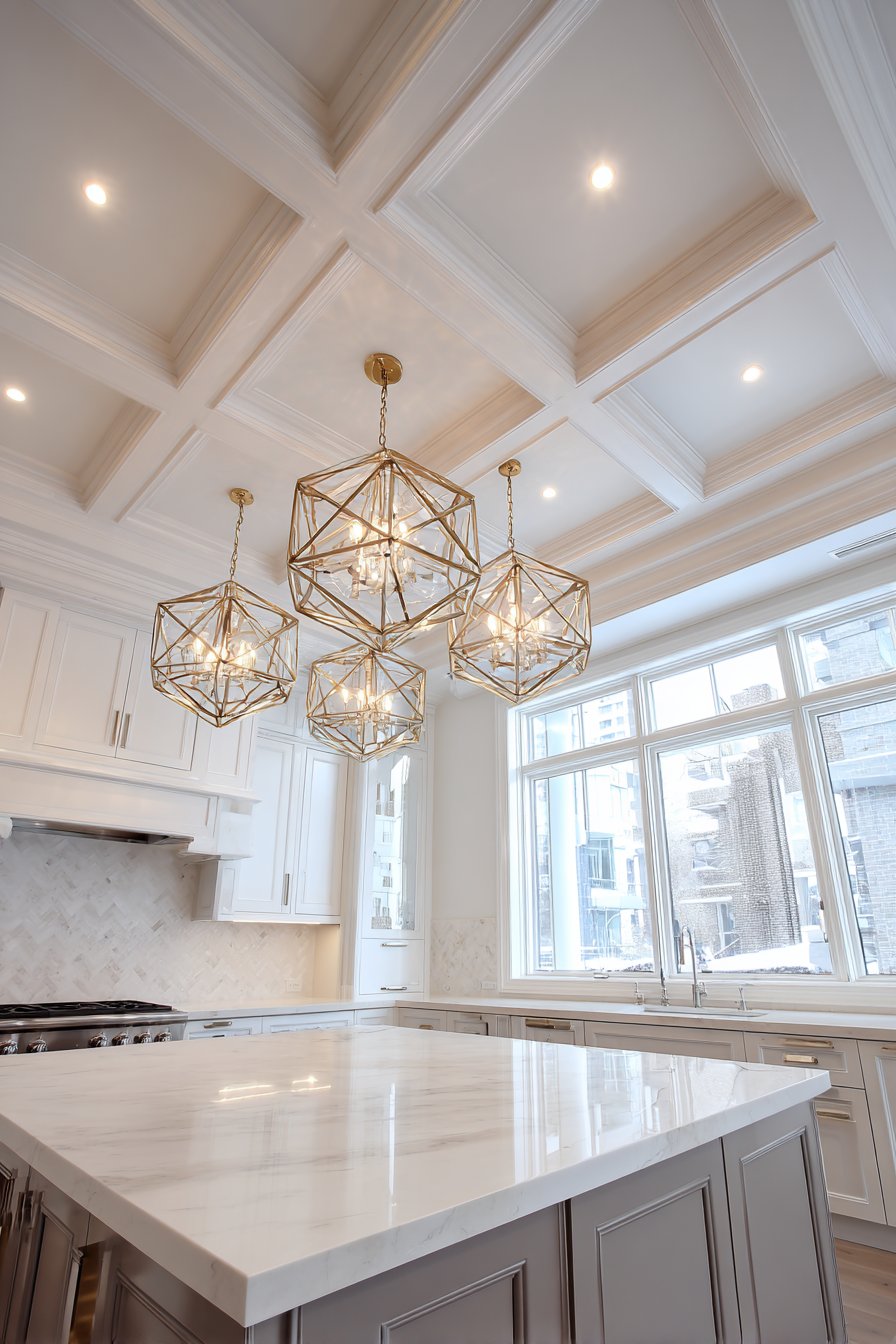
Selecting the appropriate pendant cluster requires consideration of scale, style, and positioning. The cluster should contain three to five individual pendants of varying heights, creating visual interest through asymmetry while maintaining overall balance. The fixtures should hang at heights that provide adequate task lighting—typically twenty-eight to thirty-four inches above the island surface—while remaining well within the visual field to maximize their sculptural impact. The mixed material composition of gold metal and clear or smoked glass contributes textural variety that enlivens the monochromatic white and grey kitchen below.
Key Design Tips:
- Choose pendant clusters with varied heights (6-12 inch differential) to create dynamic visual interest
- Position the cluster centerline directly over the island center for balanced, functional lighting
- Maintain 30-36 inches of clearance between pendant bottoms and countertop for practical task lighting
- Select fixtures with exposed bulbs or transparent glass to allow maximum light distribution
- Coordinate pendant metal finish with kitchen hardware and faucet for cohesive design integration
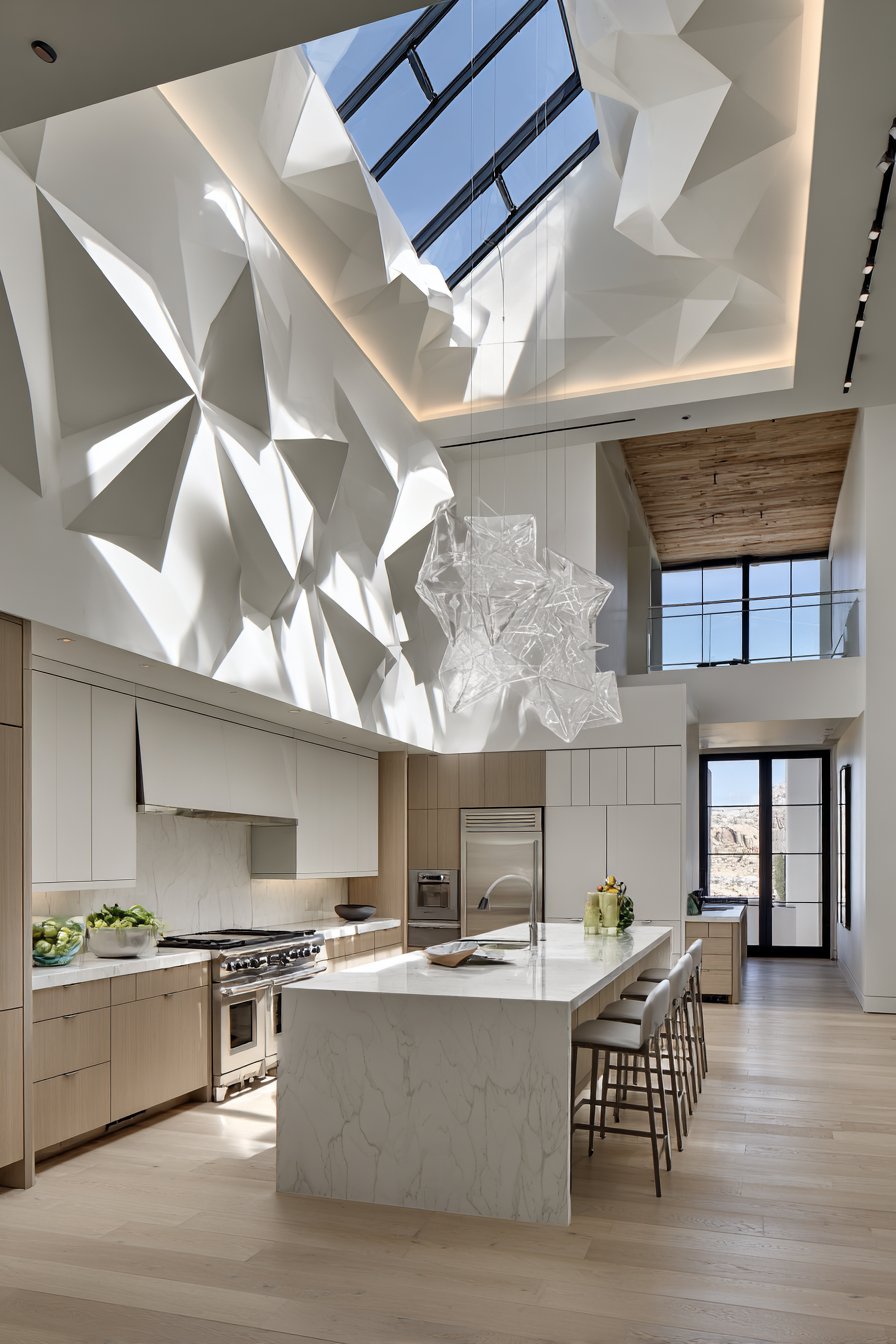
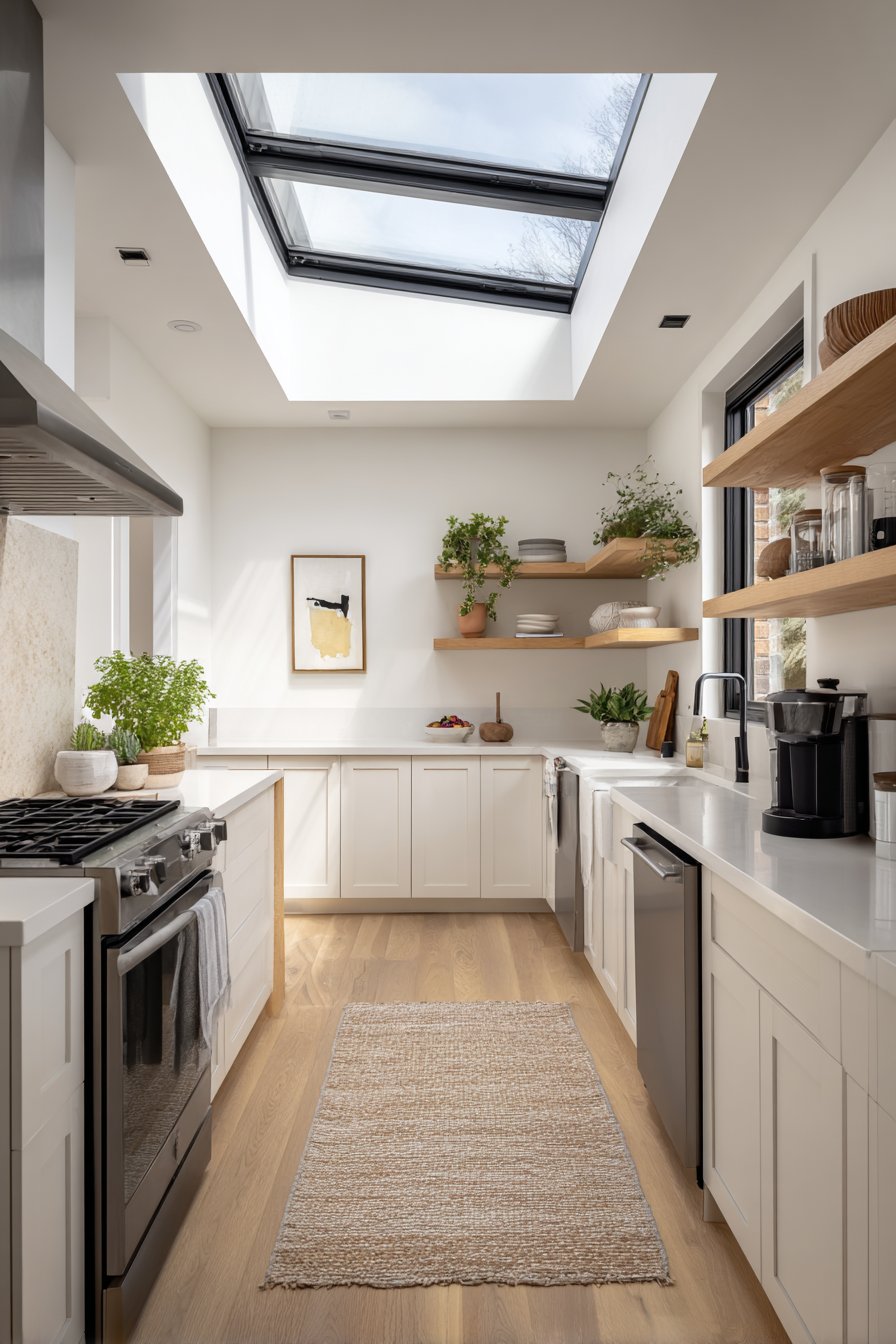
6. Skylight Installation for Natural Illumination

Natural light transforms kitchen environments, and a skylight installation represents one of the most impactful modern ceiling treatments. This design features a large rectangular skylight with minimal black frame detailing set into a flat white ceiling, creating a dramatic light well that floods the space with daylight. The skylight becomes a portal to the sky, introducing ever-changing natural light quality throughout the day and establishing a connection between interior and exterior environments. Supplemental recessed lighting strategically placed around the skylight provides evening illumination when natural light fades.
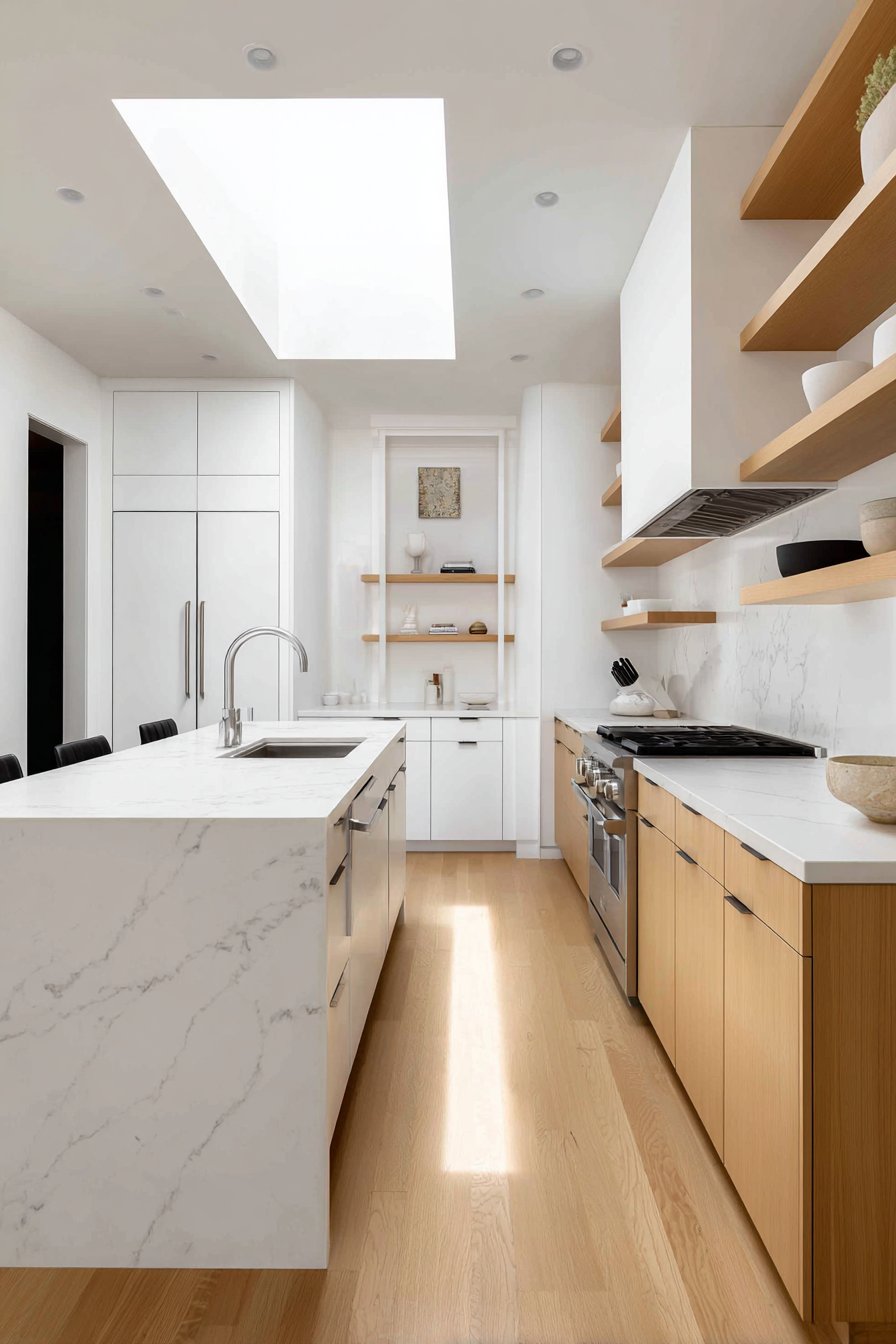
The psychological and practical benefits of skylight installation extend far beyond aesthetics. Natural daylight improves mood, enhances color perception for cooking activities, and reduces reliance on artificial lighting during daytime hours. The dynamic quality of natural light—shifting from cool morning illumination to warm afternoon glow—creates a living environment that responds to natural rhythms. This connection to outdoor conditions, even in an interior space, contributes to occupant well-being and satisfaction with the kitchen environment.
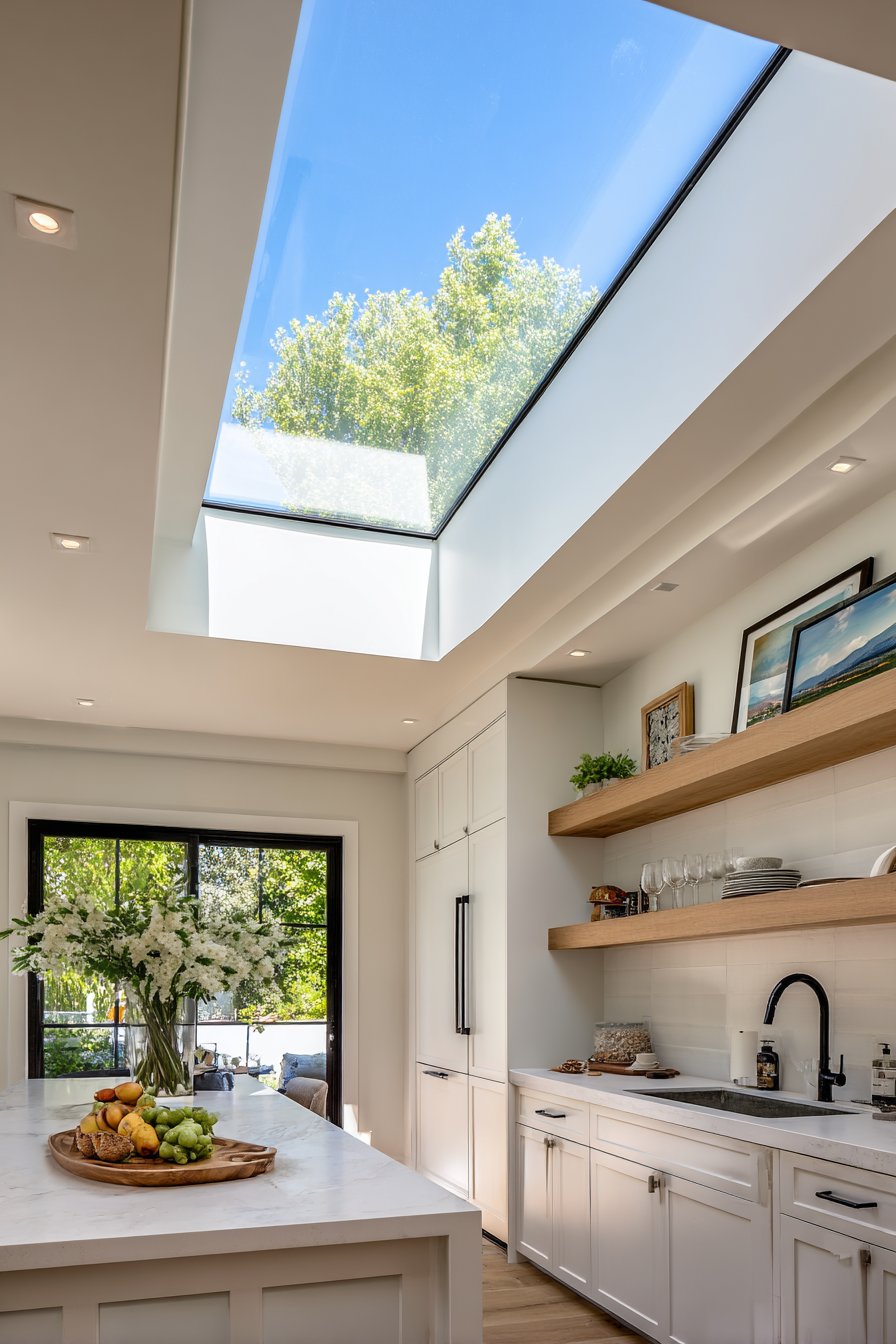
Modern skylight technology has advanced significantly, addressing previous concerns about heat gain, UV damage, and potential leaking. Contemporary skylights feature low-E coatings that reduce solar heat gain while maximizing visible light transmission, impact-resistant glazing for safety and durability, and sophisticated flashing systems that ensure weather-tight installation. The integration with smart home systems allows for motorized shades that automatically deploy based on sun position or temperature sensors, providing optimal light control throughout the day.
Key Design Tips:
- Position skylights on north-facing roof slopes for consistent, diffused light without harsh direct sun
- Size skylights to approximately 5-15% of the kitchen floor area for balanced natural light without excessive heat
- Install operable skylights to provide natural ventilation and heat release during cooking activities
- Add motorized cellular shades for light control, privacy, and enhanced insulation during evening hours
- Coordinate skylight placement with cabinetry layout to avoid shadows cast on primary work surfaces
7. Vaulted Ceiling with Exposed Black Metal Beams
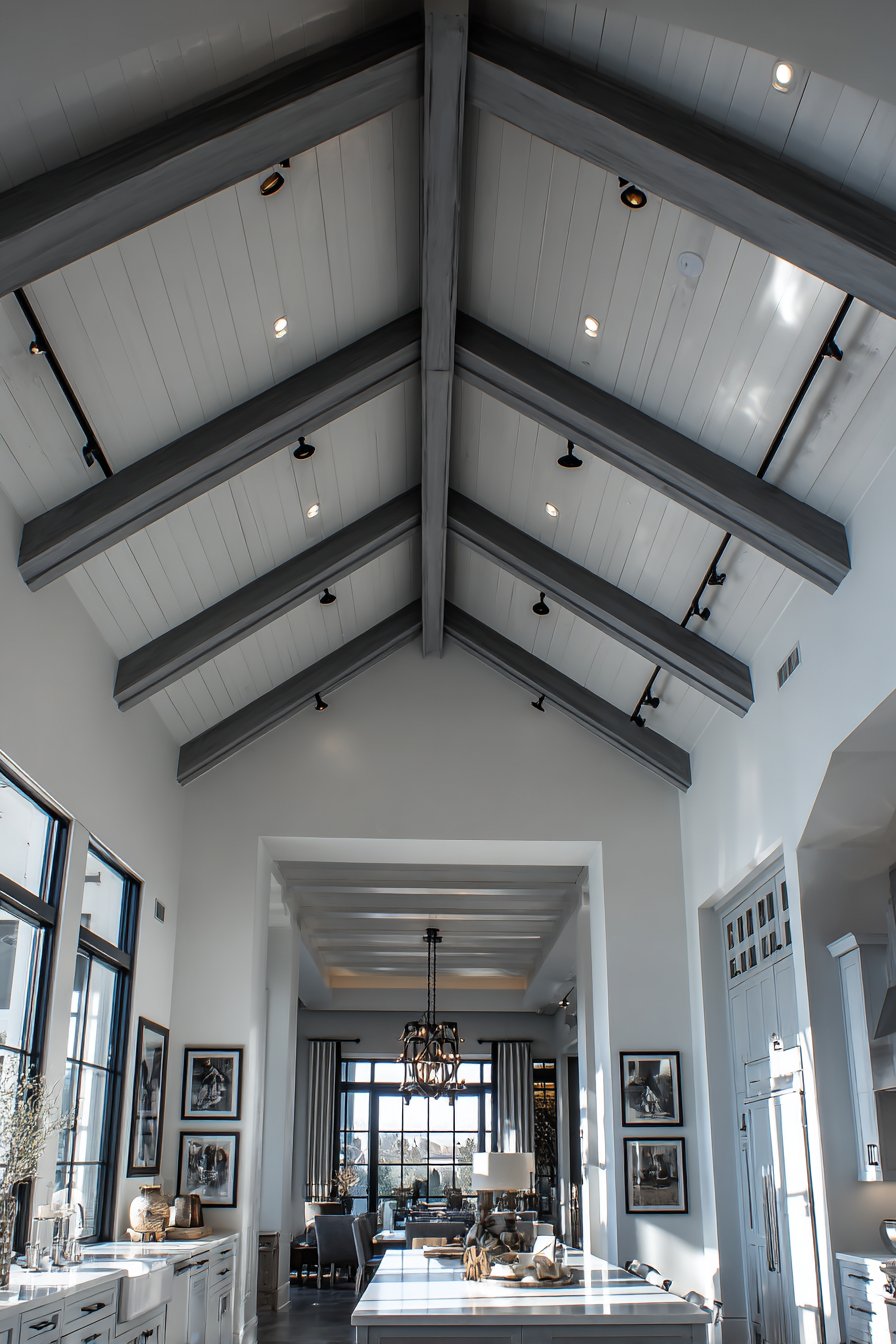
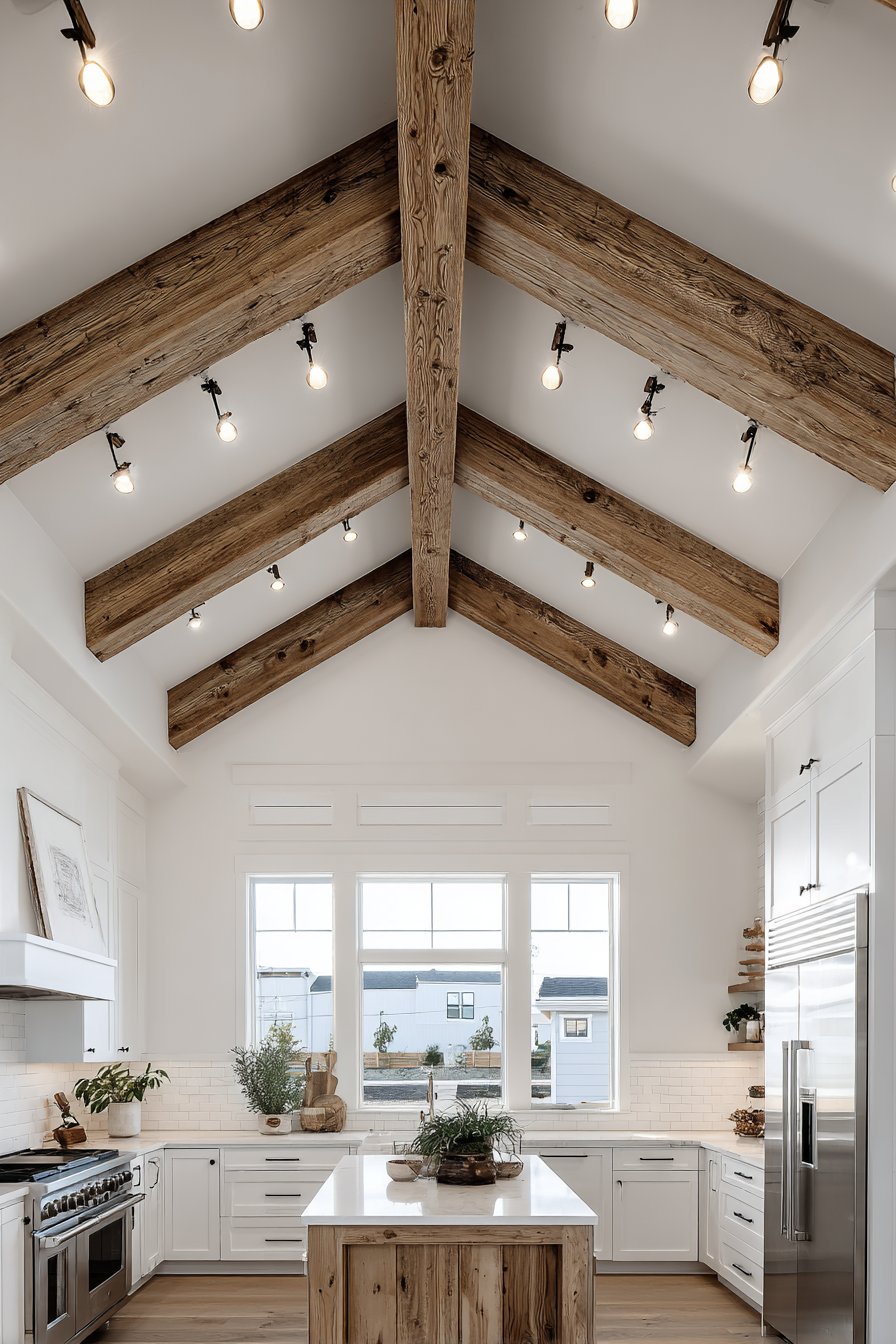
Height and volume transform kitchen environments, and a vaulted ceiling with exposed black metal beams creates dramatic spatial expansion. This design features a white painted vaulted ceiling that follows the roof slope, intersected by structural beams finished in matte black metal. The industrial material choice and dark color create strong linear elements that emphasize the ceiling’s geometry while the white surfaces maximize light reflection and perceived spaciousness. Track lighting mounted along the beams provides flexible, adjustable task lighting that can be repositioned as kitchen needs evolve.
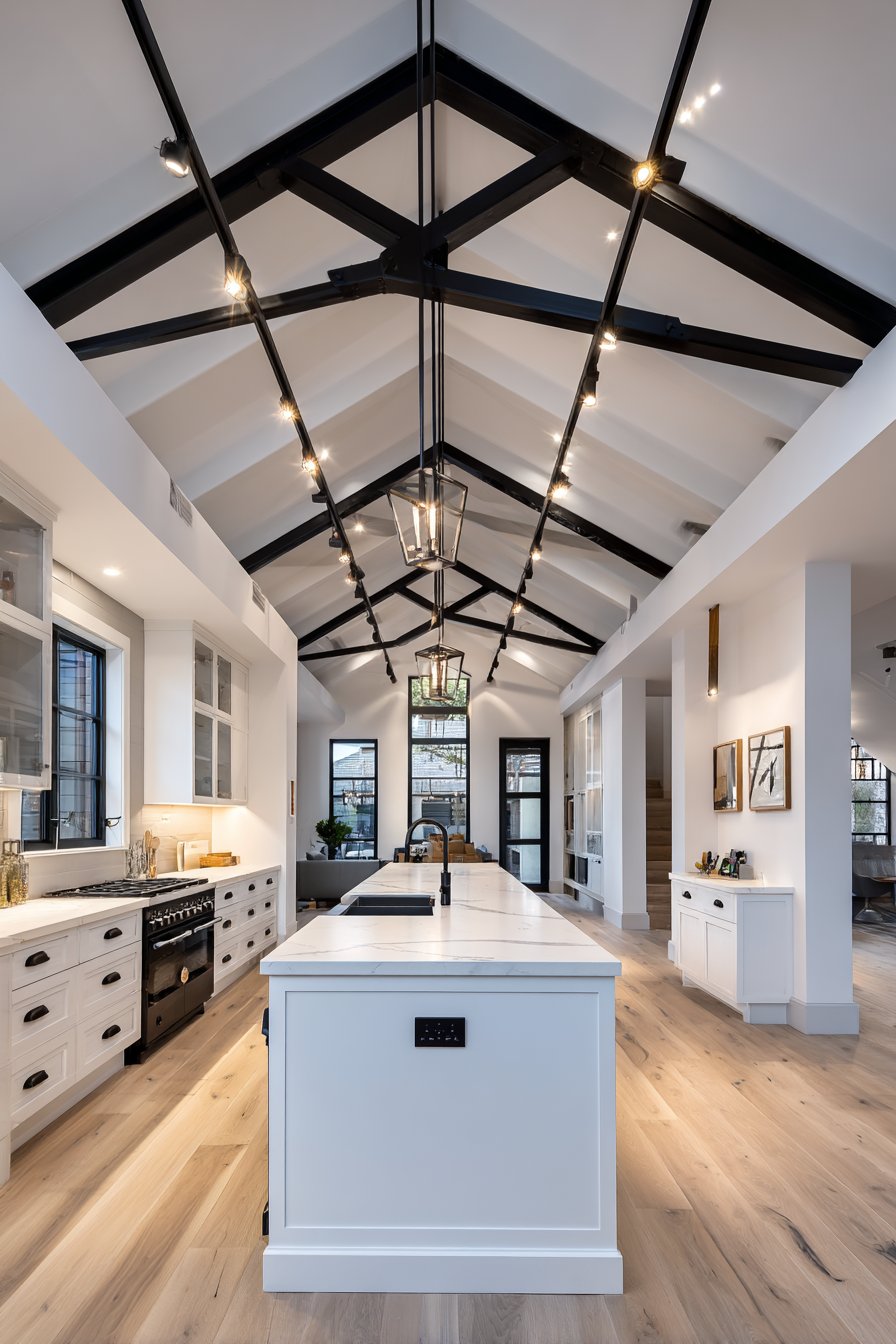
The industrial aesthetic introduced by the black metal beams complements contemporary kitchen design that embraces honest materials and exposed structural elements. This approach works particularly well in loft conversions, modern farmhouses, or urban kitchens where industrial influences inform the overall design direction. The vertical emphasis created by the vaulted form makes even modestly sized kitchens feel more spacious and grand, while the metal beams ground the soaring space with strong horizontal lines that create visual stability.
Implementing a vaulted ceiling requires structural evaluation and often involves removing or modifying ceiling joists, making it a significant renovation investment. However, the spatial and aesthetic transformation justifies the effort for homeowners seeking dramatic change. The vault pitch typically ranges from 4:12 to 8:12, with steeper pitches creating more drama but also requiring higher roof structures. The beam placement should align with structural support points while creating visually balanced spacing—typically between five to eight feet on center.
Key Design Tips:
- Paint the vaulted ceiling white to maximize light reflection and emphasize the spatial volume
- Finish beams in matte black powder coat to avoid glossy surfaces that can appear plasticky
- Install track lighting systems for flexibility in adjusting light direction toward work surfaces
- Ensure adequate insulation in the vaulted ceiling cavity to maintain energy efficiency
- Echo the black beam color in cabinet hardware, light fixtures, and island seating for design cohesion
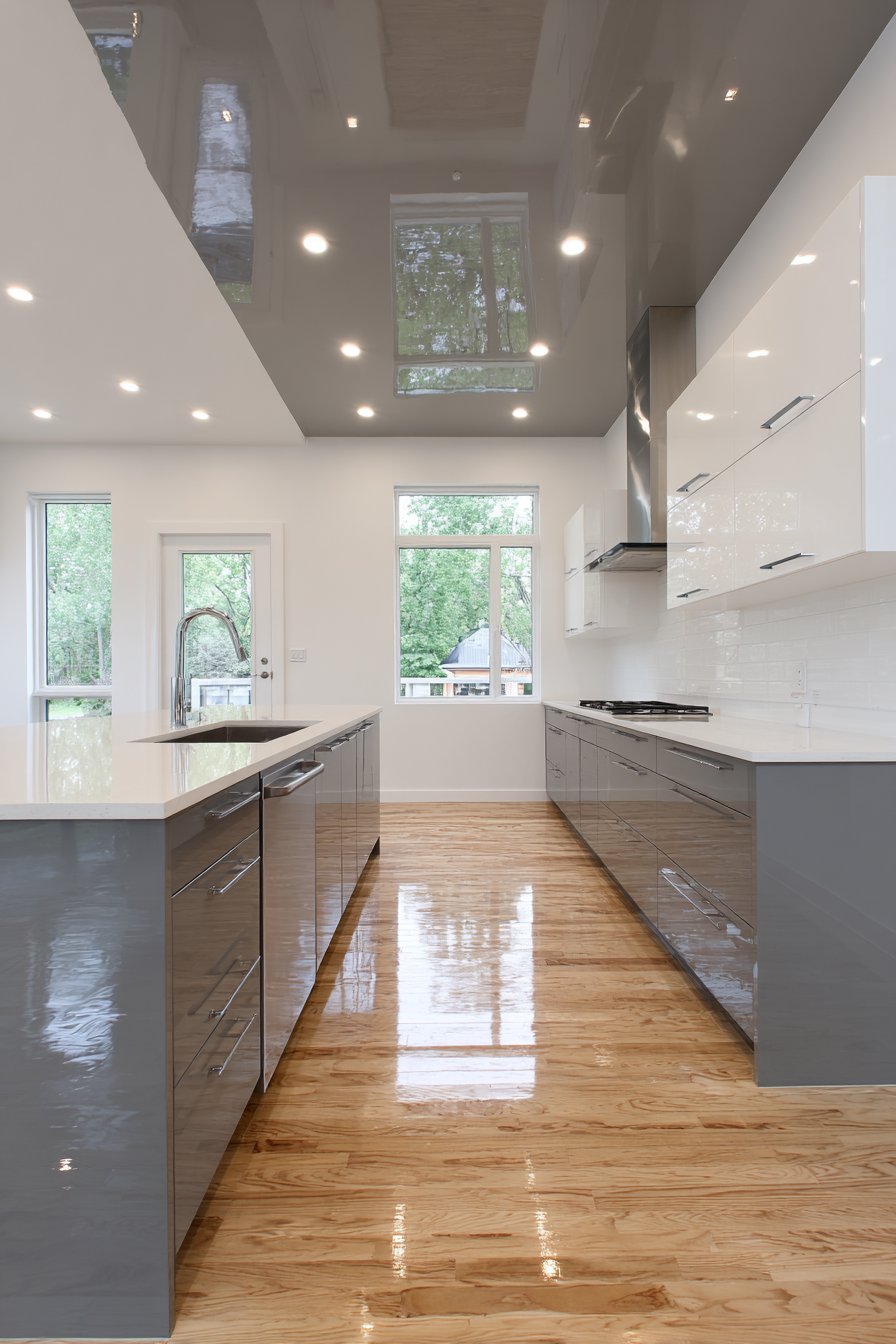
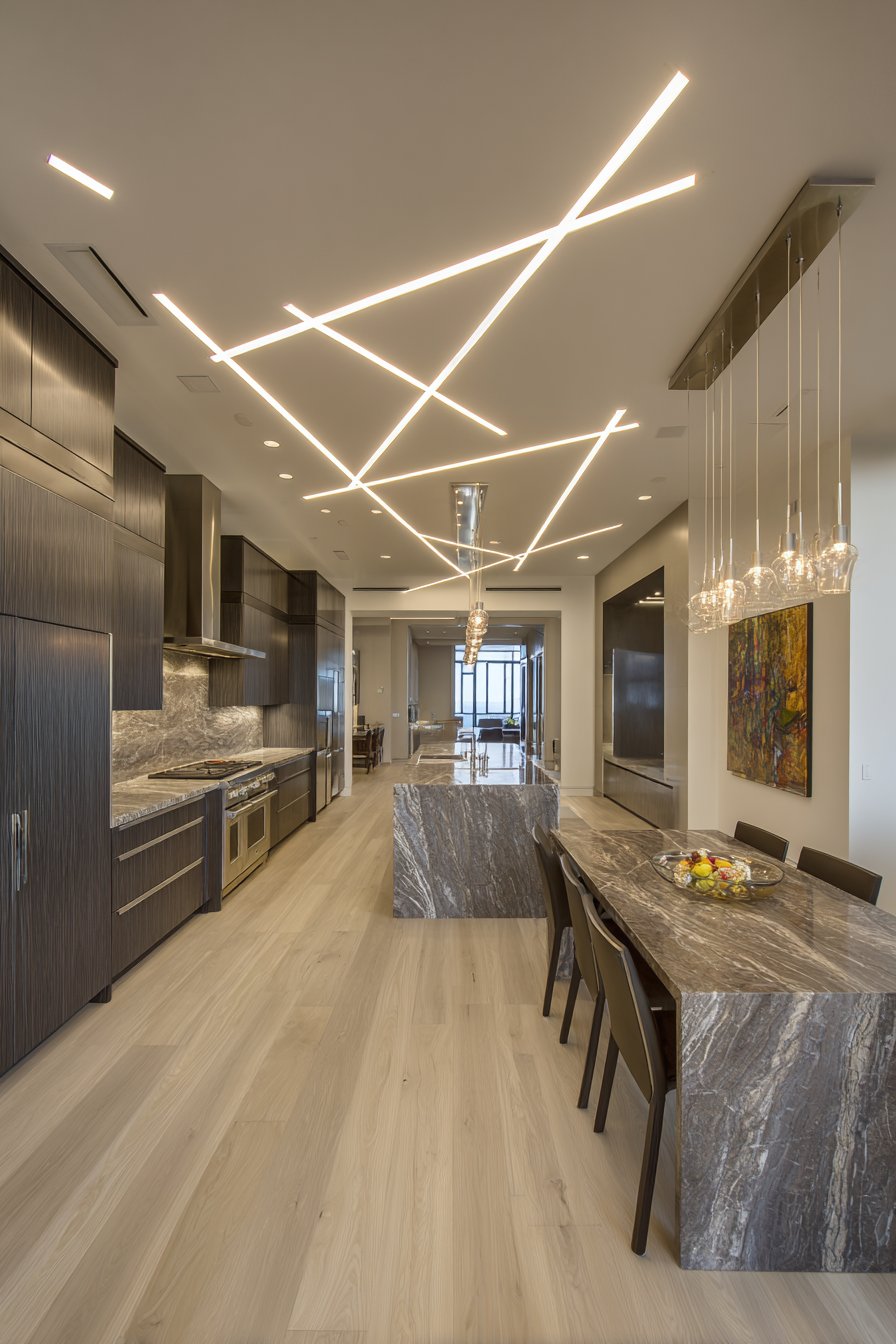
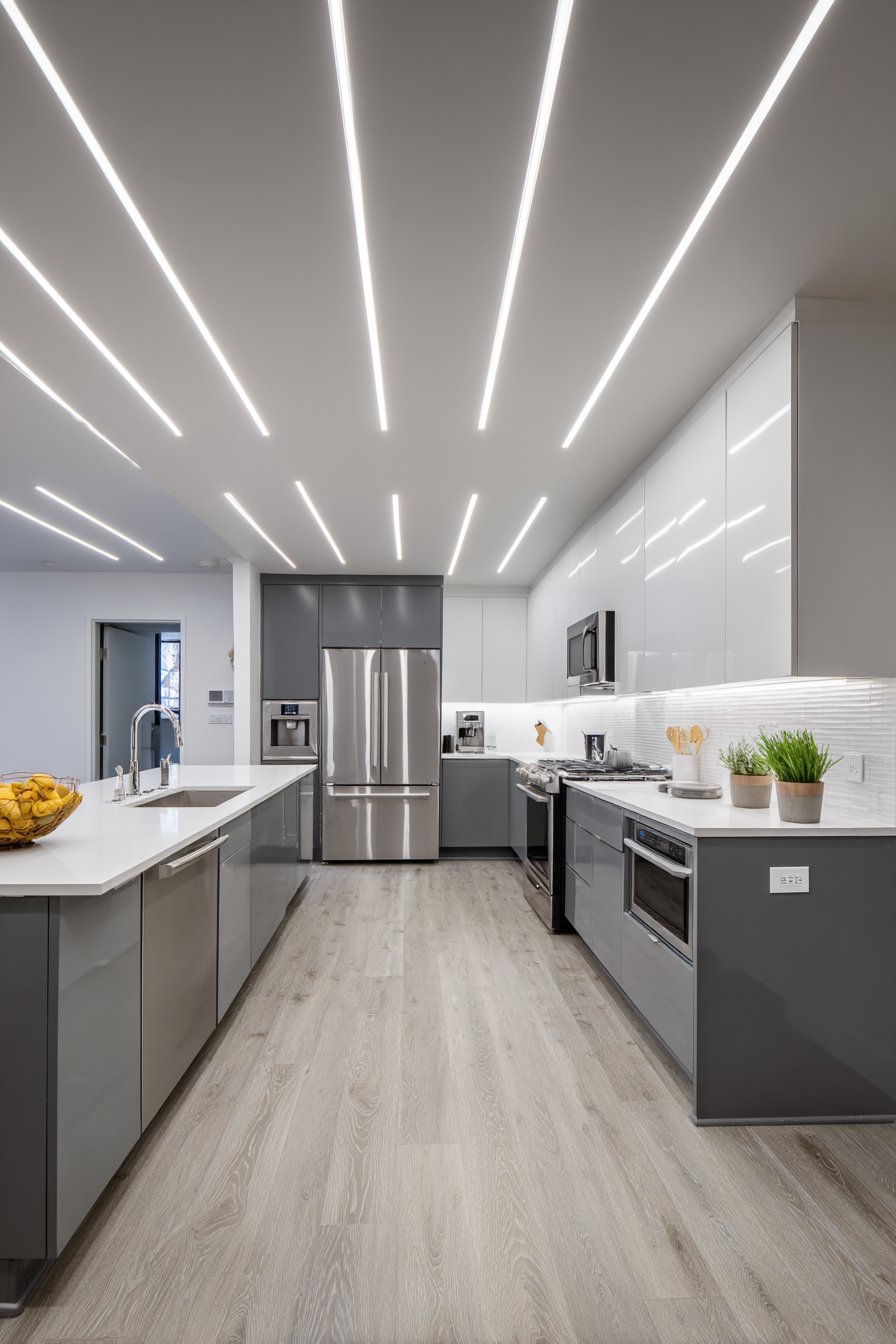
8. Linear LED Light Channel Design
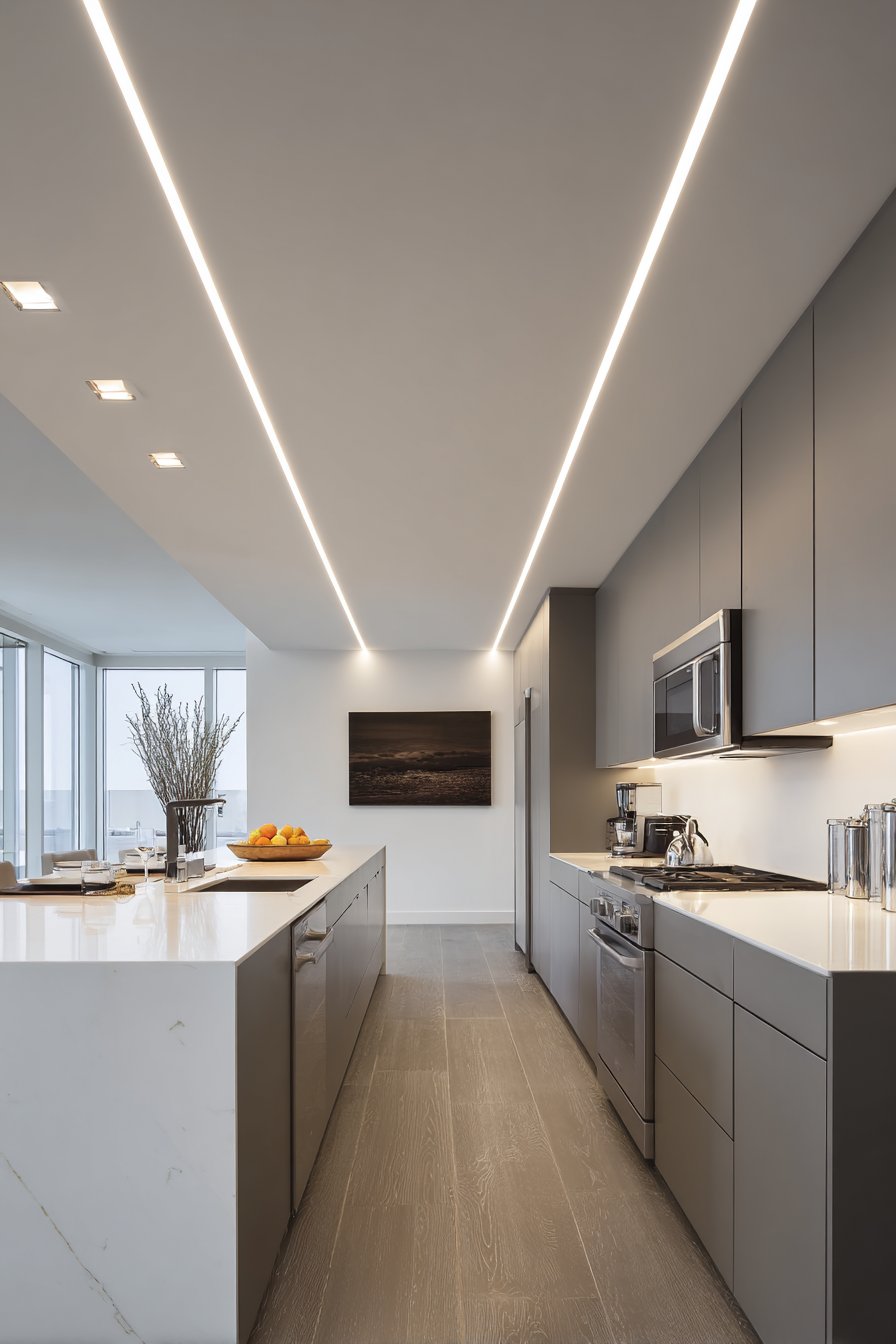
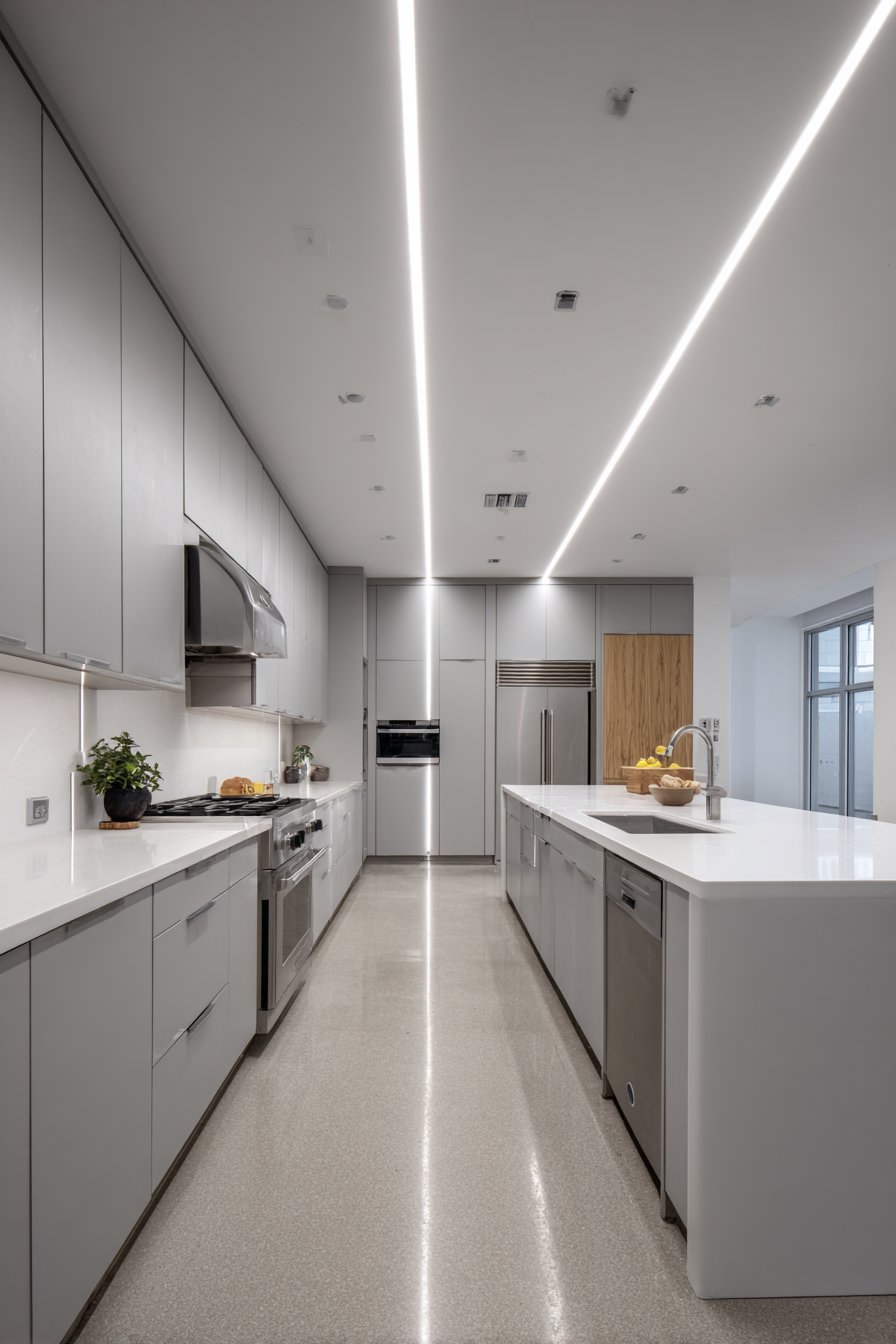
Clean, continuous lines define modern design, and a linear LED light channel creates a striking ceiling feature that emphasizes directional flow. This design features a smooth white ceiling with a recessed linear channel running the entire kitchen length, containing a continuous LED strip that creates a modern stripe of illumination. The minimalist gesture defines the space directionally while providing ambient lighting that complements additional small recessed spotlights positioned over work areas. This approach exemplifies how lighting can function as both utilitarian necessity and architectural element.
The linear light channel typically measures three to six inches wide and one to two inches deep, creating a subtle but visible recessed detail in the ceiling plane. The continuous LED strip within produces even, shadow-free illumination along its entire length, creating a light blade effect that draws the eye through the space. This design works particularly well in galley kitchens or long, narrow layouts where the linear element emphasizes the room’s natural proportions rather than fighting against them.
The technical execution of this design requires precision installation to achieve professional results. The channel must be perfectly straight—any deviation becomes immediately apparent given the linear nature of the element. The LED strips should be commercial-grade products with consistent color temperature along their entire length and proper heat dissipation to ensure longevity. The surrounding ceiling surface requires flawless finishing since the clean white planes draw attention to any imperfections in joint treatment or paint application.
Key Design Tips:
- Run the light channel parallel to the longest kitchen dimension to emphasize length and flow
- Select LED strips with minimum 90 CRI rating for accurate color rendering of food and finishes
- Recess the channel 1-2 inches deep to prevent direct view of the LED strip while allowing light emission
- Paint the channel interior white to maximize light reflection and output
- Add supplemental recessed spots on 4-foot spacing for adequate task lighting over work surfaces
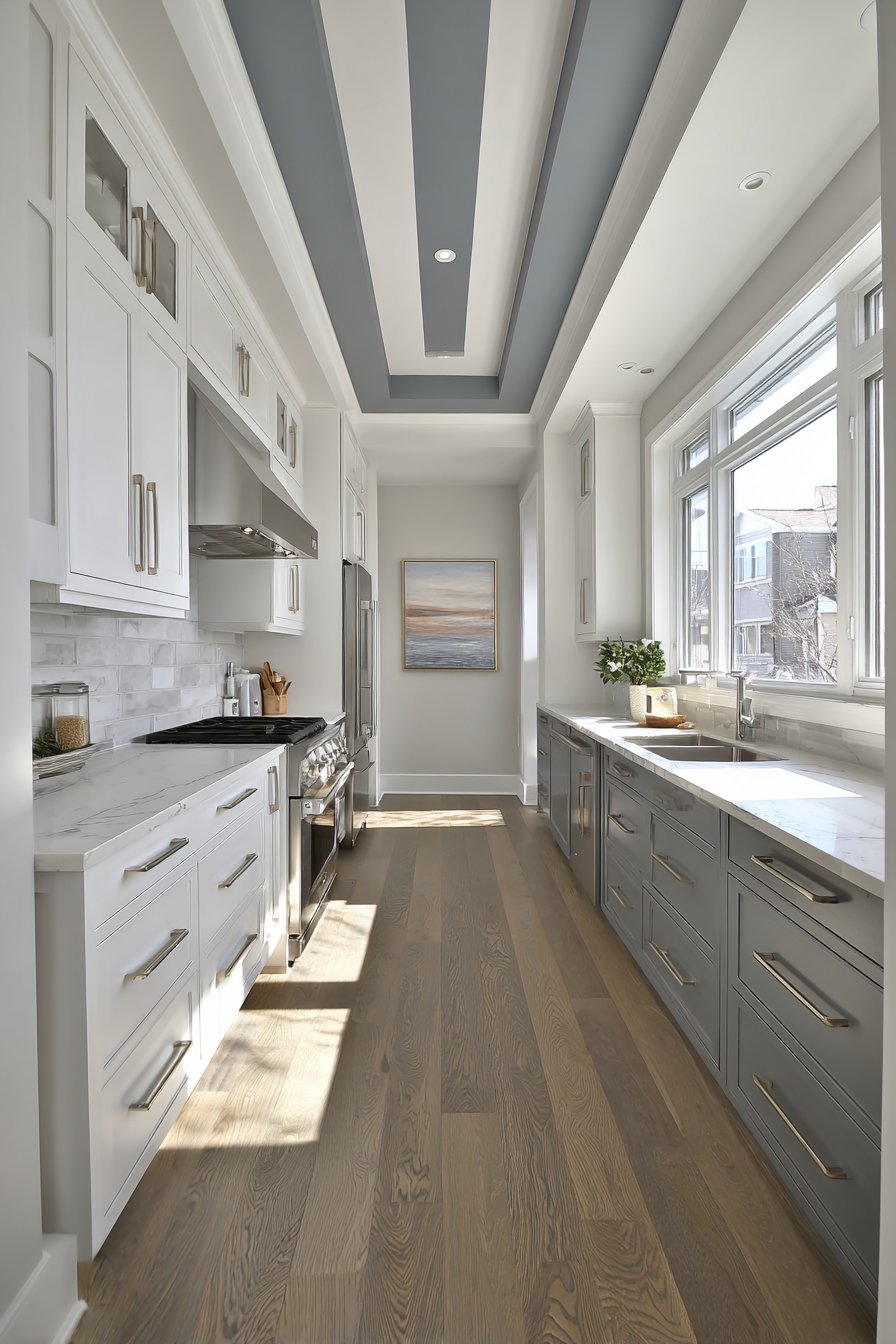
9. Two-Tone Ceiling with Cabinet-Matched Soffit
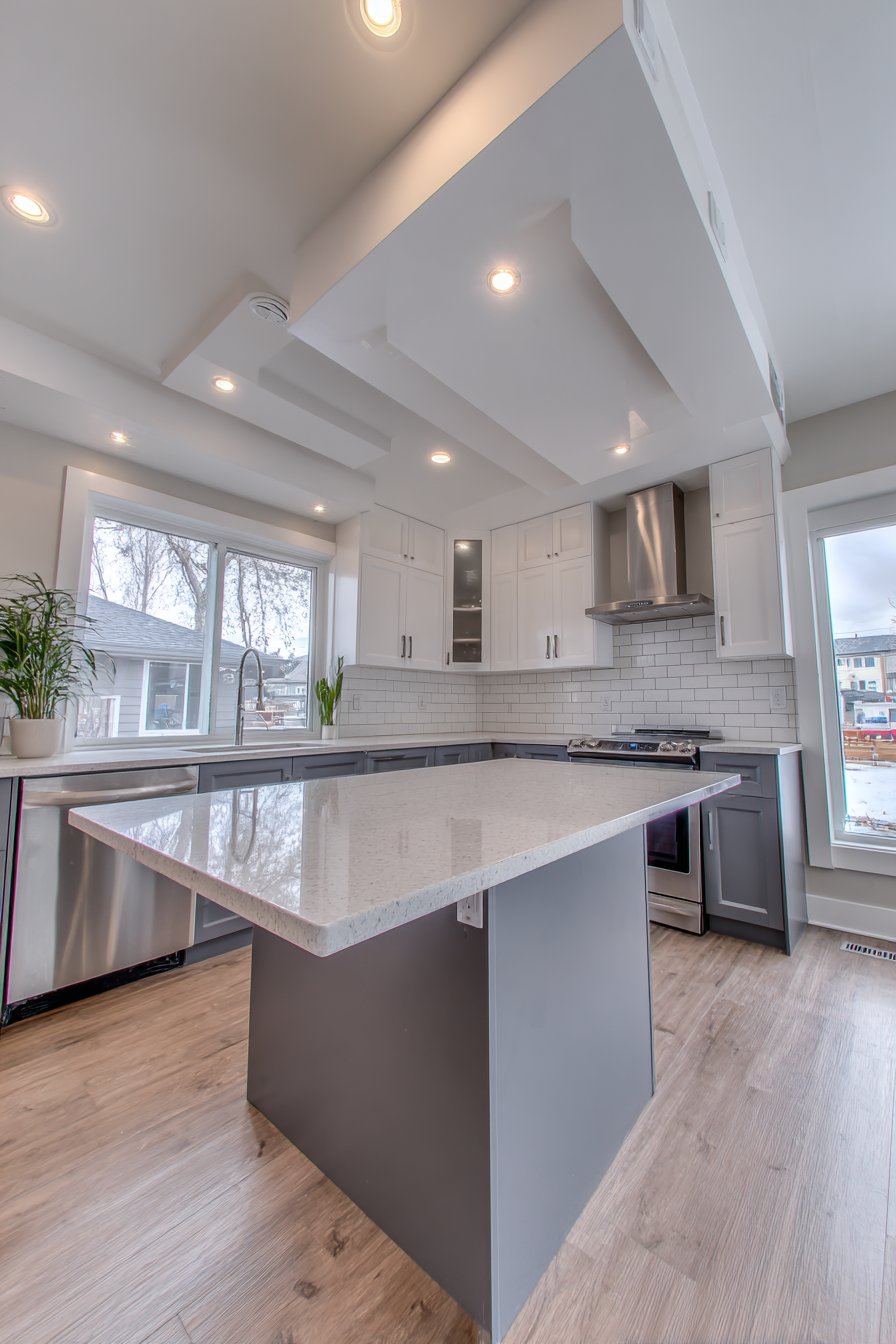
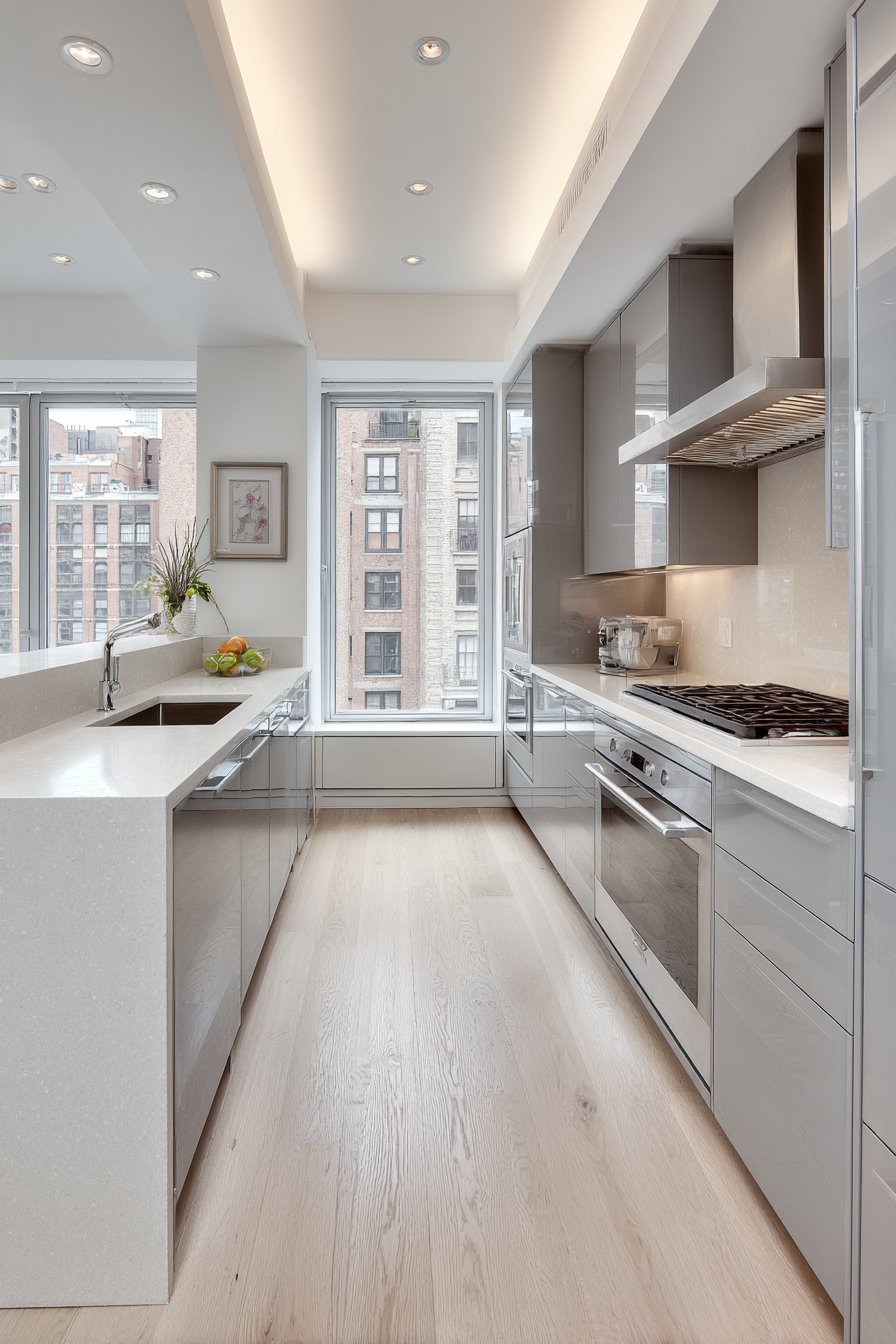
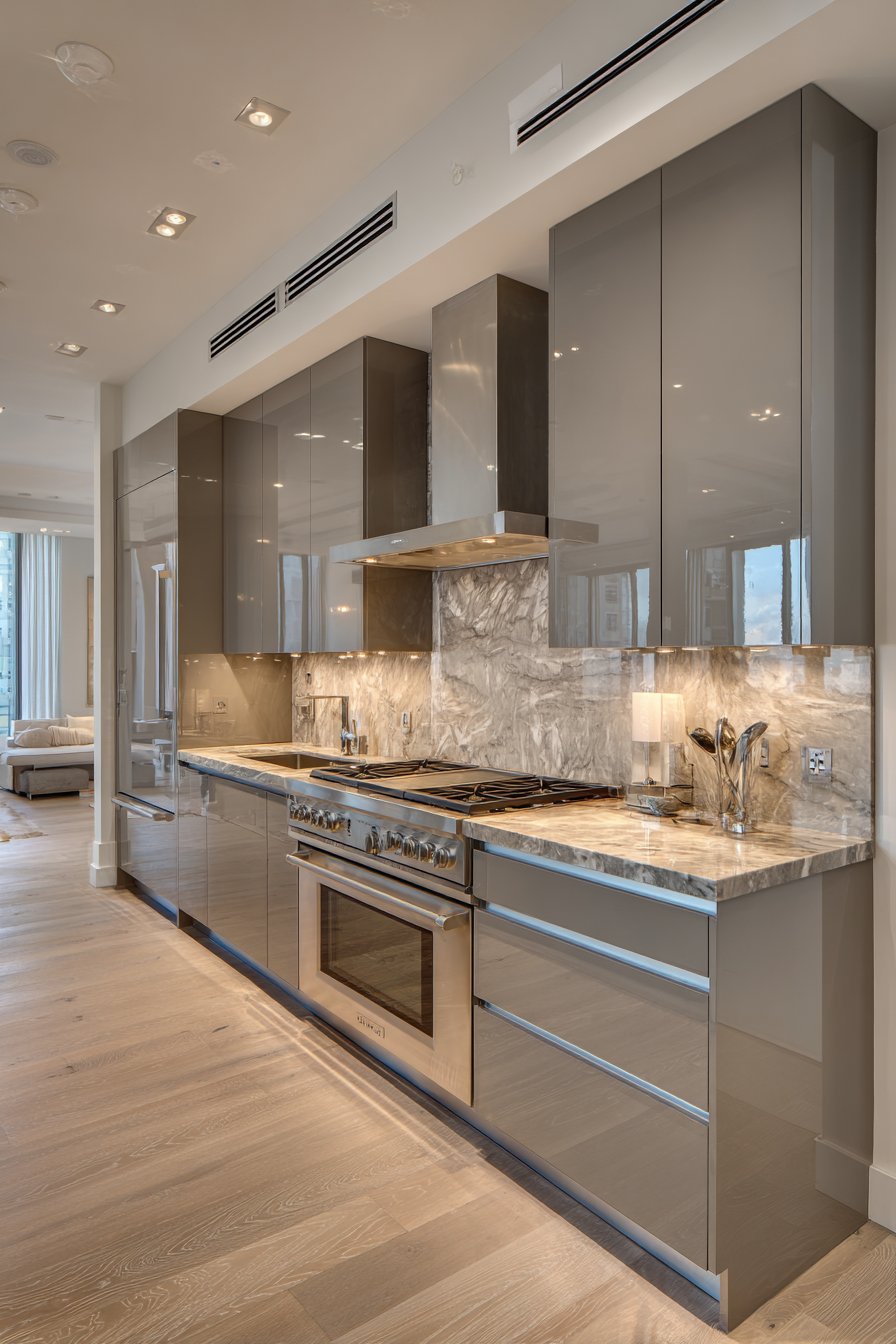
Sophisticated color coordination extends to ceiling treatments in modern kitchen design, and a two-tone ceiling approach creates subtle visual interest through strategic color placement. This design features a main white ceiling with a dropped soffit section above the cabinets painted in matching cabinet grey. The height variation adds architectural dimension while the color continuation creates visual flow that connects ceiling and cabinetry. Recessed lighting integrated into the soffit directs focused illumination onto countertops, providing functional task lighting while the color-matched surface creates a cohesive, intentional design.
The dropped soffit serves multiple practical purposes beyond aesthetics. It conceals mechanical systems, ductwork, and electrical conduits that often run above cabinets, creating clean finished surfaces rather than exposing utilitarian infrastructure. The soffit also provides mounting surfaces for upper cabinet installation and creates opportunities for integrated lighting that eliminates the gap between cabinet tops and ceiling—a notorious dust-collecting void in traditional kitchen design.
This ceiling treatment works best in kitchens with ceiling heights of nine feet or higher, allowing sufficient space for the soffit drop without creating oppressive lowered ceiling sections. The soffit typically drops twelve to eighteen inches below the main ceiling plane, measuring eighteen to twenty-four inches in depth to align with standard upper cabinet dimensions. The grey color choice should match cabinetry exactly, appearing as a continuation of the cabinet form rather than a separate architectural element.
Key Design Tips:
- Match soffit color precisely to cabinet finish using the same paint or laminate product
- Drop soffit 12-18 inches to accommodate recessed lighting while maintaining proportional balance
- Install LED recessed lights in the soffit face to direct task lighting downward onto counters
- Return the grey soffit color onto the face and underside for complete color integration
- Ensure white upper cabinets extend to the soffit bottom for clean, gap-free installation
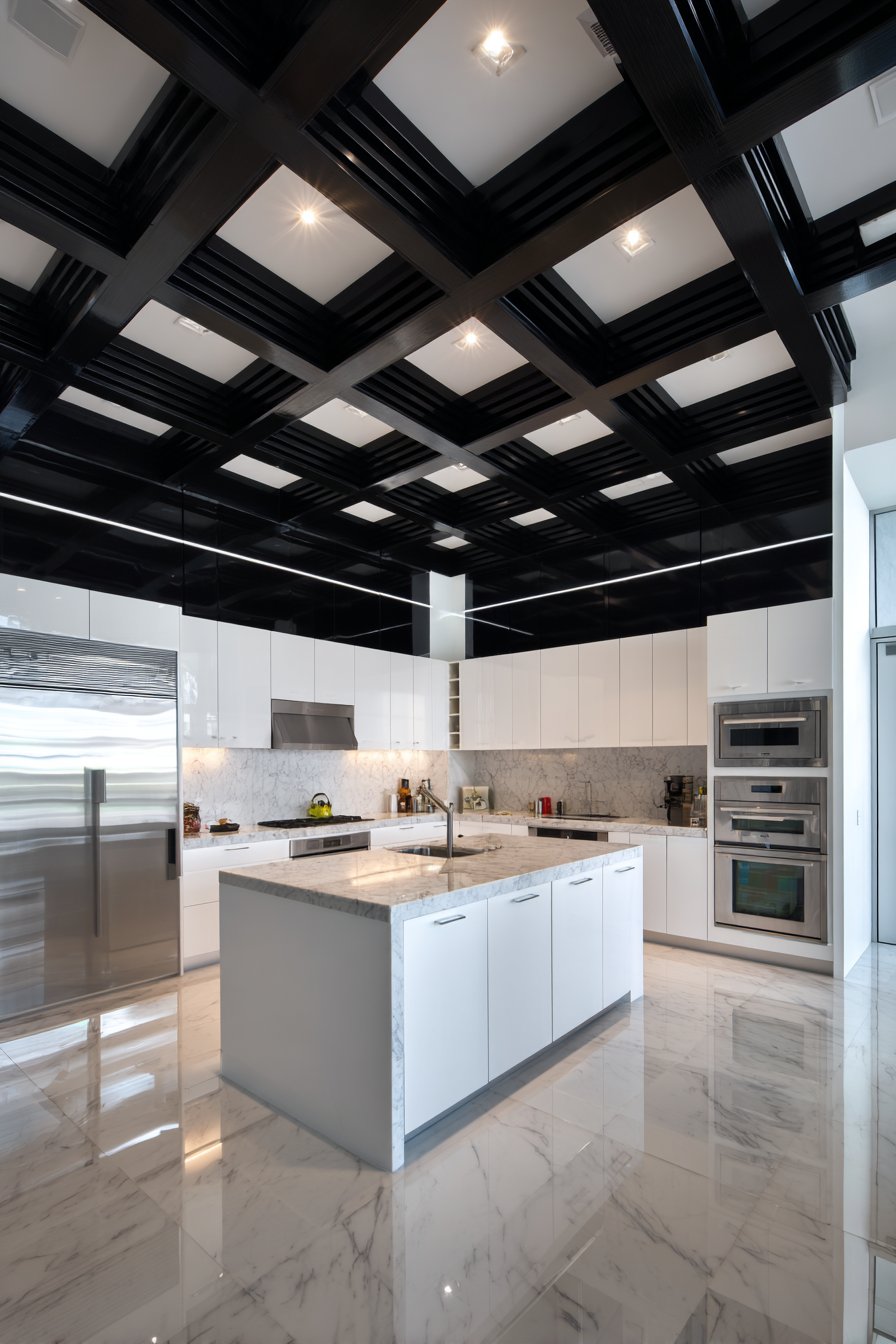
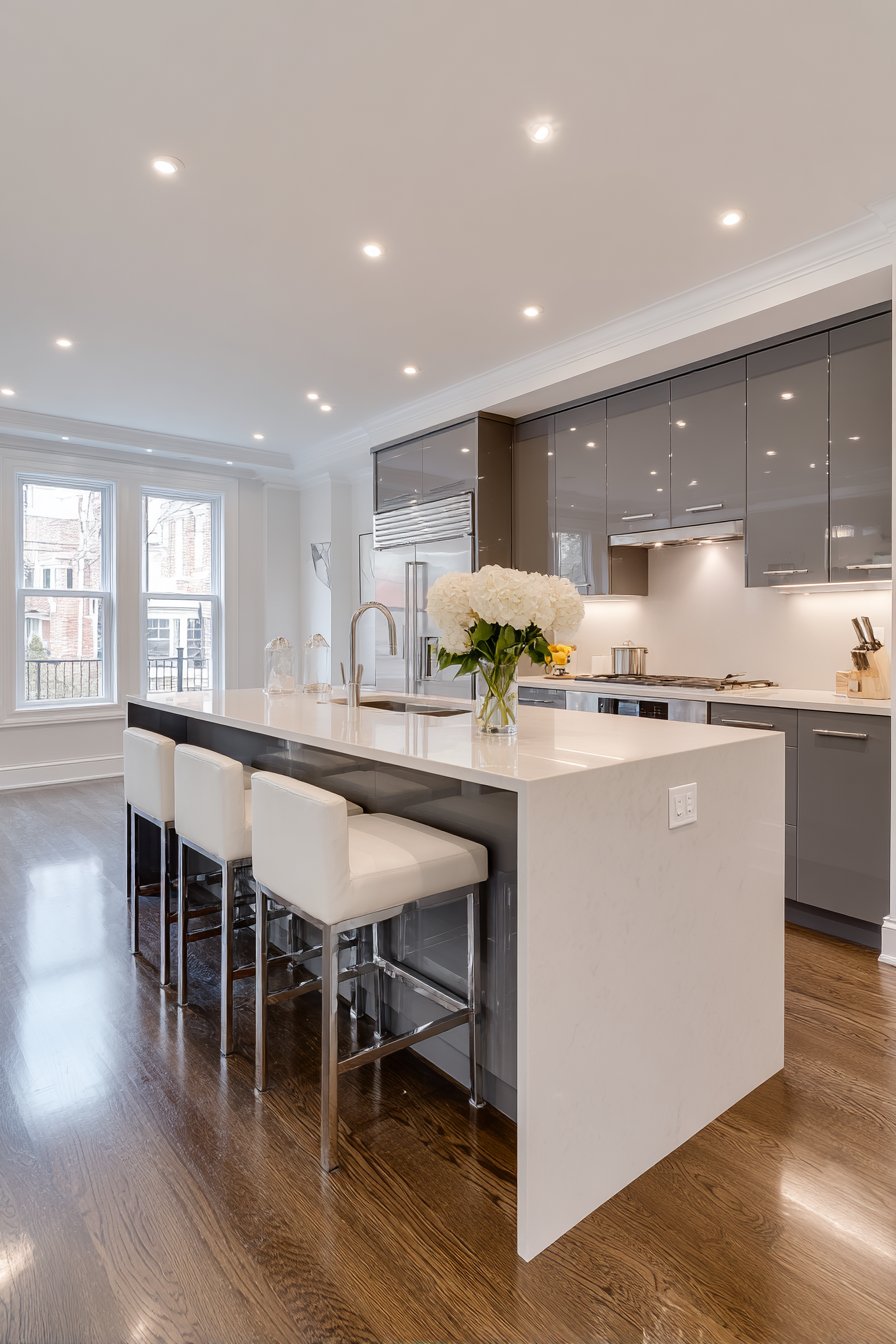
10. Minimalist Square Recessed Lighting Grid
Geometric precision defines this minimalist ceiling approach featuring oversized recessed square lighting fixtures rather than traditional round cans. The white ceiling maintains a perfectly flat, smooth surface with no additional architectural details, allowing the geometric square lights to create a contemporary pattern through their systematic distribution. This design demonstrates how functional lighting elements can become design features simply through thoughtful selection and arrangement.

The square fixtures typically measure eight to twelve inches on each side—significantly larger than traditional six-inch round recessed lights. This increased size creates stronger visual presence while providing broader light distribution from each fixture, allowing fewer total fixtures while maintaining adequate illumination levels. The geometric form reinforces the angular, linear quality inherent to modern design, creating subtle visual interest through shape rather than ornament or color.
This ceiling treatment pairs beautifully with ultra-modern kitchen design featuring handleless white cabinets and integrated appliances where every element contributes to a clean, uncluttered aesthetic. The ordered grid pattern of square lights echoes the kitchen’s emphasis on geometry and precision. The fixtures remain trimless or include minimal trim details, maintaining the ceiling’s continuous white plane interrupted only by the precisely cut square apertures.
Key Design Tips:
- Space square fixtures on 6-foot centers in both directions to create an even lighting grid
- Select fixtures between 8-12 inches square for contemporary presence without overwhelming the ceiling
- Choose trimless square fixtures that sit flush with the ceiling plane for seamless integration
- Coordinate fixture placement with cabinetry layout, aligning lights with center lines and major elements
- Use fixtures with wide beam spreads (110-120 degrees) to minimize light overlap and dark spots
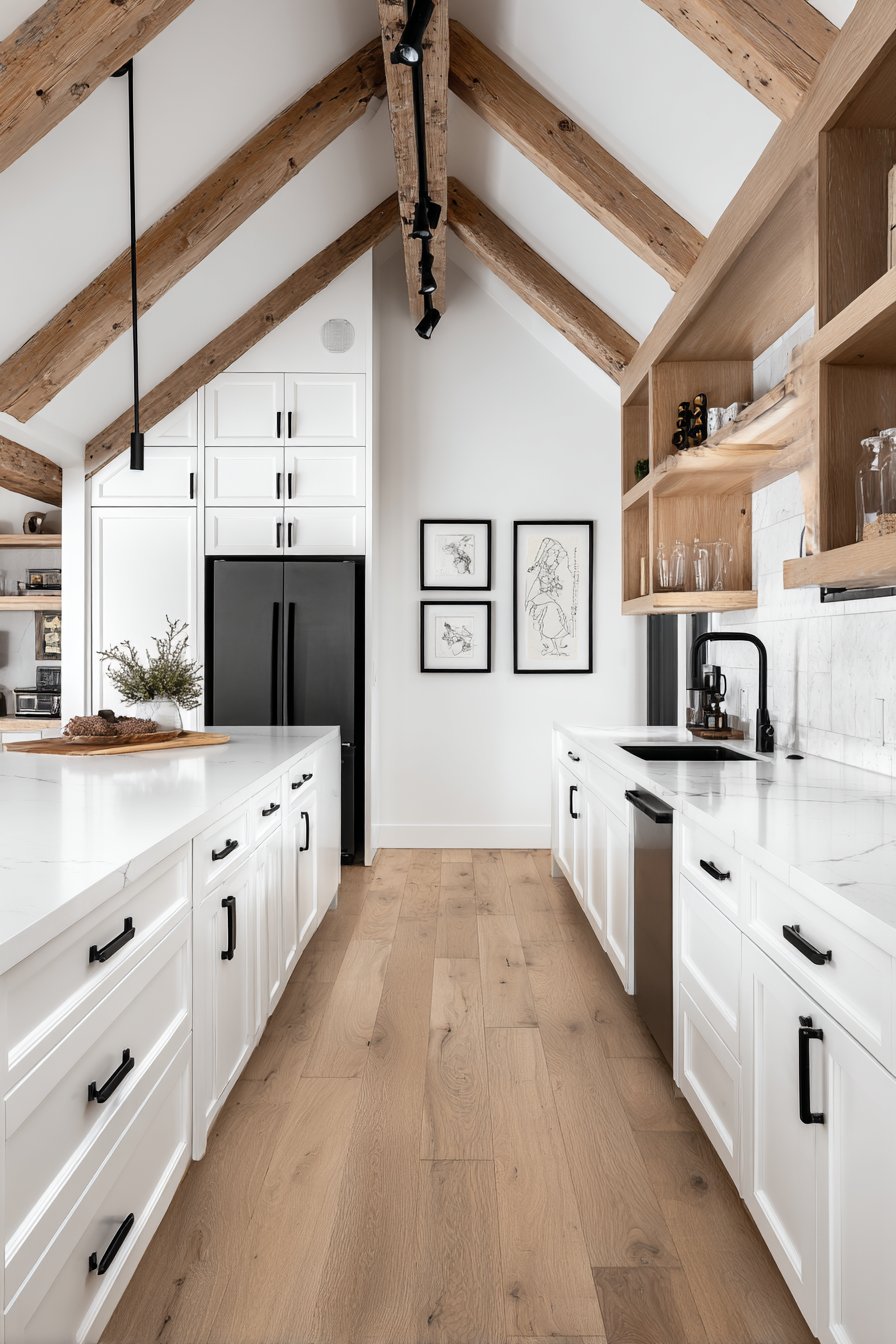
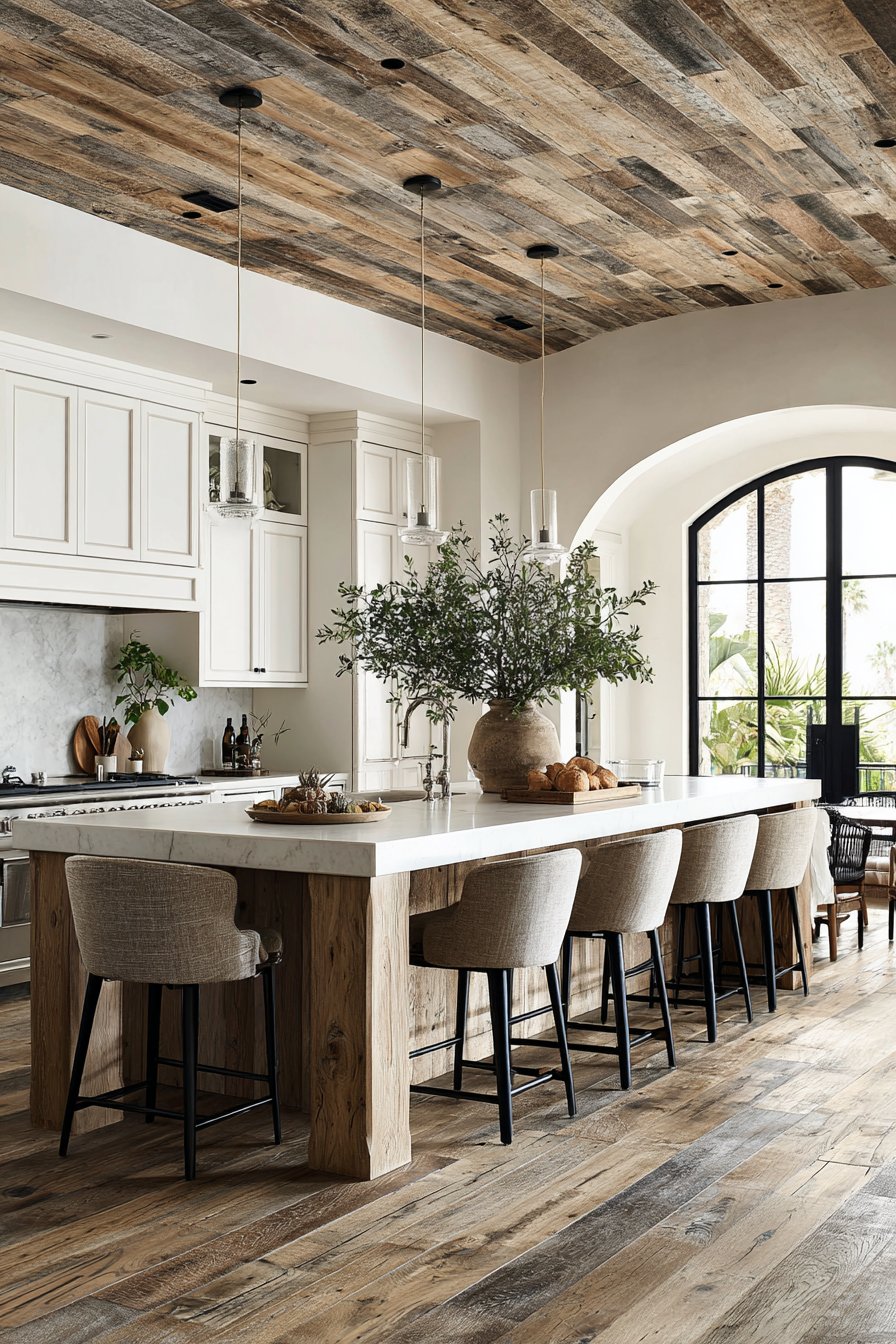
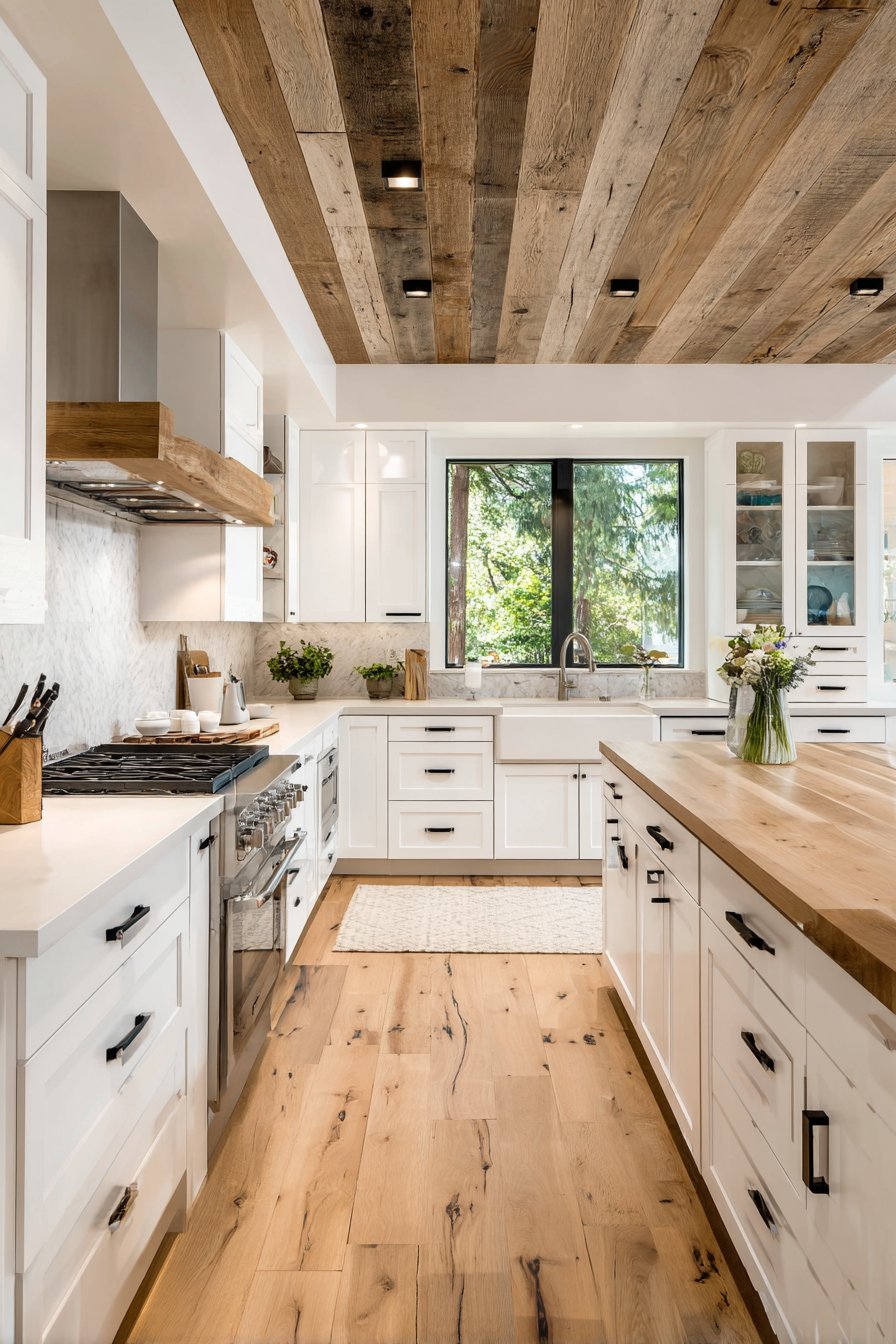
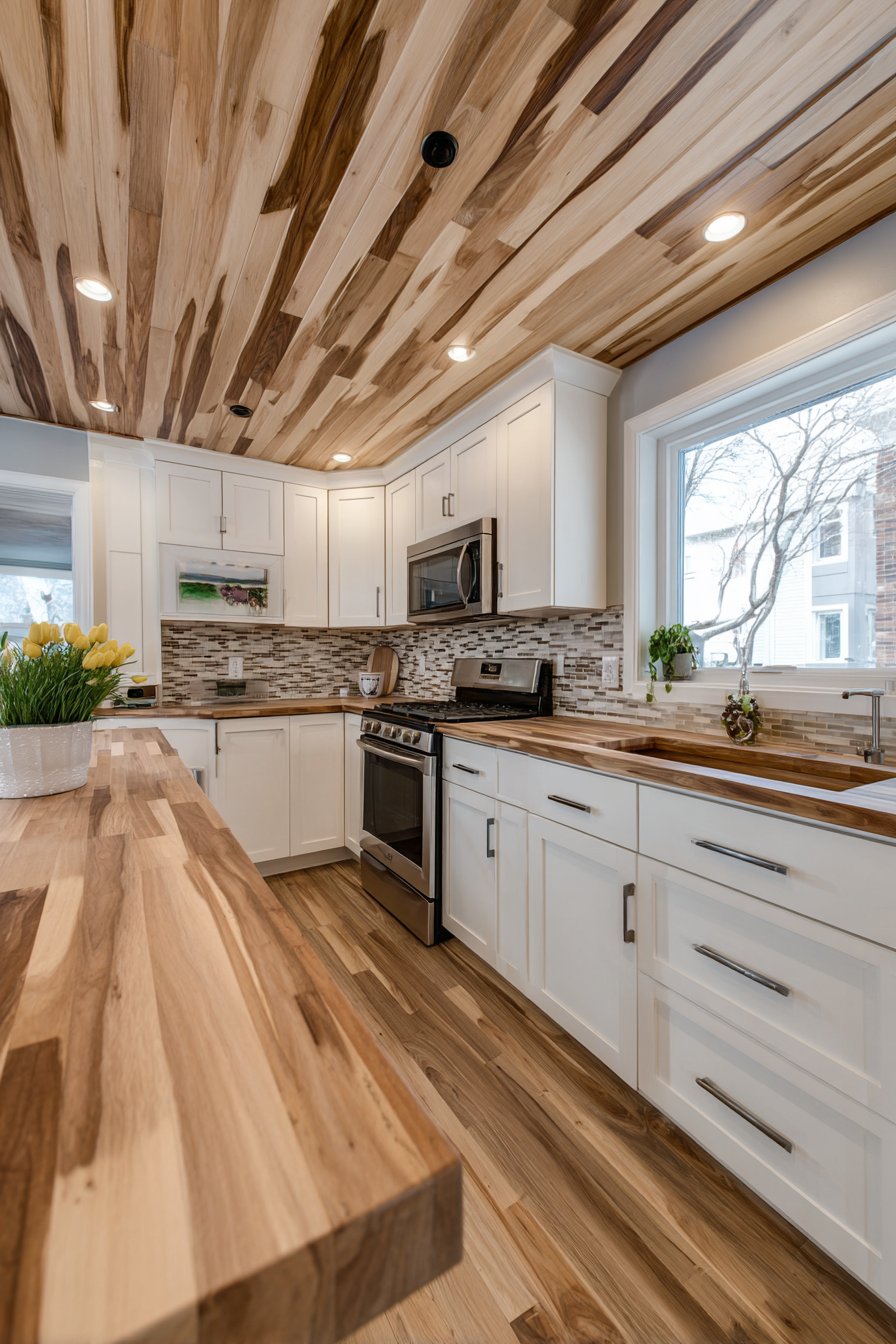
11. Natural Wood Tongue-and-Groove Planking
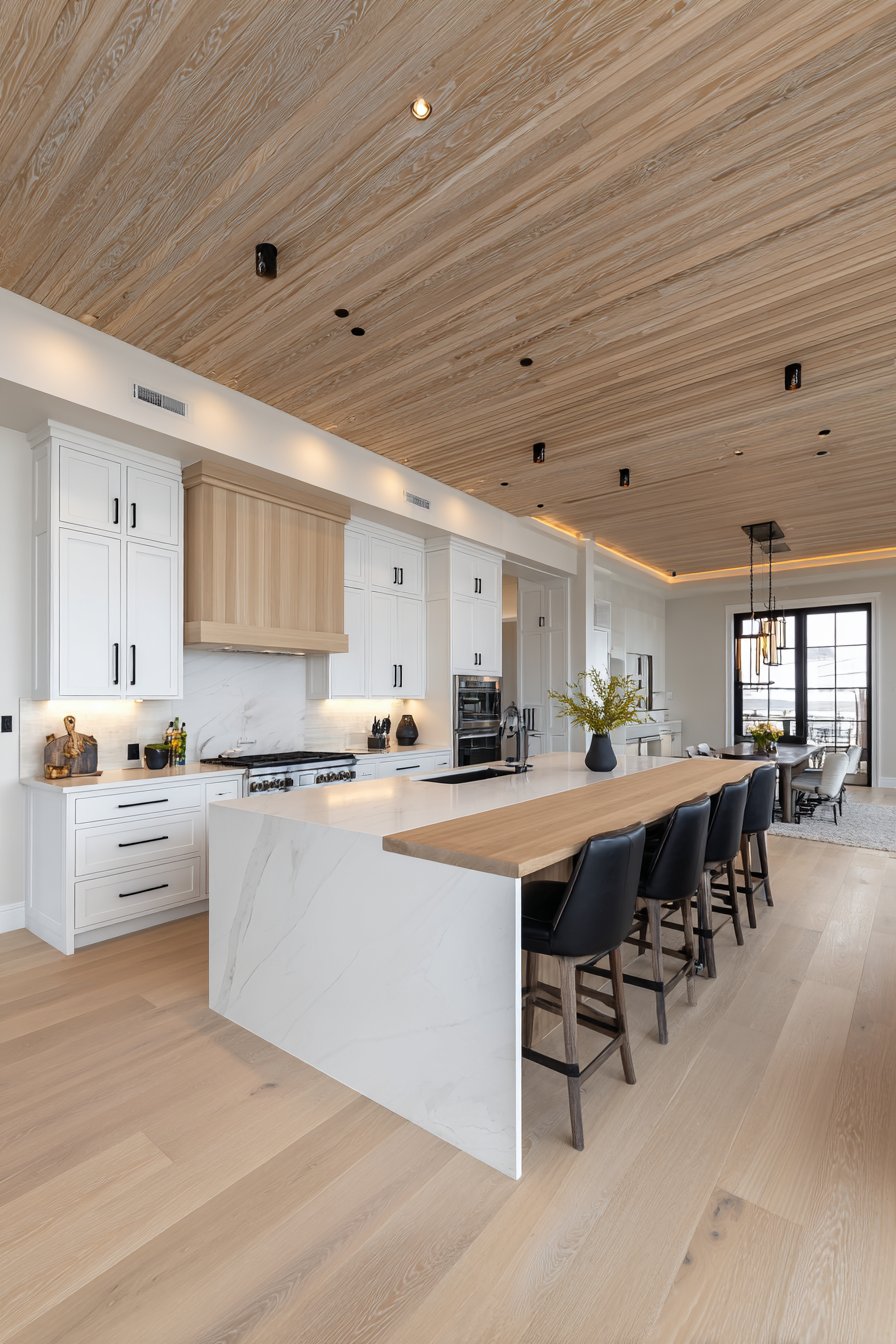
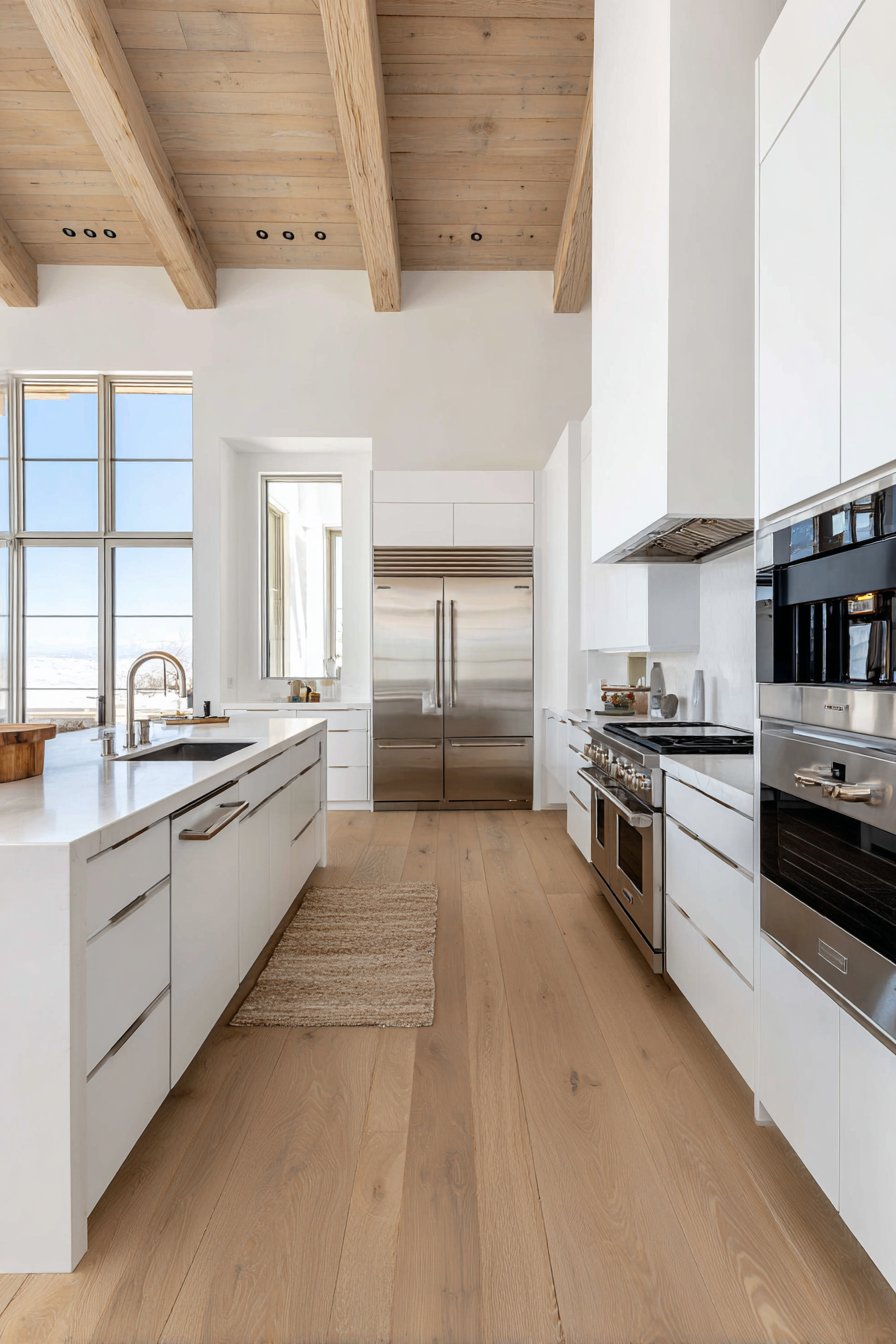
Organic materials ground modern spaces in natural authenticity, and a tongue-and-groove wood plank ceiling introduces warmth that transforms sterile contemporary kitchens into inviting gathering spaces. This design features light ash wood planks installed in a single direction across a flat ceiling, creating linear visual flow while maintaining the wood’s natural grain variation and texture. Small black recessed lights integrate discreetly between planks, providing necessary illumination without interrupting the natural material’s presence. The wood ceiling pairs beautifully with contemporary white shaker cabinets and butcher block countertops, creating a balanced composition of natural and refined elements.
The selection of wood species and finish significantly impacts the ceiling’s contribution to overall kitchen aesthetics. Light woods like ash, maple, or white oak keep the space bright and contemporary, while the natural grain variation adds visual texture that prevents monotony. The finish should be matte or low-sheen to avoid artificial-looking glossy surfaces—natural wood’s beauty lies in its subtle texture and organic imperfection rather than mirror-like perfection.
Installing tongue-and-groove ceiling planks requires proper substrate preparation and attention to wood movement considerations. The planks should be acclimated to the installation environment for several days before installation to minimize expansion and contraction after completion. A vapor barrier may be necessary in humid climates to prevent moisture-related warping. The planks typically measure three to six inches wide, with narrower planks creating more linear definition and wider planks appearing more substantial and contemporary.
Key Design Tips:
- Select light wood species (ash, maple, white oak) to maintain brightness in the kitchen
- Run planks perpendicular to the main kitchen entry to draw the eye through the space
- Apply matte polyurethane or natural oil finish to protect wood while maintaining organic appearance
- Install black recessed lights between plank runs for discreet integration that doesn’t interrupt the wood pattern
- Coordinate plank width with ceiling dimensions—narrower planks for smaller kitchens, wider for expansive spaces
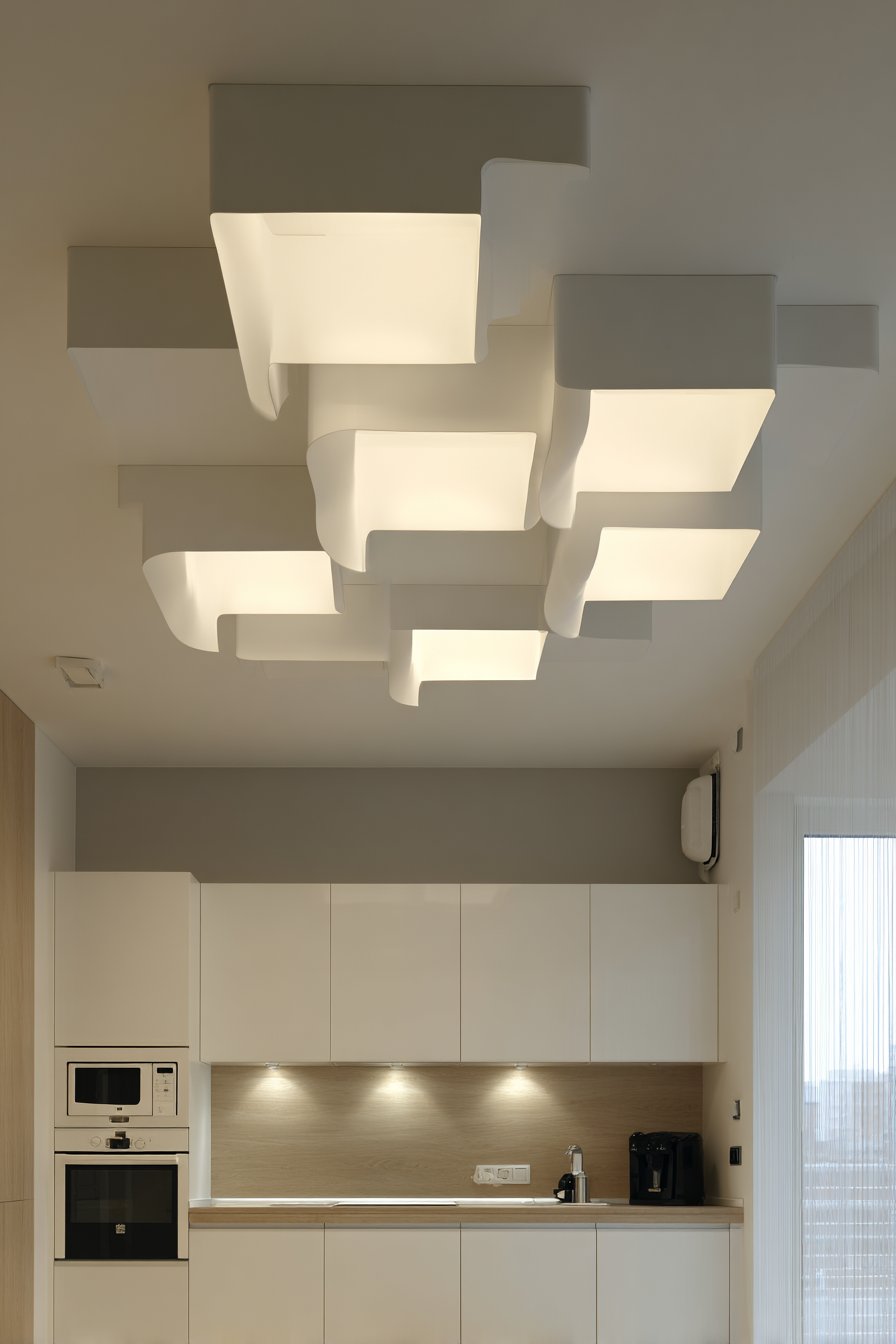
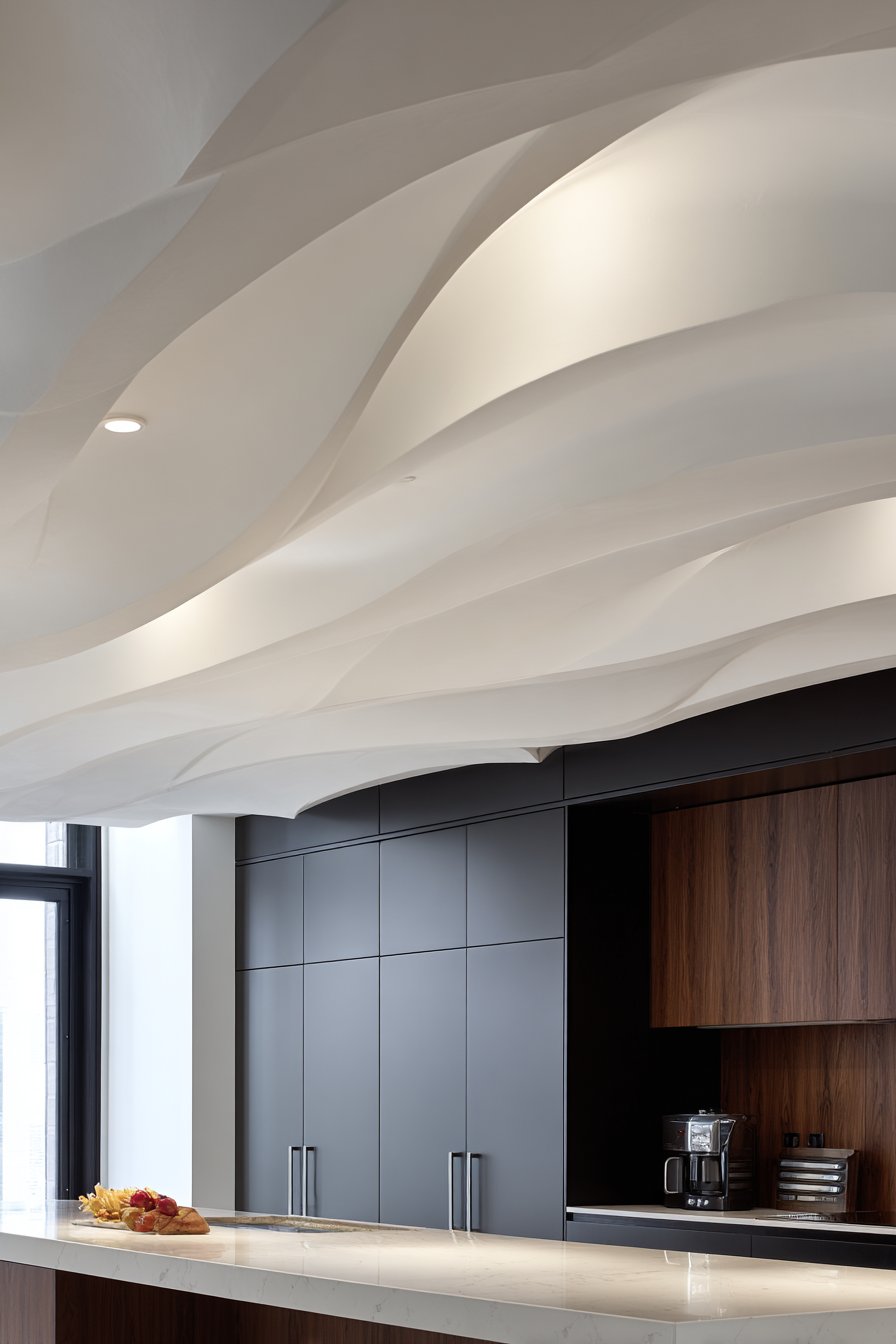
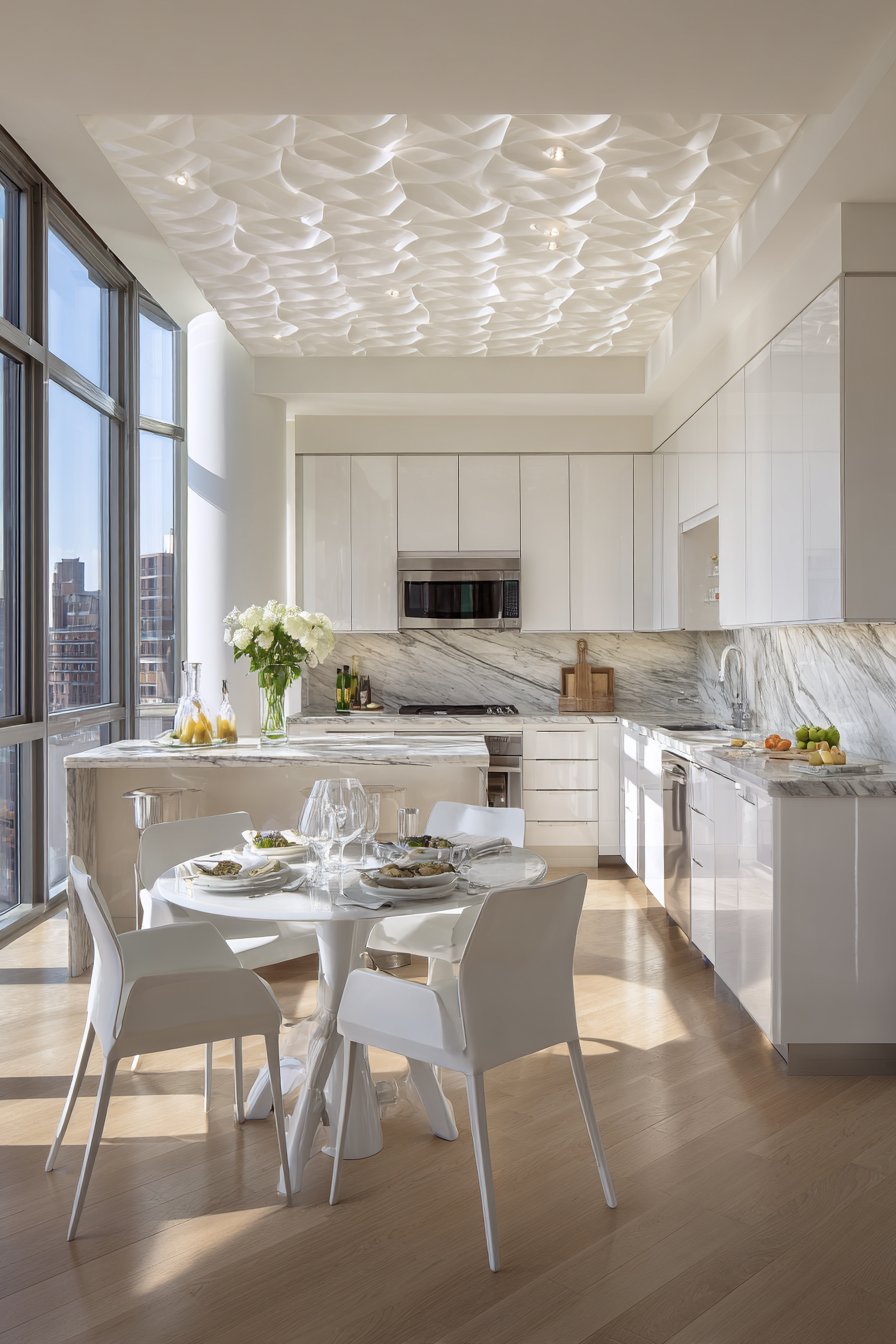
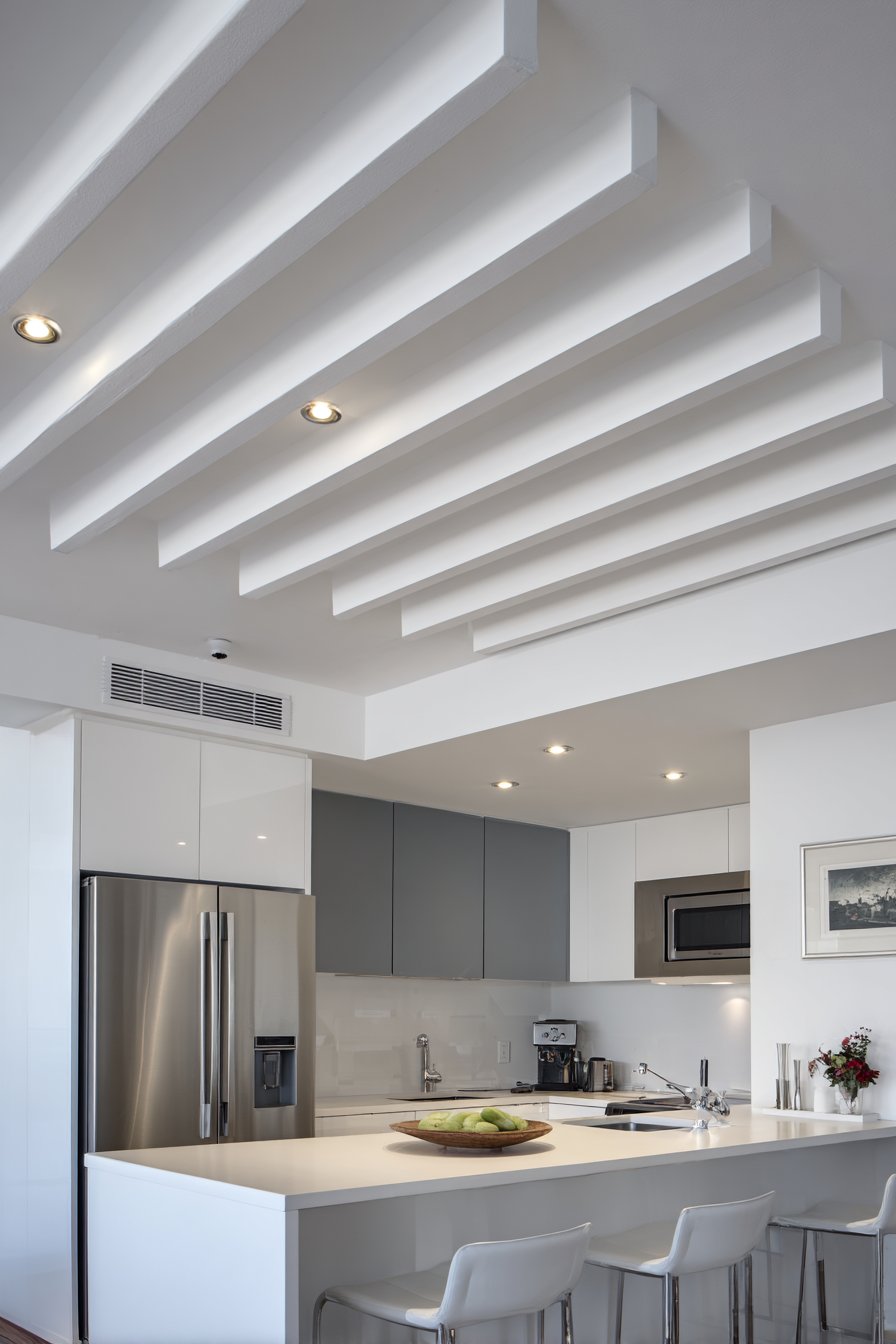
12. Architectural Wave Detail in Ceiling Form
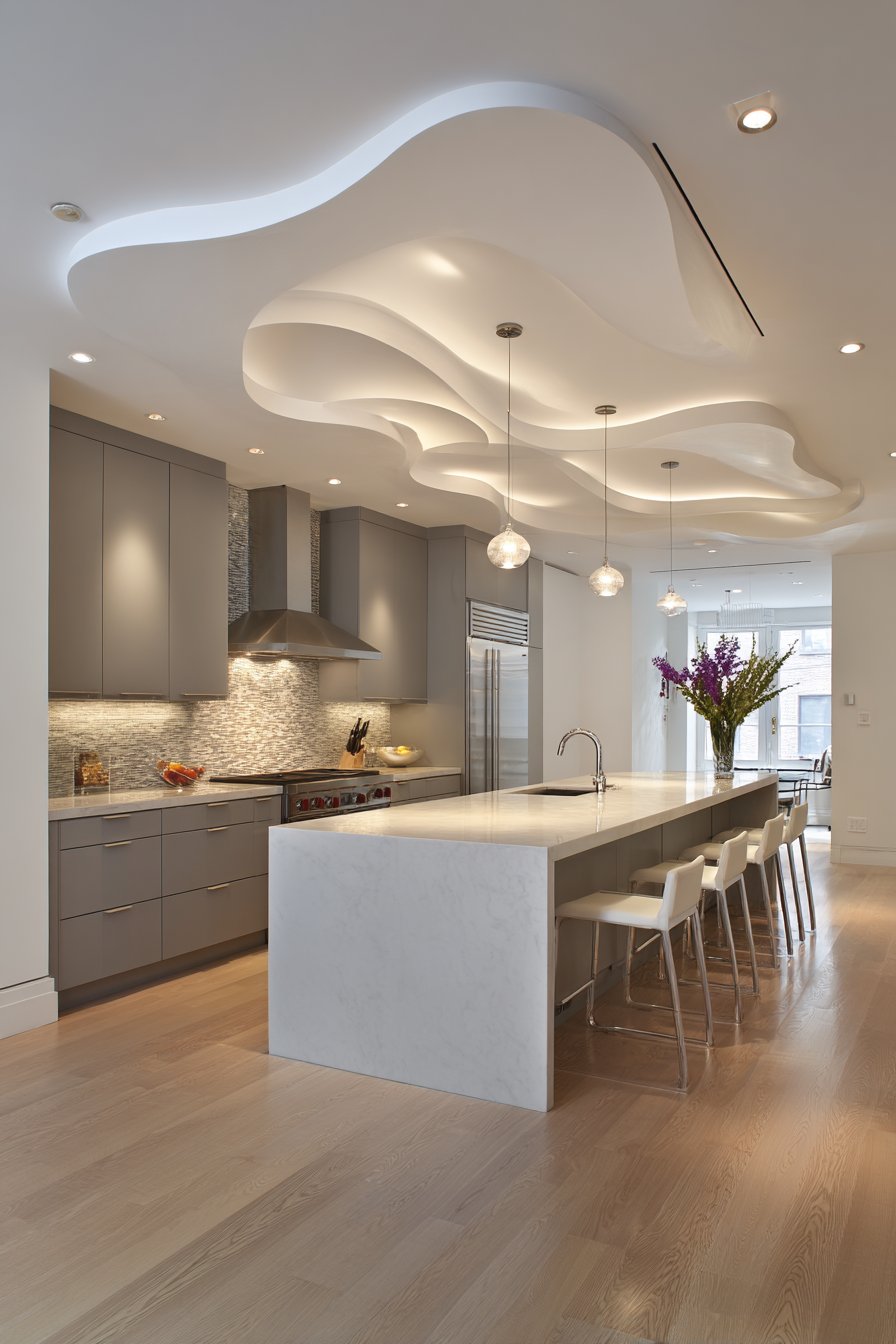
Sculptural elements introduce artistic expression to functional spaces, and an architectural wave detail in the ceiling creates a dramatic three-dimensional feature. This design employs curved drywall construction to create gentle undulating forms painted in white, adding organic movement to typically flat ceiling planes. The flowing geometry provides visual interest and architectural sophistication while recessed lighting concealed within the curves delivers indirect illumination that emphasizes the ceiling’s dimensional quality. This bold design gesture transforms the ceiling from background surface to focal point.

The wave form typically flows across the ceiling following the kitchen’s primary axis, creating a sense of directional movement that guides the eye through the space. The curves measure between six to eighteen inches in amplitude, creating visible three-dimensional form without dominating the space or creating oppressive bulkheads. The execution requires skilled drywall installation using flexible archways or radiused framing to achieve smooth, flowing curves. The sculptural quality introduces artistic expression typically associated with gallery or commercial spaces into residential kitchen design.
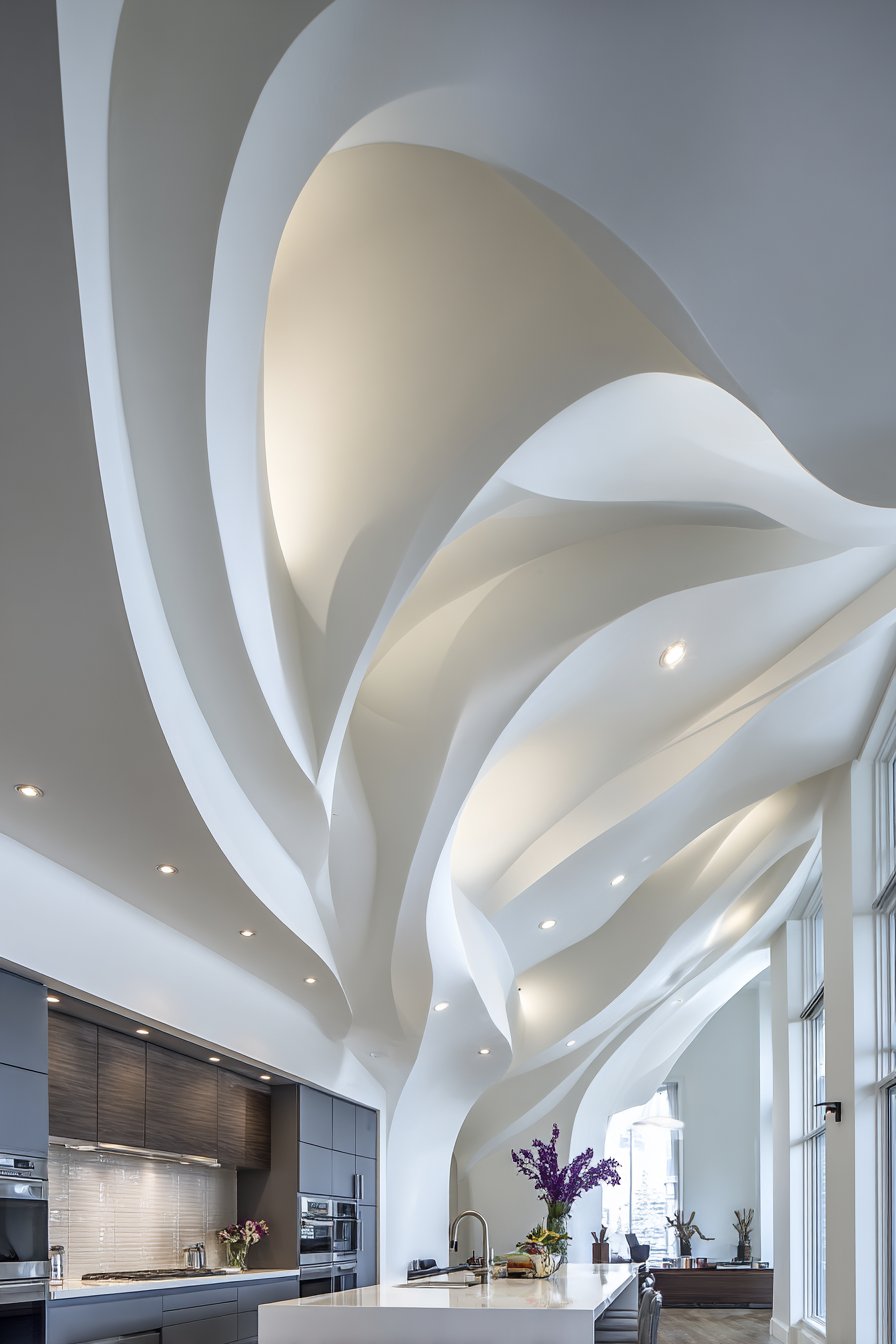
This ceiling treatment works best in contemporary kitchens with minimalist aesthetics where the ceiling sculpture contrasts against simple, clean-lined cabinetry. The grey flat-panel cabinets in this design provide visual restraint that allows the ceiling’s organic forms to command attention. The white paint unifies the ceiling while the curving shadows created by natural and artificial light create ever-changing patterns throughout the day, ensuring the ceiling remains visually dynamic.
Key Design Tips:
- Limit wave amplitude to 12 inches maximum to maintain architectural scale rather than appearing theatrical
- Create smooth, flowing curves rather than abrupt transitions for organic, natural movement
- Integrate LED strip lighting within concave curves to provide indirect uplighting that emphasizes form
- Paint the entire ceiling surface white to unify the sculptural elements and maximize light reflection
- Align wave direction with the main kitchen axis to guide movement through the space
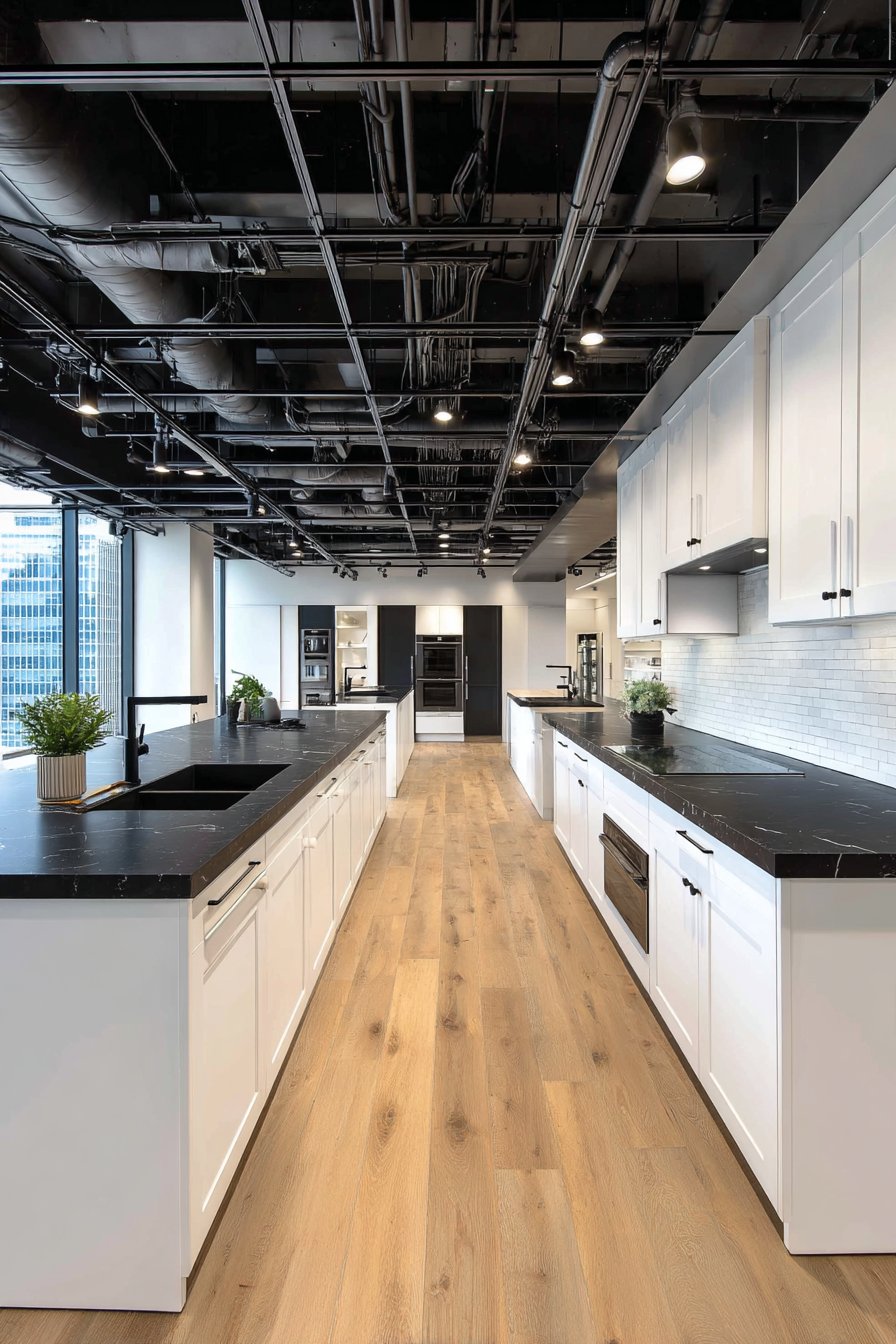
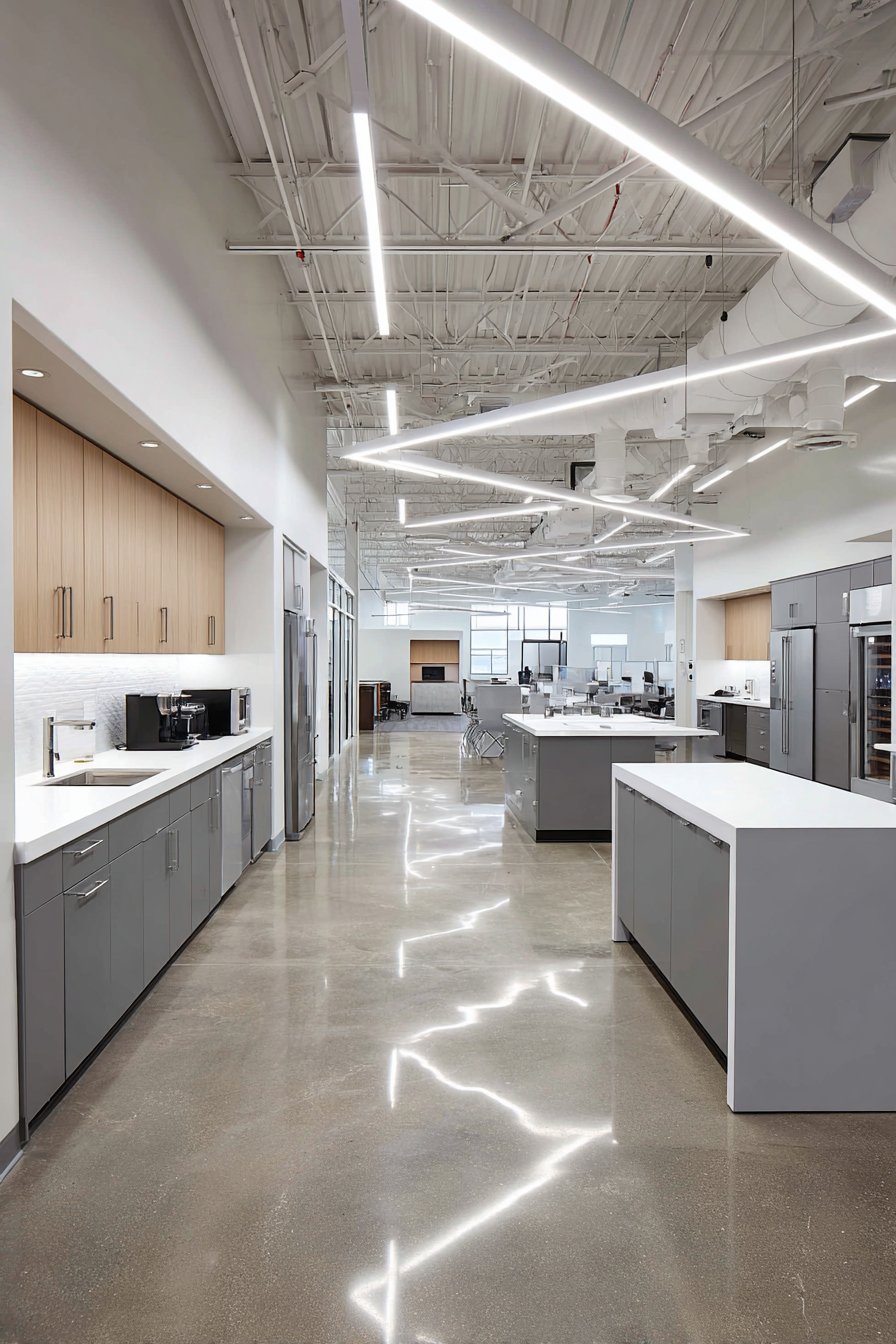
13. Industrial Exposed Ductwork Ceiling

Honest materiality defines industrial design, and an exposed ductwork ceiling celebrates functional elements as aesthetic features. This design features rectangular HVAC ducts painted in matte black against a white ceiling backdrop, transforming typically hidden mechanical systems into design statements. Simple black track lighting mounts directly on the ducts, reinforcing the industrial aesthetic while providing adjustable task illumination. The kitchen below echoes this honest material approach with white cabinets and black countertops, creating a cohesive design where every element contributes to the industrial modern narrative.
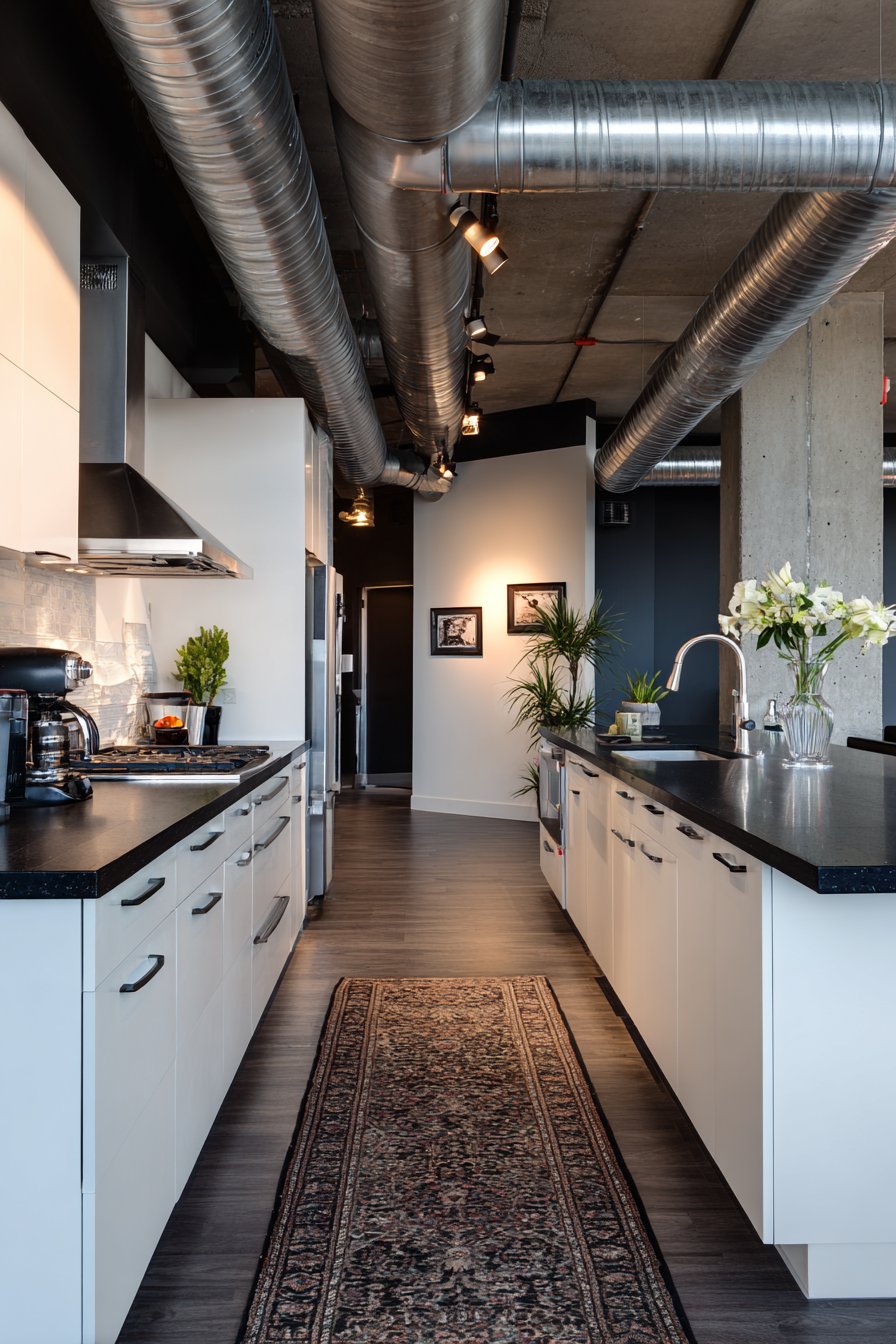
The decision to expose ductwork represents a fundamental shift in design philosophy—rather than concealing building systems behind finished surfaces, this approach celebrates the infrastructure that makes spaces functional and comfortable. The painted black ducts create strong linear elements that add visual interest and architectural definition to the ceiling plane. The contrast between the black ducts and white ceiling creates graphic quality that feels intentional and designed rather than simply unfinished.
Successfully implementing exposed ductwork requires careful planning during the renovation or construction phase. The ductwork layout must be designed for visual appeal in addition to functional efficiency, avoiding haphazard routing that appears accidental. Ducts should follow logical paths, creating organized patterns that reinforce the space’s geometry. All exposed metalwork requires professional finishing—seams must be sealed, surfaces must be smooth, and paint application must be even and complete to achieve professional results.
Key Design Tips:
- Paint all exposed ductwork in matte black to create unified visual elements rather than raw unfinished metal
- Route ducts in organized, logical patterns that create visual order and architectural presence
- Mount track lighting directly on ductwork to reinforce the industrial integration of systems
- Maintain minimum 7 feet clear height below ducts to ensure comfortable circulation space
- Seal and finish all ductwork seams professionally—exposed systems must appear intentional, not incomplete
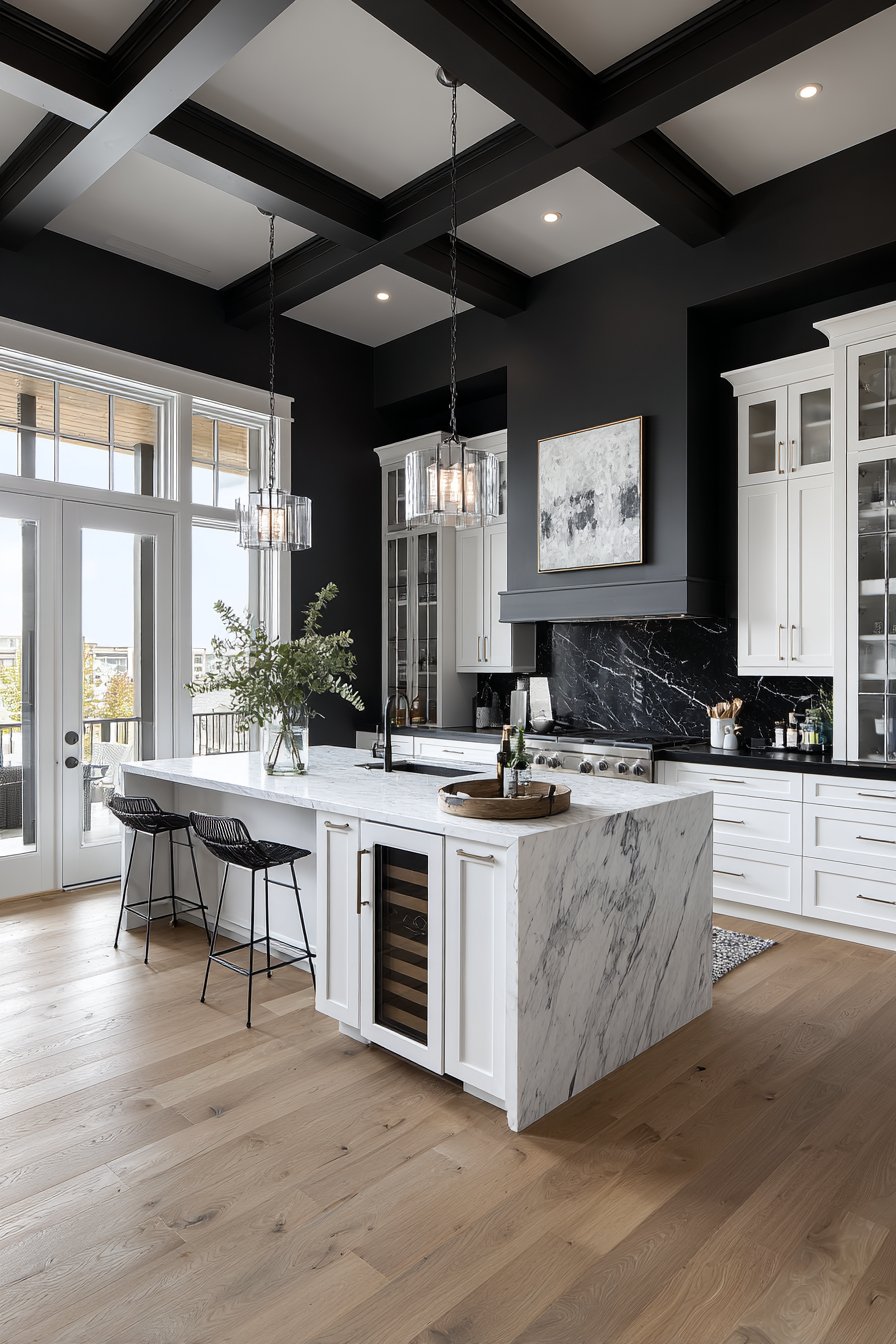
14. Dramatic Navy Blue Painted Ceiling
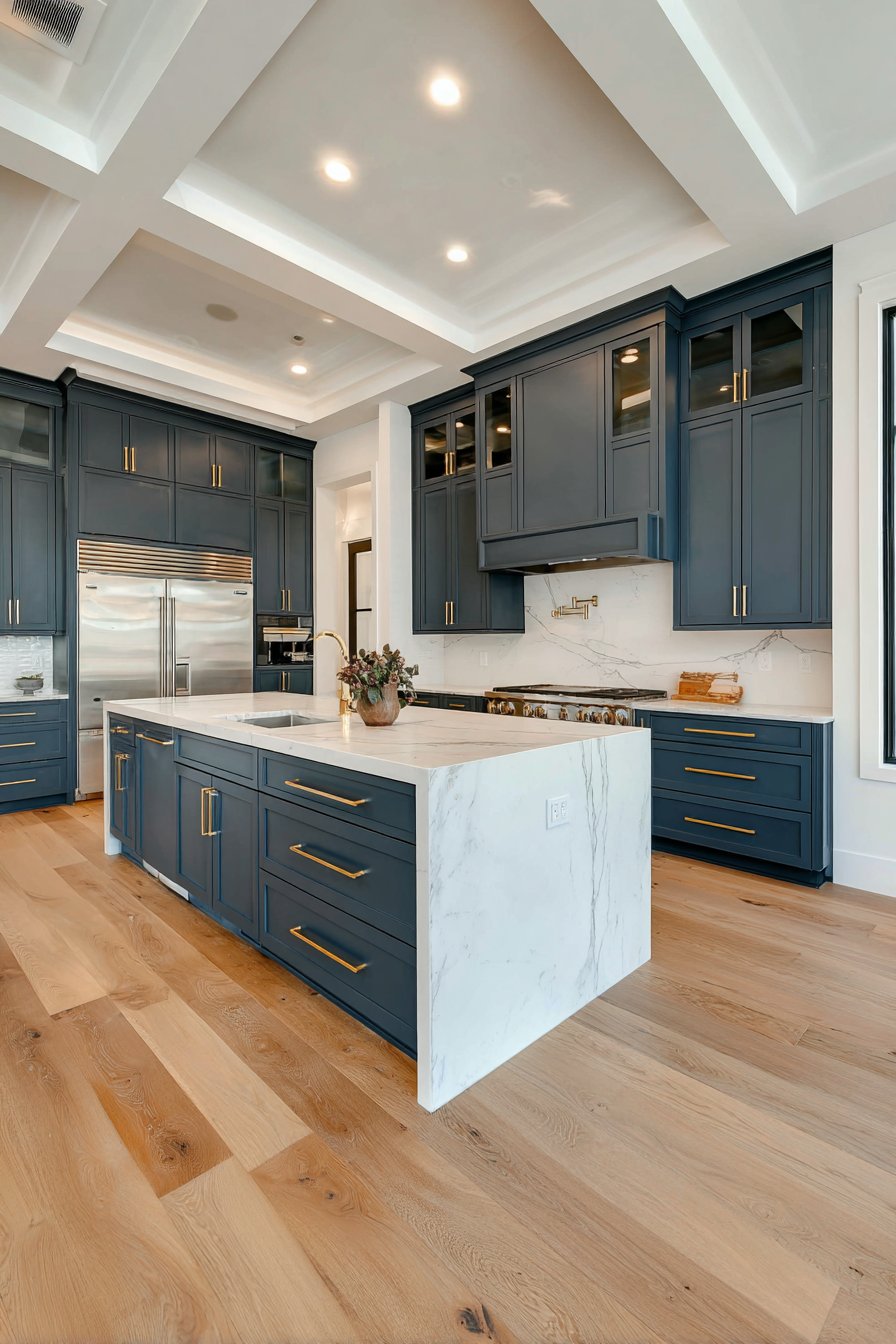
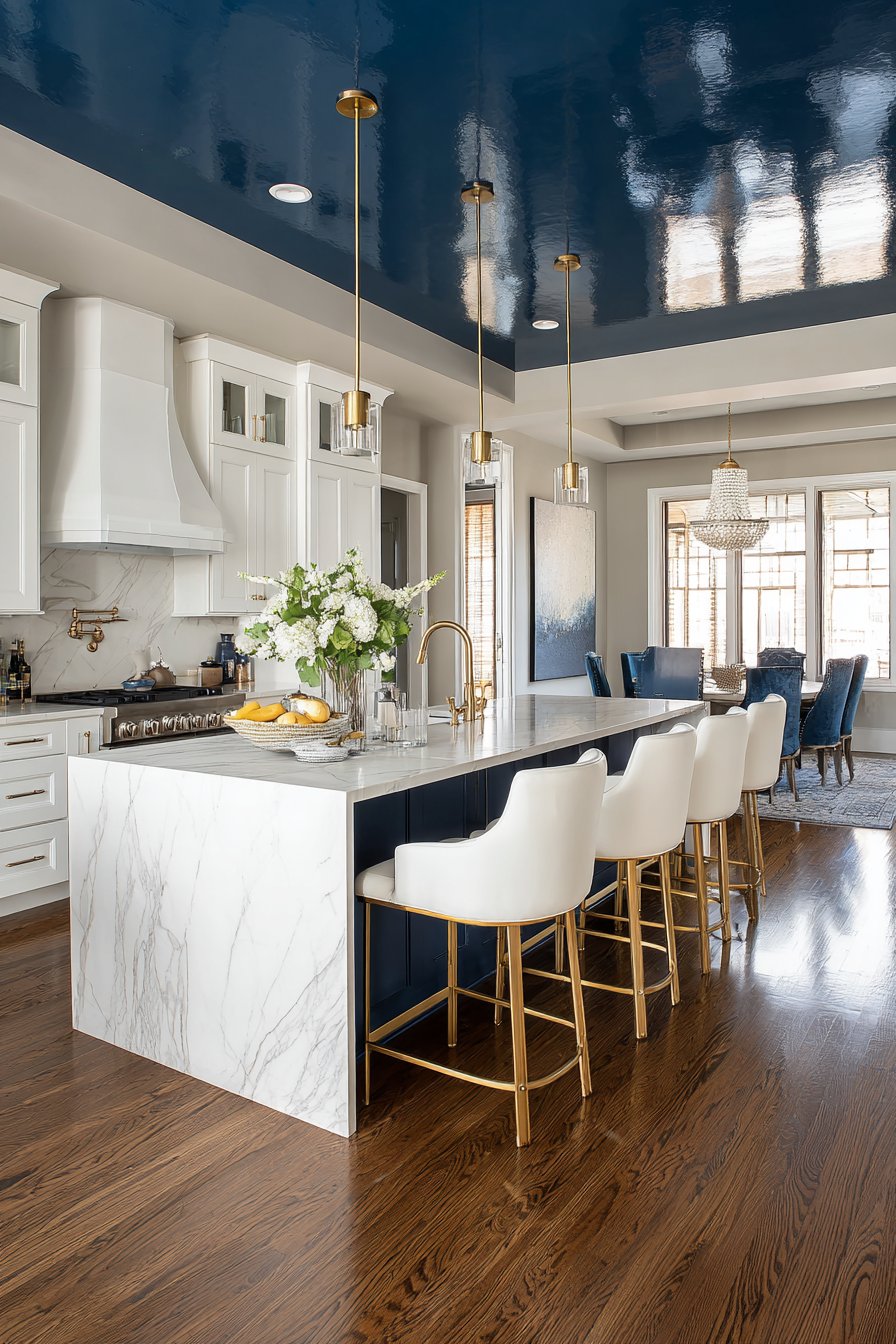
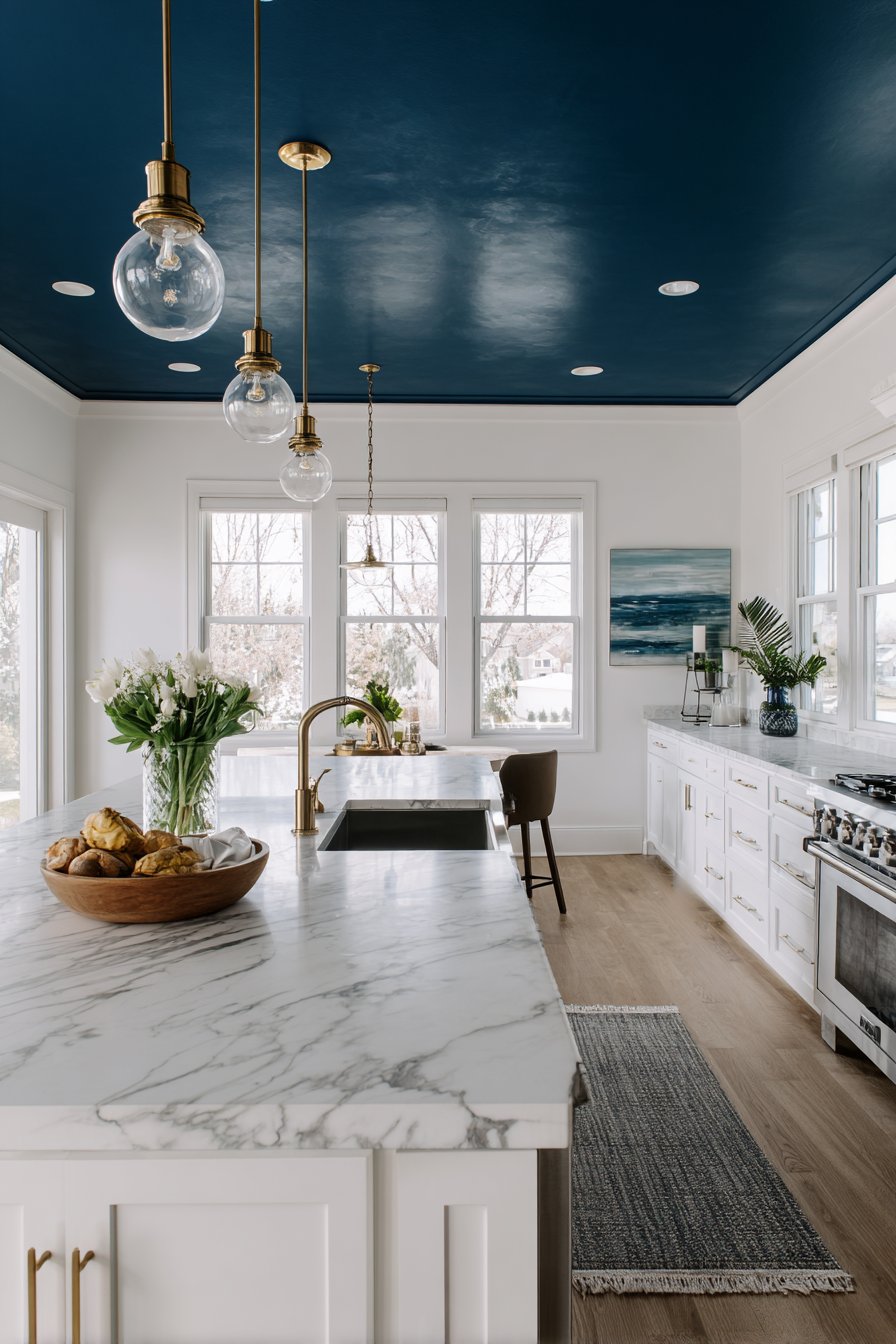
Bold color choices transform spaces, and a dramatic navy blue ceiling creates intimate, sophisticated atmosphere in a modern kitchen. This unexpected approach defies conventional wisdom about ceiling color, demonstrating how dark surfaces can anchor a space and create striking contrast. The flat ceiling features brushed brass recessed lighting fixtures that provide warm accent points against the deep blue, while white walls meet the colored ceiling with crisp definition. The kitchen below incorporates white and brass elements with marble countertops, creating bright contrast that prevents the dark ceiling from overwhelming the space.
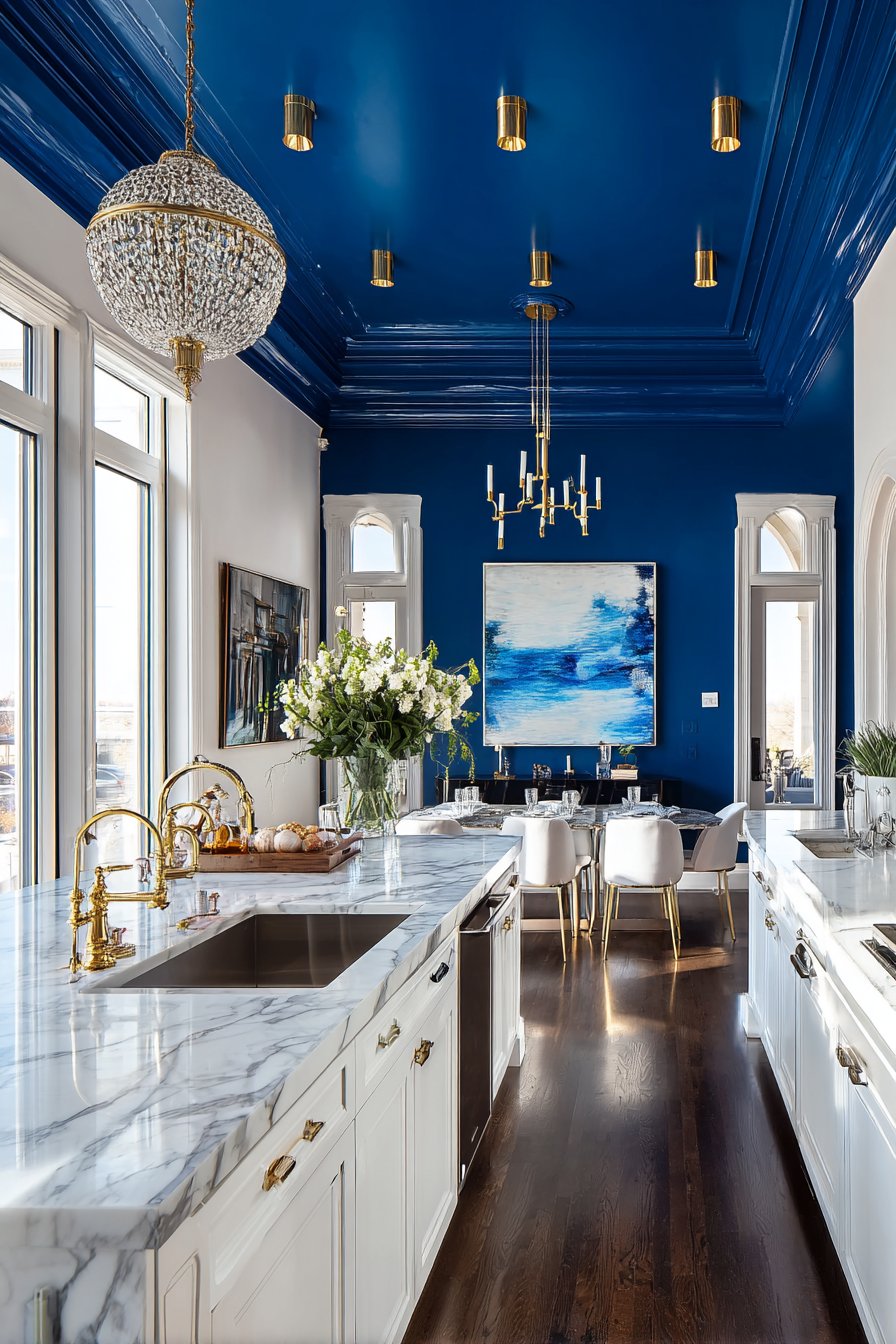
The psychology of dark ceiling colors differs significantly from traditional white approaches. Rather than receding visually as light ceilings do, dark ceilings appear to lower slightly, creating a more intimate, cocooning atmosphere. This effect works beautifully in kitchens where homeowners want to establish a sophisticated, enveloping ambiance rather than bright, expansive openness. The navy blue provides richness and depth that white simply cannot achieve, establishing a backdrop that makes white cabinetry and marble surfaces appear even more luminous by contrast.
Implementing a dark ceiling color requires confidence and careful planning. The ceiling must be perfectly prepped and smoothly finished since dark colors reveal imperfections that white conceals. Multiple coats of high-quality paint ensure even, rich color without visible roller marks or thin coverage. The paint sheen should remain matte or eggshell—glossy dark ceilings appear harsh and can create distracting reflections from light fixtures.
Key Design Tips:
- Reserve dark ceiling colors for kitchens with ceiling heights of 9 feet or higher to maintain comfortable proportions
- Install abundant lighting—both recessed and under-cabinet—to compensate for light absorption by dark surfaces
- Maintain white or light-colored walls and cabinets to create dramatic contrast and prevent cave-like darkness
- Select warm metal finishes (brass, bronze, copper) for lighting fixtures to glow beautifully against dark backgrounds
- Apply 3-4 coats of high-quality paint to ensure rich, even color without thin spots or visible application marks
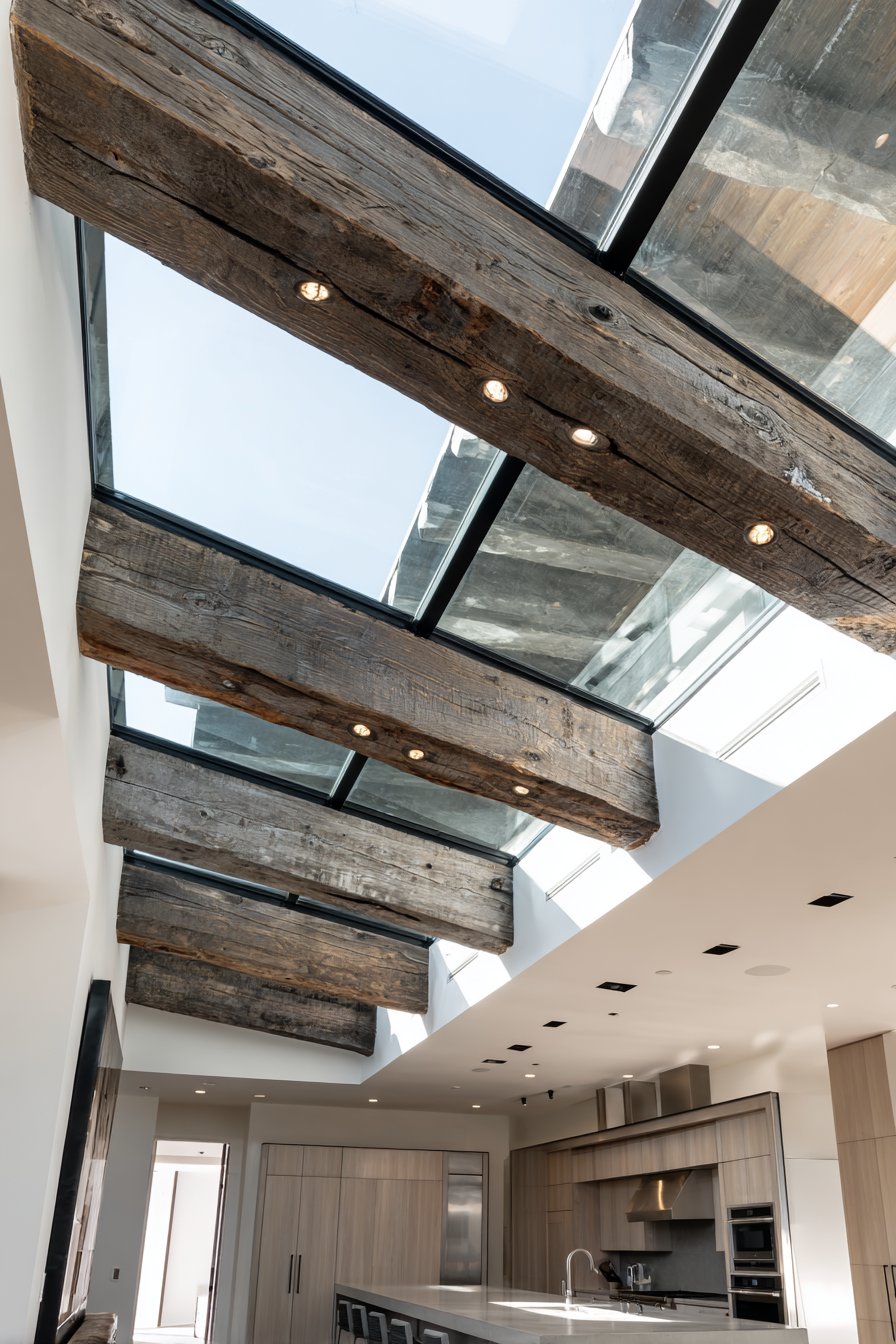
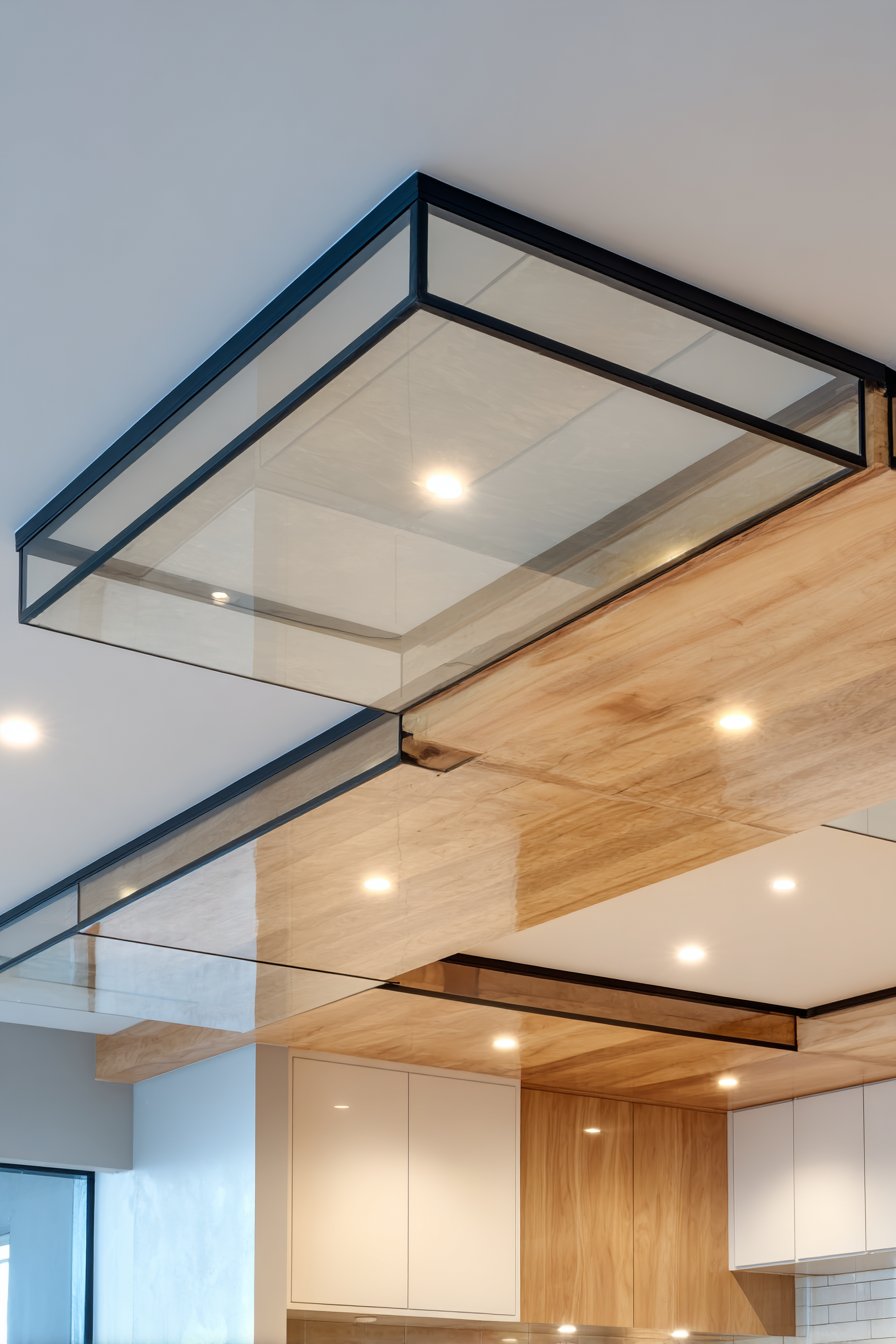
15. Transparent Glass Panel with Exposed Structure Above
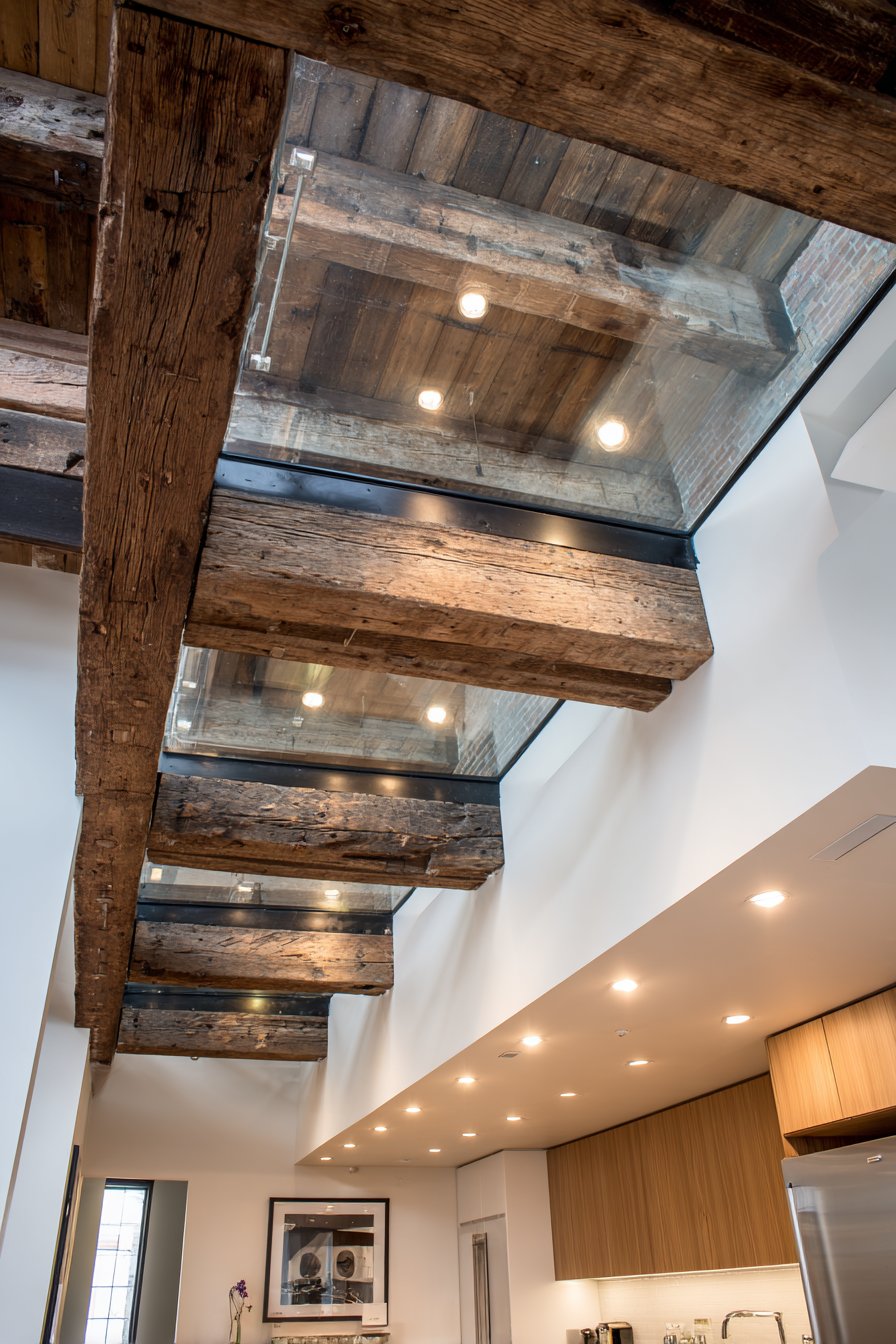
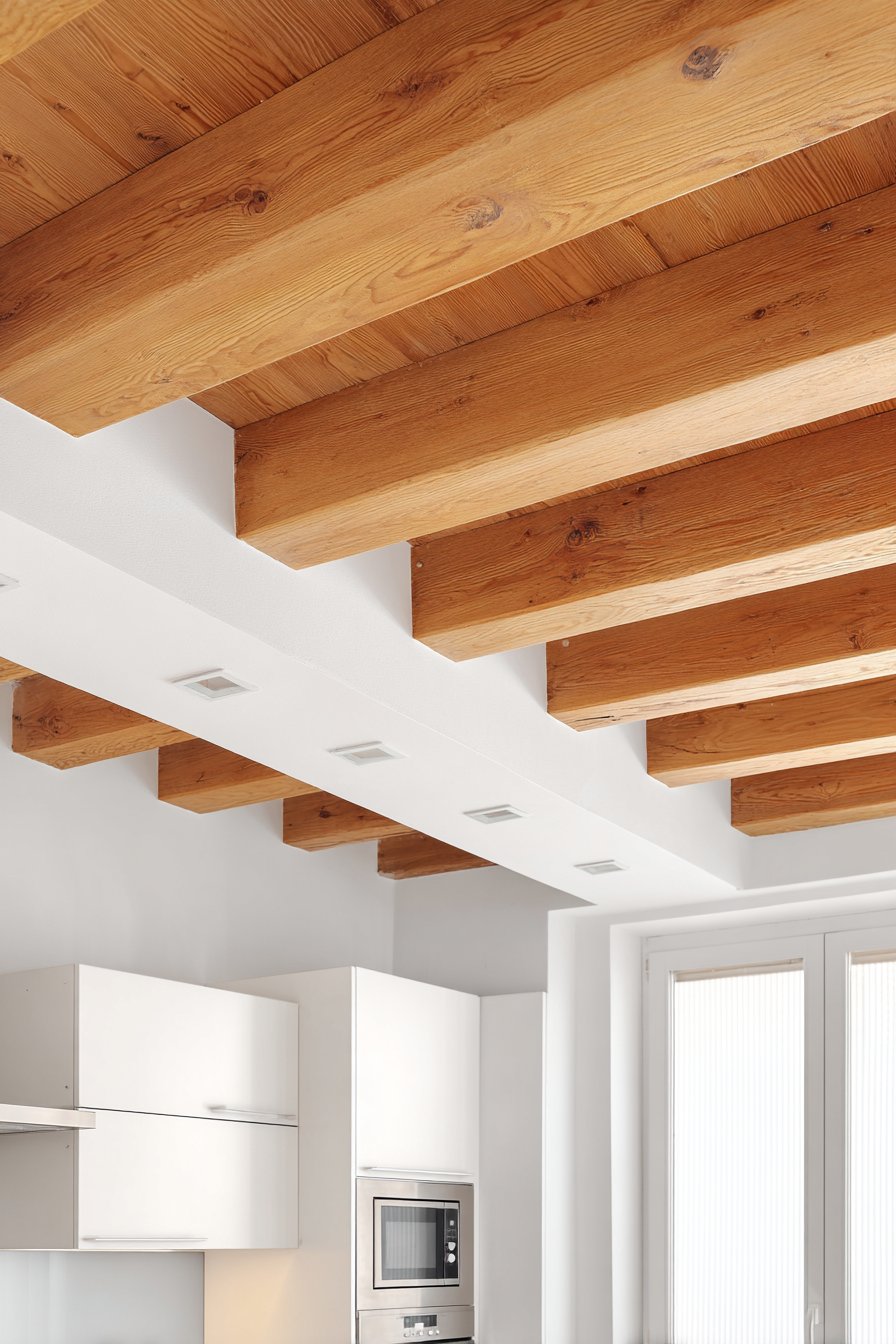
Layered architectural elements create visual complexity and interest, and a glass panel section in the ceiling reveals wooden structural beams above while maintaining weather protection. This innovative approach features glass framed with minimal black metal channels, creating an industrial-modern transparent ceiling detail that exposes the building’s structural skeleton. The surrounding white ceiling with recessed lighting provides standard finished surfaces while the glass section becomes a focal point that celebrates honest construction. The kitchen showcases contemporary concrete countertops and white oak cabinets that echo the material honesty expressed in the ceiling treatment.
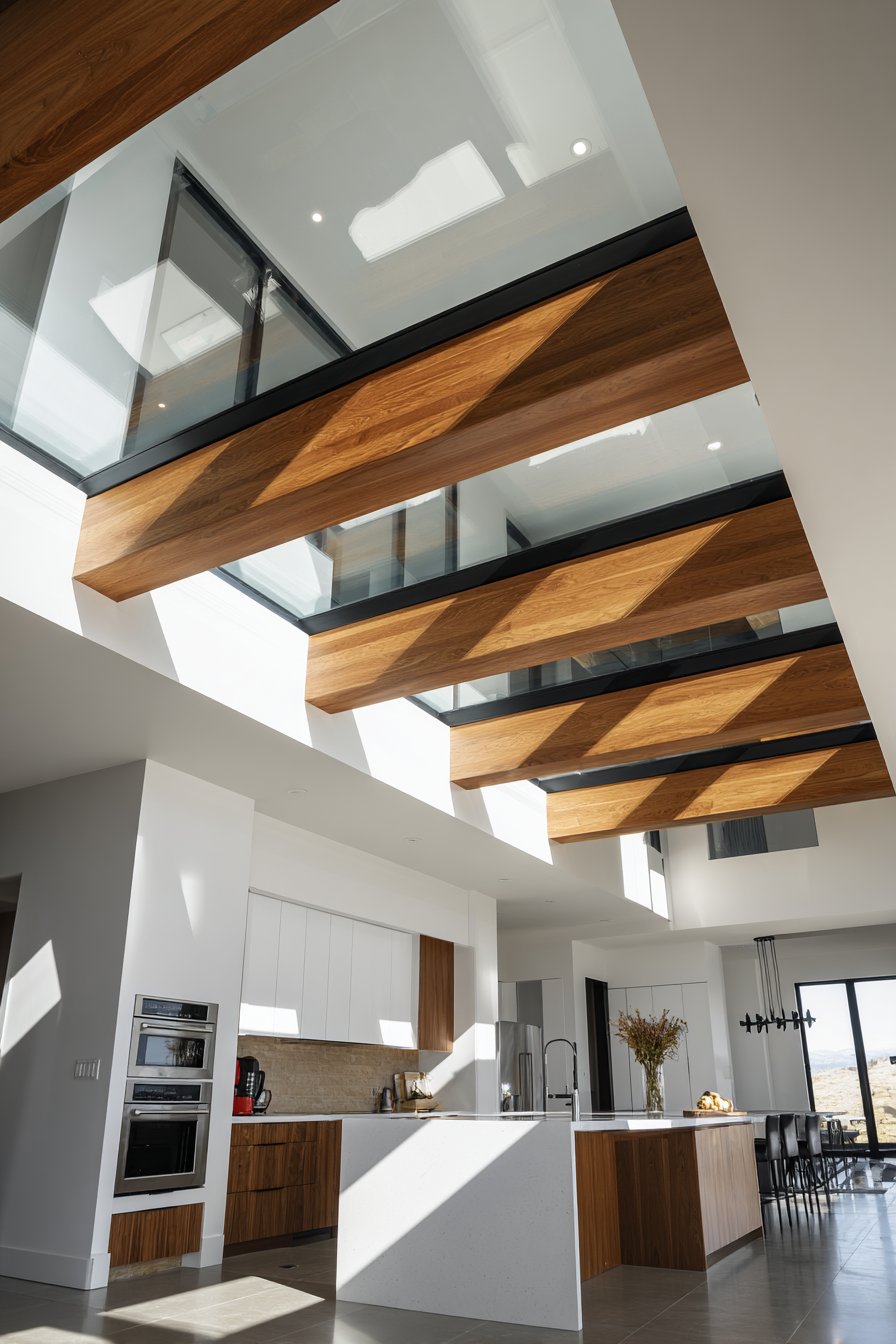
This design approach requires specific architectural conditions—typically a renovated industrial building, converted warehouse, or new construction specifically designed to accommodate exposed structure. The glass must be structural-grade with appropriate safety ratings, often tempered or laminated for impact resistance. The exposed beams above should be cleaned, sealed, and finished to prevent dust infiltration while showcasing the wood’s natural character. The transparency creates unexpected visual depth, allowing the eye to read the building’s construction in a way that connects occupants to architectural reality.
The installation complexity and cost of glass ceiling sections exceeds standard ceiling treatments, but the unique architectural character justifies the investment for homeowners seeking distinctive, conversation-worthy design features. The glass requires periodic cleaning to maintain transparency and prevent dust accumulation that would obscure the exposed structure above. Proper flashing and weather-sealing ensure the installation remains water-tight while maintaining the desired transparent quality.
Key Design Tips:
- Use structural-grade laminated glass with minimum 1/2-inch thickness for safety and durability
- Frame glass with minimal black steel channels to create industrial aesthetic without bulky framing
- Clean and seal exposed wooden structure above to create finished appearance and prevent dust infiltration
- Limit glass section to focal area (over island or dining zone) rather than entire ceiling to control cost and maintain privacy
- Install the glass section with slight pitch to prevent water pooling on the upper surface
16. Technology-Integrated Ceiling with Flush-Mounted Speakers
Smart home integration extends to ceiling design, and flush-mounted ceiling speakers create seamless audio throughout the kitchen without visible equipment clutter. This design features a white ceiling with symmetrically arranged speakers that include minimal white grilles blending into the ceiling surface. The speakers provide whole-room audio for entertainment, podcasts, or streaming music during cooking and gathering. Recessed lighting positions around the speakers create complete modern integration that addresses both illumination and audio needs. The kitchen incorporates smart home elements throughout, establishing a technology-forward environment where ceiling-mounted audio represents just one component of integrated home systems.
Modern in-ceiling speakers have evolved dramatically, offering sound quality that rivals traditional bookshelf or tower speakers while maintaining completely invisible installation. The flush-mounted design eliminates the need for cabinet-mounted speakers that consume counter space or shelf-mounted units that interrupt clean lines. The symmetrical arrangement ensures even sound distribution throughout the kitchen, preventing dead zones or areas with overwhelming volume. Connection to home automation systems allows voice control, multi-room audio coordination, and integration with video systems.
The technical planning for ceiling speaker installation should occur during the construction or renovation phase, as running speaker wire requires ceiling access. Speaker placement should account for acoustic considerations—avoiding direct alignment with hard reflective surfaces that can create harsh sound while positioning units to provide coverage throughout the kitchen. The speaker size typically ranges from six to eight inches in diameter, with larger units producing better bass response but requiring more installation depth.
Key Design Tips:
- Install speakers symmetrically in the ceiling to create balanced, even sound distribution throughout the space
- Select speakers with paintable grilles that can be finished to match the ceiling color for seamless integration
- Position speakers away from range hoods and high-heat areas to prevent heat damage to electronic components
- Connect speakers to a dedicated amplifier designed for in-ceiling installation to ensure adequate power and sound quality
- Integrate speakers with home automation systems for voice control and multi-room audio coordination
17. Suspended Floating Panel Above Kitchen Island
Defining zones within open-plan spaces requires subtle architectural gestures, and a suspended floating panel above the kitchen island creates focus without walls. This design features a rectangular panel suspended from the ceiling by thin metal cables, incorporating downward-facing LED lights that illuminate the island work surface while the panel itself becomes a sculptural element. The suspension system creates dimensionality while maintaining visual openness—the panel defines the island zone without blocking sight lines or creating heavy bulk. The white and wood kitchen cabinetry provides a refined backdrop that allows the floating panel to command attention as a design feature.
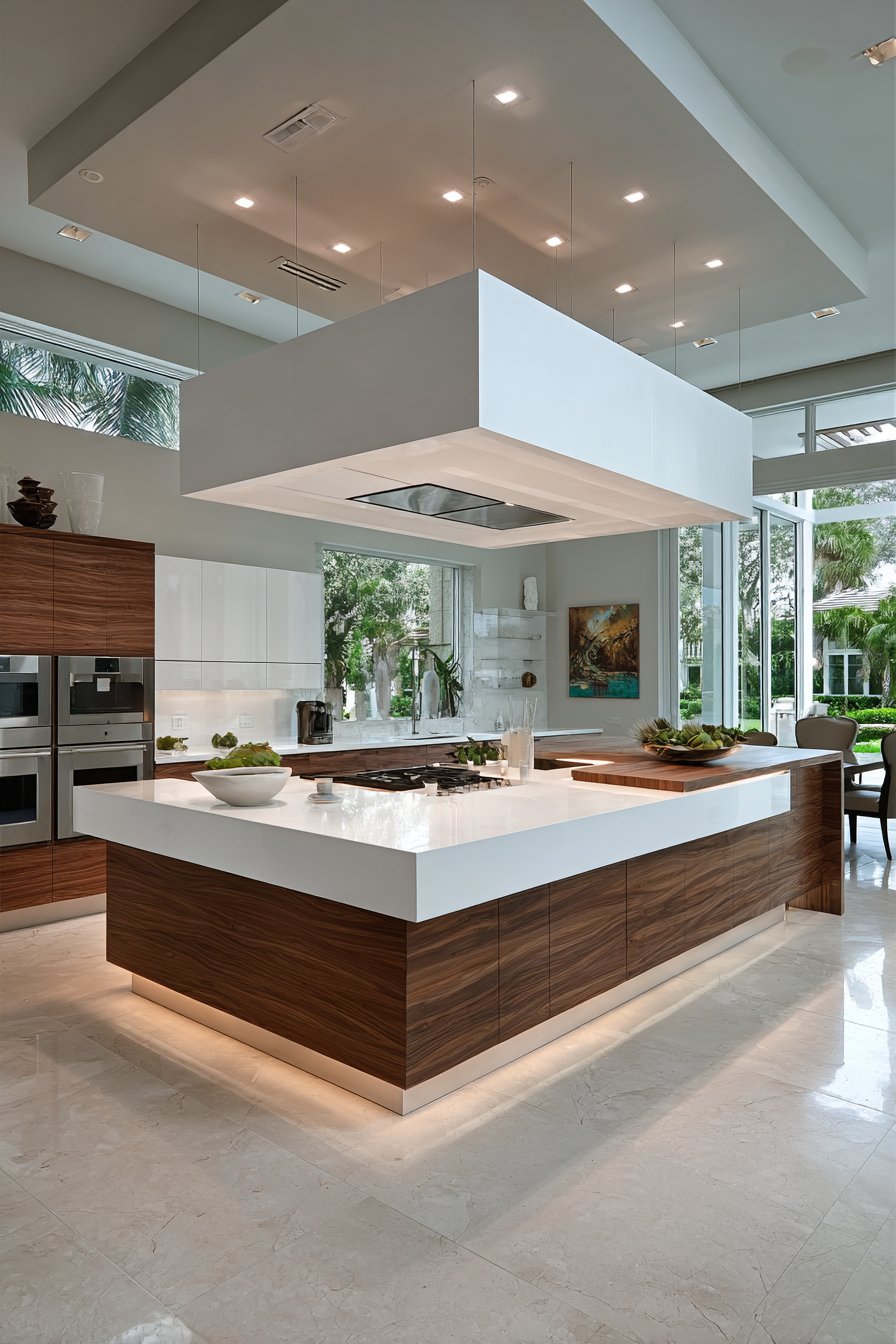
The engineering behind floating panels requires proper structural support in the ceiling above to handle the suspended weight. The cables typically consist of aircraft-grade steel wire in thin diameters that provide strength while remaining visually delicate. The panel itself should be relatively lightweight—often constructed from painted medium-density fiberboard or aluminum composite—to minimize structural load. The integrated lighting can include LED strips along the panel edges for ambient glow or recessed downlights within the panel for focused task illumination.
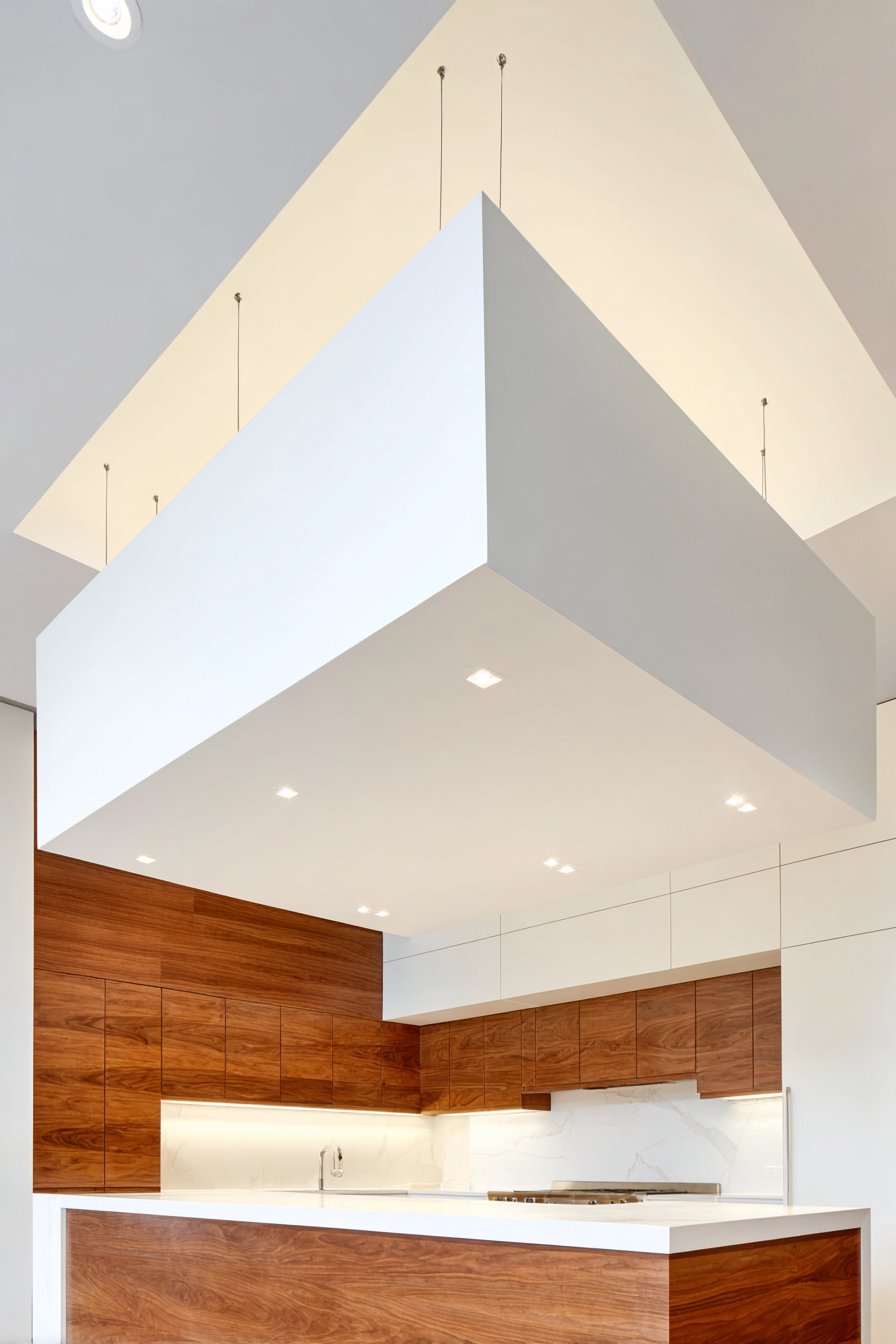
The proportions of the floating panel must relate carefully to the island dimensions below. The panel typically measures slightly smaller than the island footprint—perhaps 85-90% of the island length and width—to create visual definition without completely covering the ceiling area above. The suspension height should maintain seven to eight feet of clearance from the floor, positioning the panel within the visual field while providing adequate headroom for movement around the island.

Key Design Tips:
- Size the floating panel to 85-90% of the island dimensions to define the zone without overwhelming it
- Suspend the panel 7-8 feet above the finished floor to maintain comfortable clearance while keeping it visually present
- Use thin aircraft cables (1/8 inch diameter) for suspension to maintain visual delicacy
- Integrate LED lighting within or around the panel edges to provide functional task lighting and ambient glow
- Finish the panel in white or light grey to maintain brightness and prevent heavy visual weight
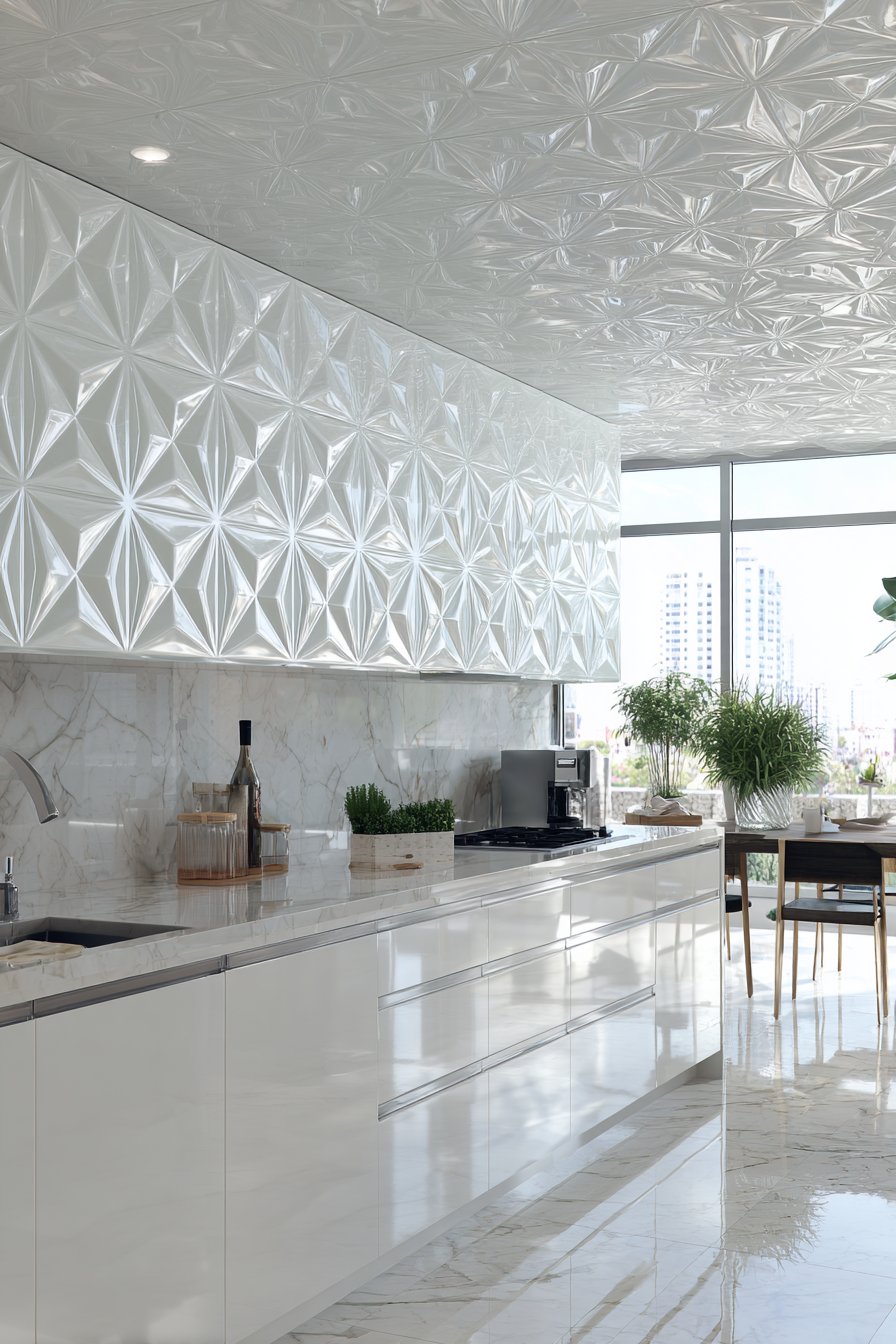
18. Textured Ceiling Tiles with Geometric Pattern
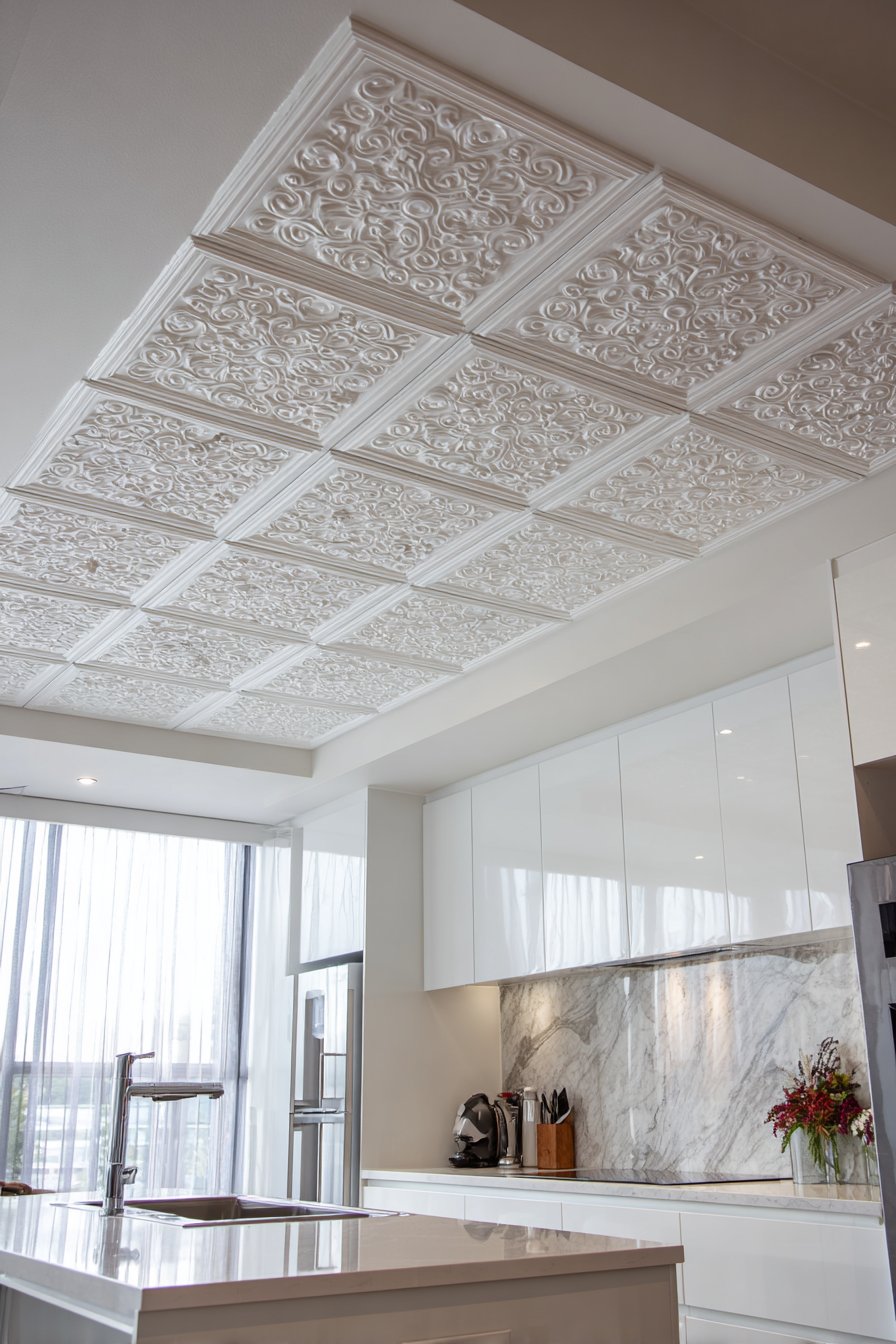
Subtle texture adds dimension without pattern complexity, and textured ceiling tiles with geometric relief create visual interest through shadow play rather than color or ornament. This design features white ceiling tiles arranged in a grid with slight dimensional variation that catches light and creates ever-changing shadow patterns throughout the day. The tiles integrate seamlessly with recessed lighting positioned within the tile grid, maintaining the ordered geometric composition. The modern kitchen’s glossy white cabinets and marble backsplash provide reflective surfaces that enhance light distribution while the textured ceiling adds tactile dimension.
The ceiling tiles typically measure two feet square or in rectangular formats like two by four feet, creating a modular grid that recalls commercial acoustical tile ceilings while offering superior aesthetic refinement. The geometric pattern may include subtle pyramid forms, linear ribs, or square recesses—patterns that create dimensional interest without appearing busy or ornamental. The white color unifies the surface while the texture becomes apparent through light and shadow rather than color variation.
Modern ceiling tiles offer practical benefits beyond aesthetics, including improved acoustics that reduce noise reverberation in open-plan kitchens and easy access to ceiling-mounted systems for maintenance. The tiles typically install on a suspended grid system, allowing individual panels to be removed for accessing electrical, plumbing, or HVAC systems above. This practical consideration becomes particularly valuable in older homes where ceiling-mounted systems require occasional service.
Key Design Tips:
- Select tiles with subtle geometric patterns (maximum 1/2 inch relief depth) for contemporary appearance
- Maintain white or off-white color to preserve brightness and allow the texture to emerge through shadow
- Coordinate tile grid with recessed lighting placement for organized, intentional appearance
- Install tiles on a suspended grid system for easy access to ceiling-mounted utilities
- Consider acoustical properties of tiles to improve sound quality in open kitchen-living spaces
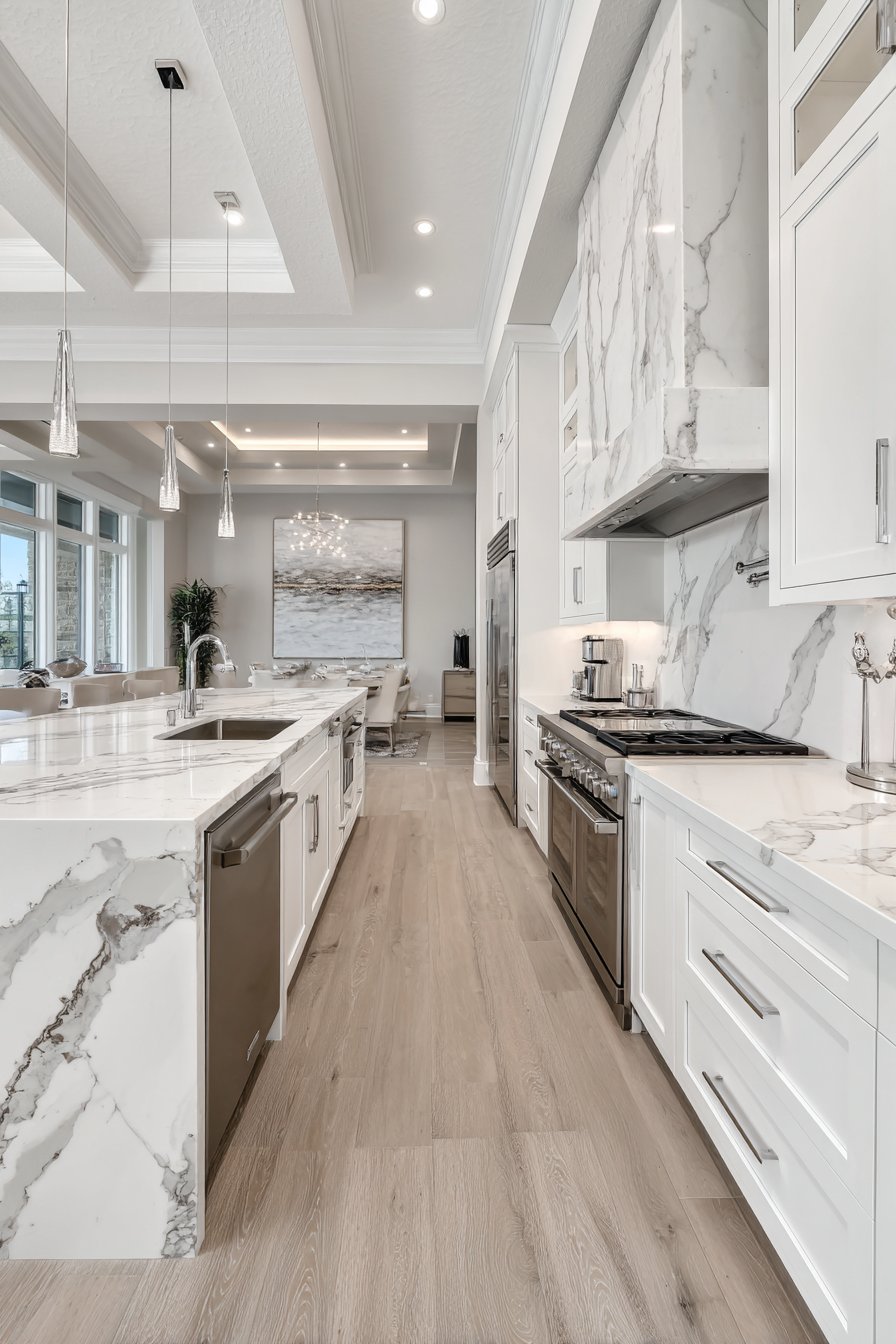
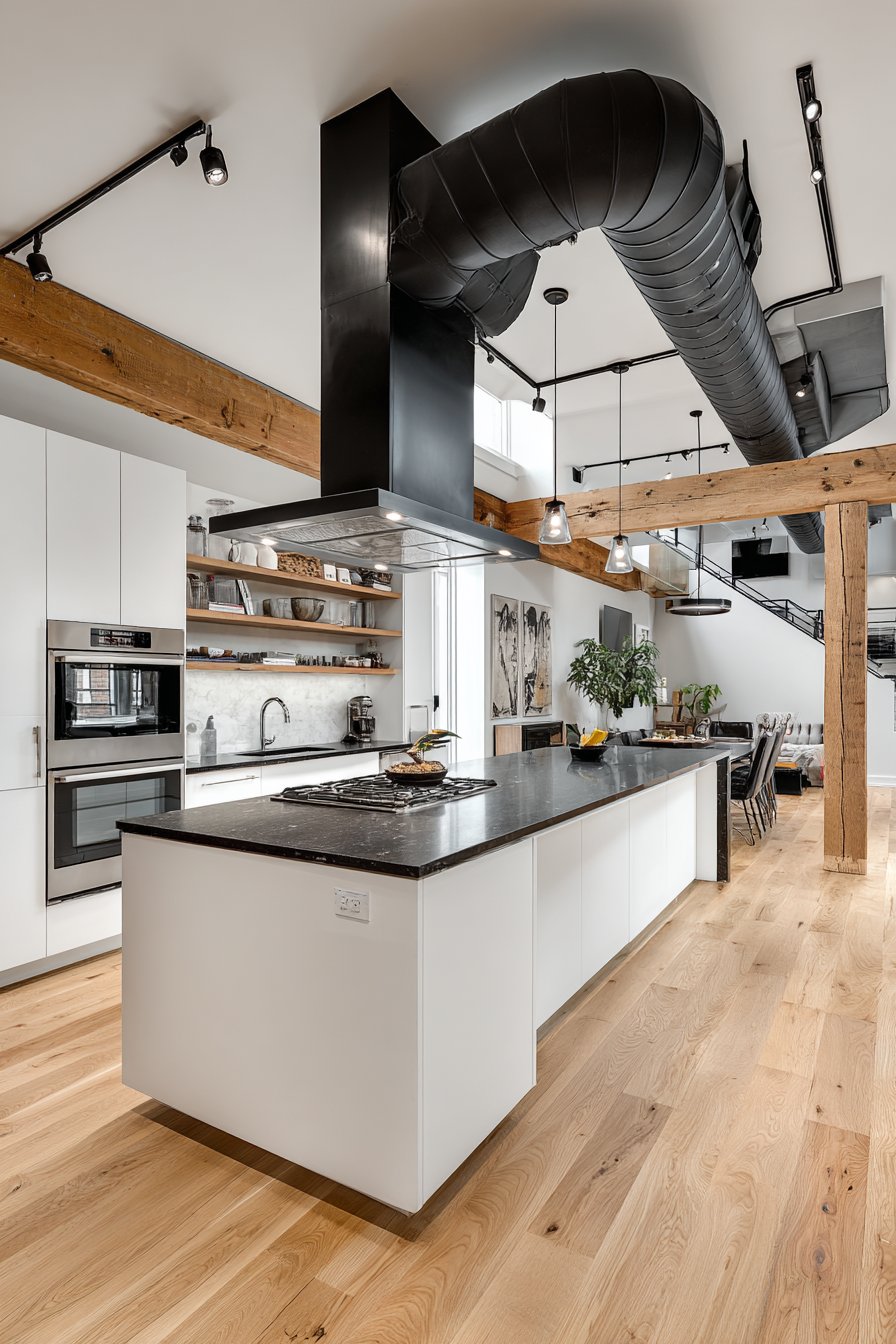
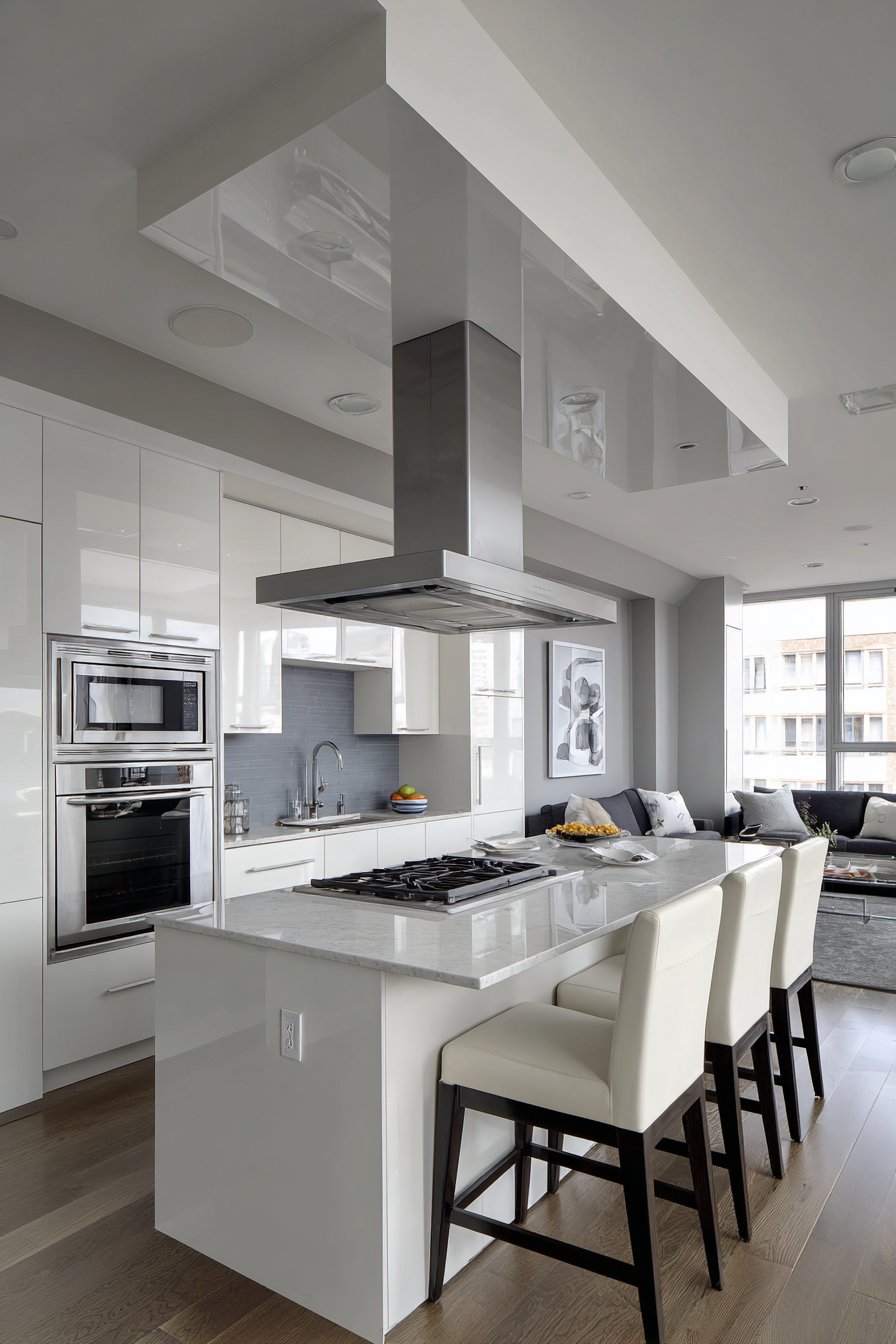
19. Ceiling-Mounted Range Hood as Sculptural Element
Functional equipment becomes design statement when treated as sculptural elements, and a ceiling-mounted range hood transforms a utilitarian appliance into a stunning focal point. This design features a sleek hood clad in brushed stainless steel suspended from the ceiling above the island cooktop, creating both a functional and visual centerpiece. The hood incorporates integrated LED lighting that illuminates the cooking surface while the metallic finish catches and reflects light throughout the kitchen. The flat white ceiling provides a simple backdrop with minimal additional recessed lights, allowing the hood to dominate as the primary ceiling feature.
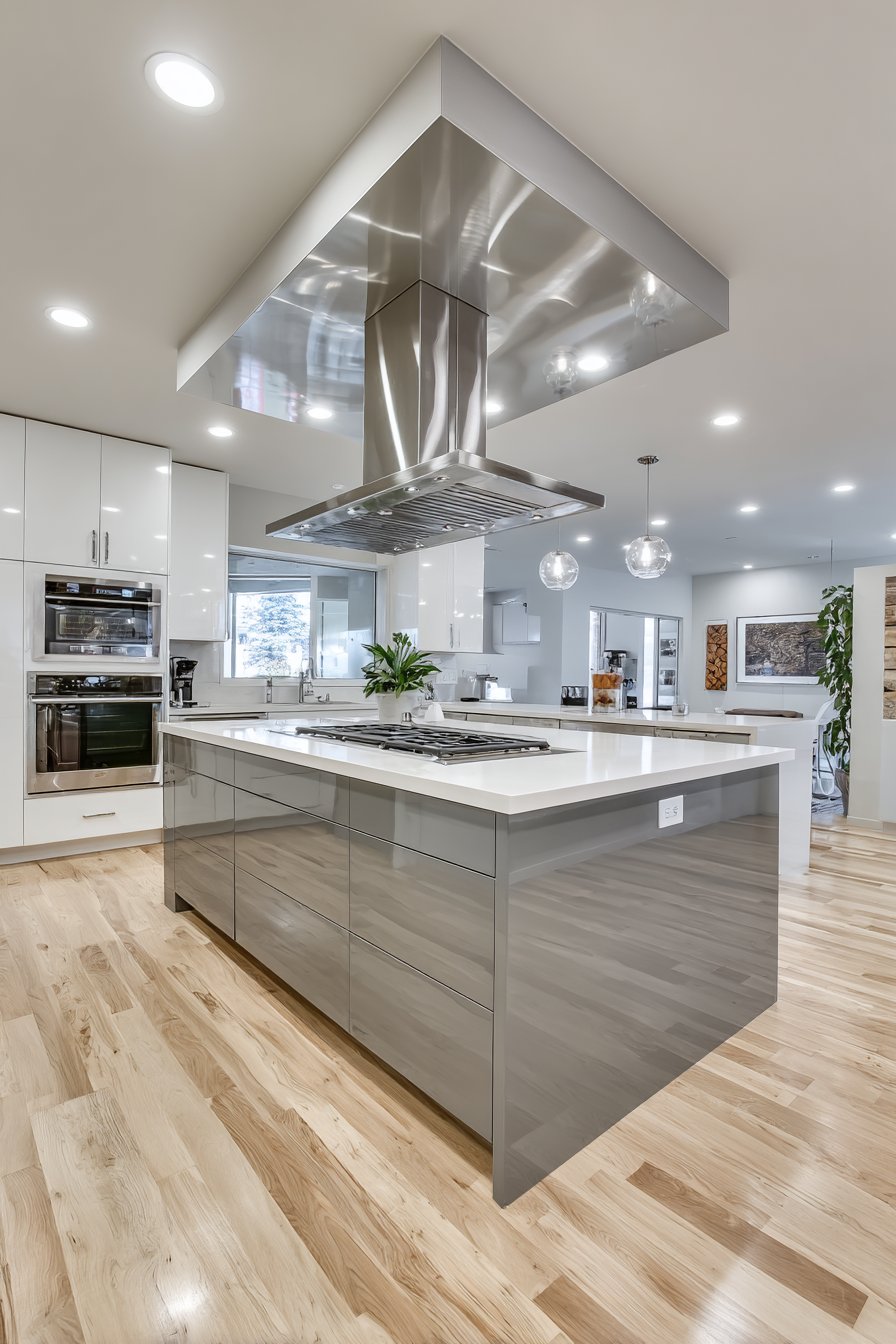
Ceiling-mounted hoods—also called island hoods—present unique design opportunities since all four sides remain visible and become part of the kitchen’s aesthetic composition. Modern hood designs range from minimalist rectangular forms to sculptural curved shapes, from industrial metal finishes to integrated panel-ready options that can be clad to match cabinetry. The hood in this design embraces the appliance’s technological nature with exposed brushed stainless steel that celebrates the hood’s functional purpose while its clean geometric form maintains contemporary aesthetics.
The installation of ceiling-mounted range hoods requires substantial planning, as ductwork must route through the ceiling to exterior ventilation. The hood typically suspends from a support structure secured to ceiling joists, requiring proper engineering to handle the weight—modern hoods can weigh 100-200 pounds or more. The hood height above the cooking surface typically measures 30-36 inches for gas cooktops and 24-30 inches for electric or induction, balancing capture efficiency with visual openness.

Key Design Tips:
- Select hood widths 6 inches wider than the cooktop for adequate smoke and steam capture
- Mount the hood 30-36 inches above gas cooktops or 24-30 inches above electric cooktops for optimal performance
- Choose hoods with integrated LED lighting to eliminate need for separate pendant lights over the cooktop
- Finish the hood in brushed stainless steel for contemporary appearance or panel it to match cabinetry for integrated design
- Ensure the hood CFM rating matches or exceeds cooktop BTU output for effective ventilation
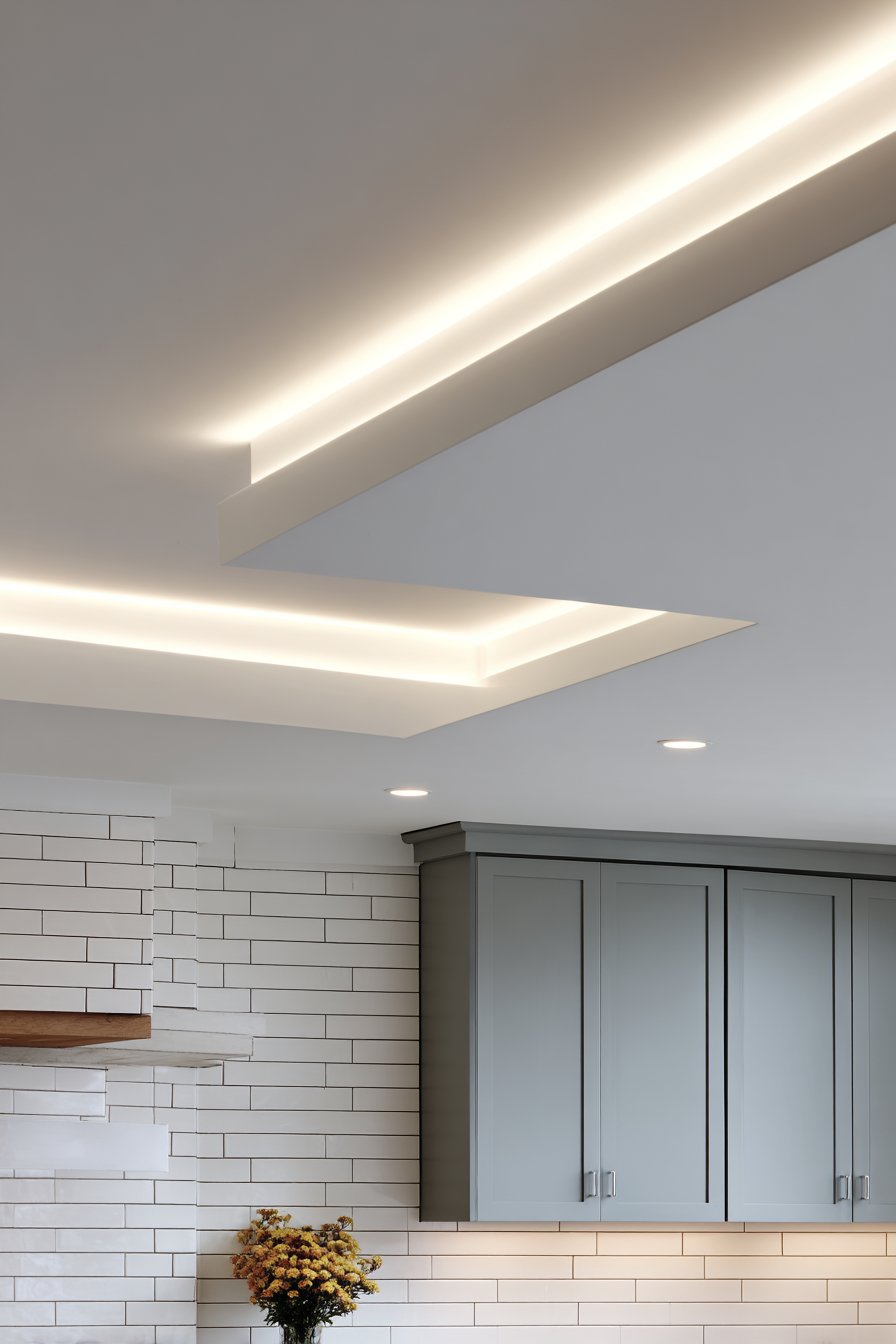
20. Perimeter Cove Lighting with Floating Effect
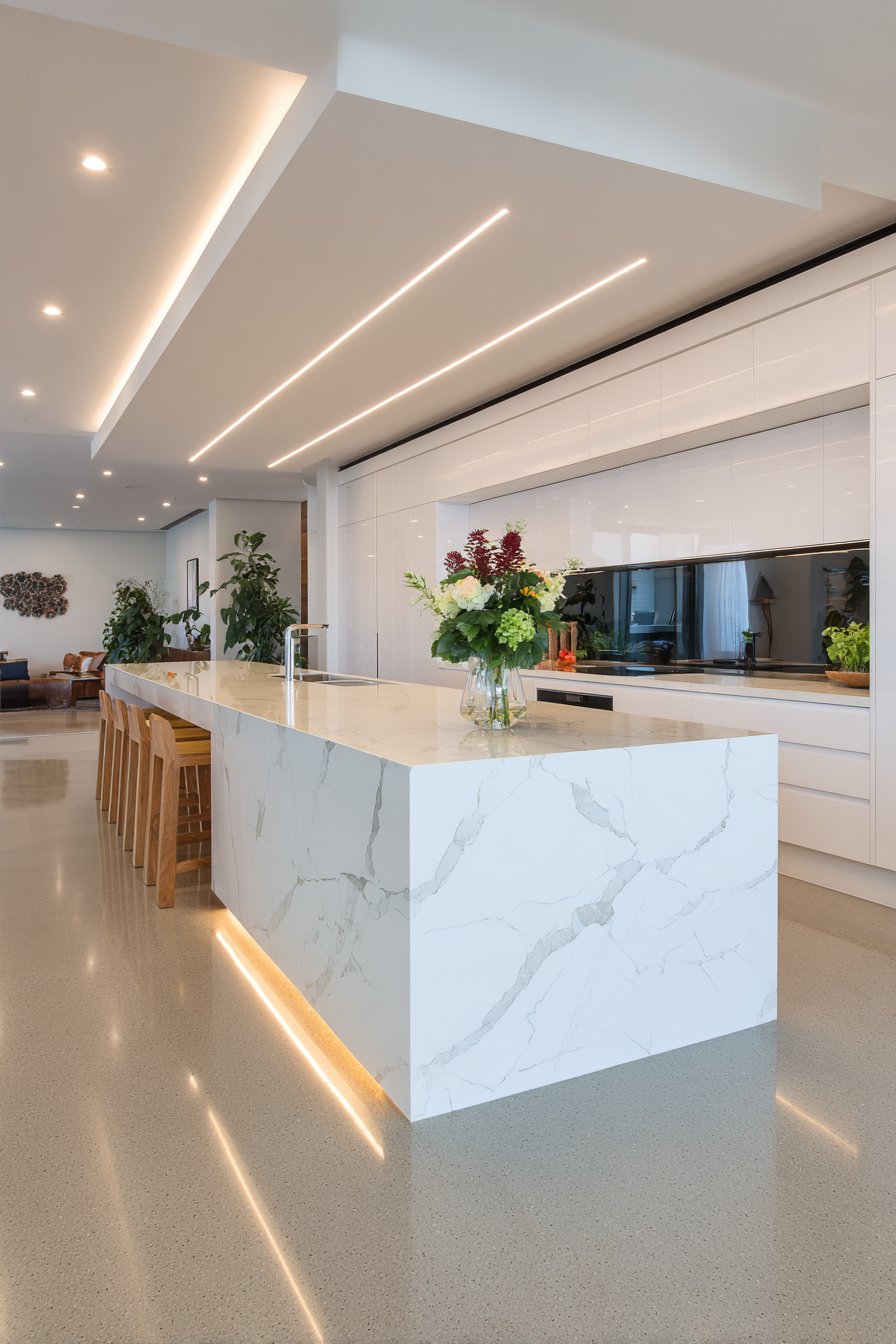
Indirect lighting creates sophisticated ambiance, and perimeter cove lighting produces a floating ceiling effect through concealed illumination. This design features a minimalist white ceiling with continuous cove detail where ceiling meets walls, containing concealed LED strip lighting that creates warm ambient illumination and visual separation. The floating effect emerges from the indirect light washing the ceiling surface while the cove detail remains shadow-free. Additional recessed task lighting over work areas provides focused illumination for cooking activities. The kitchen’s contemporary white cabinets with waterfall quartz countertops maintain the clean, minimal aesthetic that allows the architectural ceiling detail to shine.
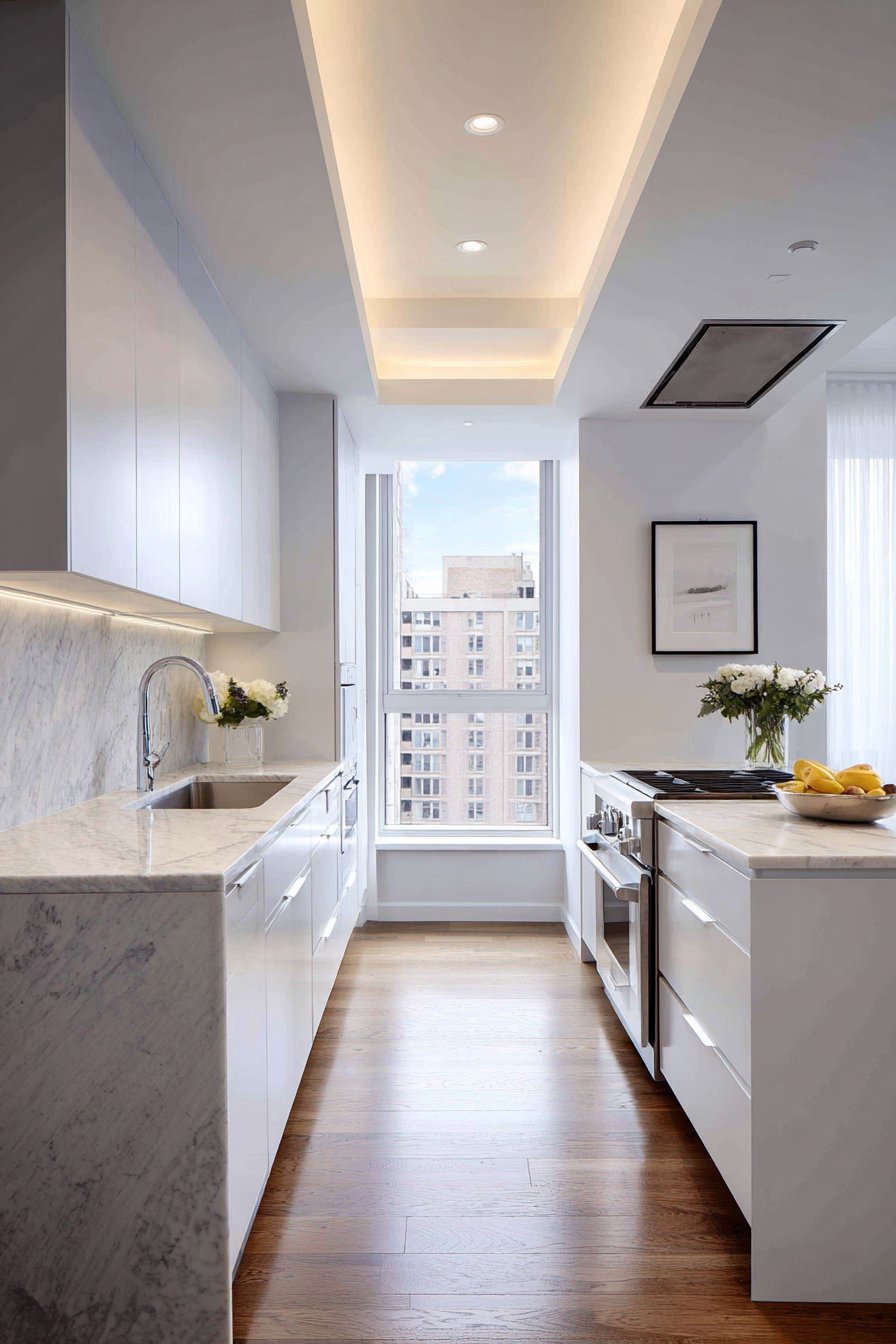
The cove detail typically measures four to eight inches in width and depth, creating sufficient space to conceal LED strips while allowing light to wash upward onto the ceiling surface. The profile may be created through drywall construction, trim molding installation, or a combination approach. The key lies in ensuring the LED strips remain completely hidden from normal viewing angles—no direct view of the light source should occur, as this destroys the floating effect and creates uncomfortable glare.
This ceiling treatment creates particularly striking effects in evening hours when natural light fades and the warm cove lighting becomes the primary illumination source. The ceiling appears to float above the walls, suspended in a warm glow that creates intimate atmosphere. During daylight hours, the cove detail remains visible as a subtle architectural element that adds dimension to the ceiling-wall transition. The combination of indirect ambient cove lighting and direct recessed task lighting provides flexible, layered illumination suitable for various kitchen activities.

Key Design Tips:
- Create cove depth of 6-8 inches to adequately conceal LED strips while allowing upward light distribution
- Install LED strips with 2700K-3000K color temperature for warm, inviting ambient illumination
- Connect cove lighting to separate dimmer controls from task lighting for independent adjustment
- Paint cove interior surfaces white to maximize light reflection and output
- Extend cove detail continuously around the entire kitchen perimeter for unified floating effect
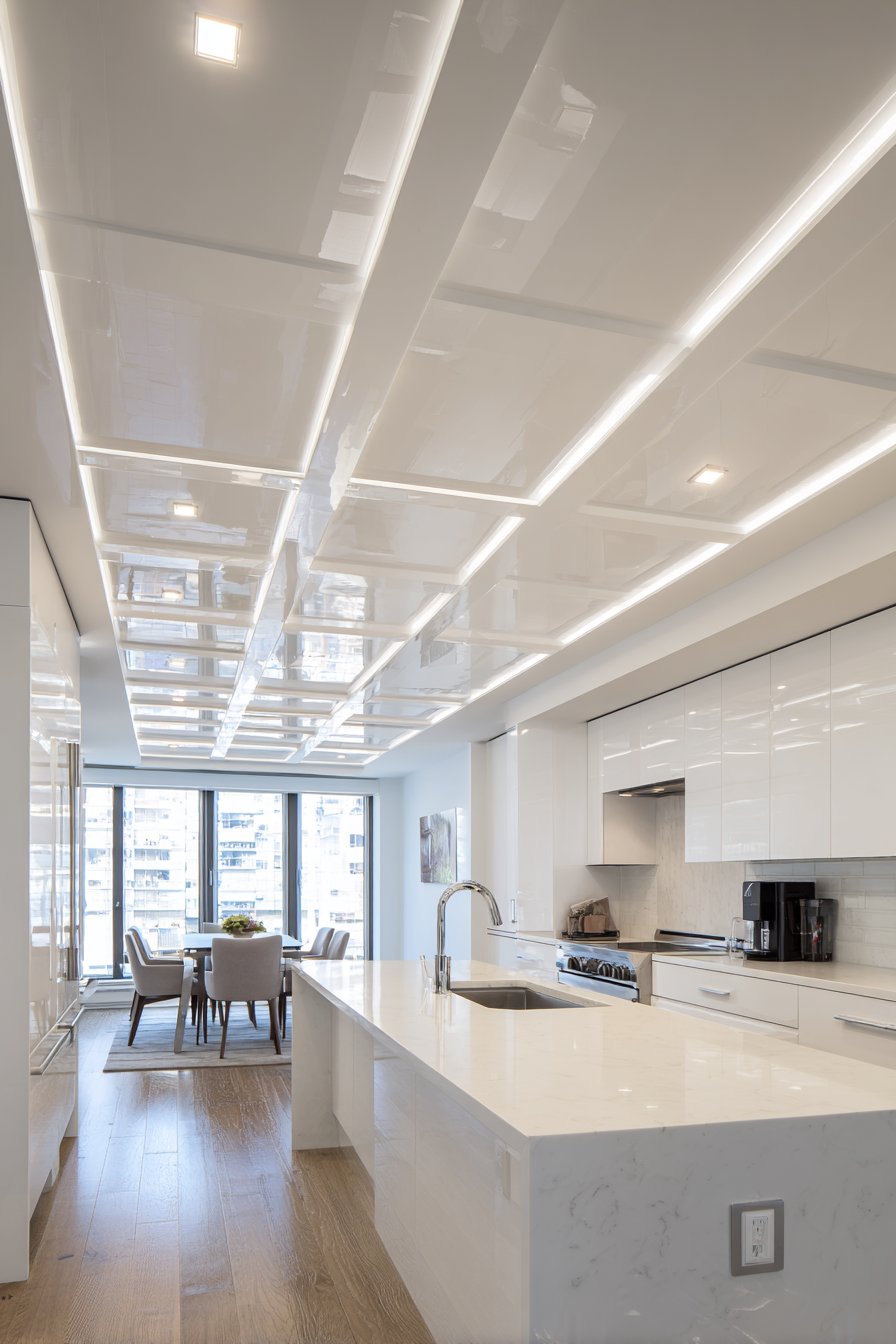
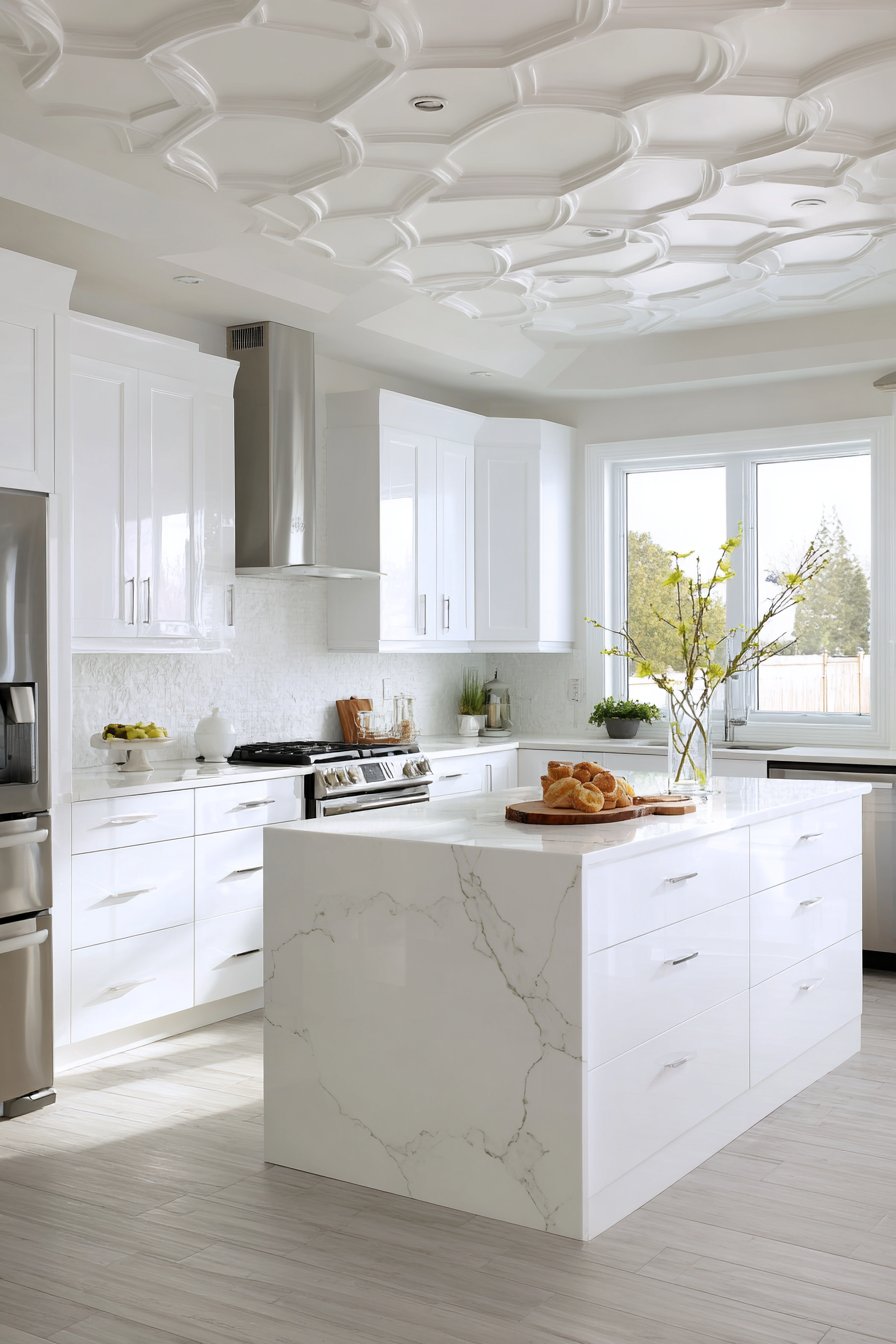
21. Mirrored Ceiling Panels Over Kitchen Island
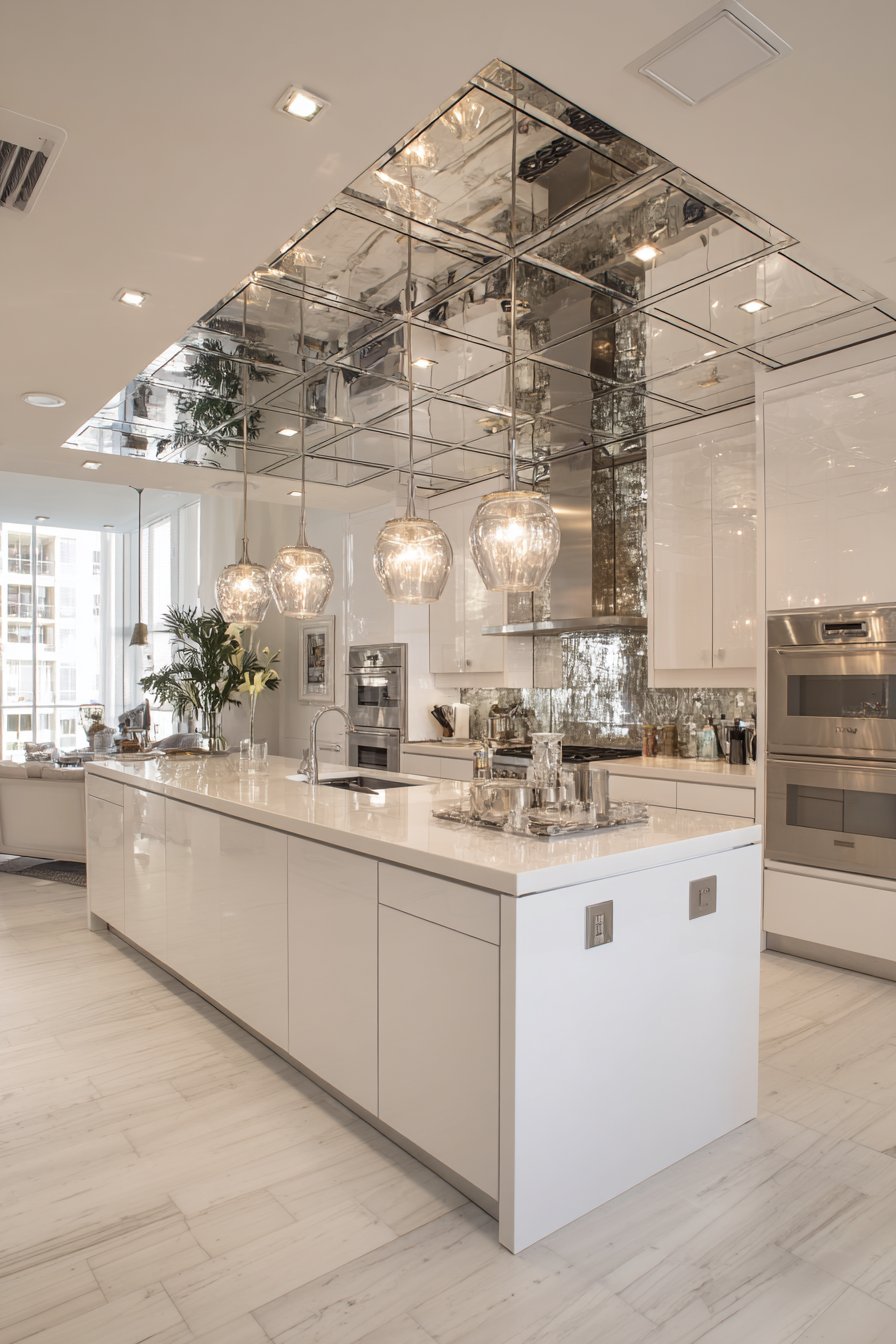
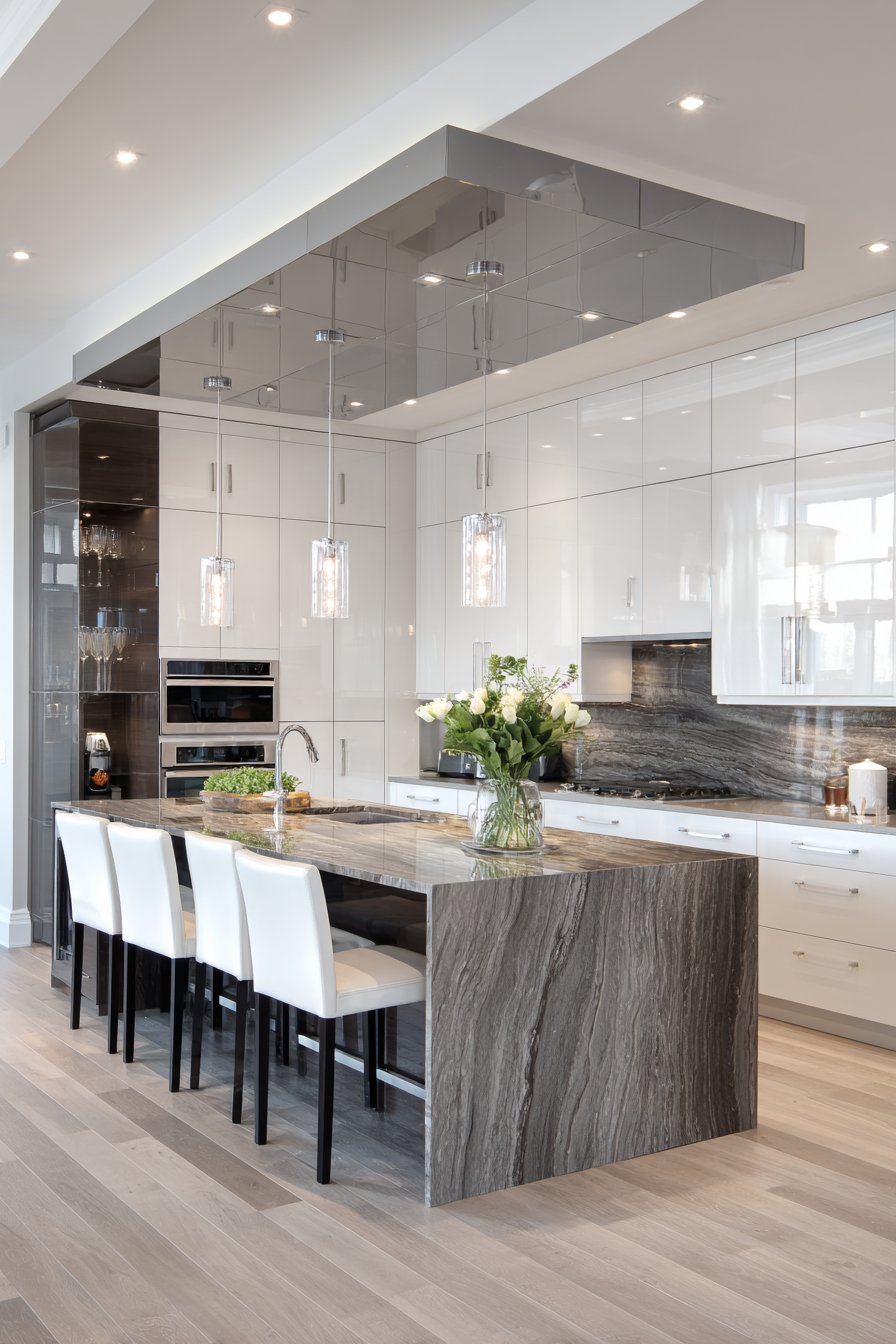
Reflective surfaces expand space and multiply light, and mirrored ceiling panels create dramatic visual impact through reflection. This design features mirror panels installed over the island area, framed with thin brushed nickel channels in a geometric grid pattern. The surrounding white ceiling with recessed lighting maintains standard finished surfaces while the mirrored section doubles the visual impact of pendant lights and creates the illusion of increased ceiling height. The white and grey modern kitchen below benefits from the light multiplication and spatial expansion that reflection provides.
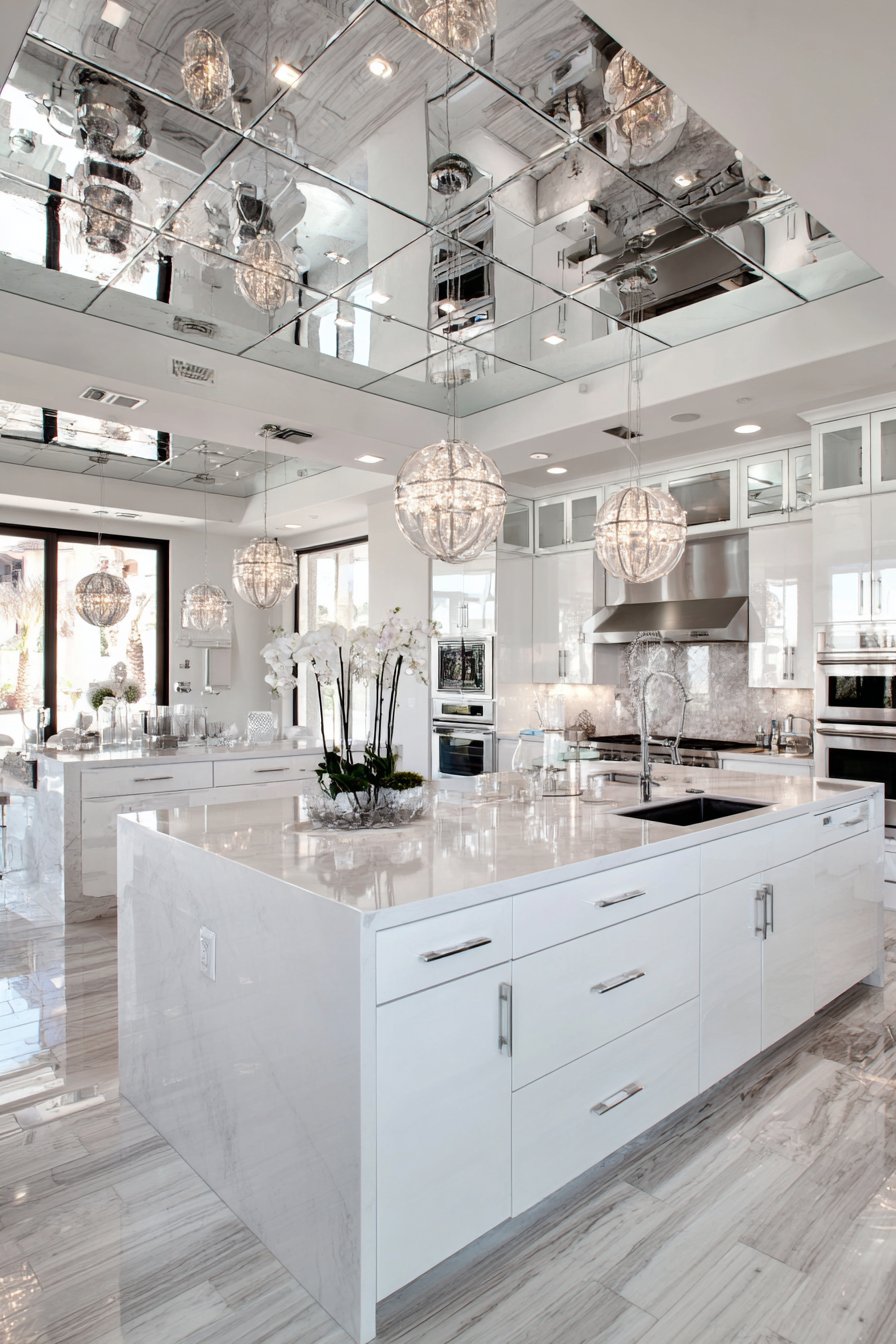
The psychological impact of mirrored ceilings differs dramatically from traditional reflective surfaces at eye level. Rather than creating opportunities for self-viewing, ceiling mirrors reflect the activity and elements below—the pendant lights, the island countertop, the food preparation, and the people gathered around. This creates a sense of spatial complexity and visual interest that makes the kitchen feel larger and more dynamic. The pendant lights, in particular, gain dramatic impact as their reflection creates the appearance of doubled fixtures suspended in visual space.
Installing mirrored ceiling panels requires careful planning and professional execution. The mirrors must be properly supported—glass mirrors are heavy and require substantial backing and attachment. The frame system of brushed nickel channels creates organized geometry while covering mirror edges and providing clean transitions. The mirror surface should be high-quality with minimal distortion to ensure clear, accurate reflections. Antique or smoked mirror finishes can reduce the intensity of the reflection while maintaining the spatial expansion benefits.
Key Design Tips:
- Limit mirrored ceiling sections to focal areas (island zones) rather than entire ceilings to avoid overwhelming reflection
- Frame mirror panels with thin metal channels (1/2 to 1 inch wide) to create organized geometry without heavy framing
- Select clear mirror for maximum light reflection or antique/smoked mirror for softer, more subtle effect
- Clean mirrors regularly to maintain clarity and prevent dust accumulation that diminishes reflection quality
- Position pendant lights strategically to create attractive doubled reflection in the mirror surface
22. Integrated Linear Air Diffusers as Design Elements
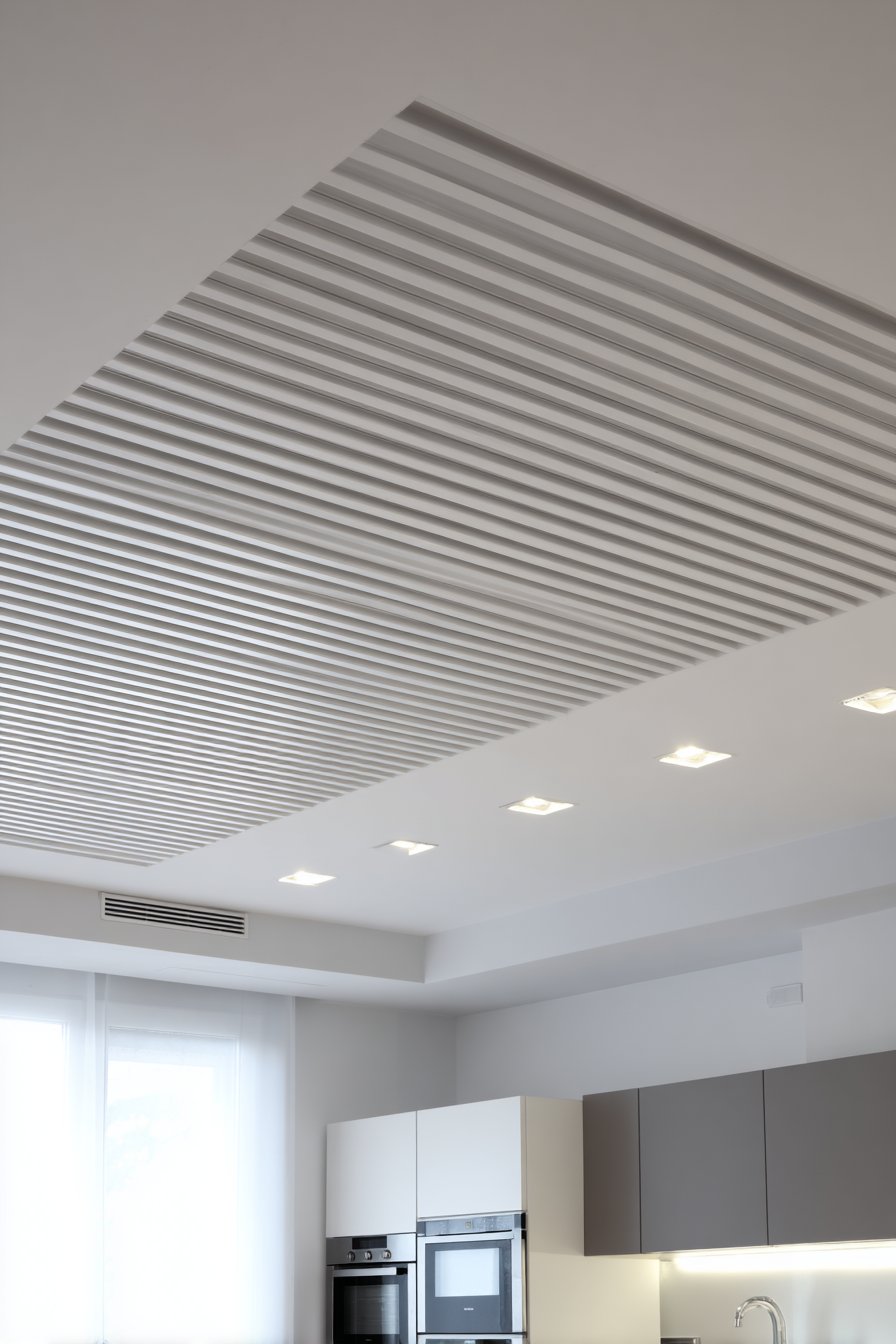
Building systems become design features when thoughtfully integrated, and continuous linear air diffusers transform HVAC components into architectural elements. This design features slim rectangular vents that run in parallel lines across the white ceiling, becoming part of the modern design language rather than apologetic interruptions. The flush-mounted diffusers deliver conditioned air throughout the space while their linear form creates rhythm and pattern. Recessed LED downlights alternate with the diffuser lines, creating a composed ceiling design where functional elements and lighting work together as a unified system. The contemporary kitchen with flat-panel grey and white cabinets echoes the ceiling’s emphasis on clean geometry and honest functionality.
Linear diffusers represent a significant departure from traditional round or rectangular grilles that interrupt ceiling surfaces with visible mechanical components. The continuous linear form extends from wall to wall or across significant ceiling spans, creating intentional architectural lines rather than scattered disruptions. Modern linear diffusers offer adjustable airflow direction, allowing customization of air distribution patterns while the visible element remains static and composed.
The coordination between HVAC design and architectural aesthetics requires early planning during the design phase. The diffuser locations should relate to the kitchen layout and ceiling composition, creating intentional patterns rather than arbitrary placement dictated solely by mechanical requirements. The diffusers typically measure two to six inches wide, with narrower profiles maintaining more delicate appearance and wider units providing greater airflow capacity. The finish should match or coordinate with the ceiling color—typically white or metallic options.
Key Design Tips:
- Run linear diffusers parallel to each other across the ceiling to create rhythmic pattern and visual order
- Space diffusers 4-6 feet apart to balance airflow distribution with aesthetic composition
- Select diffusers with slim profiles (2-4 inches wide) for contemporary appearance
- Alternate diffuser lines with rows of recessed lighting to create comprehensive functional ceiling integration
- Finish diffusers in white or brushed aluminum to coordinate with ceiling and lighting fixtures
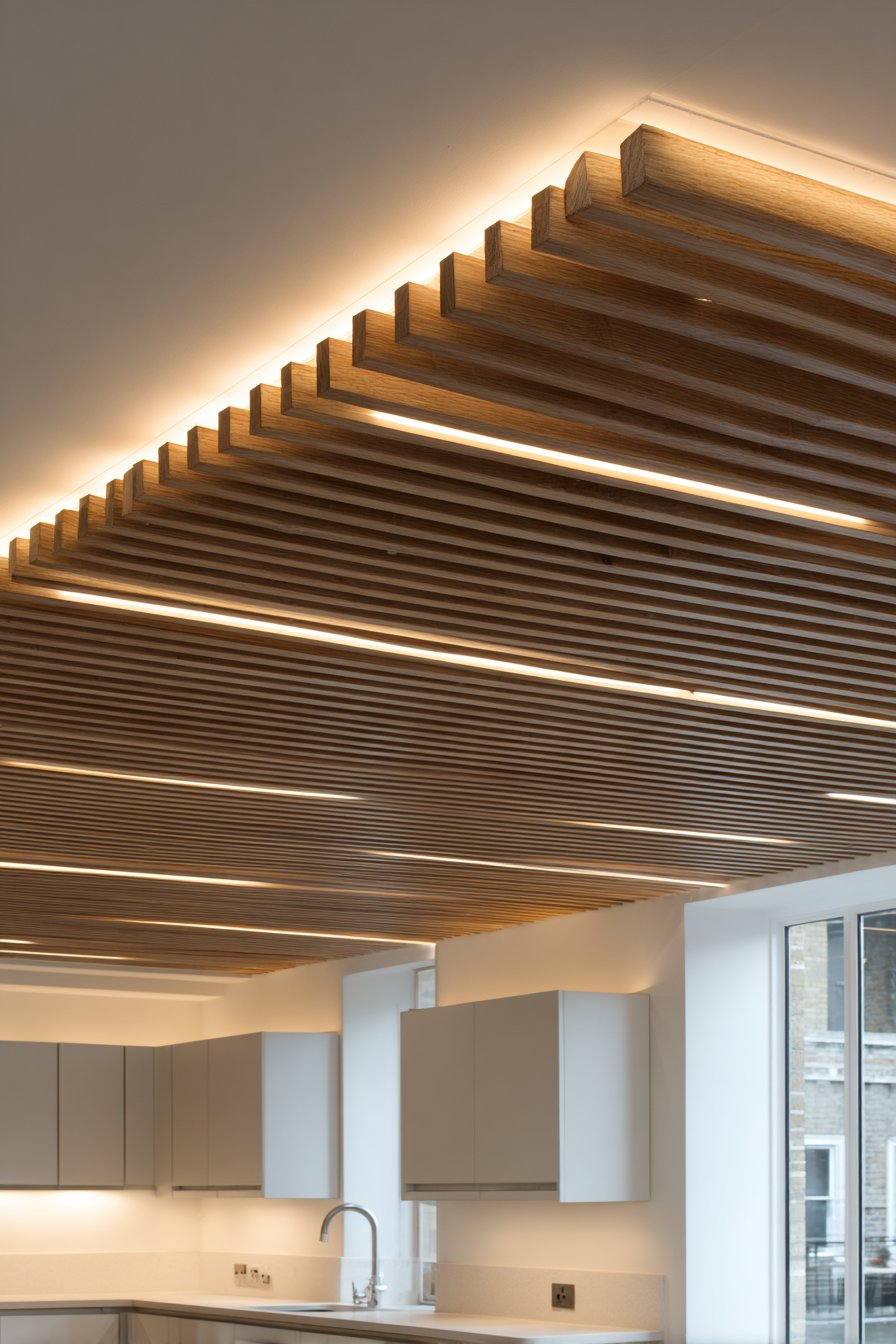
23. Wooden Slat Ceiling with Integrated Uplighting
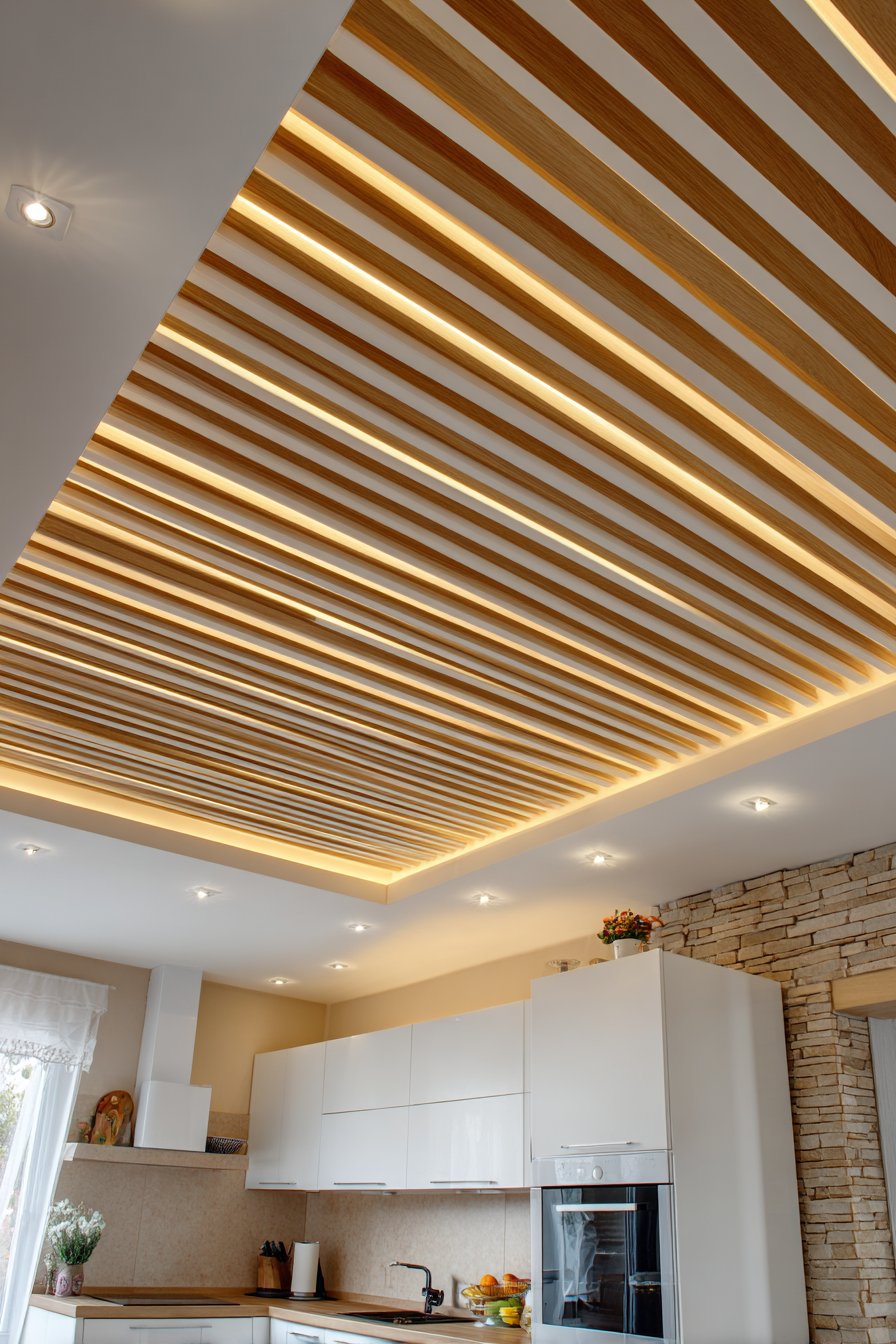
Layered lighting creates depth and atmosphere, and a wooden slat ceiling with integrated uplighting transforms natural material into a luminous feature. This design features parallel wood slats in light maple that create rhythmic pattern against a white ceiling backdrop, with gaps between slats allowing LED uplighting to create warm ambient glow. The linear slats run perpendicular to the kitchen length, emphasizing directional flow and spatial proportion. White modern cabinets and stone countertops provide refined contrast to the natural wood ceiling, creating balance between organic and manufactured elements.

The wooden slats typically measure two to four inches wide with one to two inch gaps between them, creating visual rhythm without completely obscuring the ceiling above. The slats mount on a frame system that maintains consistent spacing and provides attachment points, while the white ceiling behind serves as a light-reflecting surface that maximizes the uplighting effect. The LED strips install above the slat plane, directing light upward through the gaps to create a glowing effect that highlights the wood grain while creating soft ambient illumination.
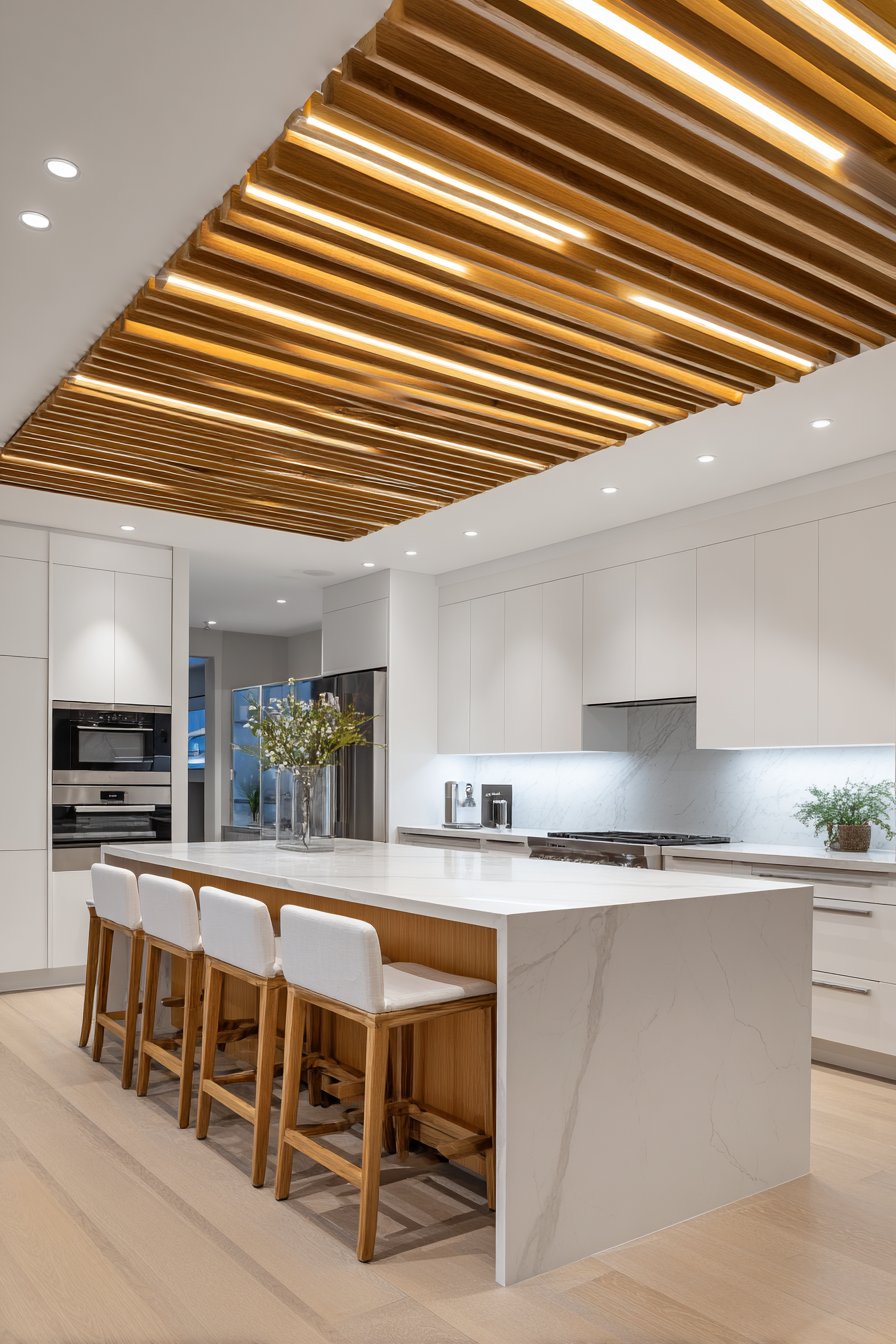
This ceiling treatment adds significant warmth to contemporary kitchens that might otherwise feel cool or austere. The natural wood grain provides organic texture and variation that prevents monotony, while the backlit effect creates dimensional quality and visual interest. The slat direction should relate to the kitchen’s proportions and layout—running slats perpendicular to the longest dimension can make narrow kitchens feel wider, while parallel orientation emphasizes length.
Key Design Tips:
- Select light wood species (maple, ash, birch) to maintain brightness and contemporary aesthetic
- Maintain 1-2 inch gaps between slats to allow adequate light transmission while preserving privacy
- Install LED strips with 2700K color temperature above slats to create warm uplighting glow
- Run slat direction perpendicular to the kitchen’s longest dimension to visually widen the space
- Apply matte or satin finish to wood to prevent glossy appearance and allow natural grain to show
Conclusion: Elevating Your Kitchen Through Ceiling Design
The modern kitchen ceiling has evolved far beyond its traditional role as a simple flat plane painted white—today’s ceiling designs offer remarkable opportunities for architectural expression, lighting innovation, and spatial transformation. From the dramatic impact of black coffered ceilings to the serene sophistication of floating panels with concealed lighting, from the organic warmth of natural wood planking to the bold statement of navy blue paint, the twenty-three designs explored in this article demonstrate the incredible versatility available to homeowners seeking to elevate their kitchens. Each approach offers unique benefits, whether emphasizing architectural volume through vaulted forms, introducing natural light through skylights, celebrating industrial honesty through exposed systems, or creating intimate atmosphere through strategic color choices.
The most successful kitchen ceiling designs emerge from careful consideration of the space’s proportions, the existing architectural character, the desired atmosphere, and practical requirements for lighting and mechanical systems. A well-designed ceiling enhances the entire kitchen environment, influencing how the space feels, how activities flow, and how people experience the room throughout the day. Whether you’re drawn to minimalist approaches that emphasize clean lines and subtle sophistication or bold gestures that transform ceilings into focal points, the key lies in selecting treatments that align with your personal aesthetic while addressing functional needs.
As you consider implementing these modern kitchen ceiling ideas in your own home, remember that successful design requires balancing aspiration with practicality, visual impact with livability, and architectural drama with budget realities. Start by evaluating your kitchen’s existing conditions—ceiling height, structural limitations, lighting needs, and mechanical system locations—then identify which ceiling treatments align with these constraints while achieving your design goals. Consult with experienced professionals for significant structural modifications, lighting redesigns, or mechanical system integration to ensure safe, code-compliant installation. With thoughtful planning and careful execution, your kitchen ceiling can transform from overlooked surface to design asset that elevates your entire space, proving once again that the fifth wall deserves as much design attention as the other four.