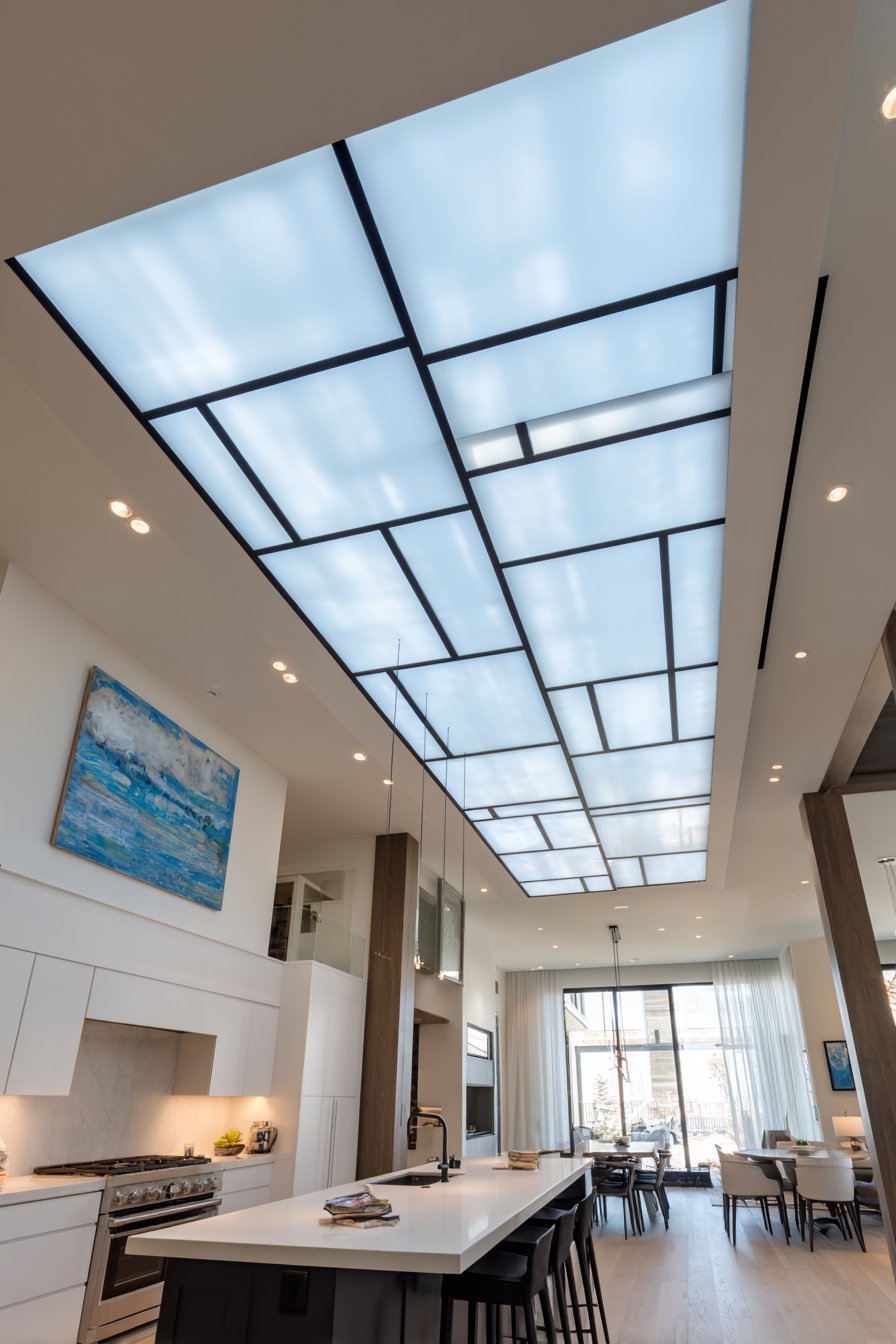
The ceiling is often called the “fifth wall” of interior design, yet it remains one of the most overlooked surfaces in our homes. While we meticulously plan wall colors, flooring materials, and furniture arrangements, the expansive plane above our heads frequently receives nothing more than a coat of flat white paint. This represents a significant missed opportunity to add character, dimension, and visual interest to any room. A thoughtfully designed ceiling can dramatically transform a space, drawing the eye upward, creating the illusion of greater height, and establishing a sophisticated atmosphere that elevates the entire room’s aesthetic. Whether you’re drawn to rustic wooden beams, modern geometric patterns, or classic architectural details, the right ceiling treatment can serve as a stunning focal point that reflects your personal style while enhancing the room’s functionality.
The beauty of ceiling design lies in its versatility and the wide range of options available to suit every taste, budget, and architectural style. From subtle enhancements like crown molding and strategic paint choices to dramatic statements featuring coffered panels, exposed beams, or innovative lighting solutions, ceiling treatments can be as understated or bold as you desire. Modern homeowners are increasingly recognizing that ceilings offer a unique canvas for creativity—a space where architectural elements, lighting design, and decorative features can converge to create something truly memorable. The ceiling’s position also makes it ideal for incorporating functional elements like acoustic panels, ambient lighting systems, and even reflective surfaces that can make small spaces feel more expansive.
In this comprehensive guide, we’ll explore twenty-seven distinctive ceiling ideas that span a spectrum of design styles, from traditional to contemporary, rustic to minimalist. Each concept offers unique advantages and aesthetic appeal, demonstrating how overhead design choices can complement and complete your interior vision. Whether you’re renovating a single room or planning a whole-home update, these ideas will inspire you to look up and reimagine the possibilities that await in the often-neglected space above. You’ll discover practical implementation strategies, material recommendations, and design tips that will help you transform your ceiling from a forgettable surface into a captivating architectural feature that guests will admire and you’ll enjoy for years to come.
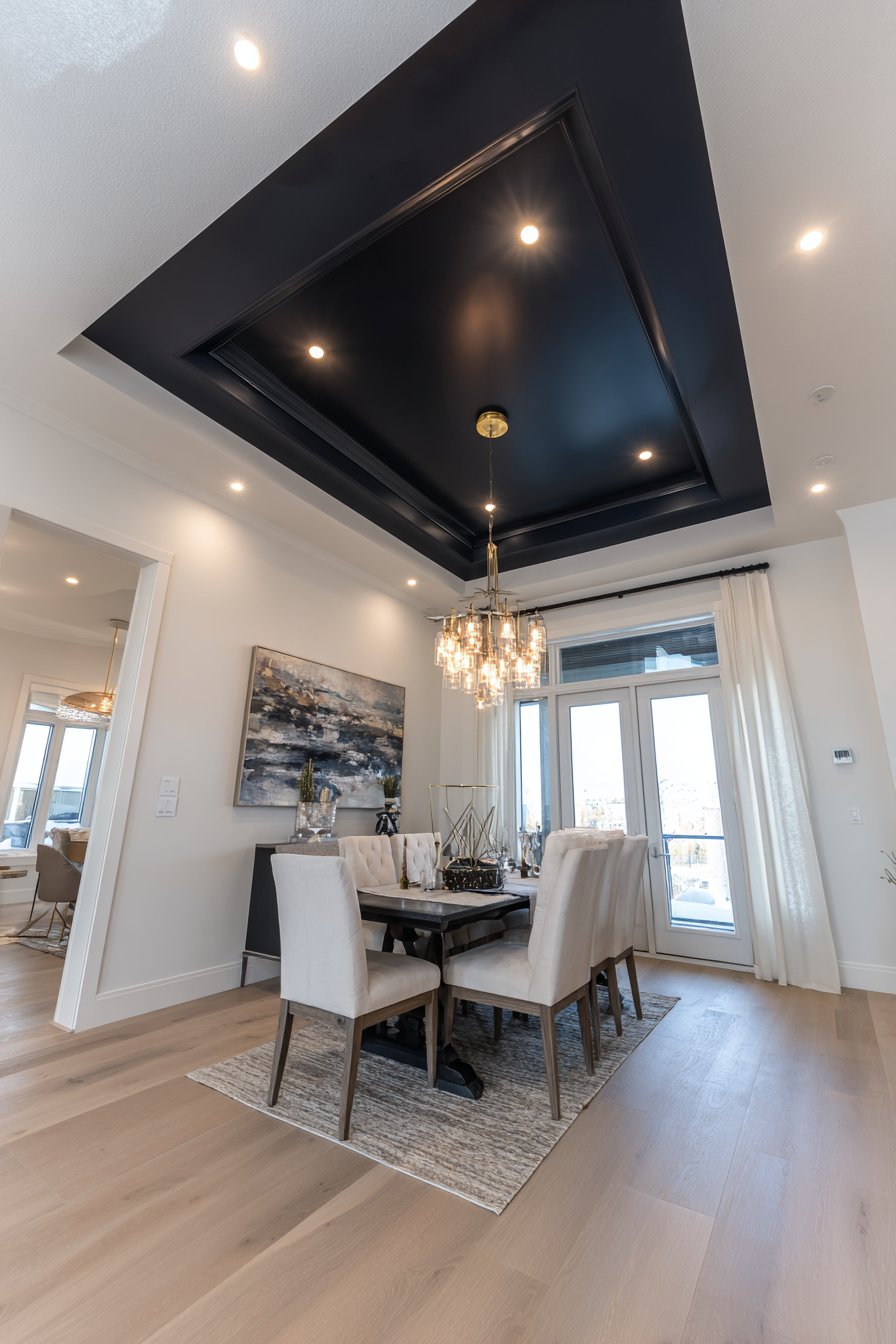
1. Elegant Tray Ceiling with Dimensional Depth
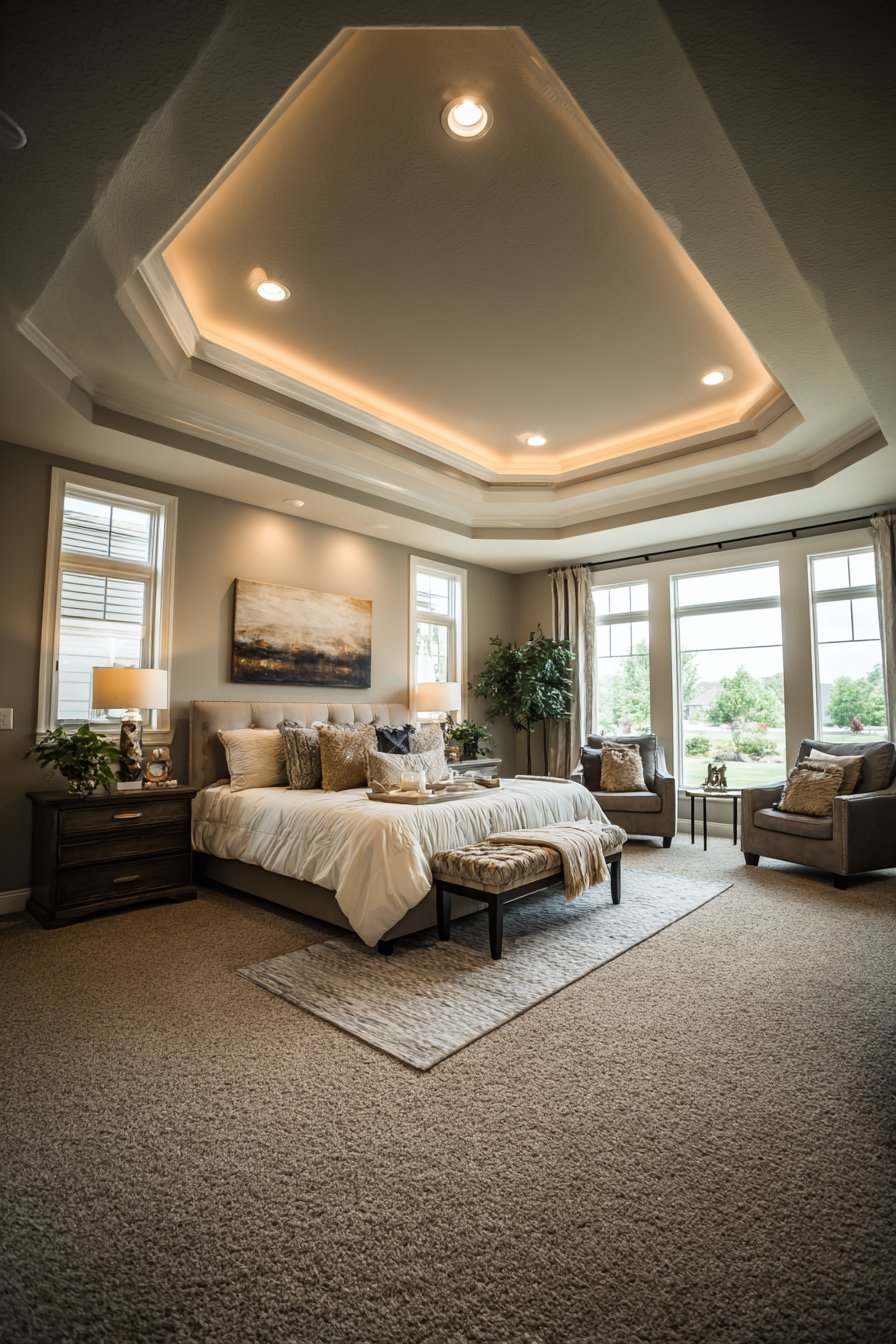
A tray ceiling introduces architectural sophistication through its layered construction, featuring a recessed center section elevated approximately twelve inches above the main ceiling plane. This dimensional design creates immediate visual interest while adding perceived height to the room. The elegant interplay between the raised outer perimeter and the recessed inner section establishes a sense of luxury and careful craftsmanship. When painted in complementary tones—such as soft warm white for the main ceiling and light gray for the recessed area—the tray ceiling gains additional definition and becomes a true focal point. The crown molding that frames both ceiling levels adds refined detail that enhances the overall elegance of the treatment.
The strategic placement of recessed lighting fixtures around the perimeter of the raised section creates a beautiful ambient uplighting effect that highlights the ceiling’s dimensional quality. This indirect lighting approach casts a soft glow that eliminates harsh shadows while creating a warm, inviting atmosphere particularly suited to bedroom environments. The light bounces off the recessed ceiling surface, creating subtle gradations of illumination that emphasize the architectural depth. During evening hours, this lighting effect becomes especially dramatic, transforming the ceiling into a glowing architectural feature that provides both functional illumination and aesthetic appeal.
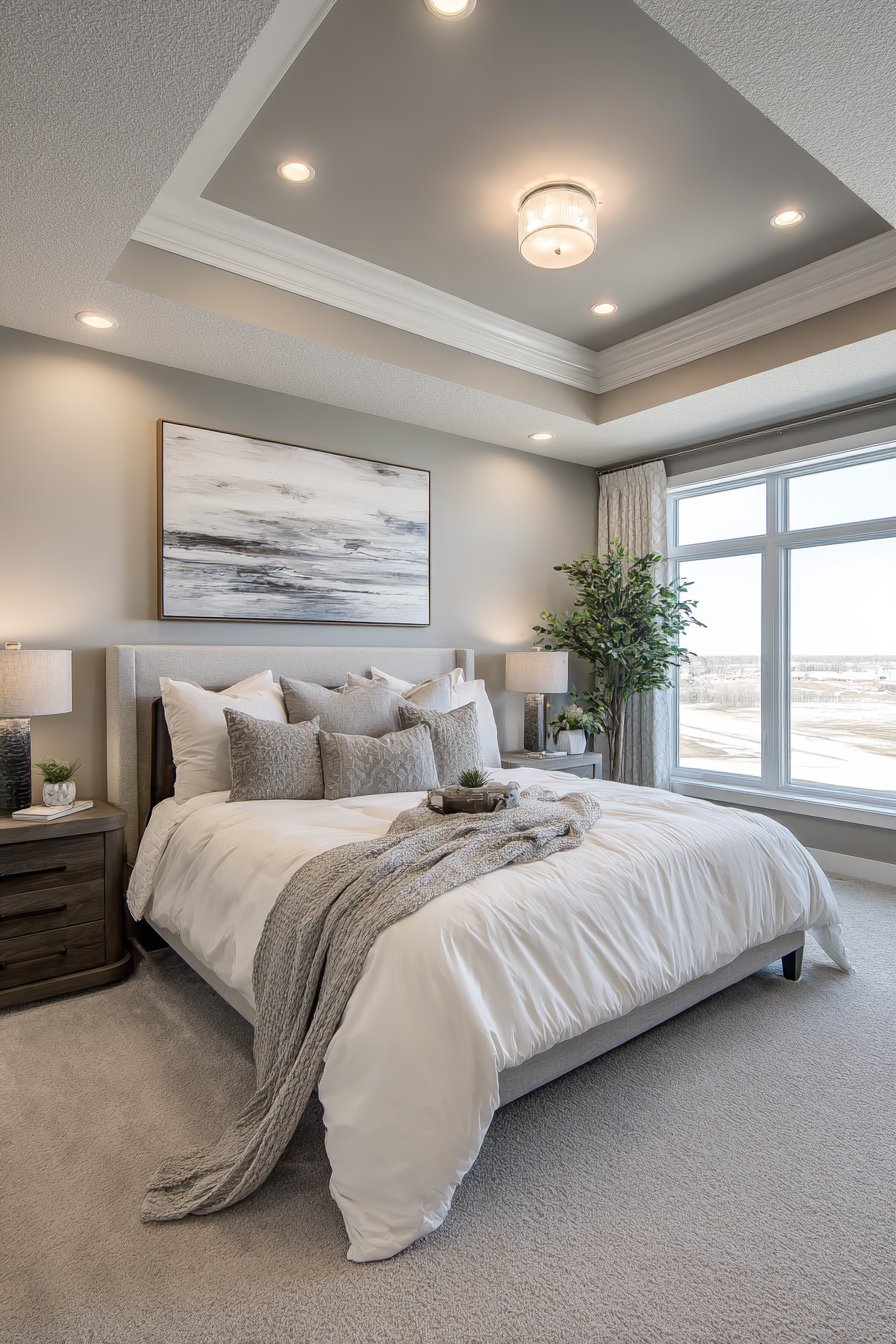
The versatility of tray ceilings makes them adaptable to various interior styles, from traditional to contemporary. In a master bedroom setting, the tray ceiling establishes a sense of importance and luxury appropriate for the home’s primary sleeping space. The dimensional effect draws the eye upward, making the room feel more spacious and grand despite the actual square footage. When combined with neutral wall colors and modern furnishings, the tray ceiling becomes a transitional element that bridges classic architectural detail with contemporary aesthetics. The subtle interplay of light and shadow across the recessed surfaces adds depth and movement to what would otherwise be a flat, static overhead plane.
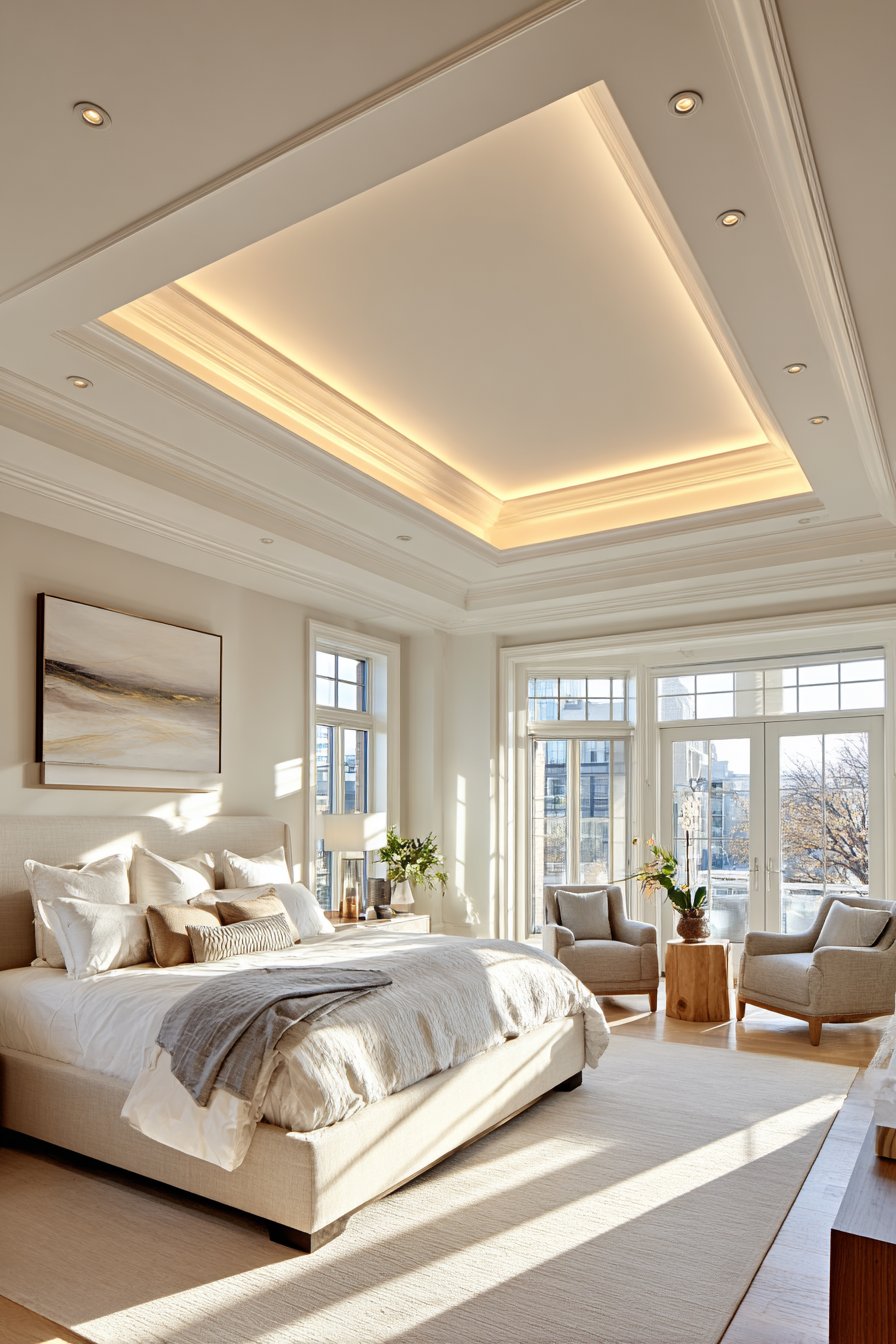
Key Design Tips: Choose paint colors with subtle contrast rather than dramatic differences to maintain sophistication. Install LED recessed lighting for energy efficiency and longevity. Ensure crown molding details are proportional to room size—larger rooms can accommodate more substantial molding profiles. Consider adding a statement light fixture in the center of the recessed area for additional visual interest. Maintain consistent ceiling heights in adjacent rooms to ensure smooth visual transitions throughout the home.
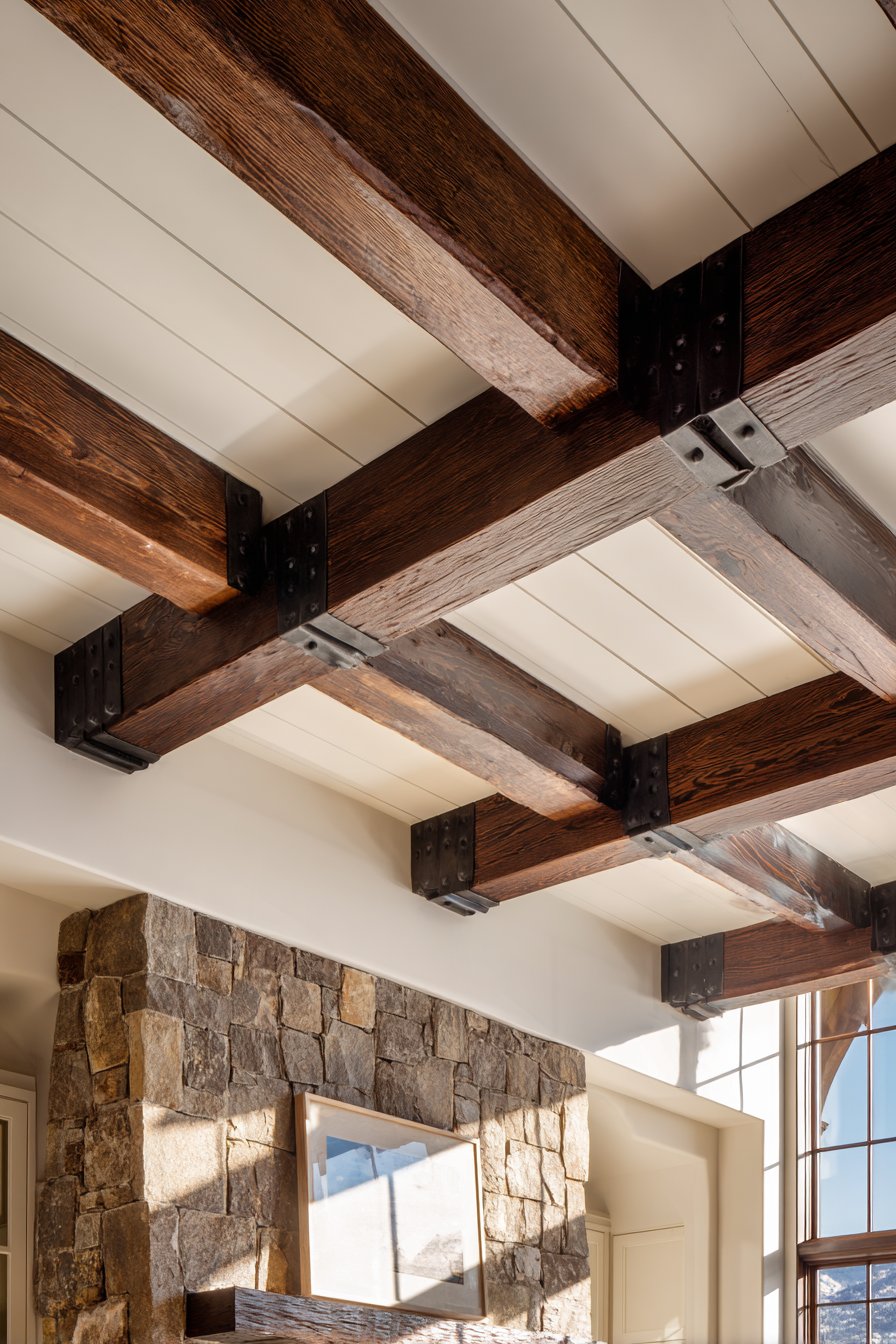
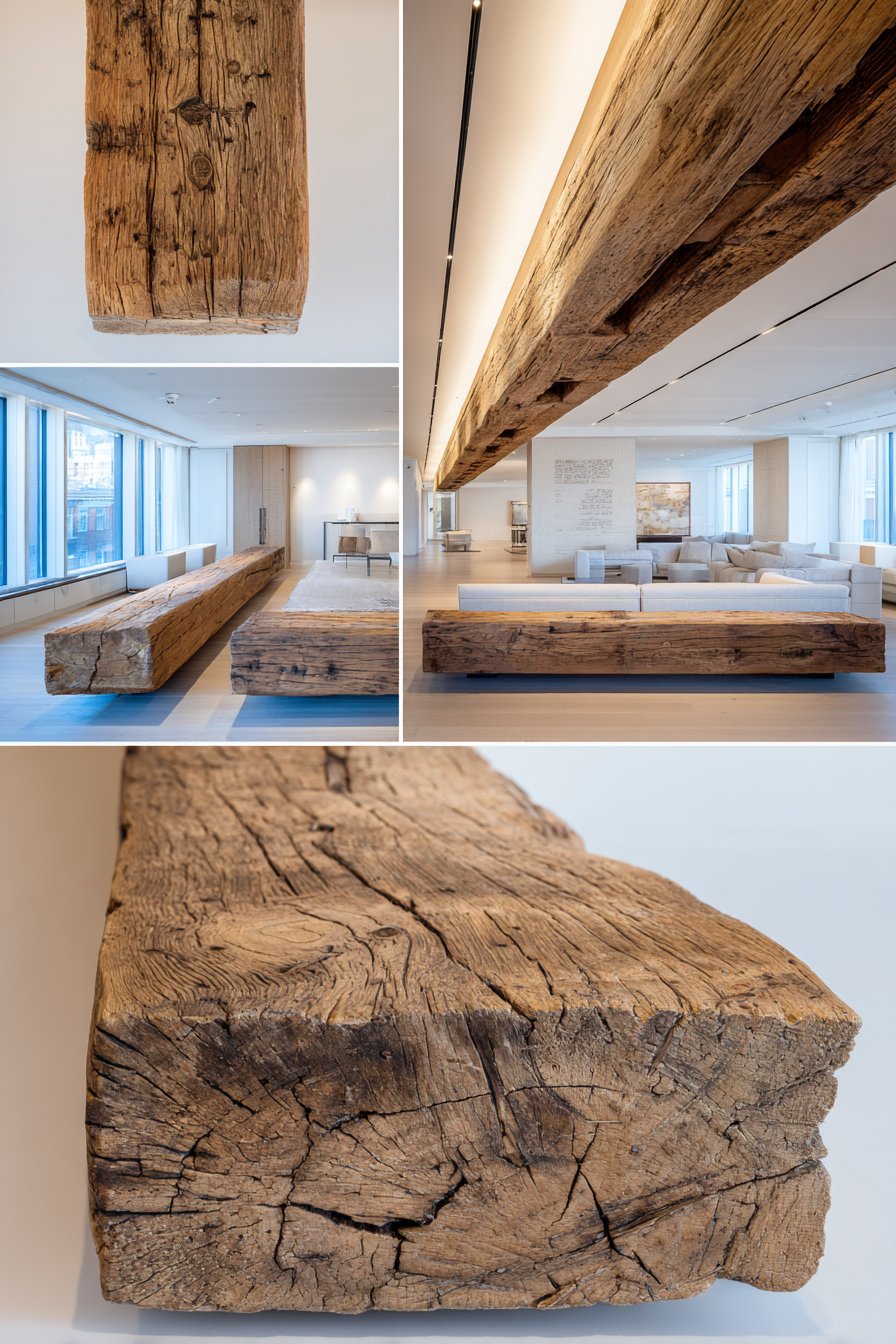
2. Rustic Reclaimed Oak Beam Elegance
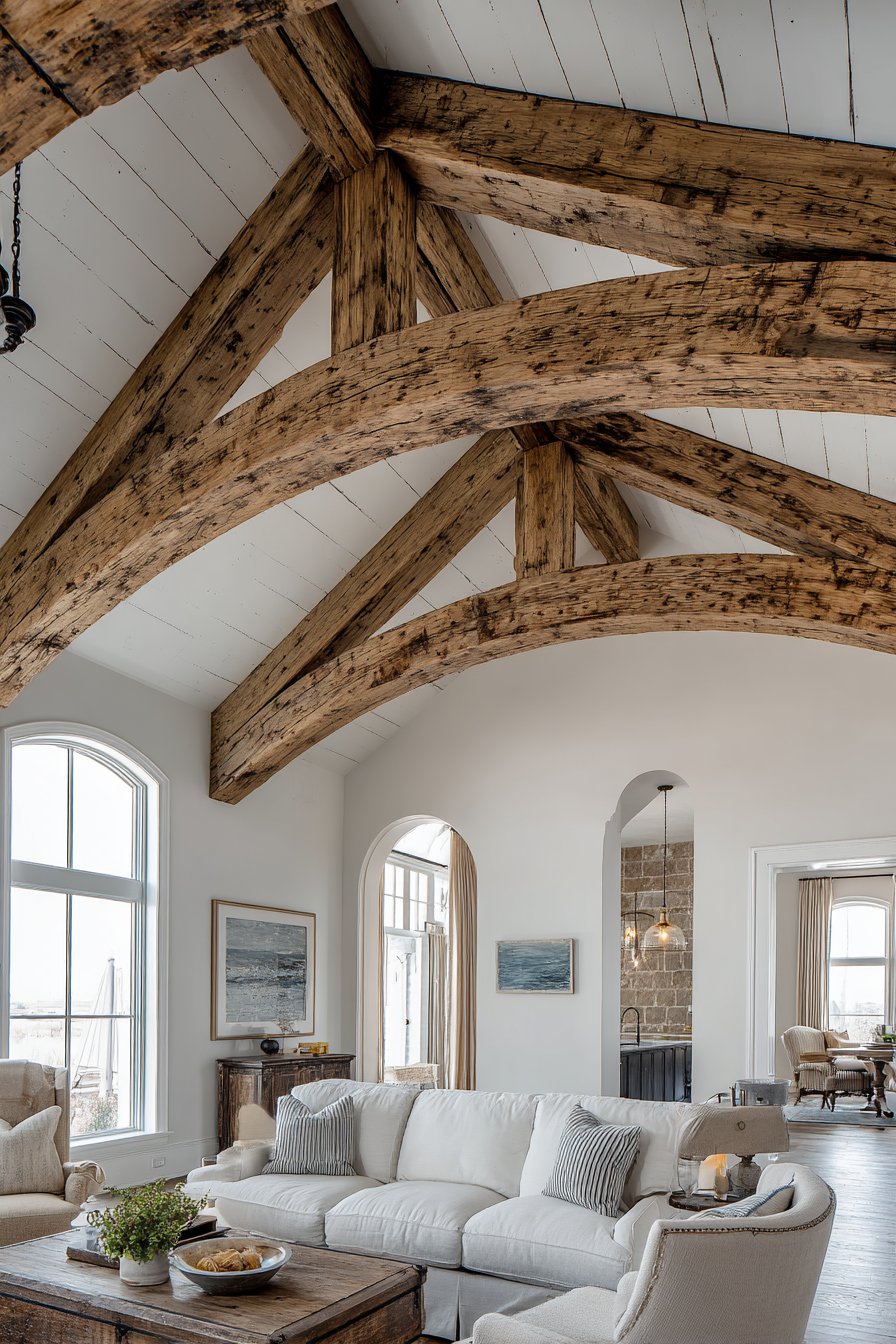
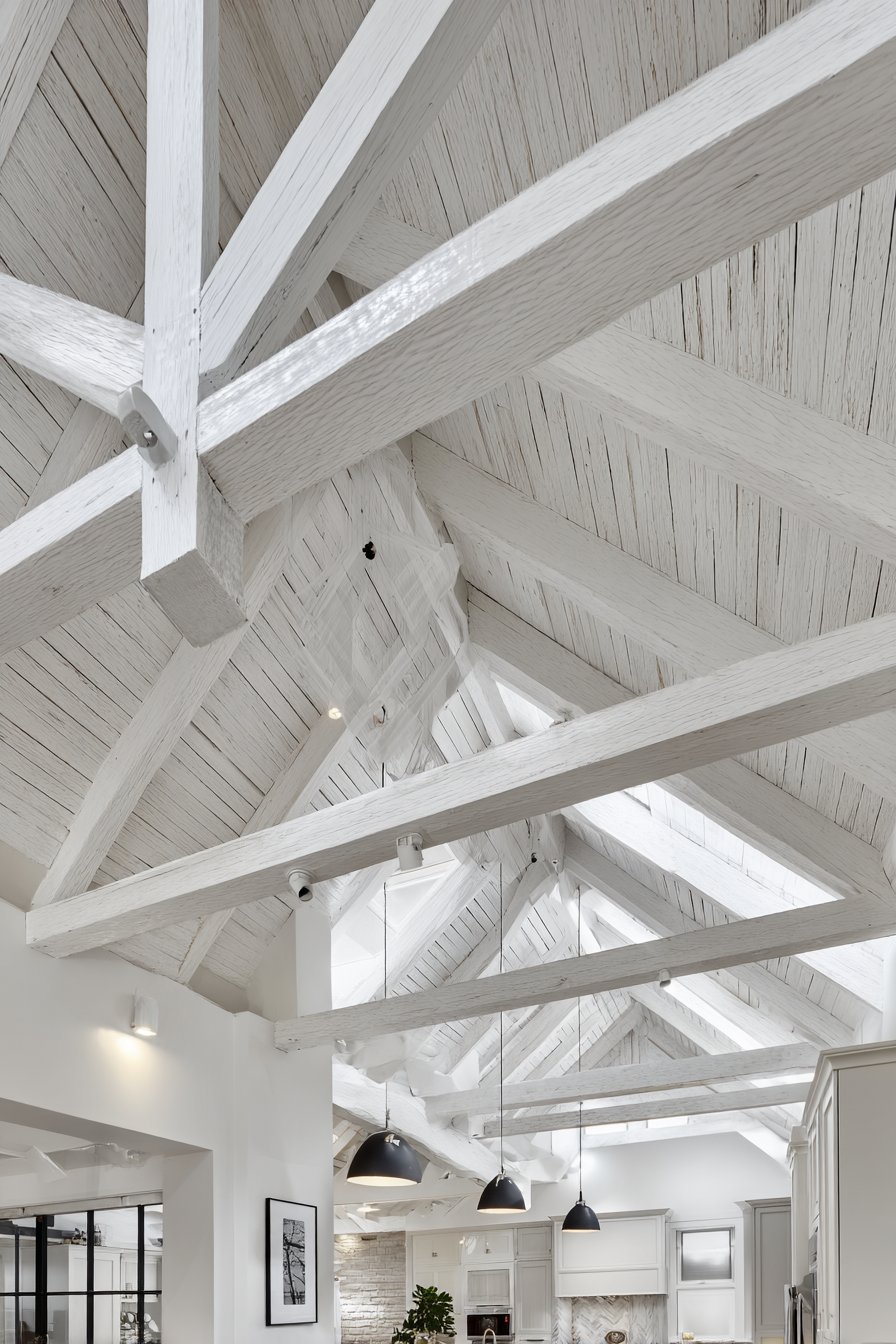
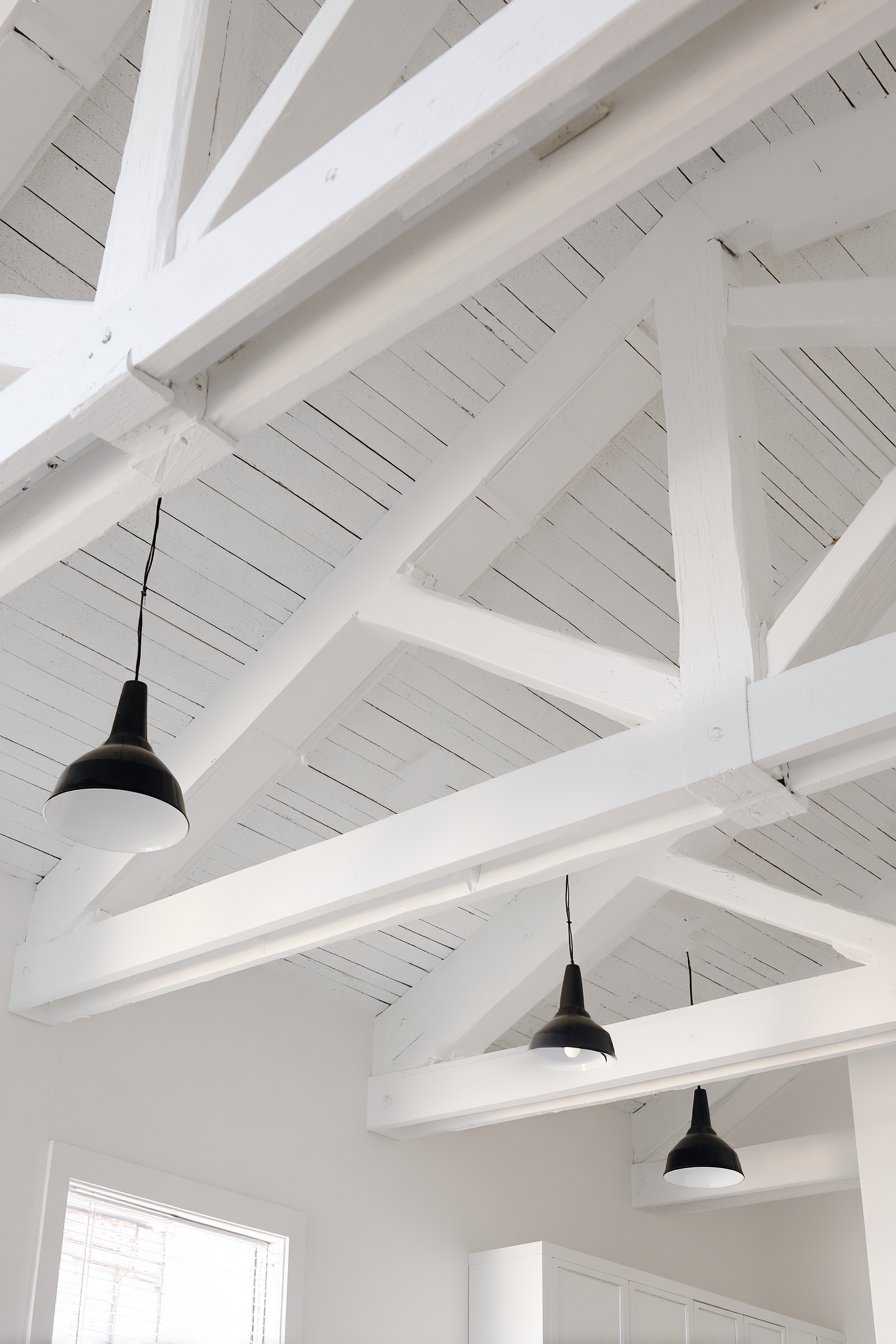
Hand-hewn reclaimed oak beams bring authentic rustic character to interiors while creating striking visual contrast against crisp white painted ceilings. These substantial architectural elements showcase the natural beauty of aged wood, with visible grain patterns, subtle knots, and warm honey-brown tones that have developed over decades of weathering and use. The beams retain their original texture and character, including the marks left by hand-hewing tools, which adds to their historical authenticity and charm. When arranged in parallel lines across a vaulted ceiling, they create rhythmic visual interest that guides the eye along the room’s length while maintaining an open, airy feeling essential to farmhouse-style interiors.
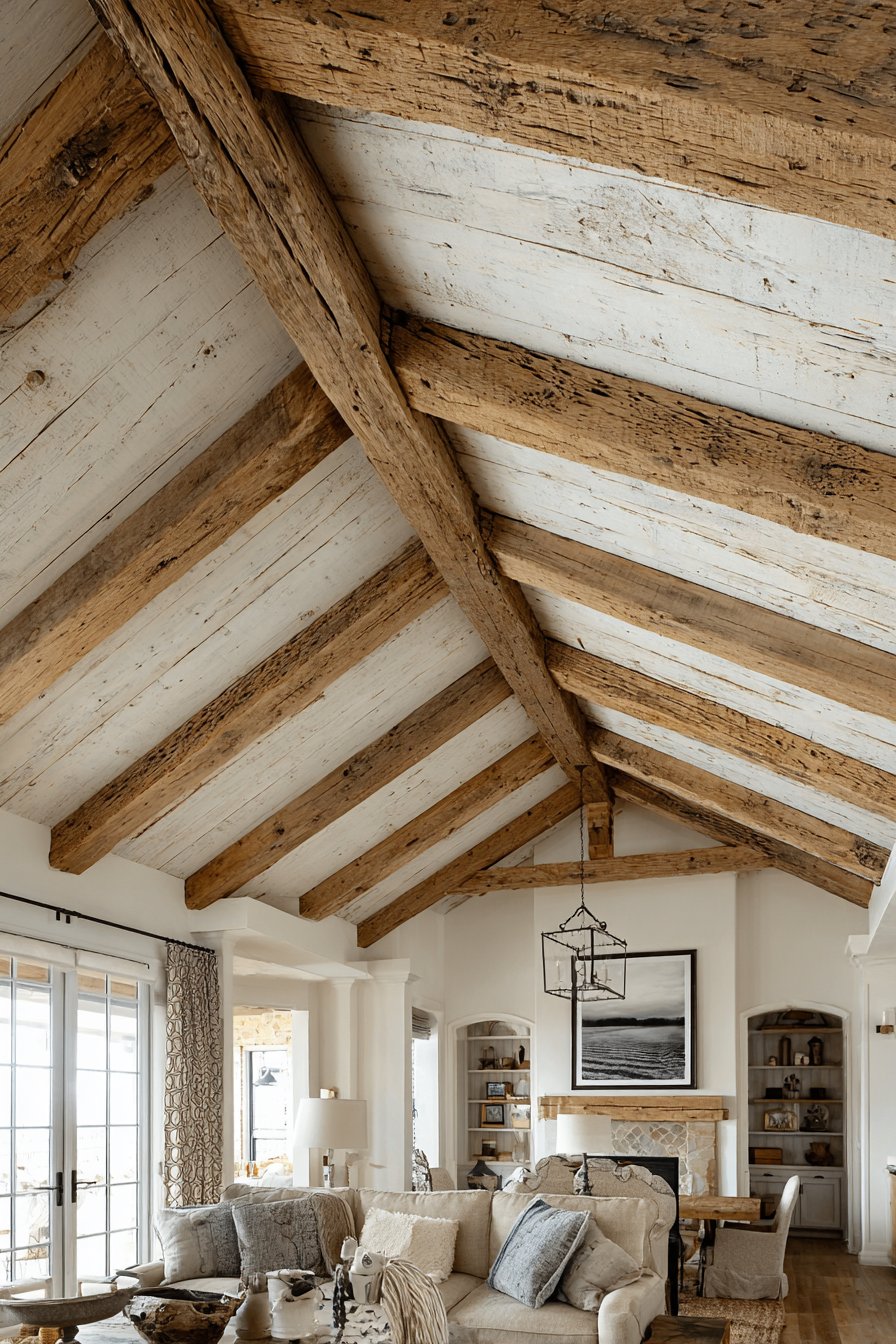
The spacing between beams requires careful consideration to balance visual impact with practical proportions. Beams placed too closely together can overwhelm a space and make ceilings feel heavy, while excessive spacing diminishes their architectural presence. The ideal arrangement creates consistent rhythm that enhances rather than dominates the room’s design. The natural variations in wood color and patina ensure that each beam possesses unique character, preventing the installation from appearing manufactured or overly uniform. This organic quality aligns perfectly with farmhouse and rustic design philosophies that celebrate imperfection and authenticity over pristine perfection.
The contrast between rough-hewn wood and smooth painted surfaces creates dynamic textural interplay that adds depth and interest to the overhead plane. Natural light streaming through windows highlights the beams’ three-dimensional quality, casting subtle shadows that shift throughout the day and animate the ceiling surface. This ever-changing play of light and shadow prevents the design from becoming static or monotonous. The warm wood tones provide visual warmth that balances the coolness of white paint, creating a harmonious color palette that feels both fresh and grounded. When paired with complementary natural materials like stone fireplaces, hardwood floors, and linen textiles, the beamed ceiling becomes part of a cohesive design narrative celebrating natural beauty and craftsmanship.
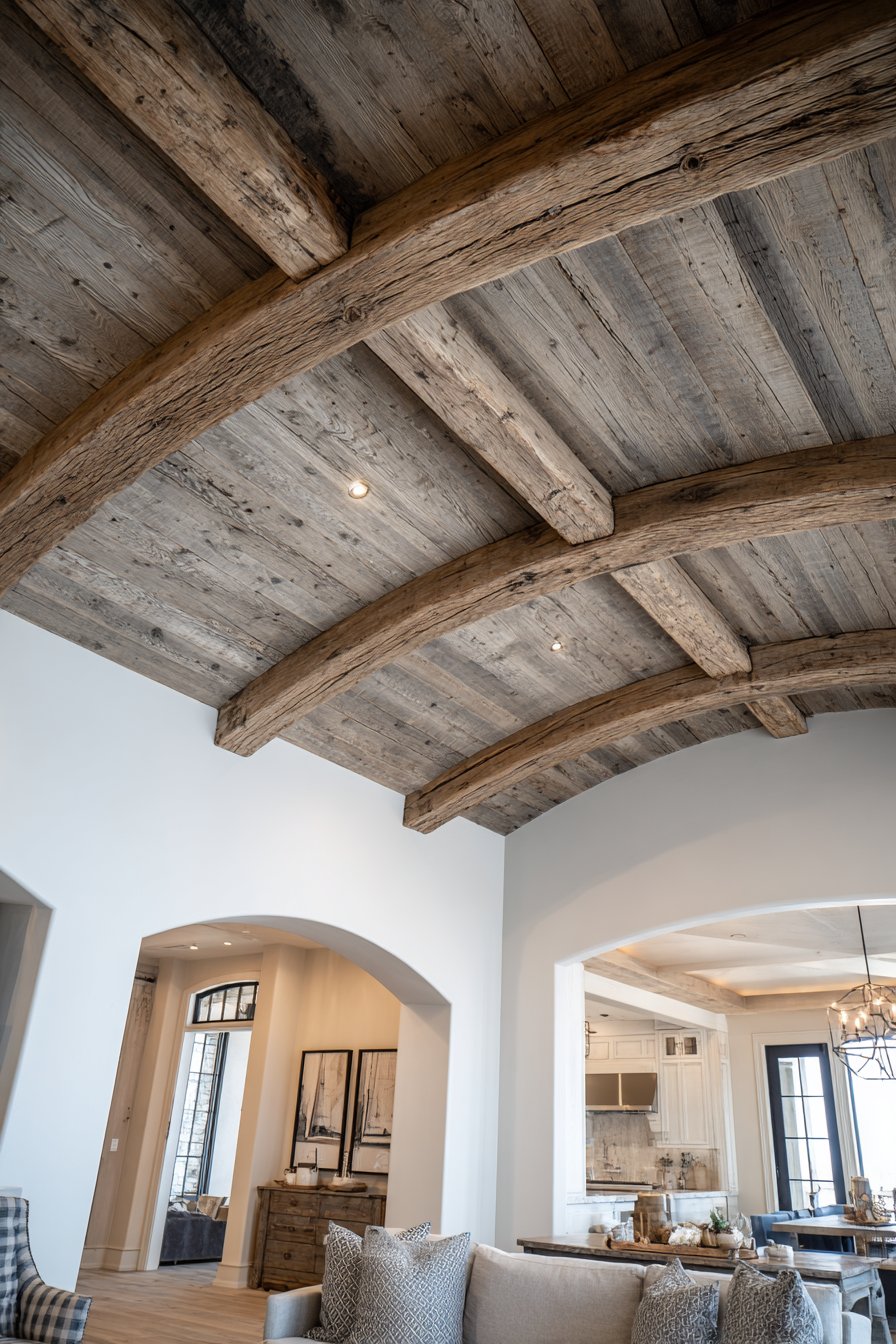
Key Design Tips: Source reclaimed beams from architectural salvage yards or specialized suppliers who can verify wood authenticity and structural integrity. Ensure beams are properly treated for insects and sealed to prevent moisture damage. Work with a structural engineer to determine safe installation methods, especially for hollow decorative beams versus solid structural beams. Maintain beam spacing between 4-6 feet for optimal visual rhythm in standard residential spaces. Consider the weight of solid beams when planning installation—hollow decorative alternatives offer authentic appearance with easier installation. Paint ceiling surfaces first, then install beams to simplify the painting process.
3. Contemporary Linear Wood Plank Design
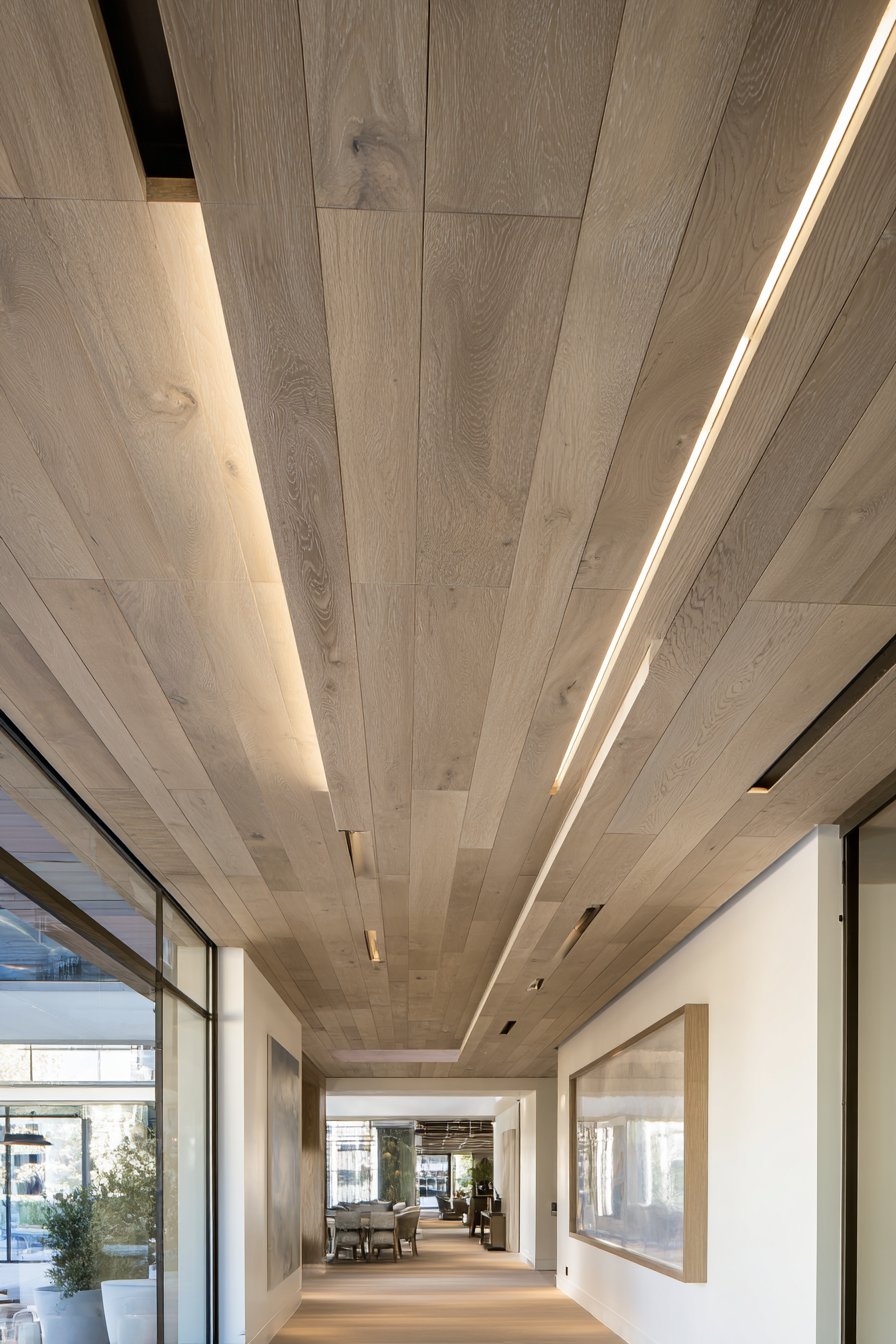
Modern ceiling design embraces clean lines and natural materials through linear wood plank installations that add warmth and texture to contemporary spaces. Narrow tongue-and-groove boards in light natural oak create subtle visual movement as they run the full length of a dining room, establishing directional flow that can make spaces feel longer and more expansive. The consistent grain patterns and pale wood tones introduce organic warmth without overwhelming minimalist aesthetics. This treatment demonstrates how natural materials can integrate seamlessly into modern design when applied with restraint and precision. The linear arrangement creates order and harmony while the wood’s inherent variations prevent the design from feeling cold or overly geometric.
Innovation emerges through the integration of slim LED track lighting recessed between select planks, transforming functional illumination into an integral design element. This approach eliminates bulky light fixtures that would disrupt the ceiling’s clean lines while providing adjustable directional lighting perfect for dining environments. The recessed tracks appear as subtle dark lines that enhance rather than interrupt the plank pattern, creating visual interest through their rhythmic placement. The resulting effect is both practical and beautiful—providing excellent task lighting for dining while maintaining the ceiling’s streamlined appearance. During daytime hours, natural light highlights the wood grain variations and creates soft shadows between planks that emphasize the installation’s dimensional quality.
The relationship between the wooden ceiling and white walls creates essential contrast that allows each surface to be fully appreciated. Without this contrast, the wood treatment might blend into its surroundings and lose impact. The crisp white walls provide a clean backdrop that makes the wood tones appear richer and more saturated while preventing the space from feeling overly warm or enclosed. This color relationship exemplifies the principles of modern design, where careful restraint and strategic contrast create maximum impact. The wooden ceiling adds character and personality to the contemporary space without requiring ornate details or complex patterns—the beauty lies in the material itself and the precision of its installation.
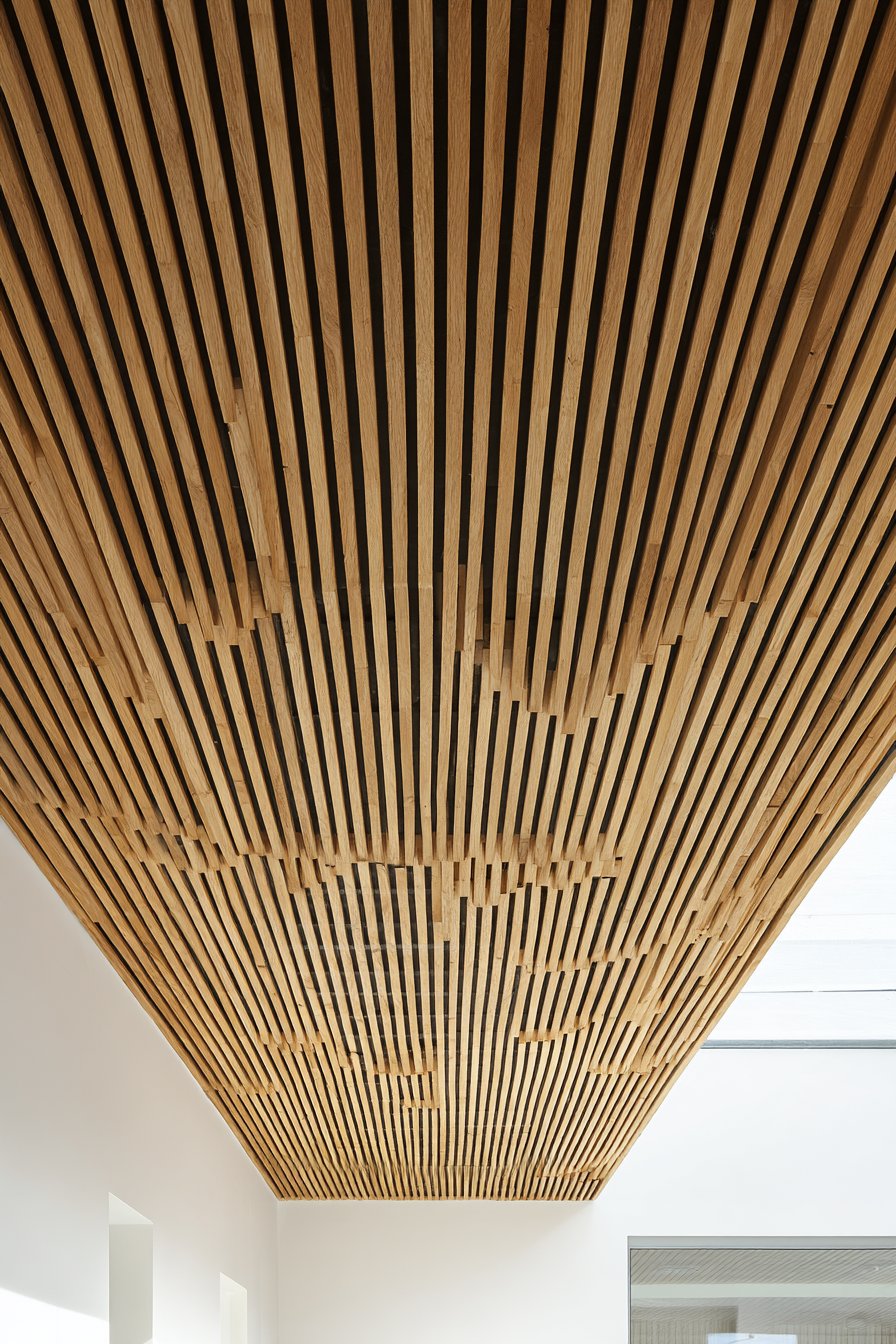
Key Design Tips: Select tongue-and-groove boards with micro-beveled edges to create subtle shadow lines that prevent the ceiling from appearing as a single flat surface. Apply a clear matte finish rather than glossy to maintain the wood’s natural appearance and prevent distracting reflections. Plan LED track placement during the framing stage to ensure proper electrical rough-in. Use color-matched screws or hidden fastening systems for a seamless appearance. Acclimate wood planks to the room’s humidity level for at least 48 hours before installation to prevent warping or gaps. Consider running planks perpendicular to windows to maximize how natural light interacts with the wood grain.
4. Bold Geometric Wallpaper Statement

Decorating the ceiling with bold geometric wallpaper represents a fearless design choice that transforms often-overlooked powder rooms into memorable spaces. This unexpected application of pattern overhead creates an element of surprise that delights guests and demonstrates sophisticated design confidence. Navy blue and metallic gold accents against a cream background establish a luxurious color palette that feels both regal and contemporary. The abstract geometric shapes create visual complexity and interest that rewards closer inspection, making even brief visits to the powder room feel special. This design approach proves that small spaces offer perfect opportunities for dramatic design choices that might overwhelm larger rooms.
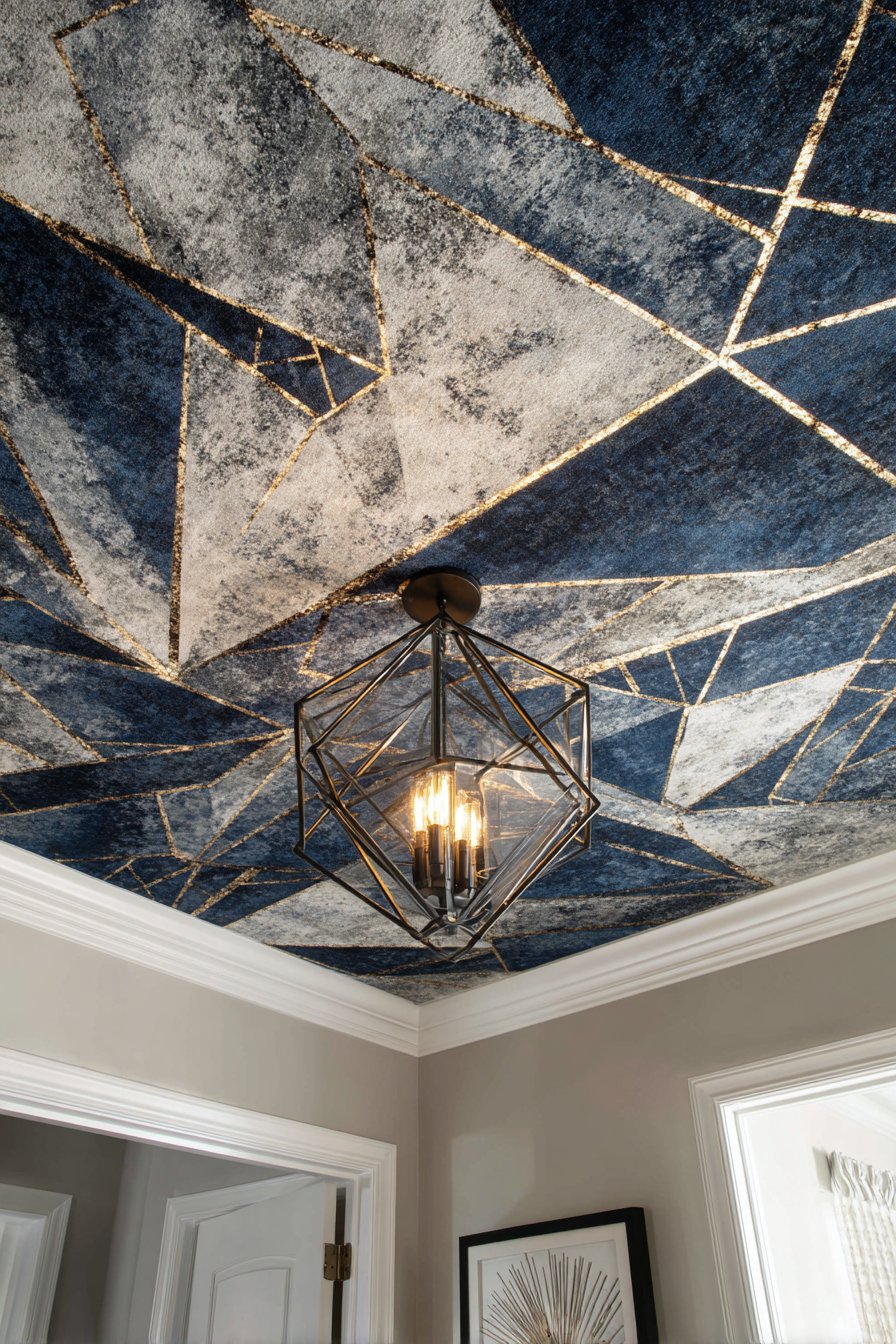
The reflective quality of metallic gold accents adds dimension and luminosity to the patterned surface, creating subtle shimmer as light angles change throughout the day. This interplay between matte and metallic finishes prevents the pattern from appearing flat or one-dimensional. When combined with a contemporary pendant light fixture hanging centrally, the metallic elements in the wallpaper catch and reflect light, creating a dynamic visual experience. The shadows cast by the light fixture interact with the geometric pattern, adding another layer of visual interest that changes depending on the time of day and whether natural or artificial light predominates.
Simple white crown molding frames the decorated ceiling, providing clean definition between the bold overhead treatment and the walls below. This framing effect is essential—without it, the patterned ceiling might appear to bleed into the walls, creating visual confusion. The white molding acts as a visual rest point that allows the eye to separate and appreciate each surface independently. The overall effect demonstrates how powder rooms, despite their compact size, can serve as design showcases where homeowners can experiment with bolder choices than they might attempt in more public spaces. The confined scale actually works in the design’s favor, creating an intimate, jewel-box quality that feels intentional and sophisticated rather than overwhelming.
Key Design Tips: Choose wallpaper specifically rated for bathroom use to ensure proper moisture resistance. Apply wallpaper primer designed for ceilings to ensure proper adhesion and easier future removal. Work with a helper during installation—ceiling wallpaper application is significantly more challenging than wall application due to gravity. Use a quality smoothing tool to remove air bubbles immediately, as they become permanent once adhesive dries. Consider the room’s lighting when selecting patterns—adequate light is essential to appreciate complex geometric designs. Cut around light fixtures carefully, using a sharp blade to ensure clean edges. Order extra wallpaper to account for pattern matching and potential mistakes during the challenging overhead installation process.
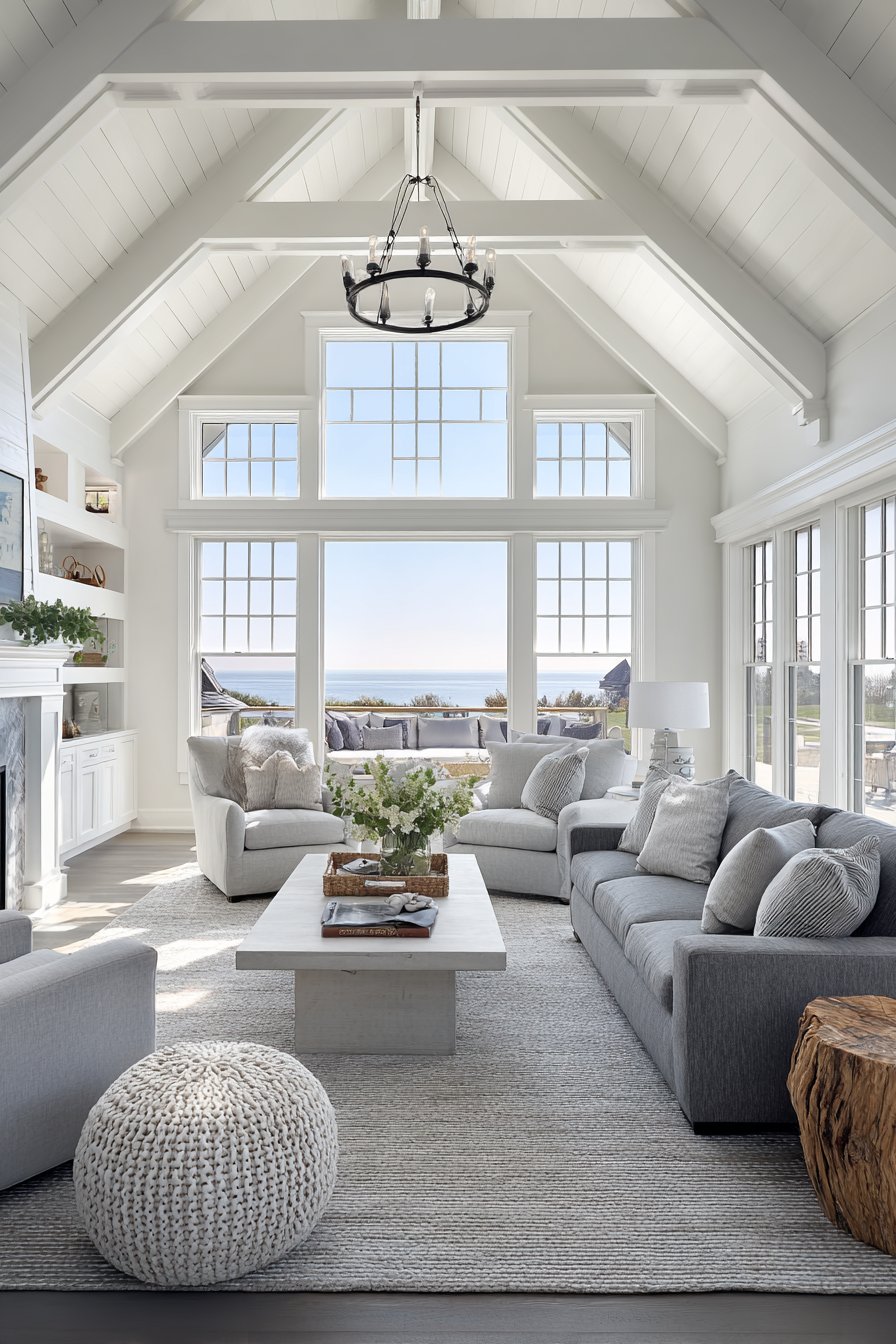
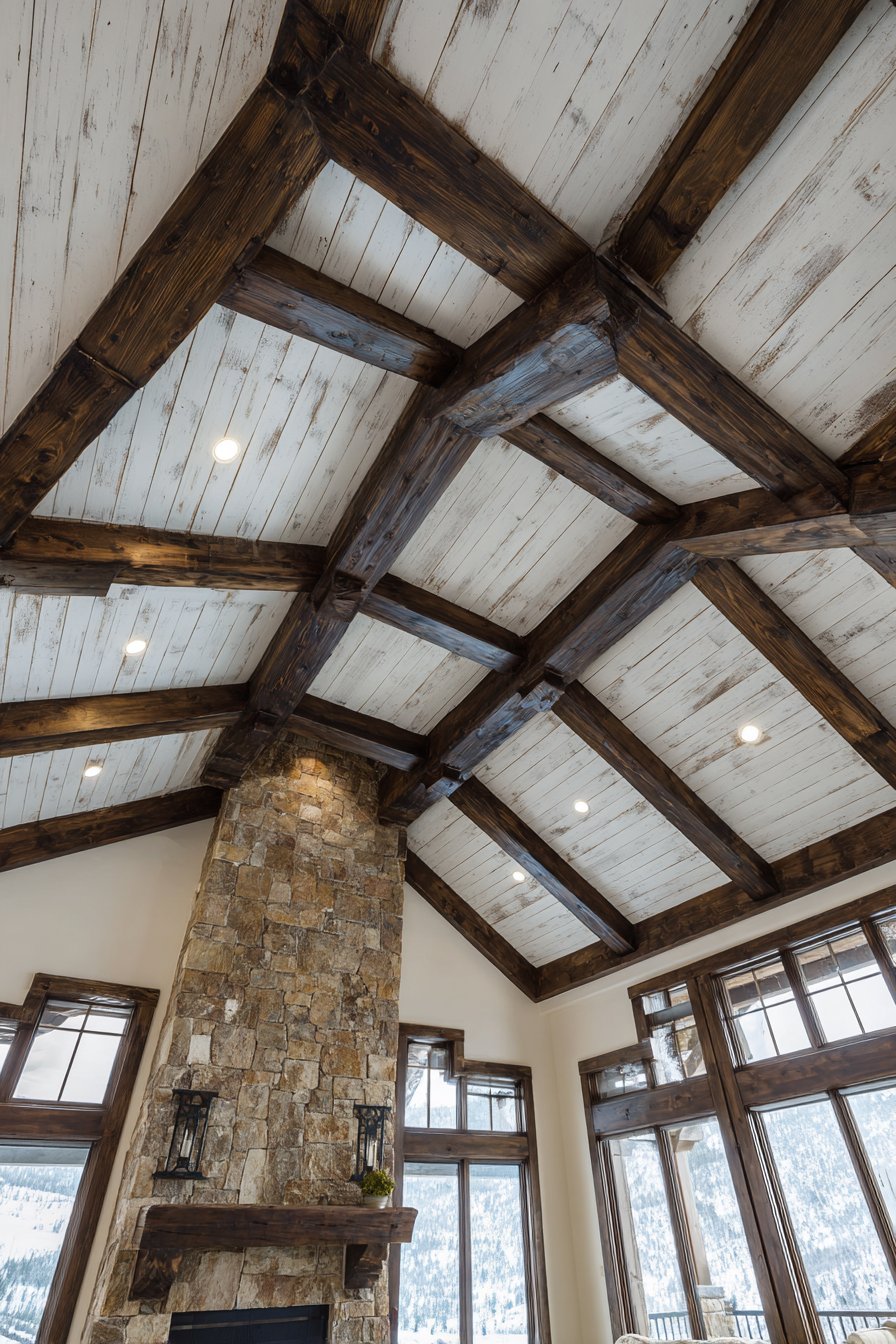
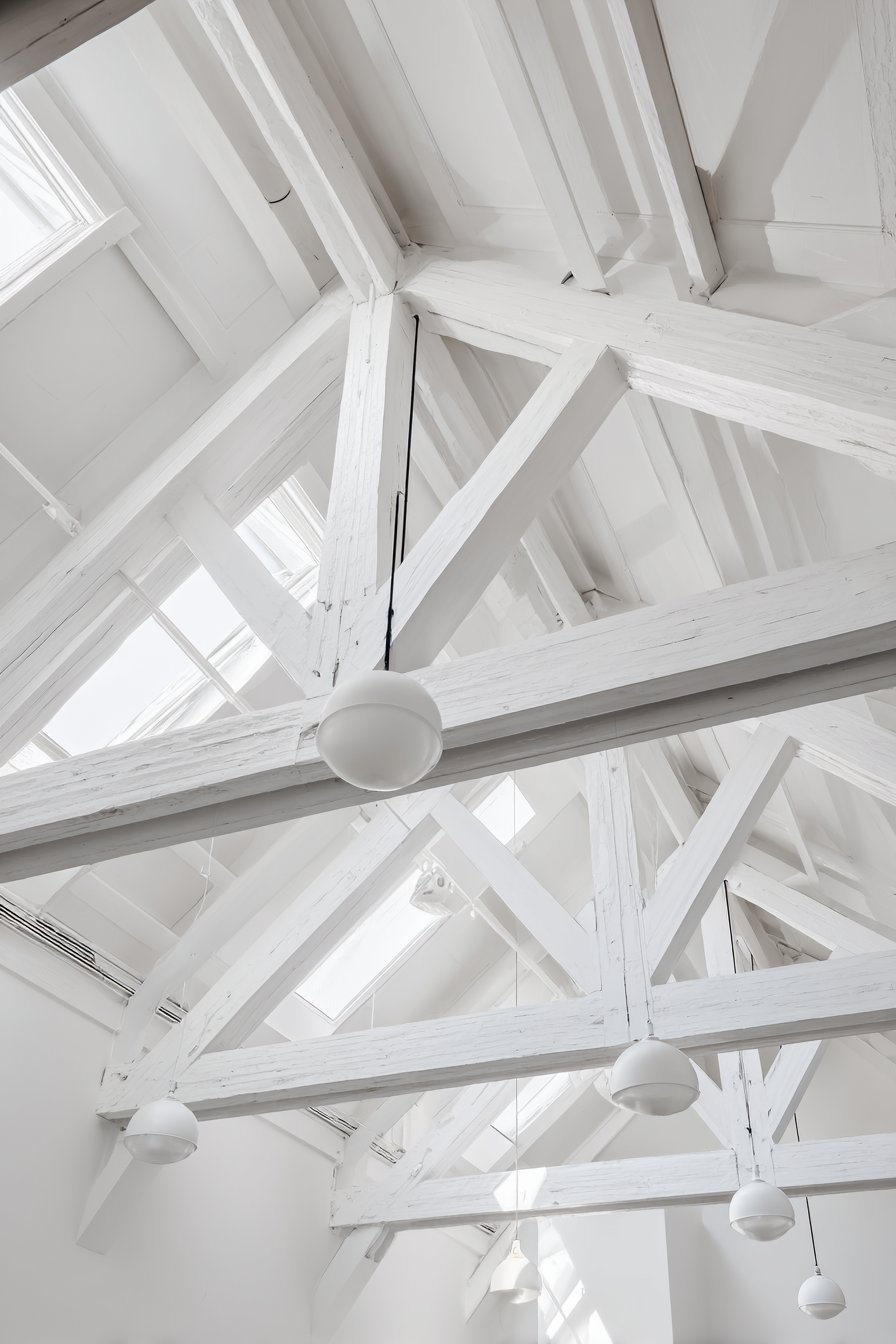
5. Dramatic Vaulted Rafters in Coastal Style
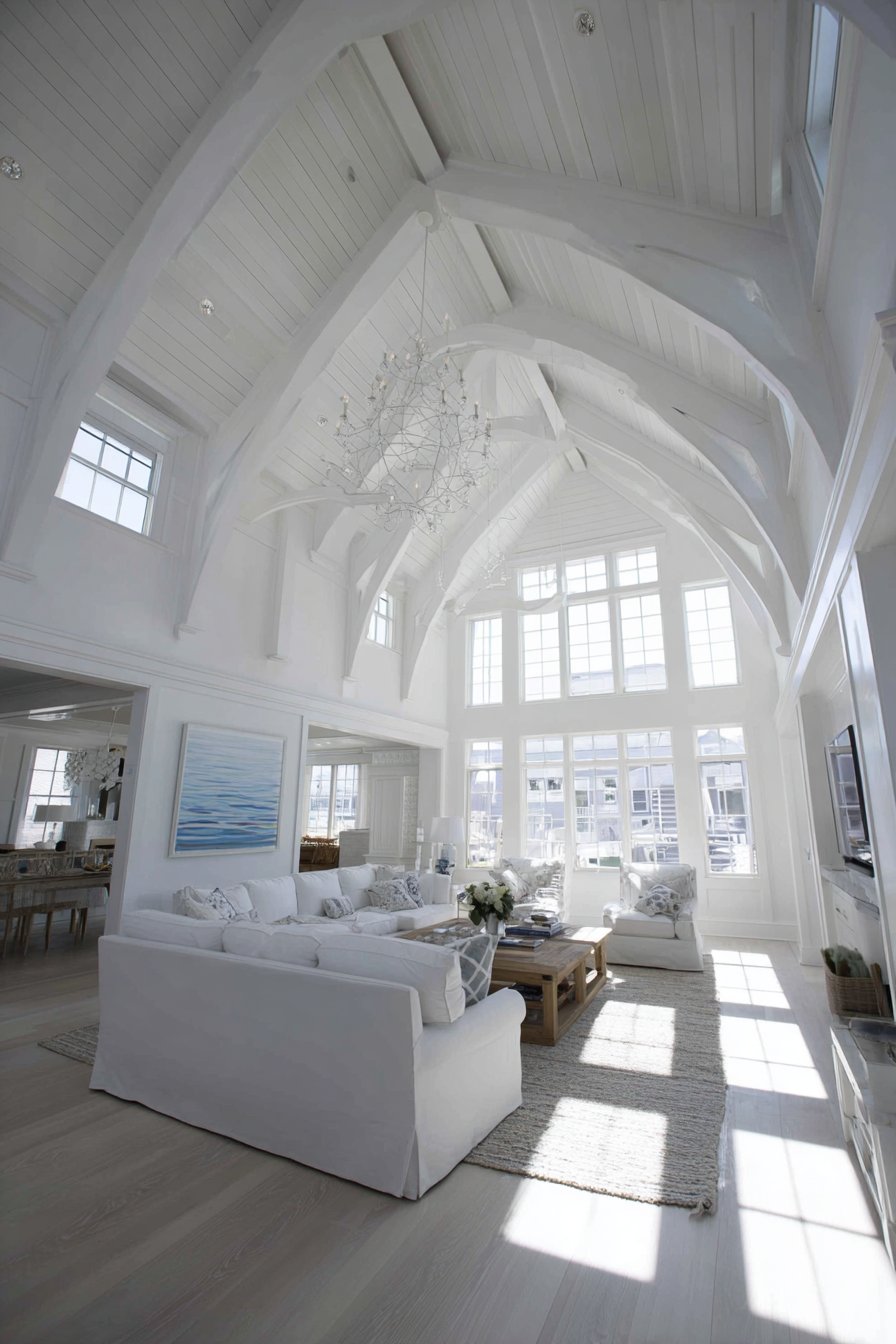
Cathedral ceilings with exposed white-painted rafters create spectacular architectural drama that captures the essence of coastal living. The peaked ceiling rises approximately eighteen feet at its center, establishing an impressive sense of volume and spaciousness that transforms the entire room’s character. Structural beams following the roofline add authentic architectural interest while serving as visual guides that lead the eye upward toward the apex. The decision to paint these structural elements in crisp white rather than leaving them as natural wood creates a lighter, airier atmosphere perfectly suited to coastal aesthetics. The tongue-and-groove ceiling boards installed between the rafters reinforce the linear quality of the design while adding subtle texture that prevents the expansive white surface from appearing flat or sterile.
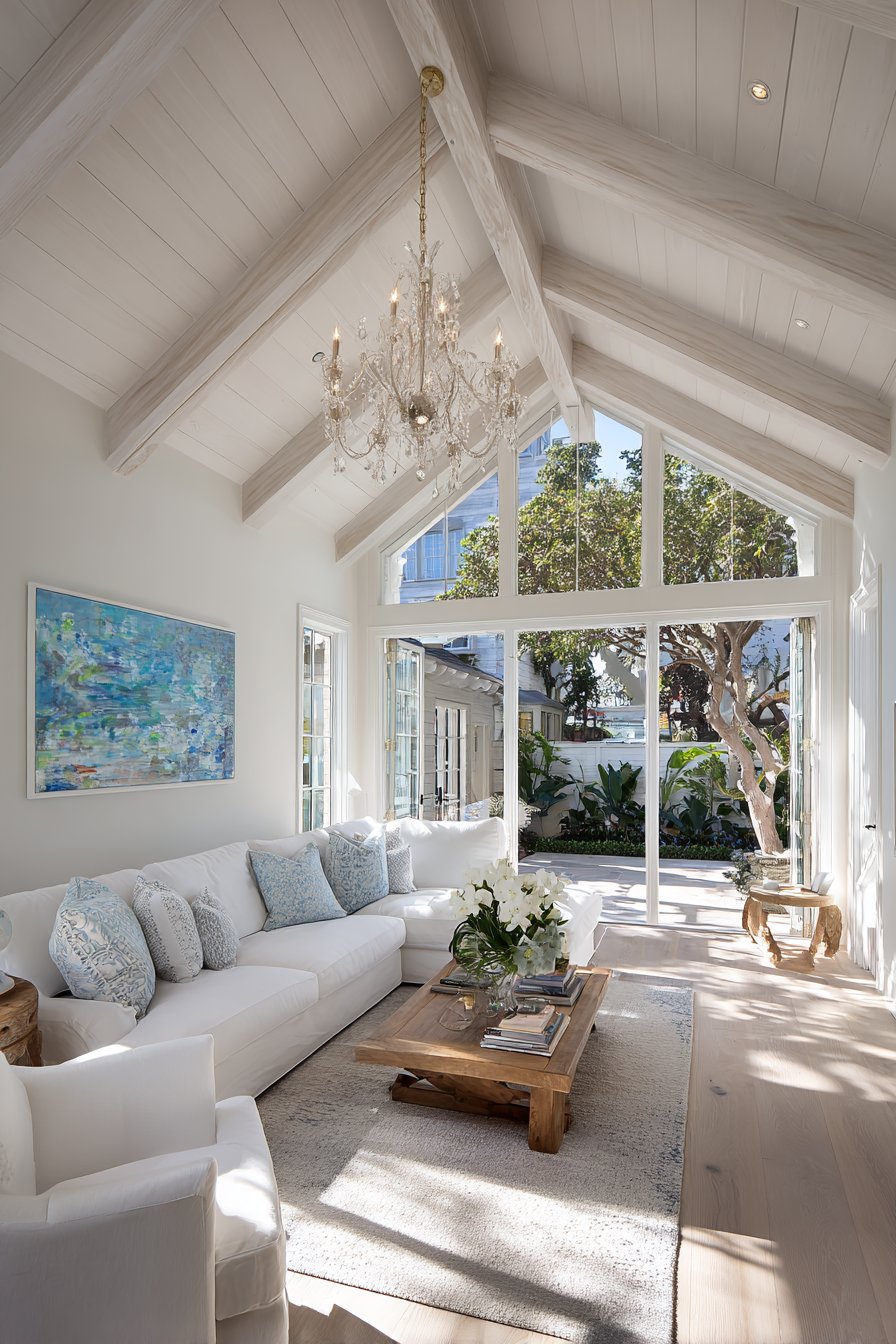
Large windows positioned at the gable end serve dual purposes—they flood the space with natural light essential to coastal interiors while providing visual relief at the ceiling’s highest point. This glazing creates a stunning focal point that draws attention to the ceiling’s dramatic height while establishing connection with outdoor views. The interplay of natural light across the white painted surfaces changes throughout the day, creating shifting patterns of brightness and shadow that animate the space. During golden hour, warm sunlight streams through the gable windows, transforming the white ceiling into a warm, glowing surface that enhances the room’s welcoming atmosphere.
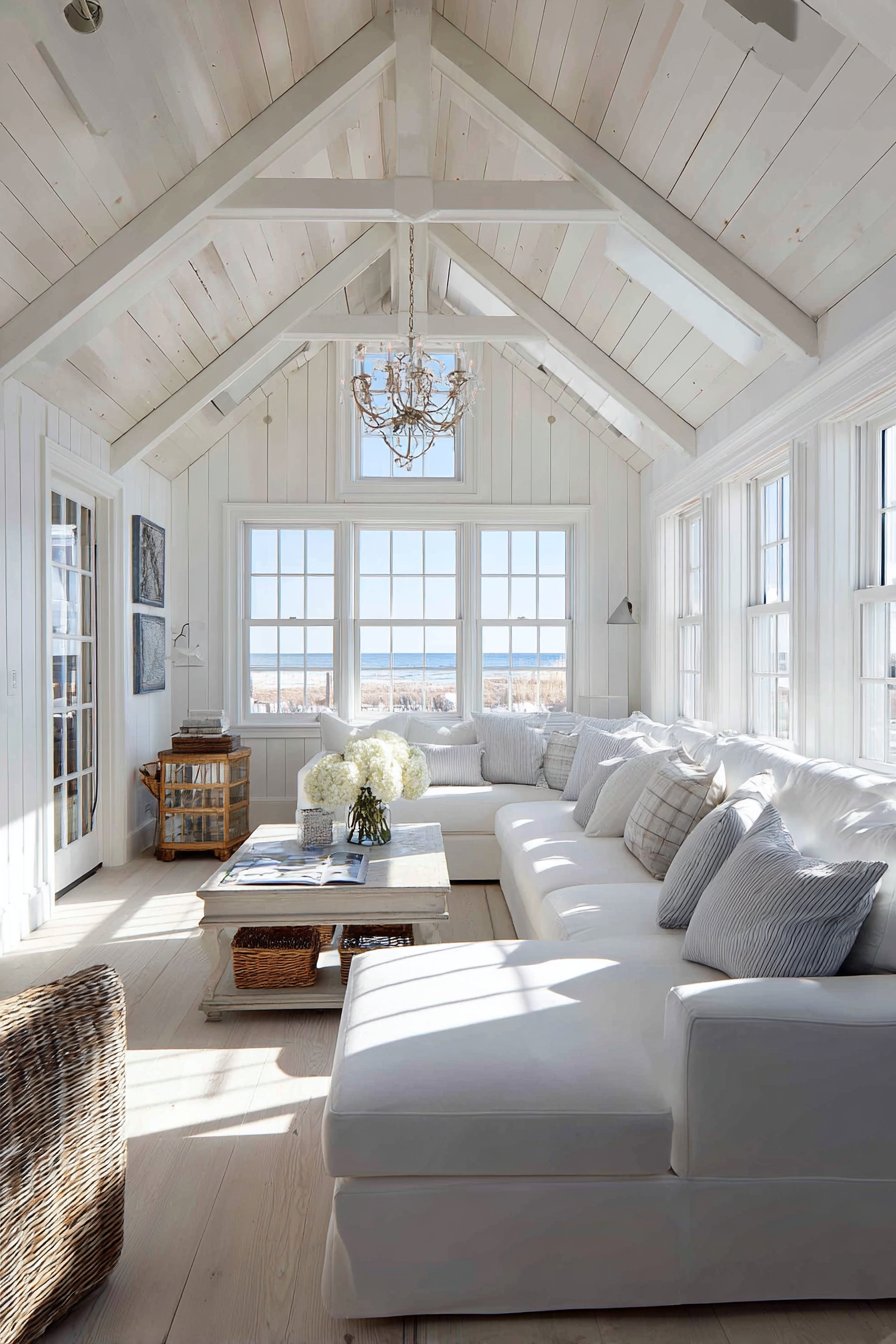
A statement chandelier suspended from the ceiling’s apex becomes an essential design element that emphasizes the vertical space while providing functional illumination. The fixture’s placement at the highest point creates a strong visual anchor that prevents the soaring space from feeling untethered or overwhelming. The chandelier’s scale must be substantial enough to maintain presence in the voluminous space—a fixture appropriate for standard eight-foot ceilings would appear insignificant in this context. The combination of architectural height, white surfaces, natural light, and carefully scaled fixtures creates the relaxed elegance characteristic of coastal design, where spaces feel both grand and comfortable, formal yet inviting.
Key Design Tips: Paint rafters and ceiling boards in the same white shade to create cohesive unity while allowing structural elements to remain distinct through their dimensional quality. Choose semi-gloss or satin paint finishes for easier cleaning of the hard-to-reach ceiling surfaces. Plan chandelier installation during construction to ensure proper electrical placement and structural support at the apex. Consider adding ceiling fans with integrated lighting to improve air circulation in the tall space—heat rises and can create uncomfortable temperature stratification. Install windows with operable sections to allow hot air to escape during summer months. Use professional scaffolding or lifts when painting—vaulted ceilings require specialized equipment for safe access. Consider acoustic treatments if the hard surfaces and high volume create excessive echo or reverberation.
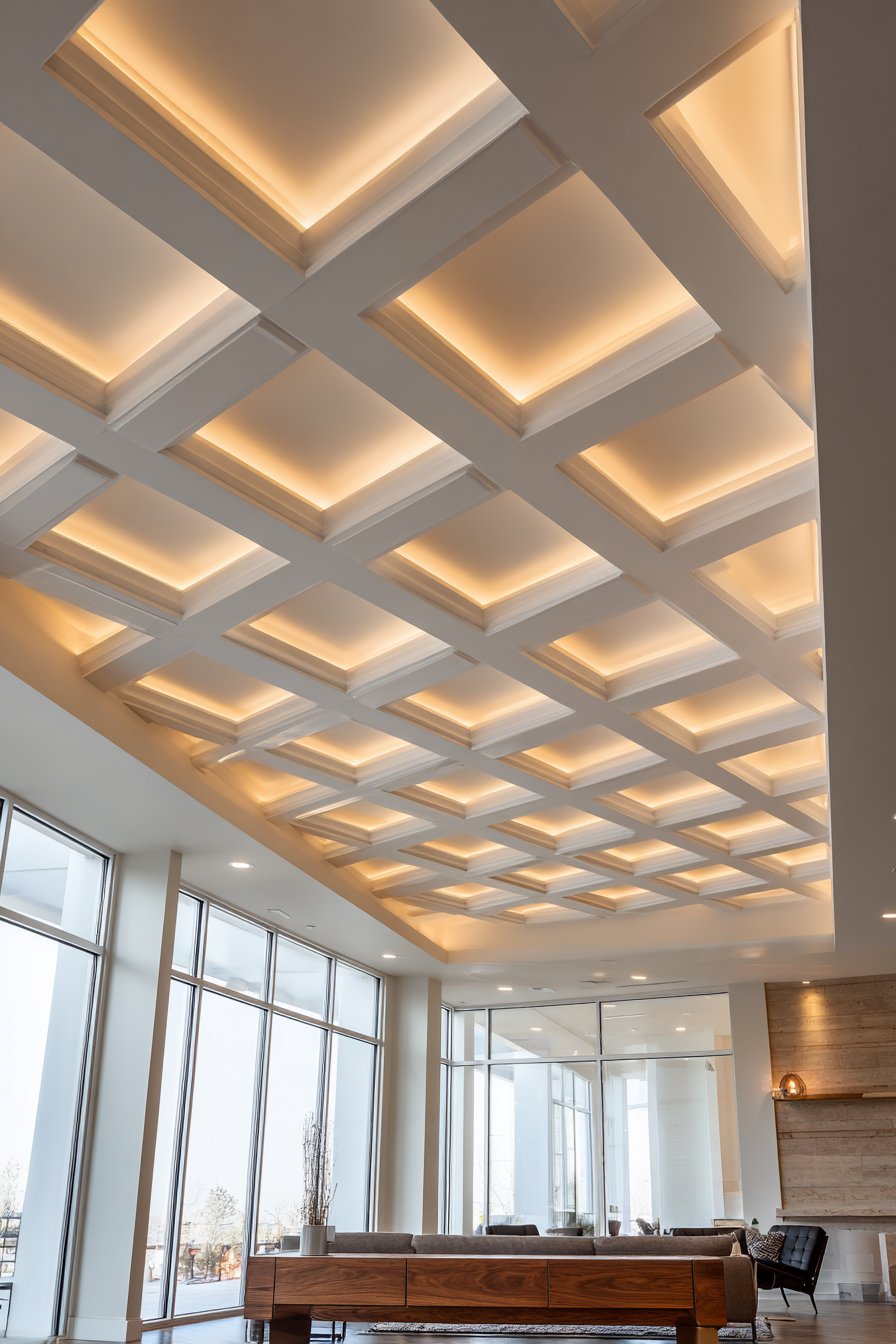
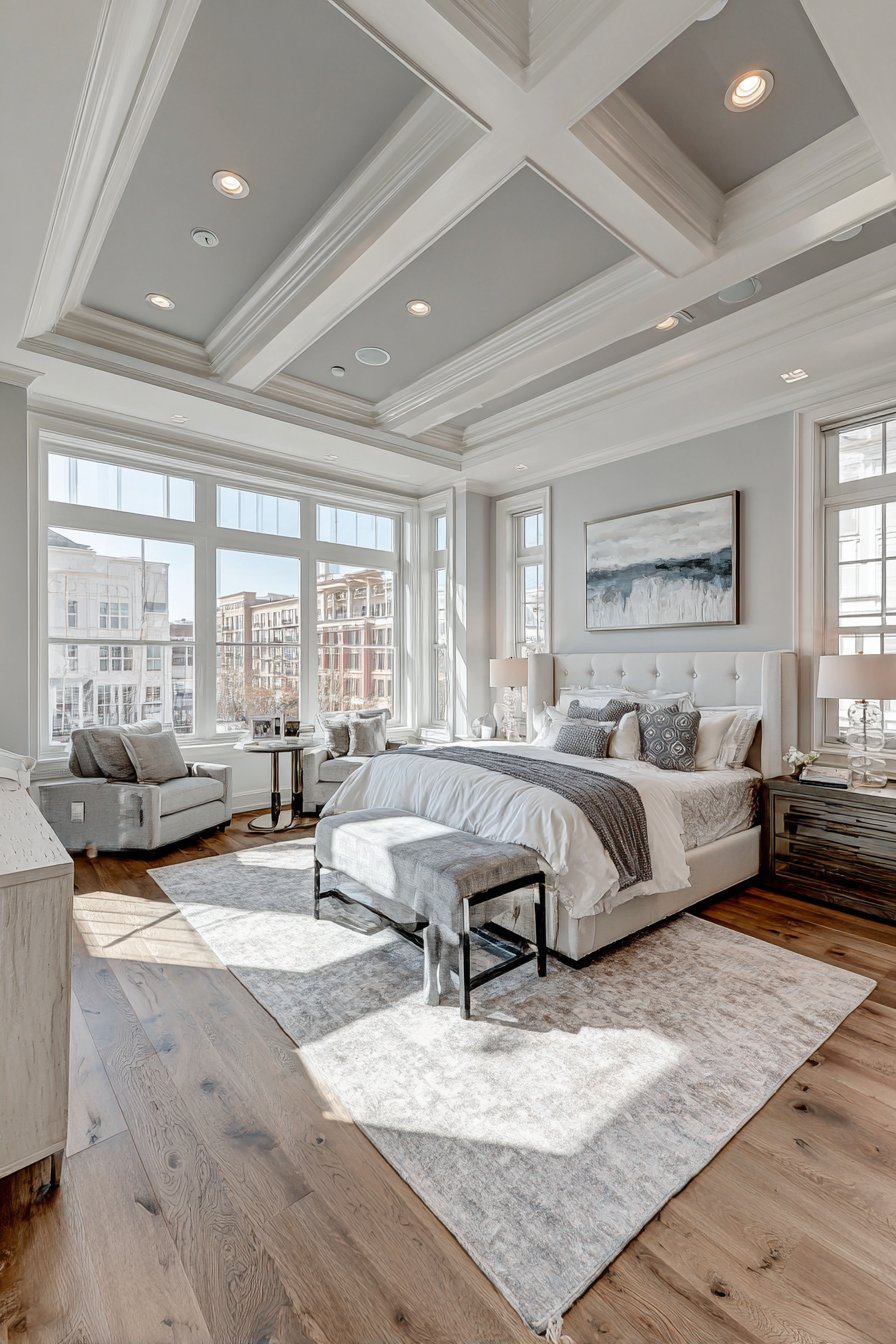
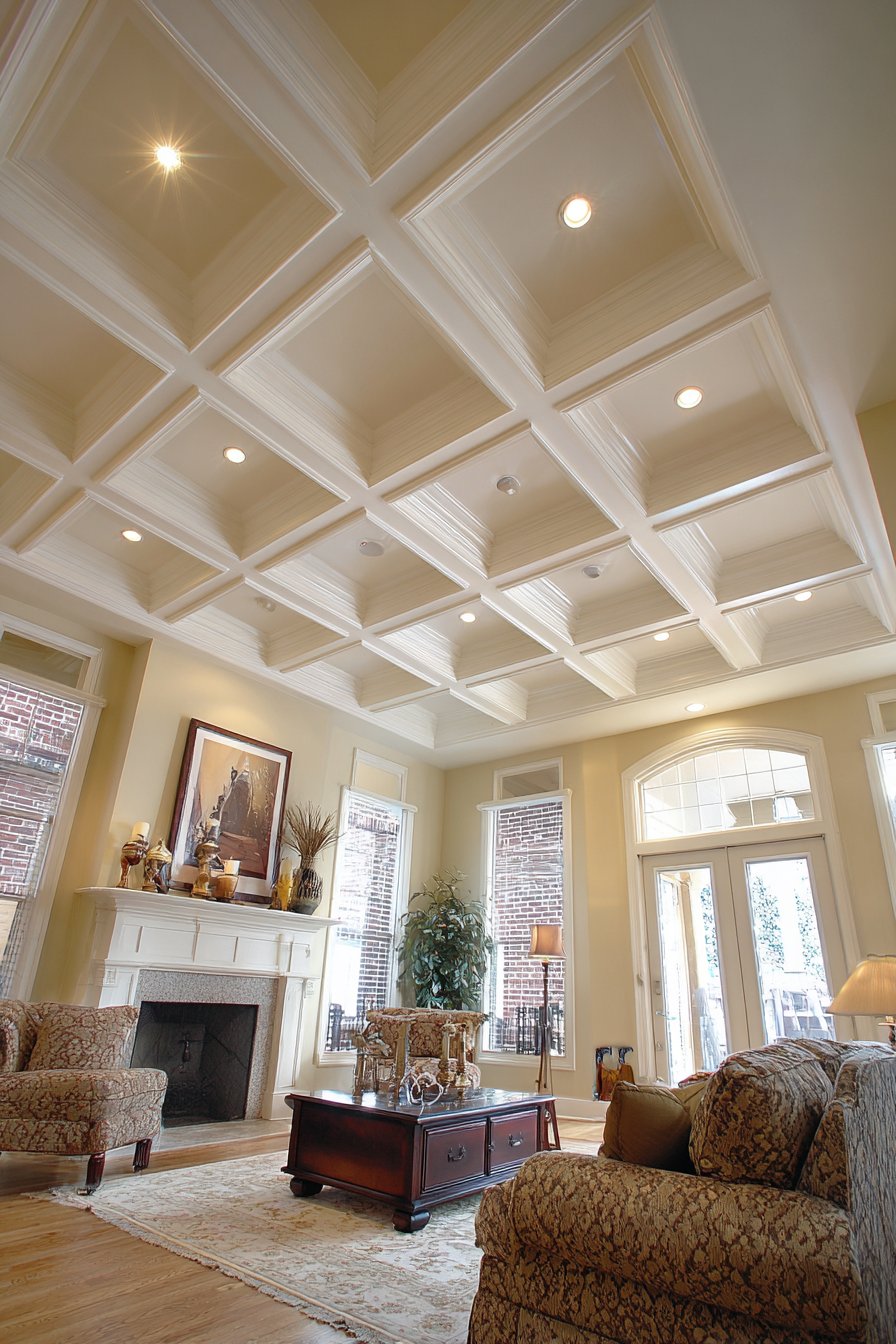
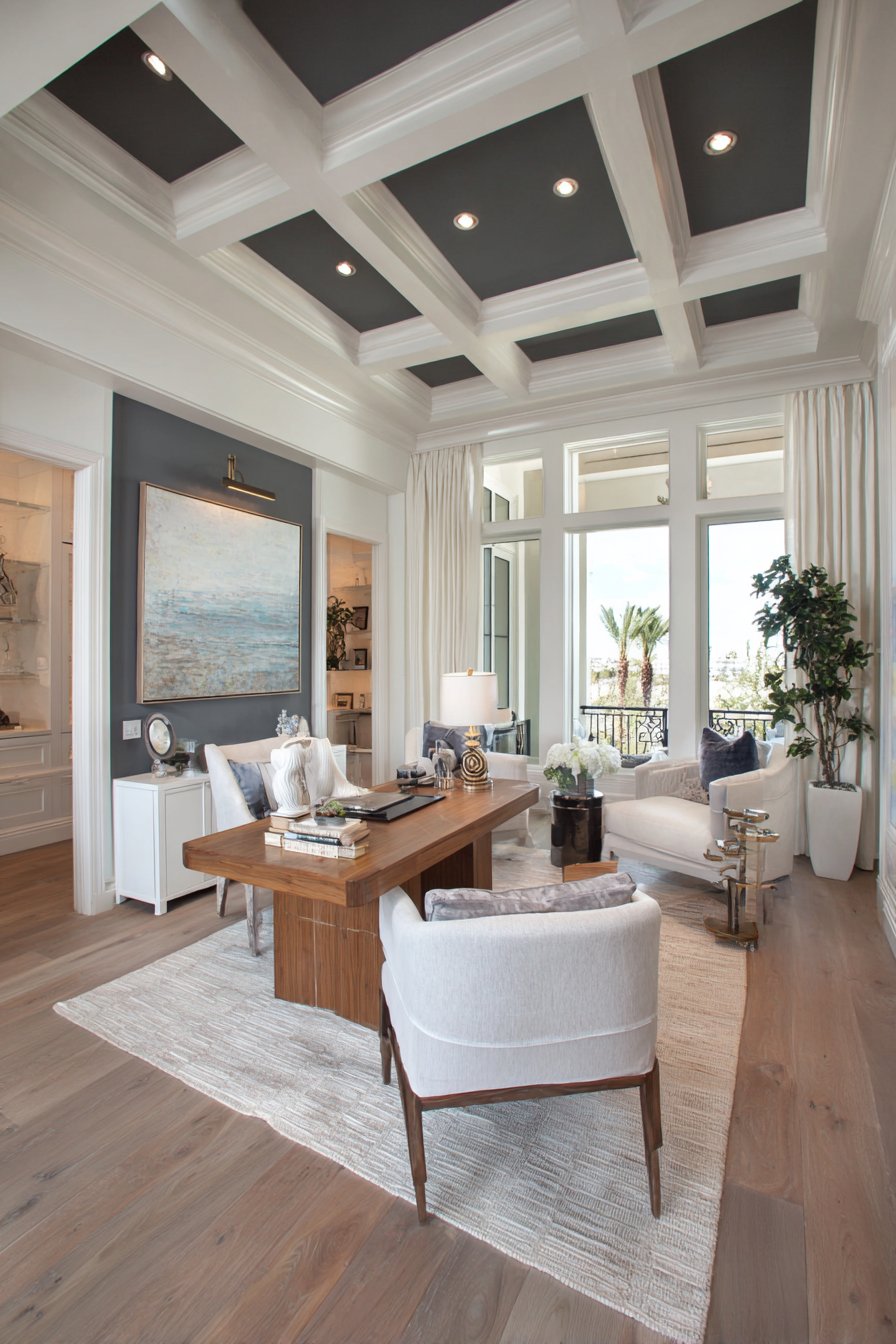
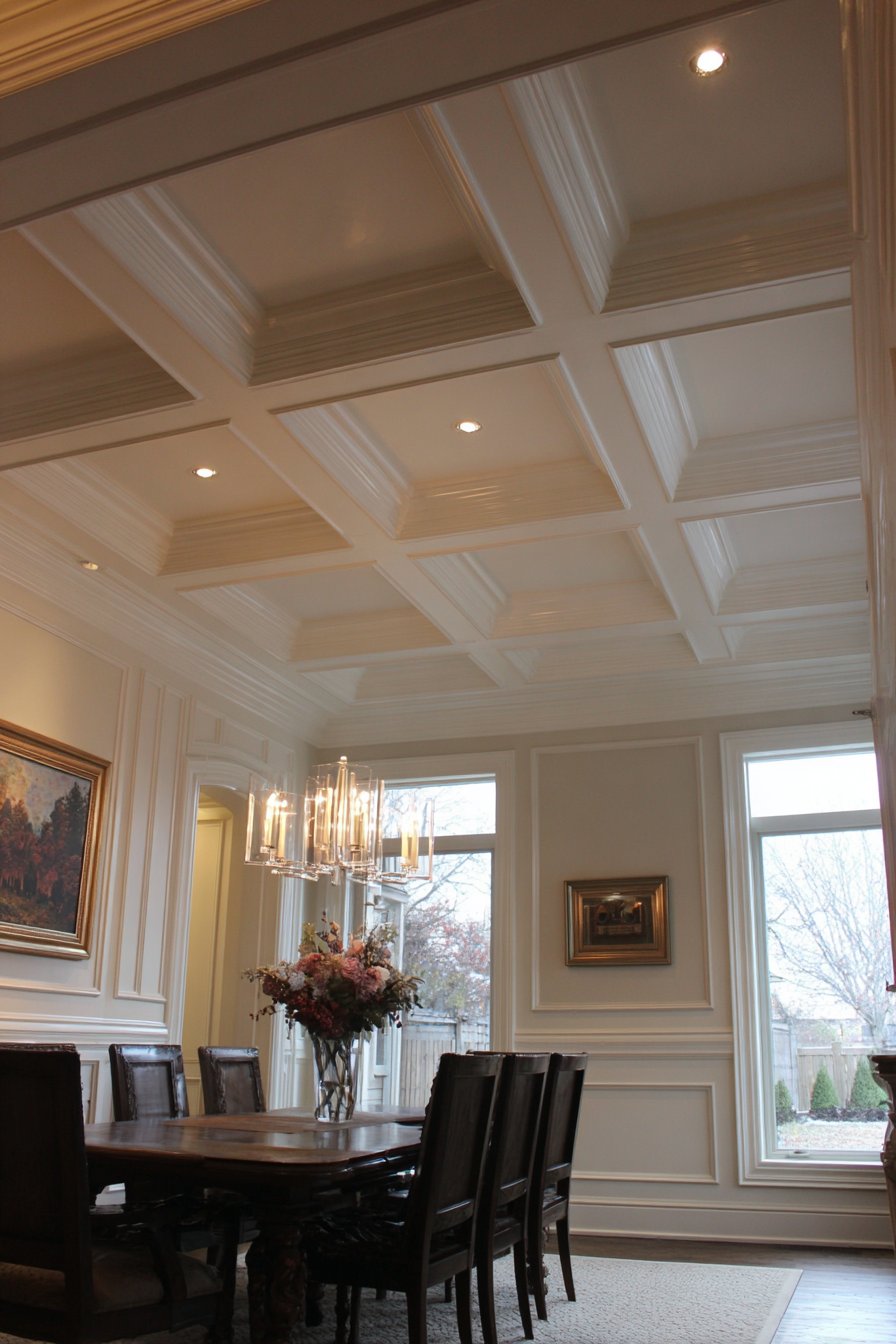
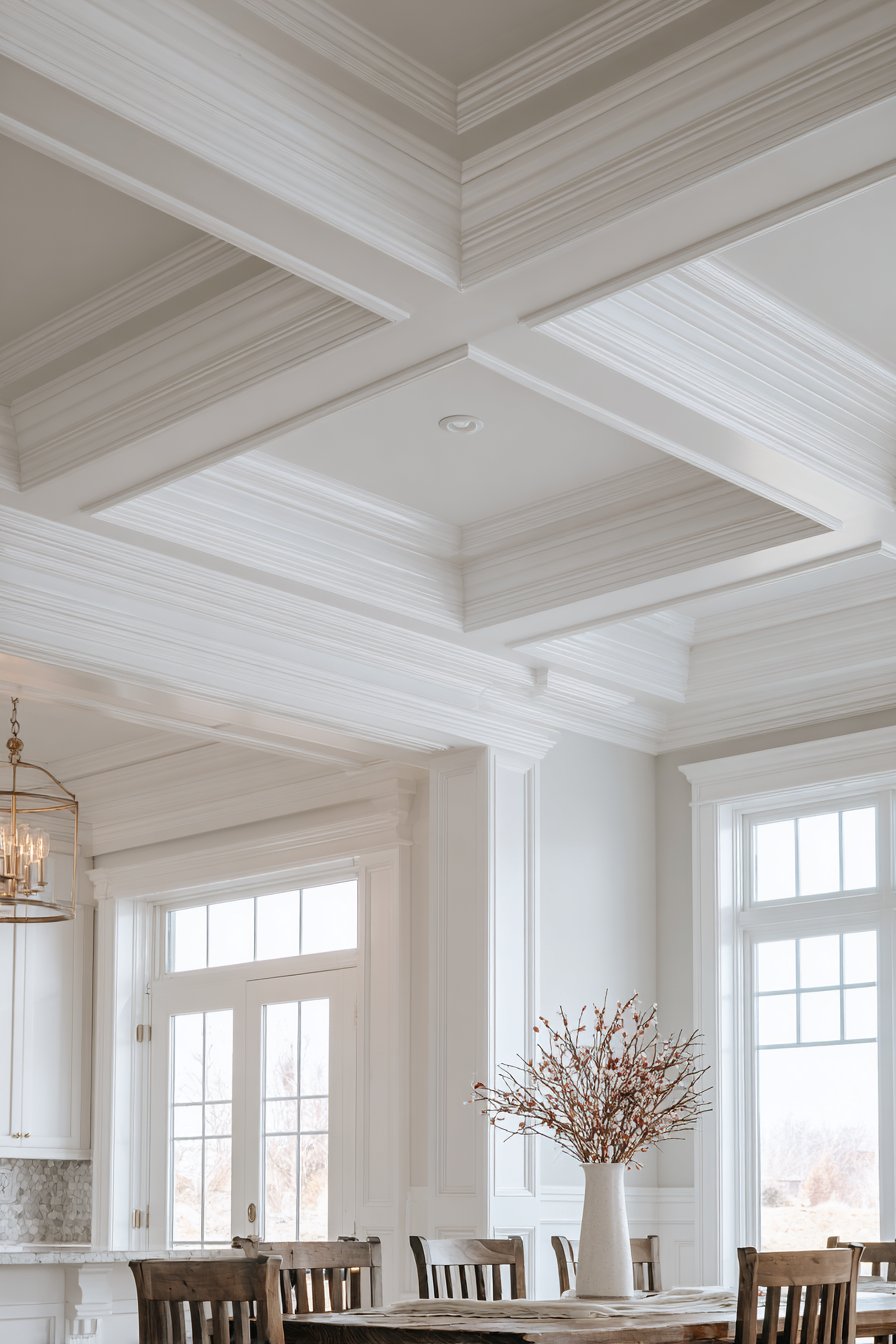
6. Traditional Coffered Ceiling Sophistication
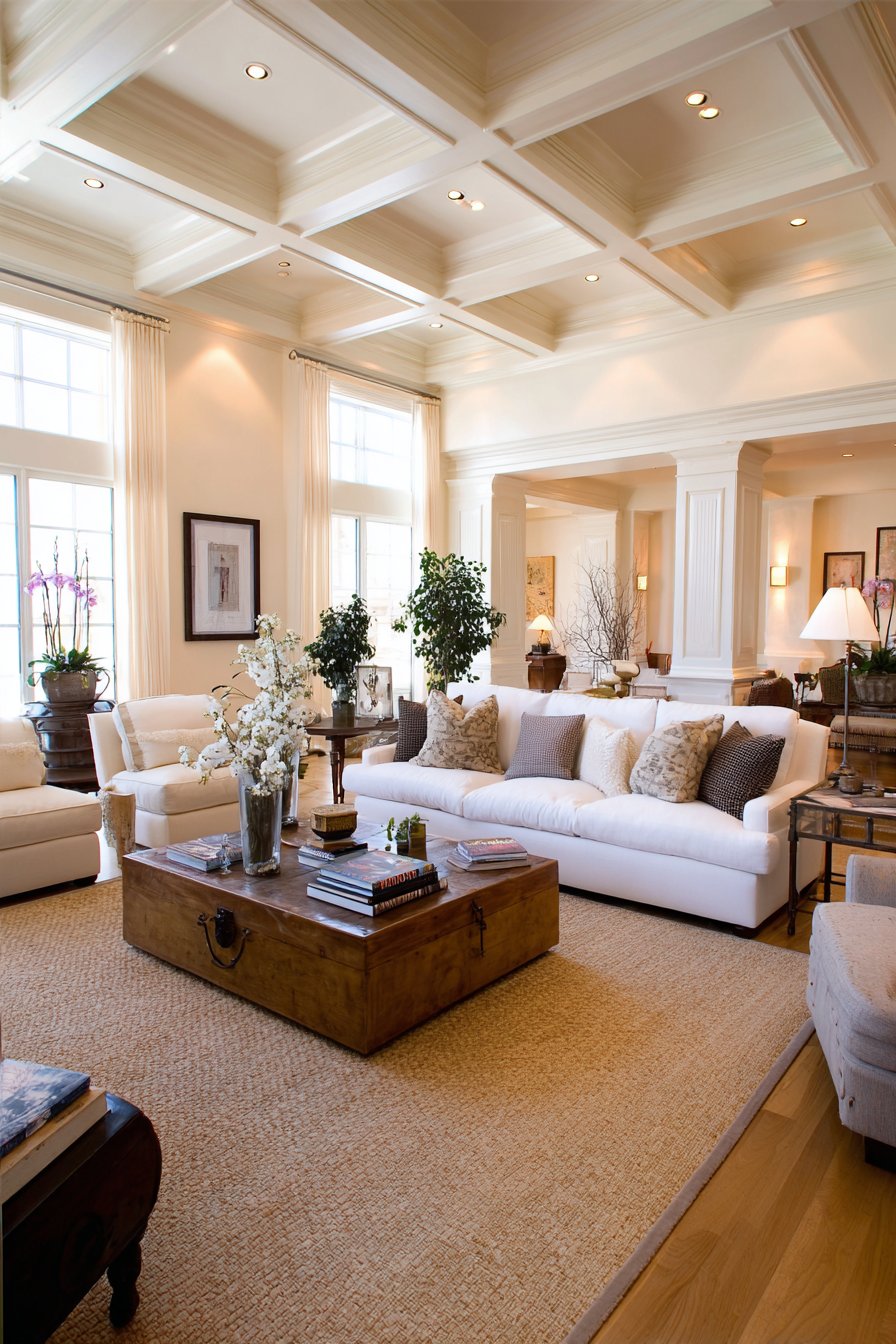
Coffered ceilings represent classical architectural elegance through their intricate grid patterns of recessed square panels bordered by substantial beams. Each coffer measuring approximately three feet square creates perfect proportion that satisfies the eye while establishing rhythmic repetition across the ceiling plane. The detailed trim work framing each recessed section demonstrates craftsmanship and attention to detail characteristic of traditional design. Painted in warm off-white tones, the beams and panel frames create subtle contrast with the recessed areas, which feature gentle texture that adds depth without competing with the grid pattern. This dimensional treatment transforms a flat ceiling into an architectural feature worthy of admiration.
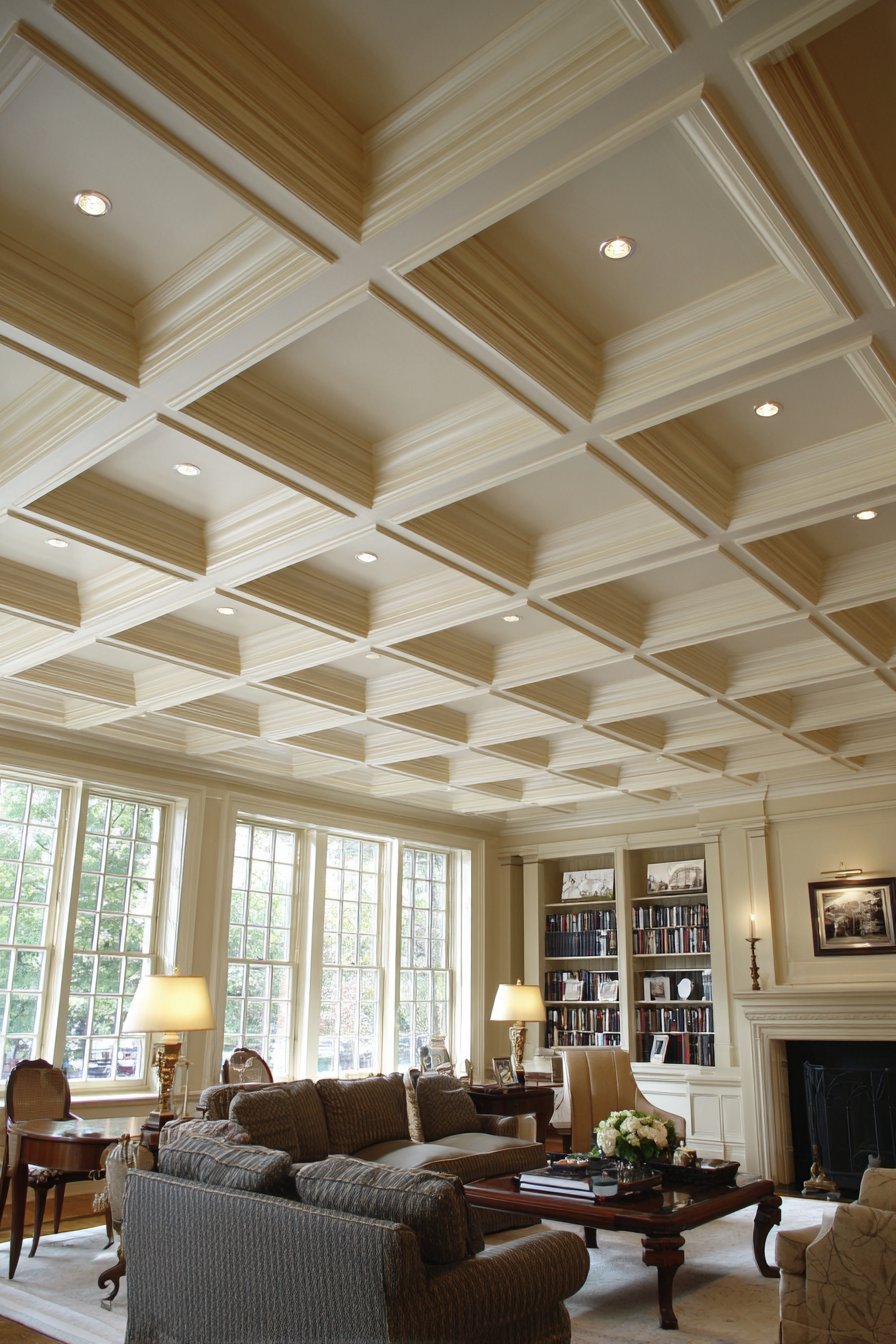
The strategic placement of small recessed lights centered in alternating coffers provides functional illumination while respecting the classical design. This lighting approach avoids the common mistake of over-illuminating coffered ceilings, which can flatten their dimensional quality and eliminate the beautiful interplay of light and shadow that makes them special. By lighting only selected coffers, the design maintains the pattern’s visual interest while ensuring adequate overall illumination. The recessed lights cast subtle glow upward into each coffer, highlighting the detailed trim work and creating gentle shadows along the beam edges that emphasize the ceiling’s three-dimensional architecture.
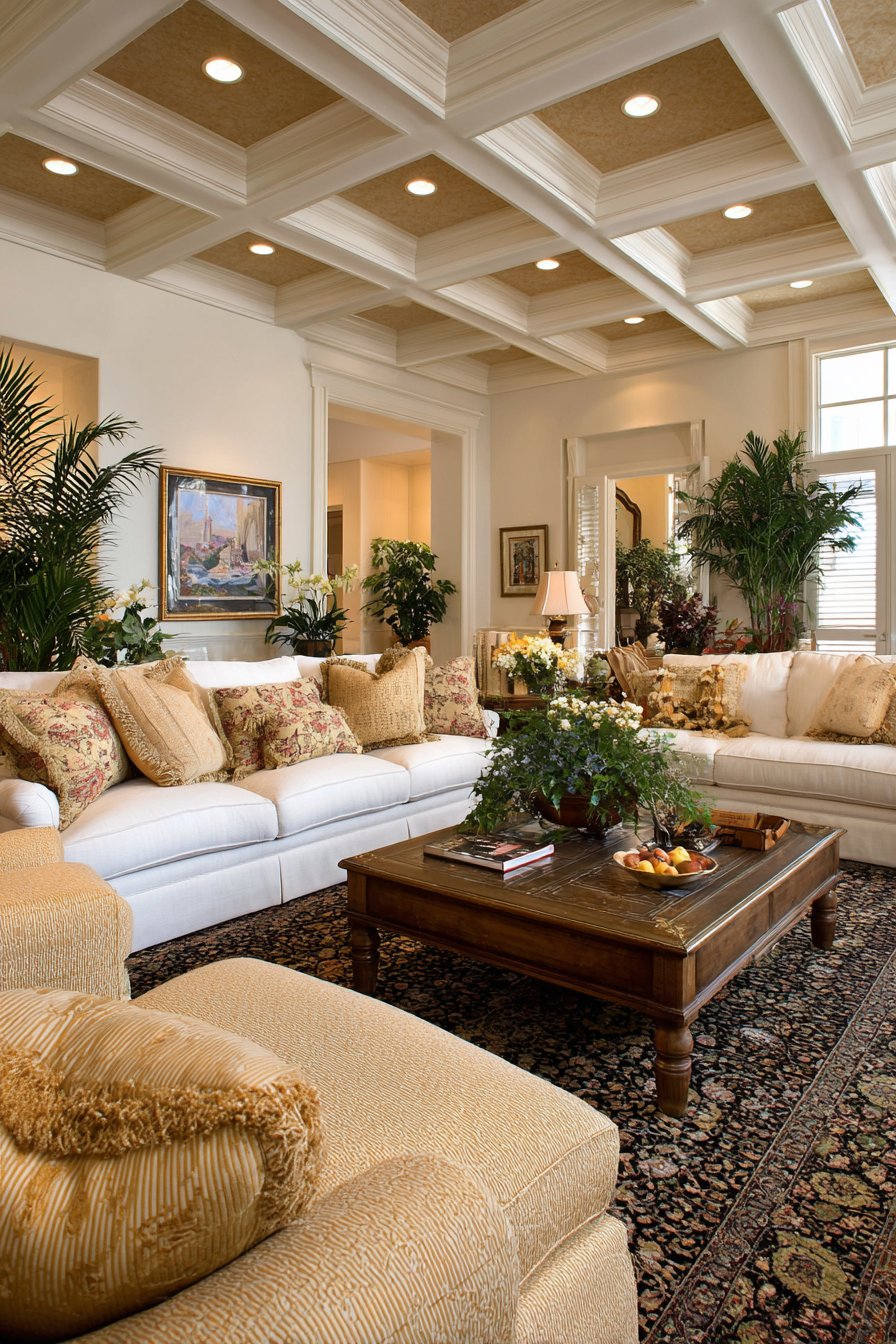
Coffered ceilings work particularly well in formal living rooms and dining rooms where traditional design sensibilities prevail. The structured formality of the grid pattern complements classic furniture styles and refined material choices. The ceiling’s complexity and visual weight require substantial room proportions—attempting this treatment in spaces with low ceilings or small square footage would create an overwhelming effect. When properly scaled to the room, however, coffered ceilings add grandeur and importance that elevate the entire space. The treatment demonstrates commitment to architectural detail and quality craftsmanship that was once standard in fine homes but has become increasingly rare in contemporary construction.
Key Design Tips: Ensure ceiling height is at least nine feet before considering coffered treatment—lower ceilings will feel oppressively heavy. Design coffer size proportional to room dimensions using approximately 10-15% of the room’s width as a guideline for individual coffer dimensions. Create detailed shop drawings before construction to ensure proper alignment and consistent dimensions throughout the grid. Use lightweight materials like medium-density fiberboard (MDF) for trim elements to reduce structural load while maintaining crisp details. Prime all surfaces thoroughly before painting to achieve uniform color and sheen. Consider faux beam construction using U-shaped channels that fit over ceiling furring strips for easier installation than solid beams. Work with experienced carpenters—coffered ceiling installation requires precision and skill to achieve professional results.
7. Industrial Exposed Brick Vault Architecture
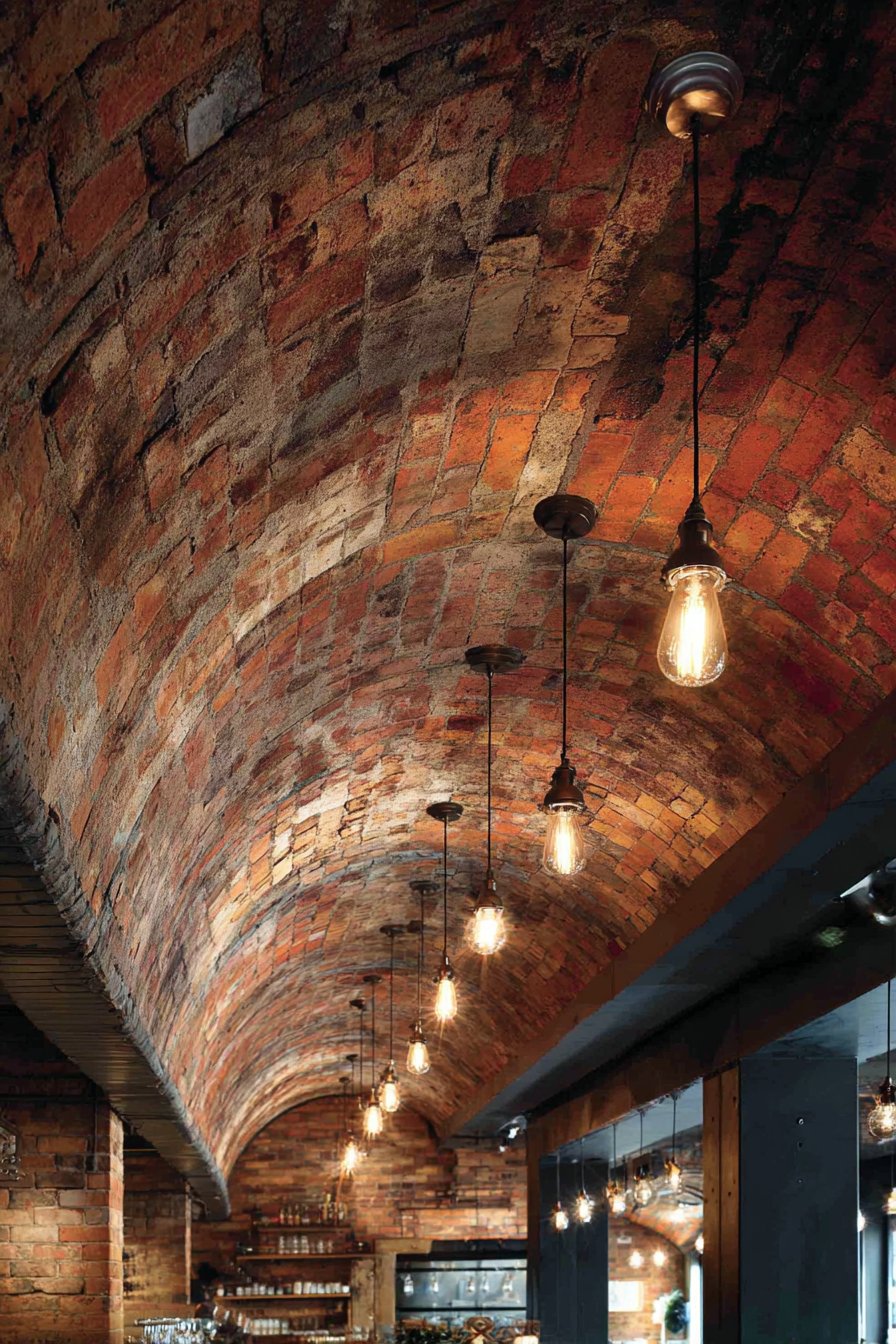
Converted loft spaces gain extraordinary character through preserved brick vault ceilings that showcase industrial heritage and architectural history. The curved brick ceiling features original red clay bricks laid in an arched pattern, displaying natural color variations and aged patina accumulated over decades or even centuries. This authentic architectural element cannot be replicated through new construction—the weathered appearance, subtle imperfections, and historical character result from genuine age and use. The curved vault form creates compelling spatial dynamics that differ dramatically from flat ceilings, establishing a sense of enclosure and intimacy despite the typically expansive floor plans found in loft conversions.
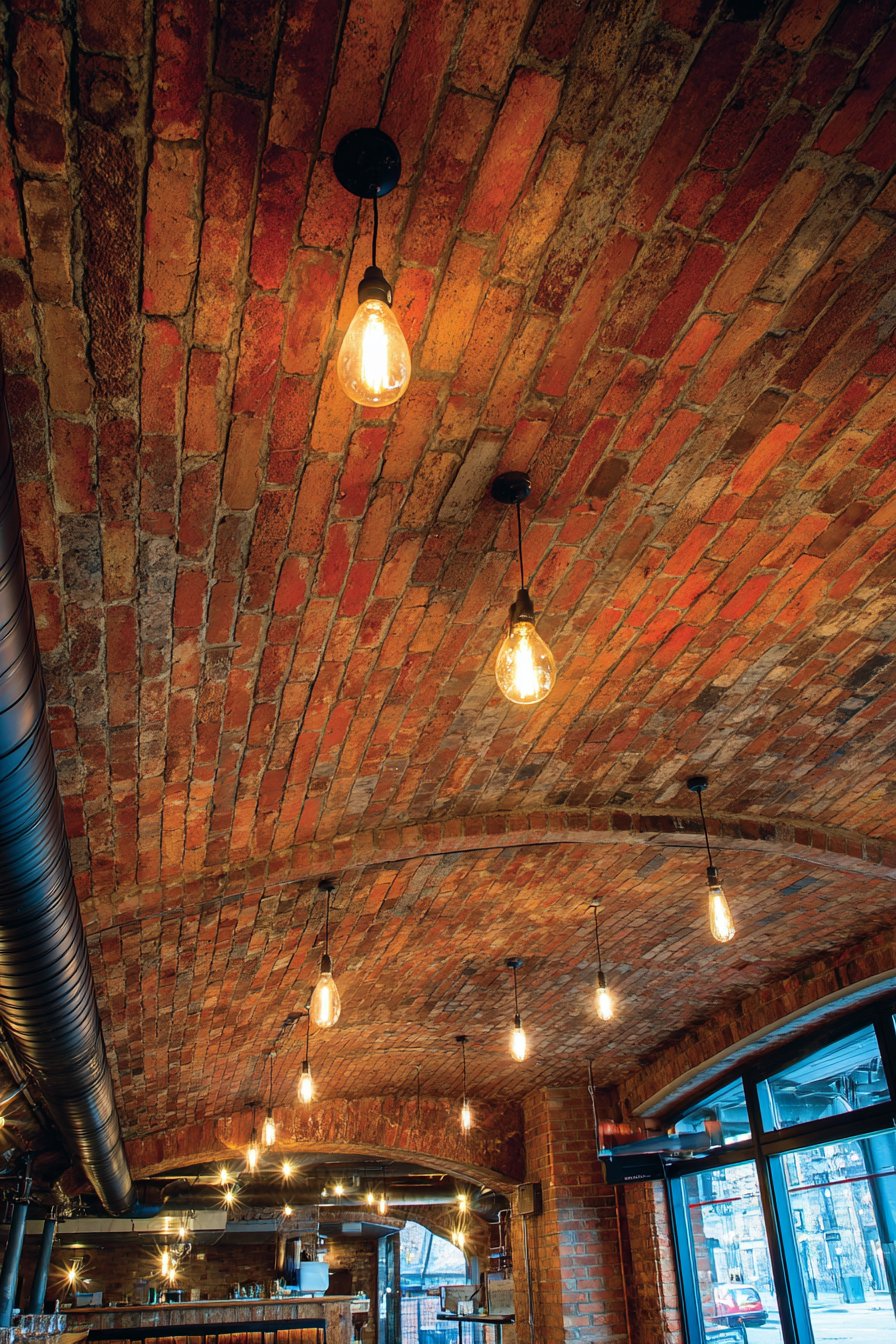
Industrial-style pendant lights featuring Edison bulbs honor the space’s heritage while providing practical illumination. These fixtures hang at varied heights throughout the space, creating visual interest through their asymmetric arrangement while avoiding the rigid formality of perfectly aligned lighting. The warm amber glow from Edison bulbs beautifully complements the brick’s reddish tones, highlighting texture details and the individual characteristics of each brick. The combination of brick and industrial lighting creates atmospheric warmth despite the urban warehouse setting. Exposed ductwork running along one side of the ceiling, painted in matte black, adds to the authentic industrial aesthetic rather than detracting from it—these utilitarian elements become design features when left visible and properly finished.
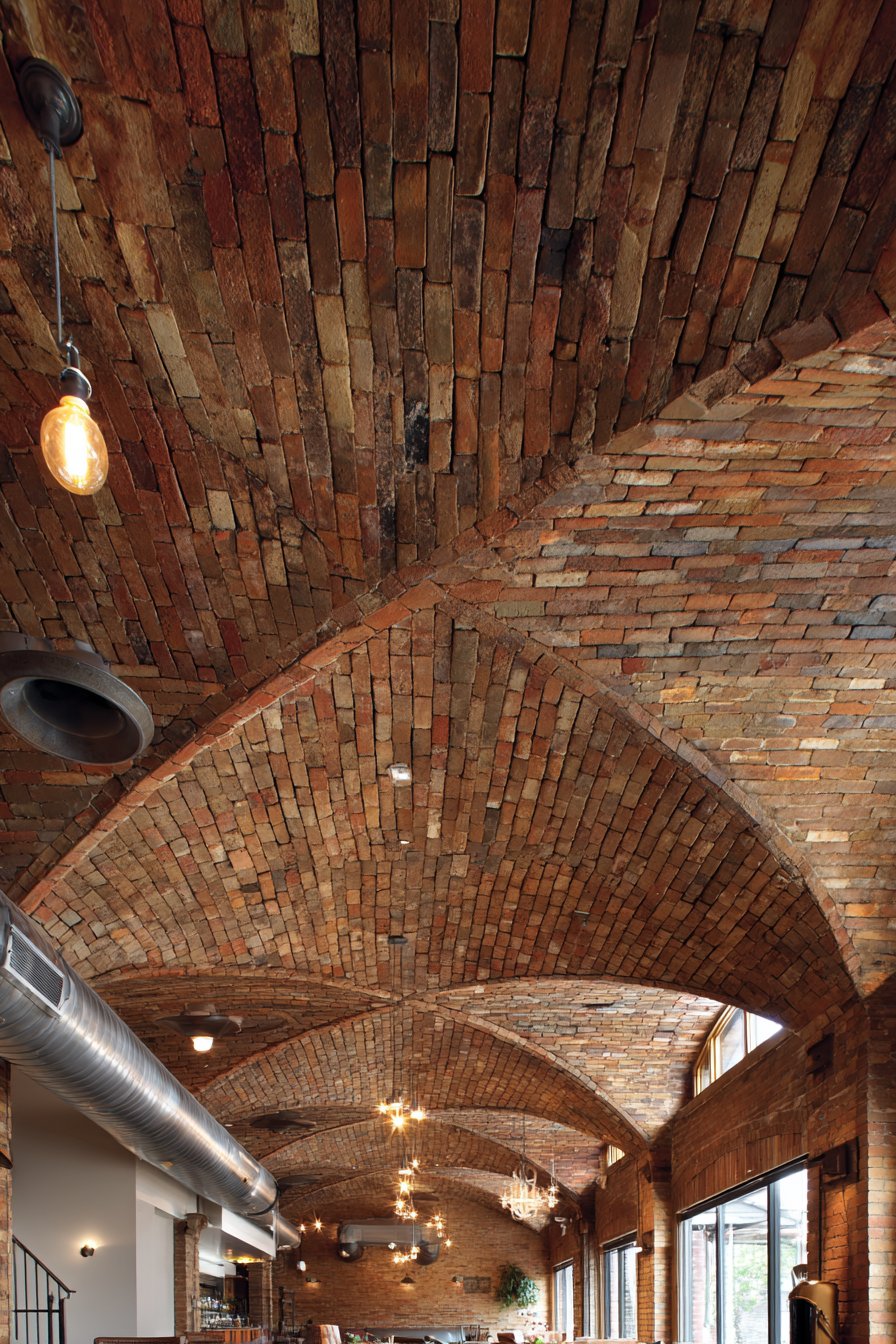
The preserved brick ceiling establishes immediate connection to the building’s history and original purpose, creating a sense of place and authenticity impossible to achieve with new construction or surface treatments. Modern furnishings below provide deliberate contrast with the historic ceiling, creating temporal dialogue between past and present. This juxtaposition exemplifies successful adaptive reuse where historical elements are preserved and celebrated while contemporary additions meet modern living requirements. The brick vault becomes a conversation piece that grounds the space in its industrial roots while the contemporary furniture and finishes demonstrate how the space has evolved to serve new purposes.

Key Design Tips: Have brick professionally inspected to ensure structural integrity before preserving as a design element. Clean exposed brick gently using specialized masonry cleaning products—avoid harsh pressure washing that can damage aged brick and mortar. Apply breathable masonry sealer to protect against moisture and dust while preserving the brick’s natural appearance. Install moisture barriers between the brick and any insulation to prevent condensation issues. Plan lighting carefully to highlight the brick’s texture—uplighting and grazing light across the surface emphasizes dimensional quality. Consider consulting with historical preservation specialists if the building has landmark status or historical significance. Address any mortar deterioration through proper repointing before sealing the surface.
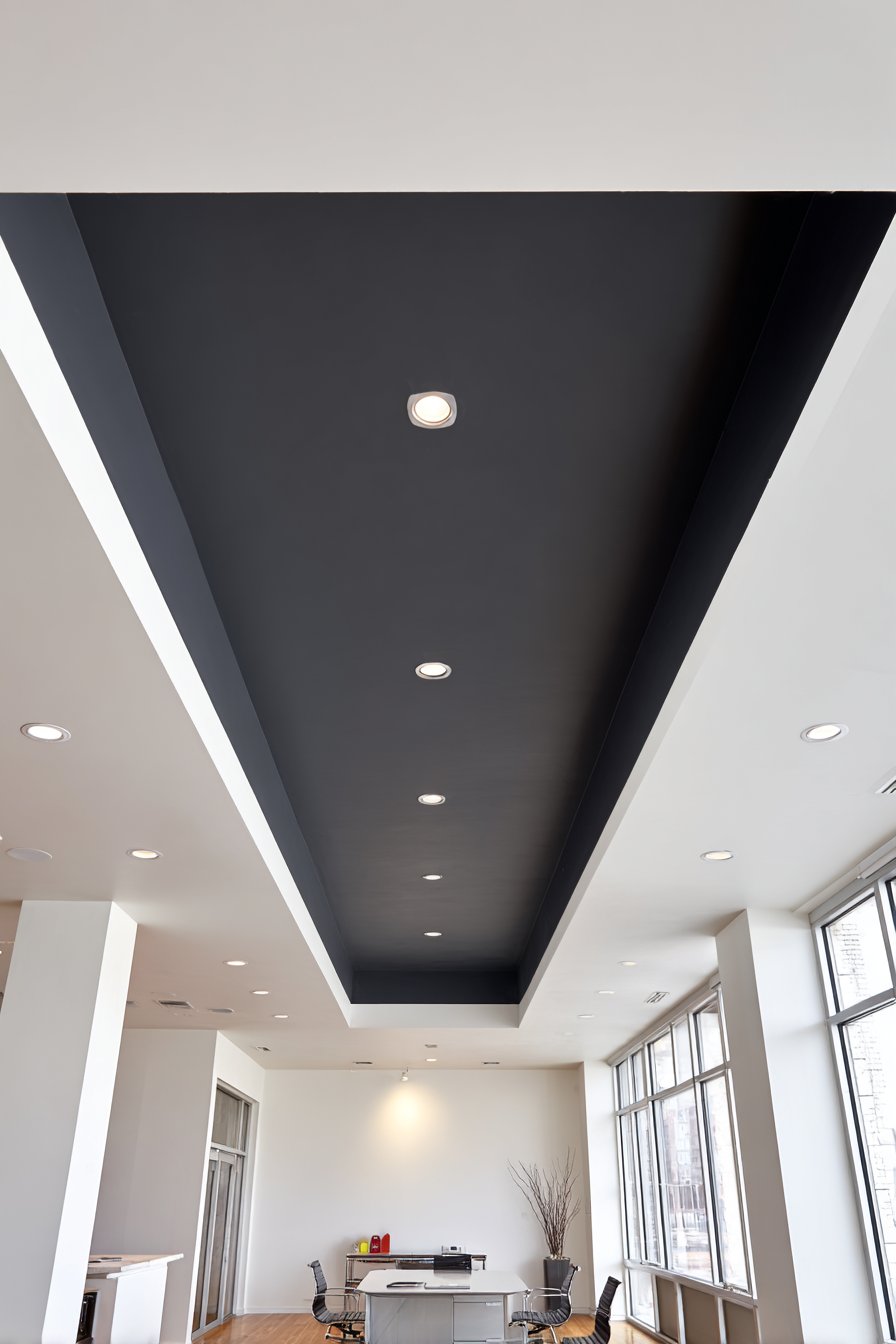
8. Modern Two-Tone Geometric Frame
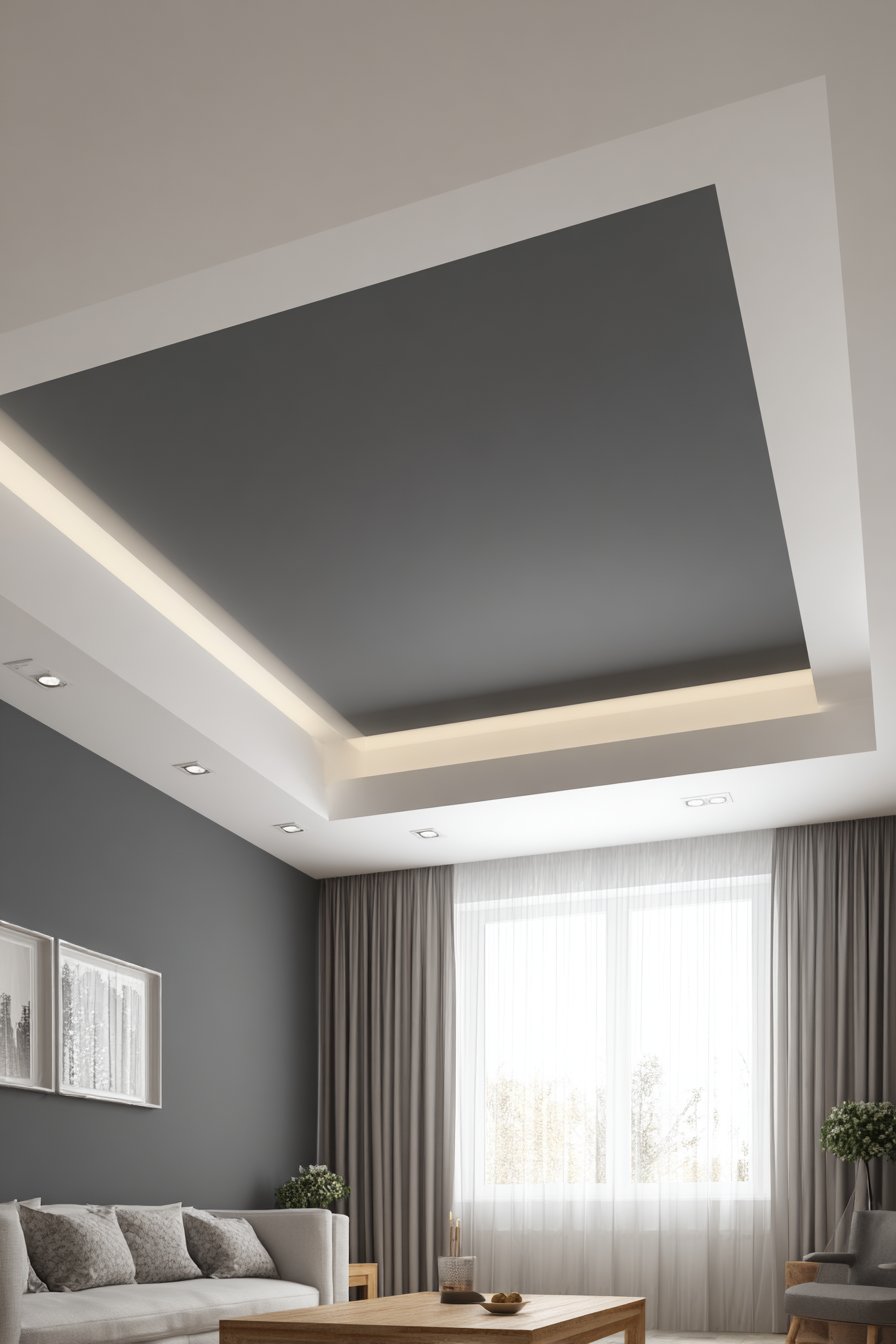
Contemporary ceiling design embraces bold color blocking through dramatic two-tone treatments that create geometric visual interest. A deep charcoal gray central section contrasted with a wide bright white perimeter border establishes strong graphic impact that transforms the ceiling into a deliberate design statement. This approach works particularly well in modern home offices where creative visual elements can inspire productivity and demonstrate design confidence. The crisp transition between colors requires precise painting technique to maintain clean geometric lines without bleeding or feathering. This sharp definition between dark and light creates the frame effect that gives the treatment its visual power.
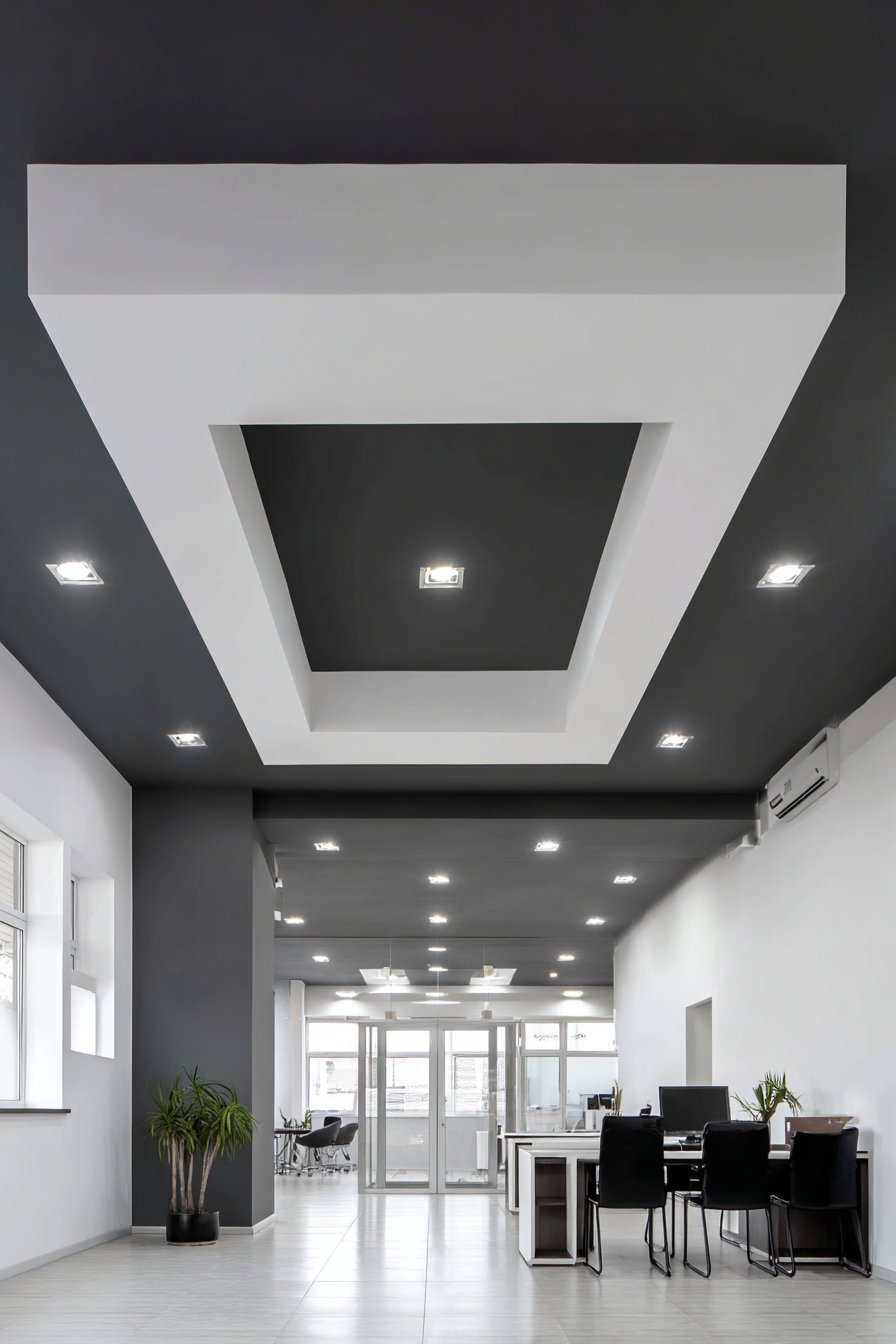
Recessed lighting installed in the white border directs illumination toward the darker central section, creating subtle contrast that prevents the dark ceiling from absorbing too much light and making the space feel gloomy. This strategic lighting placement demonstrates how technical considerations must support aesthetic choices—the dramatic dark ceiling requires thoughtful illumination to remain successful. The light directed at the charcoal center creates gentle gradations of brightness that add depth and prevent the color from appearing flat. During evening hours when artificial lighting dominates, the ceiling takes on different character as the recessed lights create glowing borders that frame the dark central field.
The two-tone ceiling treatment provides visual definition in open-plan spaces where walls may not clearly delineate different functional zones. By painting the ceiling above the home office area differently than adjacent spaces, the design creates psychological separation even when physical barriers don’t exist. This approach works well in contemporary homes where open floor plans are desired but some sense of room definition remains necessary. Minimalist furnishings below allow the bold ceiling to take center stage without creating visual competition. The restrained furniture selection demonstrates good design judgment—when one element makes a strong statement, other components should recede to maintain visual harmony.
Key Design Tips: Use painter’s tape specifically designed for crisp lines, and remove it while paint is still slightly damp to prevent peeling. Apply two coats of each color for complete coverage and color saturation. Paint the white border first, then tape and paint the darker center to simplify the process. Choose paint with identical sheen in both colors to maintain consistency—mixing matte and glossy finishes creates unwanted contrast. Test the color combination in the actual space before committing, as ceiling colors appear different than wall colors due to lighting angles. Consider the ceiling height when selecting dark colors—lower ceilings may feel oppressive with dark overhead surfaces. Use low-VOC paints for interior spaces, especially home offices where air quality impacts productivity and wellbeing.
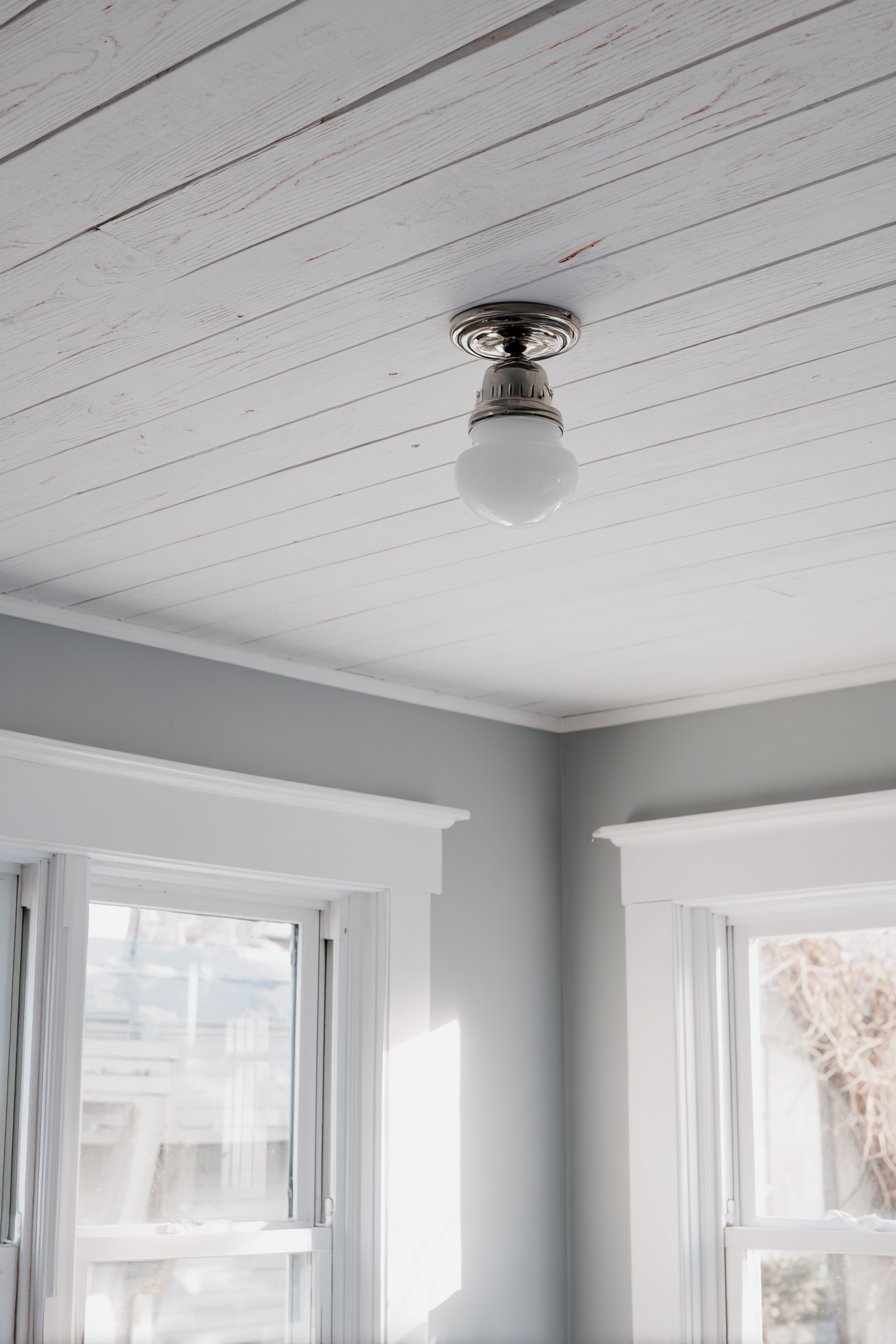
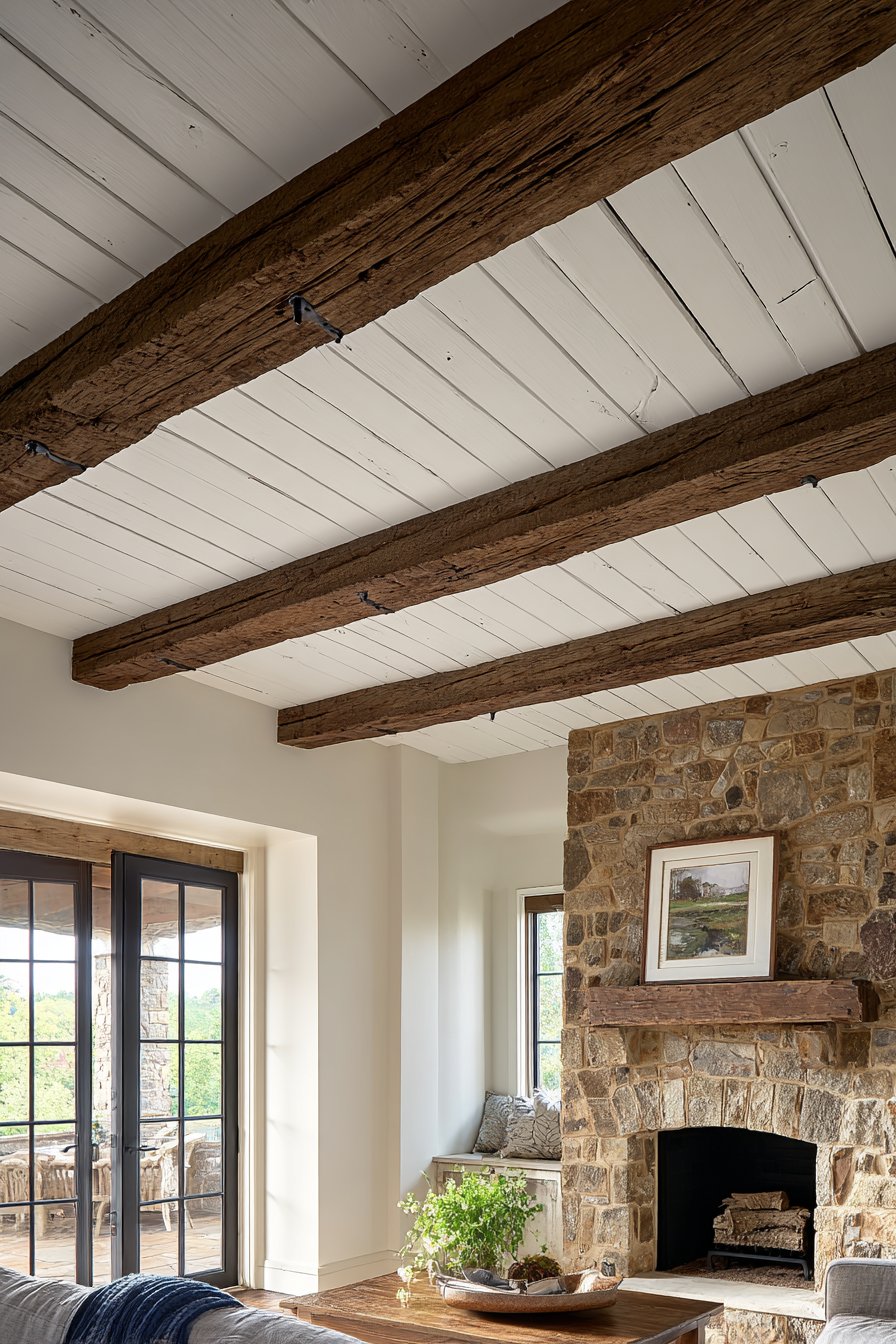
9. Farmhouse Shiplap Texture and Warmth
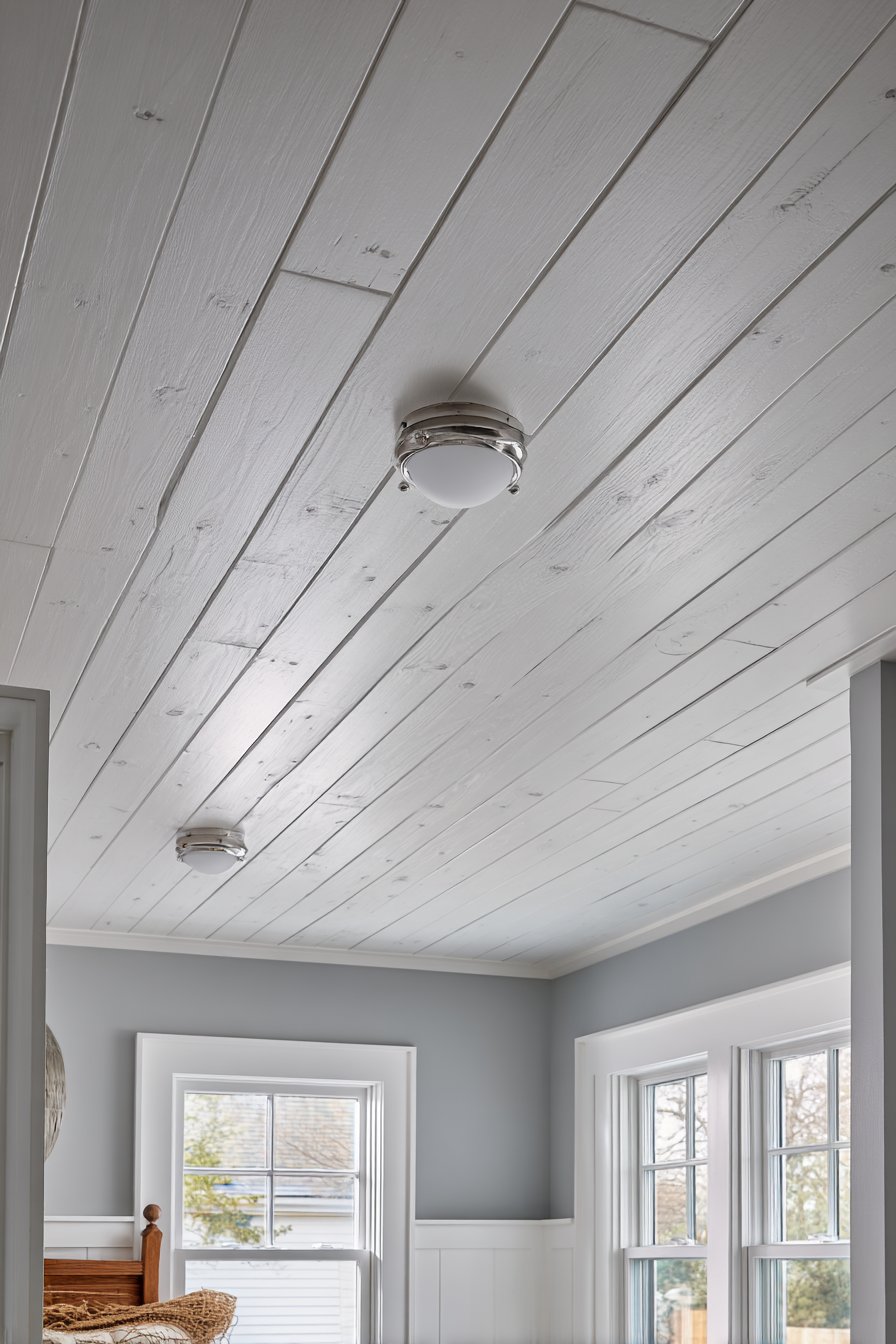
Horizontal shiplap ceiling planks painted in soft white bring casual farmhouse elegance to bedroom spaces while adding textural interest through the subtle gaps between boards. These characteristic shadow lines create dimensional quality that distinguishes shiplap from smooth drywall or plaster surfaces. The planks run perpendicular to the room’s length, creating visual lines that can make spaces feel wider or longer depending on installation direction. This simple yet effective treatment demonstrates how classic architectural elements can enhance contemporary farmhouse interiors without overwhelming them. The white painted finish maintains brightness while the wood grain texture visible through the paint adds organic character.
The installation reveals practical considerations essential to successful shiplap ceilings. Proper spacing between boards is critical—gaps too narrow fail to create the characteristic shadow lines, while excessive spacing looks unfinished and allows too much darkness to show between boards. The standard 1/8-inch gap provides optimal visual definition while maintaining a cohesive appearance. A simple semi-flush mount light fixture in brushed nickel centers the ceiling, providing functional illumination without competing with the architectural treatment. The fixture’s understated design allows the shiplap to remain the focal point while providing necessary lighting for bedroom activities.
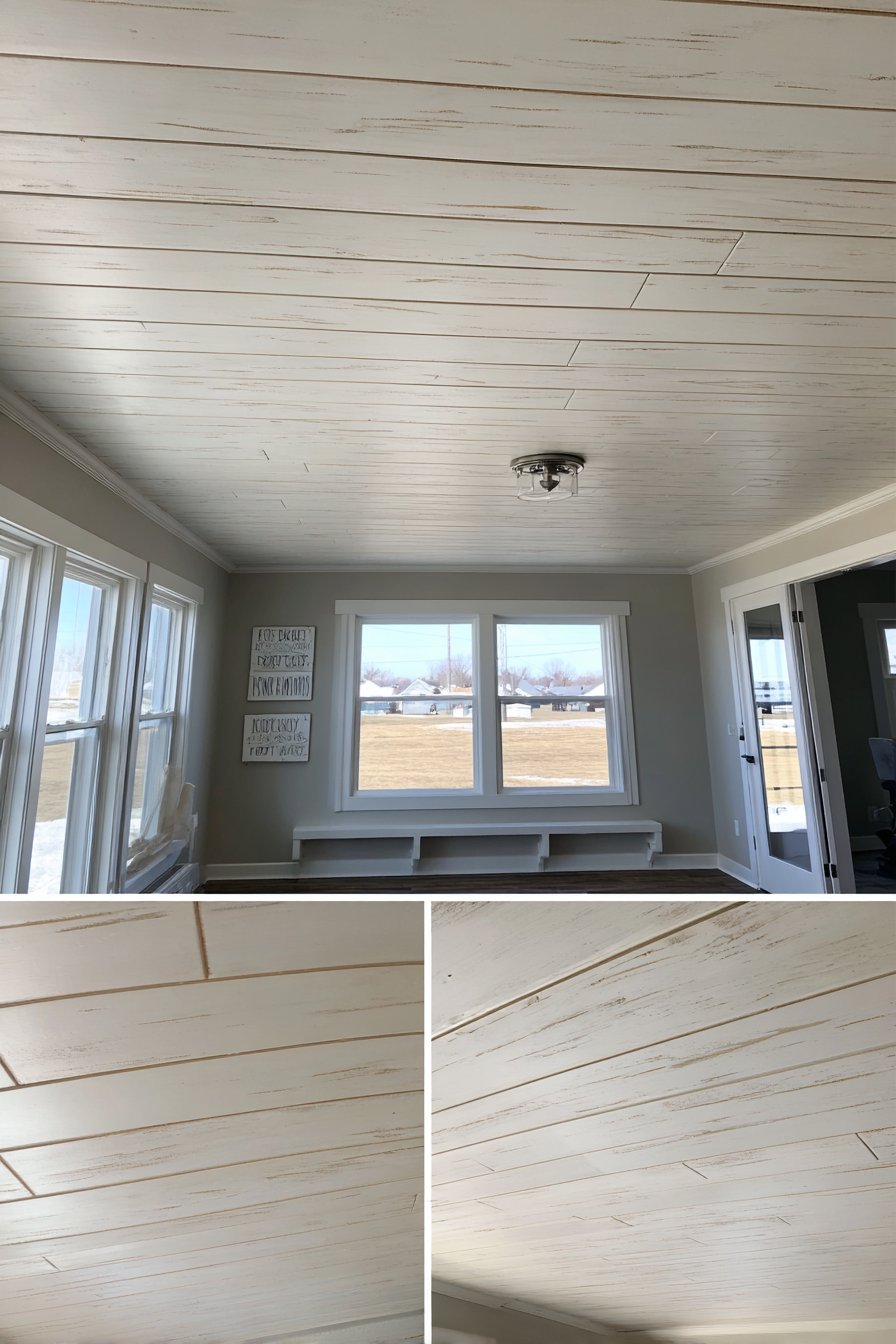
Natural daylight streaming through windows highlights the linear texture and creates shifting shadow patterns throughout the day that animate the ceiling surface. This changing quality prevents the treatment from becoming static or boring—the interplay of light and shadow ensures the ceiling looks different at various times of day and in different lighting conditions. The white shiplap contrasts effectively with warm gray walls, creating color relationship that feels both modern and timeless. This combination exemplifies the farmhouse aesthetic’s ability to blend historical elements with contemporary color palettes, creating spaces that feel collected and comfortable rather than overly styled or precious.
Key Design Tips: Use actual wood shiplap rather than vinyl alternatives for authentic appearance and better paint adhesion. Acclimate wood to room humidity for 48-72 hours before installation to prevent warping. Install perpendicular to ceiling joists when possible for maximum structural support. Use nickel spacers between boards to ensure consistent gap width throughout installation. Prime all boards before installation, then apply final paint coats after installation to seal joints. Consider board width proportional to room size—wider boards suit larger rooms while narrow boards work better in compact spaces. Paint ceiling first if adding shiplap to existing painted ceilings, allowing any drips to be covered by new installation. Use pneumatic nail guns with finish nails for efficient installation that minimizes visible fasteners.
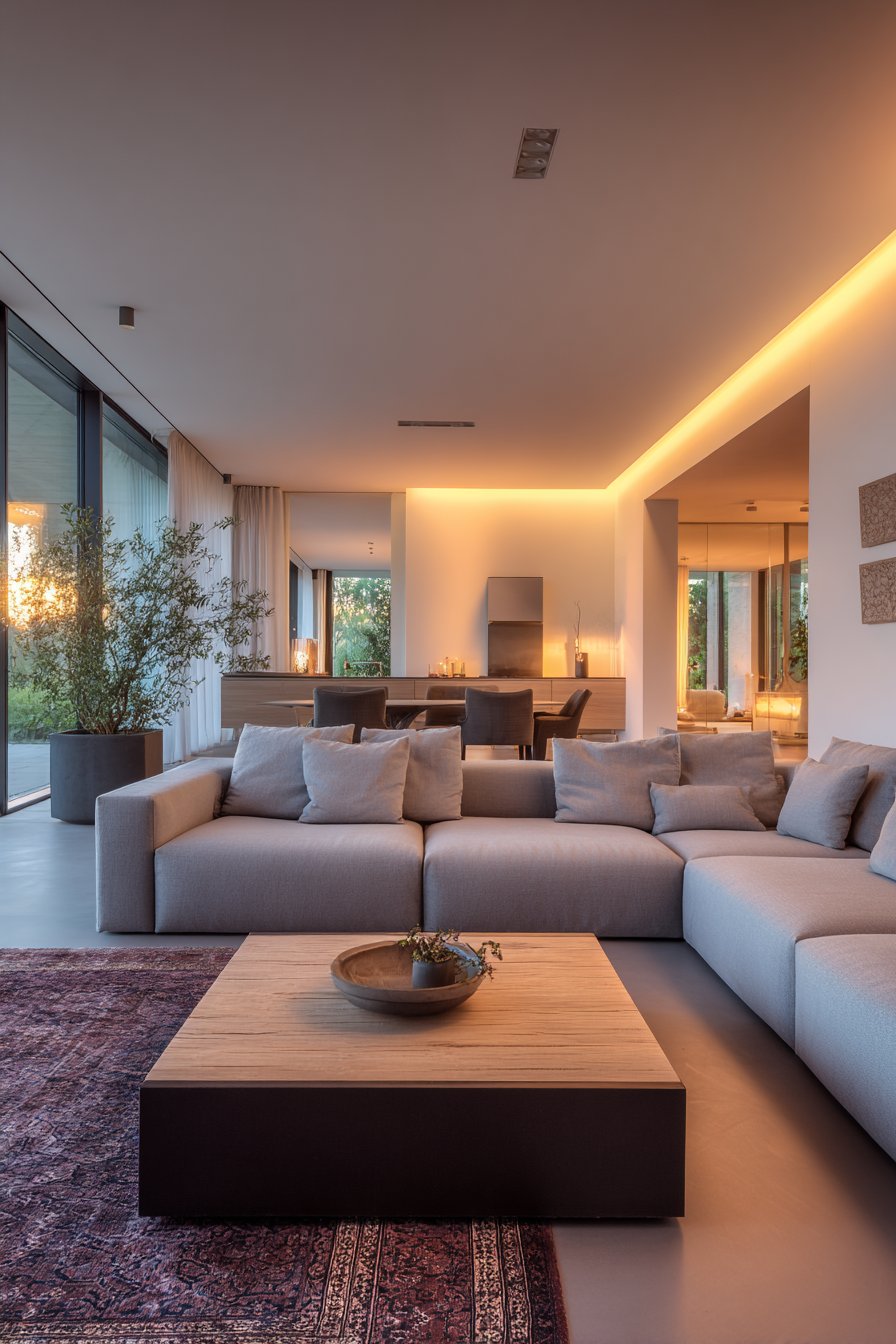
10. Ambient Perimeter LED Lighting Innovation

Modern ceiling lighting transcends traditional fixtures through innovative indirect LED installations that create floating illumination effects. Concealed LED strips mounted in recessed channels running around the entire ceiling perimeter cast warm white light upward against the ceiling surface, creating ambient glow that appears to originate from nowhere. This architectural lighting approach eliminates visible fixtures while providing sophisticated illumination that enhances the room’s atmosphere. The main ceiling remains smooth and uninterrupted, painted in warm white that reflects and diffuses the LED light throughout the space. The effect becomes most dramatic during evening hours when natural light fades and the architectural lighting takes prominence.
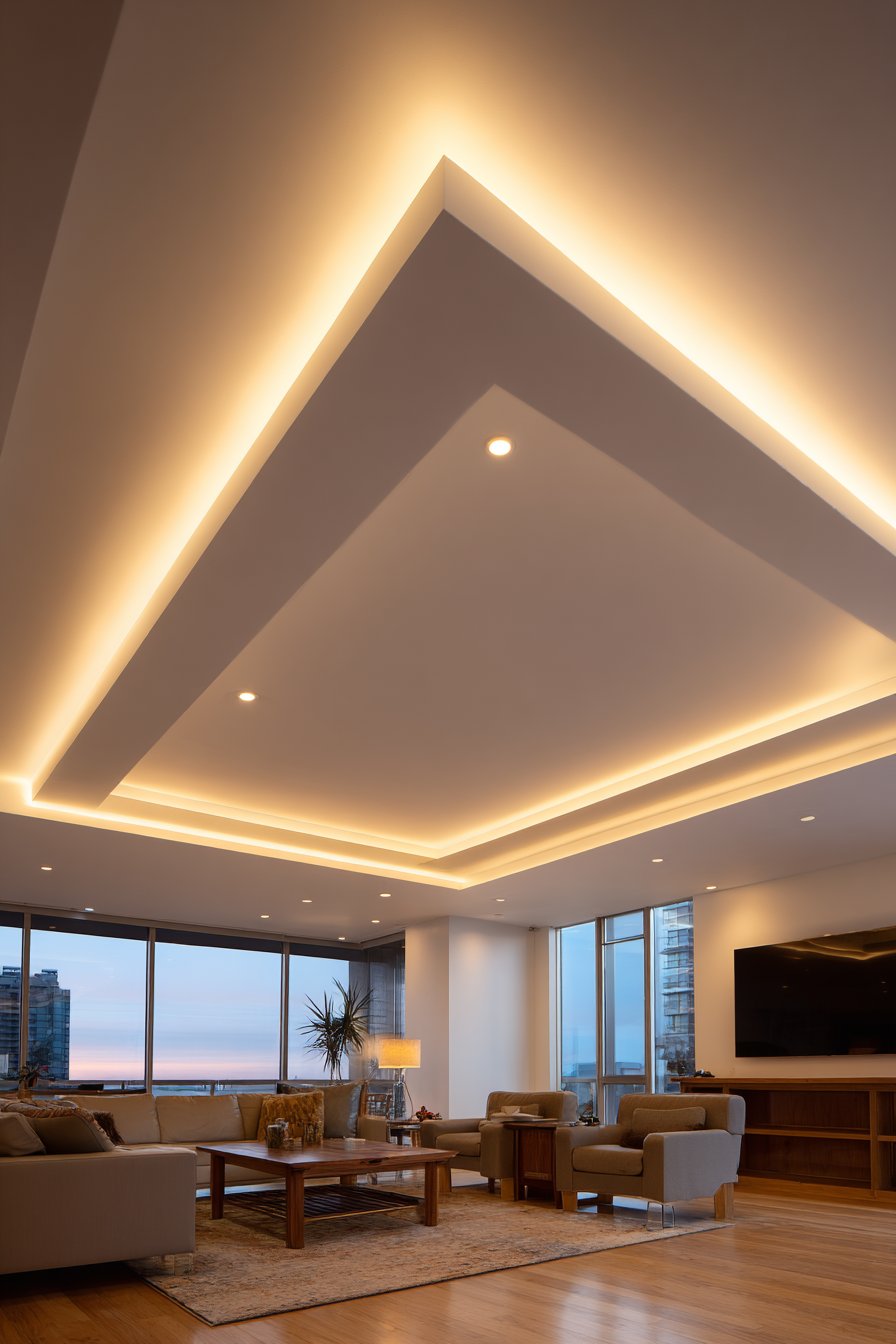
The technical execution of this lighting design requires careful planning during construction or renovation. The recessed channel must be precisely dimensioned to hide the LED strips while allowing their light to escape and wash across the ceiling surface. The channel depth, width, and position relative to the ceiling edge all impact the final lighting effect. When properly executed, the LED strips remain completely invisible while their light creates a soft, even glow that eliminates harsh shadows and creates comfortable ambient illumination. The warm white color temperature provides inviting atmosphere appropriate for living rooms and gathering spaces, while the dimmable nature of LED systems allows users to adjust lighting intensity for different activities and moods.

This contemporary lighting approach suits modern living rooms where clean lines and minimal visual clutter are priorities. The absence of visible light fixtures contributes to the streamlined aesthetic while the soft indirect lighting creates comfortable atmosphere perfect for relaxation and conversation. The architectural integration of lighting represents sophisticated design thinking where technical systems become invisible yet essential components of the overall aesthetic. During daytime hours, the ceiling appears as a simple white surface, while evening transformation reveals the hidden lighting system and its dramatic effect on the space’s ambiance.
Key Design Tips: Use high-quality LED strips rated for long lifespan to avoid premature failure in hard-to-access locations. Install strips on aluminum channels that provide heat dissipation and protect the LEDs. Specify warm white color temperature (2700-3000K) for residential applications—cooler temperatures create sterile atmosphere. Include dimmer switches to control light intensity for different activities and times of day. Paint the recessed channel interior white to maximize light reflection. Plan electrical runs during rough-in stage to avoid visible conduit or wiring. Consider smart home integration for convenient control and programming options. Install LED power supplies in accessible locations for future maintenance. Test the lighting effect before finishing surrounding surfaces to ensure desired results.
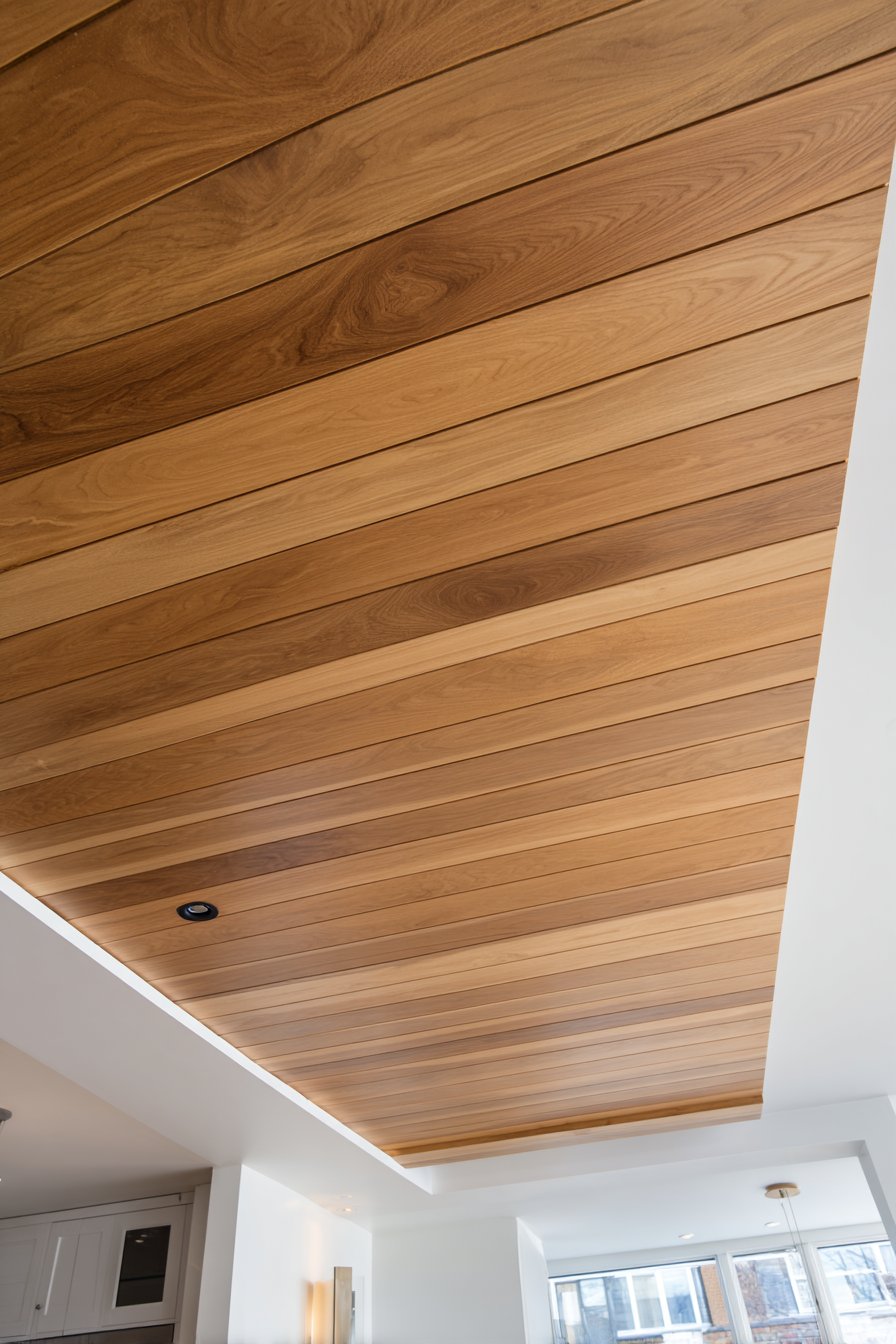
11. Natural Pine Tongue-and-Groove Beauty
Diagonal ceiling plank installations create dynamic visual movement through unexpected directional choices that distinguish them from standard parallel installations. Natural pine planks with clear finish preserve the wood’s honey tones and showcase distinctive grain patterns that make each board unique. Running these planks diagonally across a sunroom ceiling establishes energetic visual flow that draws the eye along the angular lines while creating sophisticated complexity. This installation choice requires additional material and more complex cutting but delivers visual impact that justifies the extra effort. The natural wood finish allows the material’s inherent beauty to shine while providing warm contrast to white-painted walls.
The integration of skylights between ceiling sections brings natural illumination into the space while creating interesting geometric breaks in the wood plank field. These glazed openings interrupt the diagonal pattern at strategic intervals, preventing visual monotony while serving the practical purpose of increasing daylight penetration. The relationship between wood ceiling and glass skylights creates appealing material contrast—the warm, solid wood complemented by transparent glazing that opens the room to sky views. Sunlight streaming through the skylights highlights wood grain variations, knots, and color shifts that occur naturally in pine, creating ever-changing patterns of light and shadow across the ceiling surface.
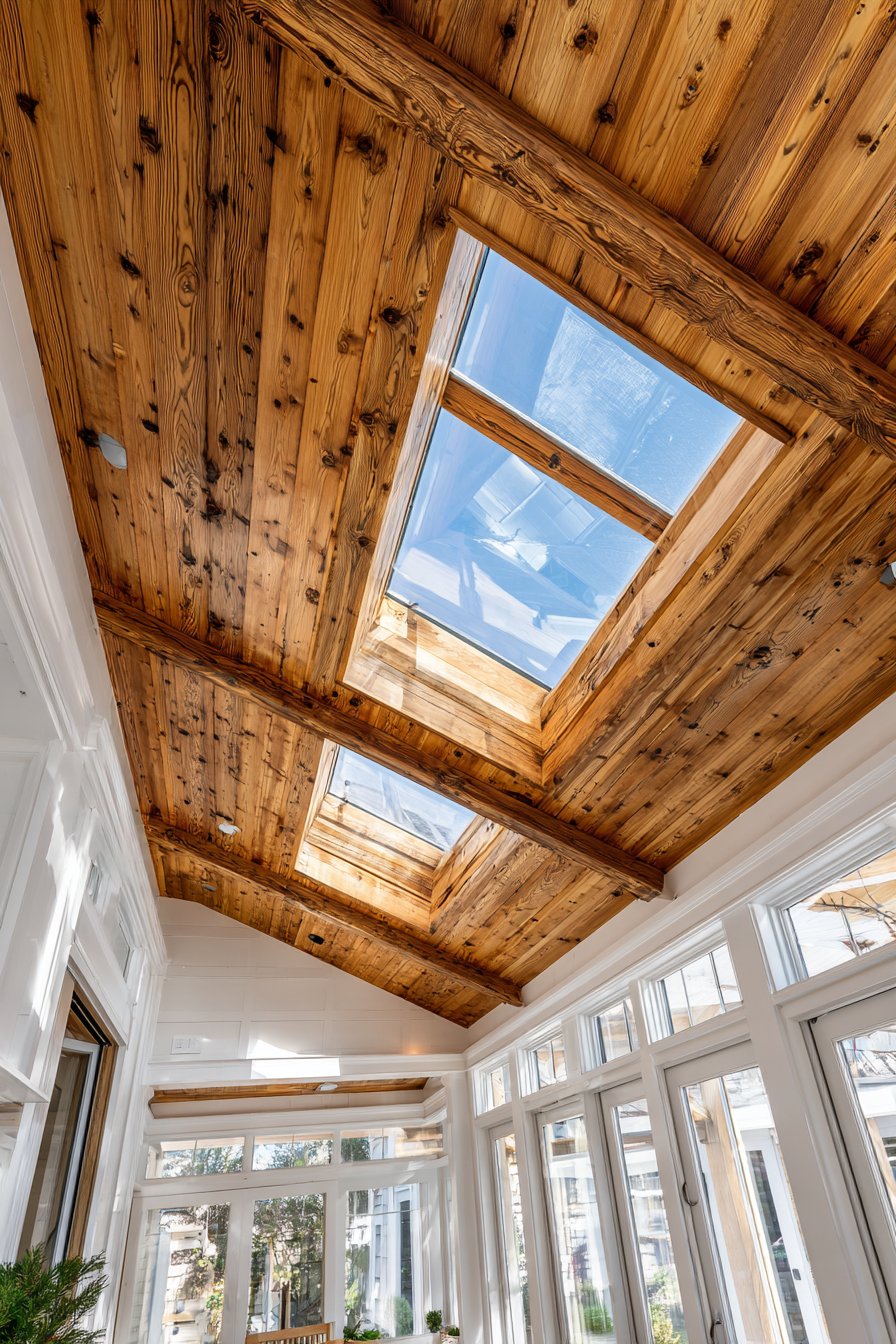
Sunrooms benefit particularly from wood ceiling treatments that bring nature-inspired materials into spaces dedicated to enjoying natural light and outdoor connections. The warm wood tones create psychological warmth that balances the potentially cool effect of expansive glass walls and windows. The diagonal orientation prevents the linear ceiling from reinforcing the room’s rectangular geometry, instead creating angular movement that adds visual interest and architectural distinction. Large windows surrounding the space ensure the wood ceiling doesn’t make the sunroom feel enclosed or dark—abundant natural light keeps the space bright and airy despite the overhead wood treatment.
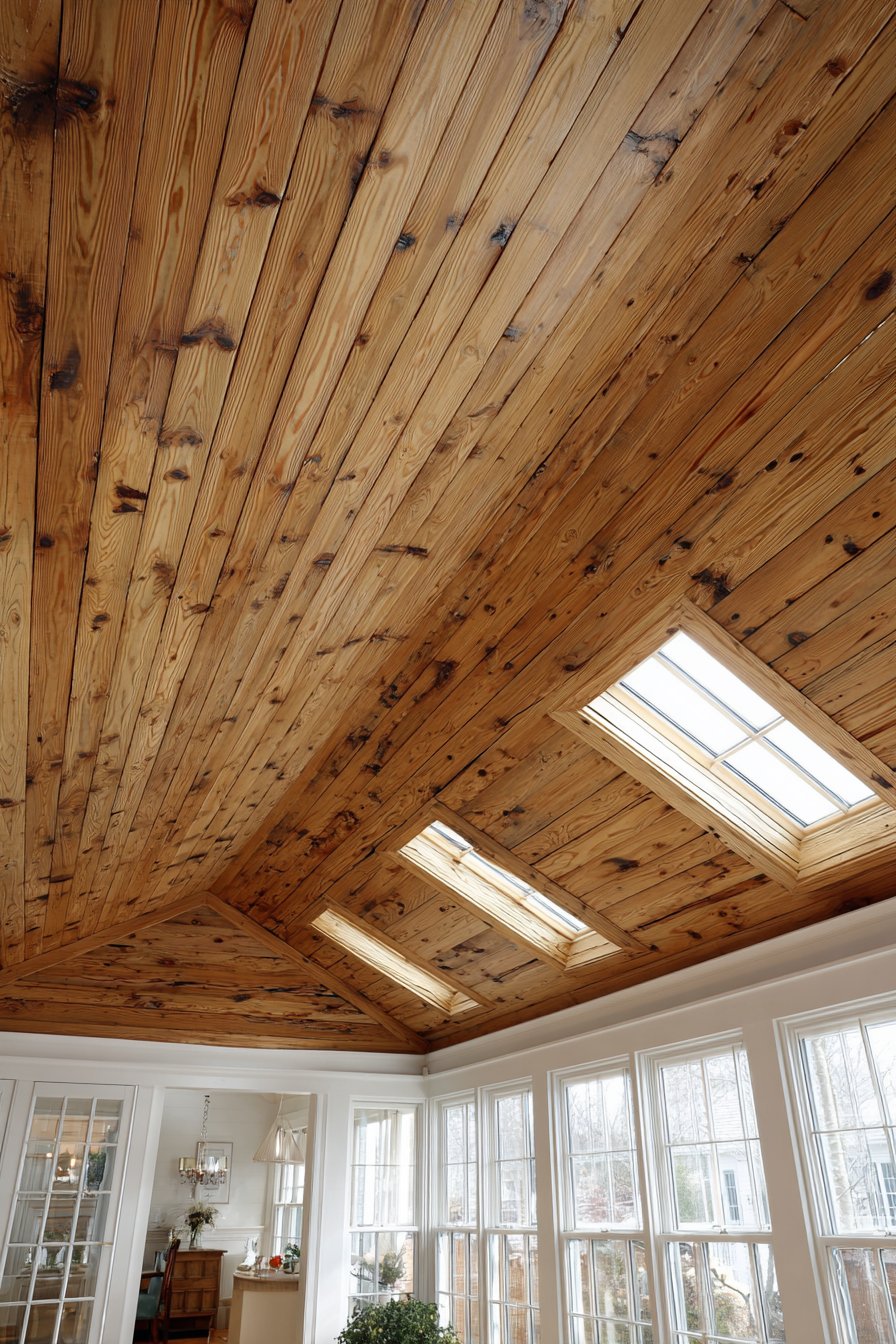
Key Design Tips: Calculate material requirements carefully for diagonal installations—waste factors increase significantly compared to parallel installations. Start installation from the room’s center and work outward to ensure symmetry and balanced board placement at edges. Use a clear penetrating finish rather than surface film finishes to maintain the wood’s natural texture and appearance. Apply multiple thin coats rather than fewer heavy coats for better penetration and more natural appearance. Address any knots with shellac-based primer before final finishing to prevent resin bleeding. Cut skylight openings precisely using proper framing to ensure weathertight integration. Consider tongue-and-groove flooring as ceiling material—it’s designed for visible installation and offers better appearance than standard framing lumber. Allow 1/4-inch expansion gaps at walls to accommodate wood movement with humidity changes.
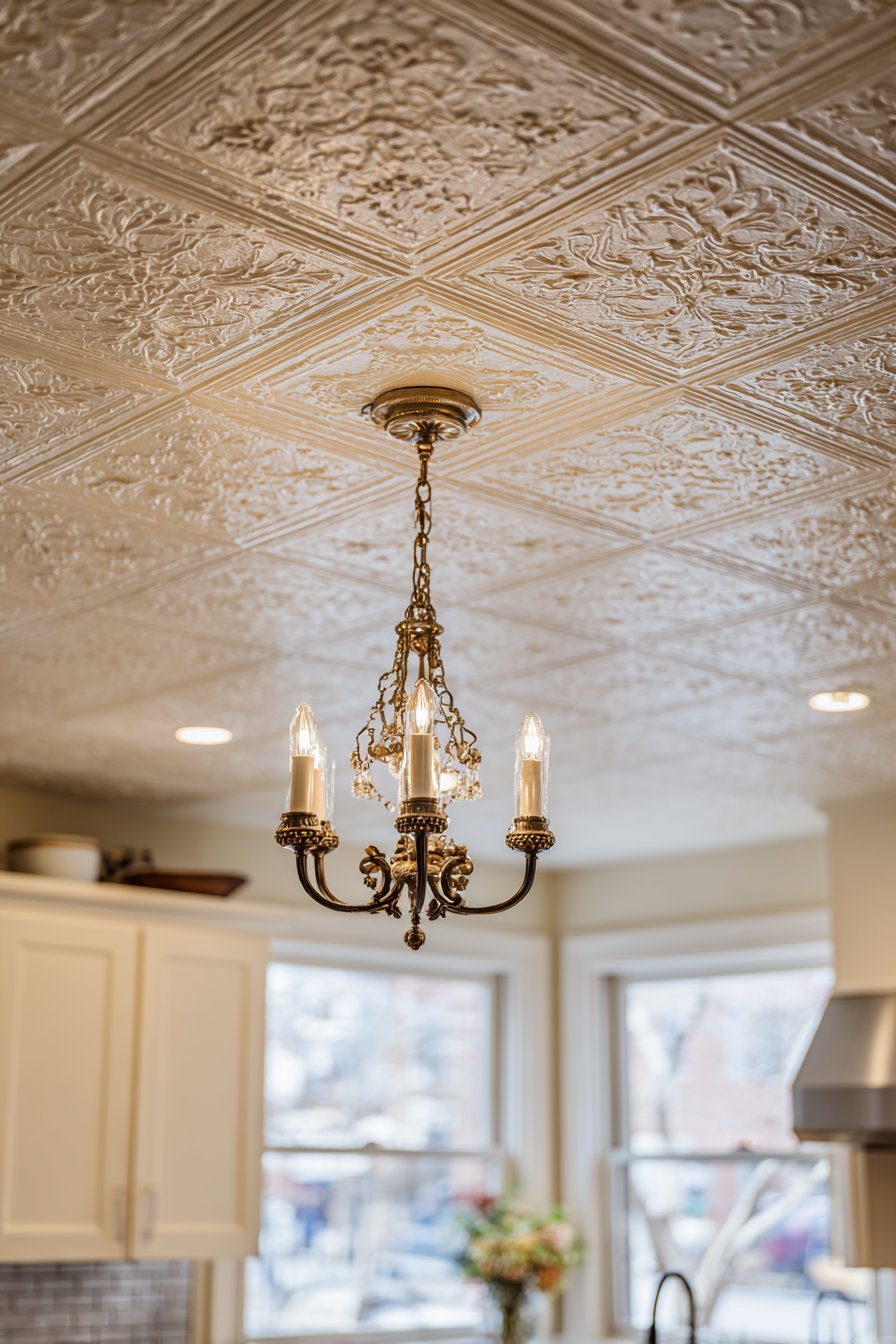
12. Victorian Pressed Tin Ceiling Romance
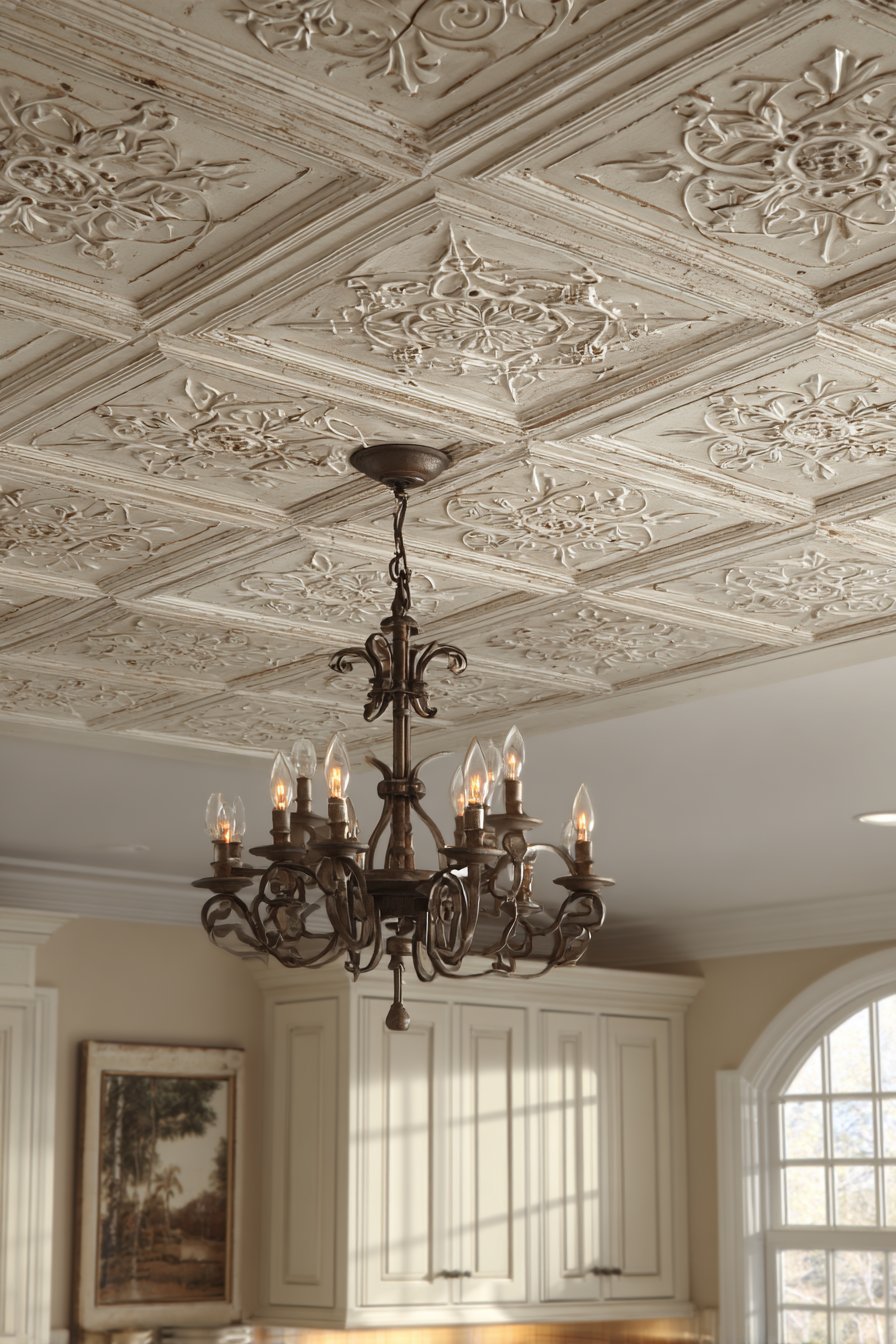
Decorative tin ceiling tiles introduce vintage charm through their embossed patterns that reference Victorian-era craftsmanship and ornate design sensibilities. Each pressed metal tile measures two feet square and features intricate floral and geometric designs that create rich visual texture overhead. The antique white paint application includes subtle distressing that reveals darker undertones in the recessed pattern areas, creating aged appearance that suggests historical authenticity. This finishing technique adds depth and shadow that emphasizes the three-dimensional quality of the embossed designs, preventing the tiles from appearing flat despite their metallic construction. The overall effect transports viewers to an earlier era when decorative ceilings were standard in quality homes.
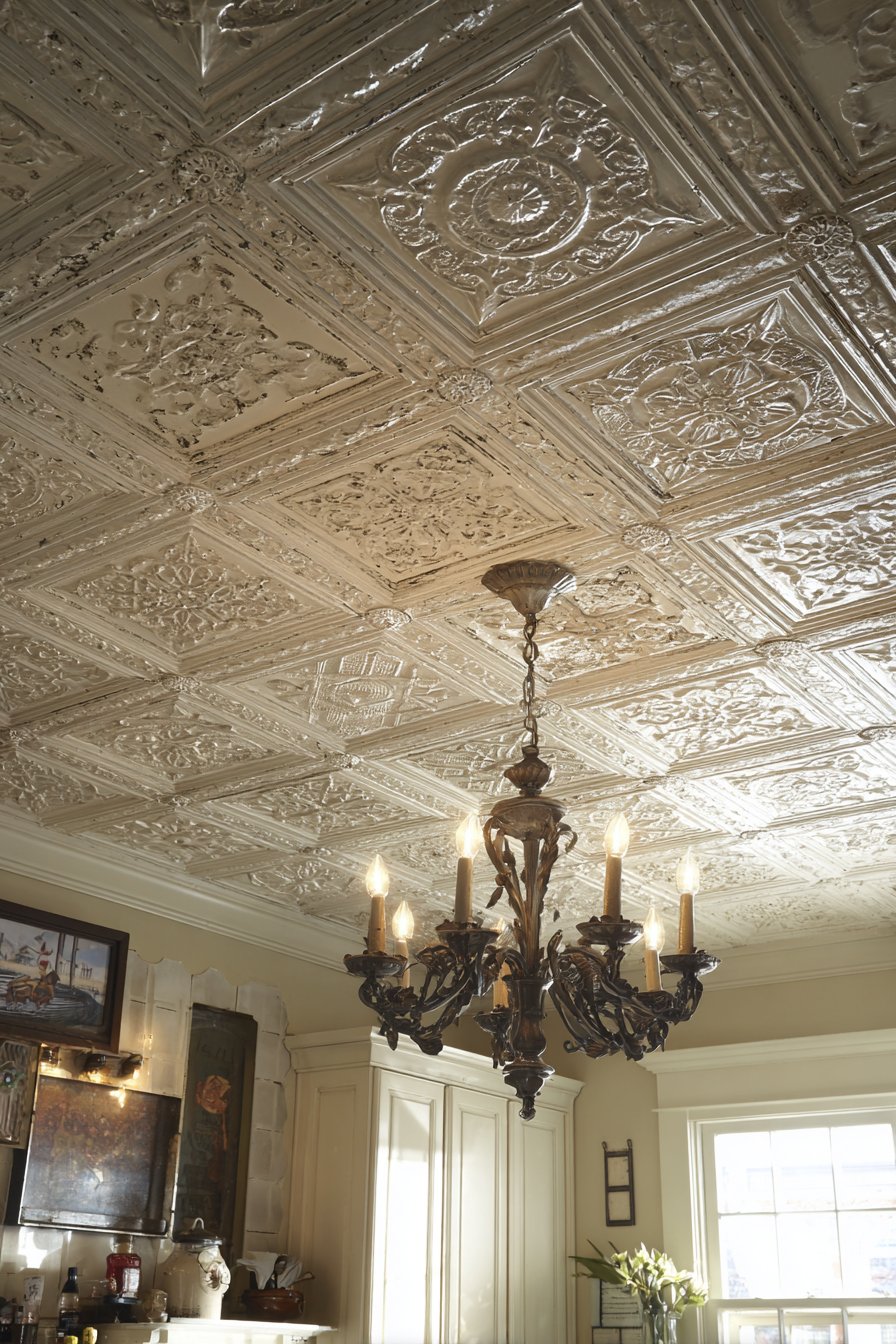
The installation in a vintage-inspired kitchen creates appropriate context for this historical ceiling treatment. Period-appropriate lighting, such as chandeliers or pendant fixtures with traditional design, reinforces the vintage aesthetic while providing necessary task illumination. The detailed ceiling pairs beautifully with Shaker-style cabinetry that shares the vintage sensibility without literal period replication. This combination demonstrates how different historical references can coexist successfully when they share similar values of craftsmanship and quality materials. The tin ceiling becomes the jewel of the room—a distinctive architectural feature that establishes character and provides conversation-worthy detail.
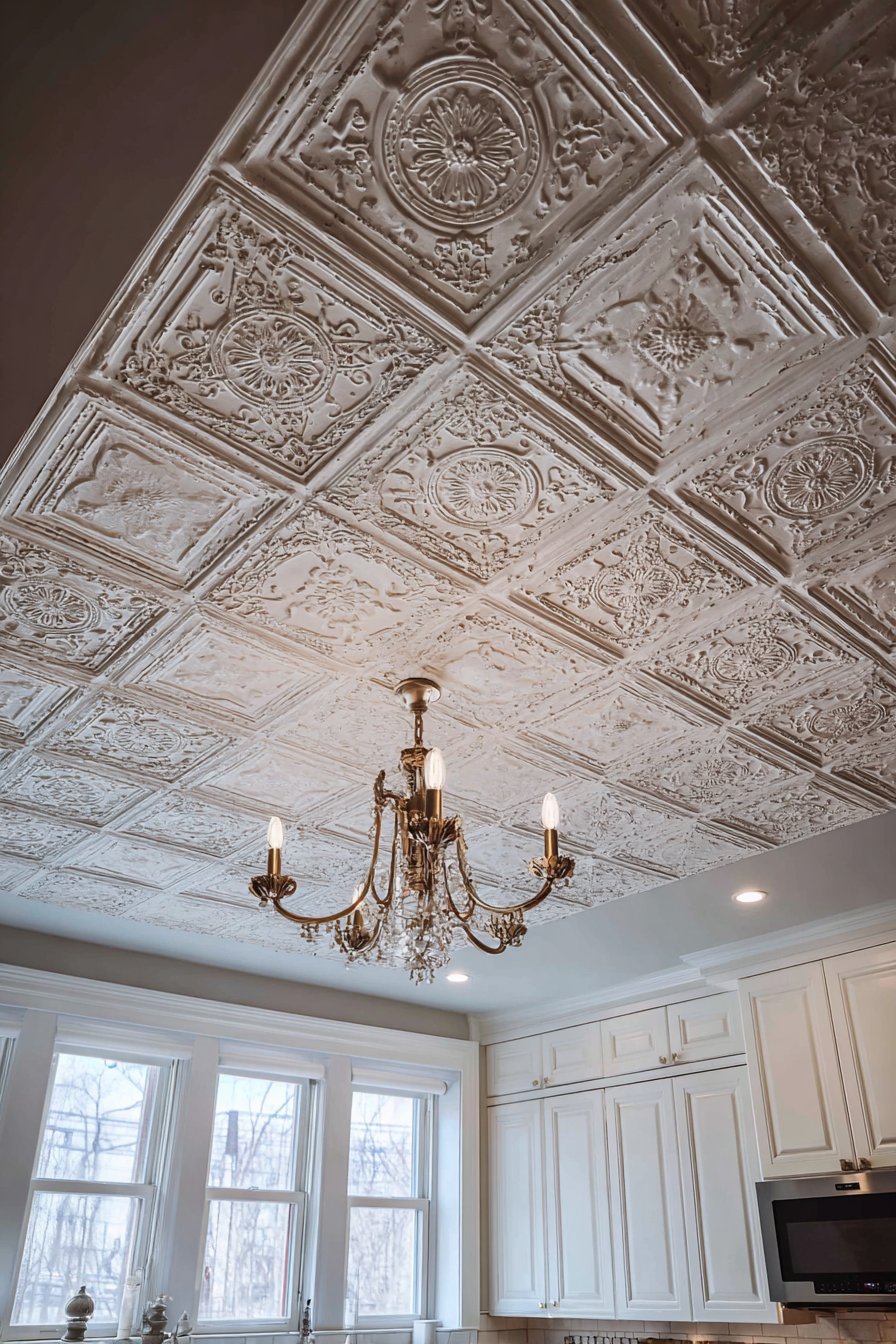
Modern manufacturing techniques make reproduction tin ceiling tiles widely available and relatively affordable compared to historical originals. These contemporary versions accurately replicate antique patterns while offering easier installation than original tiles. The lightweight metal construction simplifies installation compared to plaster or wood alternatives while providing authentic appearance. For homeowners seeking vintage character without the challenges of working with antique materials, reproduction tin tiles offer practical solution. The tiles’ durability and low maintenance requirements add practical advantages to their aesthetic appeal, making them suitable for kitchen environments where moisture and temperature fluctuations might damage other ceiling treatments.
Key Design Tips: Purchase extra tiles to account for mistakes during cutting and installation—patterns must align precisely for professional appearance. Install furring strips to create flat, level surface before tile installation—uneven substrate will telegraph through thin metal. Use manufacturer-recommended adhesives and mechanical fasteners for secure long-term installation. Plan tile layout from room center outward to ensure balanced pattern at perimeters. Cut tiles carefully using tin snips or metal-cutting tools—rough cuts will be visible and detract from the ornate appearance. Prime metal surfaces before painting to ensure proper paint adhesion and prevent rust. Apply glaze or antiquing solution while base paint is still tacky for most authentic aged appearance. Consider applying clear polyurethane topcoat in moisture-prone areas for added protection.
13. Minimalist Trimless Recessed Lighting
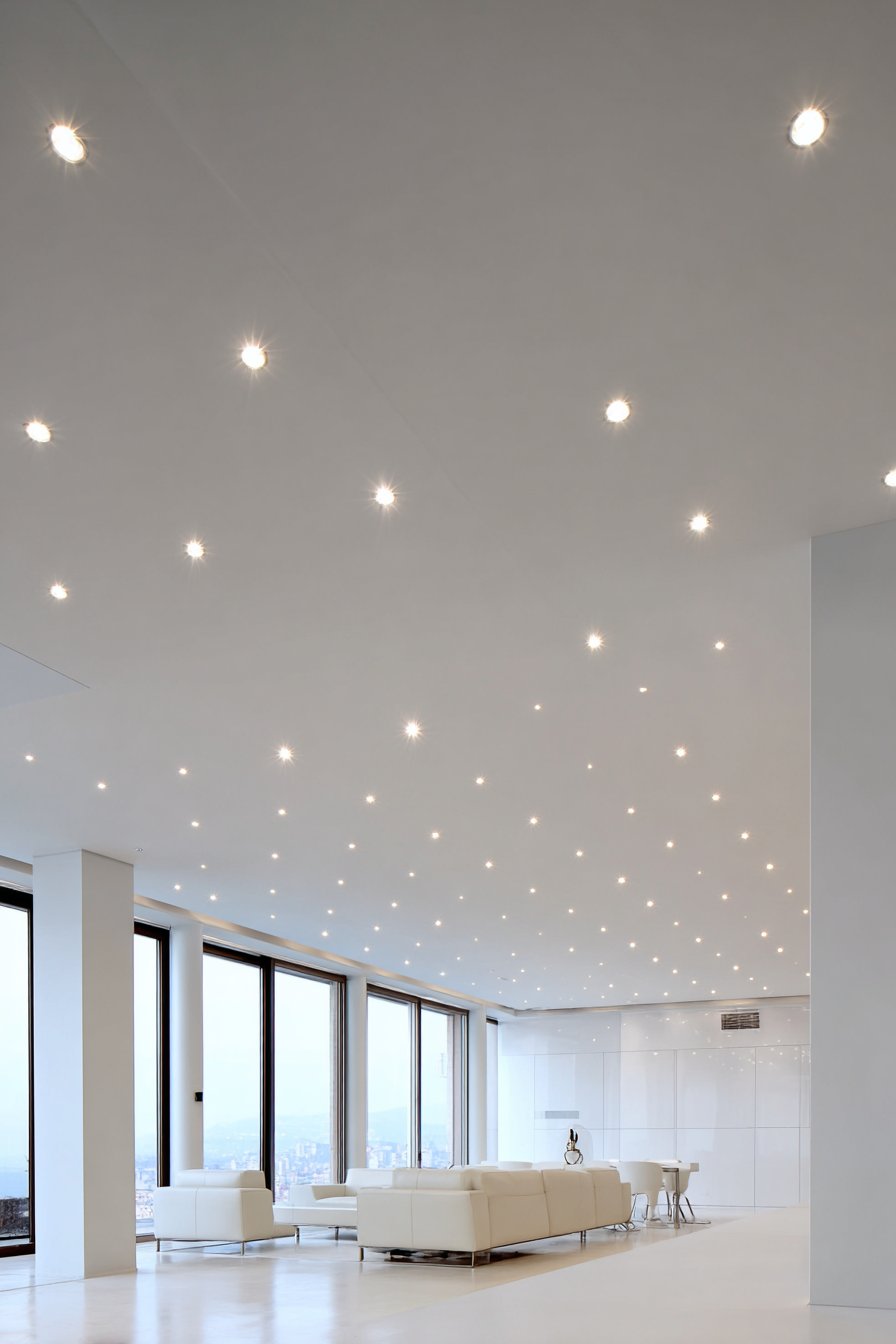
Contemporary minimalism finds expression through utterly smooth ceiling surfaces interrupted only by carefully placed recessed lighting. This approach eliminates all visible trim, molding, and textural variations to create perfectly flat planes that embody reductive design principles. The asymmetric arrangement of ultra-thin trimless recessed lights provides functional illumination without introducing visual complexity or disrupting the ceiling’s clean geometry. These fixtures appear as simple circular light sources flush with the ceiling surface, their minimal presence almost disappearing into the smooth white expanse. This lighting approach requires precise installation during construction to achieve the seamless integration that makes the design successful.

The ceiling spans a contemporary open-concept living area where floor-to-ceiling windows provide abundant natural light and establish strong connection between interior and exterior environments. In this context, the simple ceiling recedes appropriately, allowing attention to focus on views, furnishings, and spatial volumes rather than architectural ornament. The smooth white ceiling maximizes light reflection, helping to bounce daylight throughout the space and create bright, airy atmosphere. Modern minimalist furnishings below echo the ceiling’s restraint, creating cohesive design language throughout the space. The overall aesthetic prioritizes spatial clarity, clean lines, and absence of unnecessary decoration.
This minimalist approach suits contemporary lifestyles that value simplicity and reject excessive ornamentation. The smooth ceiling creates visual rest—a calm overhead plane that doesn’t compete for attention or add visual complexity to busy modern lives. The asymmetric lighting arrangement prevents rigid formality while ensuring even illumination throughout the space. The result feels effortless despite the significant technical expertise required to achieve such seemingly simple perfection. Every detail must be executed flawlessly because any imperfection becomes immediately obvious against the unadorned surface. This design philosophy demands commitment—minimalism requires restraint and discipline to resist the temptation to add “just one more thing.”
Key Design Tips: Use Level 5 drywall finishing to achieve the perfectly smooth surface essential for minimalist ceilings—lower quality finishing will show imperfections. Install recessed lighting during rough-in stage with precise measurements to ensure desired spacing and alignment. Choose trimless fixtures specifically designed for this application—standard recessed lights with visible trim rings will not achieve the desired aesthetic. Paint ceiling with premium paint in flat or matte finish to minimize any surface irregularities. Ensure perfectly level ceiling installation—even slight variations become obvious in smooth, unadorned surfaces. Plan lighting layout to provide adequate illumination without visible fixtures—consult with lighting designer for optimal placement. Use high-quality LED fixtures to avoid maintenance issues in fixtures that are flush-mounted and difficult to access. Consider acoustic requirements—smooth hard surfaces can create excessive reverberation in open spaces.
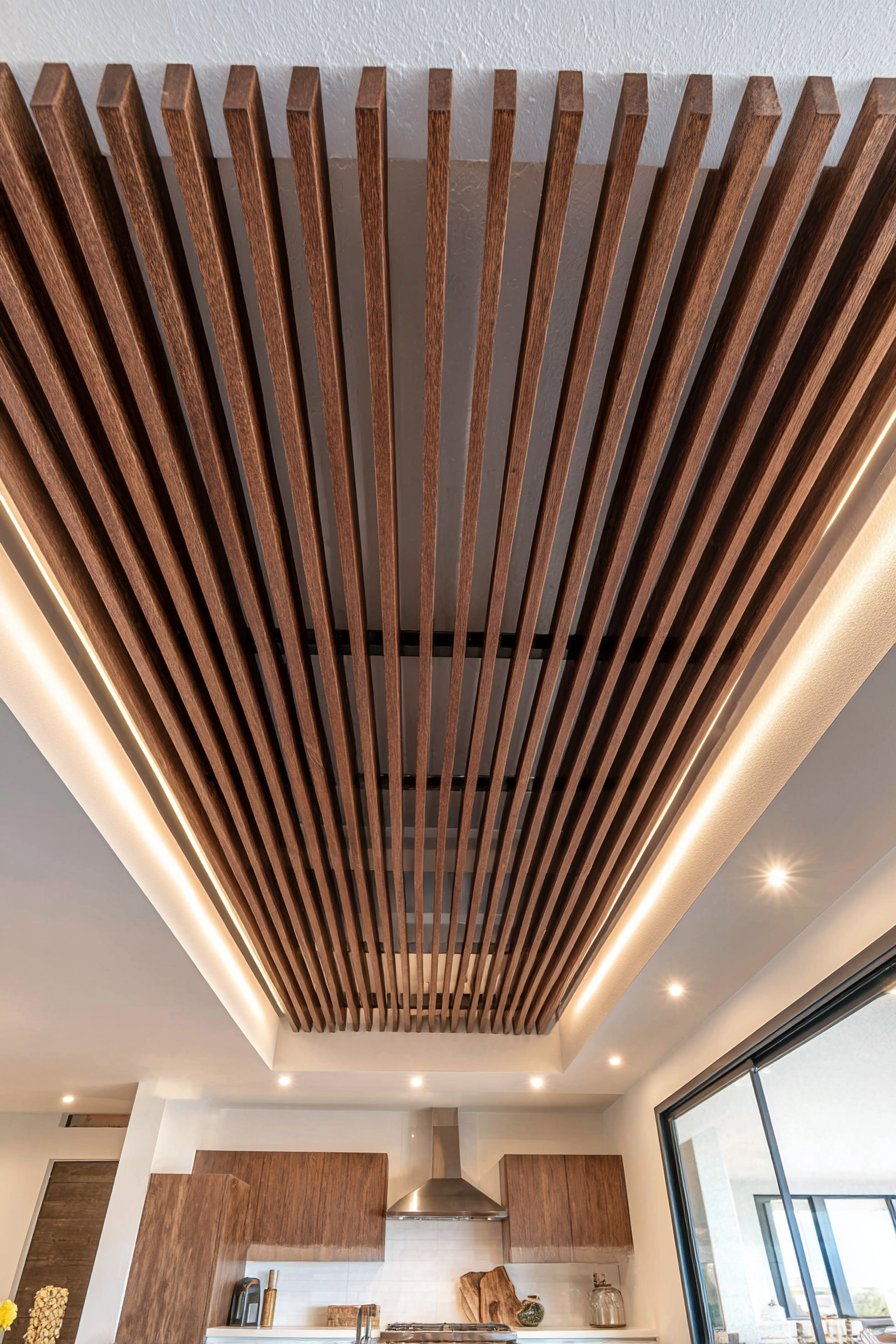
14. Contemporary Floating Wood Slat Feature
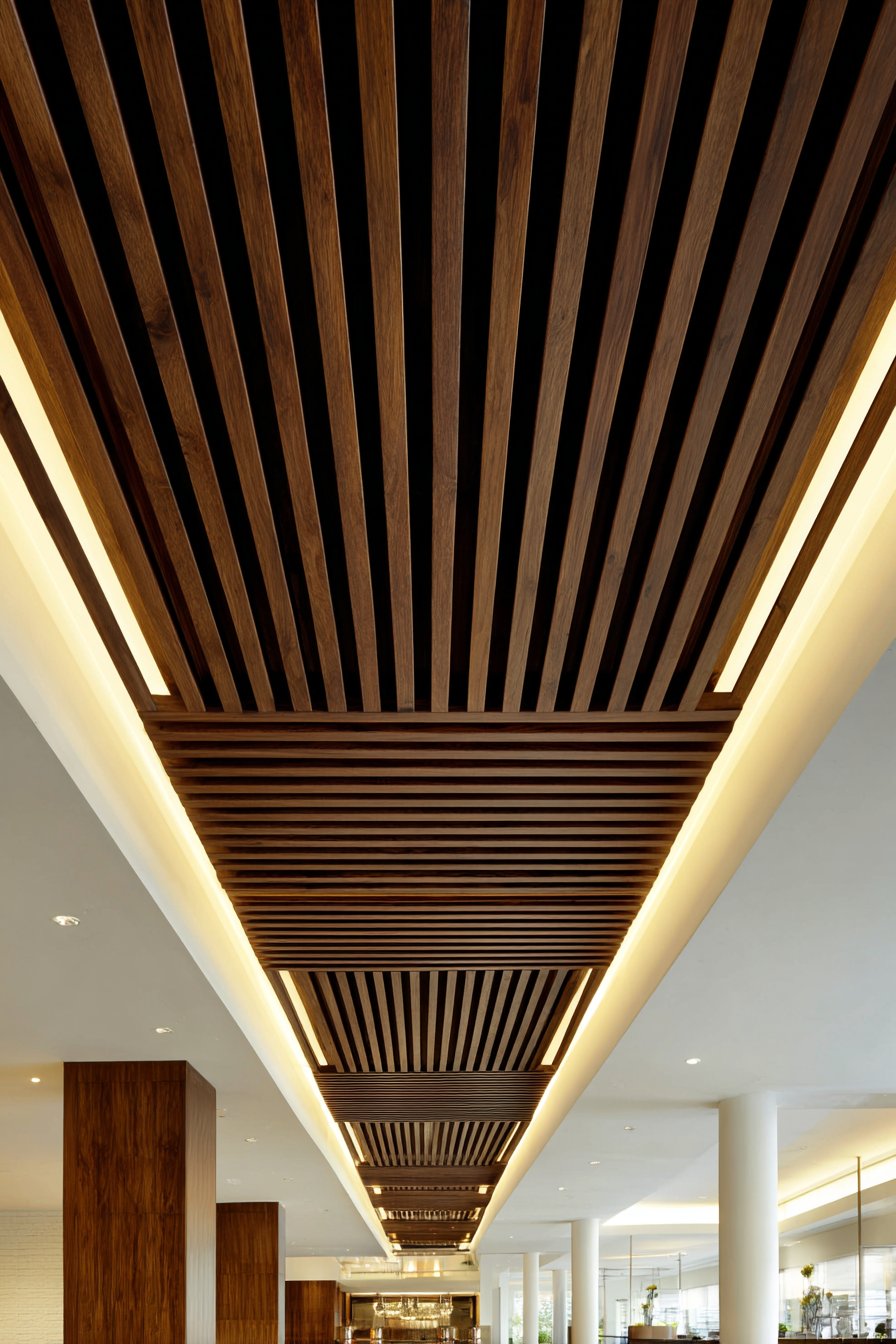
Statement ceiling treatments can focus attention through selective application rather than covering the entire overhead plane. Dark walnut wood slats arranged in parallel horizontal lines create dramatic linear feature when spanning only the central ceiling portion, with white drywall visible between and around the slat field. This partial coverage approach creates greater impact than full ceiling treatment because the contrast between wood slats and white ceiling emphasizes both elements. The slats appear to float approximately six inches below the main ceiling plane, with integrated LED strips concealed above creating uplighting that highlights the ceiling above while making the slats appear weightless.

The spacing between individual slats—approximately six inches—creates rhythmic visual pattern that adds interest without creating excessive visual density. This open configuration allows light to penetrate through the slat field, preventing the dark wood from making the space feel heavy or oppressive. The three-dimensional quality of the floating installation creates genuine architectural depth rather than surface decoration. Shadows cast by the slats onto the ceiling above add another layer of visual interest that changes throughout the day as natural light angles shift. The uplighting from concealed LEDs becomes particularly dramatic during evening hours, transforming the wood slats into a glowing architectural feature that provides both aesthetic impact and ambient illumination.
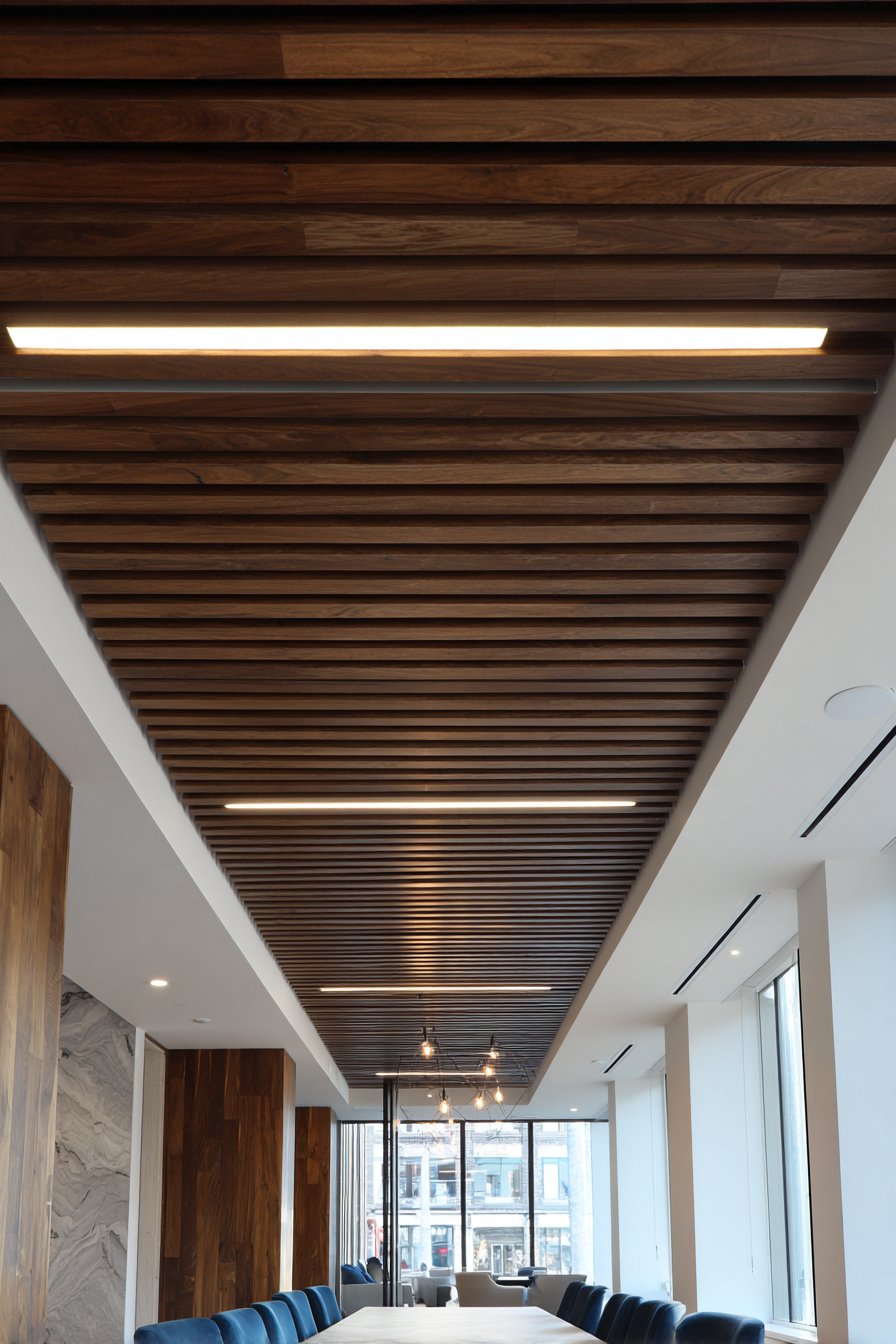
This treatment works particularly well above dining tables where the linear slat arrangement can reinforce the rectangular table geometry and create sense of definition in open-plan spaces. The dark walnut wood adds richness and sophistication appropriate for dining environments while the modern geometric arrangement keeps the design contemporary rather than traditional. The partial ceiling coverage ensures the treatment doesn’t overwhelm the space—full coverage with dark wood slats would create oppressive atmosphere, while this selective approach creates just the right amount of visual interest and architectural definition. The white ceiling surrounding the slat field provides essential contrast and visual rest.
Key Design Tips: Suspend slats from ceiling using adjustable hanging system that allows precise leveling and spacing. Use consistent wood species and finish throughout to maintain visual unity—mixing wood types creates unintended busy appearance. Space slats proportional to their width—wider slats require greater spacing to maintain balanced visual weight. Conceal LED strips in channels or behind blocking to ensure no direct view of light source. Use warm white LED color temperature to complement wood tones. Ensure adequate ceiling height before installing floating elements—minimum nine-foot ceiling recommended. Calculate accurate material requirements including both slats and suspension system components. Consider acoustic properties—open slat systems can help manage sound in spaces with hard surfaces. Install dimmer switches for LED uplighting to control intensity for different occasions and times of day.
15. Rustic Beam and Board Contrast
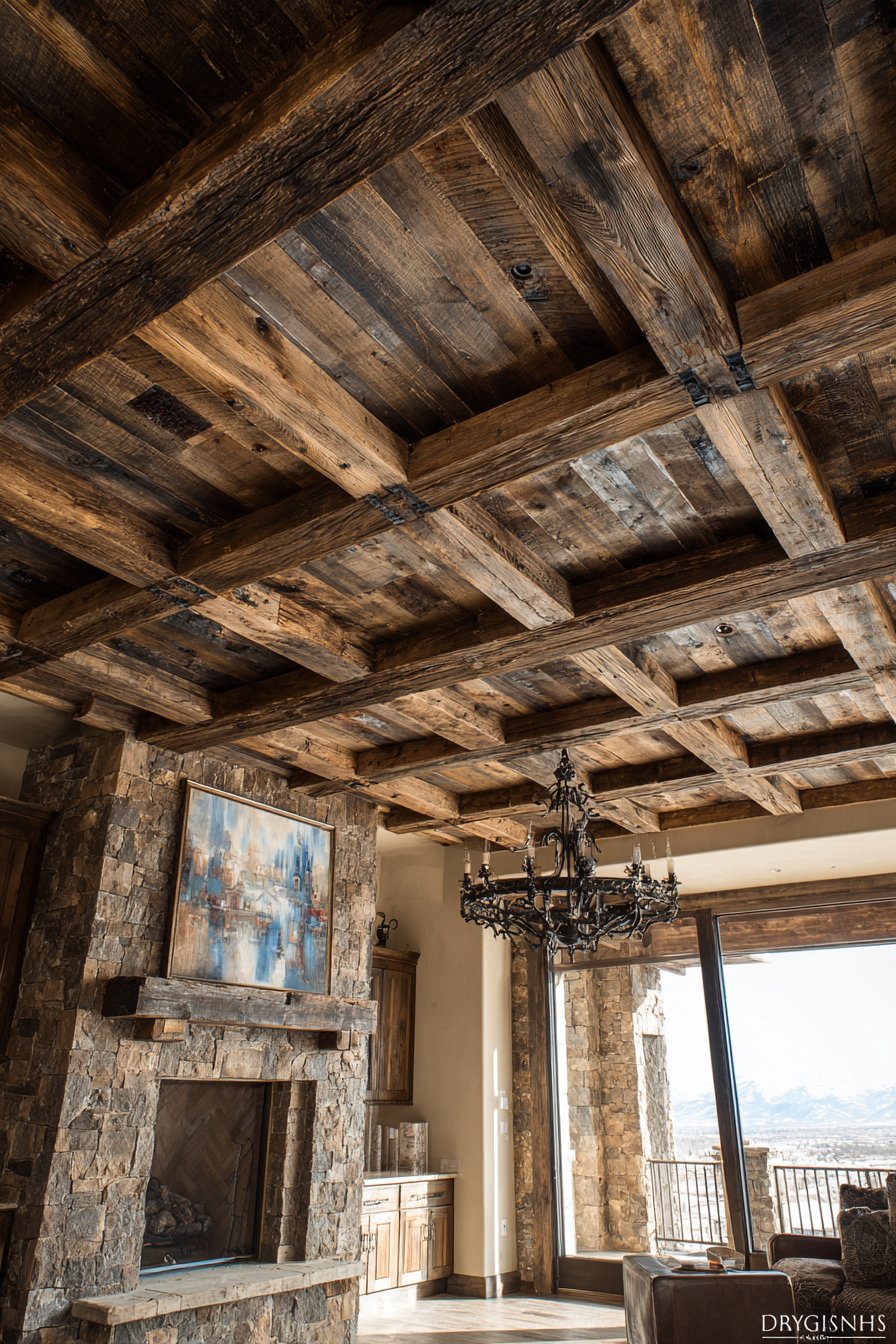
Traditional ceiling treatments gain contemporary relevance through thoughtful color contrast and material juxtaposition. White-painted tongue-and-groove boards create bright base layer while contrasting dark-stained wood beams in rich espresso brown overlay the boards in grid pattern. The beams measure approximately eight inches wide, providing substantial visual presence without overwhelming the space. Decorative iron brackets at beam intersections add authentic period detail while serving as visual focal points that reward close inspection. This combination creates classic yet approachable aesthetic suitable for great rooms in mountain lodge or modern farmhouse settings.
The dramatic contrast between light boards and dark beams creates strong visual impact that establishes immediate architectural interest. This color relationship prevents either element from disappearing—the white boards would fade into white walls without the dark beams’ definition, while dark beams alone would create oppressive atmosphere without the bright boards’ balance. The grid pattern creates order and rhythm across the ceiling plane while the natural wood materials maintain organic quality. When combined with stone fireplace walls and substantial furnishings appropriate to great room scales, the ceiling treatment becomes part of cohesive design narrative celebrating natural materials and architectural craftsmanship.
Natural light entering through large windows creates complex interplay of light and shadow across the beamed ceiling’s dimensional surface. The dark beams cast shadows onto the white boards, creating depth and movement that changes throughout the day. This dynamic quality ensures the ceiling remains visually engaging rather than static. The rustic aesthetic suits mountain and rural settings where connection to natural materials and traditional building methods feels authentic and appropriate. Modern furnishings below create interesting temporal contrast—pairing historical architectural elements with contemporary furniture demonstrates how different eras can coexist successfully when united by quality materials and thoughtful design.
Key Design Tips: Paint or stain boards before installing beams to simplify finishing process. Use actual wood beams rather than hollow faux beams if structural requirements allow—solid beams have more authentic appearance and better proportions. Stain beams to desired color before installation, allowing adequate drying time before mounting. Install iron brackets using appropriate fasteners that penetrate into structural elements for secure attachment. Plan beam layout to align with room proportions—beams should create balanced grid that relates to room dimensions. Consider beam depth proportional to room size—larger rooms require deeper beams to maintain visual presence. Ensure adequate ceiling height—this treatment works best with ten-foot or higher ceilings. Use semi-transparent stains that allow wood grain to remain visible rather than solid paint colors. Apply polyurethane topcoat to stained beams for protection and easier cleaning in high-traffic areas.
16. Modern Sculptural Single Beam Focus
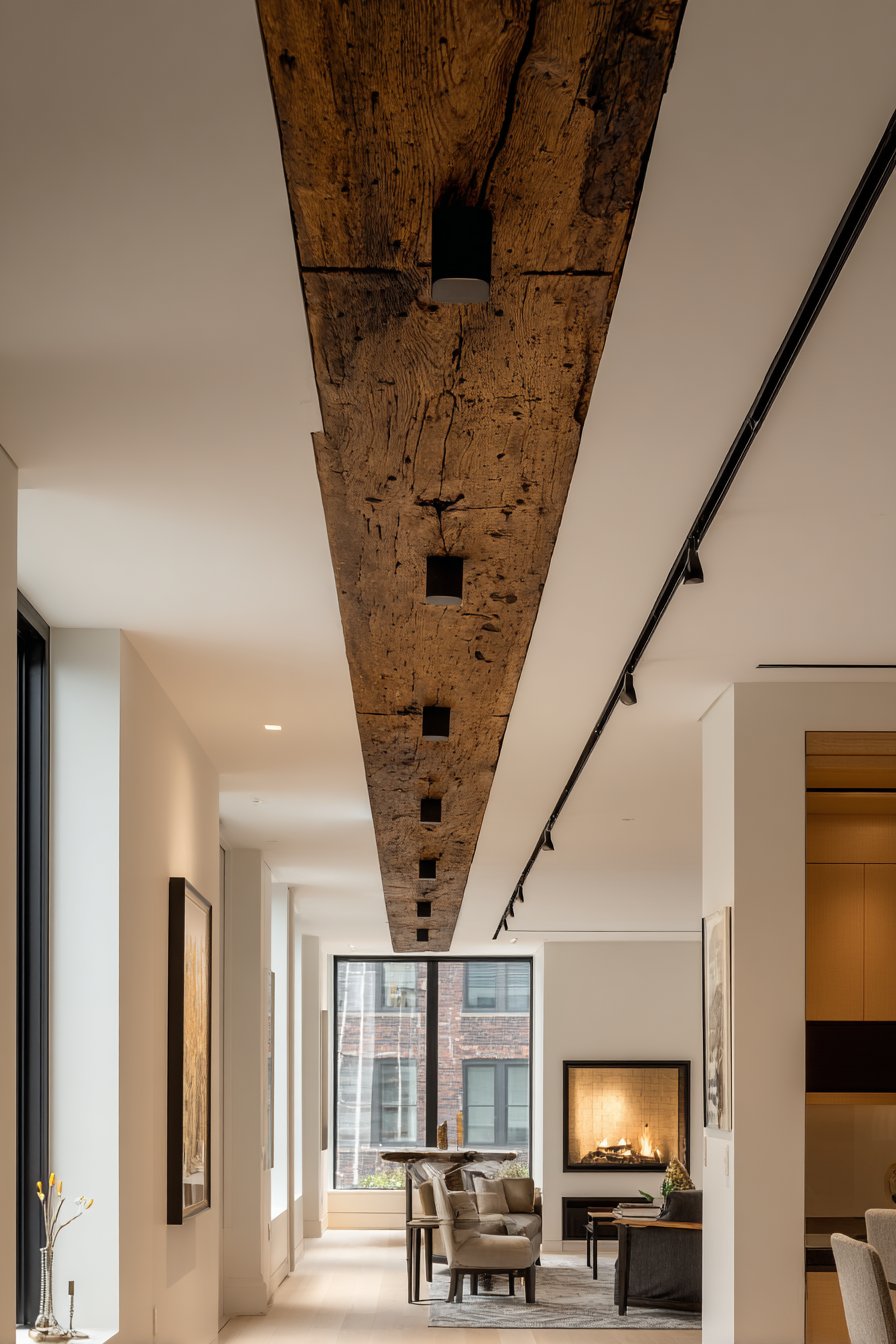
Contemporary design often achieves maximum impact through strategic restraint, as demonstrated by single statement beams positioned centrally and appearing to float due to concealed mounting hardware. A substantial beam crafted from reclaimed Douglas fir showcases natural edge details where the original tree’s curved outer surface remains visible, creating organic quality that contrasts beautifully with the refined interior space. The authentic weathering, prominent grain patterns, and subtle checking (small cracks that develop as wood ages) all contribute to the beam’s character and visual interest. This singular architectural element becomes powerful focal point precisely because it exists in isolation rather than as part of a repetitive pattern.

The beam’s positioning running the length of a modern living room creates strong directional emphasis that can make spaces feel longer while adding visual interest to the overhead plane. Track lighting discreetly mounted along one side of the beam provides practical illumination while maintaining the fixture’s sculptural quality—the lighting appears as incidental rather than the beam’s primary purpose. The surrounding ceiling remains smooth drywall painted warm white, providing neutral backdrop that allows the beam’s natural beauty to dominate. Contemporary furnishings below provide appropriate scale reference while maintaining the modern aesthetic that makes the rustic beam feel like intentional contrast rather than stylistic confusion.
The reclaimed wood’s authenticity cannot be replicated through artificial aging or staining techniques—genuine weathering and patina develop only through decades of exposure to elements. This authenticity adds value and integrity to the design while supporting sustainable practices through material reuse. The natural edge details that preserve the tree’s original form create sculptural quality that elevates the beam beyond simple architectural element into art object. The careful balance between the organic beam and refined contemporary surroundings demonstrates sophisticated design thinking where opposites create productive tension rather than conflict.

Key Design Tips: Select reclaimed beams with interesting character but avoid severely damaged or structurally compromised pieces. Clean reclaimed wood thoroughly to remove dirt and loose material before installation. Apply penetrating oil finish that enhances natural color while protecting the surface without creating glossy artificial appearance. Engineer concealed mounting system that provides adequate support for heavy solid beams—improper installation creates safety hazard. Plan electrical runs for track lighting before beam installation to conceal wiring within mounting system. Consider beam dimensions proportional to room size—oversized beams overwhelm small spaces while undersized beams lack presence in large rooms. Acclimate wood to interior humidity before installation to minimize movement after mounting. Consult structural engineer for beams exceeding twelve feet or weighing more than 200 pounds. Position beam to avoid interference with ceiling fans, light fixtures, or other functional requirements.
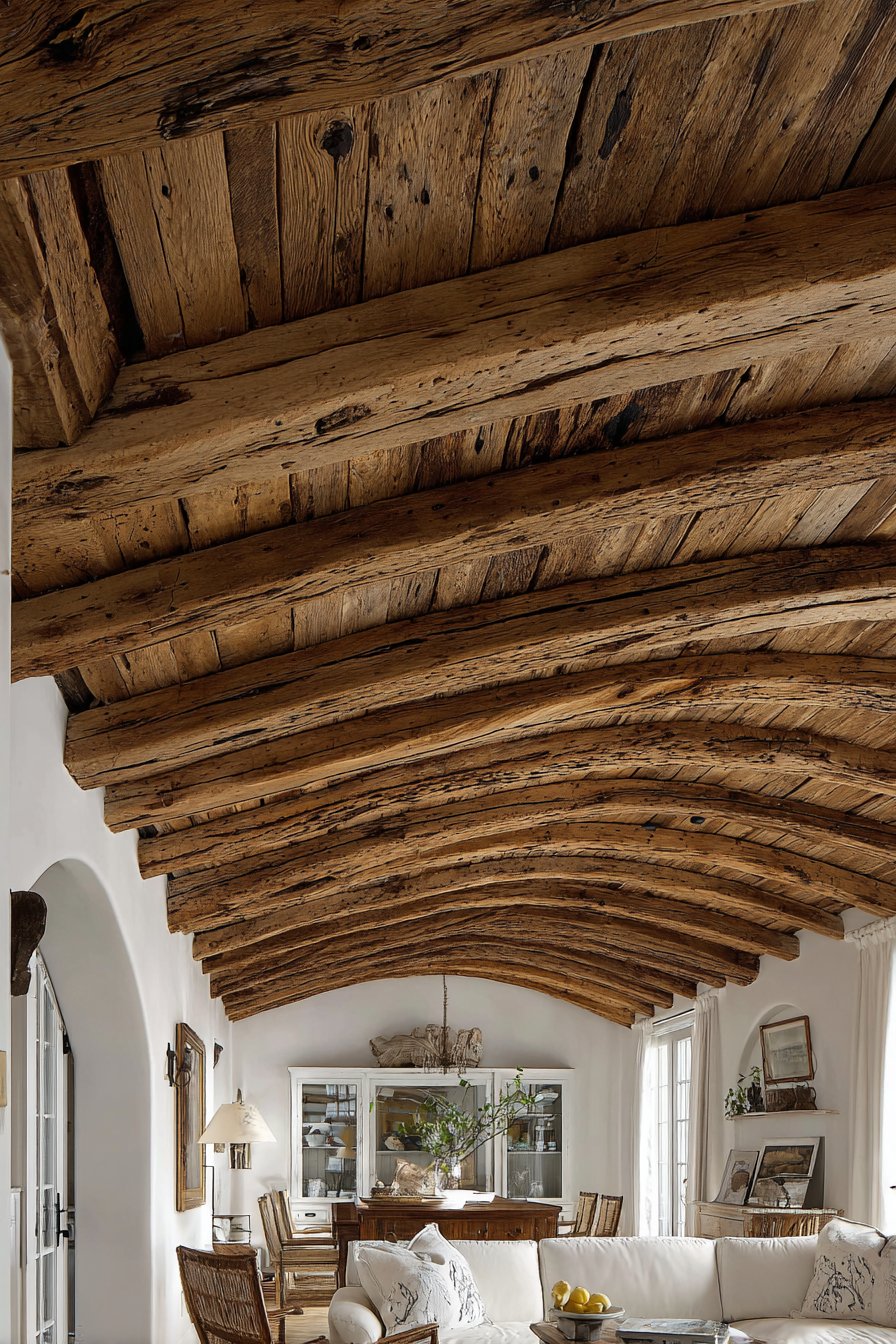
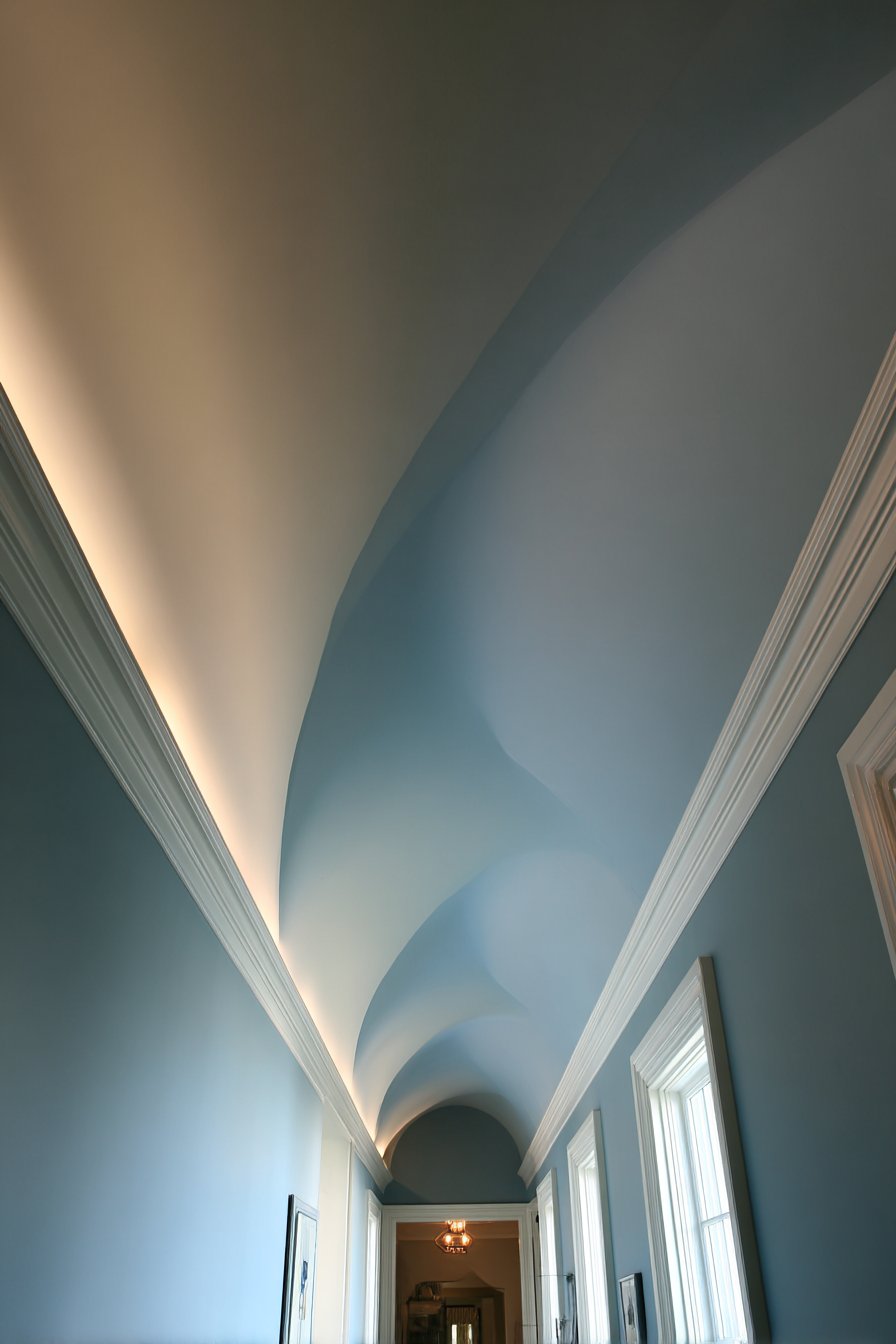
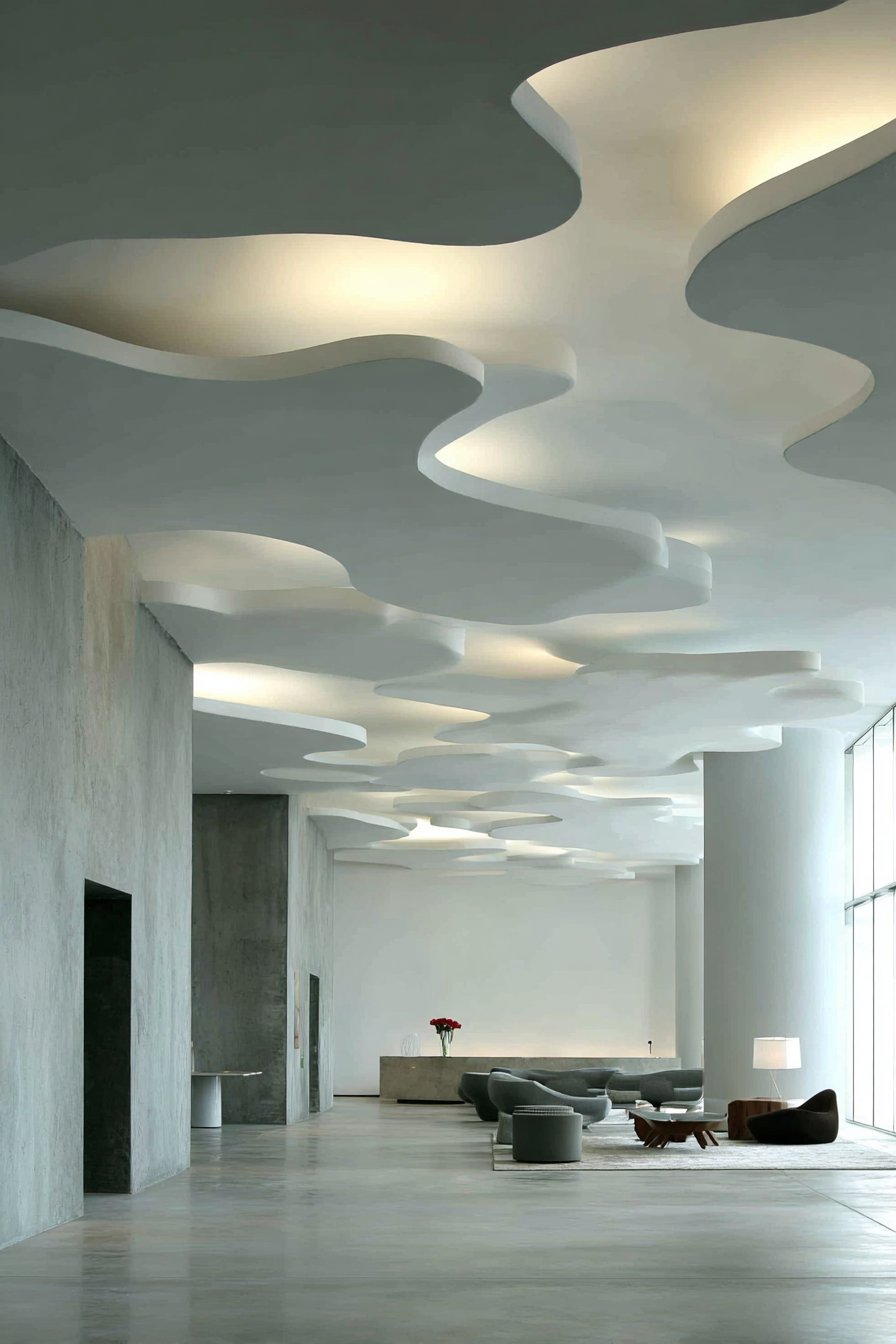
17. Elegant Barrel Vault Hallway
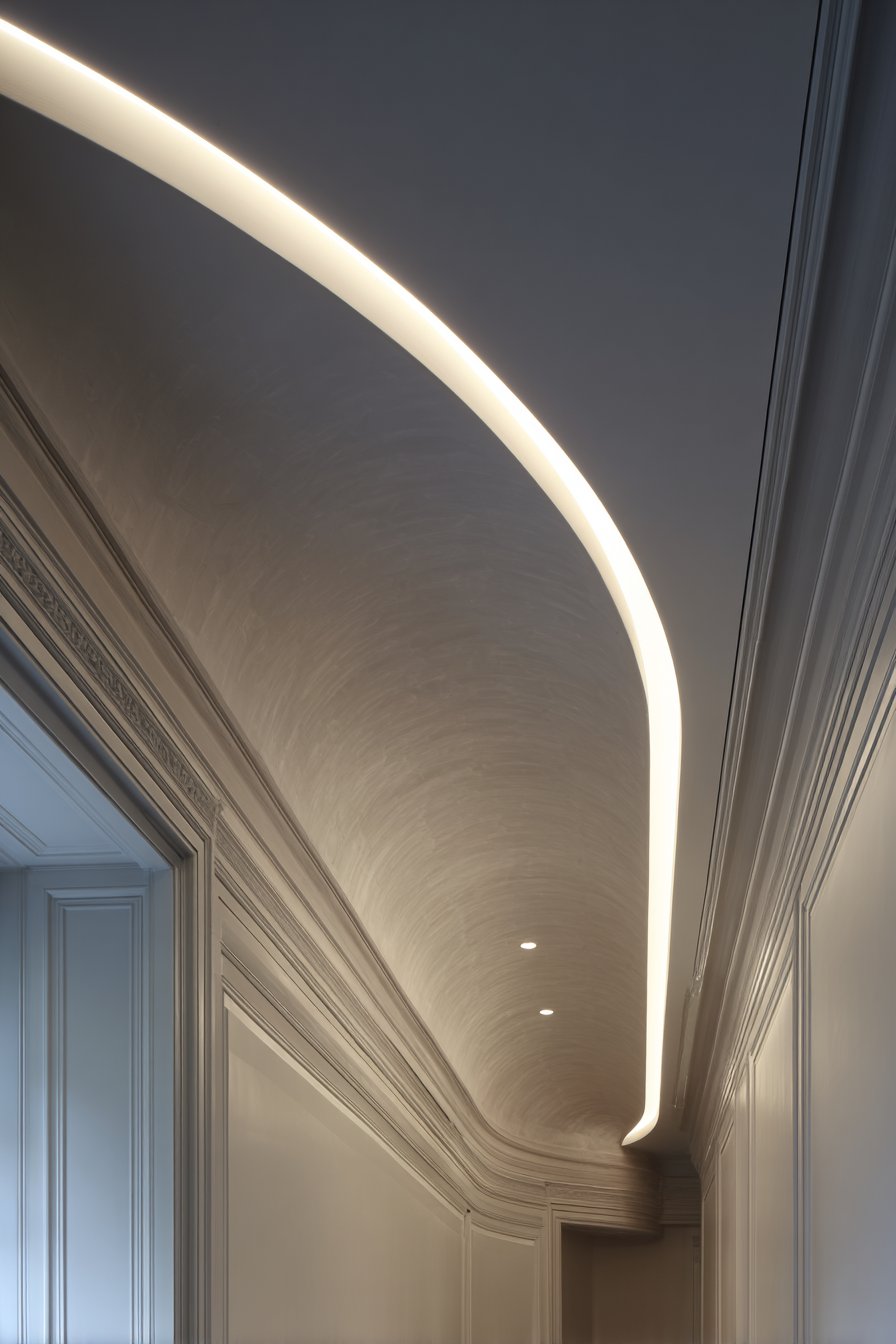
Curved ceiling forms create architectural sophistication through their fluid geometry and technical complexity. A barrel vault ceiling features gentle curved surface transitioning seamlessly from crown to vertical wall without visible seams or breaks. Painted in soft blue-gray, this architectural element transforms a simple hallway into memorable transition space that rewards passage through the home. The smooth curve requires expert plastering or specialized drywall techniques to achieve the continuous surface essential to successful execution. The color choice adds personality and interest while the soft tone prevents the curved form from feeling heavy or oppressive in the confined hallway dimensions.
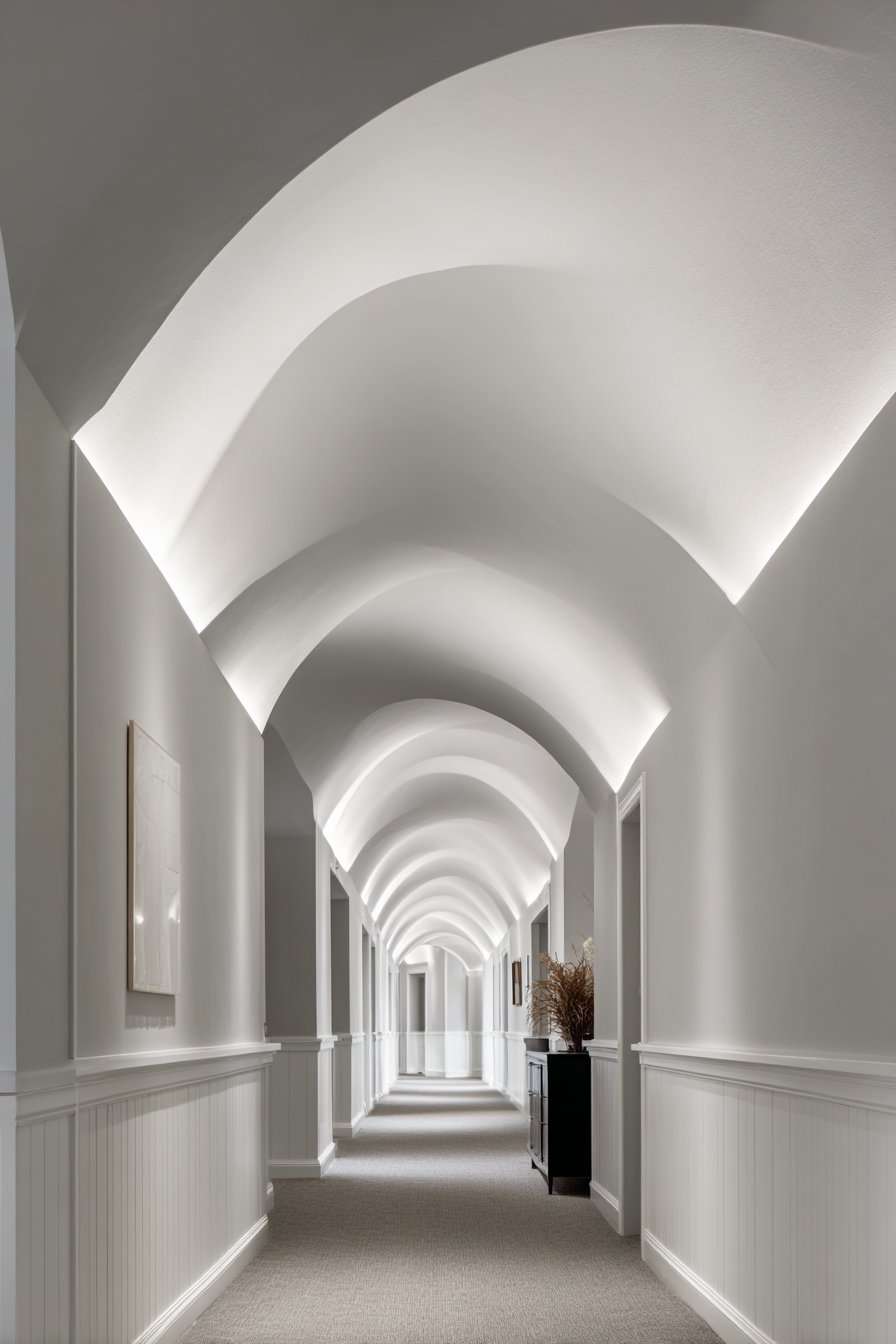
Linear LED fixtures recessed along the crown where the curve begins provide indirect uplighting that emphasizes the vault’s form through gradual gradation from brightness at the base to shadow at the apex. This lighting approach highlights the architectural geometry while providing functional illumination for navigation through the hallway. The light washes upward across the curved surface, creating gentle transitions between brightness and shadow that emphasize the three-dimensional form. Without this strategic lighting, the curved ceiling’s shape might not read clearly—the lighting transforms architectural form into visual experience. White wainscoting on the lower walls provides classic contrast that grounds the space and creates traditional architectural detail balancing the curved ceiling’s fluid geometry.
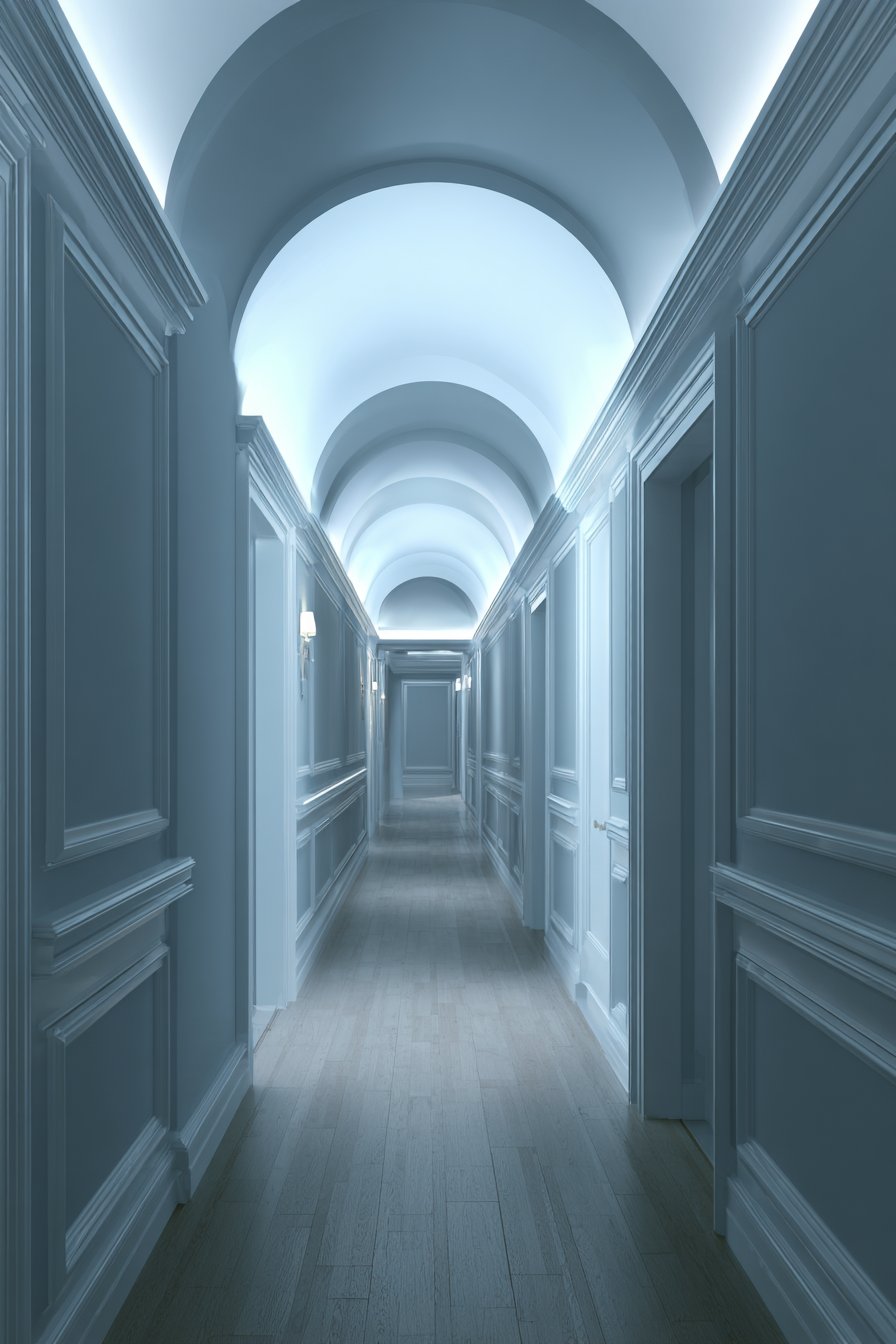
The tunnel effect created by the barrel vault running the hallway’s length creates sense of journey and destination, making passage through the home more experiential than purely functional. This architectural treatment elevates a utilitarian circulation space into memorable design feature that demonstrates attention to detail throughout the home. The curved form softens the hallway’s potentially claustrophobic quality—curves create psychological comfort that hard rectangular geometries cannot match. The smooth plaster finish showcases craftsmanship and quality materials that distinguish custom homes from production construction. This level of architectural detail requires commitment and budget but delivers enduring value through its unique character.
Key Design Tips: Work with experienced plasterers or specialty drywall contractors familiar with curved ceiling construction. Create accurate templates during framing to ensure consistent curve radius throughout the length. Use flexible drywall or multiple thin layers of standard drywall bent over curved framing for smooth continuous surface. Apply multiple skim coats of plaster or joint compound to achieve perfectly smooth finish essential for curved surfaces. Sand meticulously between coats—any imperfections become obvious on curved planes. Paint with satin or semi-gloss finish that enhances the smooth surface and facilitates cleaning. Install LED fixtures before finishing ceiling to conceal all electrical connections. Plan adequate floor protection during construction—curved ceiling work creates significant dust and debris. Consider acoustic properties—curved surfaces can create unusual sound reflections or amplification.
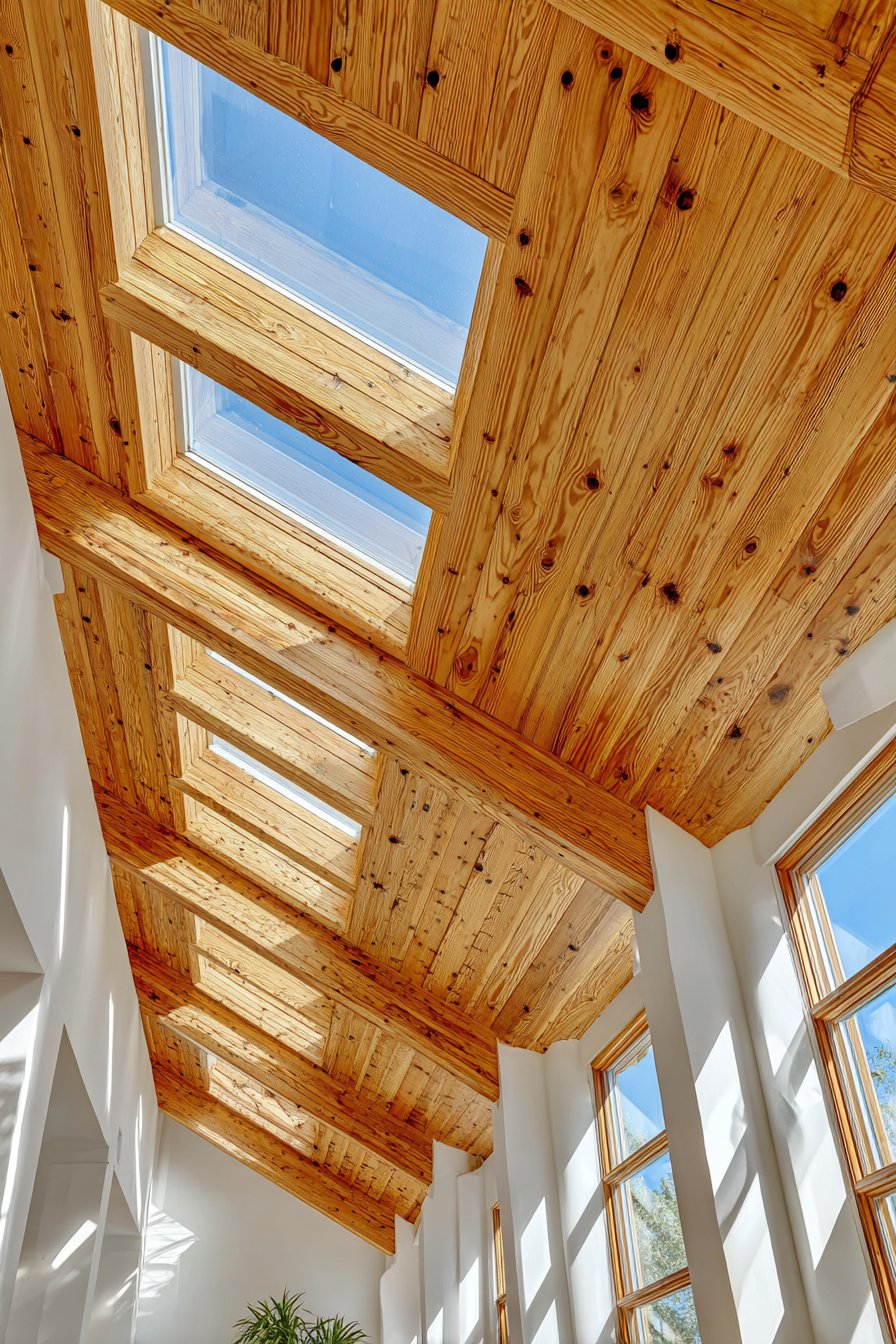
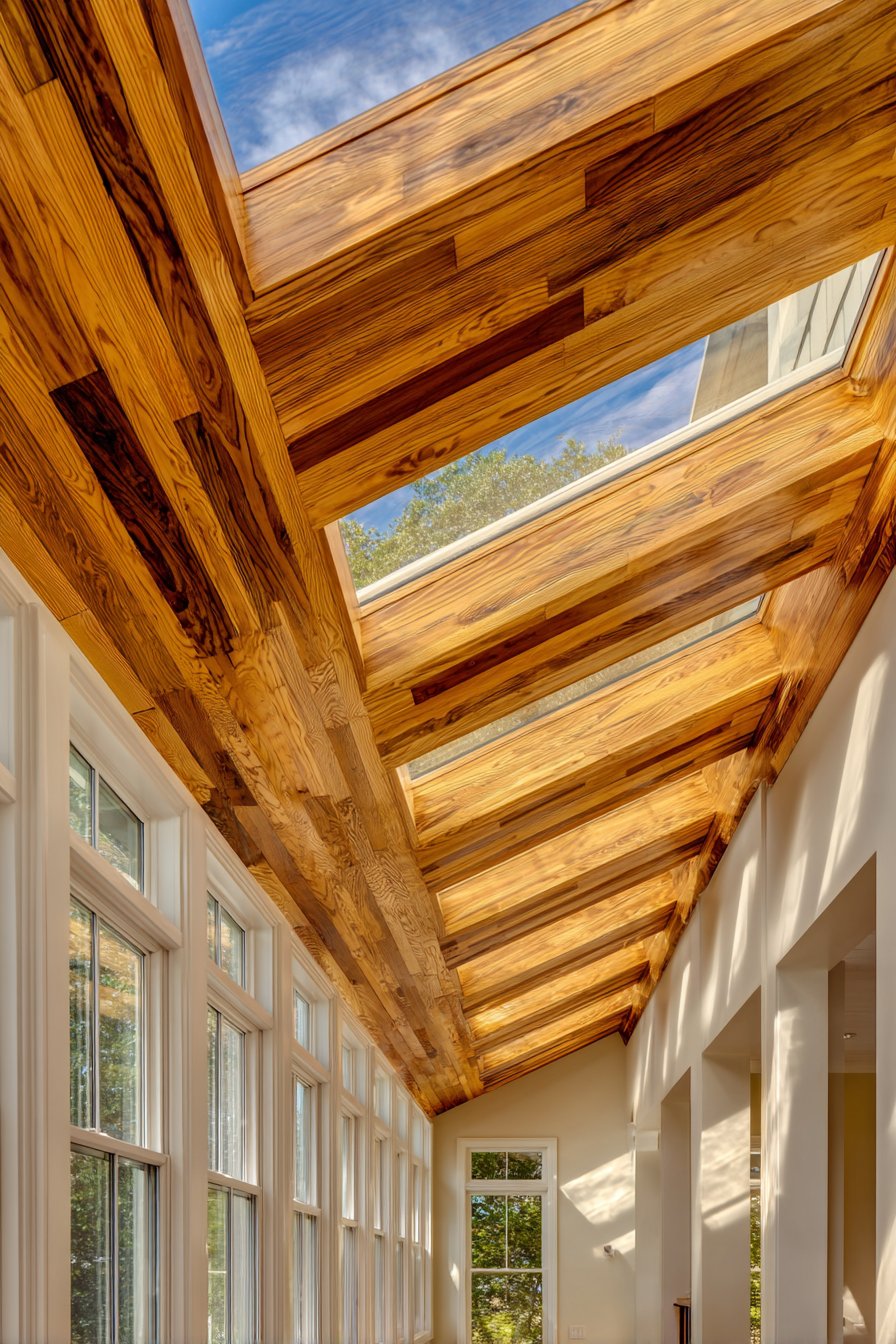
18. Contemporary Grid Skylight Integration
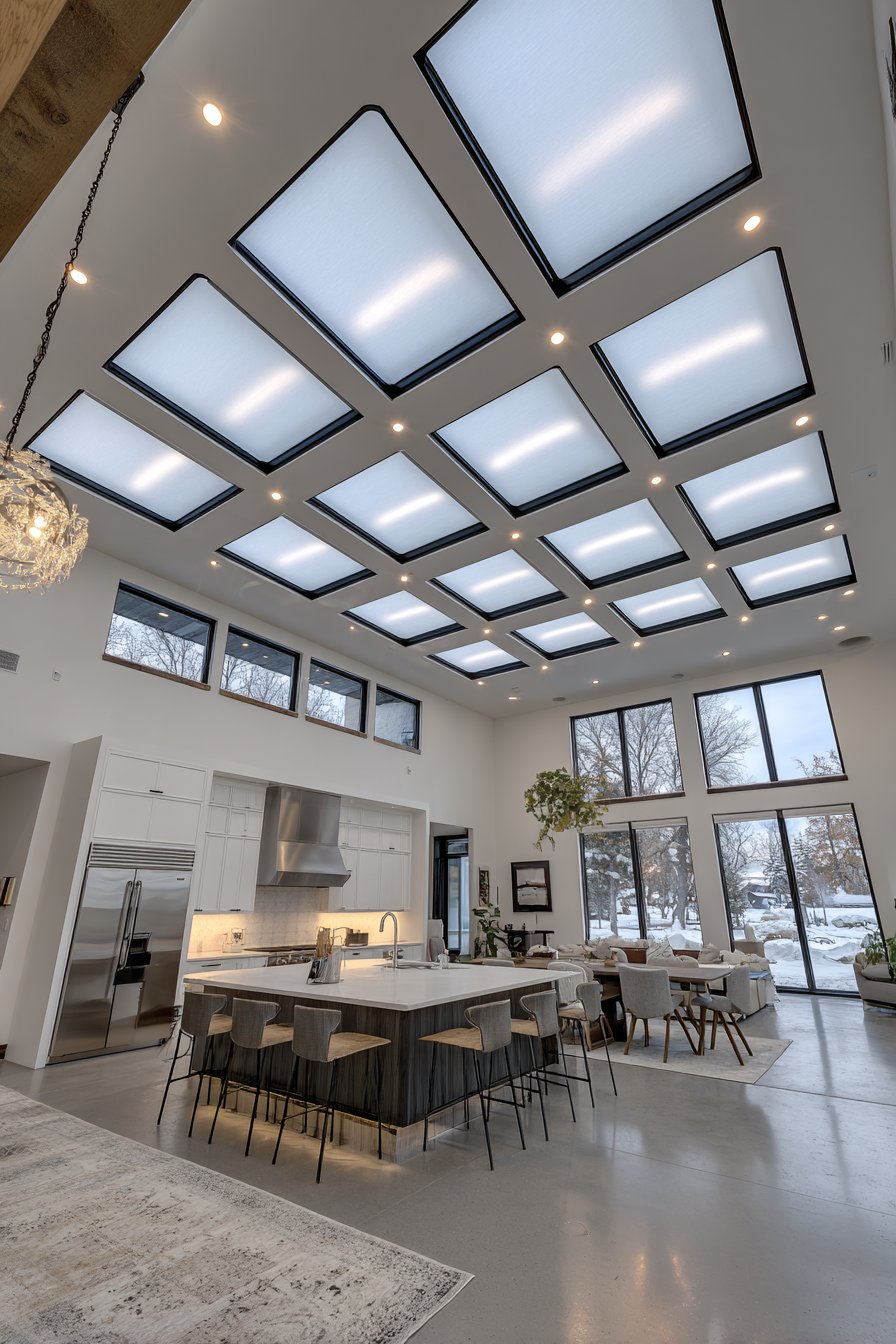
Natural light integration represents one of the most impactful ceiling design strategies, as demonstrated by multiple rectangular skylights arranged in geometric grid pattern. Each skylight measures approximately two by four feet with minimal aluminum framing in matte black that provides necessary structure while maintaining clean contemporary lines. The grid arrangement creates rhythmic pattern across the ceiling while flooding the space with natural daylight that eliminates the need for artificial lighting during daytime hours. Motorized shades provide light control, allowing occupants to modulate natural light intensity based on time of day, season, and desired atmosphere. The ceiling paint remains simple white to maximize light reflection and distribution throughout the space.
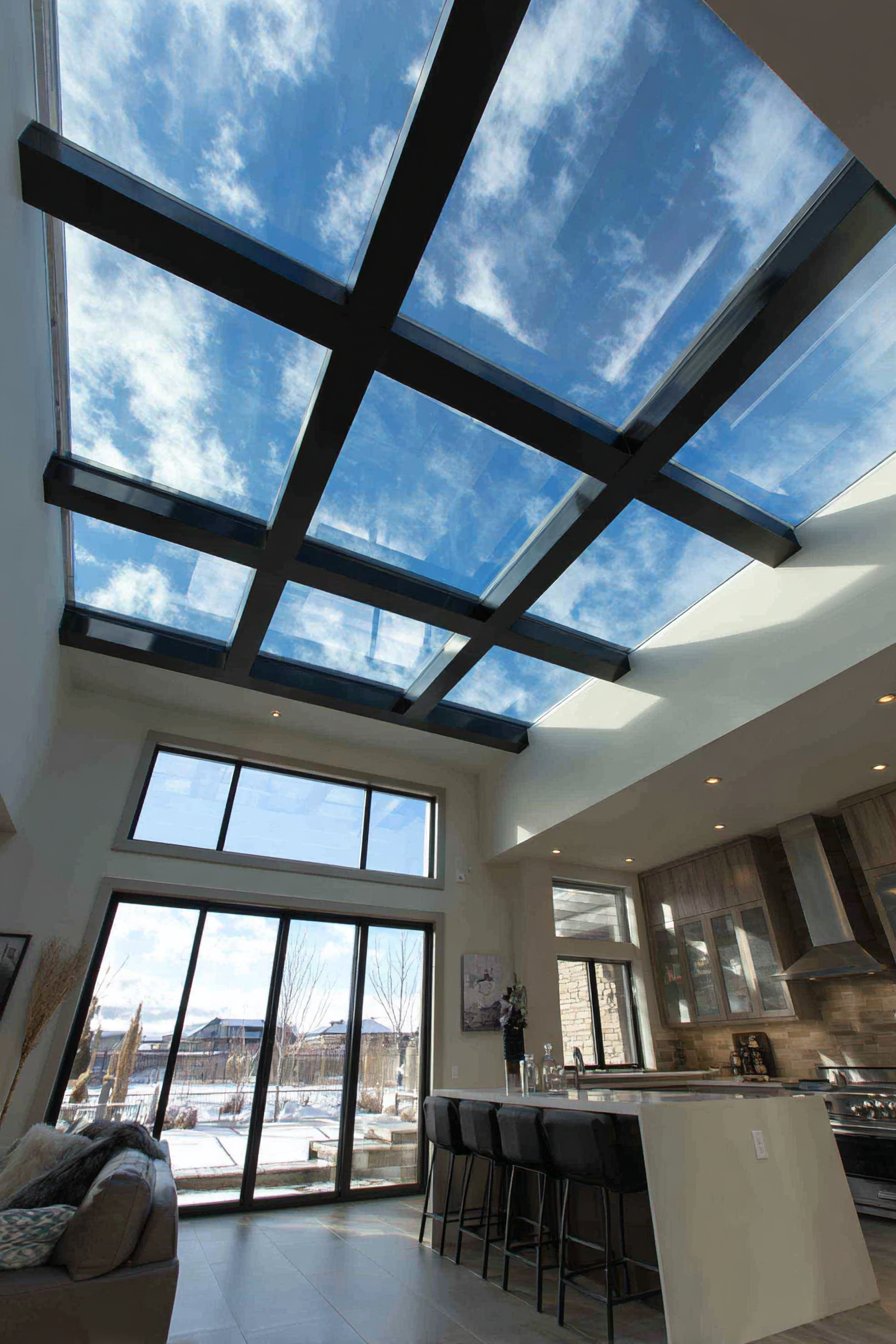
The skylights’ positioning above a contemporary kitchen island demonstrates strategic planning—natural light illuminates the primary work surface where tasks requiring good visibility occur. This thoughtful placement enhances both functionality and wellbeing by providing connection to outdoor conditions and natural day-night cycles. The quality of natural light differs fundamentally from artificial illumination, creating more accurate color rendering and psychological benefits associated with daylight exposure. The grid arrangement ensures even light distribution rather than creating hot spots or dark zones that would result from single large skylight placement.
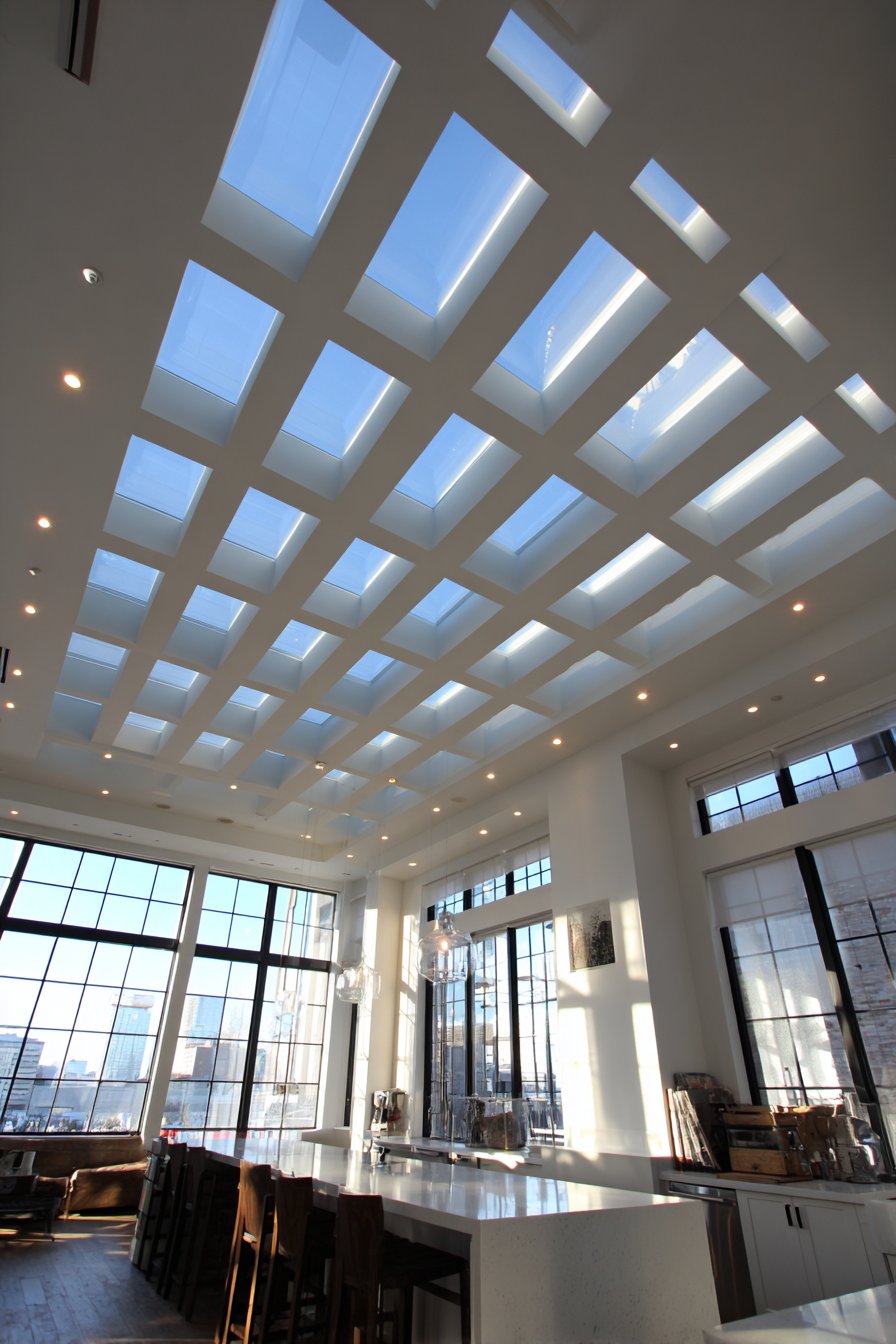
The matte black skylight frames create strong graphic impact against the white ceiling, establishing visual interest through their geometric precision. This deliberate contrast demonstrates how functional elements can serve aesthetic purposes when thoughtfully detailed. The motorized shades represent important practical consideration—skylights without light control can create excessive brightness, heat gain, and glare that make spaces uncomfortable. The automation allows convenient operation of overhead shades that would be difficult to reach manually. During evening hours, the skylights become dark frames within the white ceiling, creating different geometric pattern than their daytime appearance and demonstrating how the ceiling’s appearance shifts with lighting conditions.
Key Design Tips: Work with licensed contractors experienced in skylight installation to ensure weathertight integration with roof structure. Choose skylights with proper glazing for climate—low-E coatings and insulated glass reduce heat loss in cold climates and heat gain in warm climates. Plan skylight placement to avoid structural members that would require expensive engineering modifications. Consider sun angle and orientation when positioning skylights—south-facing skylights provide maximum winter light while potentially creating excessive summer heat gain. Install flashing systems according to manufacturer specifications to prevent water infiltration. Select frame colors that complement interior finishes—matte black suits contemporary spaces while white frames disappear in traditional interiors. Consider tempered or laminated glass for safety and hail resistance. Specify operable skylights if natural ventilation is desired—hot air rises and can exit through opened skylights. Plan motorization and electrical controls during rough-in stage to conceal wiring.
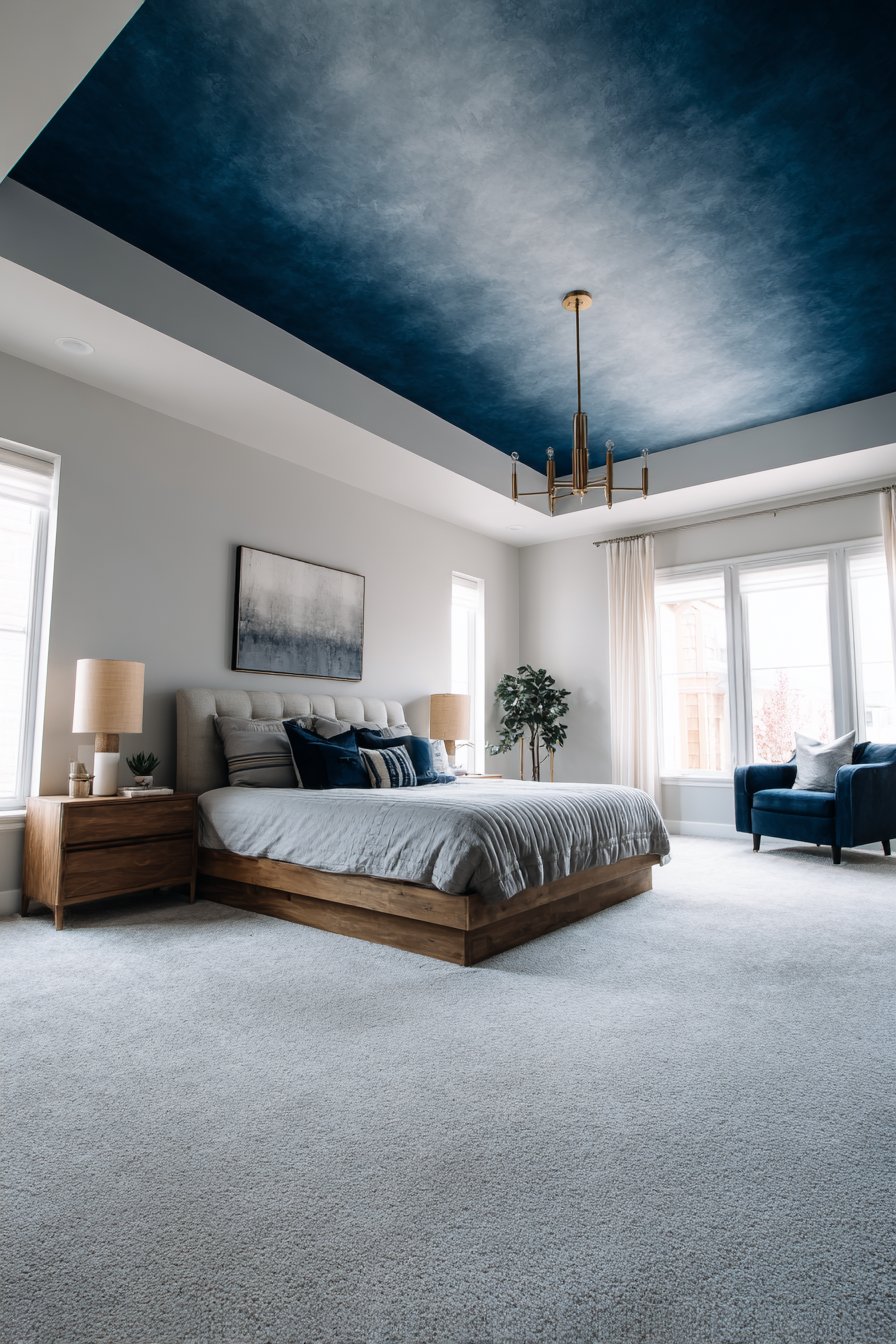
19. Sophisticated Ombre Color Transition
Artistic paint techniques transform ceilings into gradient compositions that create atmospheric effects impossible with solid colors. An ombre treatment transitioning from deep navy blue at the perimeter to soft white at the center creates cloud-like effect suggesting sky views overhead. The smooth color gradation requires skilled painting technique and careful blending to eliminate visible brush strokes or abrupt transitions between shades. This sophisticated treatment converts the ceiling from architectural surface into artistic element that establishes mood and atmosphere in bedroom environments. The dramatic color variation creates visual interest while the gradual transition maintains cohesive unity across the surface.
The technique demonstrates how ceilings can incorporate artistic expression typically reserved for wall surfaces or artwork. The deep navy perimeter creates sense of enclosure and intimacy appropriate for bedroom settings while the bright center prevents the dark color from making the space feel oppressive. The gradient creates natural focal point at the room’s center, where the lightest tones draw the eye upward. This subtle directional emphasis can make ceilings appear higher than they actually measure. The color choice works particularly well in bedrooms where the blue tones create calming atmosphere conducive to rest and relaxation.
Neutral walls and contemporary furnishings prevent competition with the statement ceiling, allowing the ombre effect to dominate as the room’s primary design feature. This restraint demonstrates good design judgment—multiple competing focal points create visual chaos rather than cohesive composition. The furniture’s simplicity ensures the artistic ceiling receives appropriate attention while maintaining the room’s functionality and comfort. Even lighting throughout the space ensures the gradient reads clearly without shadows or bright spots that would distort the careful color transitions. The overall effect creates memorable personal retreat that demonstrates design confidence and artistic sensibility.
Key Design Tips: Practice the ombre technique on sample boards to develop skill before applying to ceiling. Use high-quality paint that remains workable long enough to blend transitions while still damp. Work in small sections to maintain wet edges essential for smooth blending. Use multiple intermediate colors between the darkest and lightest shades—more color steps create smoother gradients. Apply base coat in the lightest color before creating gradient effect. Blend colors using large soft brush, sponge, or specialized blending tools depending on desired effect. Work quickly to blend transitions before paint dries and creates hard edges. Consider hiring professional decorative painter for best results—ombre ceilings require significant skill. Apply protective topcoat in high-traffic areas where ceiling might be touched. Use flat or matte paint sheen that minimizes visible brush strokes and creates smooth appearance.
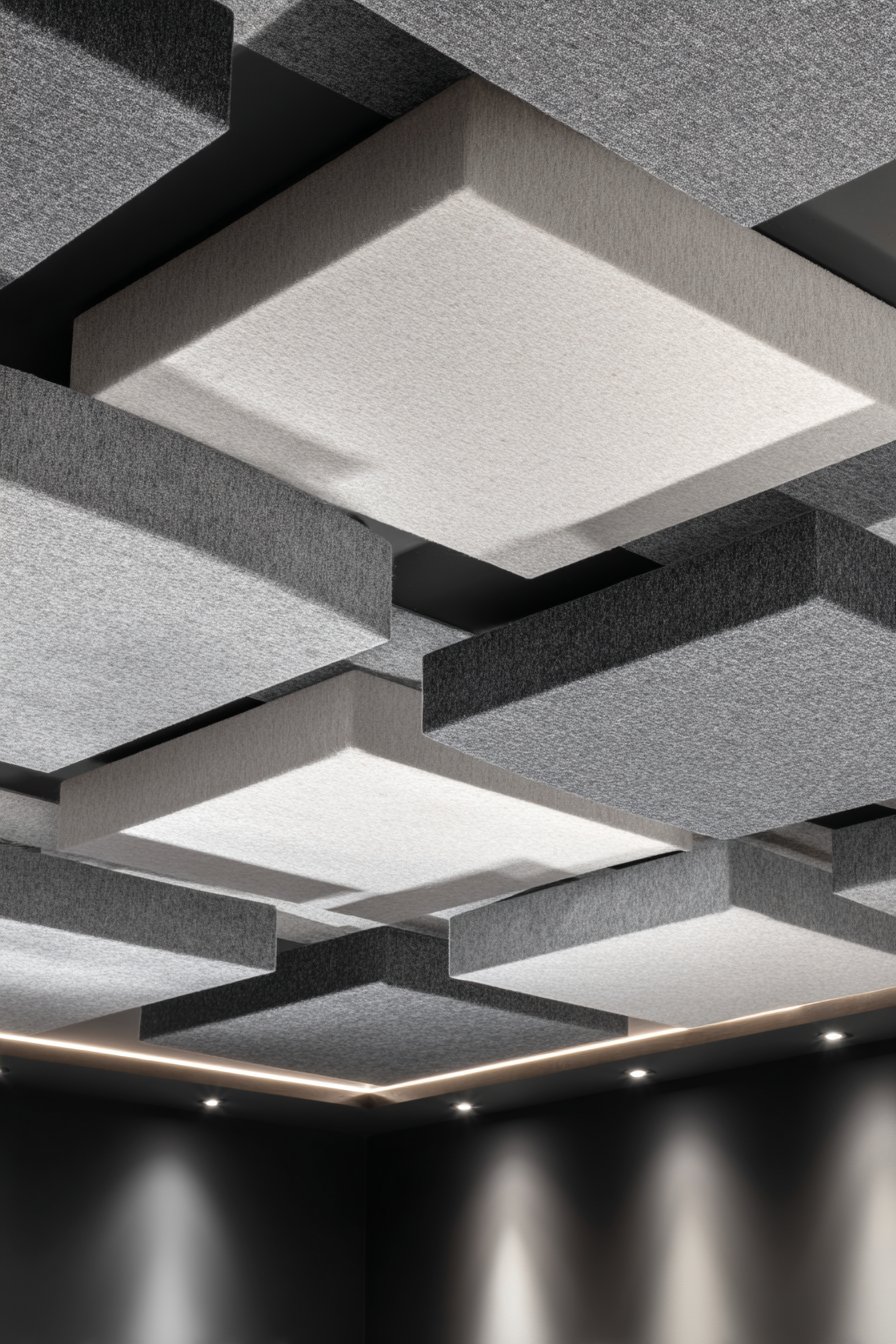
20. Functional Acoustic Panel Integration

Contemporary ceiling design increasingly addresses acoustic performance in addition to visual aesthetics, as demonstrated by integrated sound-dampening panels arranged in geometric patterns. Fabric-wrapped acoustic panels in soft gray and white tones create subtle checkerboard effect while serving functional purpose of reducing echo and reverberation in spaces with hard surfaces. The panels install flush with the ceiling surface, maintaining clean modern appearance without protruding elements that would disrupt the overhead plane. This integration of function and form exemplifies thoughtful design where technical requirements and aesthetic goals align rather than conflict.
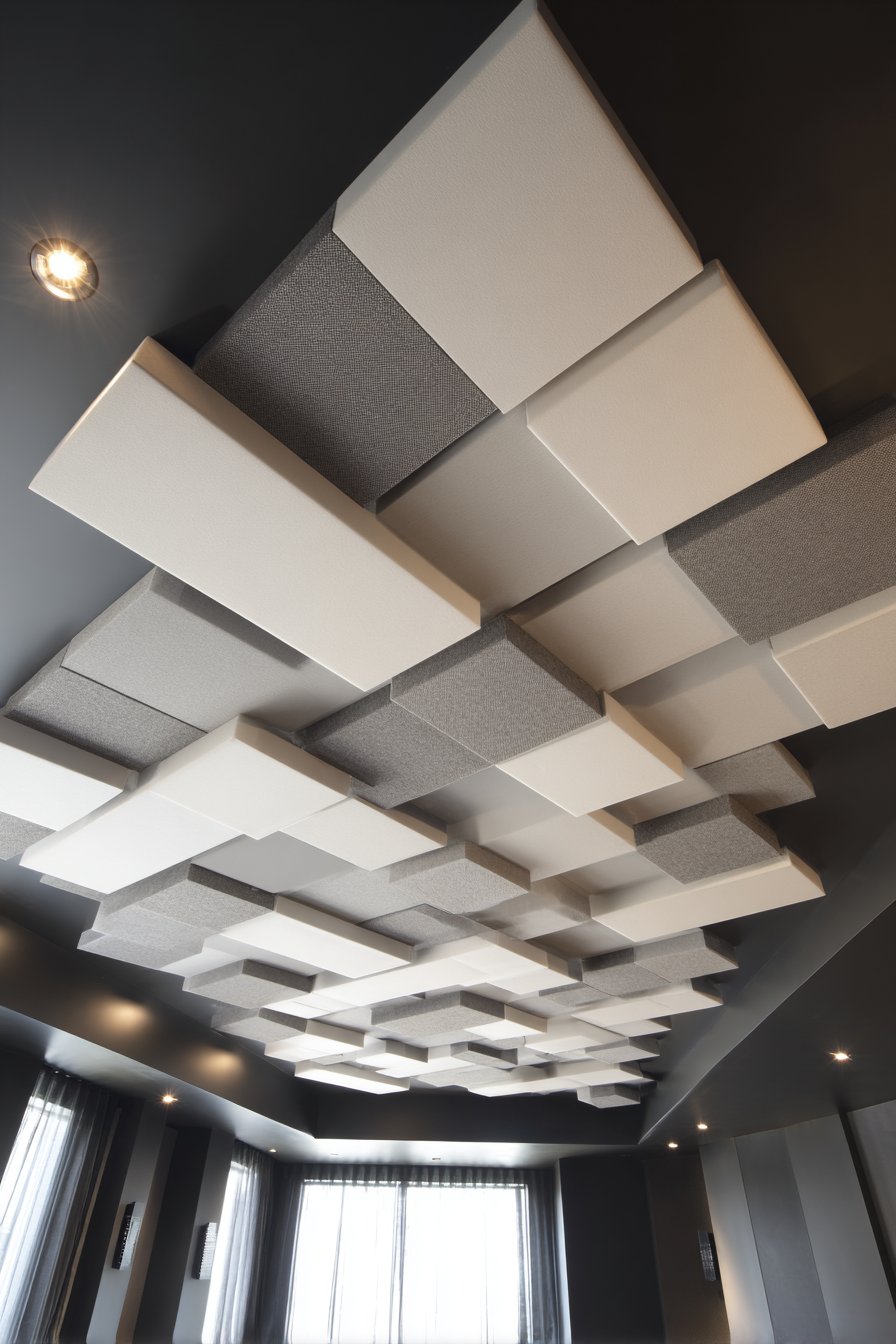
The geometric arrangement creates visual interest through pattern and subtle color variation while the acoustic performance transforms problematic sound environments into comfortable spaces. Hard surfaces like drywall, glass, and tile reflect sound waves, creating excessive echo that makes conversation difficult and creates fatiguing acoustic environment. The acoustic panels absorb sound energy, reducing reverberation time and improving speech intelligibility. This functional improvement dramatically enhances the space’s usability, particularly in home theater environments where acoustic quality directly impacts enjoyment and immersion. The panels’ strategic placement and coverage area determine acoustic performance—professional acoustic design ensures optimal results.
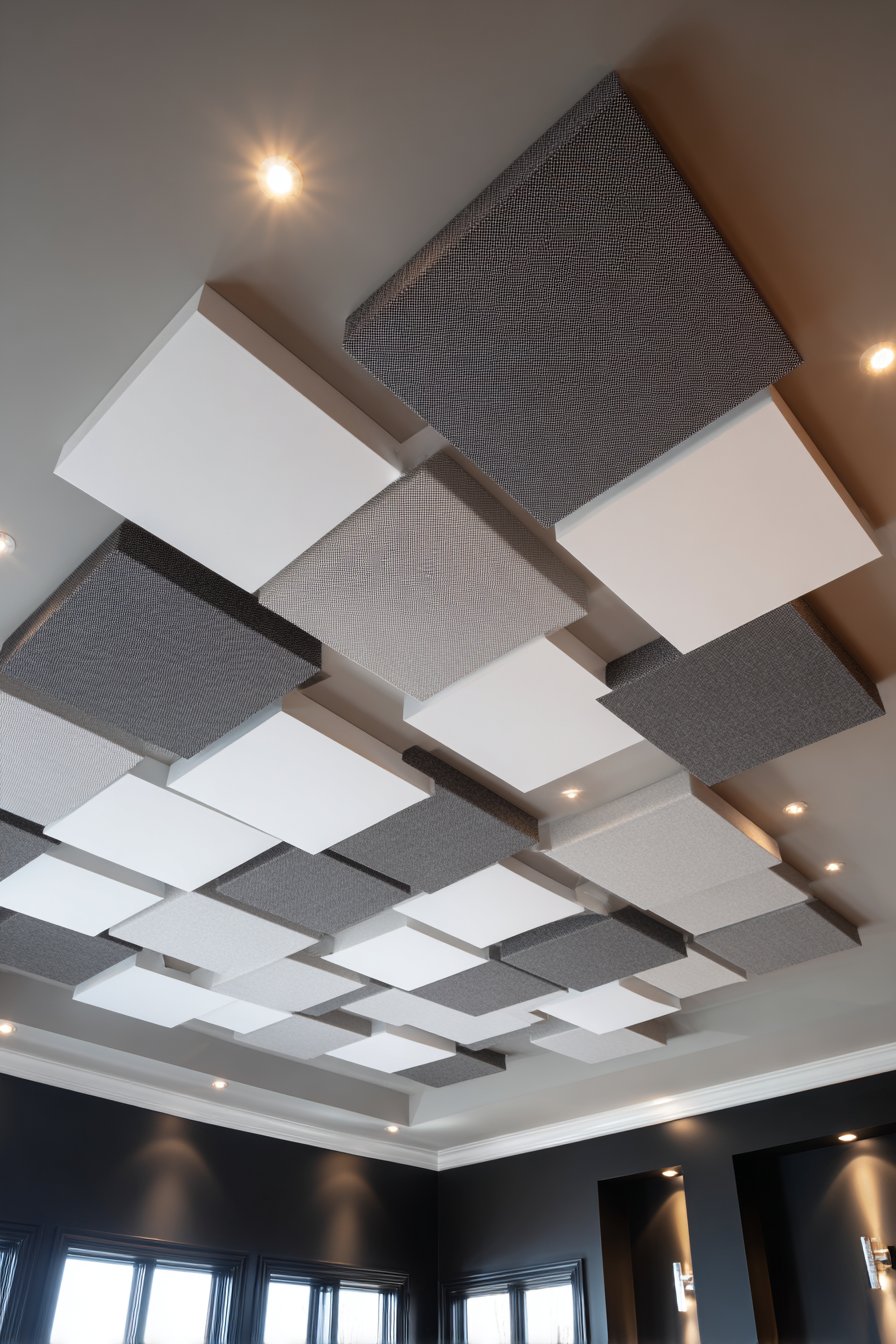
The fabric wrapping provides finish options that allow acoustic panels to integrate visually with surrounding ceiling surfaces. The soft gray and white color palette creates subtle pattern that adds visual interest without overwhelming the space. Recessed lighting strategically placed in the white panel sections provides functional illumination while emphasizing the checkerboard pattern. The three-dimensional quality of the acoustic panels becomes visible through the shadows cast by recessed lighting, revealing the panels’ depth and textural quality. This treatment demonstrates how technical building systems can become integrated design elements rather than afterthoughts requiring concealment.
Key Design Tips: Consult with acoustic specialist to determine required panel coverage for desired sound absorption. Choose acoustic panels rated for appropriate frequency range—some panels target low frequencies while others address high frequencies. Install panels according to manufacturer specifications to ensure proper acoustic performance. Consider panel thickness in ceiling height calculations—thicker panels provide better low-frequency absorption but reduce ceiling height. Select fabric covering that complements interior finishes while maintaining acoustic transparency. Plan lighting to emphasize rather than fight the panel pattern. Use professional installation for flush-mounted systems that require precise cutting and fitting. Consider combining acoustic panels with other absorptive materials like rugs and upholstered furniture for comprehensive acoustic treatment. Test acoustic performance after installation and adjust if necessary—acoustic design sometimes requires iteration to achieve optimal results.
21. Dramatic Matte Black Statement
Bold color choices can dramatically transform spatial perception and create sophisticated contemporary atmospheres, as demonstrated by matte black painted ceilings. This counterintuitive approach—painting ceilings dark rather than light—creates dramatic contrast in dining rooms with white walls and natural wood flooring. The black ceiling paradoxically makes spaces feel taller rather than lower because the dark surface visually recedes, creating sense of infinite depth overhead. Recessed lighting with brass trim rings adds warmth and luxury while providing functional illumination that prevents the dark ceiling from making the space feel gloomy. The brass metallic elements create sophisticated contrast against both the black ceiling and white walls.
A statement chandelier with mixed metal and glass elements hangs centrally, becoming even more prominent against the dark backdrop. The black ceiling acts as dramatic stage for the light fixture, making it appear more luminous and sculptural than it would against light surfaces. This relationship demonstrates how ceiling color can enhance rather than compete with decorative lighting. The contrast between dark ceiling and bright walls creates strong horizontal definition that emphasizes the room’s proportions and creates visual interest through color blocking. During evening hours when artificial lighting dominates, the black ceiling nearly disappears, allowing light fixtures to appear as floating elements creating pools of illumination.
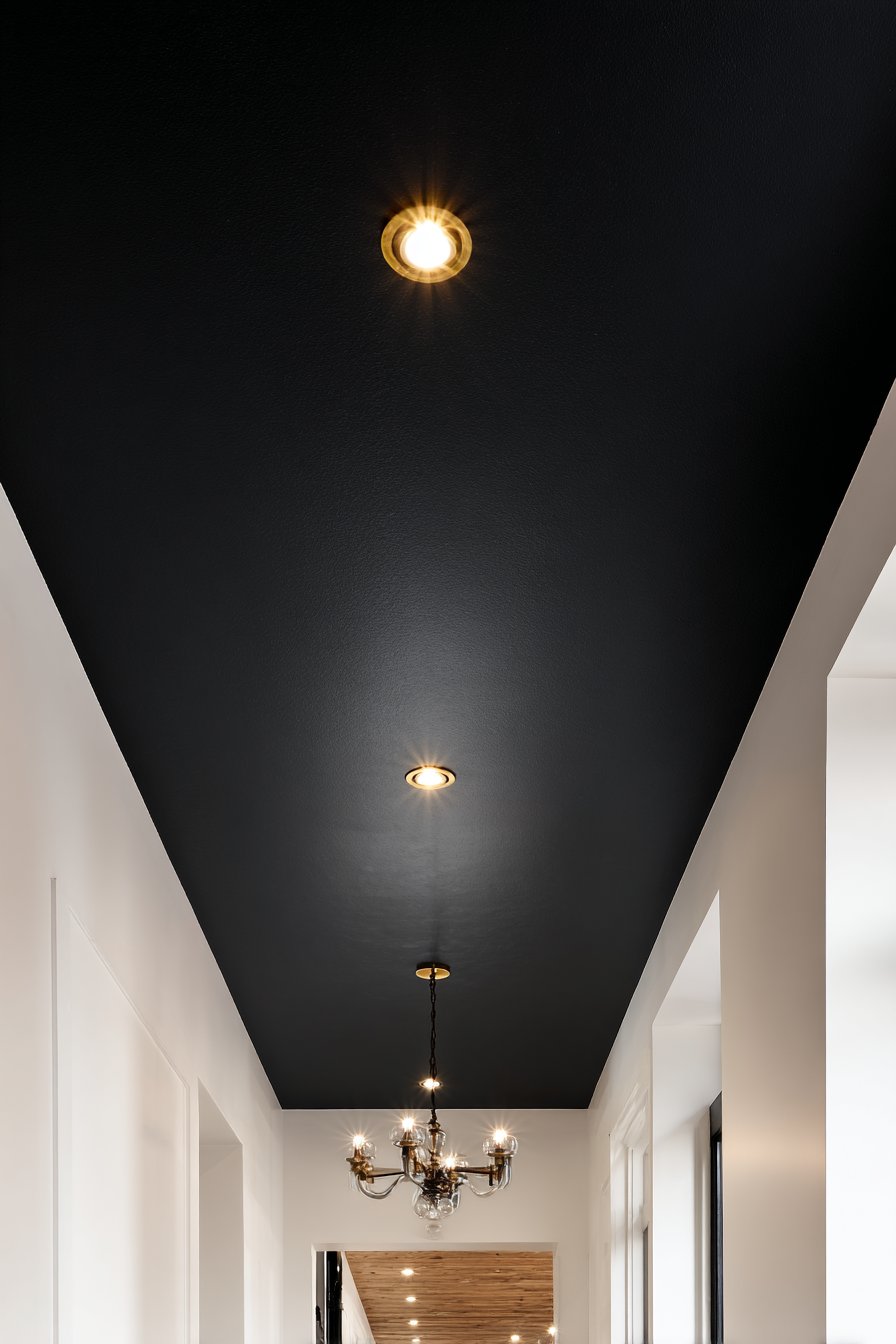
The bold ceiling treatment requires confident design commitment—black ceilings represent deliberate choice that fundamentally changes a room’s character. This approach suits formal dining rooms where sophisticated atmosphere and dramatic effect are desired. The dark ceiling creates intimate ambiance appropriate for evening entertaining while the white walls maintain brightness and prevent the space from feeling oppressive. Natural wood flooring adds warmth that balances the cool black and white contrast, creating color palette that feels sophisticated rather than stark. The overall effect demonstrates how unconventional color choices can create memorable spaces that challenge expectations and demonstrate design sophistication.
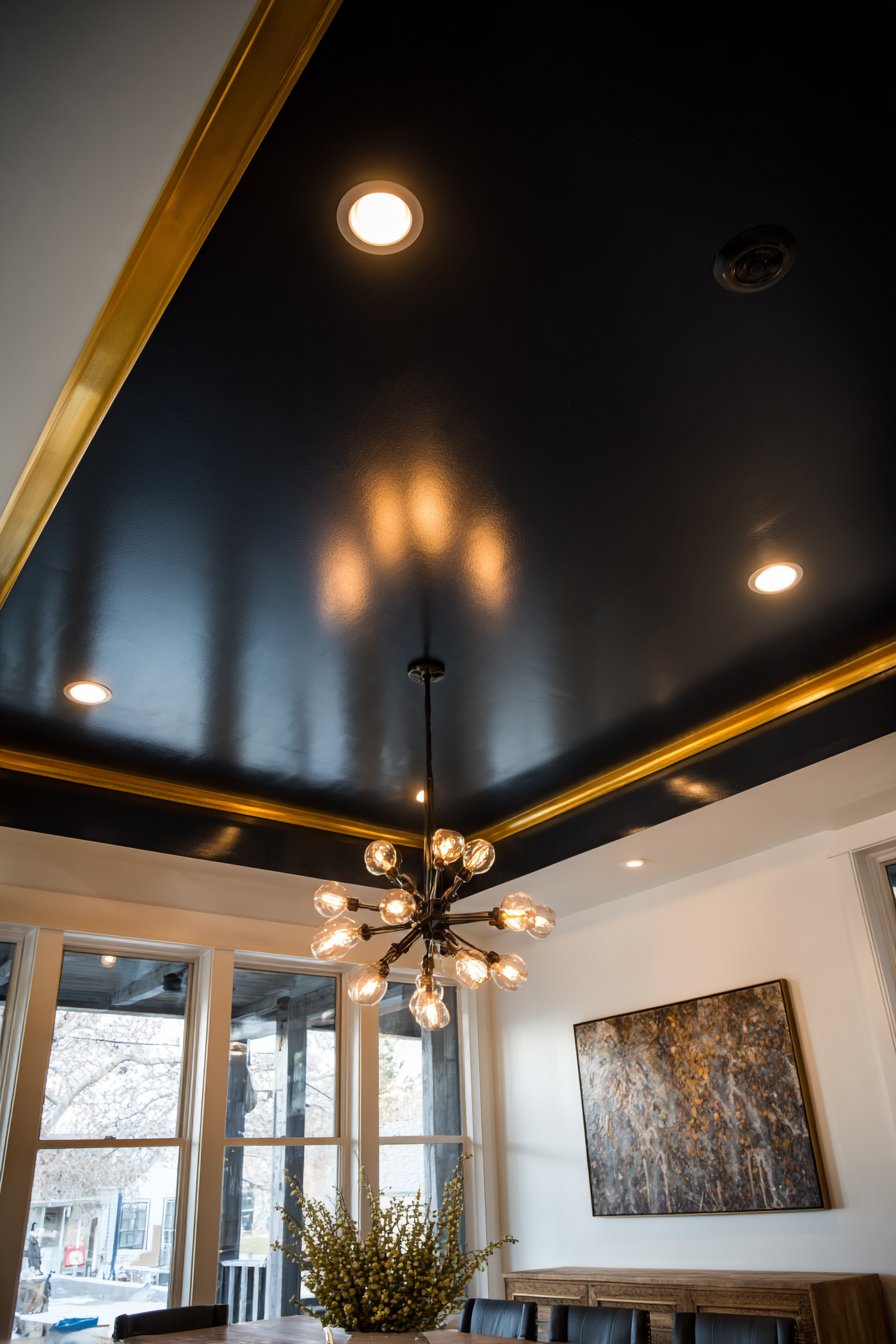
Key Design Tips: Use true matte finish paint specifically formulated for ceilings—glossy or semi-gloss sheens create unwanted reflections and emphasize surface imperfections. Apply multiple coats for complete coverage and deep color saturation—dark colors require more coats than light colors. Ensure perfectly smooth ceiling surface before painting—imperfections show more prominently against dark colors. Choose warm-toned metallic trim for recessed lights to prevent cold institutional appearance. Install adequate lighting to prevent dark ceiling from creating gloomy atmosphere. Consider ceiling height before painting dark colors—minimum nine-foot ceilings recommended. Protect walls, floors, and fixtures thoroughly during painting—dark paint shows visibly on light surfaces and is difficult to remove. Apply painter’s tape carefully along crown molding for crisp edge where ceiling meets walls. Use low-VOC paint for better indoor air quality. Test paint color in the actual space at different times of day before committing.
22. Historical Exposed Structure Character
Preserved architectural elements from historic buildings create authentic character impossible to achieve through new construction or surface treatments. White-painted exposed structural components including original joists, beams, and between-joist boards showcase building methodology and craftsmanship from earlier eras. The structural elements remain visible and textural despite the unified white paint treatment that creates cohesive appearance while maintaining dimensional interest. This approach honors historical architecture while adapting it to contemporary aesthetics through the fresh white finish. Modern pendant lights hanging from the joists at varied heights bridge historical and contemporary design, creating dialogue between past and present.
The exposed structure spans an updated historic home’s kitchen where period architectural details blend with contemporary updates to create transitional aesthetic. The visible joists create rhythm across the ceiling through their regular spacing, while the boards between joists add texture and reveal historical construction methods. Wood grain remains visible through the white paint, maintaining organic quality and material authenticity despite the color transformation. The white finish brightens the space and creates cohesive appearance that prevents the exposed structure from overwhelming the interior. Without paint, the mixed wood species and varying patinas might create visually chaotic appearance—the unified white treatment provides organization while preserving architectural interest.
This preservation approach demonstrates sustainable design thinking where existing architectural elements are celebrated and reused rather than covered or removed. The exposed structure tells the building’s story, creating connection to history and previous occupants. Modern kitchen updates below the historical ceiling create productive tension between eras, demonstrating how historic buildings can accommodate contemporary living while maintaining their essential character. The pendant lights’ varied heights create visual interest while providing task lighting for kitchen work areas. The overall effect shows how thoughtful renovation can honor historical integrity while meeting modern functional requirements and aesthetic preferences.
Key Design Tips: Clean exposed structural elements thoroughly before painting to remove accumulated dirt and ensure proper paint adhesion. Repair any damaged or deteriorated wood before painting to ensure structural integrity. Apply primer designed for bare wood to seal surface and ensure uniform paint coverage. Use paint sprayer for most efficient coverage of three-dimensional structural elements—brush application is extremely time-consuming. Protect surrounding surfaces thoroughly before spraying—overspray travels farther than expected. Apply multiple thin coats rather than single heavy coat to prevent drips and ensure complete coverage. Consider semi-gloss or satin finish for easier cleaning of exposed structural elements that accumulate dust. Plan lighting placement to avoid drilling into structural members—work with locations between joists when possible. Consult structural engineer before hanging heavy objects from historical structural elements—load capacity may differ from modern framing. Embrace imperfections and irregularities as character rather than flaws—historical elements won’t have the precision of modern construction.
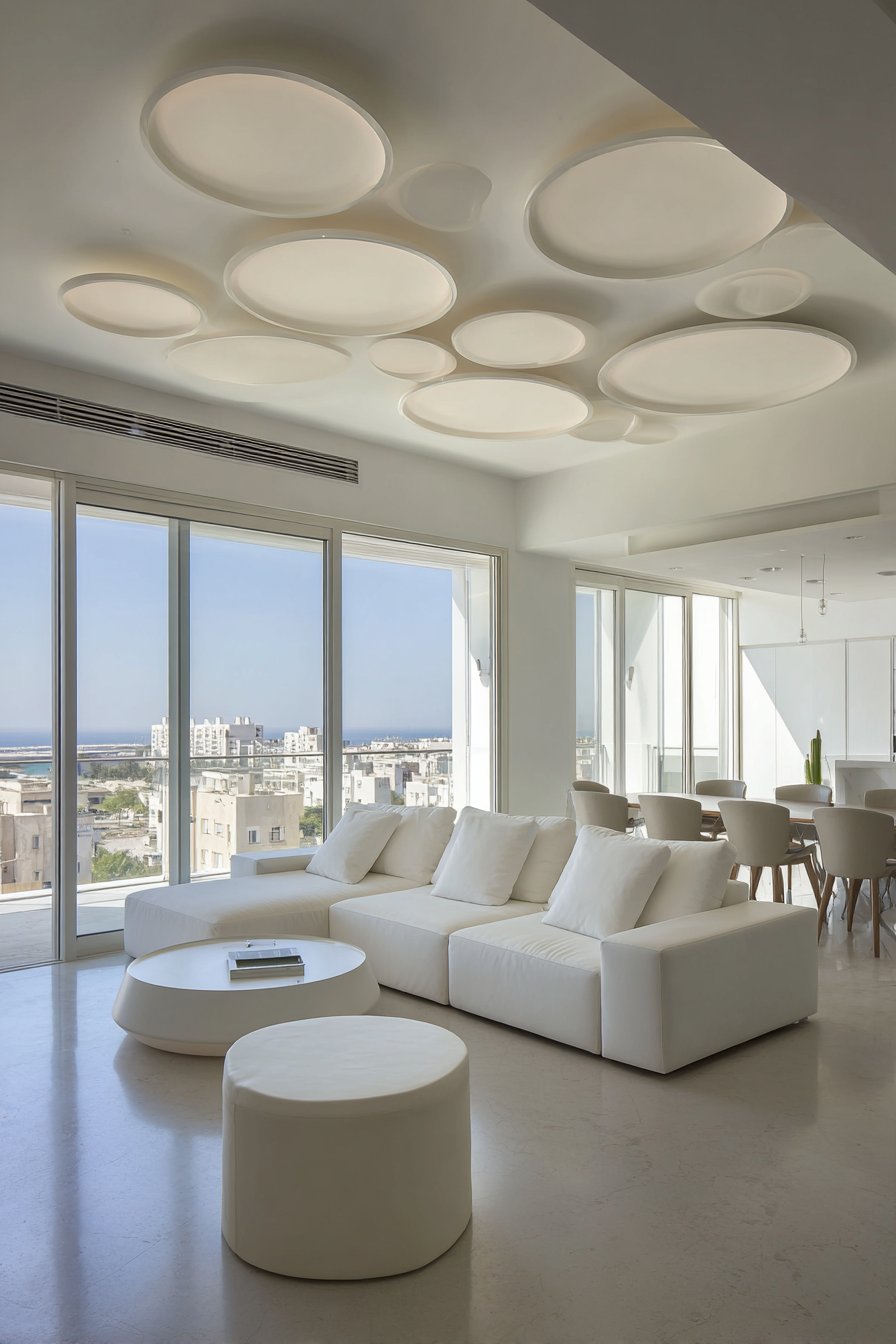
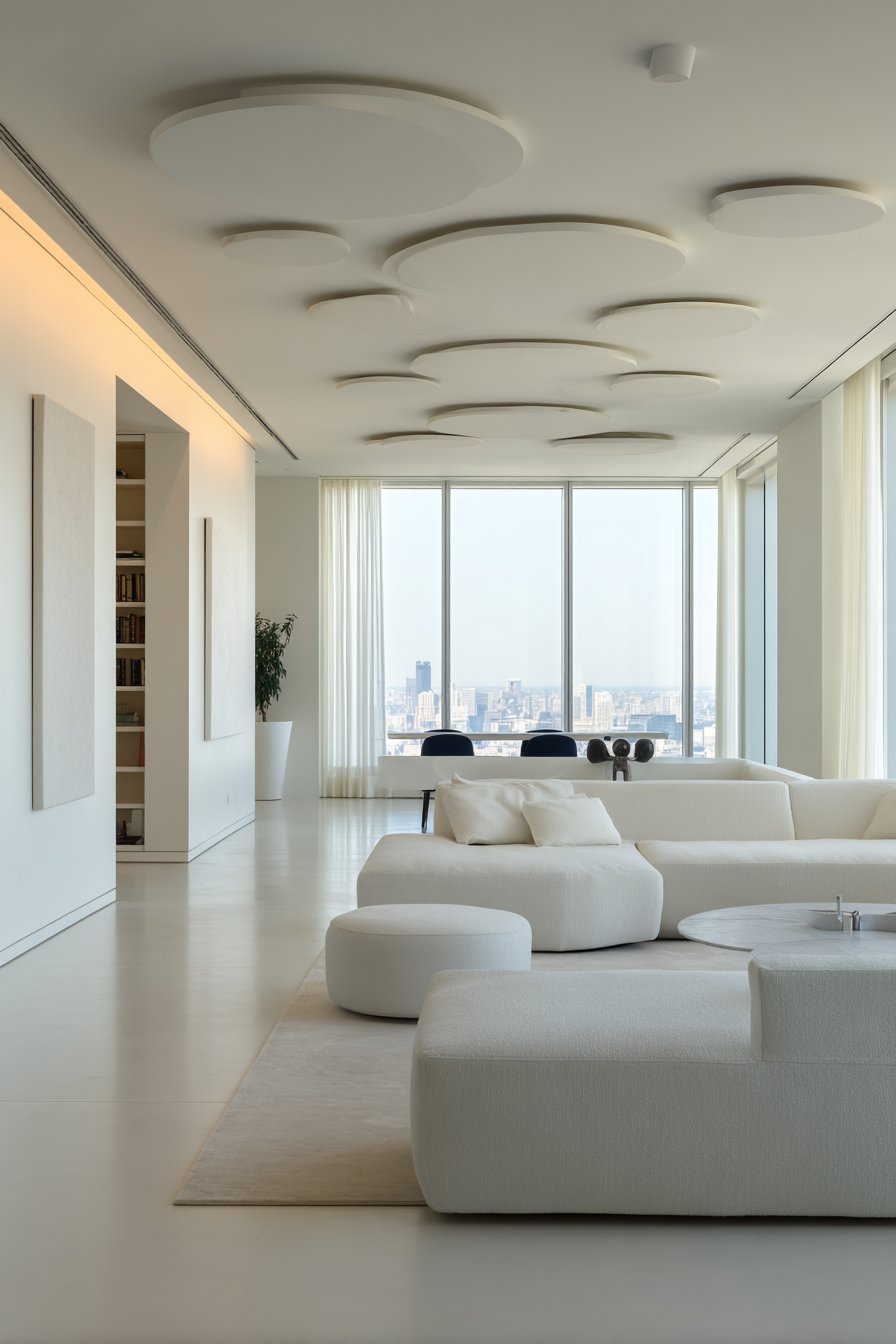
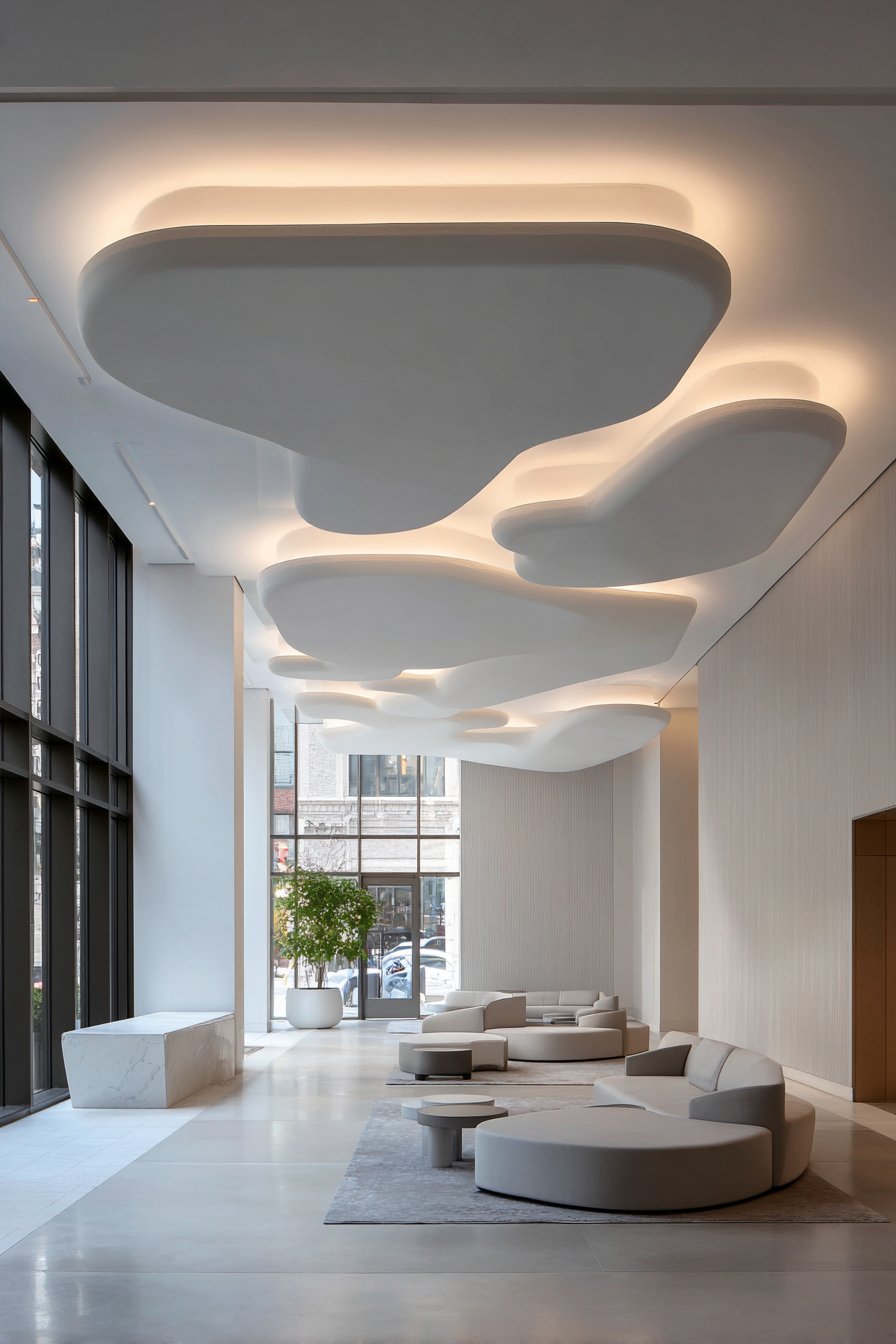
23. Artistic Sculptural Cloud Elements
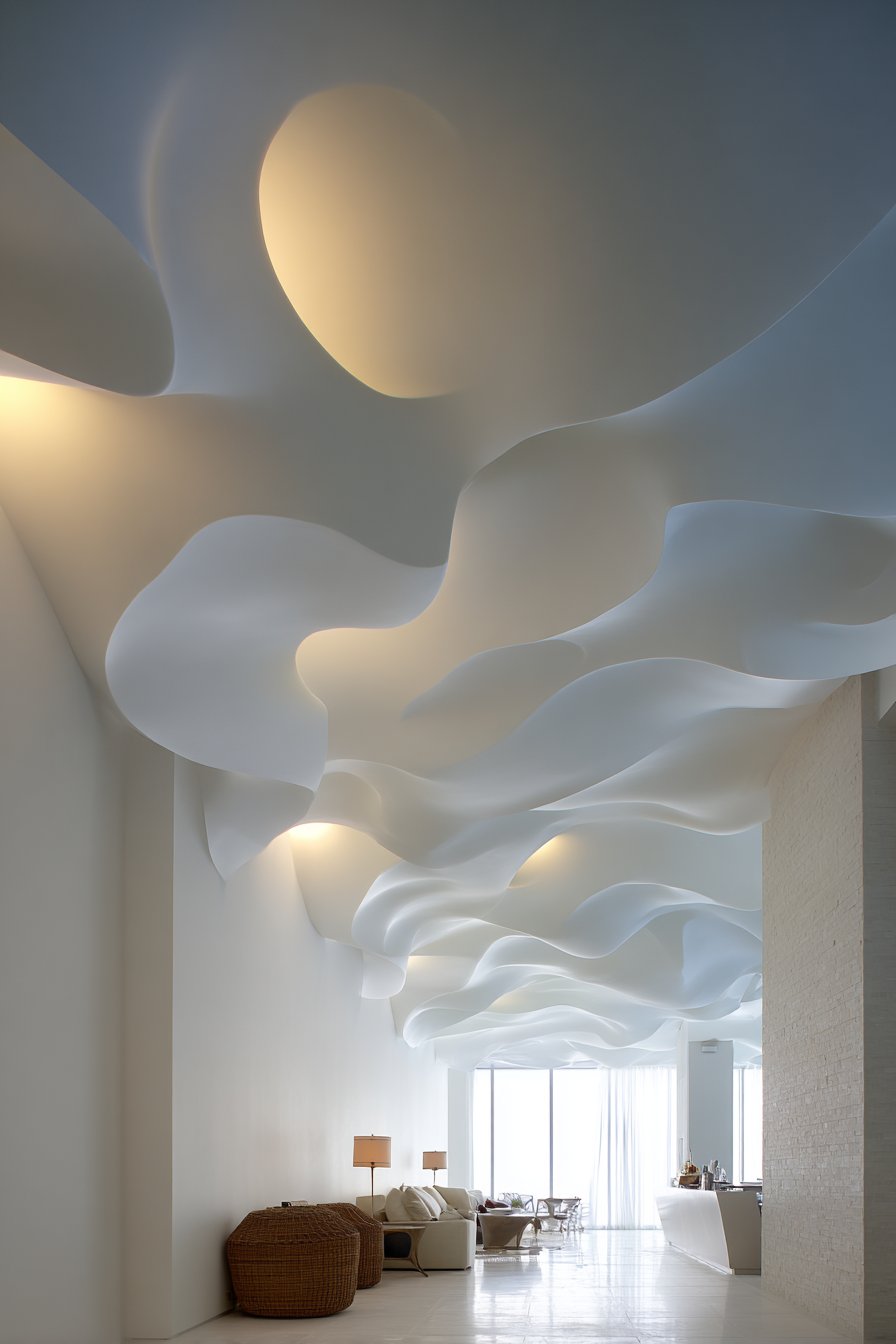
Contemporary ceiling design explores three-dimensional sculptural possibilities through floating organic forms that create visual interest while improving acoustic performance. Lightweight sculptural elements in matte white appear to float below the ceiling plane, creating cloud-like formations with organic shapes that soften architectural geometry. These abstract forms add artistic quality and visual interest while serving practical function of absorbing sound energy in spaces with predominantly hard surfaces. The main ceiling above remains smooth and white with concealed lighting creating ambient glow that emphasizes the sculptural elements’ three-dimensional quality. This artistic treatment suits modern lobbies or living areas where design innovation and acoustic comfort are both priorities.
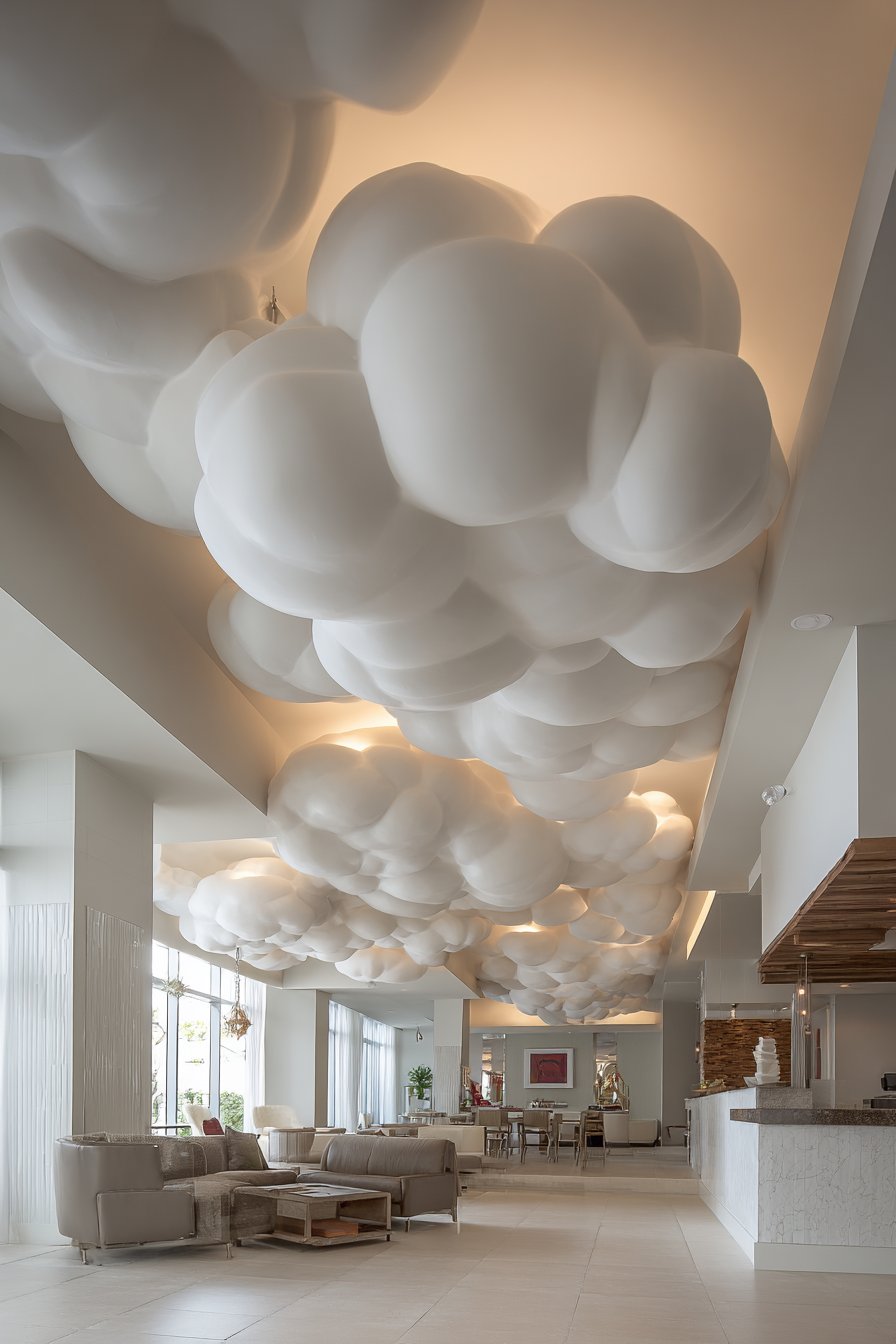
The cloud formations create sense of movement and fluidity overhead, bringing dynamic energy to static architectural spaces. The organic shapes contrast beautifully with the room’s rectangular geometry, introducing nature-inspired forms into contemporary interiors. The sculptural elements’ positioning and arrangement require artistic judgment—random placement might appear chaotic while overly regular patterns would feel rigid and controlled. The successful installation achieves balanced asymmetry where forms appear naturally distributed without obvious pattern. The white color maintains visual lightness, ensuring the sculptural elements add interest without creating heavy appearance that might overwhelm the space.
The acoustic benefits of these sculptural elements provide functional justification for their installation beyond pure aesthetics. By reducing reverberation and echo, the cloud forms improve conversation clarity and reduce auditory fatigue in spaces where people gather. This dual-purpose design approach exemplifies contemporary thinking where form and function integrate seamlessly. Minimalist furnishings below complement the artistic ceiling treatment, creating cohesive modern aesthetic. The overall effect demonstrates how ceilings can transcend their traditional role as simple overhead surfaces to become three-dimensional architectural features that combine art, acoustics, and innovative design thinking.
Key Design Tips: Work with professional designers or sculptors to create custom forms appropriate to space scale and character. Choose lightweight materials designed for suspended installation to minimize structural requirements. Engineer suspension systems that securely support elements while remaining concealed from view. Consider fire safety requirements—suspended elements must meet building code fire ratings. Plan lighting to create shadows that emphasize three-dimensional forms and sculptural quality. Space elements to maintain visual balance while avoiding cluttered appearance. Consider maintenance access for cleaning and light source replacement. Select materials rated for acoustic absorption if sound control is design objective. Integrate sculptural elements early in design process to coordinate structural support and electrical requirements. Consider how elements appear from different viewing angles throughout the space—successful sculptural ceilings work from multiple perspectives.
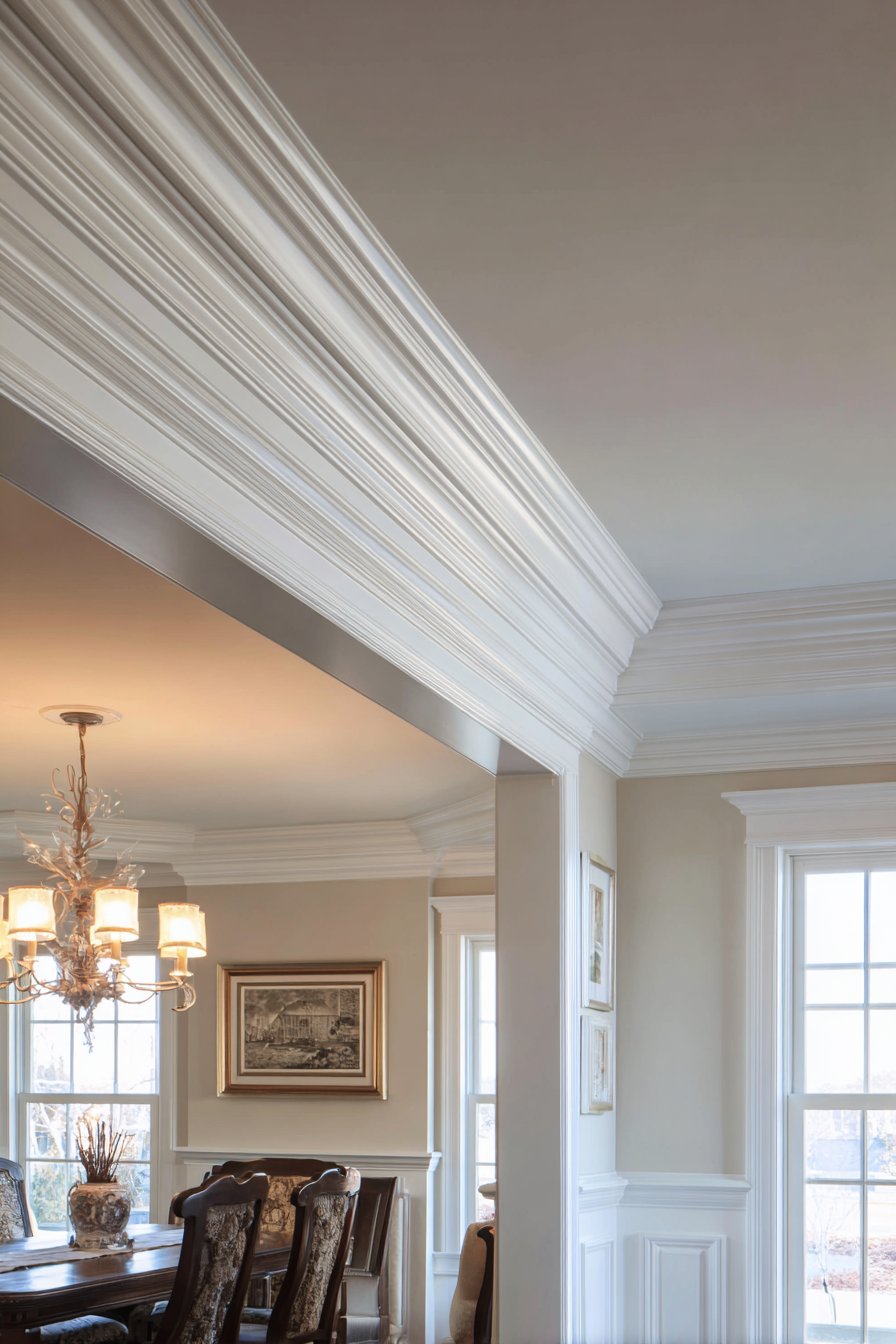
24. Traditional Crown Molding Refinement
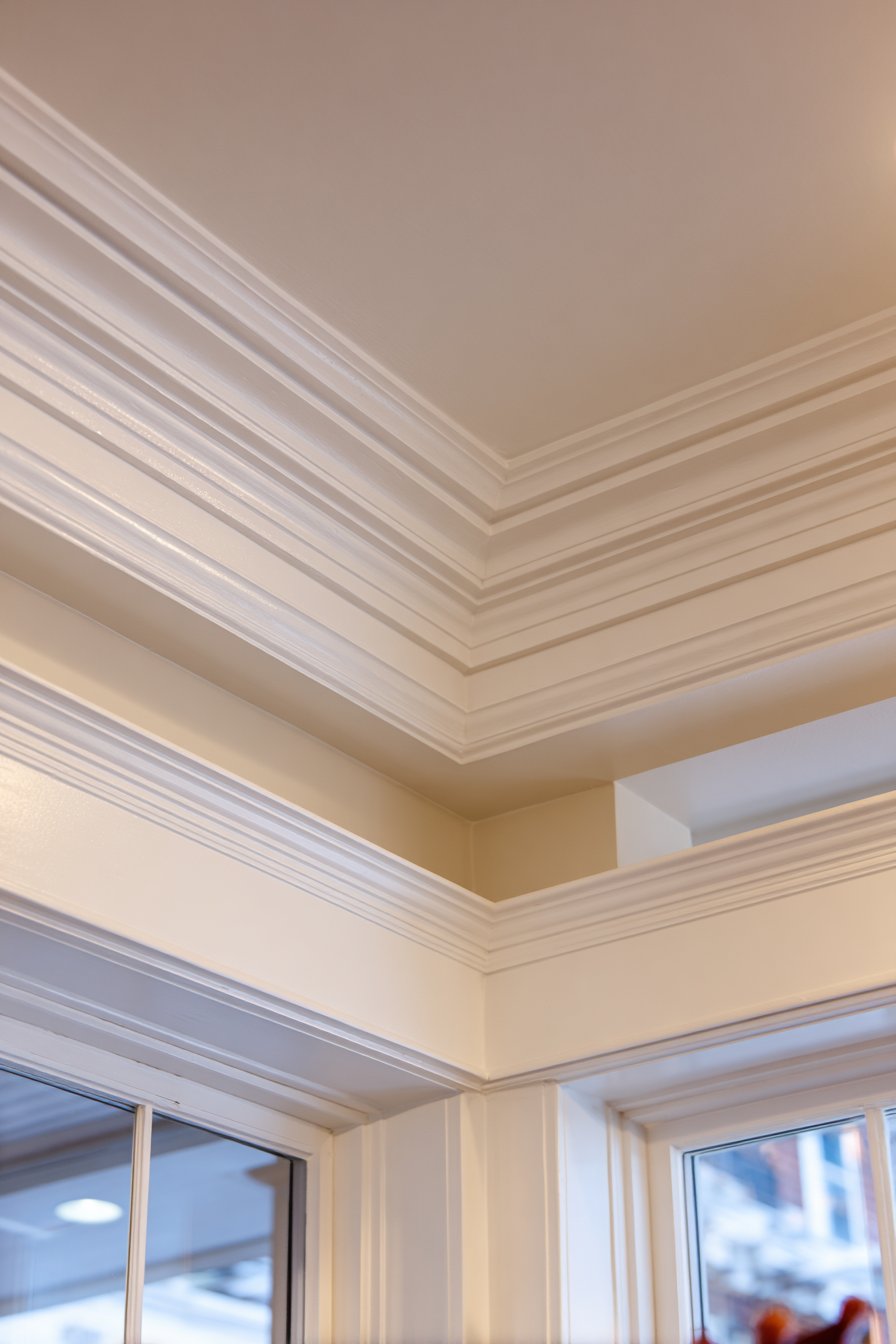
Classic architectural trim demonstrates enduring appeal through substantial traditional detailing that frames and defines ceiling planes. Crown molding measuring approximately eight inches tall features multiple profile layers including dentil details that create dimensional richness and shadow play. This substantial trim represents quality craftsmanship and attention to architectural detail characteristic of formal traditional interiors. The molding installs in bright white while the main ceiling receives slightly warmer white paint, creating subtle definition that allows the trim’s profile to be fully appreciated. This traditional treatment frames formal dining rooms where wainscoting and traditional furnishings extend the classical aesthetic throughout the space.
The molding’s profile depth creates multiple shadow lines that change throughout the day as natural light angles shift. These shadows emphasize the trim’s dimensional quality and reveal the careful detail work in the profile design. The dentil elements—small rectangular blocks creating rhythmic pattern along the molding’s lower edge—add classical detail referencing Greek and Roman architectural traditions. This historical connection adds gravitas and formality appropriate for dining rooms and other ceremonial spaces. The substantial scale suits rooms with high ceilings and formal proportions—the same molding would overwhelm rooms with standard eight-foot ceilings or modest dimensions.
Traditional crown molding represents investment in architectural permanence and quality that transcends temporary design trends. Unlike painted finishes or decorative treatments that might date quickly, quality architectural trim maintains its appeal across decades and design generations. The molding visually connects ceiling to walls while concealing the joint where these surfaces meet—both functional and aesthetic purposes. In rooms with wainscoting, the crown molding creates visual bookends at top and bottom that frame the wall surface and create architectural completeness. The overall effect demonstrates how classical architectural elements continue providing design value through their inherent proportional relationships and carefully refined details developed over centuries of architectural practice.
Key Design Tips: Choose molding scale proportional to ceiling height—standard eight-foot ceilings suit 3-5 inch moldings while higher ceilings accommodate larger profiles. Use wood moldings rather than plastic or foam alternatives for authentic appearance and better paint acceptance. Cut precise miters at corners using power miter saw with sharp blade—poor joints immediately visible on prominent trim. Prime all molding pieces before installation for better paint coverage and reduced installation time. Fill nail holes, joints, and imperfections with paintable caulk or wood filler appropriate to material. Sand smooth after filler dries, before painting. Apply multiple paint coats for complete coverage and smooth finish. Consider built-up crown molding combining multiple profiles for custom appearance. Install blocking at inside corners to provide secure nailing surface. Work methodically around room, completing one wall at a time. Use pneumatic finish nailer for efficient installation and minimal surface damage requiring filling.
25. Luminous Backlit Fabric Panel System
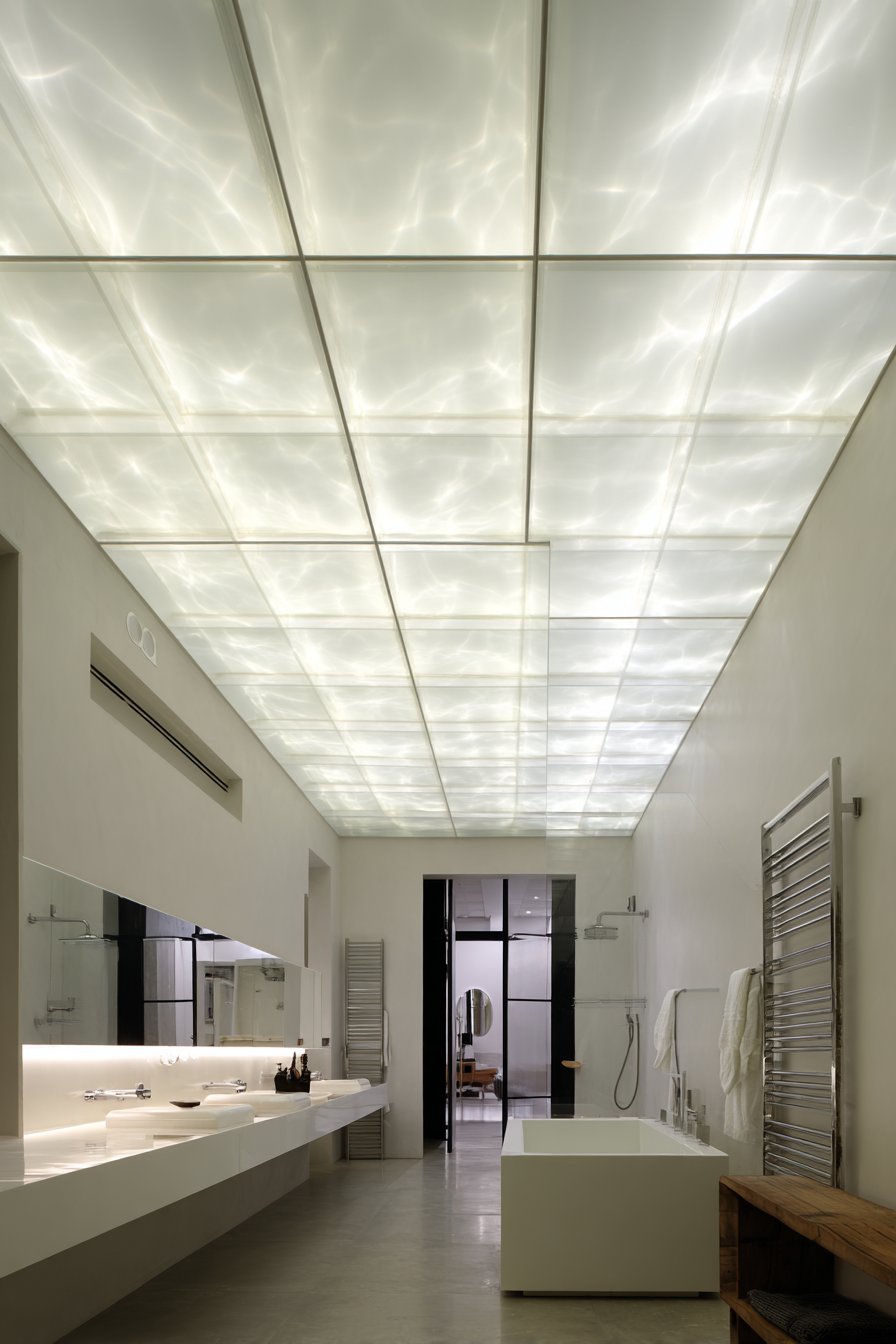
Innovative ceiling lighting approaches integrate illumination sources with architectural surfaces to create glowing luminous effects that provide both functional lighting and atmospheric beauty. Translucent white fabric stretched within aluminum frames creates backlit panel system where concealed LED lighting above the fabric produces even diffused illumination. The panels arrange in grid pattern with thin black reveals between sections that provide necessary structural definition and create geometric order across the ceiling plane. This modern treatment demonstrates how lighting can become architectural rather than additive—the ceiling itself becomes the light source rather than simply supporting separate fixtures.
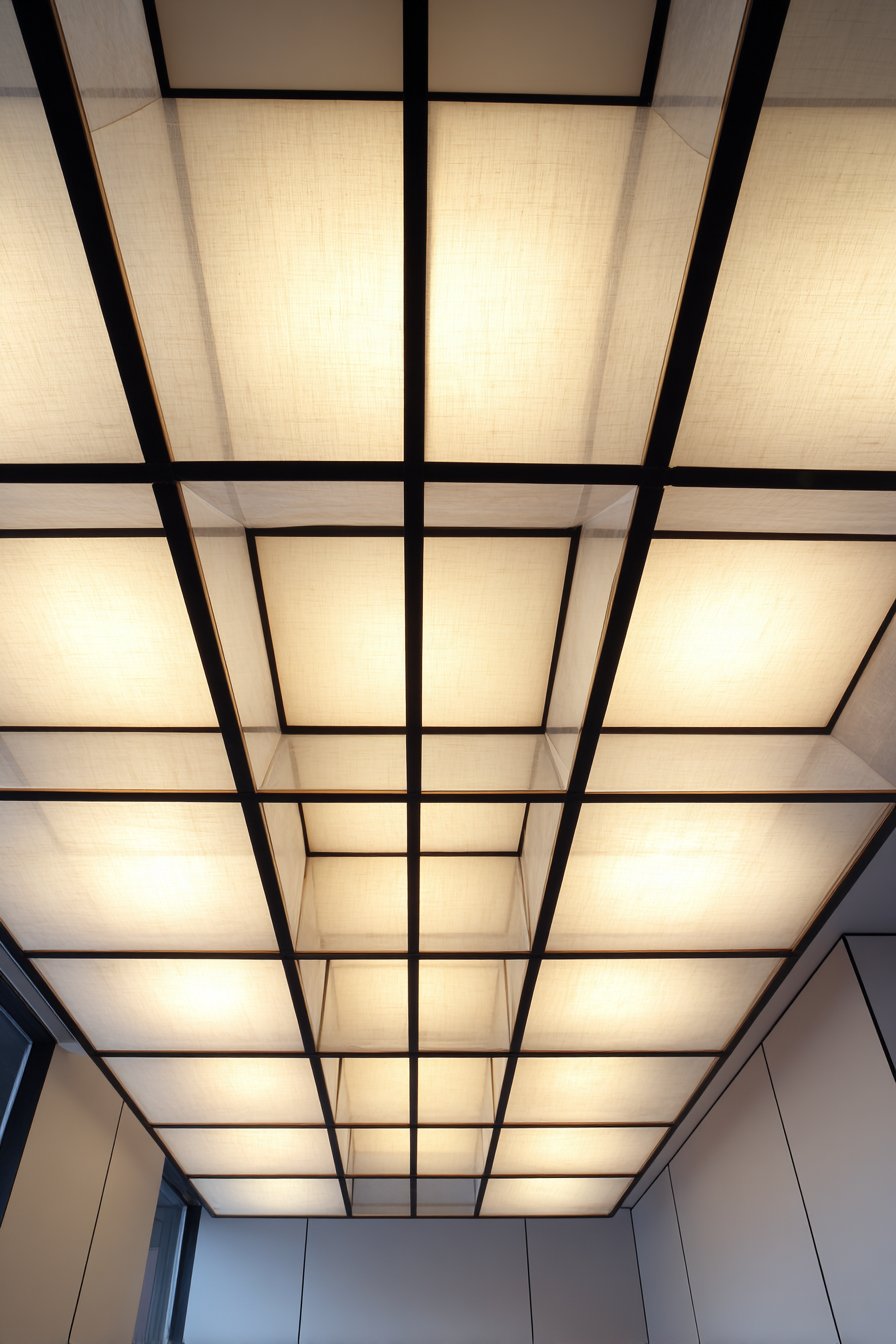
The luminous quality creates calm, even illumination particularly suitable for bathroom environments where harsh shadows and bright spots create unflattering lighting for grooming activities. The diffused light wraps around facial features without creating the stark shadows produced by downlights or side-mounted fixtures. This comprehensive illumination makes spaces feel larger and more open while creating spa-like atmosphere associated with luxury bathrooms. The fabric when backlit displays subtle texture that adds visual interest while maintaining the overall minimalist aesthetic. During daytime hours when artificial lighting is unnecessary, the white fabric panels blend with white ceiling surfaces, maintaining clean contemporary appearance.
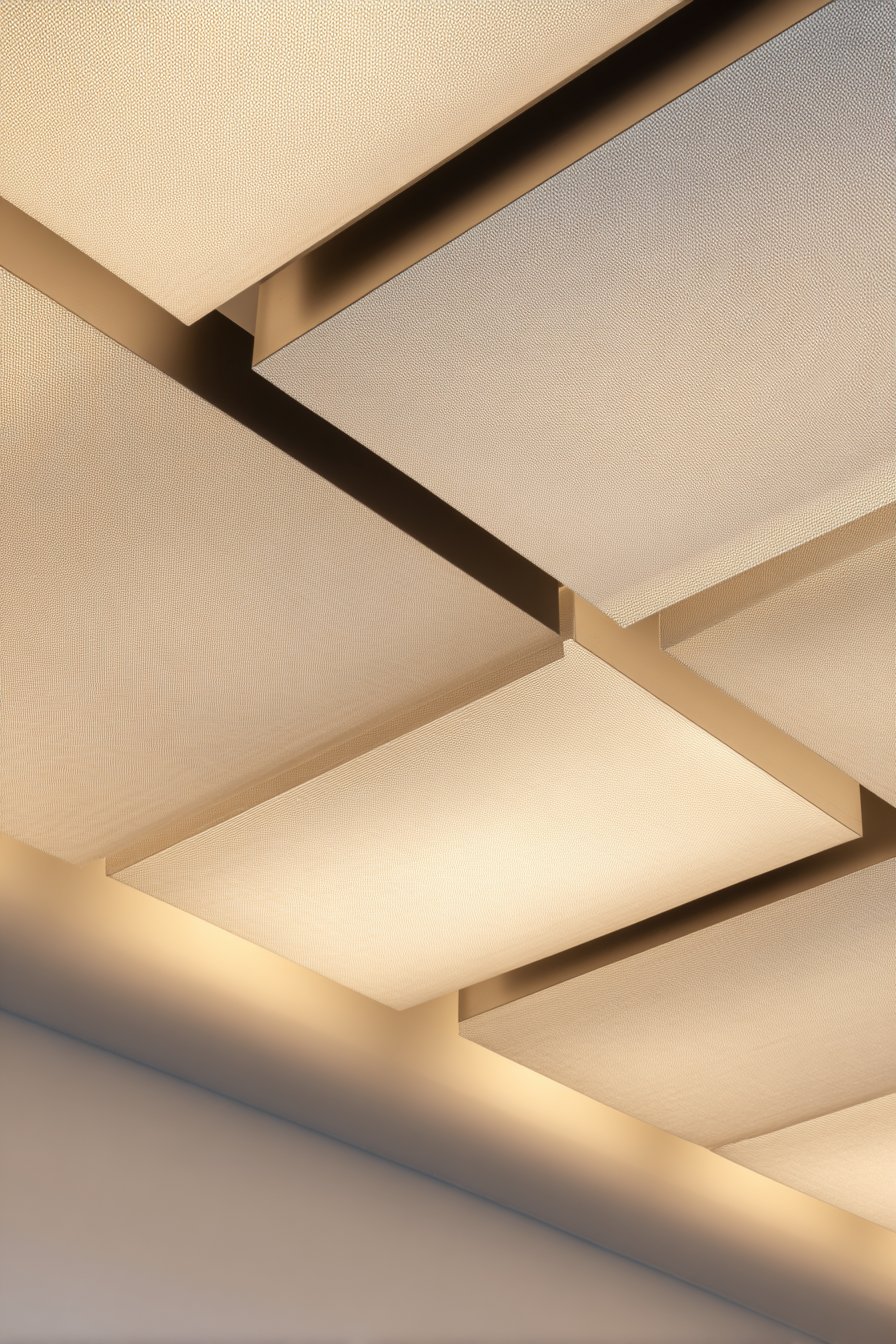
The technical execution requires careful planning to conceal LED strips, electrical connections, and aluminum framing while ensuring even light distribution across panel surfaces. Uneven lighting creates hot spots and dark zones that reveal the artificial nature of the installation. Quality LED components with proper spacing and diffusion create the seamless glow that makes this treatment successful. The black reveals between panels add graphic quality while concealing the mechanical systems that support the installation. The result represents sophisticated integration of architecture, lighting design, and interior finishes that elevates functional bathroom lighting into design feature worthy of attention and appreciation.
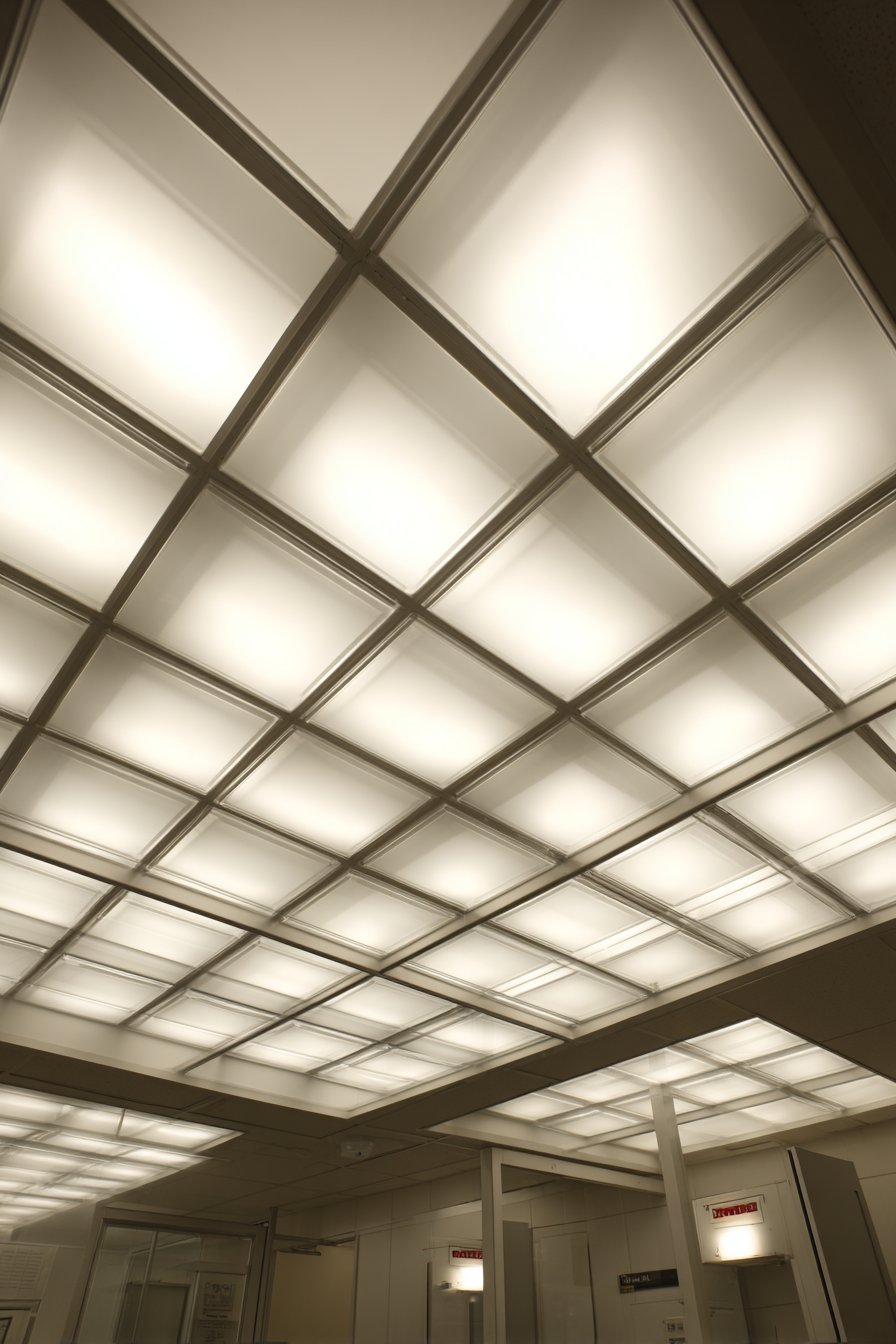
Key Design Tips: Work with lighting designers to calculate proper LED spacing and quantity for even illumination. Choose aluminum frame systems specifically designed for backlit panel applications. Select fabric with appropriate light transmission properties—too transparent shows LED sources while too opaque requires excessive lighting. Install LED strips according to manufacturer spacing recommendations to eliminate hot spots. Use high-quality LEDs with consistent color temperature across all panels. Plan access panels for future LED maintenance and replacement. Consider dimming capabilities for light level adjustment. Ensure adequate ceiling depth to accommodate frame systems and lighting components. Select warm white color temperature (2700-3000K) for residential bathroom applications. Clean fabric surfaces regularly using appropriate methods—some fabrics require professional cleaning. Plan electrical layout to distribute load appropriately across circuits. Test lighting before final installation to ensure desired effect and even illumination.
26. Dynamic Diagonal Plank Direction
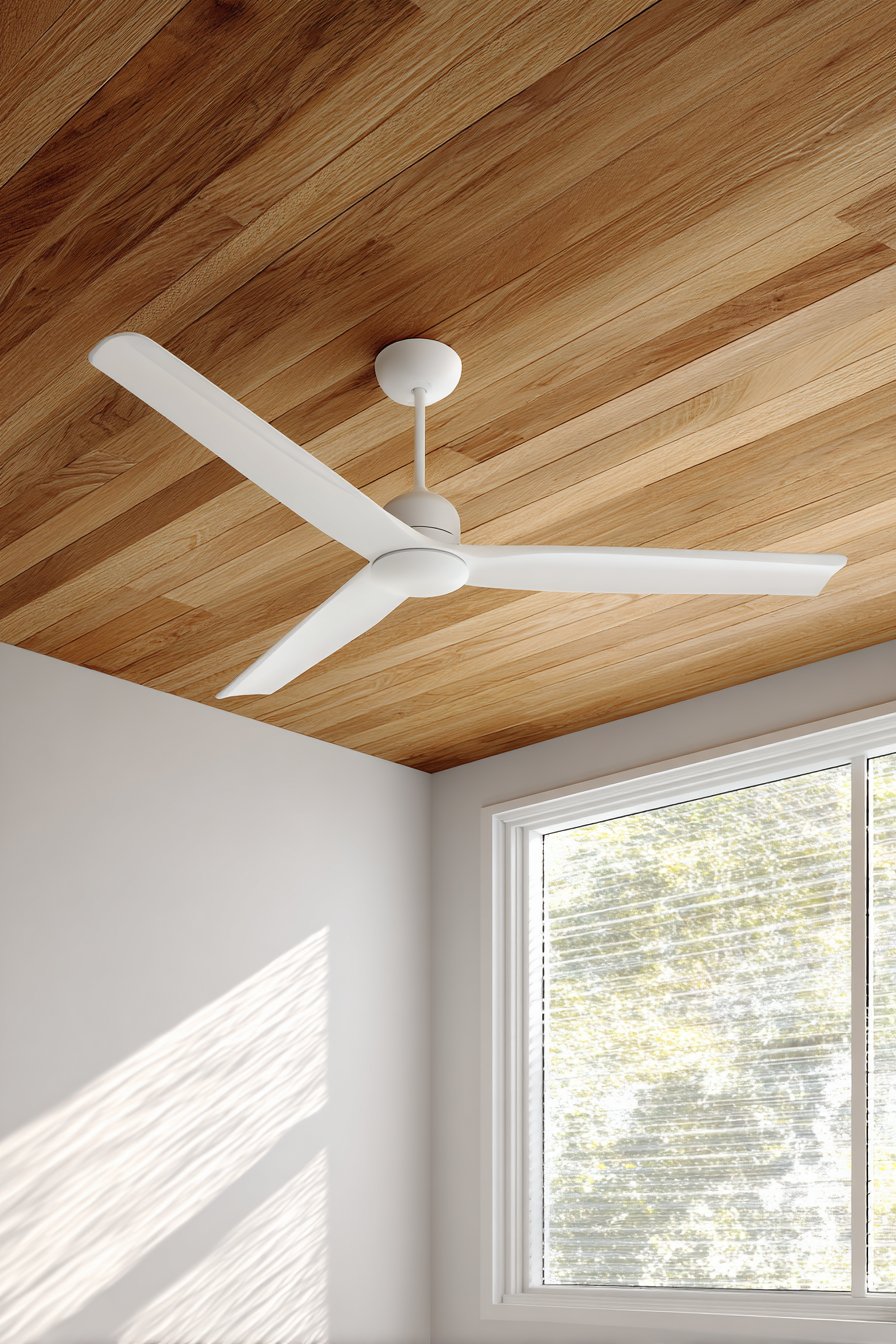
Ceiling plank installations create visual interest through directional choices that affect spatial perception and create distinctive character. Wood planks running at 45-degree diagonal across bedroom ceilings create dynamic visual movement that draws the eye along angular lines. This unconventional orientation distinguishes the installation from standard parallel arrangements while adding architectural interest through geometric complexity. Medium-width planks in natural oak with clear matte finish showcase authentic grain patterns and natural color variations that make each board unique. A modern ceiling fan with integrated lighting centers the space, providing functional air circulation and illumination. White walls create contrast that emphasizes the wood ceiling’s warmth and character.
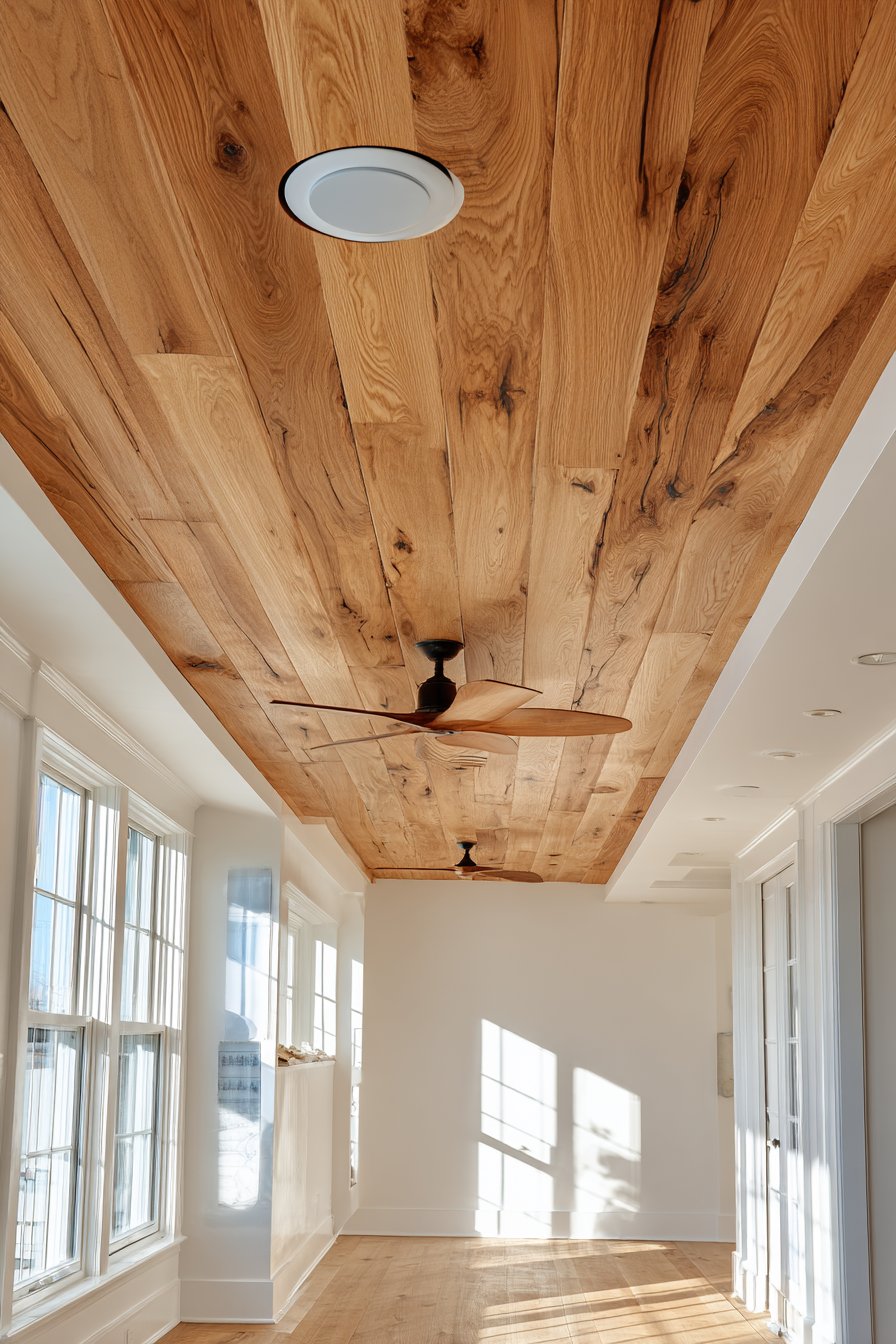
The diagonal orientation prevents the ceiling from reinforcing the room’s rectangular geometry, instead introducing angular movement that adds visual complexity and interest. This design choice makes rectangular rooms feel less boxy while creating sophisticated aesthetic that demonstrates design thoughtfulness. The natural oak finish allows the wood’s inherent beauty to dominate without color staining that might look artificial or dated. The clear matte finish protects the surface while maintaining natural appearance and preventing distracting reflections. Natural window lighting streaming into the space highlights wood grain detail and creates interesting angular shadows that shift throughout the day, ensuring the ceiling’s appearance remains dynamic rather than static.
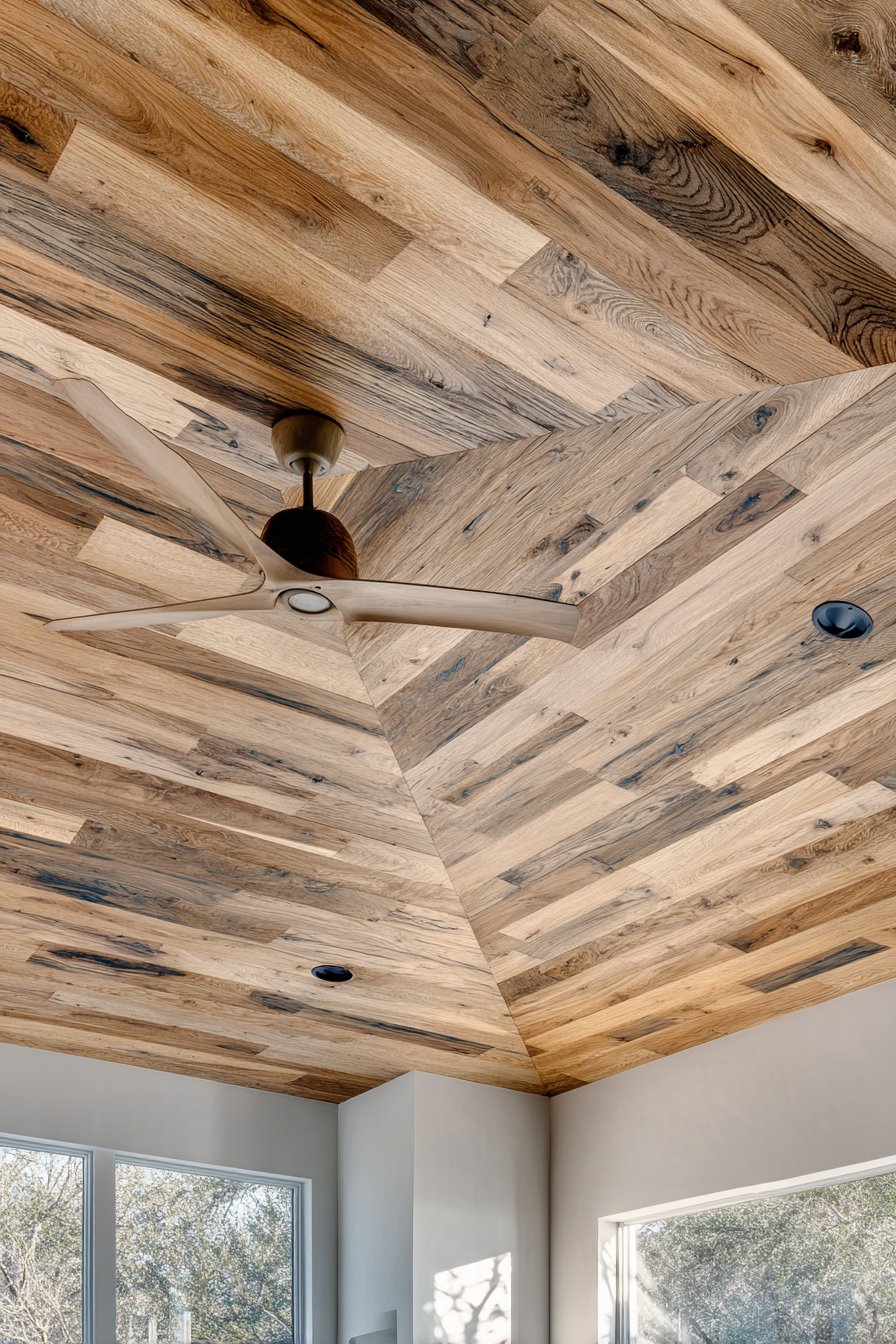
The wood ceiling adds warmth to bedroom environments while creating architectural interest that elevates the space beyond basic construction. The natural material creates psychological comfort and connection to nature beneficial in sleeping spaces. The diagonal installation requires additional material due to increased cutting waste, but the visual impact justifies the extra expense for homeowners seeking distinctive design. The ceiling fan’s modern design provides necessary contrast—traditional fan styles would conflict with the contemporary wood installation while ultra-modern designs complement the natural material. The overall composition demonstrates how material choice, installation pattern, and finish selection combine to create cohesive ceiling treatments that enhance rather than simply cover overhead surfaces.
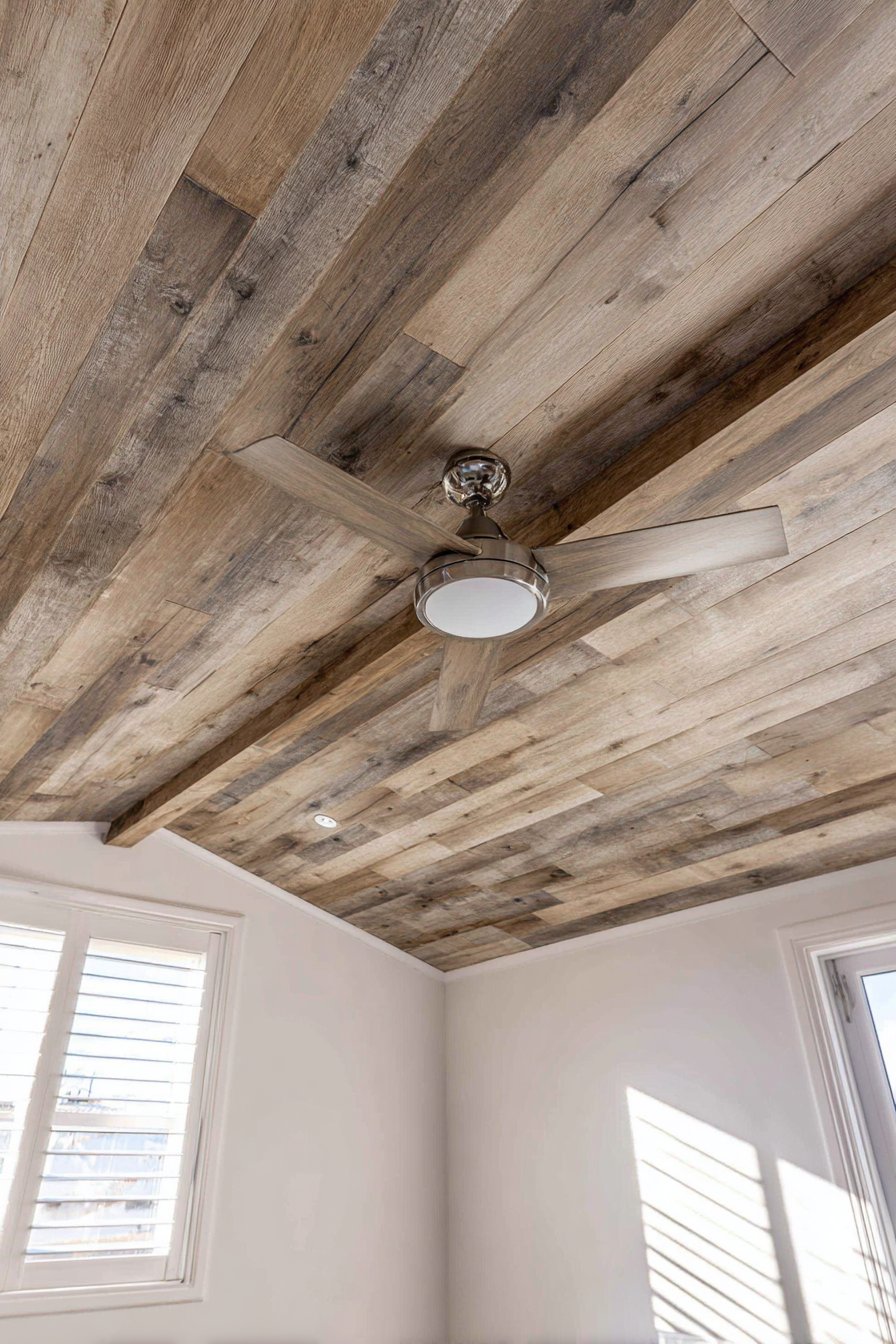
Key Design Tips: Calculate material requirements carefully for diagonal installations—expect 15-20% waste from cutting. Plan starting point and layout before beginning installation to ensure balanced board placement at room perimeters. Use quality pneumatic nailer for secure fastening and efficient installation. Pre-finish boards before installation if possible to simplify finishing process and avoid drips. Cut precise angles using power miter saw with sharp blade designed for hardwood. Maintain consistent spacing between boards throughout installation. Apply clear finish appropriate to wood species—some woods require specific finishes for best protection and appearance. Consider grain direction when planning layout—running grain diagonally to plank direction creates additional visual interest. Install ceiling fan mounting box during rough construction to ensure proper structural support. Allow wood to acclimate to room humidity for 48-72 hours before installation. Consider using tongue-and-groove flooring as ceiling material for better appearance than standard boards.
27. Luxurious Mirrored Surface Illusion
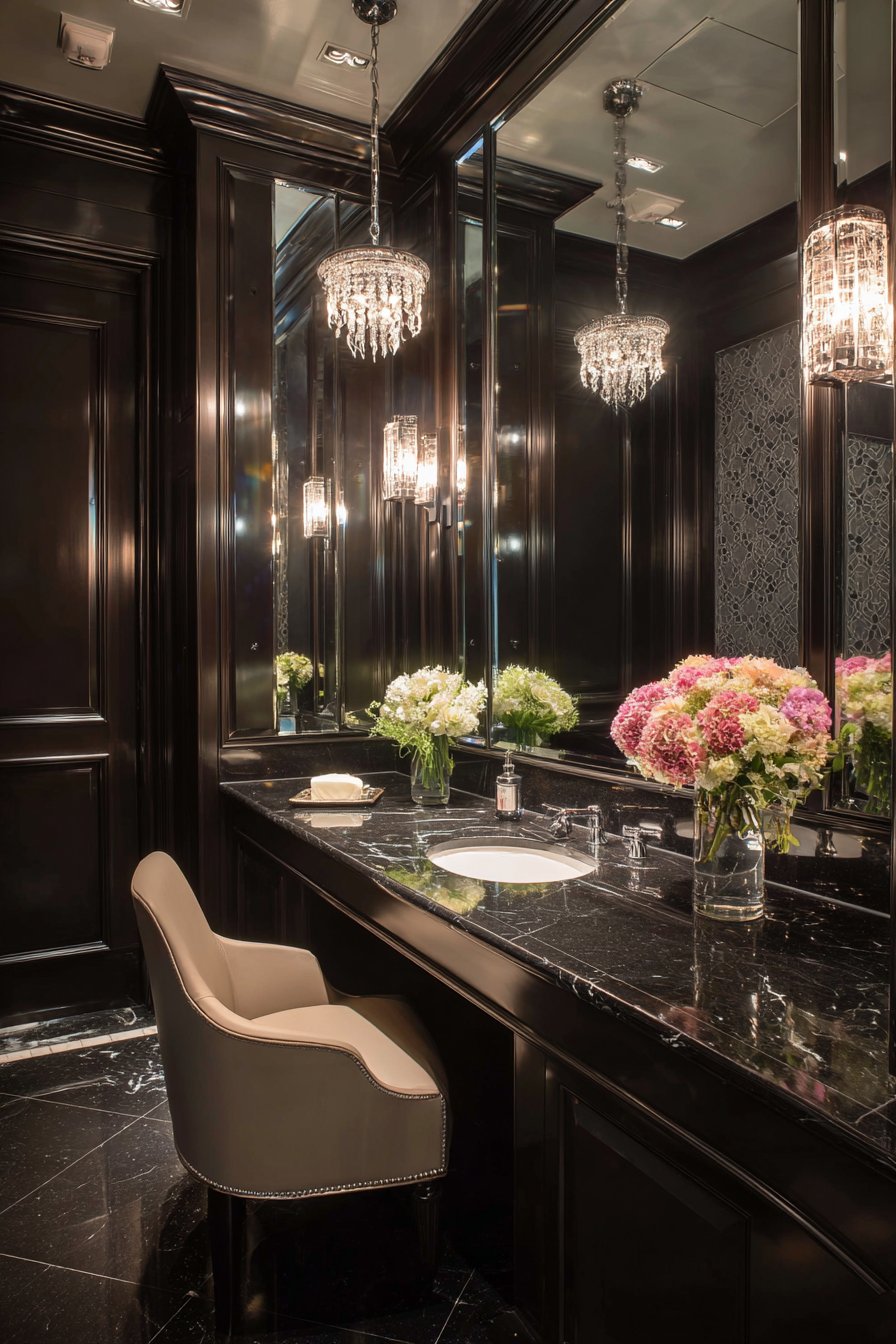
Mirror applications on ceiling surfaces create dramatic spatial illusions through reflection, making compact powder rooms feel twice their actual size. Seamless mirror panels covering entire ceiling plane with minimal reveals create continuous reflective surface that doubles the perceived height. This sophisticated treatment requires precise installation to achieve seamless appearance essential to successful execution. A statement chandelier hanging centrally appears doubled through reflection, creating visual drama and luxurious atmosphere. The mirrored ceiling pairs with elegant wallpaper and marble surfaces below to create cohesive luxury design appropriate for high-end powder rooms where dramatic design gestures create memorable guest experiences.
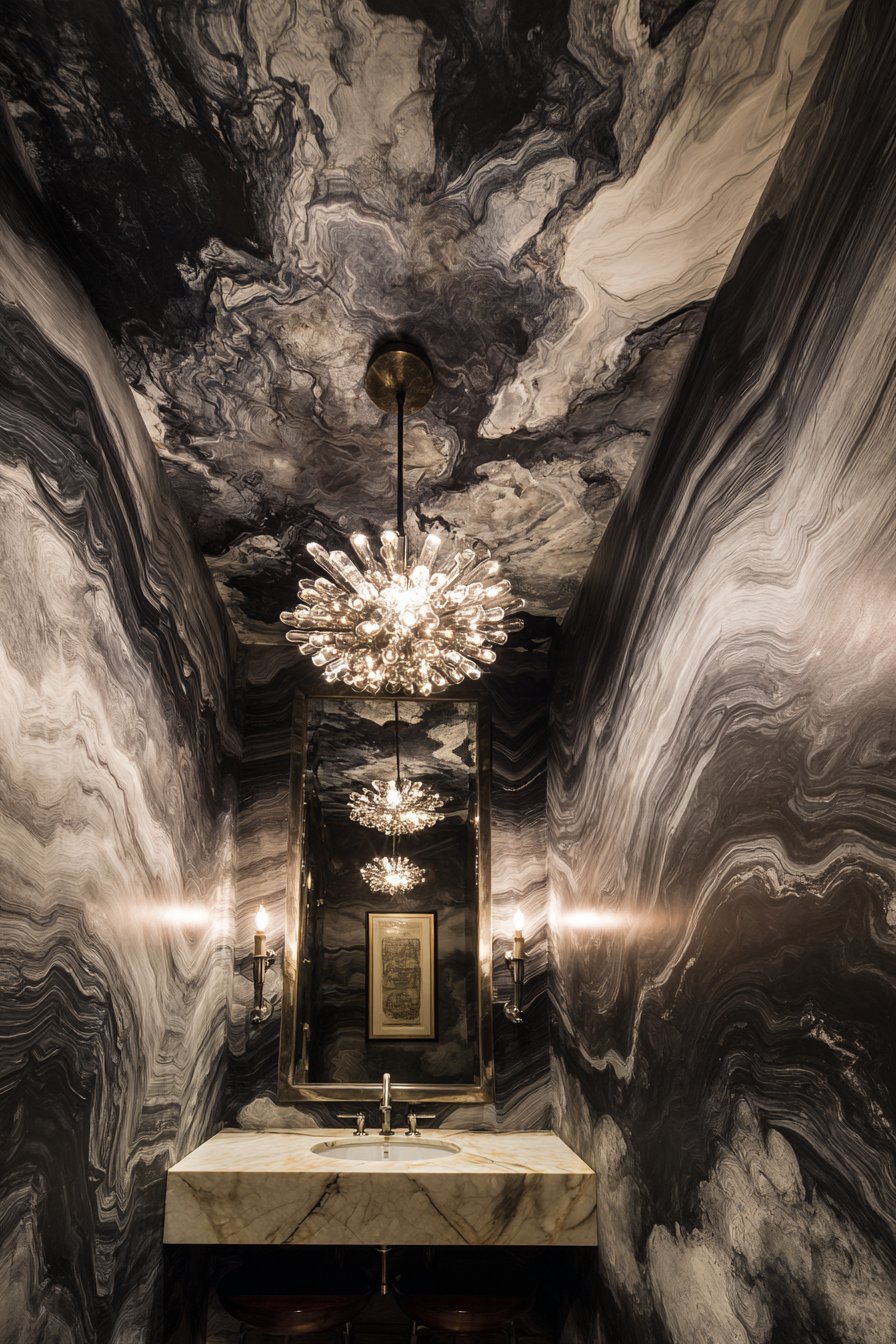
The reflective surface creates fascinating visual effects as ceiling mirrors reflect walls, fixtures, and decorative elements, creating complex layered views that reward inspection. The chandelier’s reflection creates particularly stunning effect—the fixture appears to float in space surrounded by its mirror image. This doubling effect makes the light fixture appear more substantial and dramatic while creating unique visual experience impossible with standard ceiling surfaces. The mirrored ceiling reflects light from the chandelier and other sources, increasing overall illumination and creating brighter atmosphere than non-reflective surfaces would allow. This light-multiplying effect benefits compact powder rooms where space limitations might otherwise create dim conditions.

The installation requires specialized skills and careful planning to achieve professional results. Mirror panels must be precisely cut to fit ceiling dimensions while maintaining minimal gaps between sections. The panels require secure mounting systems that support the weight while remaining concealed behind the reflective surface. Lighting placement requires careful consideration—fixtures that look attractive from below might appear awkward when seen reflected in ceiling mirrors. Despite these challenges, mirrored ceilings create undeniable luxury and sophistication that elevates powder rooms into true design showcases. The bold treatment demonstrates design confidence and willingness to embrace unexpected solutions that create memorable spaces.
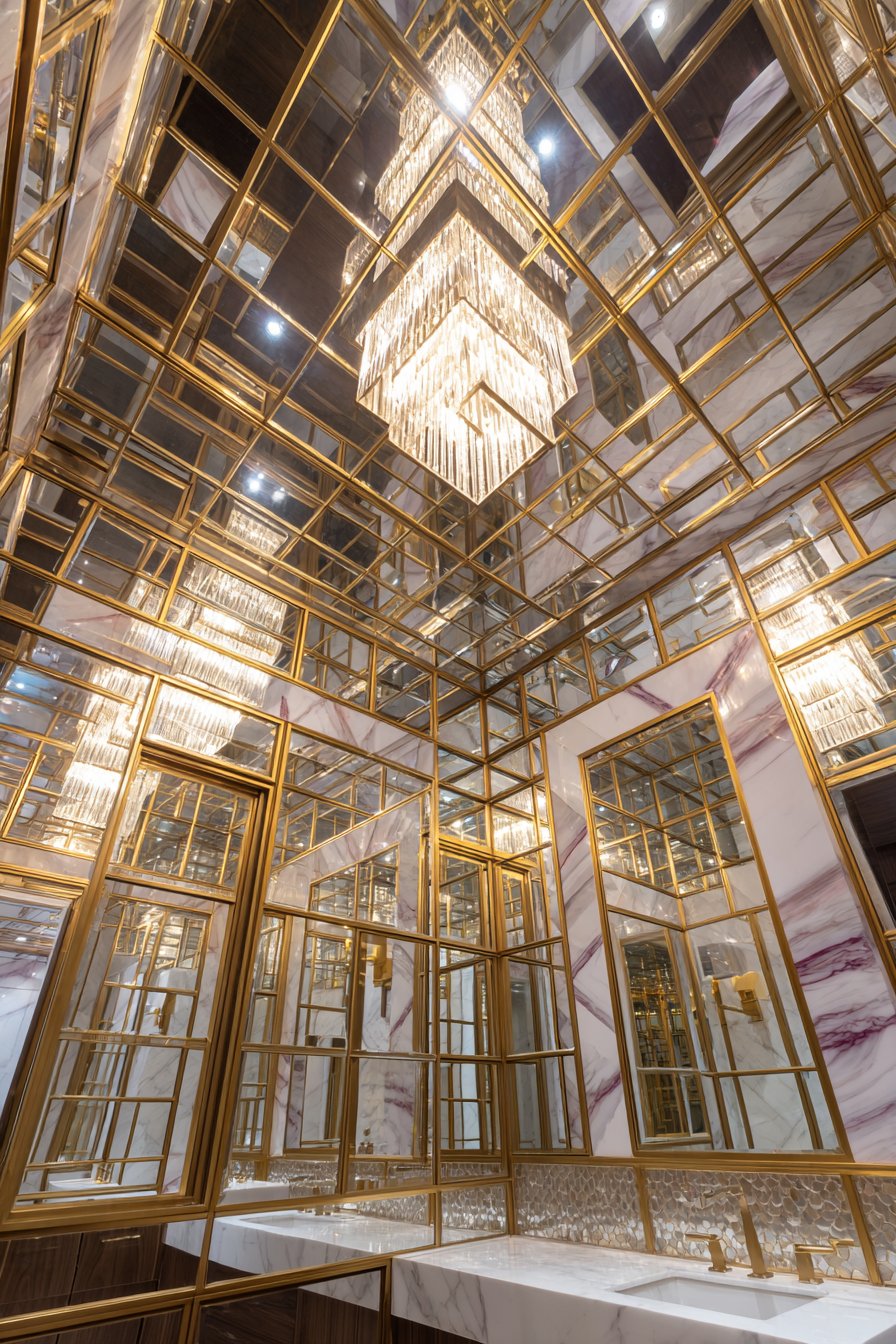
Key Design Tips: Hire professional mirror installers experienced with ceiling applications—DIY installation risks injury and poor results. Use high-quality mirror with proper backing that prevents moisture damage in bathroom environments. Plan precise measurements and create detailed layout before ordering custom-cut mirror panels. Install secure mounting systems rated for mirror weight—improper support creates safety hazards. Minimize visible seams through careful panel sizing and layout planning. Clean mirrors using appropriate products that won’t damage reflective coating or backing. Consider maintenance requirements—ceiling mirrors collect dust and require regular cleaning. Plan lighting carefully to avoid unflattering reflections or glare. Ensure ceiling substrate is perfectly flat and smooth—irregularities will show in mirror reflections. Address any moisture issues before installation—humidity can damage mirror backing over time. Consider antique mirror or slightly tinted options to reduce harsh reflections and create softer appearance.
Conclusion: Elevating Your Home Through Thoughtful Ceiling Design
The ceiling truly deserves recognition as the “fifth wall”—an essential architectural surface with tremendous potential to enhance your home’s character, functionality, and aesthetic appeal. As we’ve explored through these twenty-seven distinctive ceiling ideas, the options available span an impressive range from subtle enhancements like strategic paint colors and crown molding to dramatic statements featuring sculptural elements, exposed beams, and innovative lighting systems. Each approach offers unique advantages and demonstrates how ceiling treatments can complement your overall interior design vision while adding dimension, visual interest, and architectural distinction to any room. The key lies in selecting treatments that align with your personal style, respect your home’s architectural context, and meet your practical requirements for lighting, acoustics, and maintenance.
Whether you’re drawn to the rustic warmth of reclaimed wood beams, the clean sophistication of minimalist smooth surfaces, or the bold drama of geometric patterns and unexpected colors, ceiling design offers opportunities for creative expression that too many homeowners overlook. The ceiling’s unique position overhead makes it ideal for incorporating functional elements—from ambient LED lighting systems that create floating illumination effects to acoustic panels that improve sound quality in challenging spaces. Modern materials and installation techniques have made many of these treatments more accessible and affordable than ever before, bringing professional-quality ceiling designs within reach of typical renovation budgets. The investment in thoughtful ceiling design pays dividends through enhanced spatial perception, improved functionality, and the creation of memorable rooms that guests admire and homeowners enjoy daily.
As you consider implementing ceiling design ideas in your own home, remember that successful projects begin with careful planning, realistic budget assessment, and understanding of your space’s specific requirements. Some treatments like fresh paint colors or simple crown molding make excellent DIY projects, while others—including structural beam installation, complex lighting systems, or specialized finishes—demand professional expertise for safe, successful execution. Start by identifying which rooms in your home would benefit most from ceiling enhancements, then explore options that complement your existing design while adding the character and functionality you desire. Whether you choose to transform just one room or embark on a comprehensive home update, approaching ceiling design with creativity, planning, and attention to detail will help you achieve results that elevate your entire home and demonstrate that truly inspired interior design considers every surface—including the one overhead.