When it comes to home design challenges, few spaces test our creativity quite like the tiny bathroom. Whether you’re working with a compact powder room, a narrow ensuite, or a bijou apartment bathroom, the struggle to balance functionality with style in limited square footage is real. Yet, small bathrooms offer a unique opportunity to showcase innovative design thinking, where every inch counts and clever solutions can transform cramped quarters into surprisingly spacious-feeling sanctuaries.
The beauty of tiny bathroom design lies in its problem-solving nature. These spaces demand thoughtful planning, strategic choices, and an understanding of how visual tricks, smart storage, and multi-functional elements can work together to create rooms that feel considerably larger than their actual dimensions. From wall-mounted fixtures that free up precious floor space to reflective surfaces that bounce light around the room, the techniques for maximizing small bathrooms are as varied as they are effective. Modern homeowners are discovering that size limitations need not mean style compromises—instead, they present opportunities for creative expression within carefully considered parameters.
This comprehensive guide explores 31 distinct approaches to tiny bathroom design, each offering unique solutions to common small-space challenges. Whether you’re drawn to minimalist Scandinavian aesthetics, rustic charm, modern sleekness, or spa-inspired tranquility, you’ll find practical ideas that demonstrate how constraints can inspire innovation. From corner-mounted fixtures and floating vanities to wet room concepts and strategic lighting, these designs prove that thoughtful planning and smart choices can transform even the most compact bathrooms into functional, beautiful spaces that enhance your daily routine and add value to your home.
1. Corner-Mounted Space Efficiency
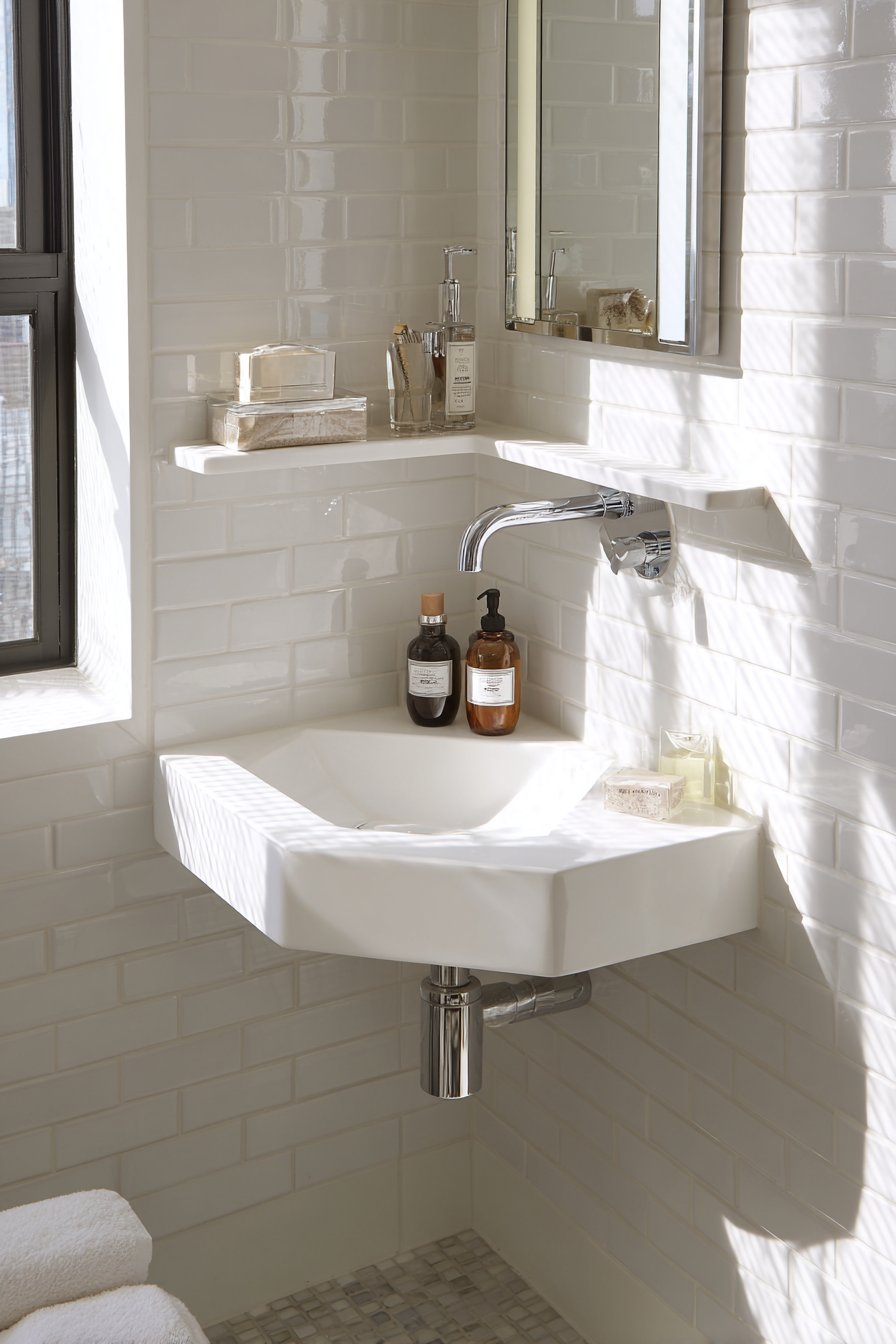
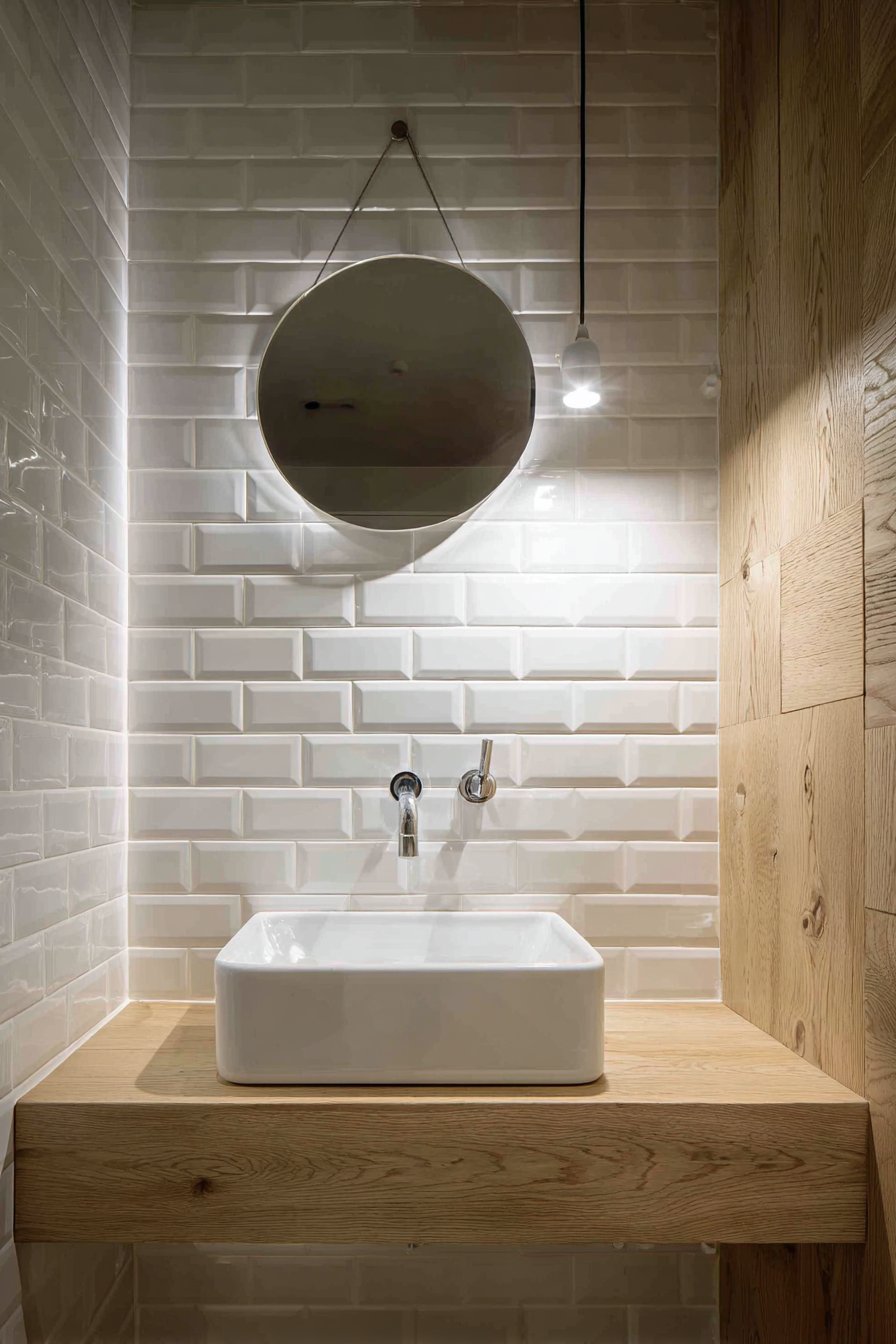
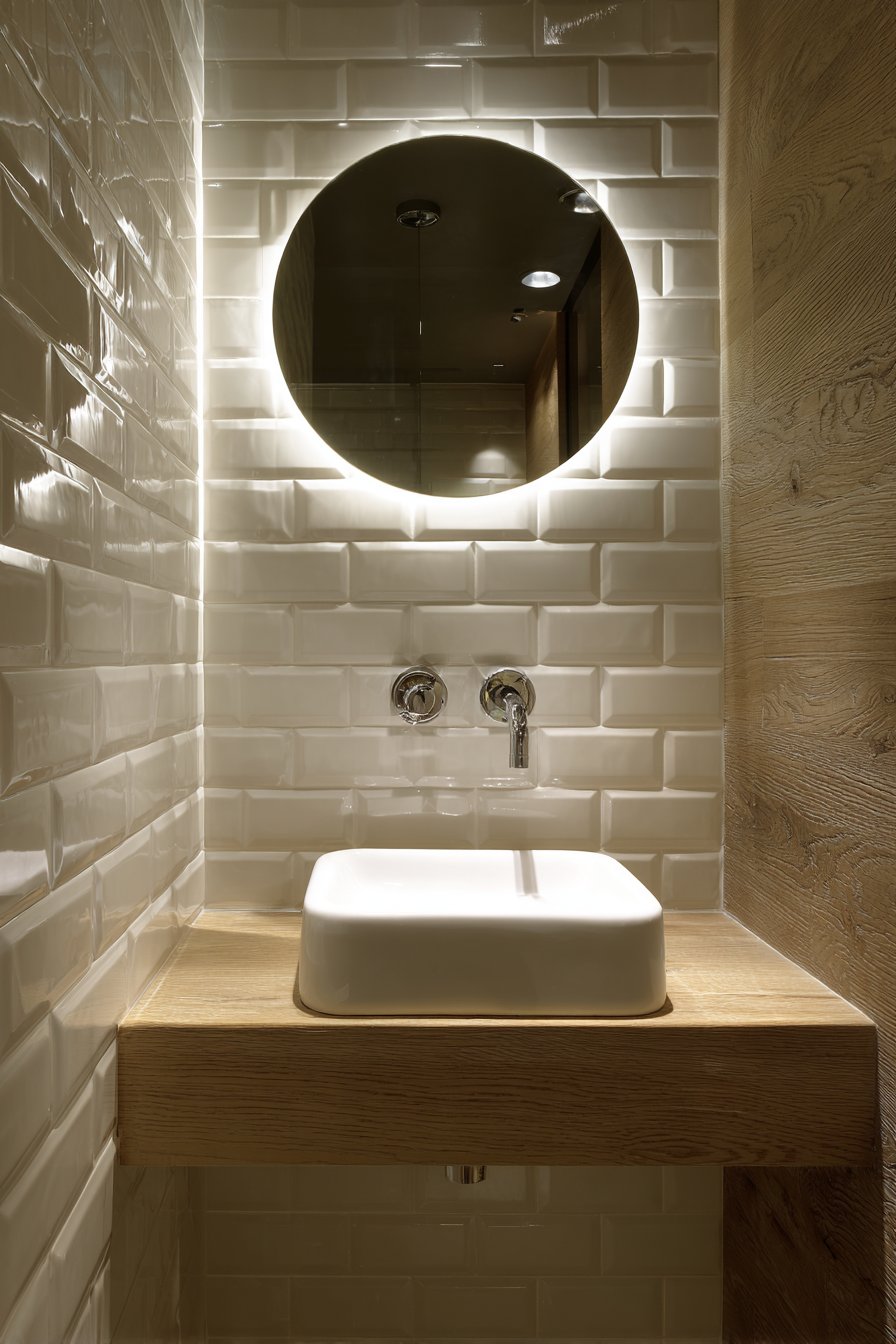
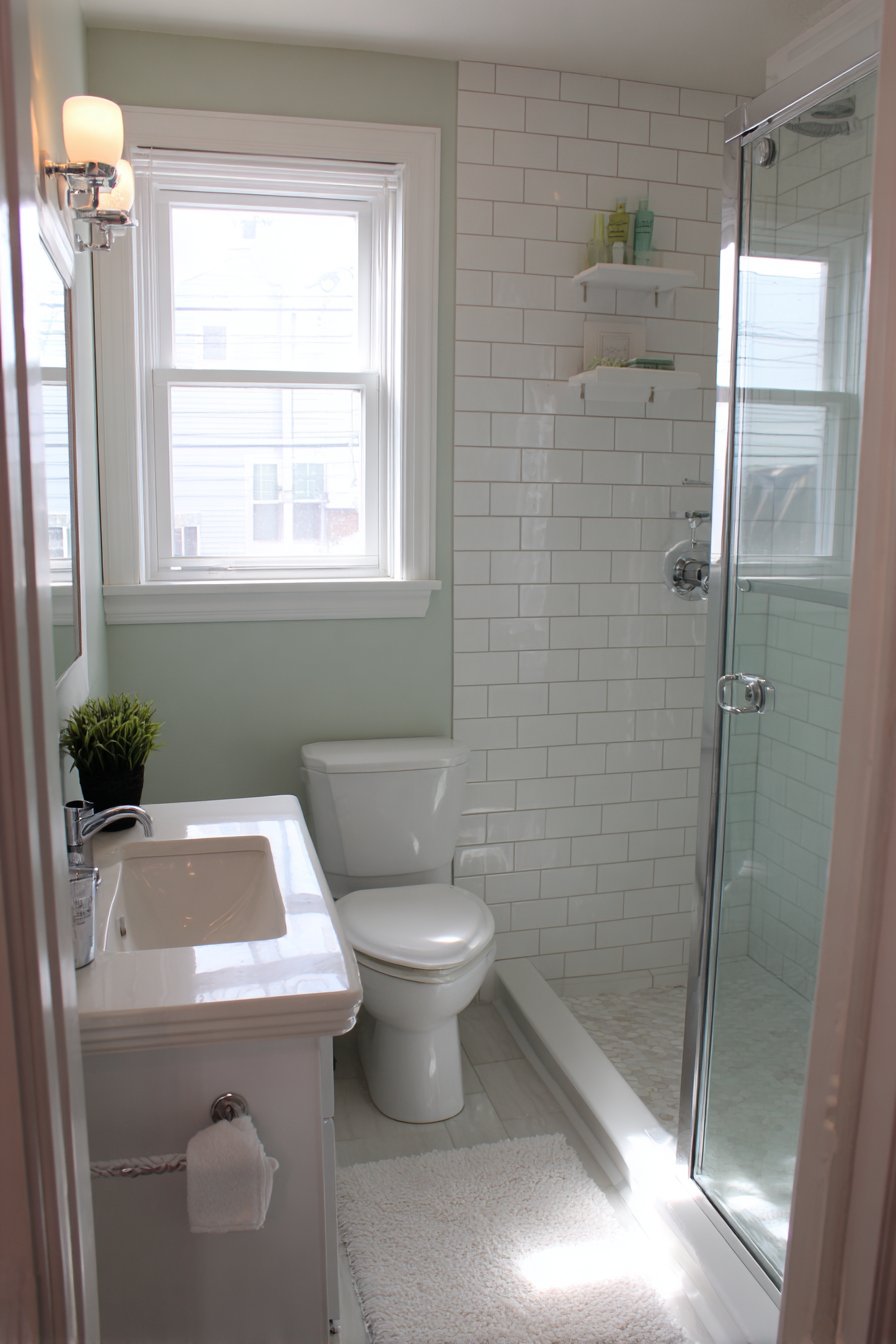
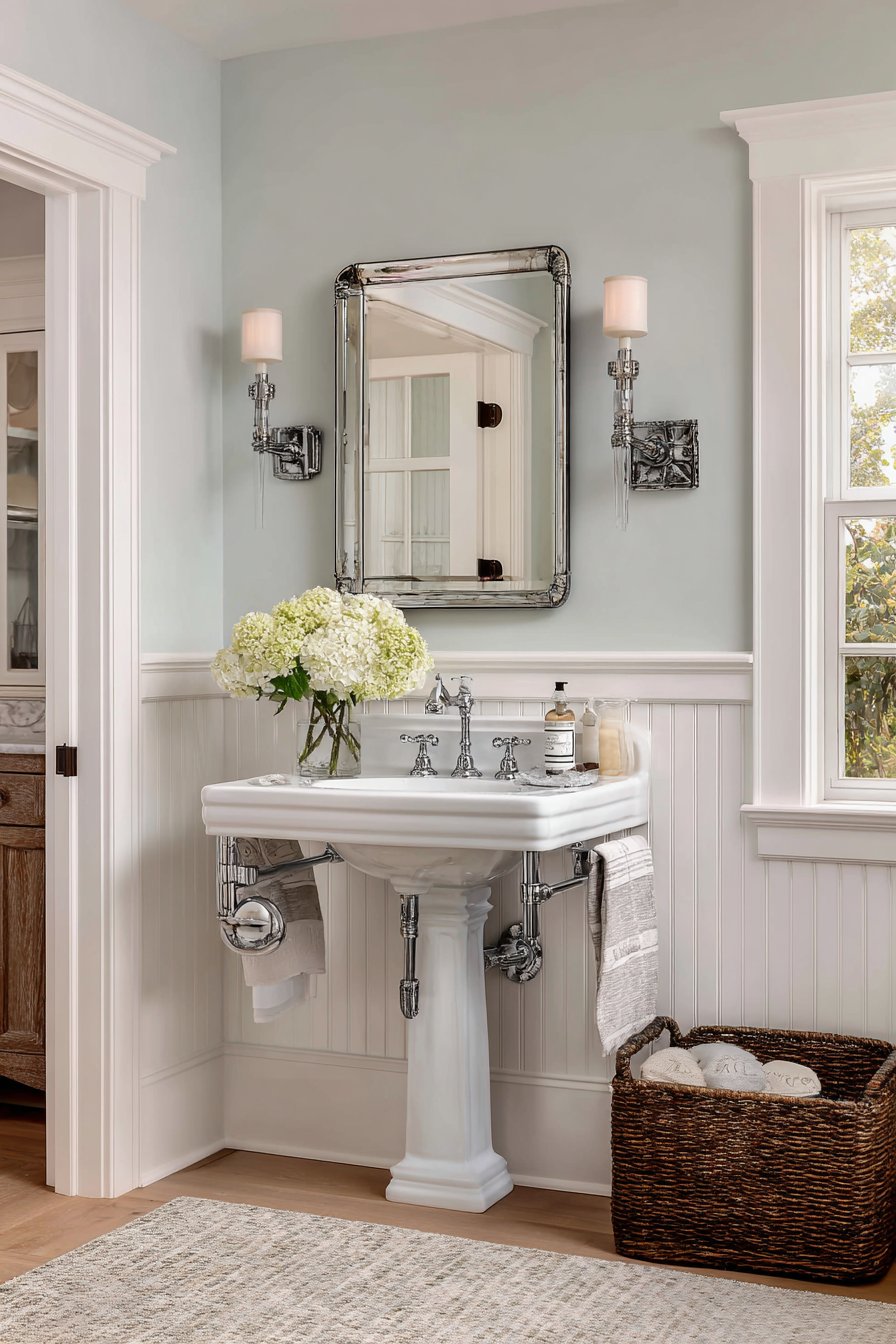
The strategic use of corner spaces represents one of the most effective approaches to tiny bathroom design, particularly when working with extremely limited floor plans of 40 square feet or less. A corner-mounted sink with a triangular vanity capitalizes on what is often underutilized space, creating a functional washing area without encroaching on the central floor area that’s essential for movement and accessibility. This configuration works exceptionally well in powder rooms or basement bathrooms where every square inch matters.

The integration of a wall-mounted chrome faucet eliminates the need for deck space, allowing the vanity to be even more compact while maintaining full functionality. Above the sink, a narrow mirror with integrated LED lighting serves dual purposes—providing essential task lighting for grooming while creating the illusion of depth through reflection. The choice of white subway tiles throughout the space isn’t merely aesthetic; these classic tiles reflect available light, bouncing it around the room to combat the cave-like feeling that can plague tiny bathrooms.
Natural lighting plays a crucial role even in the smallest bathrooms, and positioning a small window strategically can make an enormous difference in how the space feels throughout the day. The soft shadows created by natural light add dimension to an otherwise compact area, preventing the flatness that can make small spaces feel claustrophobic. A small floating shelf provides essential storage for toiletries without the visual weight of closed cabinetry, maintaining the open, airy feeling that’s paramount in tiny bathrooms.
Key Design Tips:
- Position corner fixtures at a 45-degree angle to maximize usable counter space
- Choose wall-mounted faucets to eliminate deck-mounted hardware and create more counter room
- Install mirrors with integrated lighting to reduce the need for separate light fixtures
- Use light-reflective materials like glossy subway tiles to amplify available light
- Keep accessories minimal and store items on floating shelves rather than cluttering counters
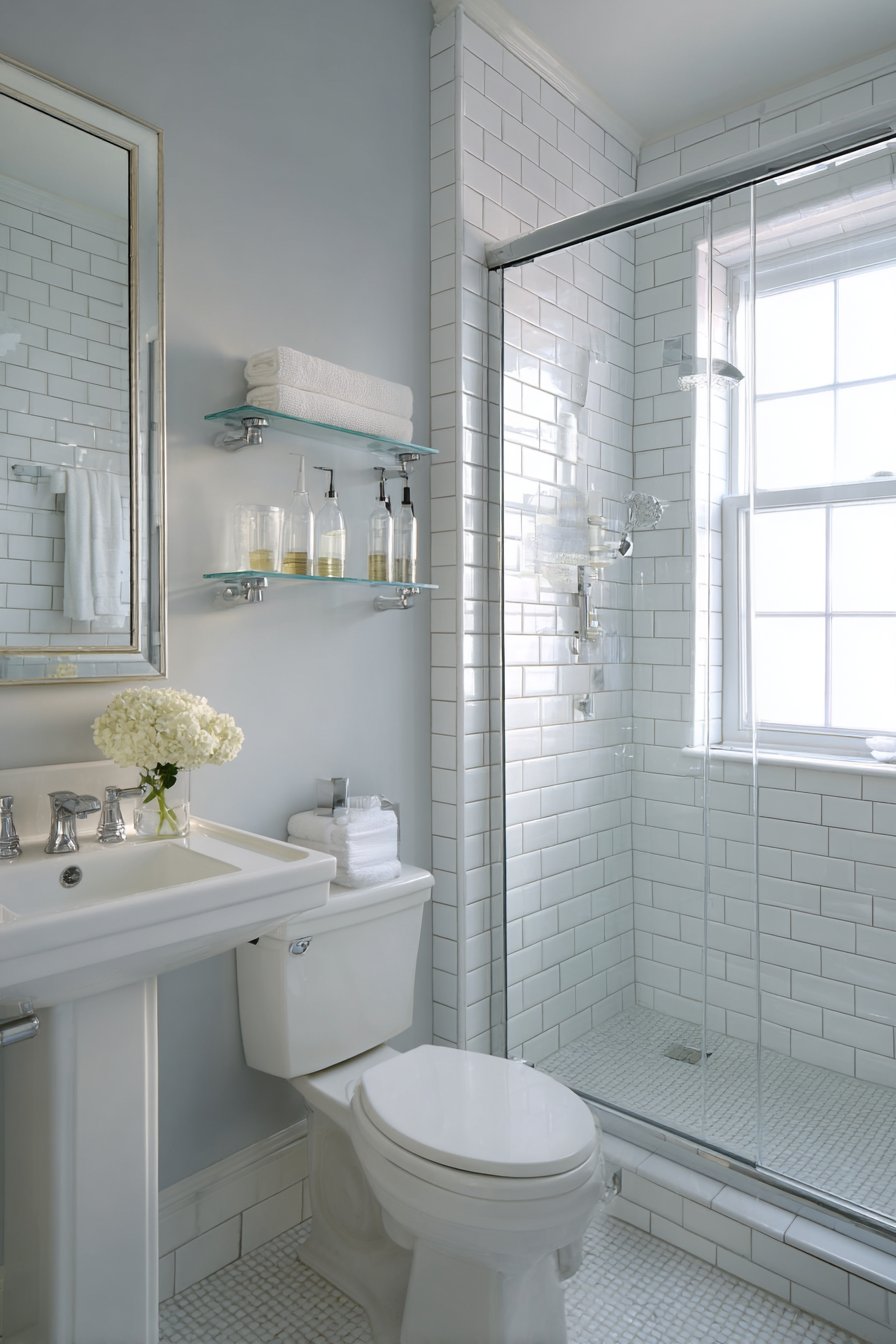
2. Frameless Glass Shower Transparency
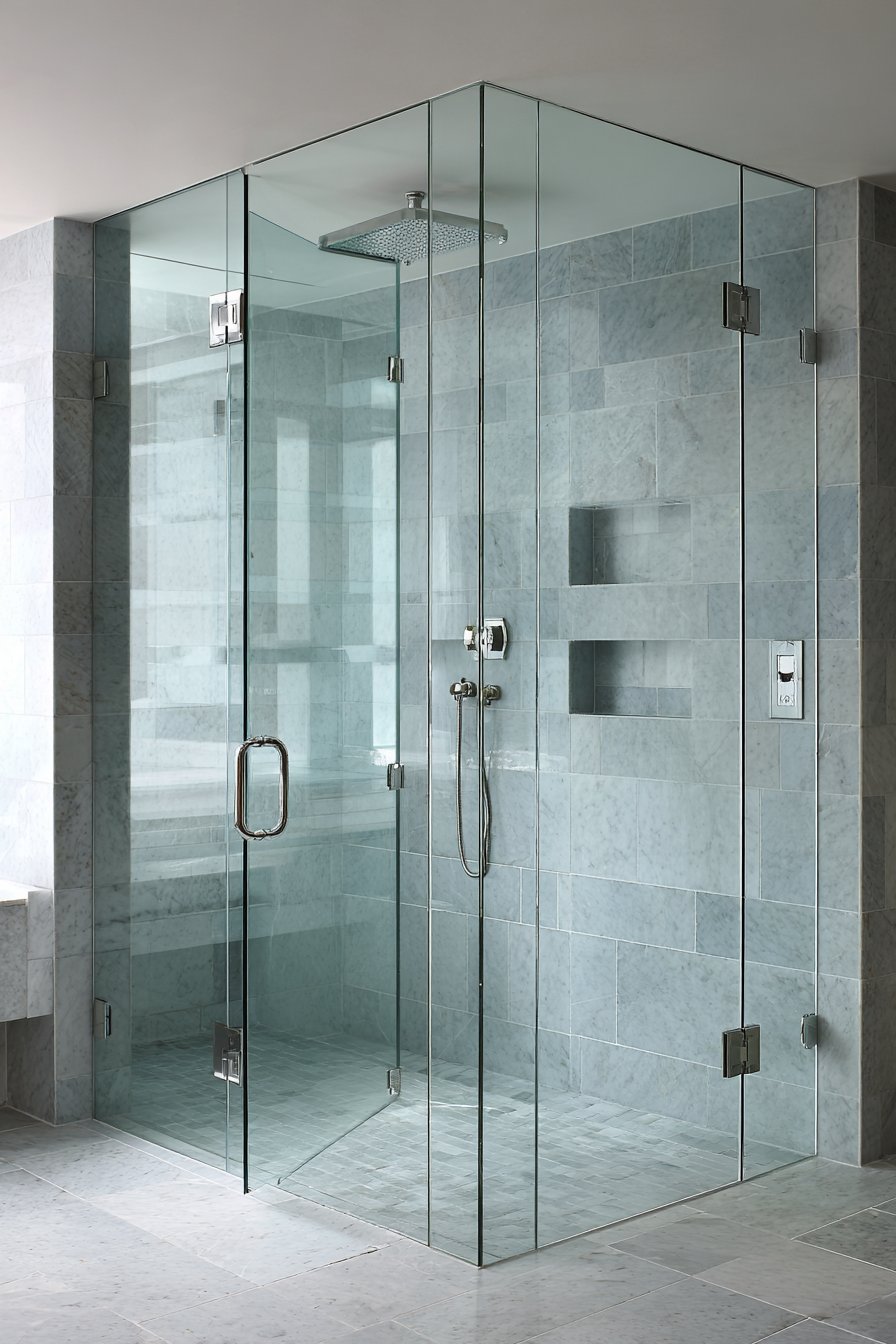
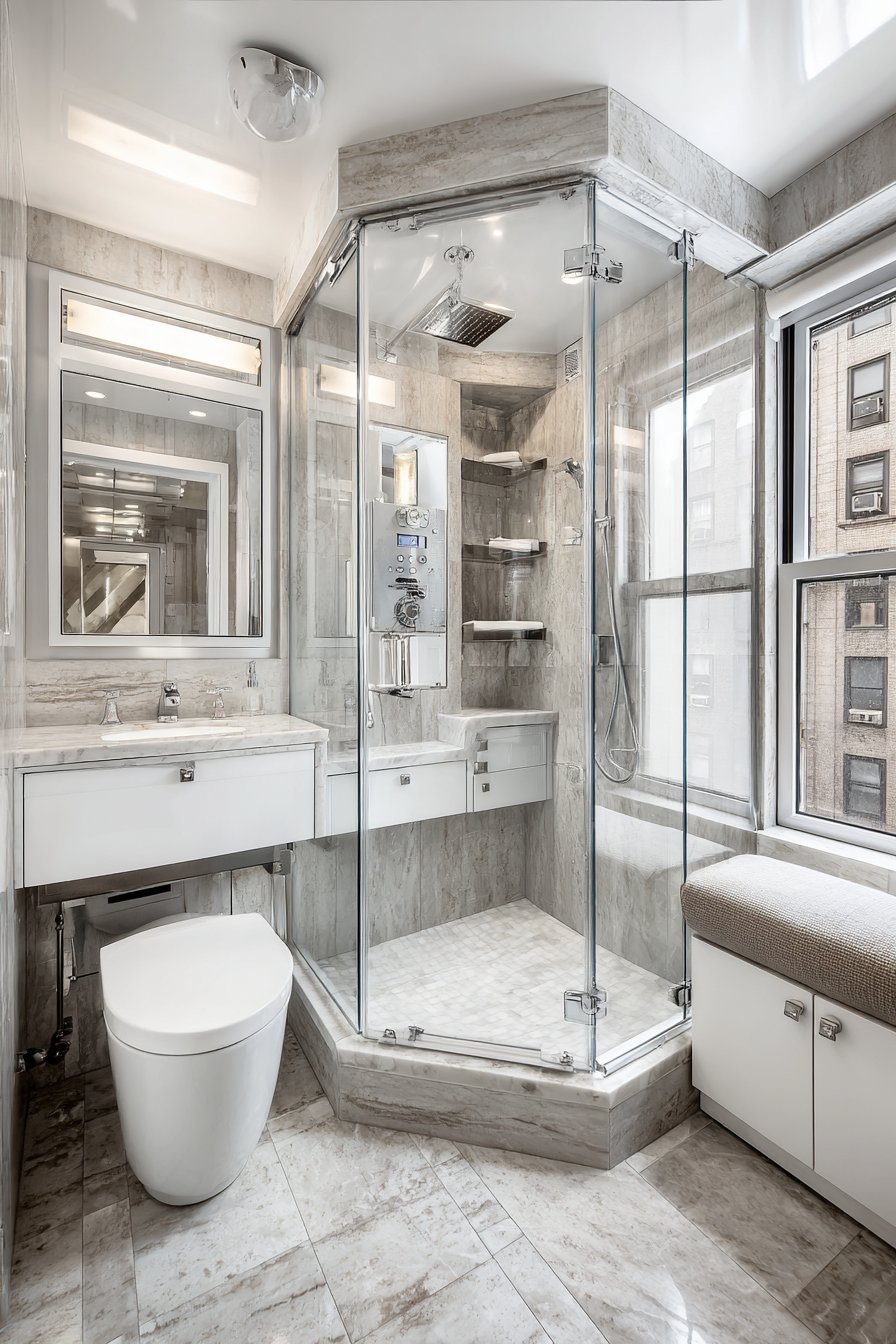
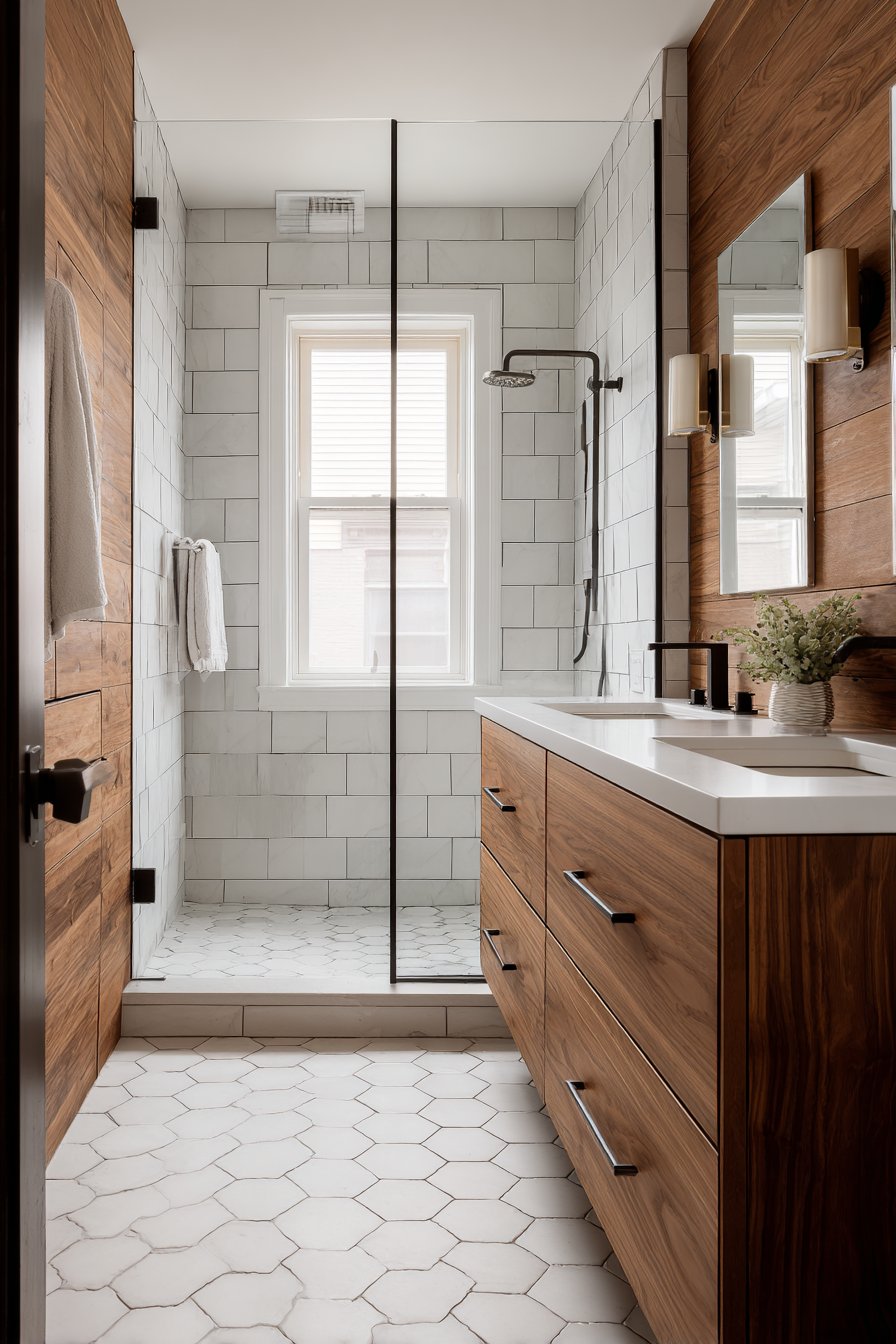
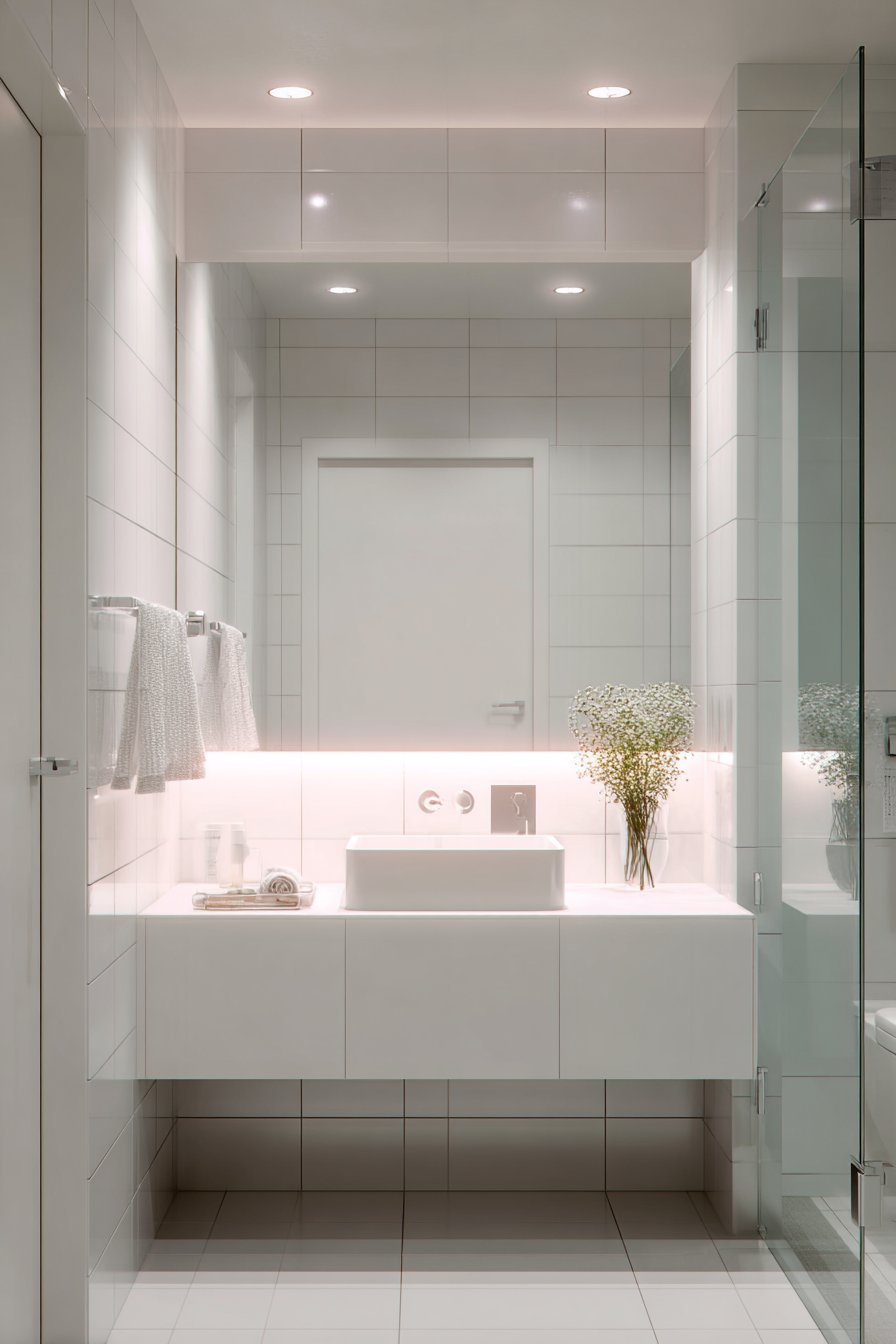
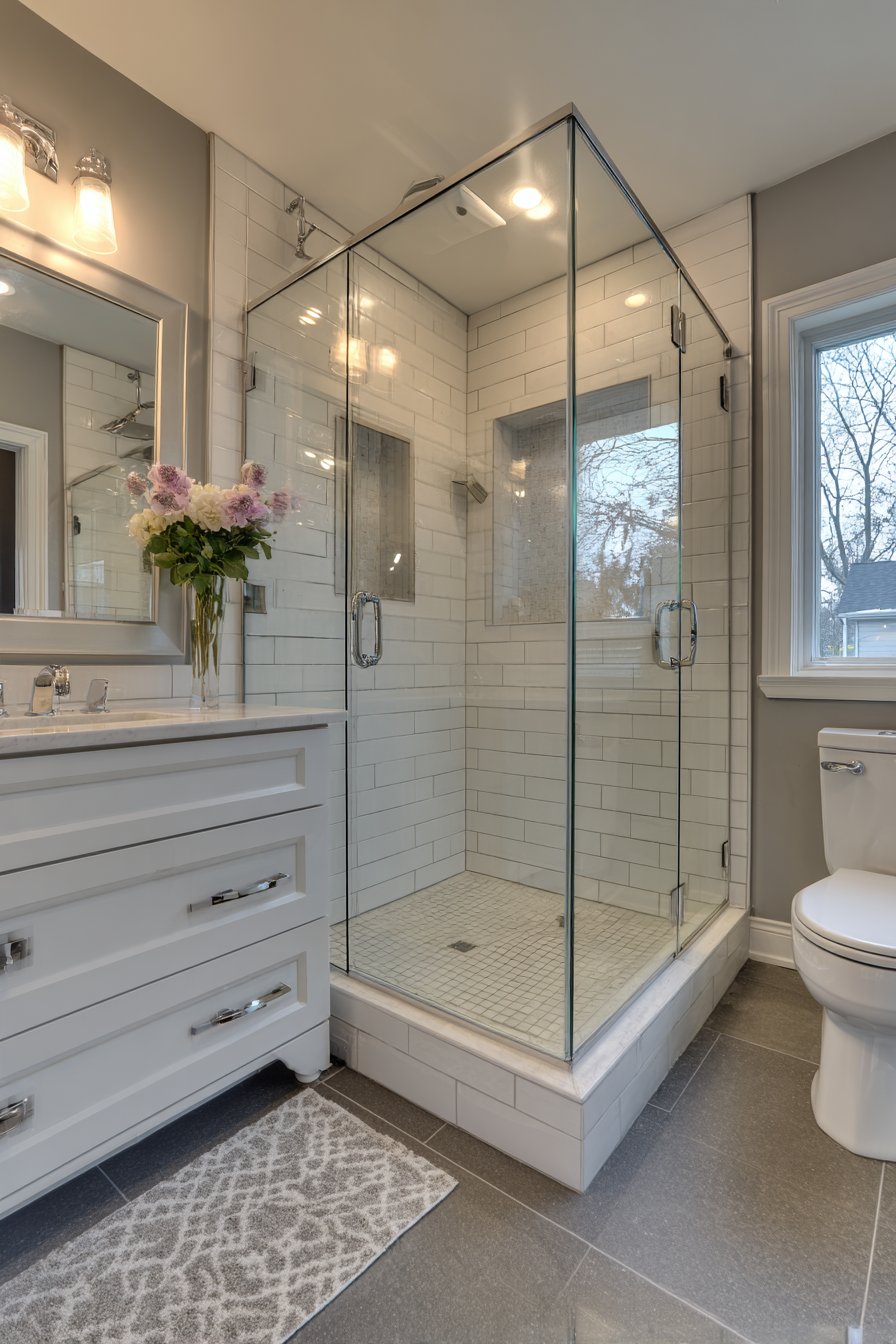
When floor space is at an absolute premium, visual transparency becomes your greatest ally in making a tiny bathroom feel considerably larger than its measurements suggest. A walk-in shower with a frameless glass partition represents a masterclass in spatial perception—by eliminating visual barriers, you allow the eye to travel uninterrupted through the entire bathroom, creating a sense of openness that solid shower curtains or framed enclosures would destroy. This approach works particularly well in 4×5 foot spaces where every design decision significantly impacts the overall feel.

Built-in tile niches deserve special attention in tiny bathrooms because they provide essential storage without sacrificing any floor space or protruding into the shower area where every inch of elbow room counts. These recessed compartments can be incorporated during the tile installation process, creating seamless storage solutions that hold shampoo bottles, soap, and other shower essentials without requiring caddies or corner shelves that would make the shower feel more cramped. The choice of light grey porcelain tiles with minimal grout lines creates visual continuity across surfaces, an important consideration when you want to avoid the choppy, busy look that can make small spaces feel even smaller.
The handheld shower fixture on a sliding bar adds a layer of flexibility that’s particularly valuable in compact showers, allowing users of different heights to adjust the water flow to their preference while also making shower cleaning considerably easier. Wide-angle interior design photography reveals how effectively this design approach can transform a tiny bathroom, showcasing the seamless flow between shower and bathroom proper that makes the entire space feel cohesive and open.
Key Design Tips:
- Invest in high-quality frameless glass that won’t require bulky frames or tracks
- Plan for recessed niches during initial construction or renovation to avoid protruding shelves
- Choose large-format tiles or tiles with minimal grout lines to reduce visual fragmentation
- Install a linear drain rather than a centered drain for a more streamlined look
- Consider a curbless entry if possible to create truly uninterrupted sightlines
- Use consistent tile throughout the shower and bathroom floor for maximum continuity
3. Wall-Hung Toilet Floating Effect
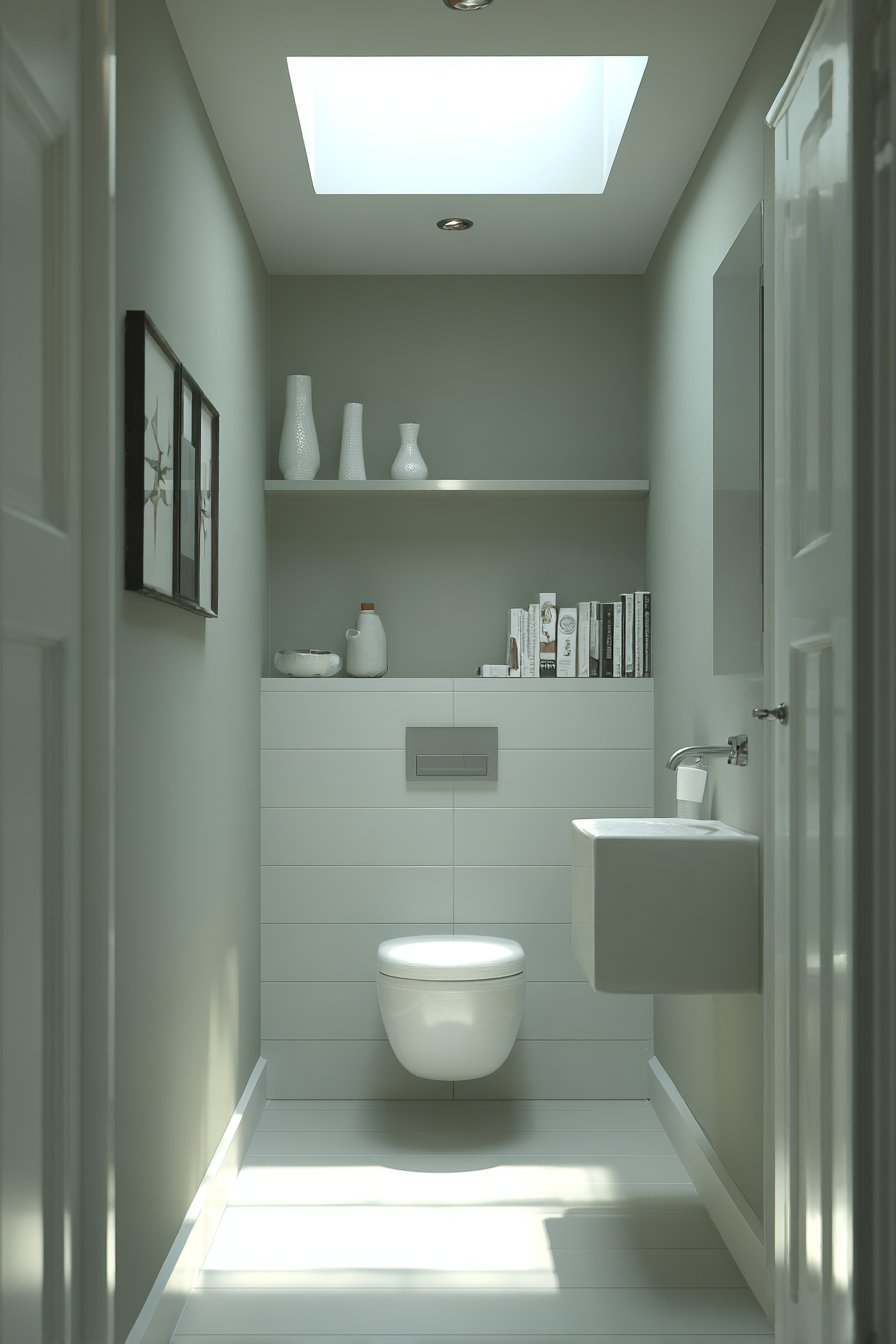
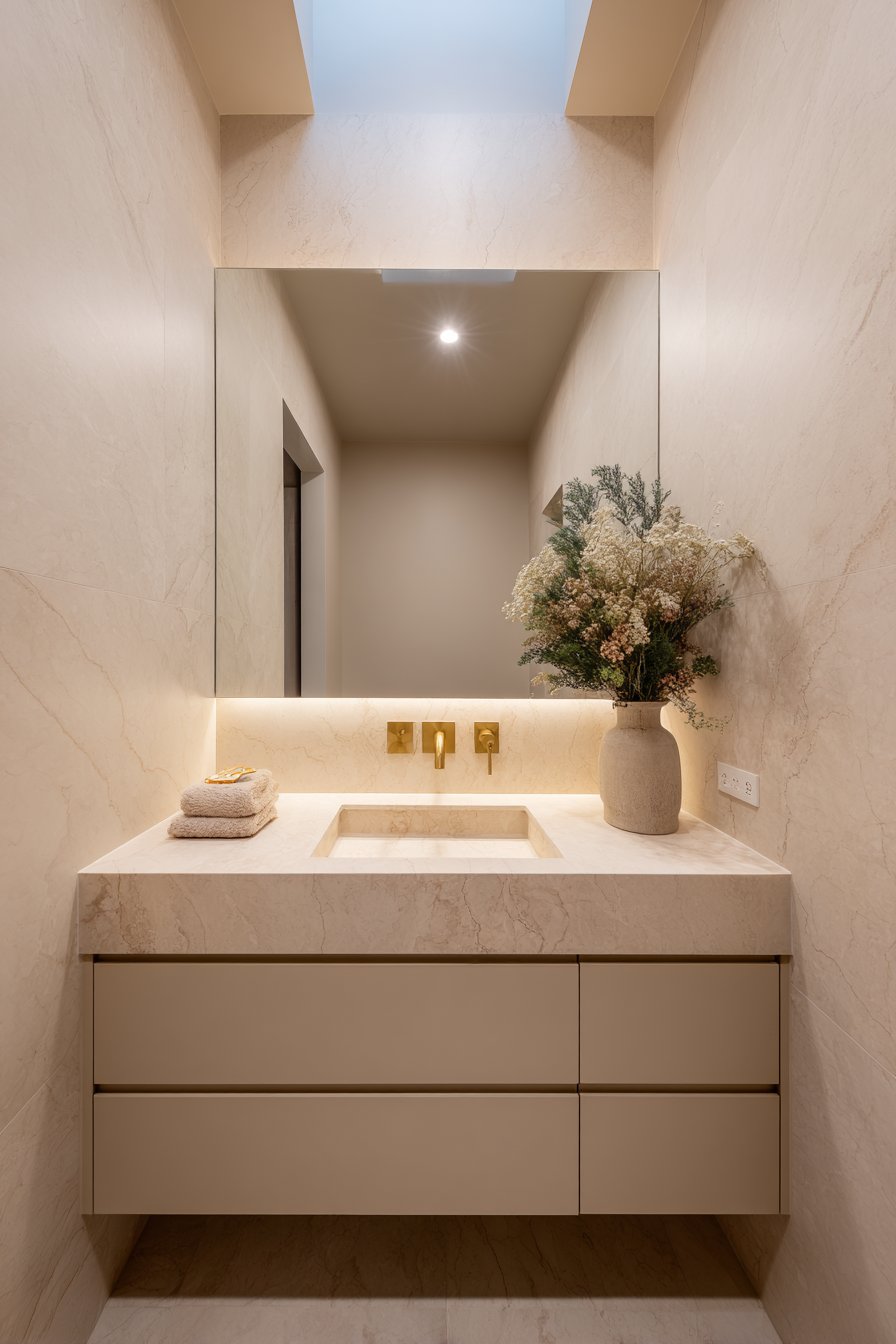
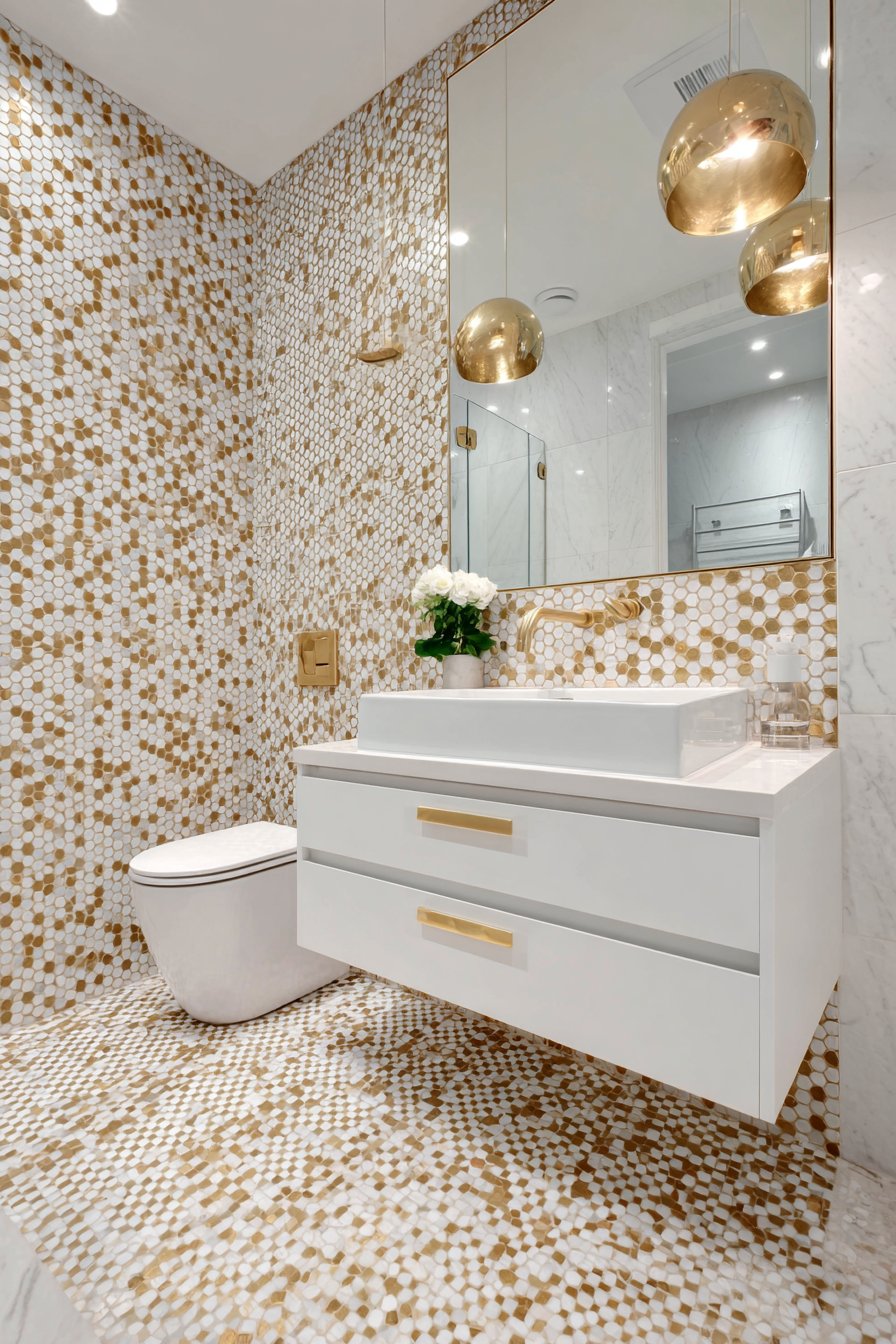
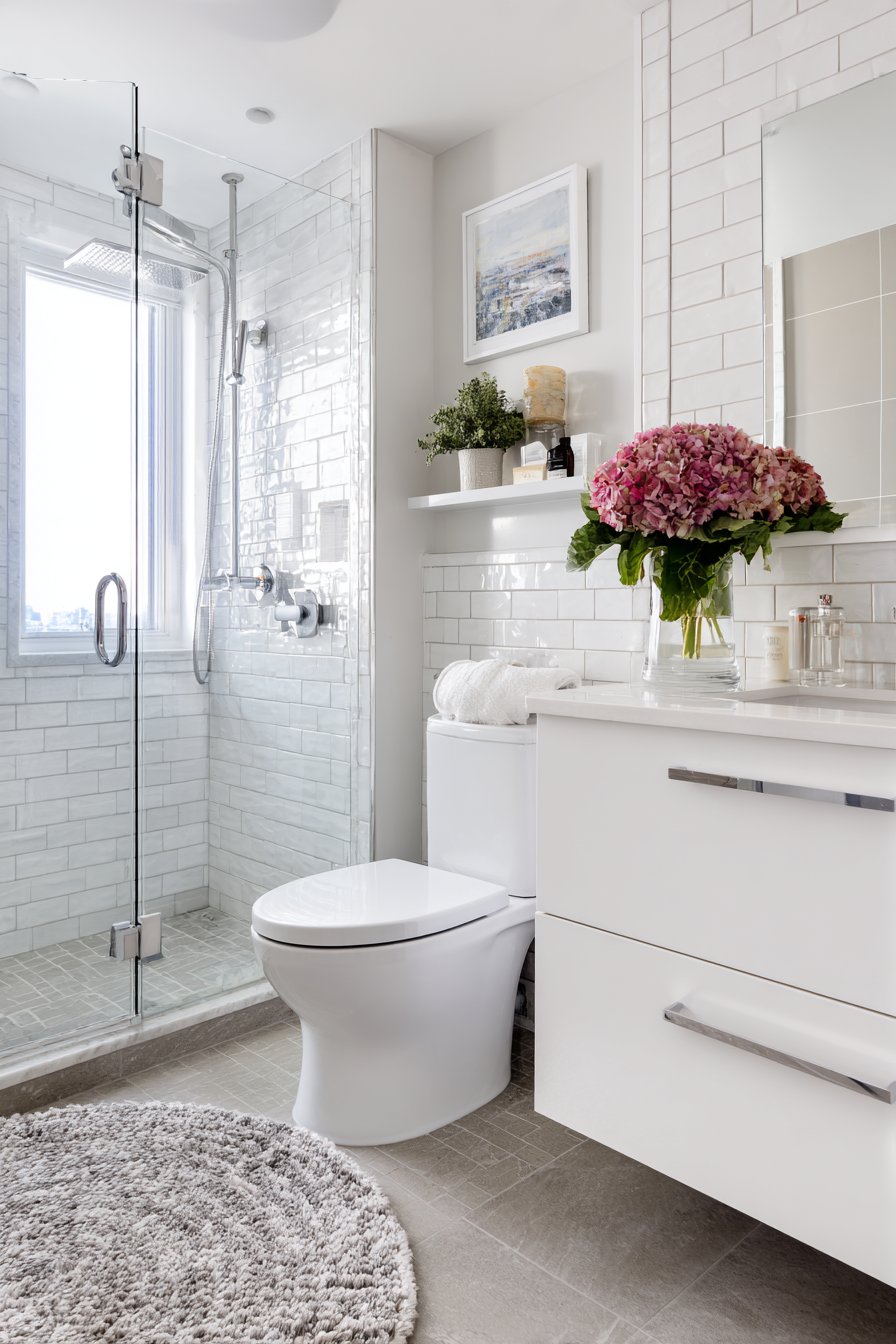
The psychological impact of visible floor space in tiny bathrooms cannot be overstated, which makes wall-hung toilets one of the most effective solutions for creating a sense of spaciousness in compact powder rooms. By suspending the toilet bowl from a wall-mounted carrier system and concealing the tank within the wall cavity, you achieve a floating effect that exposes more floor area, making the room feel significantly more open and less cluttered. This approach is particularly effective in bathrooms where the toilet is visible immediately upon entry, as the exposed floor creates an instant impression of space.
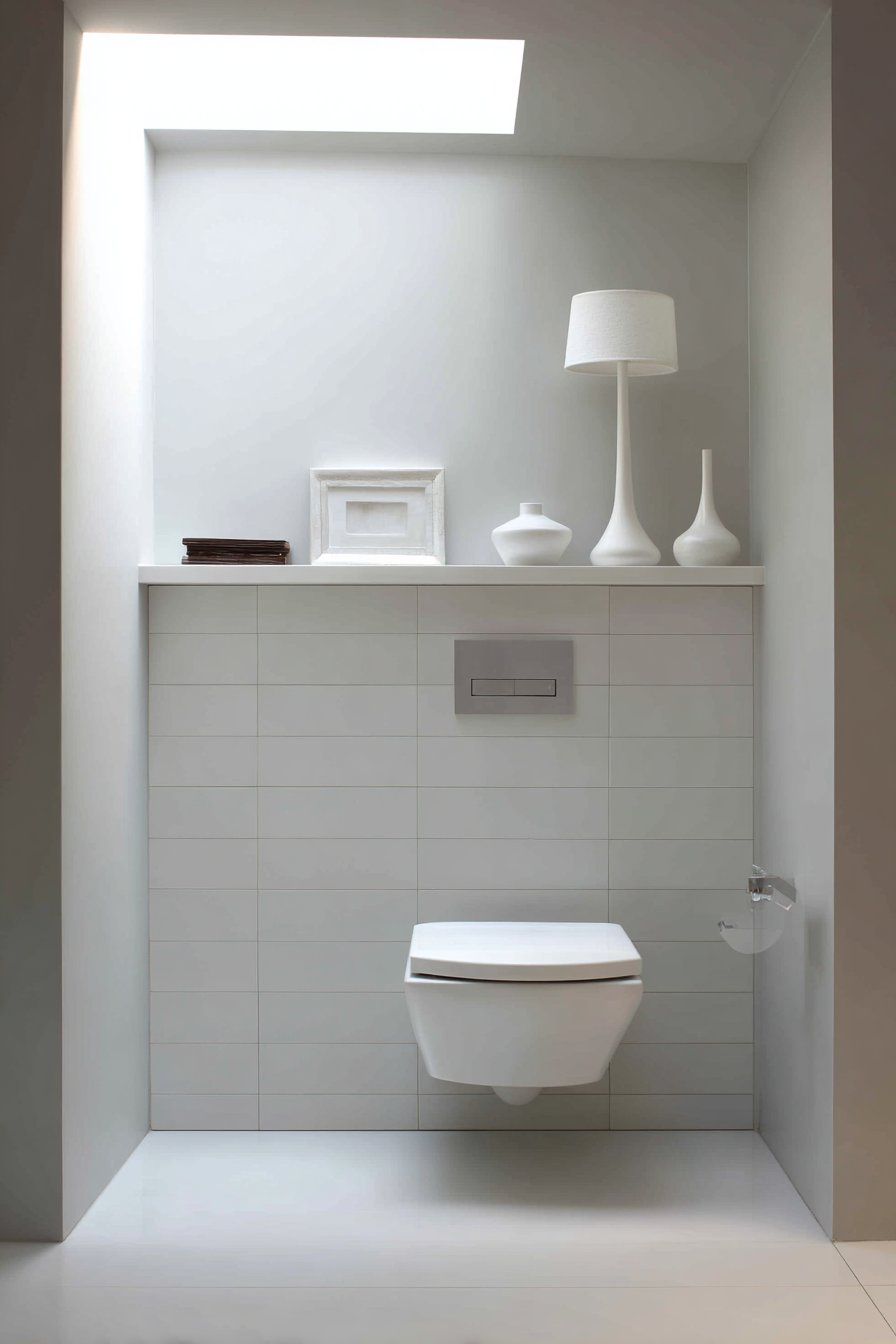
The concealed tank system hidden behind a tiled wall represents smart use of wall depth that would otherwise remain unutilized, effectively moving the plumbing infrastructure out of sight without sacrificing functionality. Above the toilet, a narrow floating shelf provides a practical surface for decorative items or essential storage without the bulk of traditional over-toilet cabinets that can make small bathrooms feel top-heavy and cramped. The choice of matte white fixtures creates a cohesive, seamless look when paired with pale grey walls, allowing the architectural elements rather than surface treatments to define the space.
Natural light from a skylight bathes the compact space in illumination from above, an often-overlooked strategy in tiny bathrooms where wall space for windows may be limited or non-existent. This overhead lighting creates even distribution throughout the day, eliminating the dark corners that can make small bathrooms feel cave-like and uninviting. The interior photography style emphasizes the floating elements and unobstructed floor view that fundamentally changes how we perceive the bathroom’s size.
Key Design Tips:
- Ensure proper wall structure before installing wall-hung toilets, as they require solid support
- Choose matte finishes over glossy for a more sophisticated, contemporary look
- Install the toilet at the proper height (typically 15-19 inches) for comfortable use
- Keep the area beneath the toilet completely clear to maximize the floating effect
- Use the wall cavity for the concealed tank to store other plumbing infrastructure efficiently
- Consider adding a subtle LED strip beneath the toilet for dramatic nighttime illumination
4. Vertical Ladder Shelving
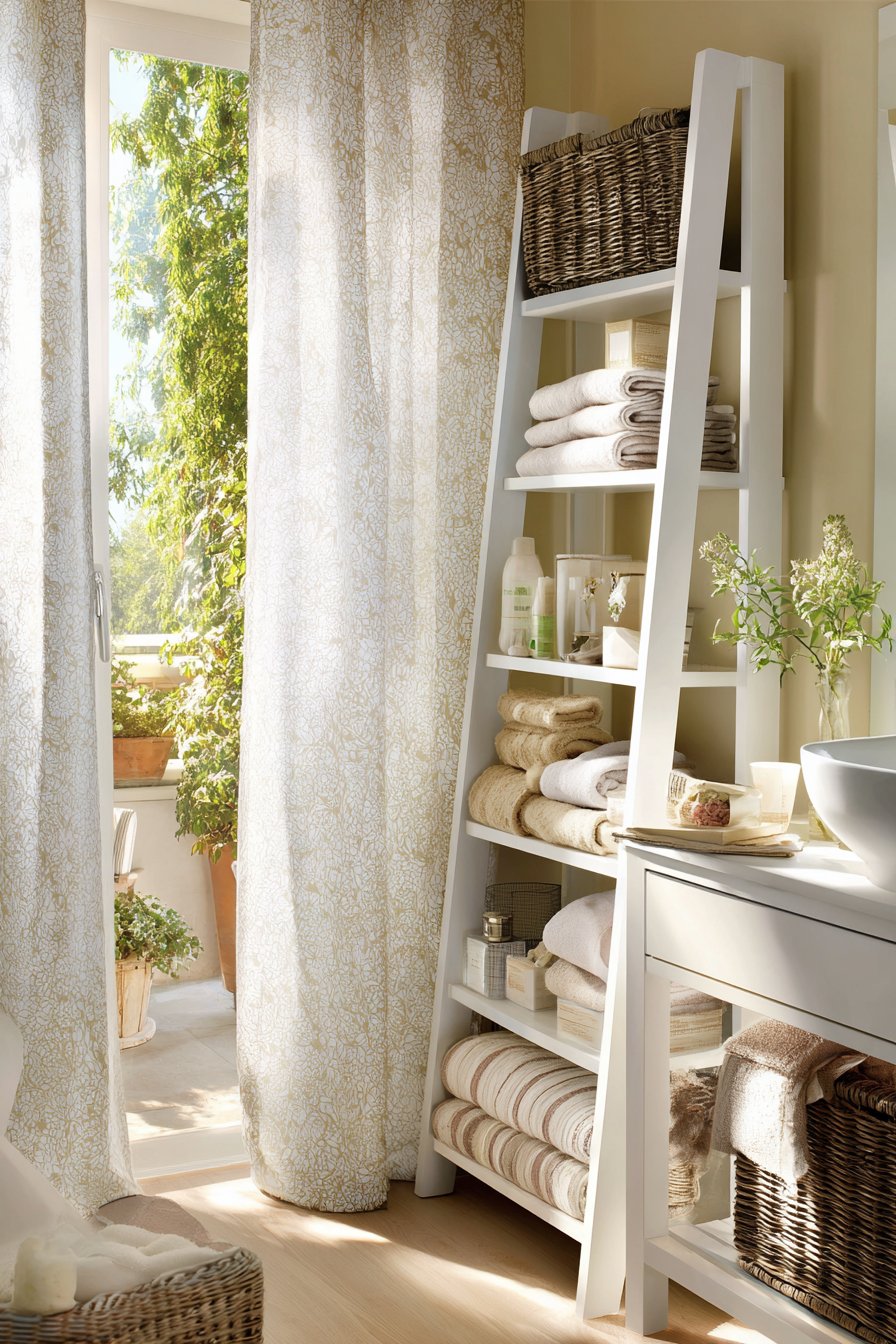
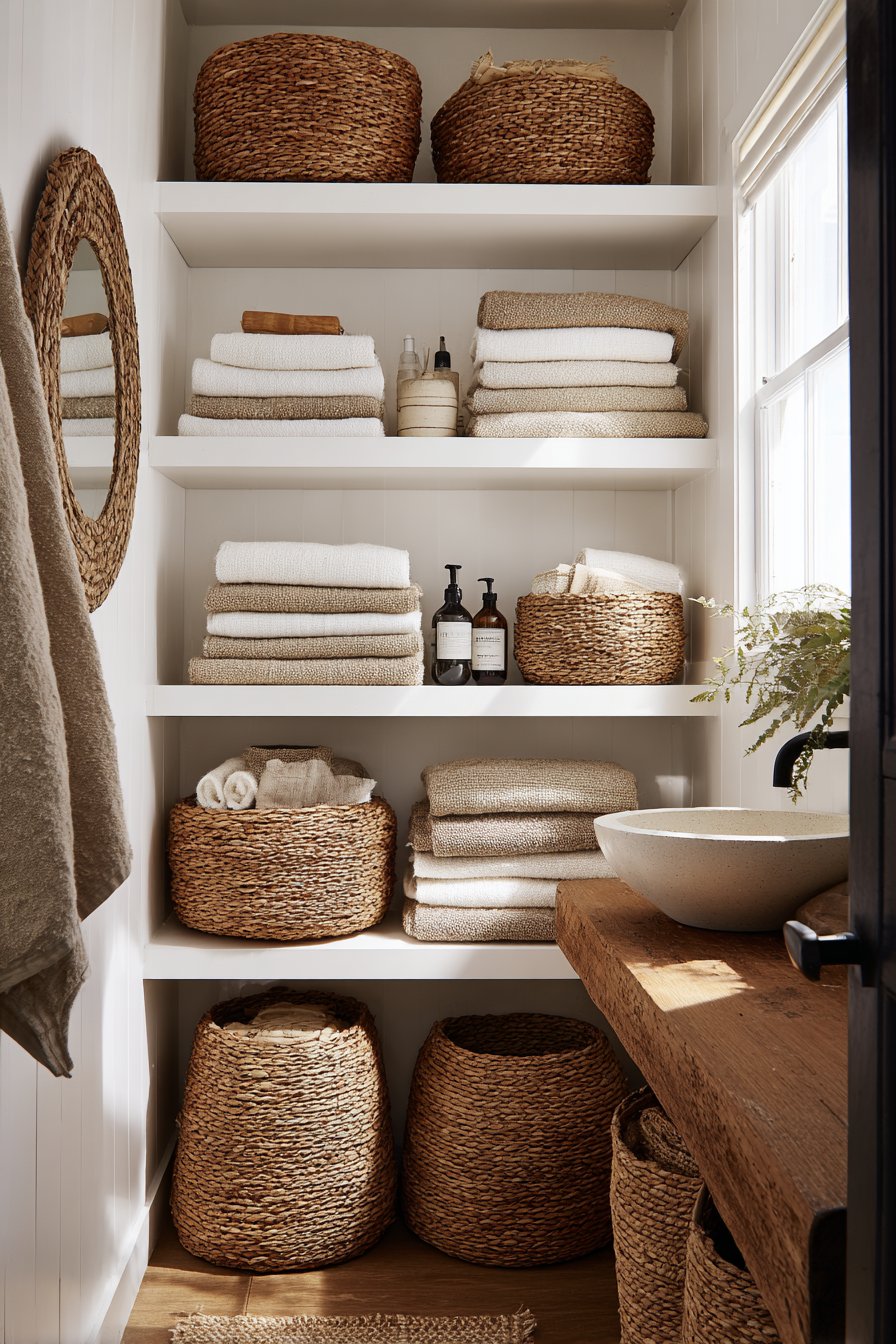
When horizontal space is limited, the only direction to build is up, making vertical storage solutions essential in tiny bathroom design. Floor-to-ceiling white ladder shelving creates a striking visual element that draws the eye upward, effectively making the ceiling feel higher while providing ample storage for rolled towels, small plants, woven baskets, and other bathroom essentials. This open shelving approach avoids the closed-in feeling that traditional cabinetry can create in narrow bathrooms, maintaining visual lightness while still addressing practical storage needs.
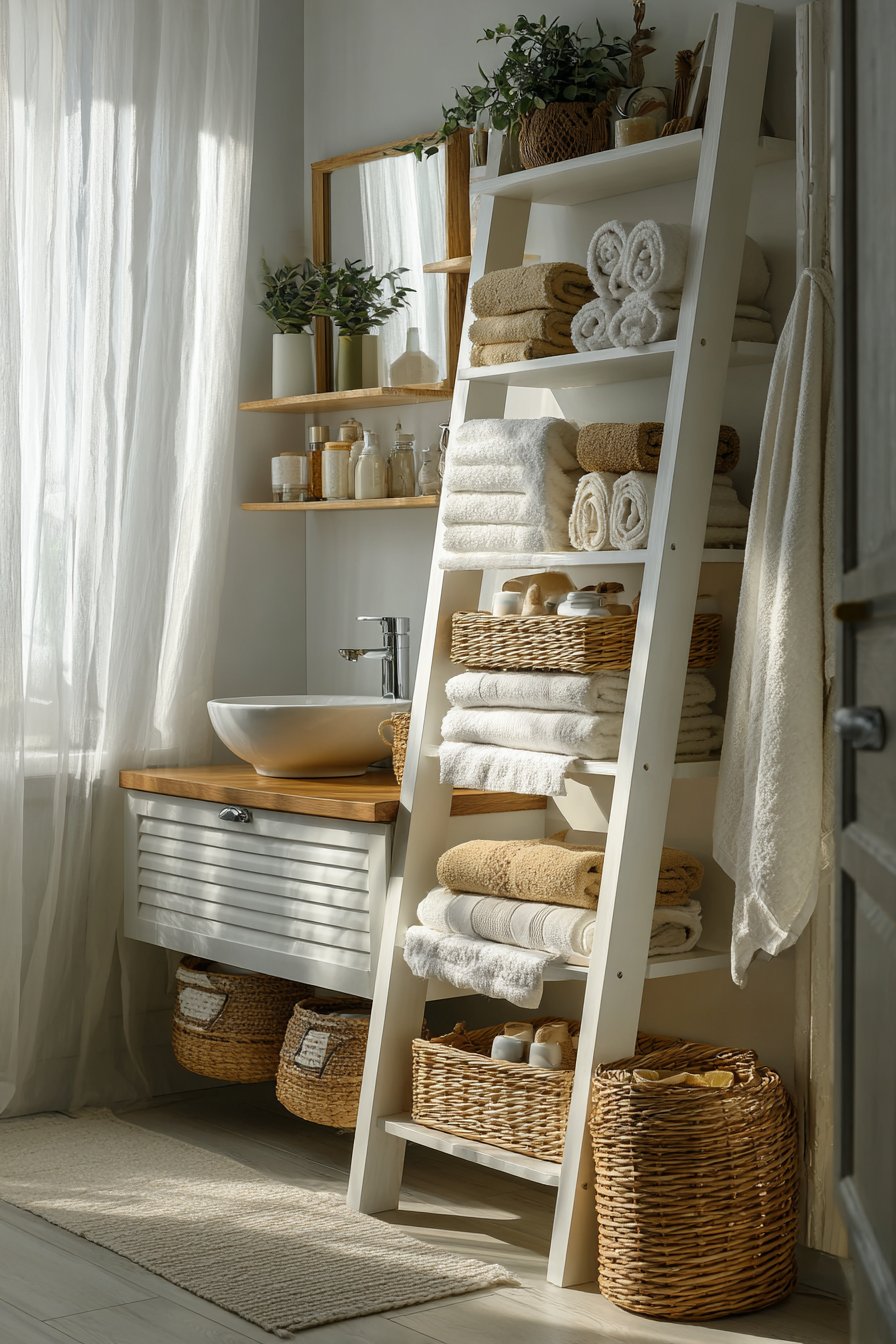
The strategic arrangement of items on ladder shelving represents an art form in itself—rolled towels create cylindrical forms that fit efficiently on narrow shelves, while woven baskets contain smaller items that might otherwise create visual clutter. Small plants introduce life and color to the bathroom environment, improving air quality while adding organic shapes that soften the hard edges of typical bathroom fixtures and tilework. Light wood flooring adds warmth to the predominantly white palette, preventing the sterile institutional feeling that all-white bathrooms can sometimes project.
A small vessel sink on a compact vanity preserves precious floor space at ground level, working in harmony with the vertical storage solution to create a balanced design that addresses both practical needs and aesthetic concerns. Soft natural lighting through sheer curtains creates an airy atmosphere that complements the open shelving approach, casting gentle shadows that add depth and dimension to what could otherwise feel like a flat, cramped space. Professional interior photography showcasing the full height utilization demonstrates how dramatically vertical emphasis can transform the perception of a narrow bathroom.
Key Design Tips:
- Secure ladder shelving firmly to wall studs to ensure stability when loaded with items
- Arrange items strategically with heavier pieces on lower shelves for visual stability
- Use uniform containers and baskets to create cohesion and prevent visual chaos
- Leave some shelves partially empty to maintain an airy, uncrowded feeling
- Choose ladder shelving with appropriate depth (8-12 inches) to avoid excessive protrusion
- Incorporate small plants that thrive in bathroom humidity like pothos or ferns
- Use the vertical storage to display attractive items rather than hiding everything
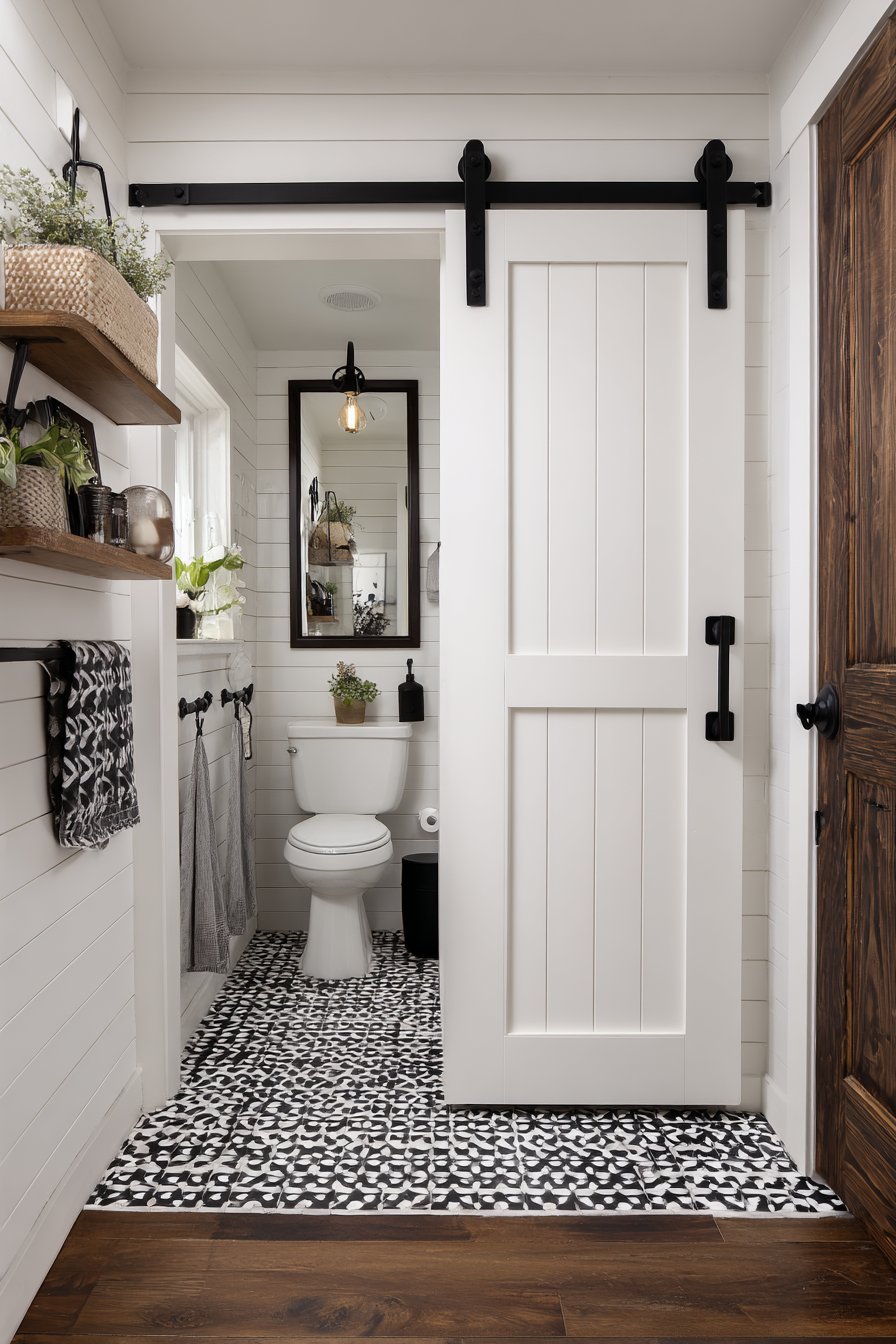
5. Space-Saving Sliding Barn Door
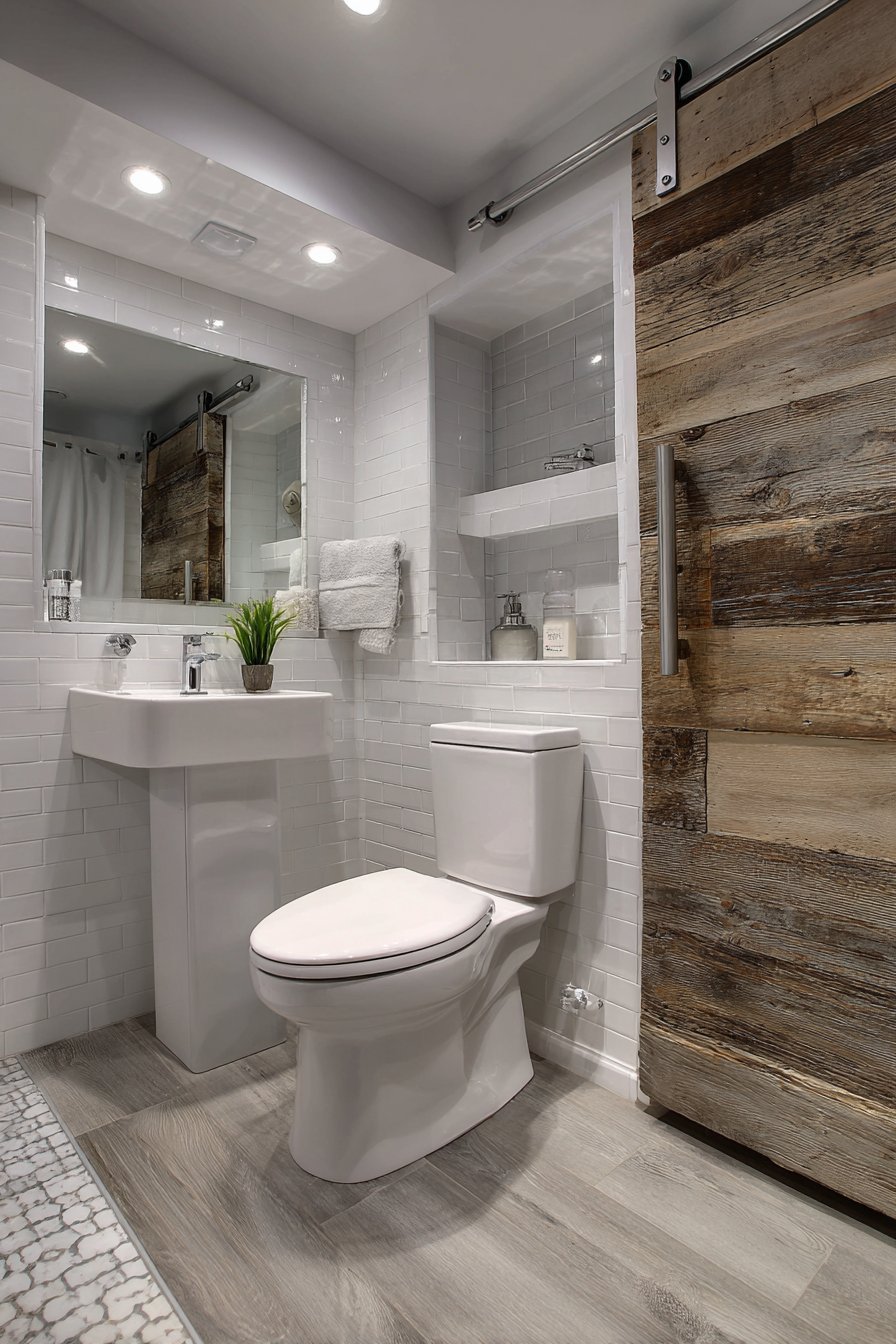
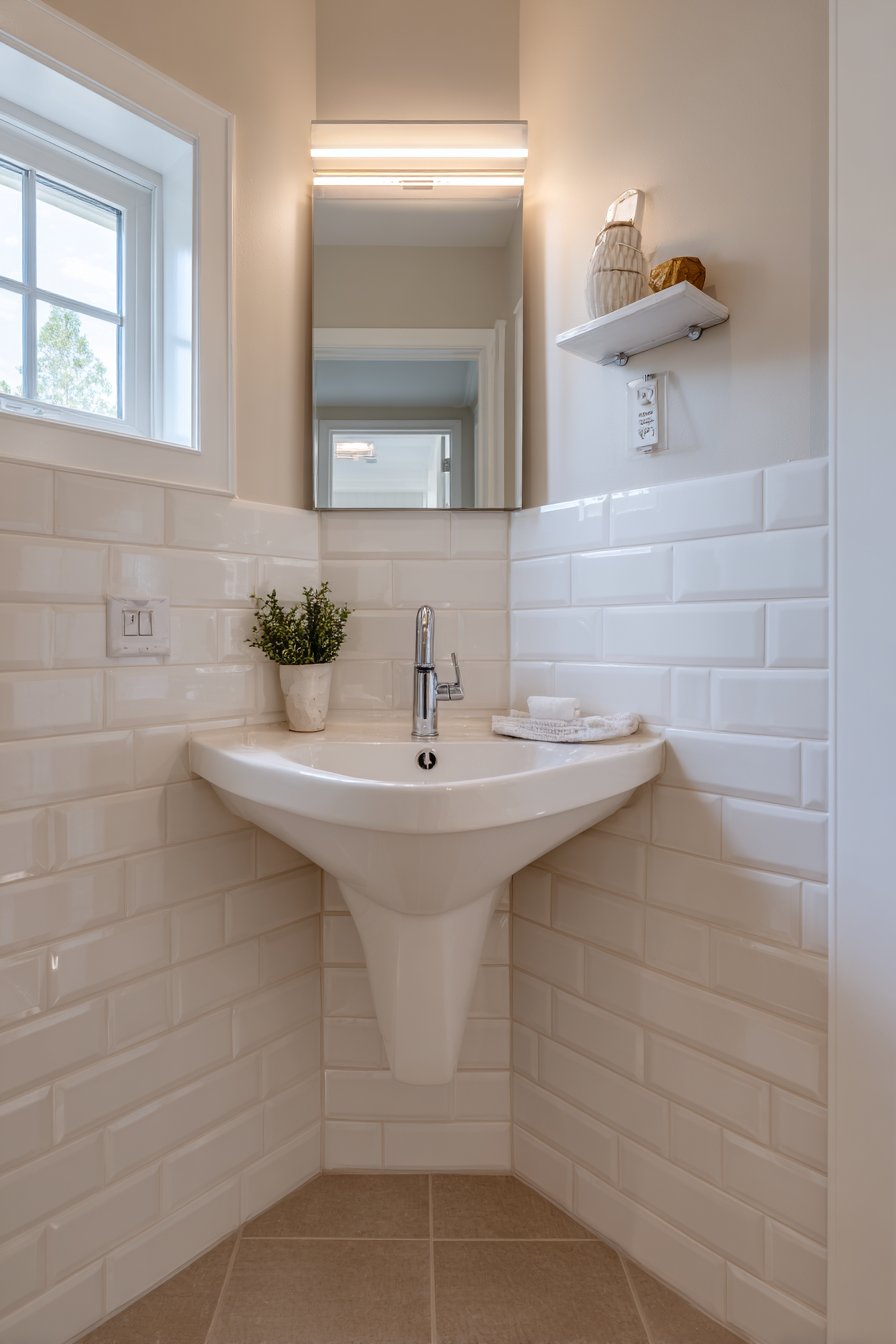
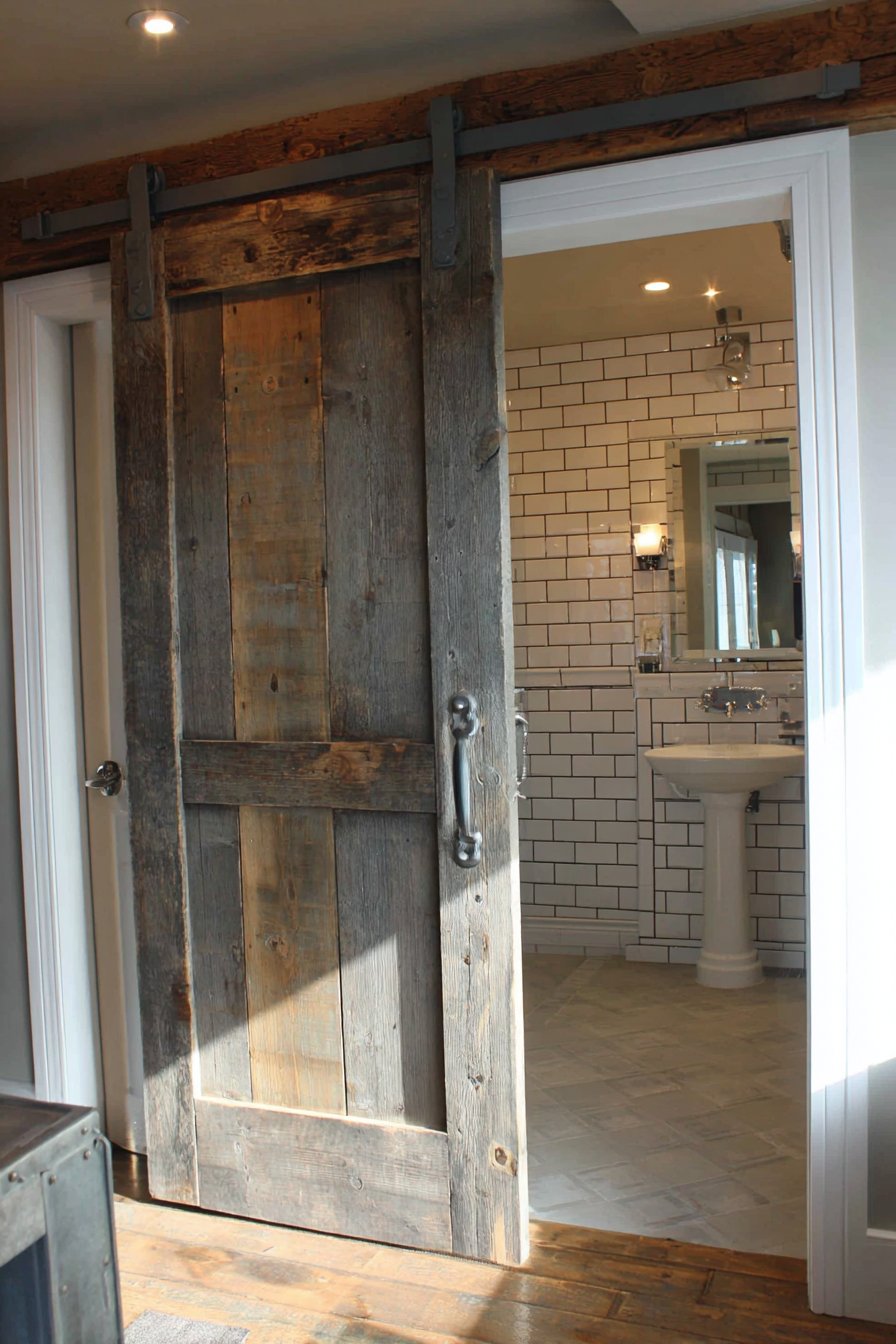
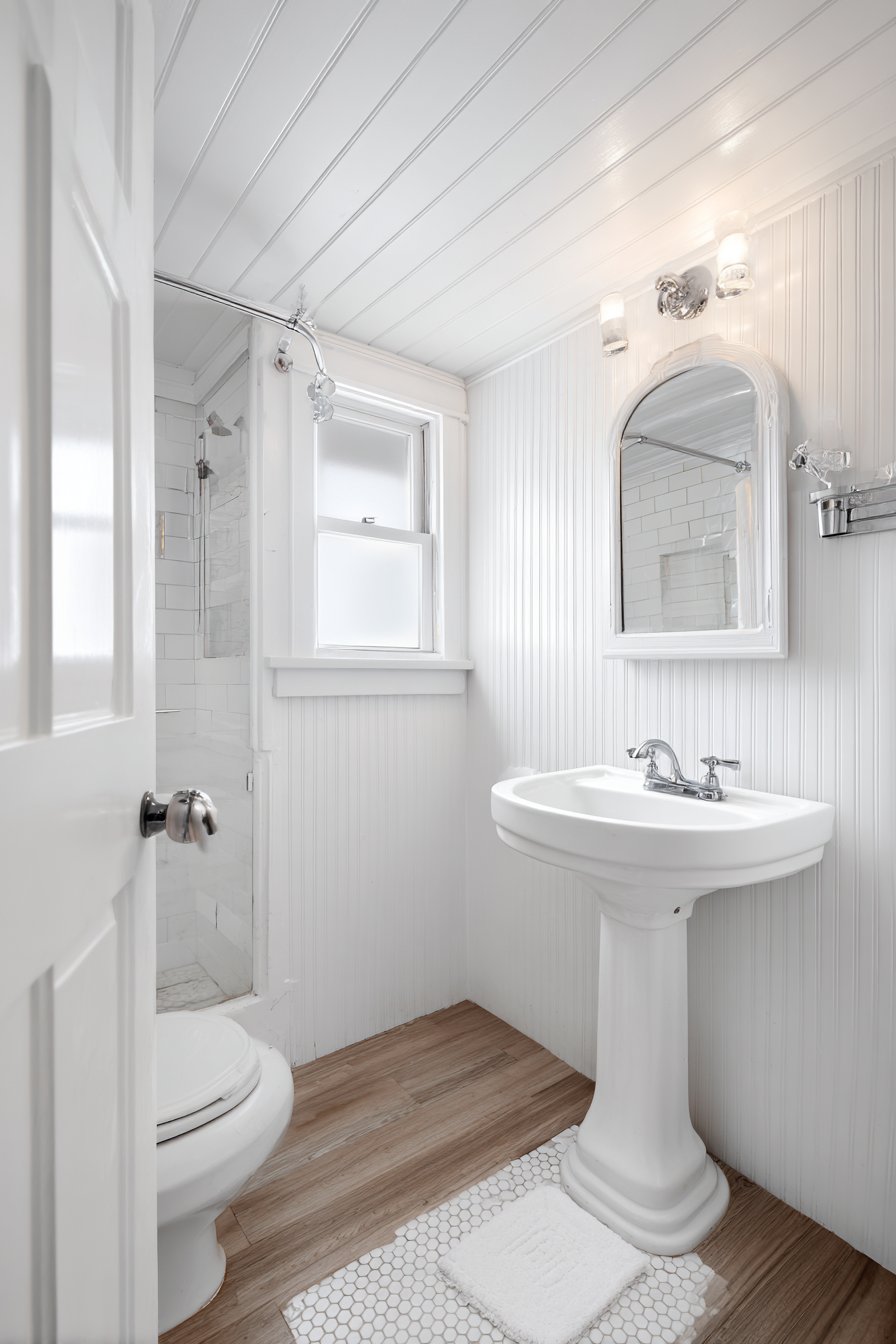
The swing radius required by traditional hinged doors consumes valuable floor space that tiny bathrooms simply cannot spare, making sliding barn doors an increasingly popular solution for compact bathroom access. A sliding barn door eliminates the need for clearance space in front of the doorway, effectively reclaiming 6-9 square feet that can be utilized for fixtures or simply left open to create a more spacious feeling in a 35-square-foot bathroom. The rustic wood texture of barn door hardware creates an interesting material contrast with modern white subway tiles and chrome fixtures, adding character to what might otherwise be a purely utilitarian space.
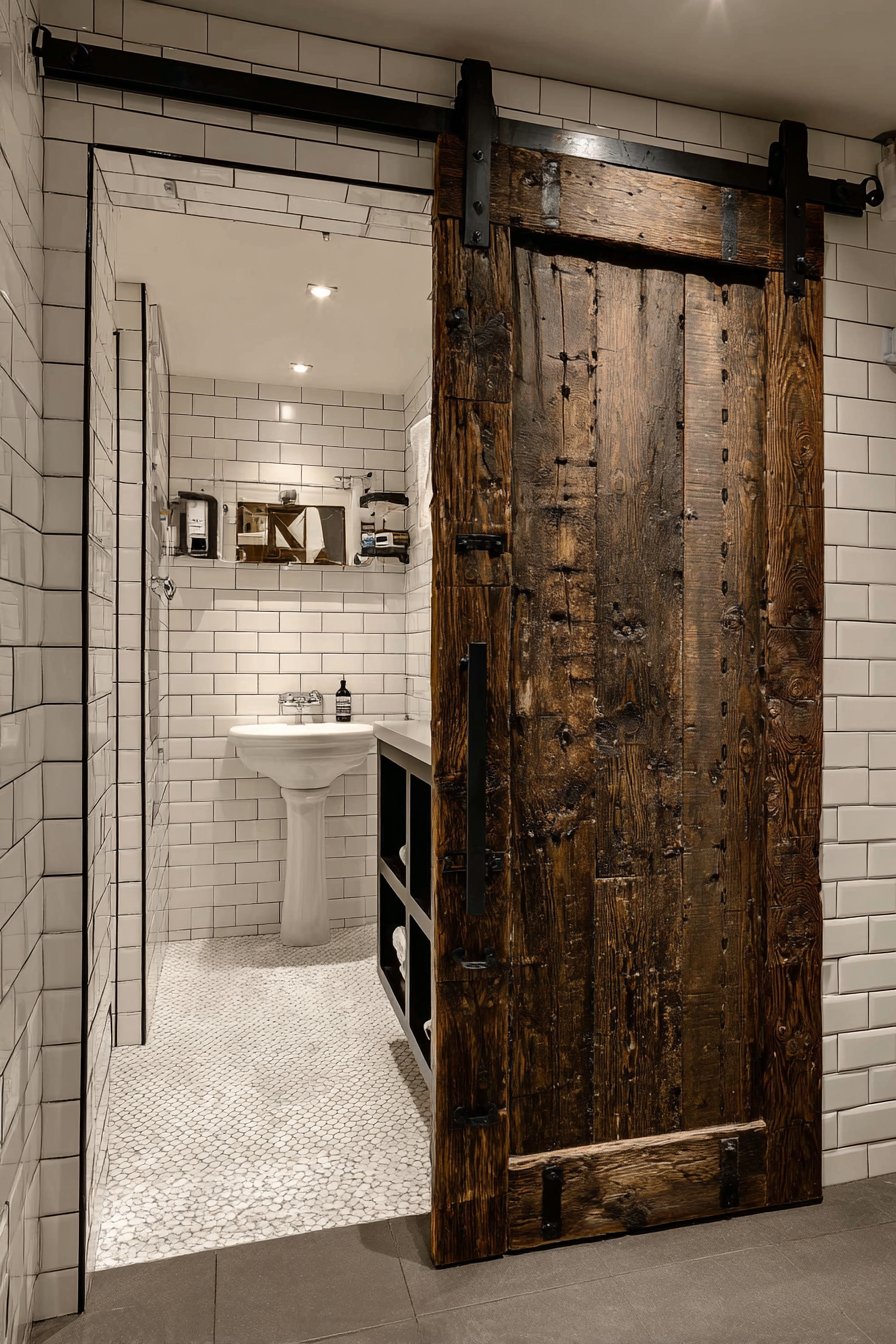
Inside the bathroom, a pedestal sink and wall-mounted storage maximize the limited footprint by keeping the floor as clear as possible, a crucial strategy in bathrooms where every square foot counts. The pedestal sink’s slim profile provides essential washing functionality without the bulk of vanity cabinets, while wall-mounted storage keeps toiletries and towels accessible without encroaching on movement space. Recessed lighting provides even illumination without requiring surface-mounted fixtures that would protrude into the limited overhead space.
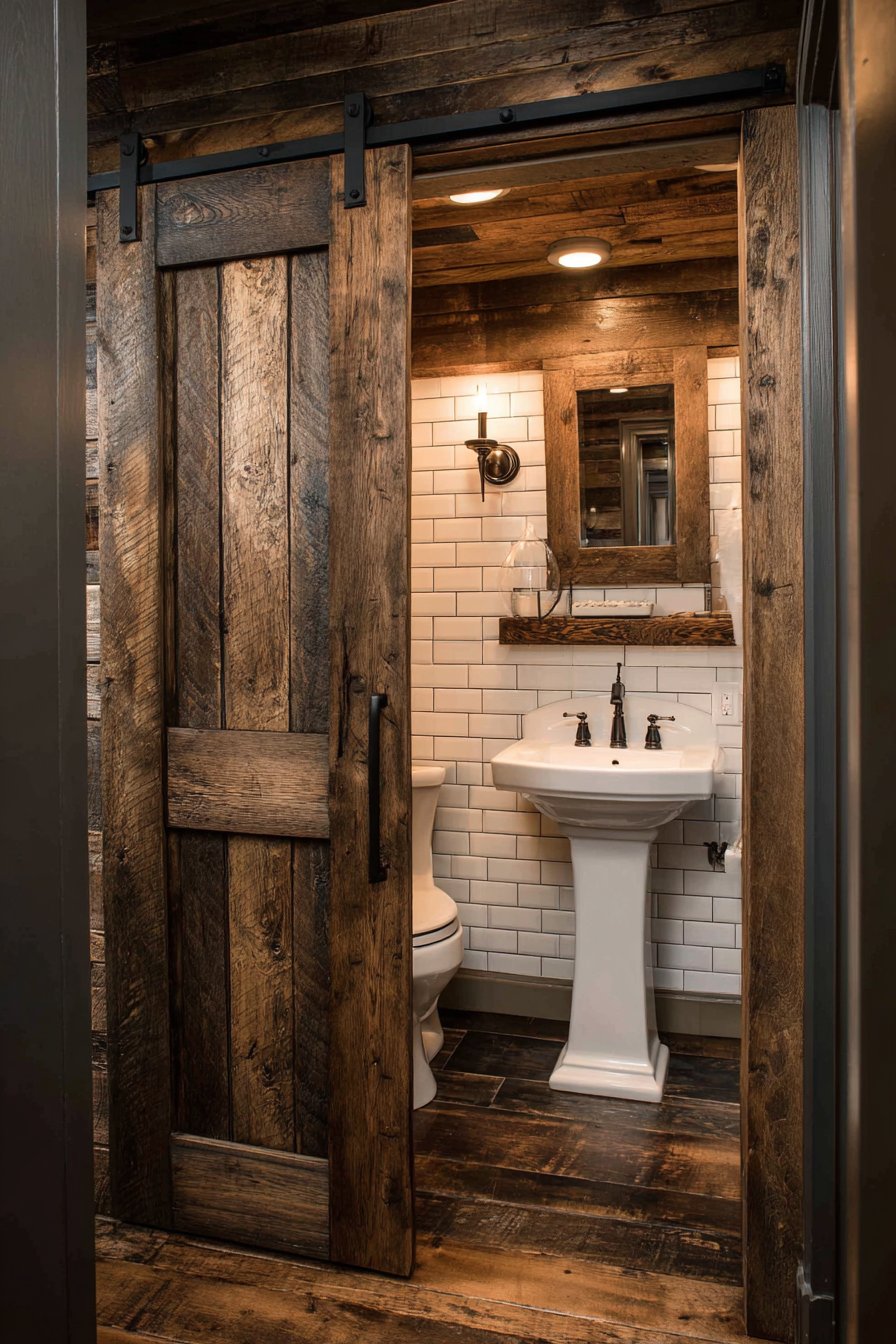
Wide-angle interior design photography effectively captures both the space-saving door mechanism and the efficiently arranged interior, demonstrating how these two elements work together to create a functional bathroom in an extremely limited footprint. The barn door itself becomes a design feature rather than merely functional hardware, with its visible track and rustic aesthetic adding visual interest to the hallway or bedroom from which the bathroom is accessed.
Key Design Tips:
- Measure carefully to ensure adequate wall space beside the doorway for the door to slide completely open
- Choose barn door hardware rated for bathroom humidity to prevent corrosion and degradation
- Install a soft-close mechanism to prevent slamming and reduce noise
- Consider a locking mechanism if privacy is a concern with sliding doors
- Ensure the door fully covers the doorway opening with at least 1-2 inches of overlap on each side
- Use weatherstripping or door sweeps to improve sound dampening if needed
- Select door material and finish that complements both bathroom and adjacent room aesthetics
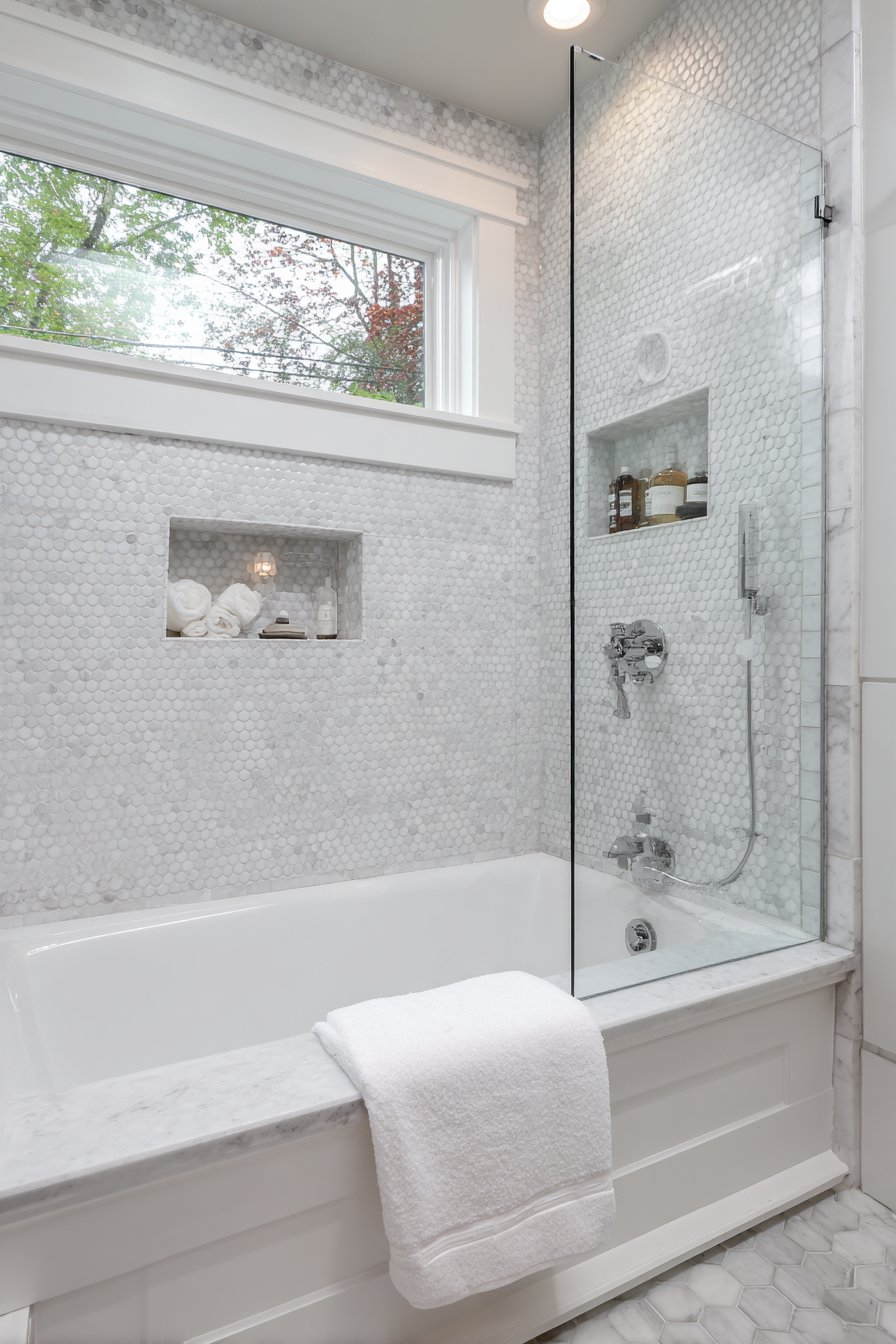
6. Seamless Wet Room Design
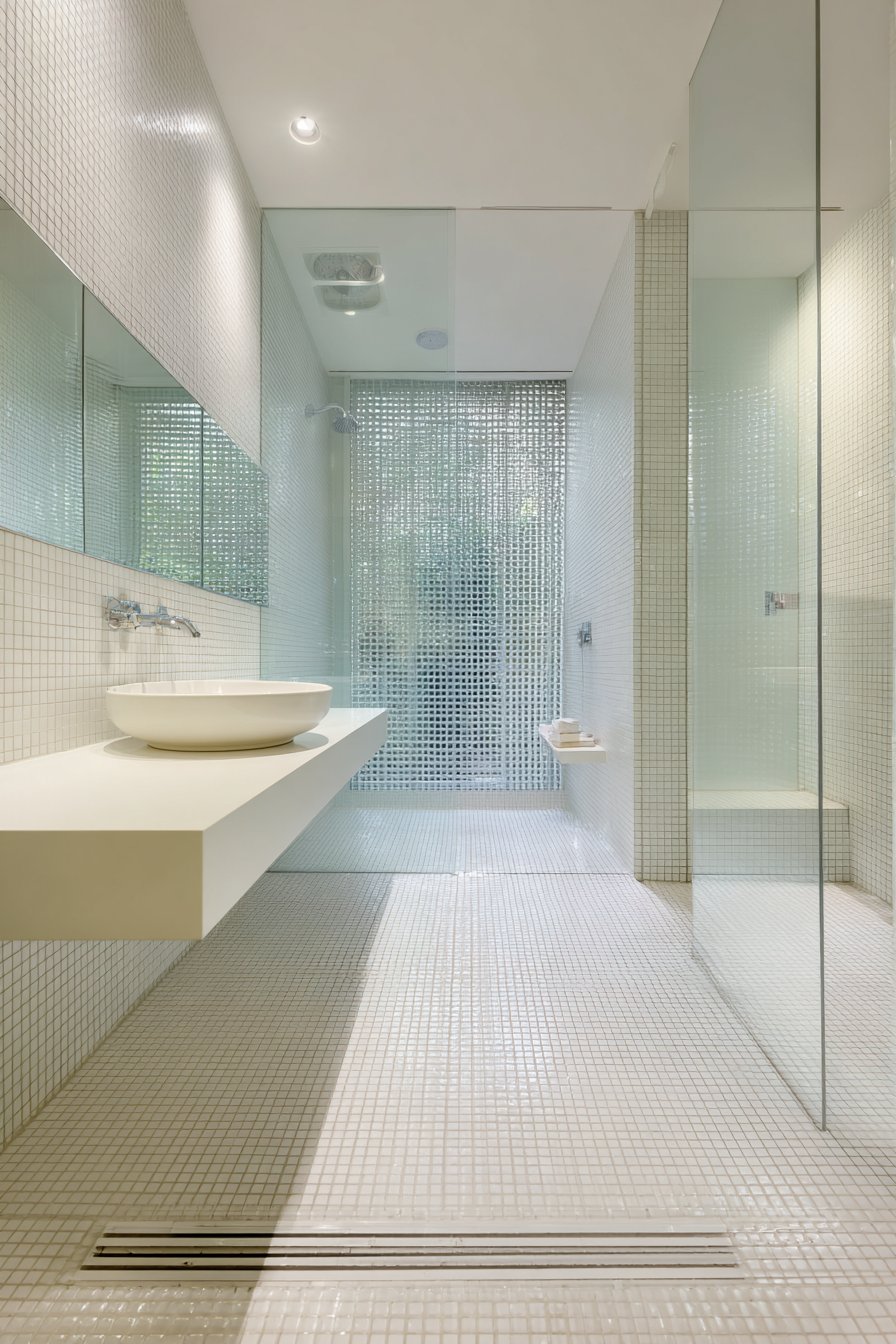
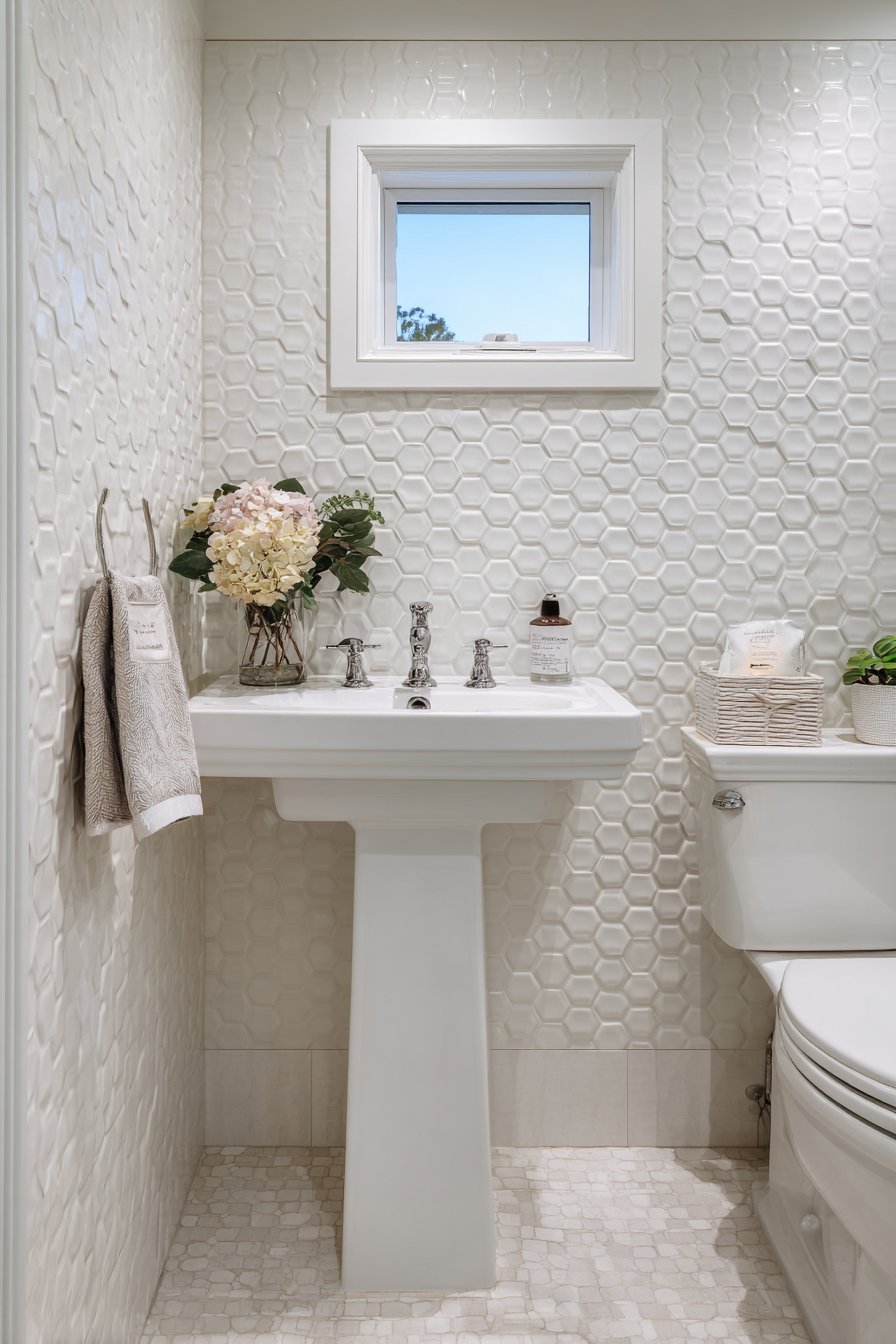
The wet room concept represents one of the most radical approaches to tiny bathroom design, eliminating traditional shower enclosures entirely and instead creating one continuous waterproof surface that functions as both bathroom floor and shower floor. This approach proves particularly effective in 45-square-foot spaces where traditional shower stalls would consume disproportionate amounts of the available area. A curbless shower floor with a linear drain integrated into white hexagonal tile pattern creates a seamless transition that allows the entire floor plane to read as one unified surface, dramatically expanding the perceived size of the bathroom.
The glass partition that separates the shower zone serves a practical purpose—containing water spray to prevent the entire bathroom from becoming soaked—while maintaining visual openness by using minimal framing and clear glass. Wall-mounted fixtures and a floating vanity keep the floor clear, reinforcing the continuous surface that defines the wet room aesthetic. This approach requires meticulous waterproofing throughout the entire bathroom, not just the shower area, but the payoff in terms of spatial perception is substantial.
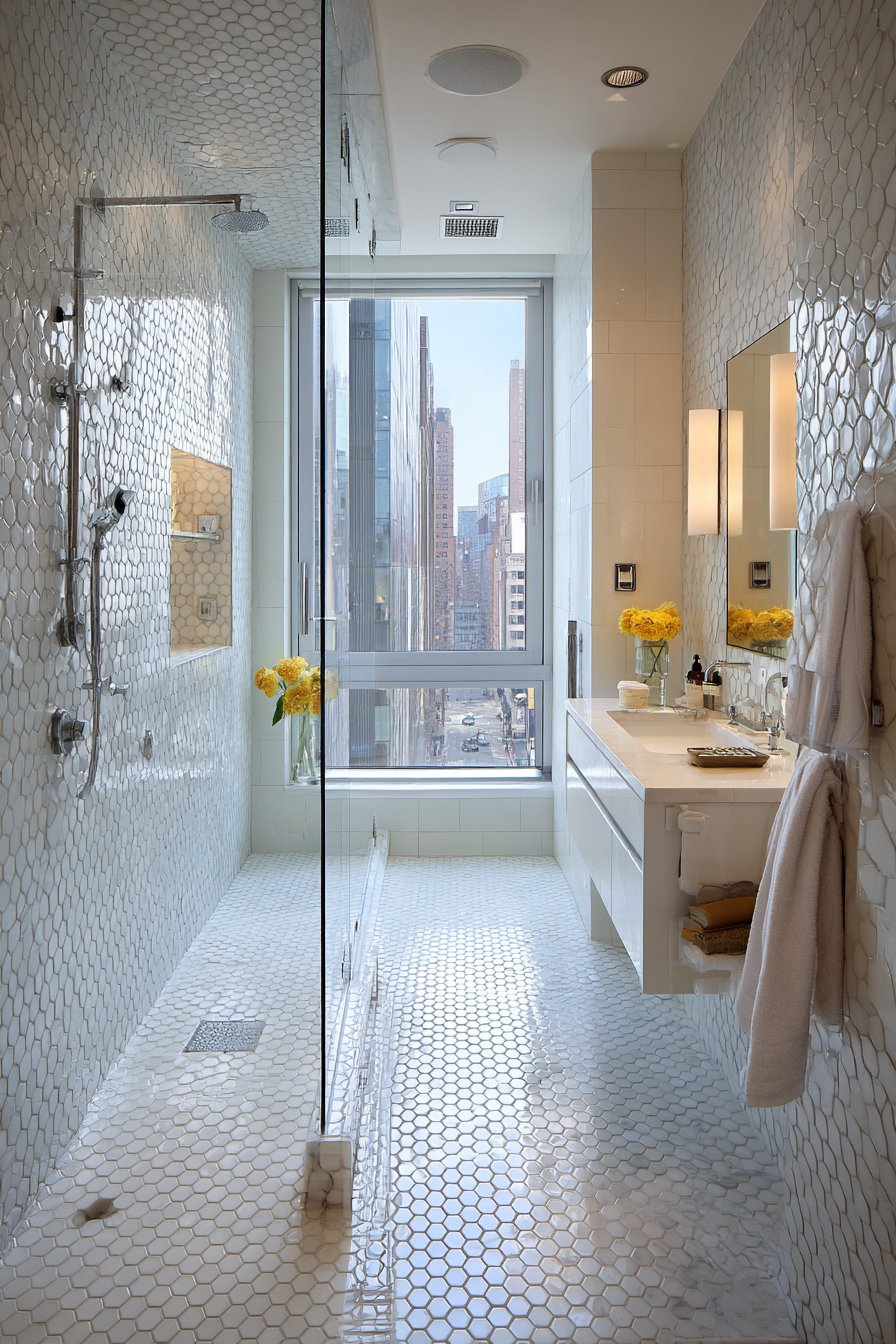
Natural light diffusing through frosted glass provides privacy while maintaining the bright, airy quality that makes wet rooms feel so much larger than their actual dimensions. Interior photography showcasing the seamless wet room design pays particular attention to drainage details and material textures, revealing how the slight slope toward the linear drain remains virtually imperceptible while ensuring proper water evacuation. The careful selection of slip-resistant tile becomes paramount in wet rooms, where the entire floor may become wet during showering.
Key Design Tips:
- Hire experienced contractors familiar with wet room waterproofing requirements
- Install a linear drain for more efficient water evacuation than center drains
- Create a subtle slope (typically 1/4 inch per foot) toward the drain without making it noticeable
- Choose textured or matte-finish tiles for slip resistance throughout the entire floor
- Ensure excellent ventilation to manage humidity in the fully waterproofed space
- Consider heated flooring to improve comfort and accelerate drying after showering
- Use large-format tiles to minimize grout lines and create a more seamless appearance
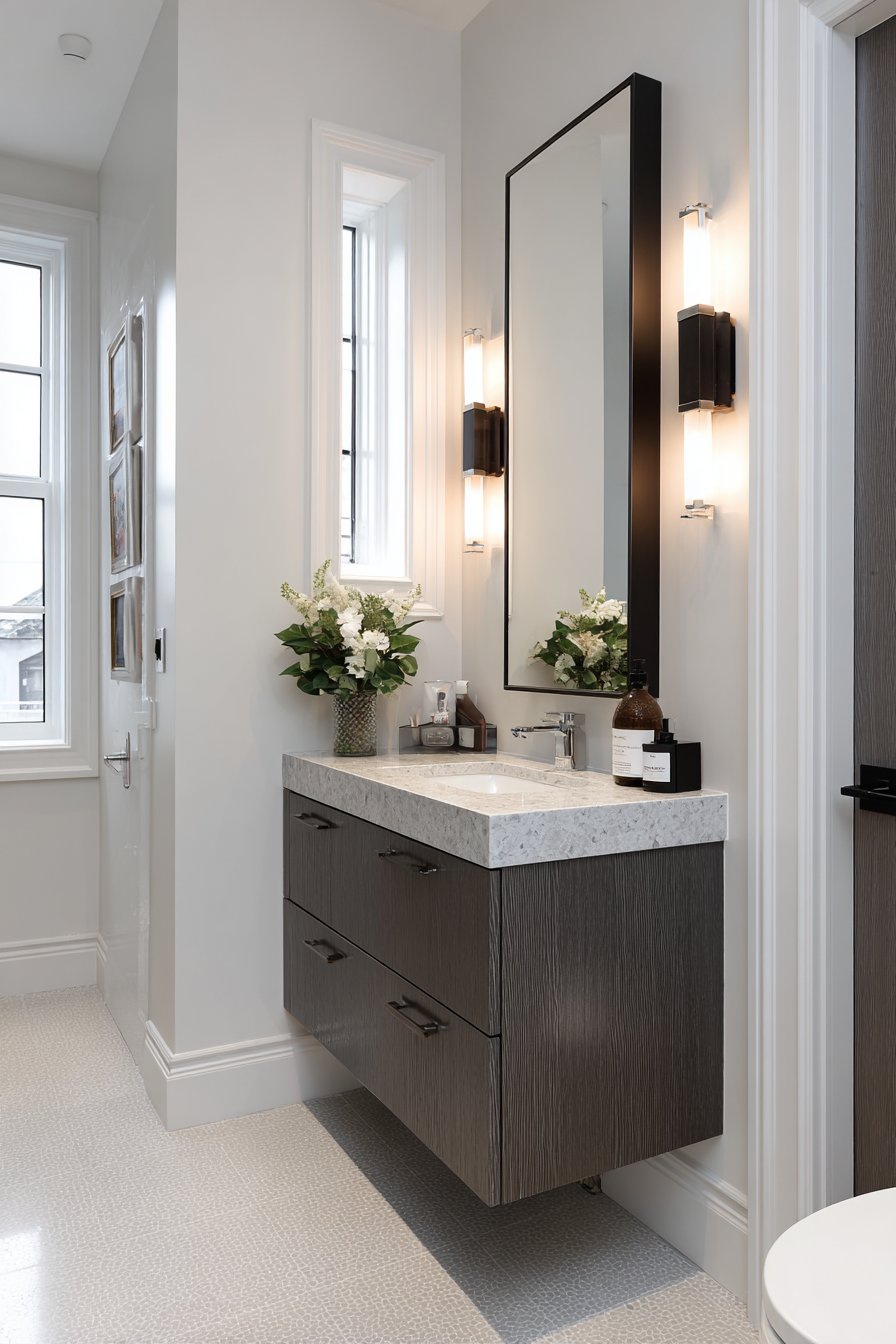
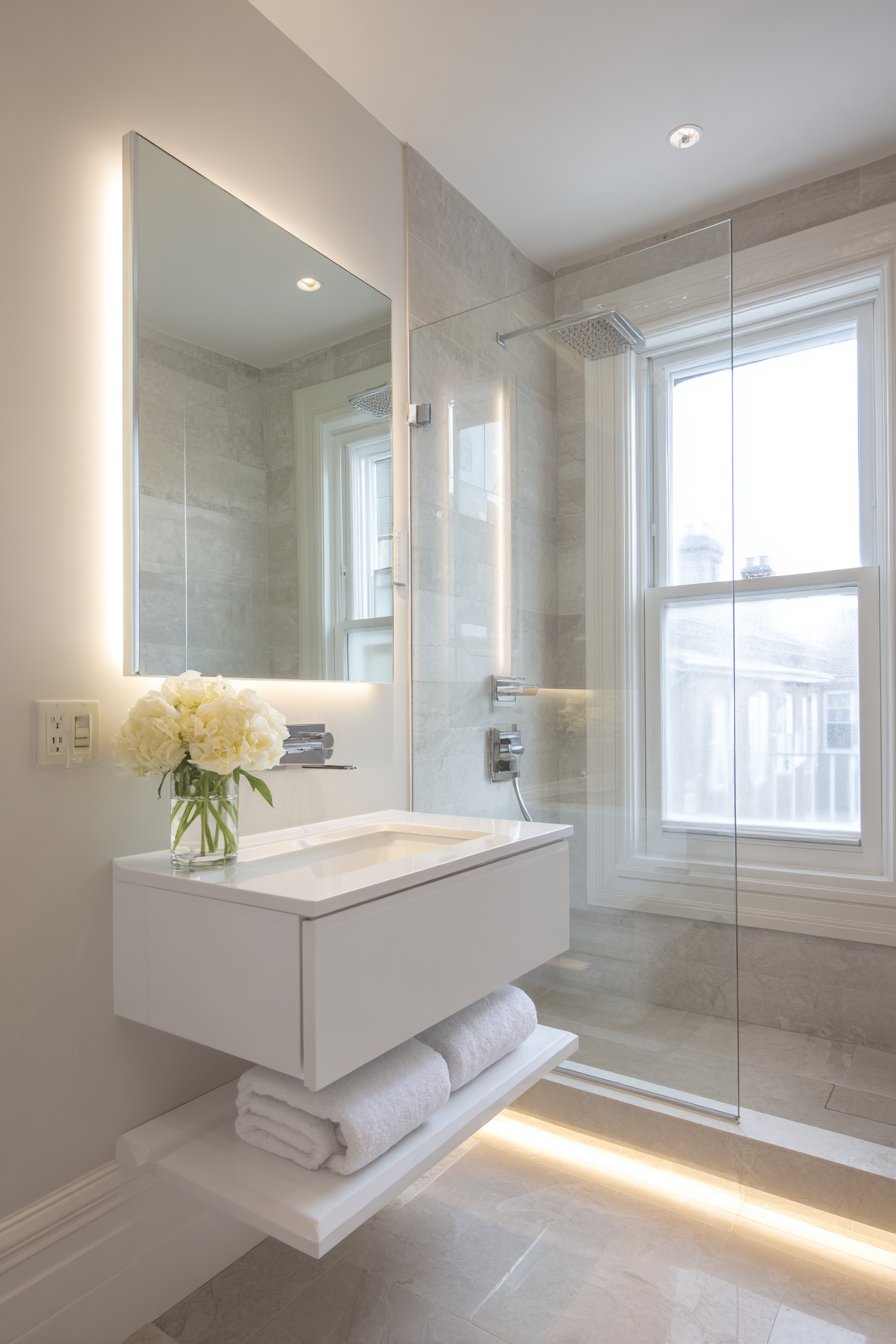
7. Ultra-Slim Vanity Profile
When bathroom width is severely constrained, standard-depth vanities (typically 21-24 inches) simply won’t fit without blocking circulation paths or making the space feel impassably narrow. An 18-inch-deep narrow vanity with a rectangular undermount sink provides essential functionality without dominating a small 3×7 foot bathroom, leaving enough clearance for comfortable movement. The two drawers with soft-close mechanisms offer surprising storage capacity despite the slim profile, accommodating toiletries, cosmetics, and bathroom essentials that would otherwise clutter limited counter space.
A large mirror extending wall-to-wall creates one of the most effective optical illusions in small bathroom design, visually doubling the perceived depth of the space by reflecting the opposite wall and creating the impression that the bathroom extends much further than it actually does. Brushed gold fixtures add a touch of elegance and warmth that prevents the narrow space from feeling cold or institutional, while the metallic finish catches and reflects light throughout the day. Soft natural lighting from above creates gentle highlights that emphasize the fixtures and fittings without creating harsh shadows that can make narrow spaces feel more constricted.
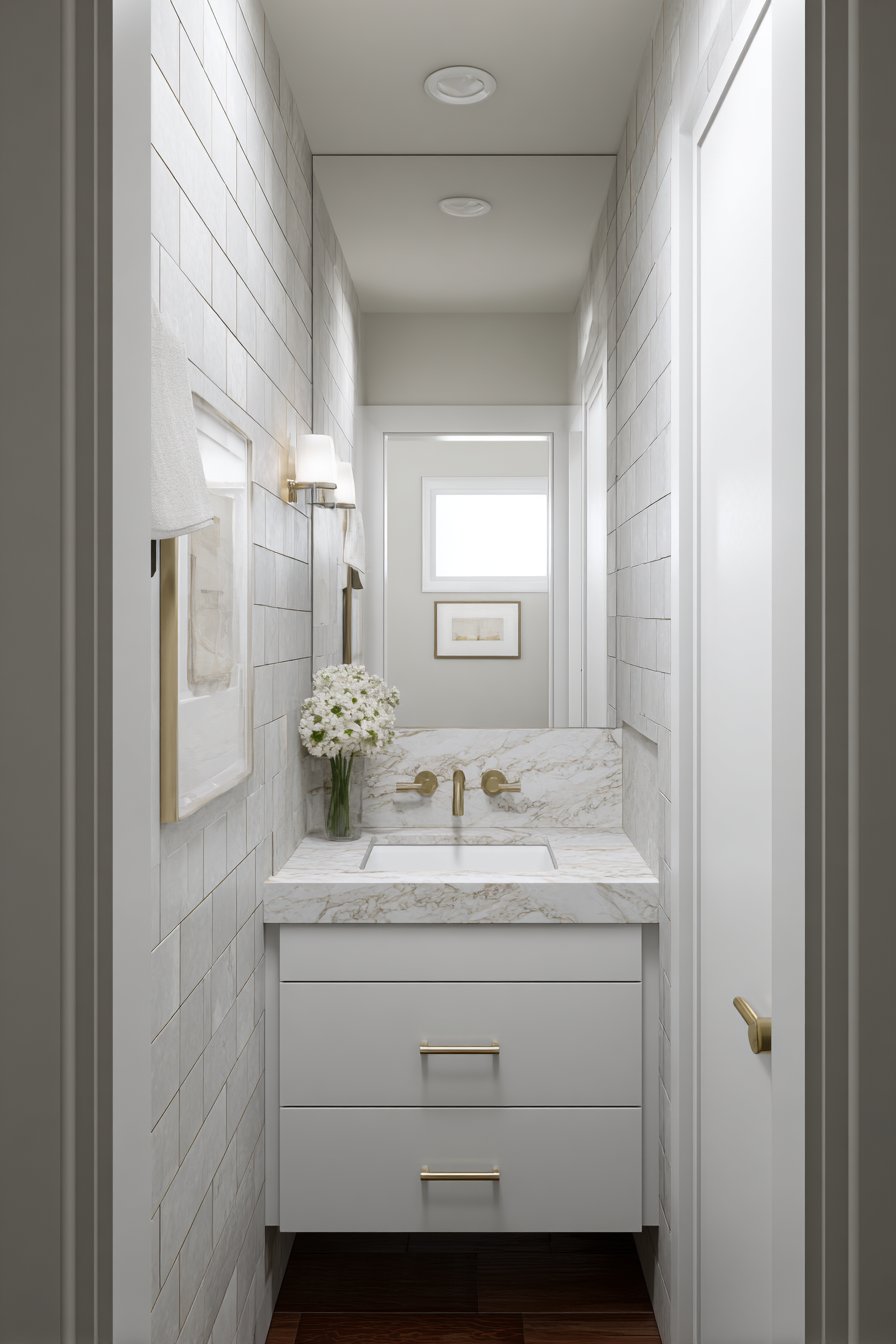
Professional interior photography focuses on the slim profile and reflective surfaces, two key elements that work synergistically to make this narrow bathroom function effectively. The rectangular undermount sink maximizes usable counter space compared to vessel sinks or drop-in models, while the wall-to-wall mirror eliminates the visual interruption that a framed mirror would create, maintaining continuous reflection across the entire width of the vanity.
Key Design Tips:
- Choose vanities specifically designed for small spaces rather than simply using short-depth standard models
- Opt for undermount sinks to maximize counter space and create easier cleaning
- Install wall-to-wall mirrors rather than framed mirrors to maximize reflective surface
- Use drawer organizers to maximize storage efficiency in limited drawer space
- Consider wall-mounted faucets if counter space is extremely limited
- Install adequate lighting on either side of or above the mirror for proper task illumination
- Select light-colored countertops to reflect maximum light and maintain brightness
8. Corner Neo-Angle Shower
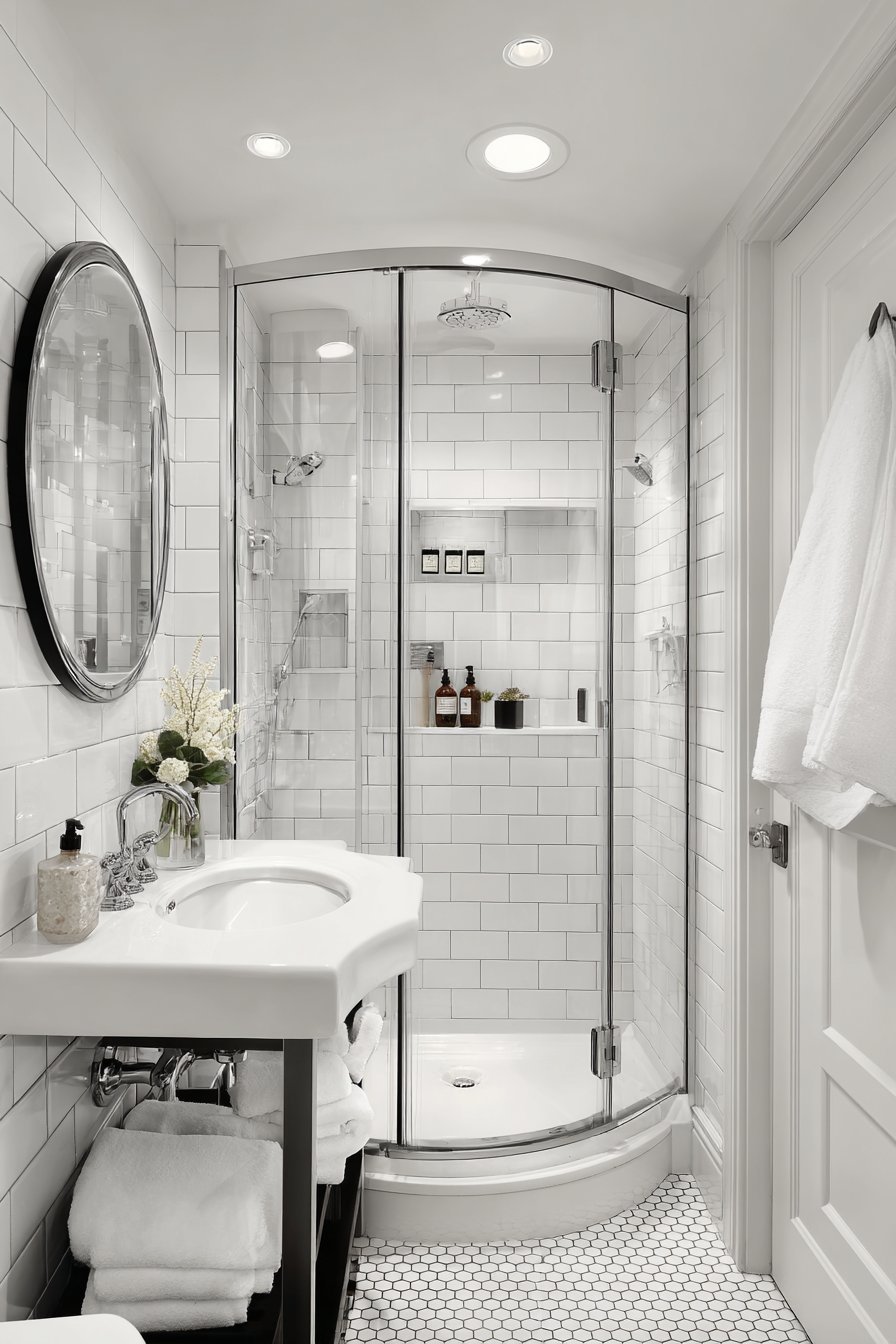
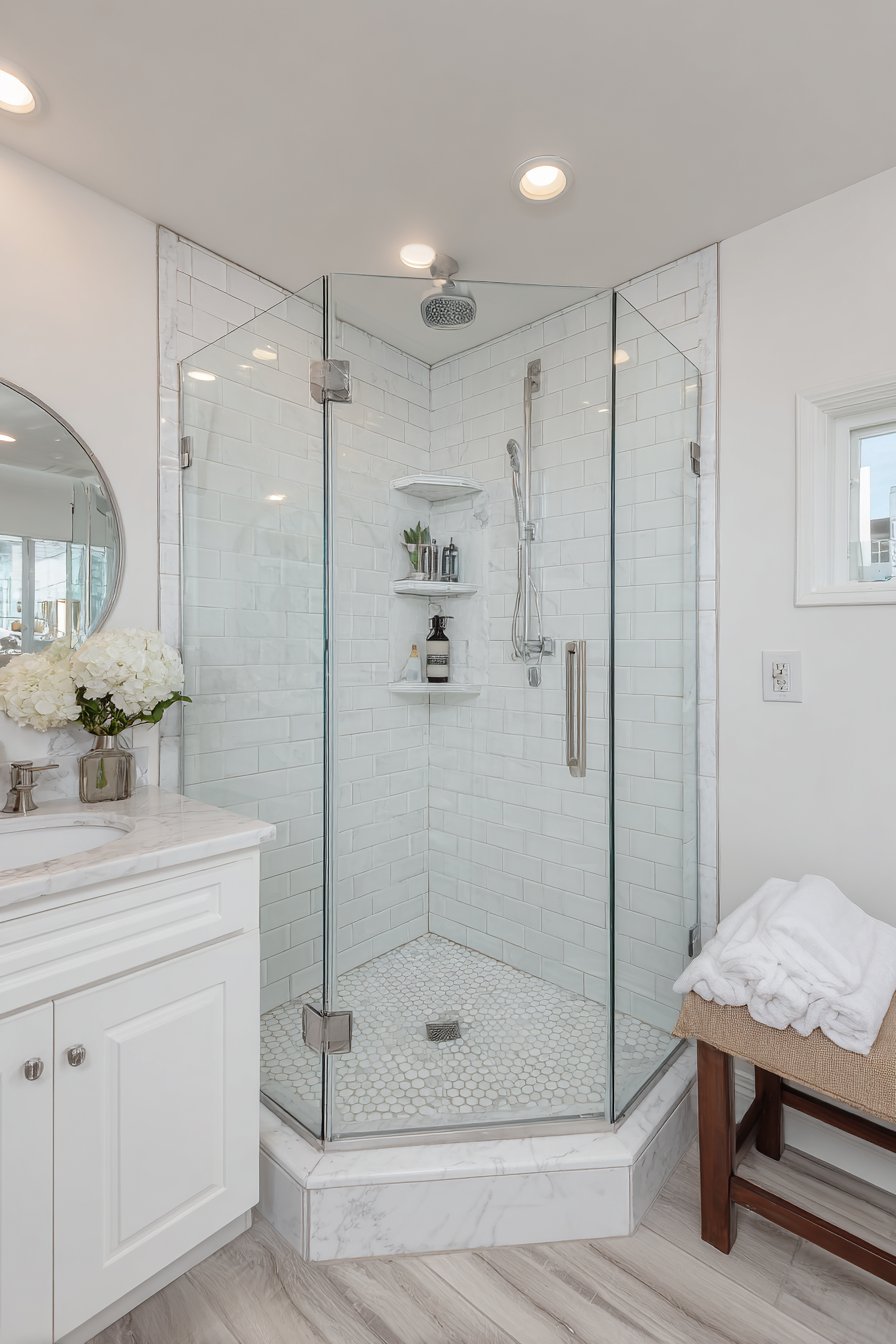
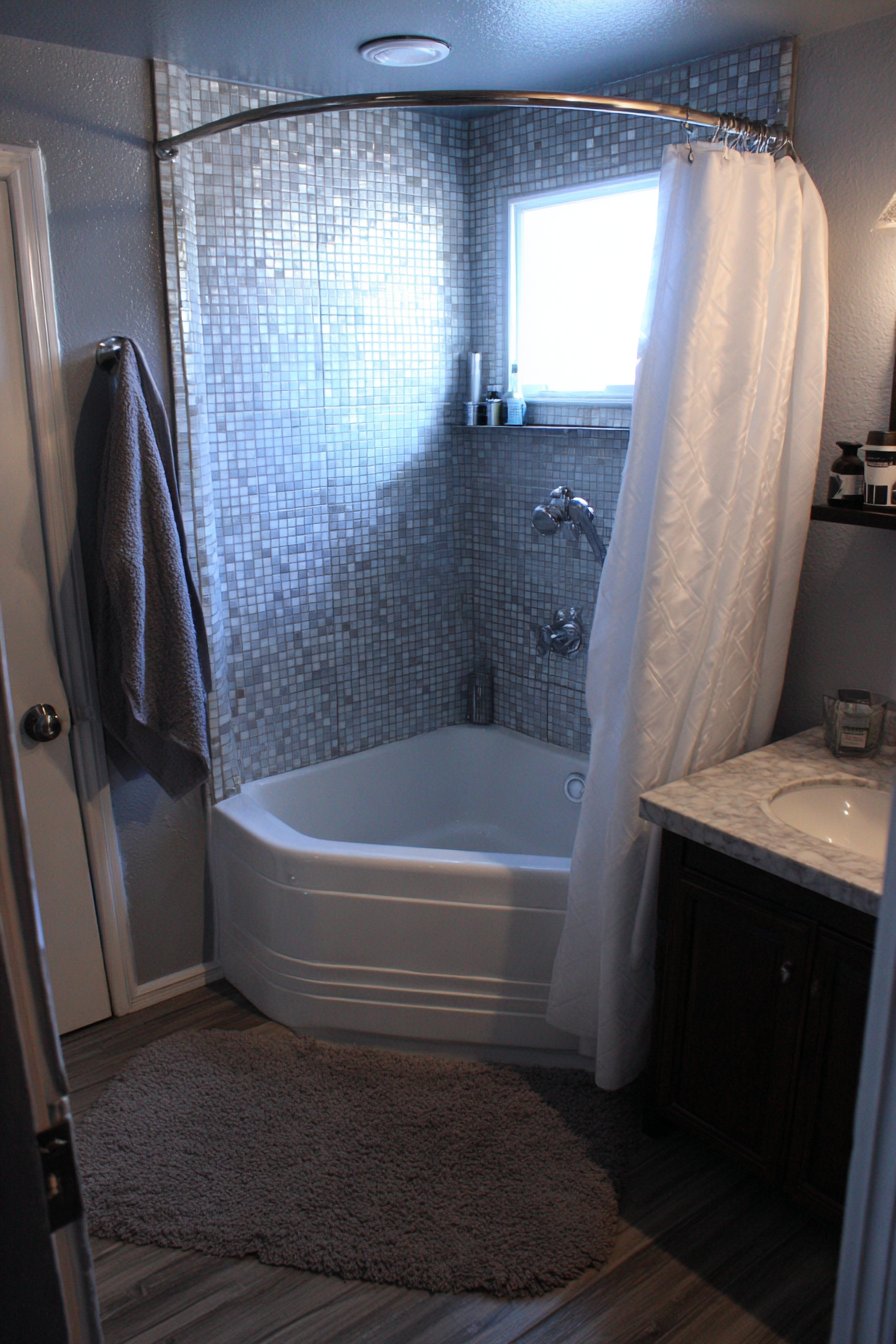
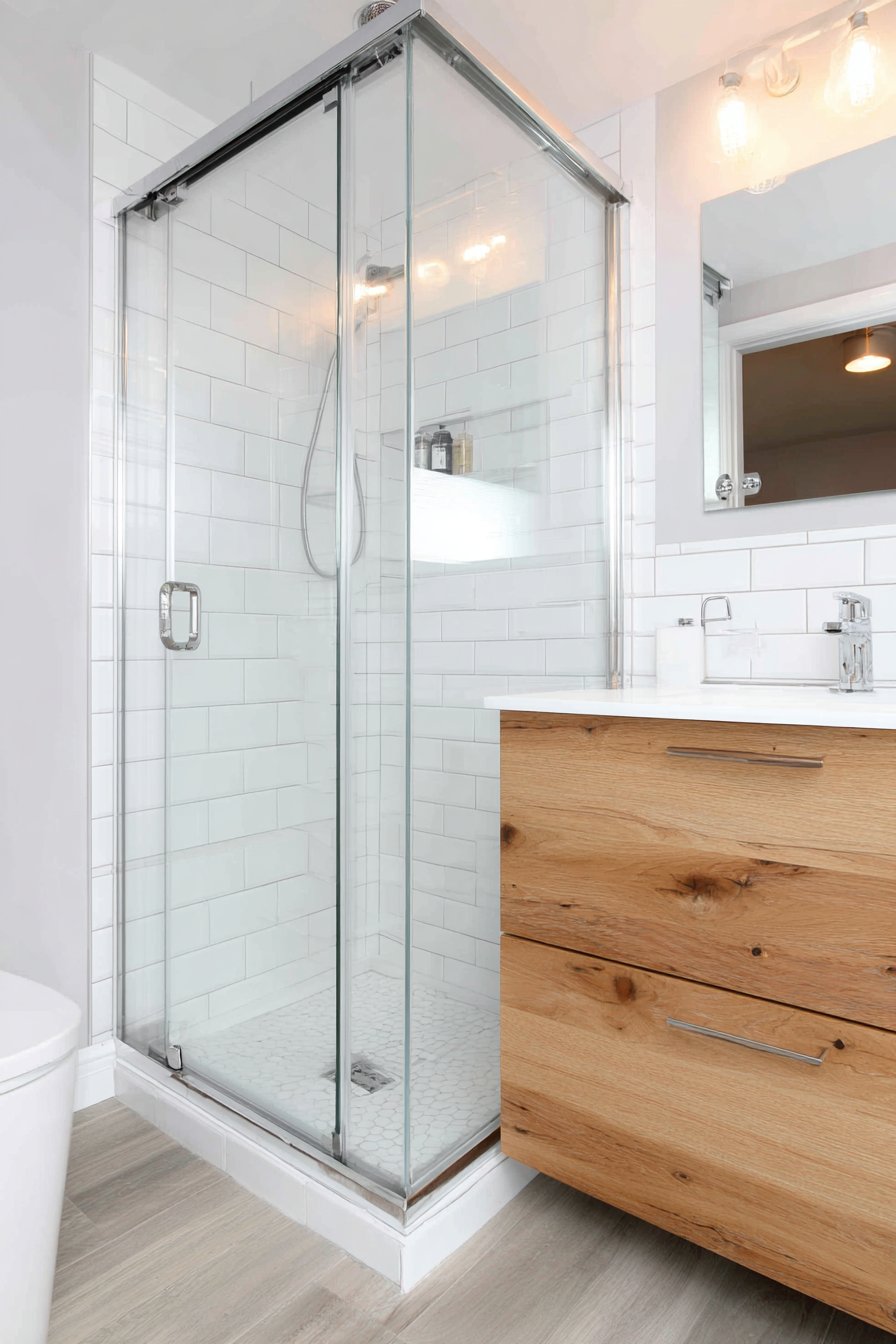
Corner installation represents one of the oldest tricks for maximizing space in tiny bathrooms, and the neo-angle shower enclosure perfects this approach with its distinctive five-sided design that fits neatly into corners while providing more interior shower space than traditional square corner units. In a 40-square-foot bathroom, this configuration claims corner real estate that might otherwise remain underutilized, while the angled door provides easier entry than corner units with doors that open into the already-limited bathroom space.
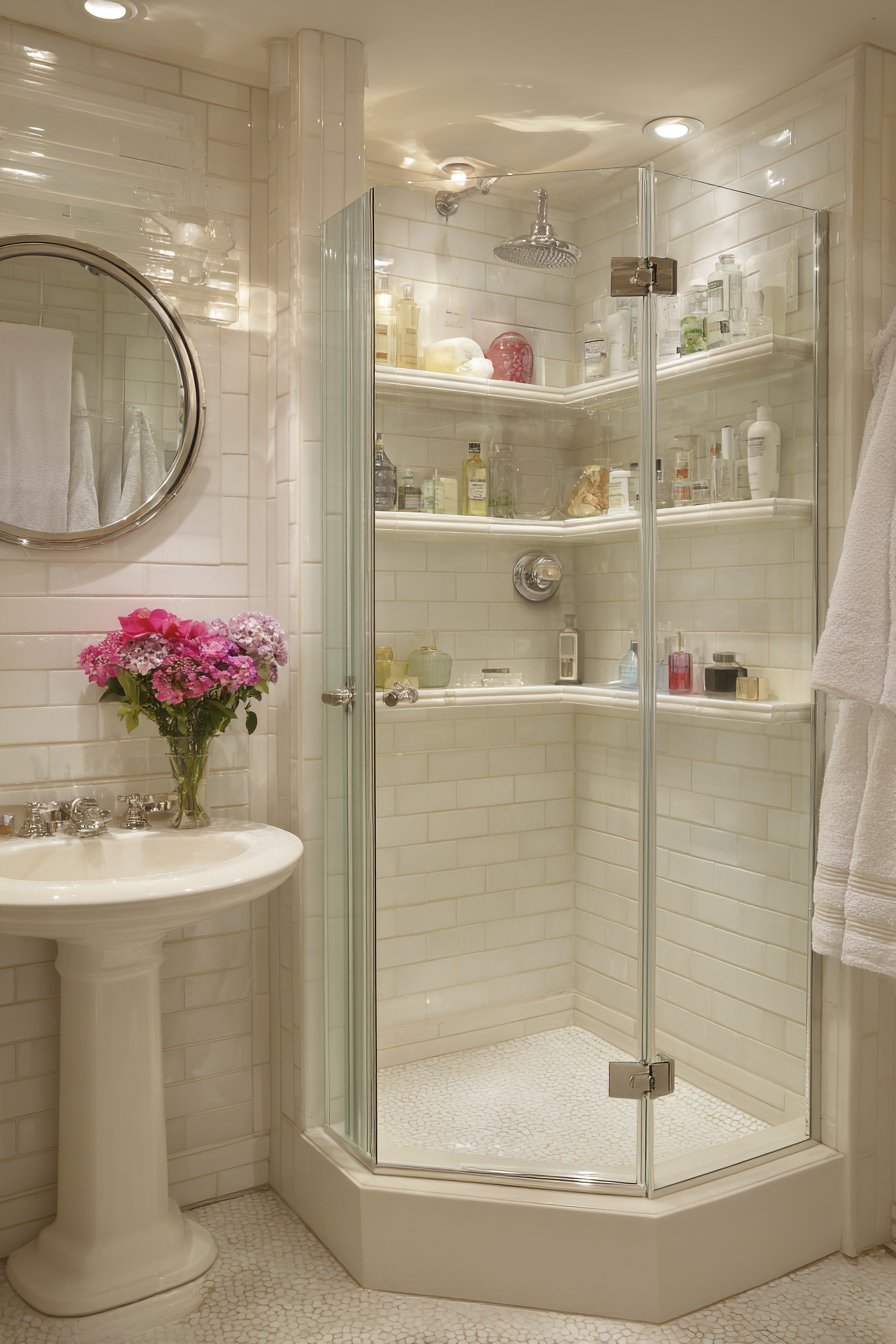
White beveled subway tiles create visual interest without overwhelming the compact space, their three-dimensional surface catching light and creating subtle shadows that add depth to what could otherwise be flat, uninteresting walls. Built-in corner shelves hold shower essentials without requiring hanging caddies or suction-cup organizers that can make small showers feel cluttered and temporary. A compact round mirror and small floating sink complete the efficient layout, each element carefully scaled to provide functionality without dominating the limited available wall space.
Recessed ceiling lights provide bright, even illumination throughout the space, eliminating shadows in corners where wall-mounted sconces might create dark spots or visually fragment the limited wall space. Wide-angle interior design photography demonstrates the efficient corner utilization and light-reflecting white surfaces that work together to make this tiny bathroom feel considerably more spacious than its square footage suggests. The neo-angle design’s distinctive shape becomes a design feature in itself, adding visual interest to what might otherwise be a purely functional corner shower.
Key Design Tips:
- Measure corner angles carefully as not all corners are perfectly 90 degrees
- Choose neo-angle doors that open outward to maximize interior shower space
- Install corner shelves at varying heights to accommodate different bottle sizes
- Use large white tiles to create continuity and reduce visual busy-ness
- Ensure adequate slope toward the drain to prevent water pooling
- Consider a curved shower rod to add elbow room without structural changes
- Install proper ventilation to manage moisture in the enclosed corner
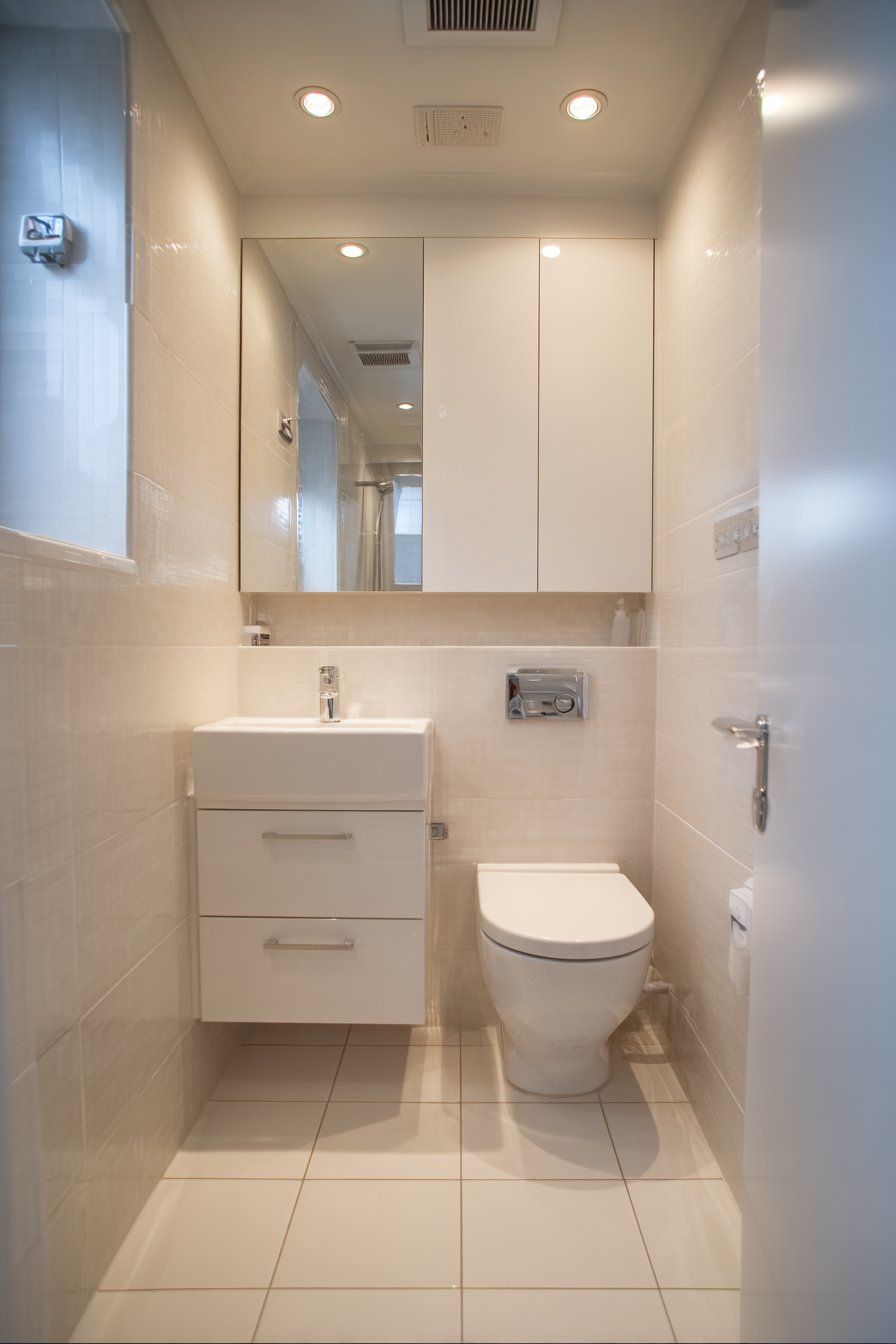
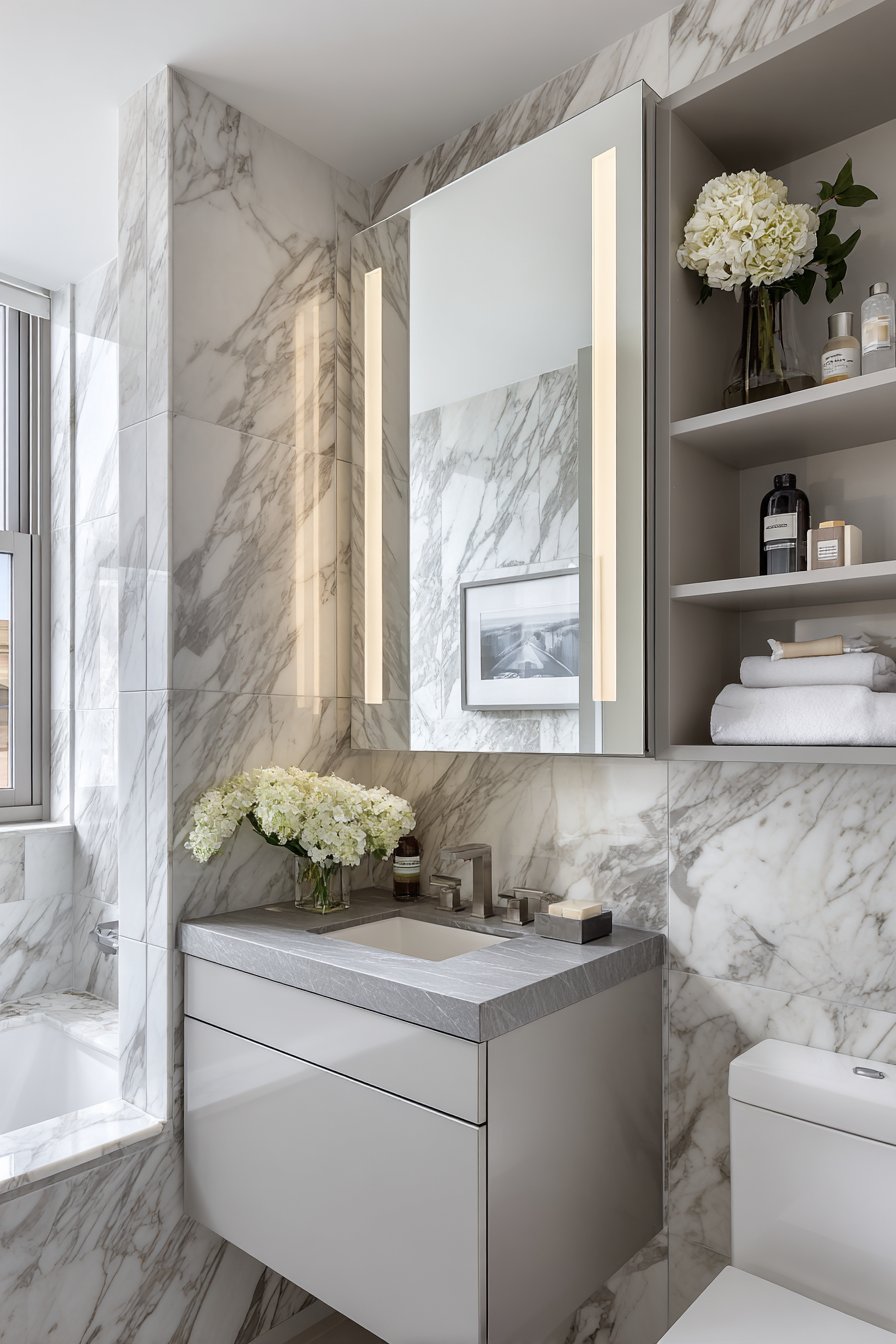
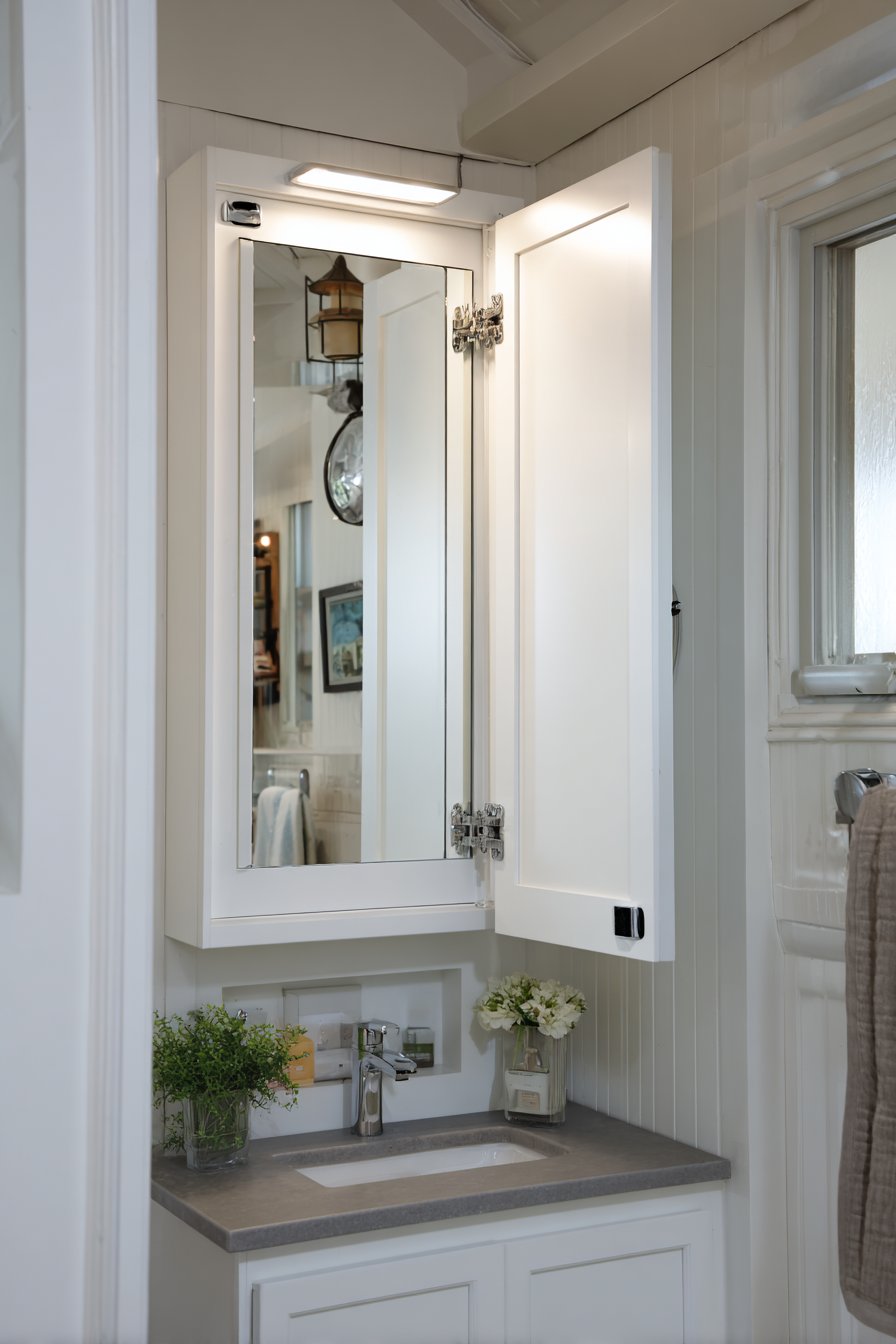
9. Recessed Medicine Cabinet Efficiency
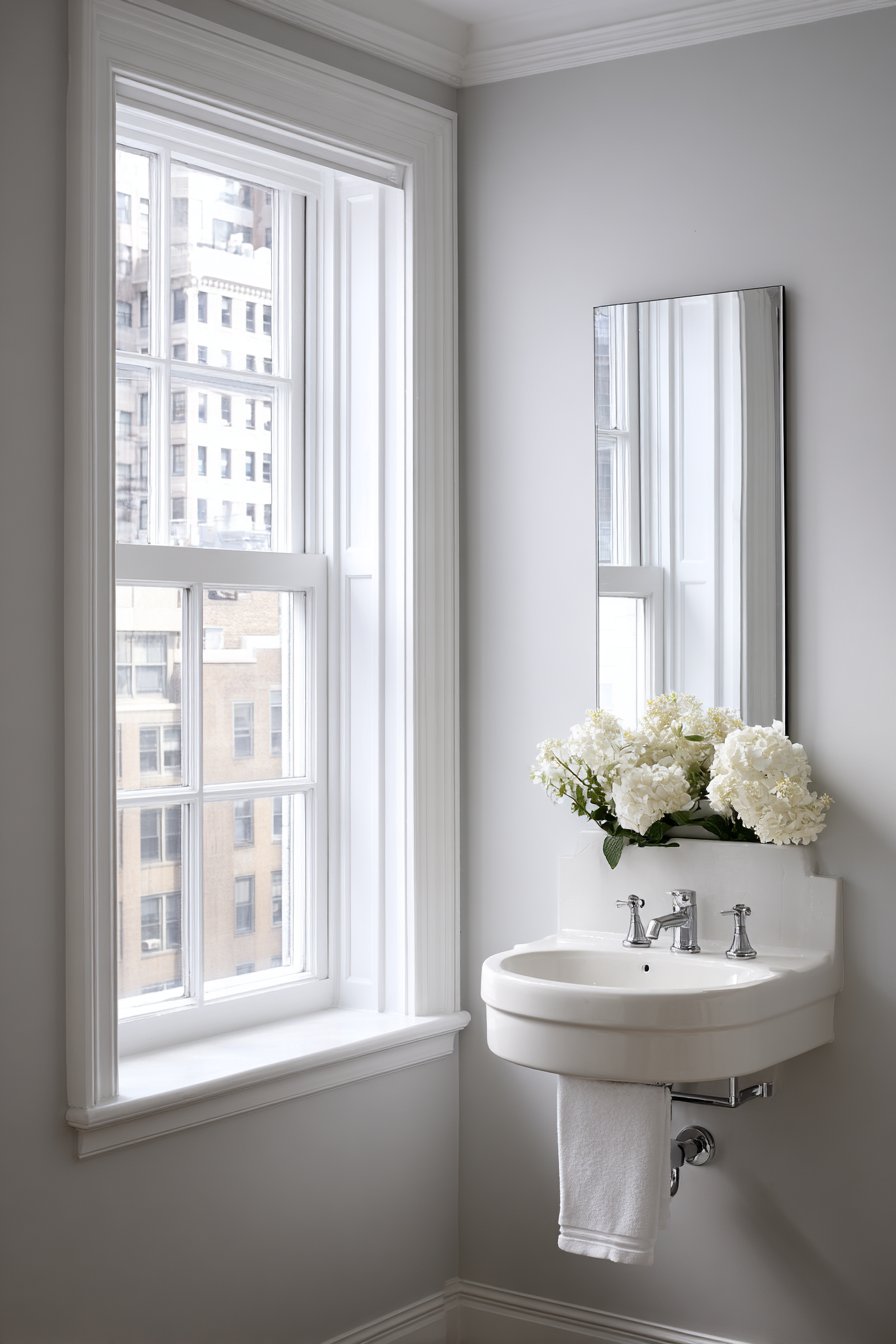
The difference between recessed and surface-mounted storage in tiny bathrooms can be transformative, particularly in narrow 4-foot-wide spaces where every protruding element makes the room feel more cramped and difficult to navigate. A medicine cabinet recessed into the wall rather than projecting outward preserves valuable clearance space while providing essential storage for medications, toiletries, and grooming supplies. The mirrored cabinet door serves double duty, reflecting light and creating depth while concealing storage behind a clean, uninterrupted surface.
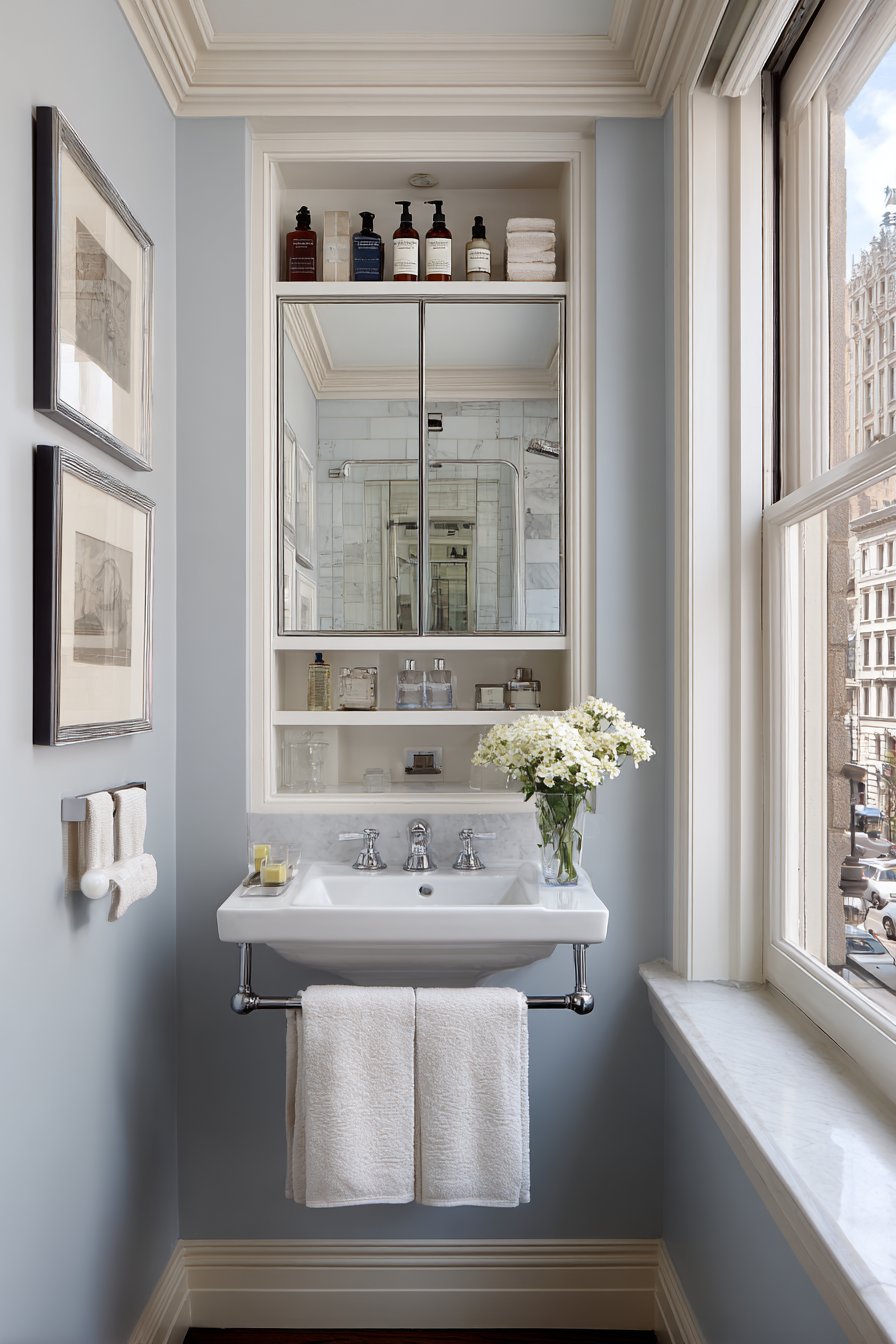
Below the medicine cabinet, a wall-mounted sink with an integrated towel bar maximizes functionality in minimal space, eliminating the need for separate towel bars that would consume precious wall real estate. Soft grey walls and white trim maintain brightness while adding subtle color that prevents the sterile, cold feeling of all-white bathrooms. Natural window light supplements ambient LED lighting, creating layers of illumination that can be adjusted based on time of day and activity, from quick morning routines to relaxing evening baths.
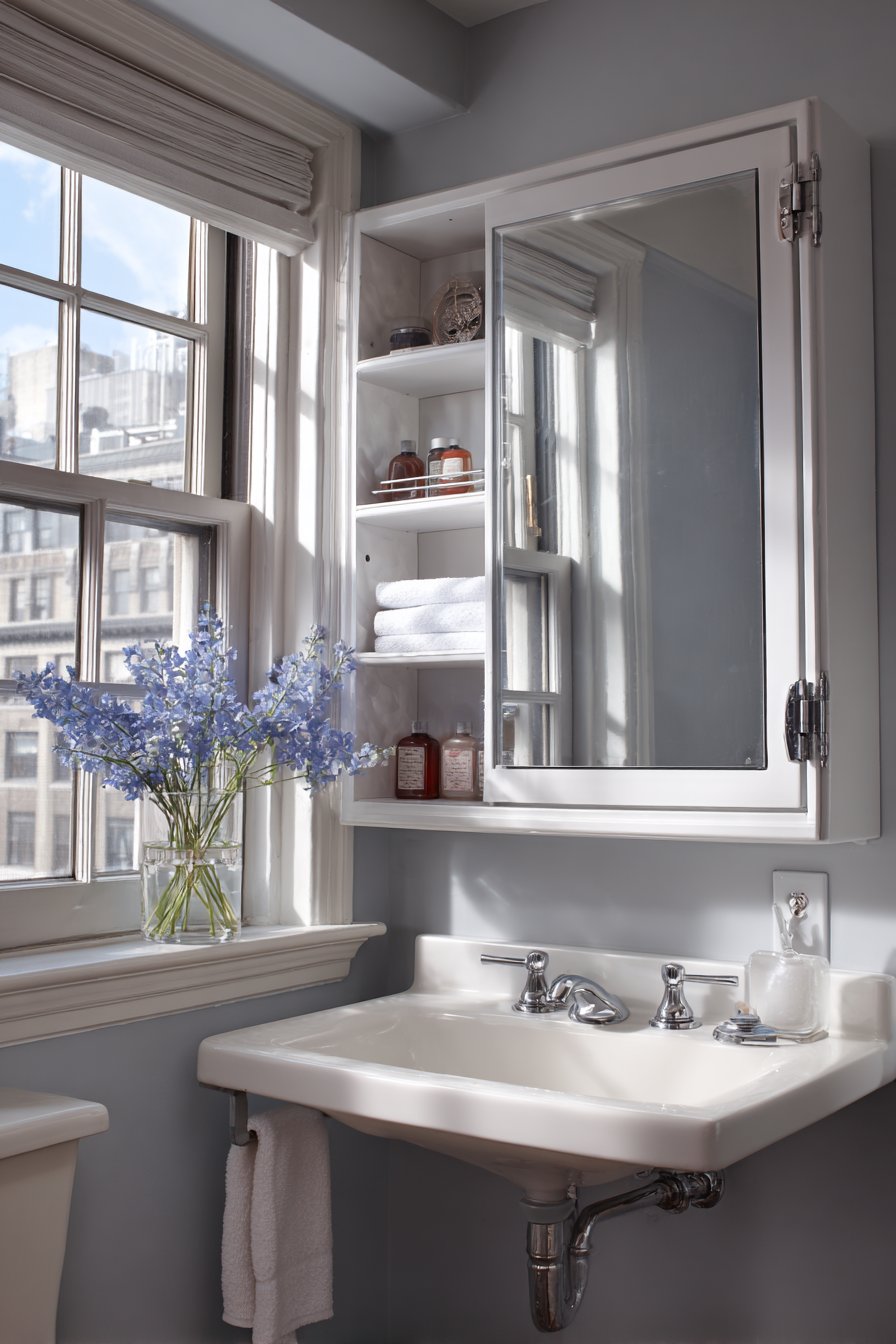
Interior photography emphasizes the flush-mount storage solution and space-conscious design that defines this approach, showing how recessed elements maintain clean wall planes that make narrow bathrooms feel less constricted. The integrated towel bar on the sink represents the kind of multi-functional thinking that’s essential in tiny bathrooms, where each element should ideally serve multiple purposes to justify its presence in the limited space.
Key Design Tips:
- Check wall cavity depth and stud placement before purchasing recessed cabinets
- Choose medicine cabinets with adjustable shelves to accommodate various item heights
- Install the cabinet at appropriate eye level (typically 60-72 inches from floor)
- Consider cabinets with integrated lighting to eliminate separate light fixtures
- Ensure cabinet width fits between wall studs or plan for structural modifications
- Choose mirrored fronts to maintain the reflective surface you’d have with a regular mirror
- Look for cabinets with soft-close hinges to prevent slamming and hardware wear
10. Compact Soaking Tub Solution
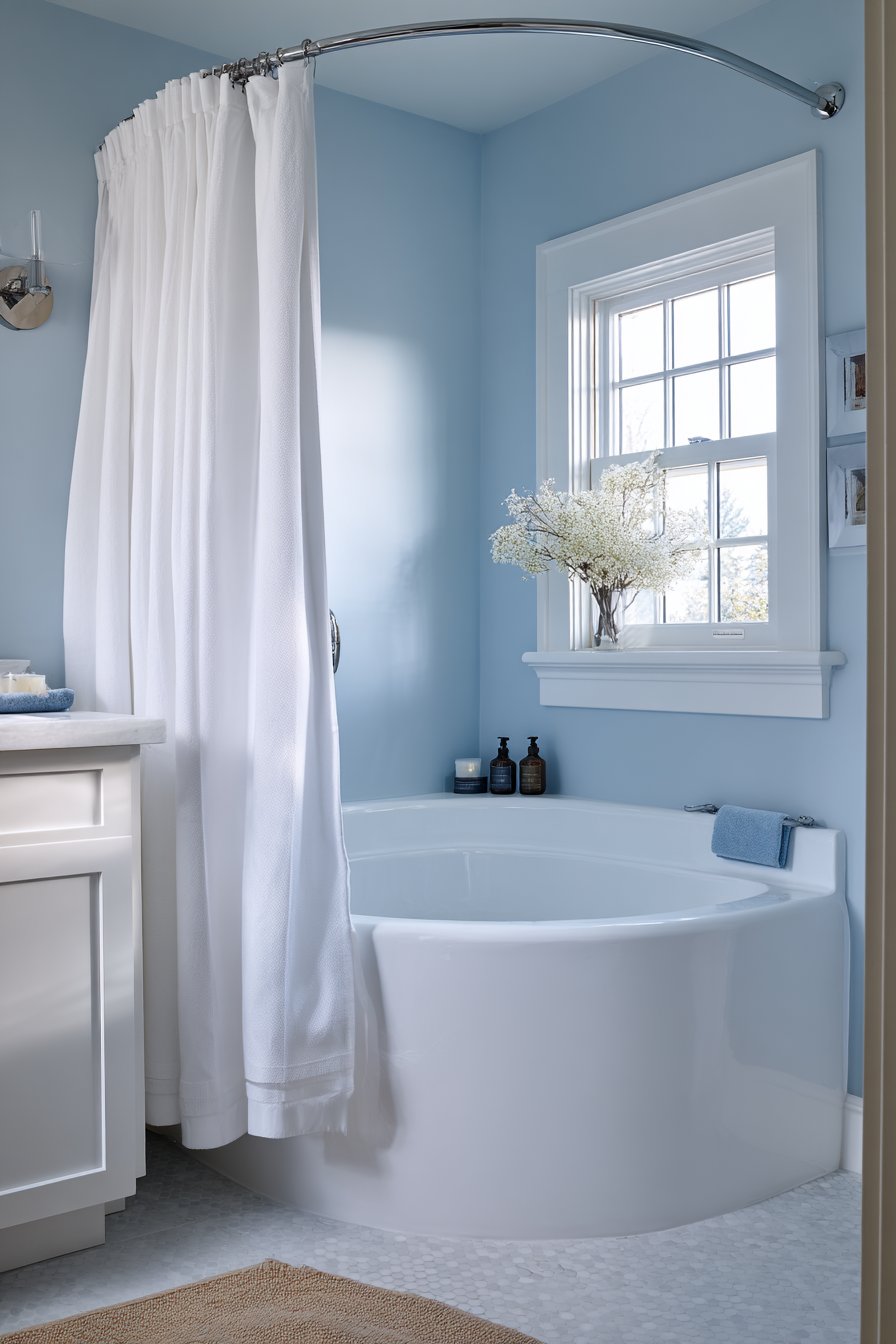
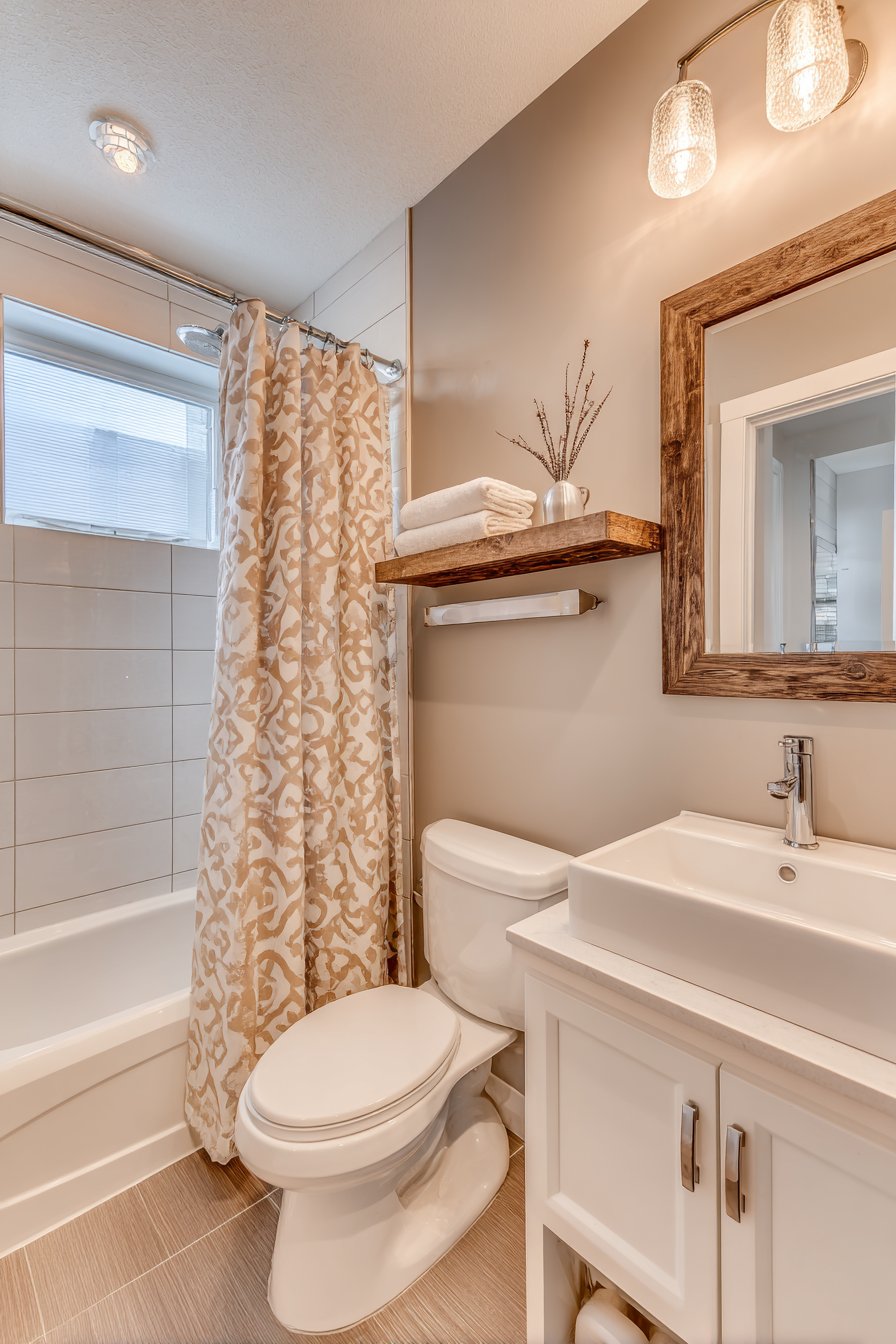
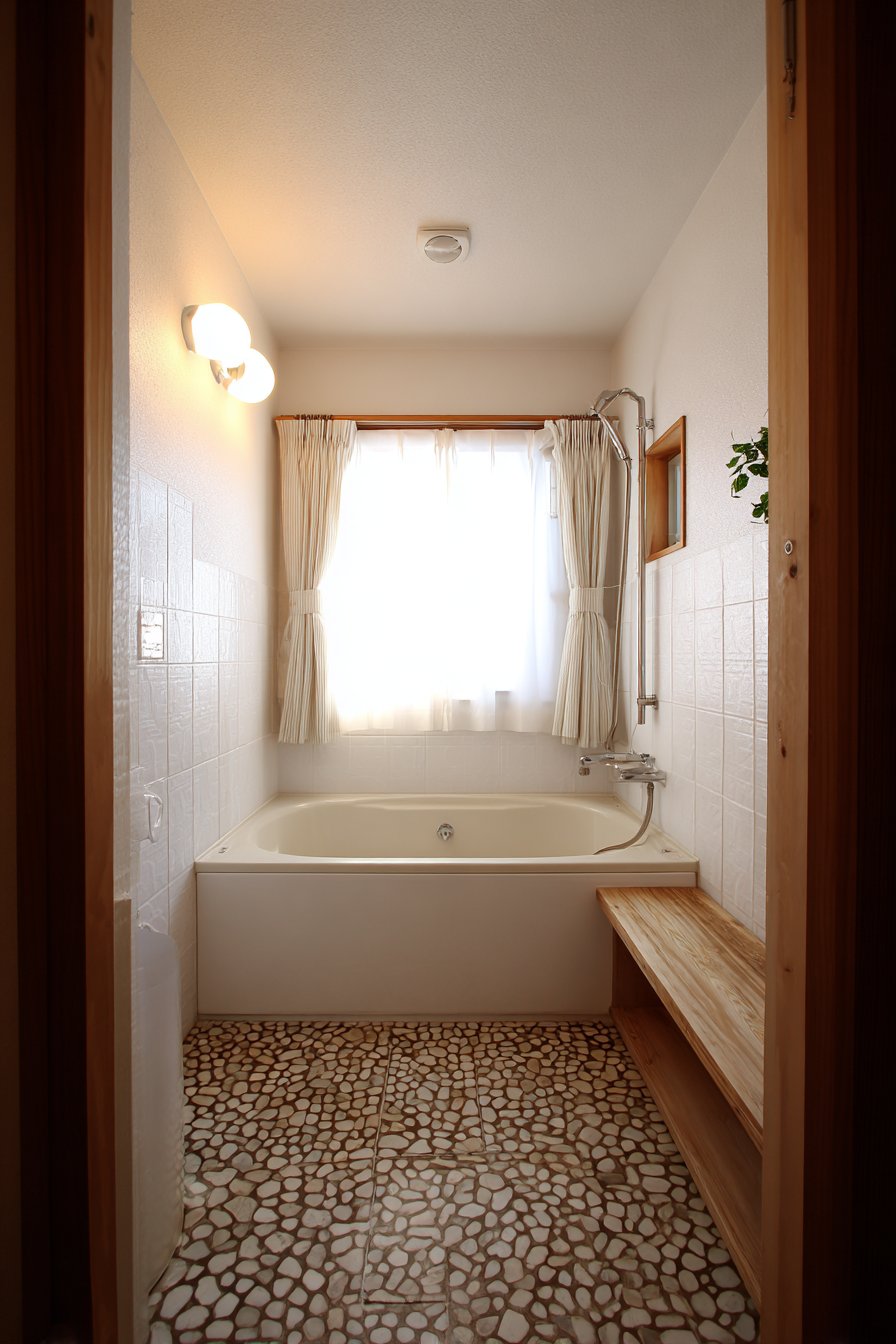
The belief that tiny bathrooms must sacrifice bathing luxury is thoroughly disproven by compact bathtub designs that deliver soaking depth in minimal footprints. A bathtub only 48 inches long, positioned against the back wall of a 5×6 foot bathroom, provides genuine soaking capability without consuming the excessive floor space that standard 60-inch tubs require. This shower-tub combination with a curved rod and white shower curtain adds showering functionality, creating a versatile bathing solution that serves multiple needs in a single fixture.
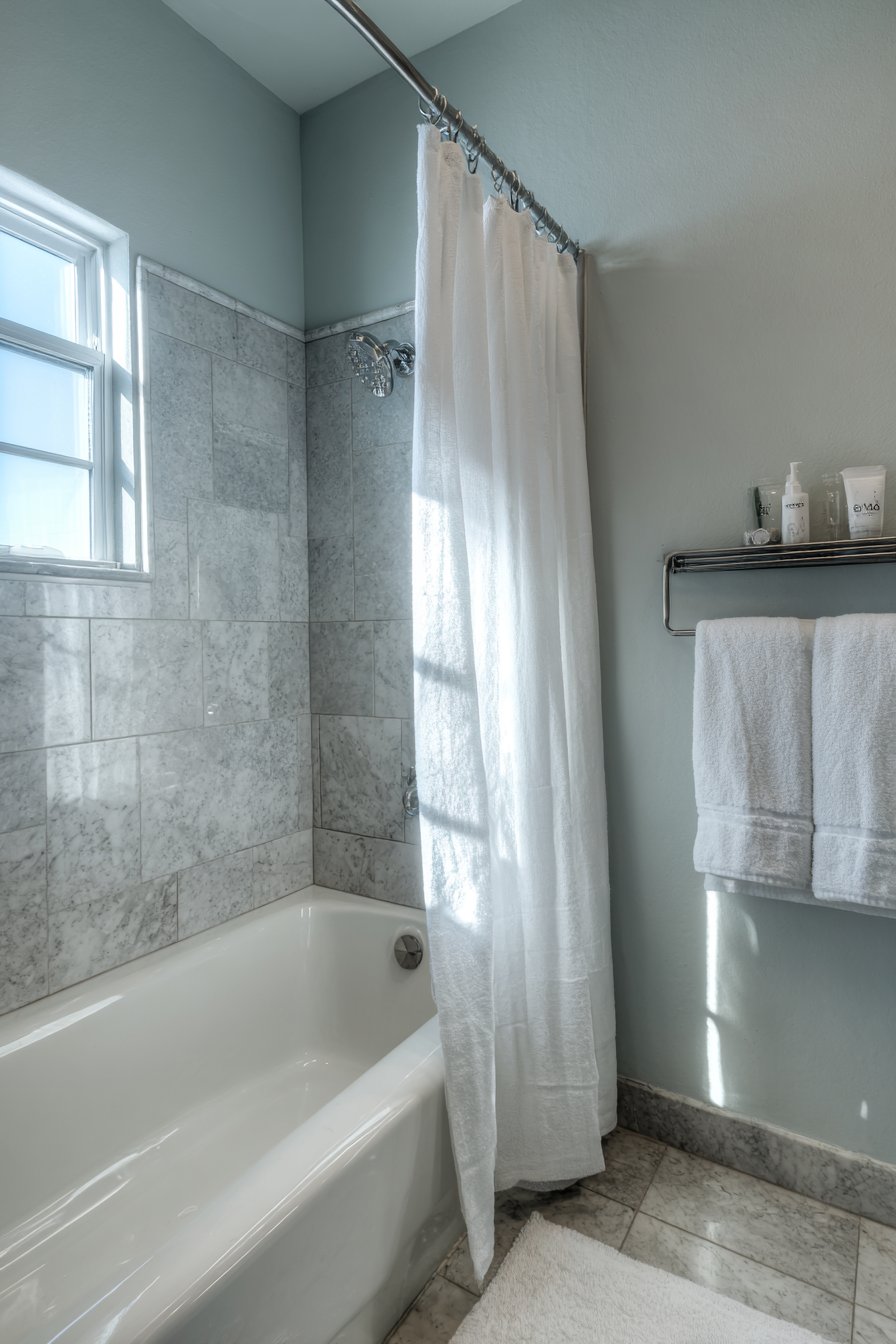
Light blue-grey walls create a calming atmosphere that enhances the relaxation potential of the compact soaking tub, while the color choice adds visual interest without overwhelming the limited space. A small floating shelf above the tub holds bath products within easy reach, eliminating the need for tub caddies or corner shelves that would intrude into the already-limited bathing space. Soft natural lighting through a privacy window provides illumination while maintaining discretion, an important consideration for bathrooms with tubs positioned near windows.
Professional interior photography captures the proportions and practical layout of the miniature soaking tub, demonstrating how depth can compensate for length in providing a satisfying bathing experience. The curved shower rod adds valuable elbow room during showering without requiring any structural modifications, simply by extending the shower curtain outward at the top while maintaining the standard tub width at floor level.
Key Design Tips:
- Prioritize tub depth over length for better soaking experience in compact models
- Choose tubs specifically designed as soaking tubs rather than standard tubs cut short
- Install curved or wraparound shower rods to maximize shower space in tub combinations
- Ensure proper support structure for deep soaking tubs that will hold more water weight
- Consider Japanese-style soaking tubs designed for small spaces and deep soaking
- Use waterproof lighting above the tub for safe evening bathing
- Install grab bars or safety rails to facilitate entry and exit from deep compact tubs
11. Pocket Door Space Recovery
Traditional swinging doors in tiny bathrooms represent a significant spatial inefficiency, requiring clearance space both inside and outside the bathroom that could be better utilized for fixtures or simply left open to improve the sense of spaciousness. A pocket door that slides into the wall cavity eliminates door swing requirements entirely, effectively reclaiming 6-8 square feet in a 38-square-foot bathroom—a substantial portion of the total space. Modern matte black hardware contrasts beautifully with crisp white walls, creating a contemporary aesthetic that elevates what could be purely functional door hardware into a design feature.
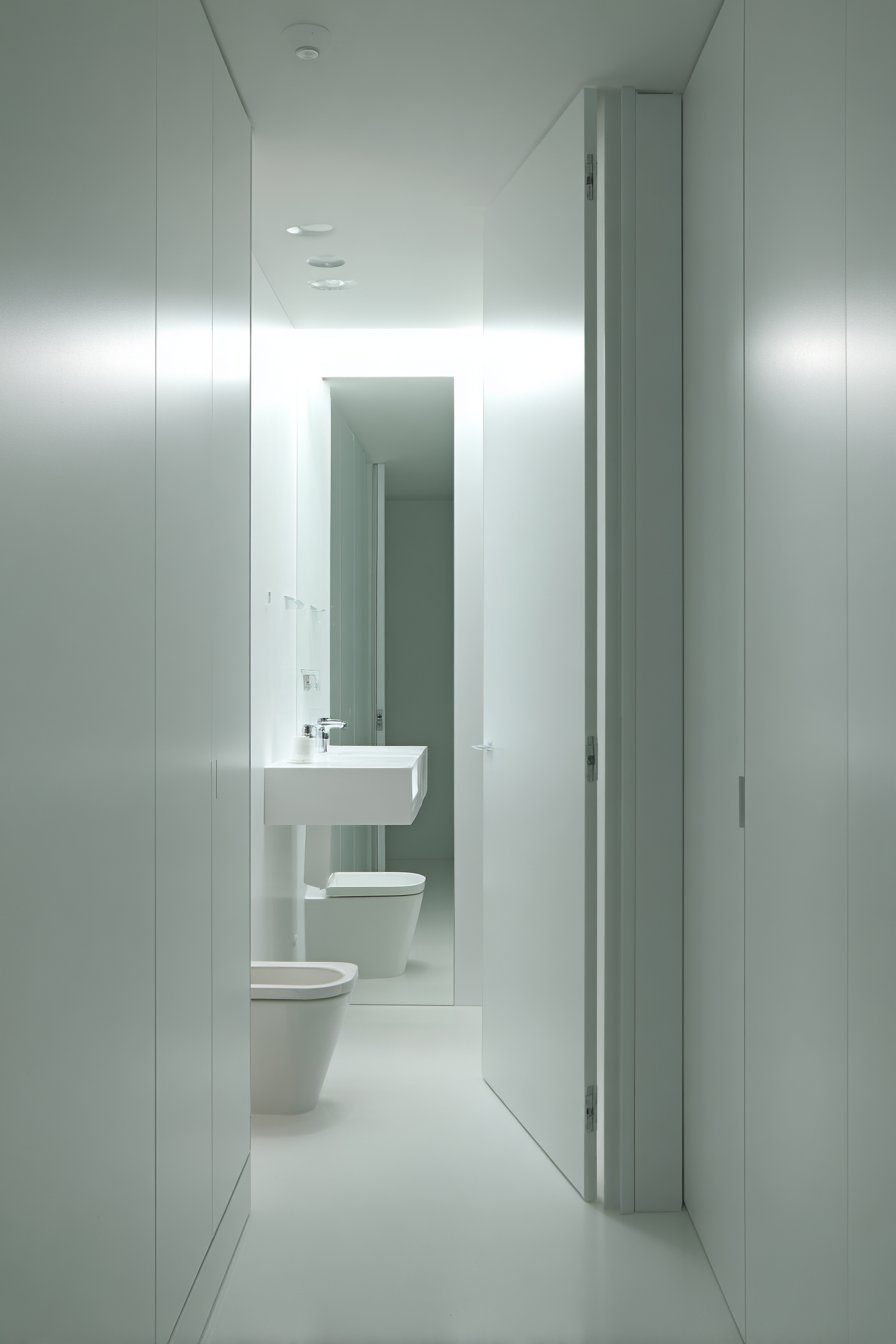
Inside the bathroom, a wall-mounted sink and toilet optimize the tight layout by keeping the floor as clear as possible, a strategy that becomes even more important when the door swing space has been reclaimed for bathroom use rather than left vacant for door operation. A narrow full-length mirror creates vertical emphasis, drawing the eye upward and making the ceiling feel higher—a valuable perceptual trick in compact spaces where horizontal expansion is impossible. Recessed lighting keeps the ceiling plane clean and uninterrupted, avoiding the visual clutter that surface-mounted fixtures can create in small rooms where every element is immediately visible.
Wide-angle interior design photography captures both the space-saving door system and the efficiently organized interior, demonstrating how pocket doors and compact fixtures work synergistically to create a functional bathroom in severely limited square footage. The installation process for pocket doors requires more complex framing than standard hinged doors, as wall cavities must be created or modified to accommodate the door sliding mechanism, but the spatial benefits in tiny bathrooms make this investment worthwhile.
Key Design Tips:
- Verify that wall cavities can accommodate pocket door frames (typically requiring 2x the door width)
- Choose pocket door hardware specifically designed for frequent use in bathrooms
- Install proper seals and weatherstripping to maintain sound dampening and privacy
- Consider soft-close mechanisms to prevent slamming and hardware wear
- Ensure the pocket door wall doesn’t contain plumbing or electrical that would complicate installation
- Plan for pulls or handles that don’t protrude when door is closed
- Test door operation before finishing walls to ensure smooth sliding action
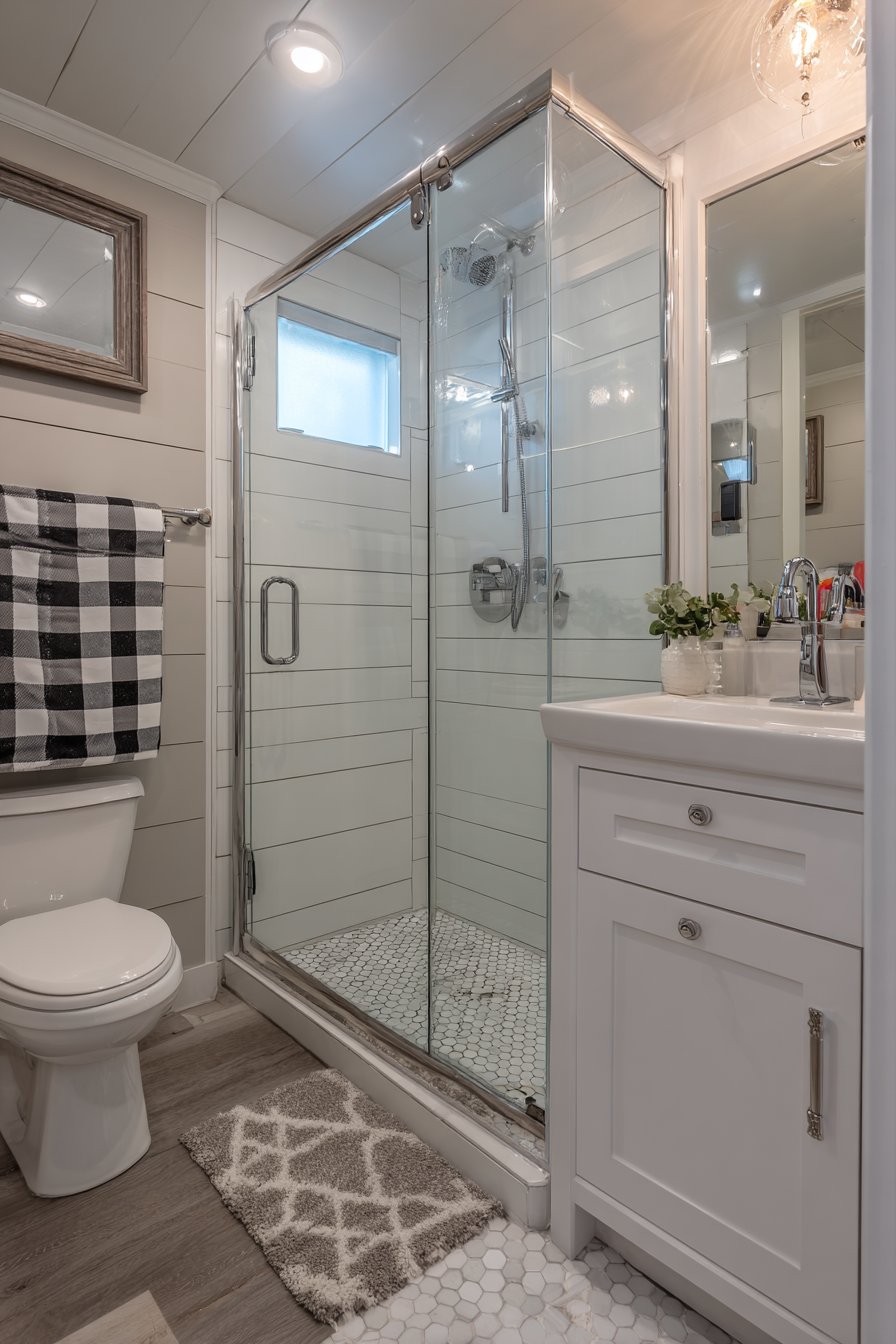
12. Partial Glass Shower Panel

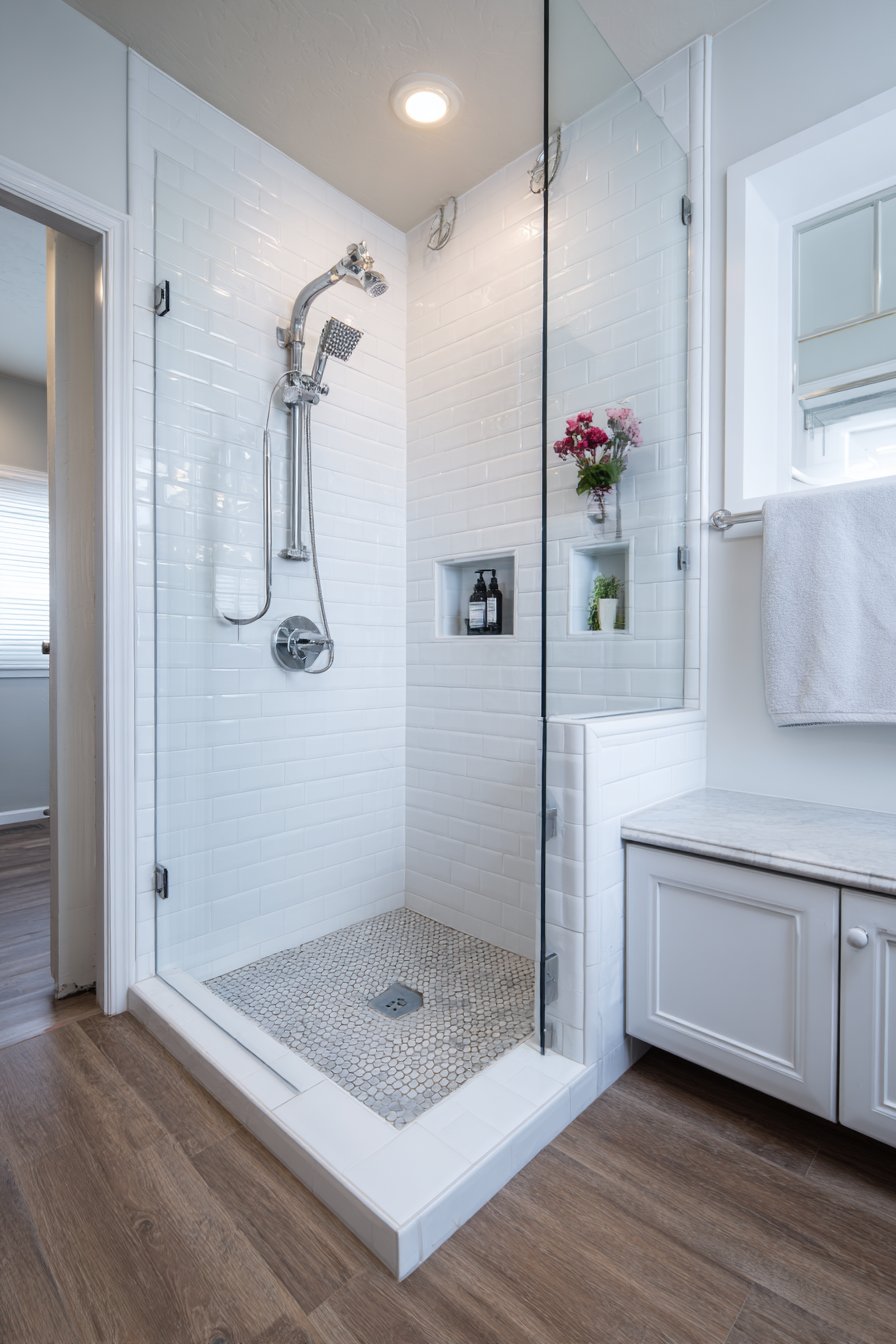
When full shower enclosures feel too confining or budget constraints limit options, a fixed glass panel offers an elegant middle ground that contains water spray while maintaining visual openness. This shower-over-tub setup in a 5-foot-wide bathroom features a single fixed glass panel instead of a complete enclosure, saving space while preventing water from drenching the bathroom floor. White penny tile covering the shower surround creates a distinctive pattern with contrasting grey grout, adding textural interest without the overwhelming busyness that some bold patterns can introduce in small spaces.
Chrome fixtures and a handheld shower head add convenience and flexibility, allowing users to direct water flow precisely while also facilitating tub and wall cleaning after bathing. A small niche holds toiletries securely without requiring corner caddies or tension poles that can make small showers feel cluttered and temporary. Natural light filters through a translucent window, providing daytime illumination while maintaining privacy—a crucial consideration for bathrooms with exterior-facing windows.
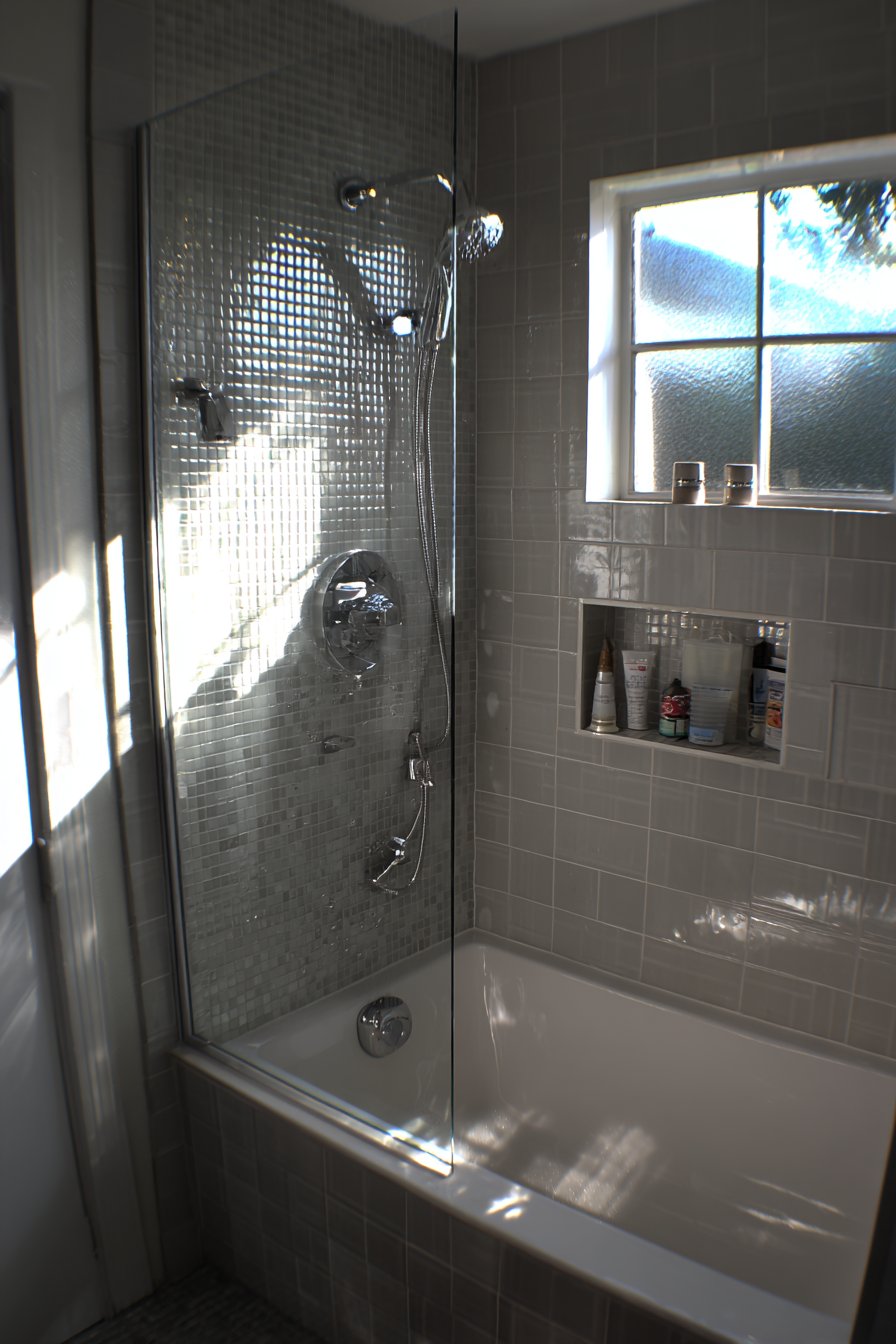
Interior photography showcases the partial glass solution and practical arrangement, revealing how this compromise between open and enclosed showering creates an effective balance in tiny bathrooms. The fixed panel requires no maintenance of moving parts, tracks, or hinges that can become problematic in humid bathroom environments, while still providing most of the water containment benefits of full enclosures. Soft shadows highlight textures in the penny tile and create depth that makes the compact tub surround more visually interesting.
Key Design Tips:
- Install glass panels at least 30 inches wide to provide adequate splash protection
- Position panels to protect the toilet area and bathroom floor from spray
- Use tempered glass rated for bathroom use to ensure safety
- Consider frosted or textured glass for privacy if the shower faces a door or window
- Install a slight angle toward the tub to encourage water runoff back into the bathing area
- Ensure proper sealing at wall connections to prevent water infiltration
- Clean glass panels regularly with appropriate cleaners to maintain clarity and prevent buildup
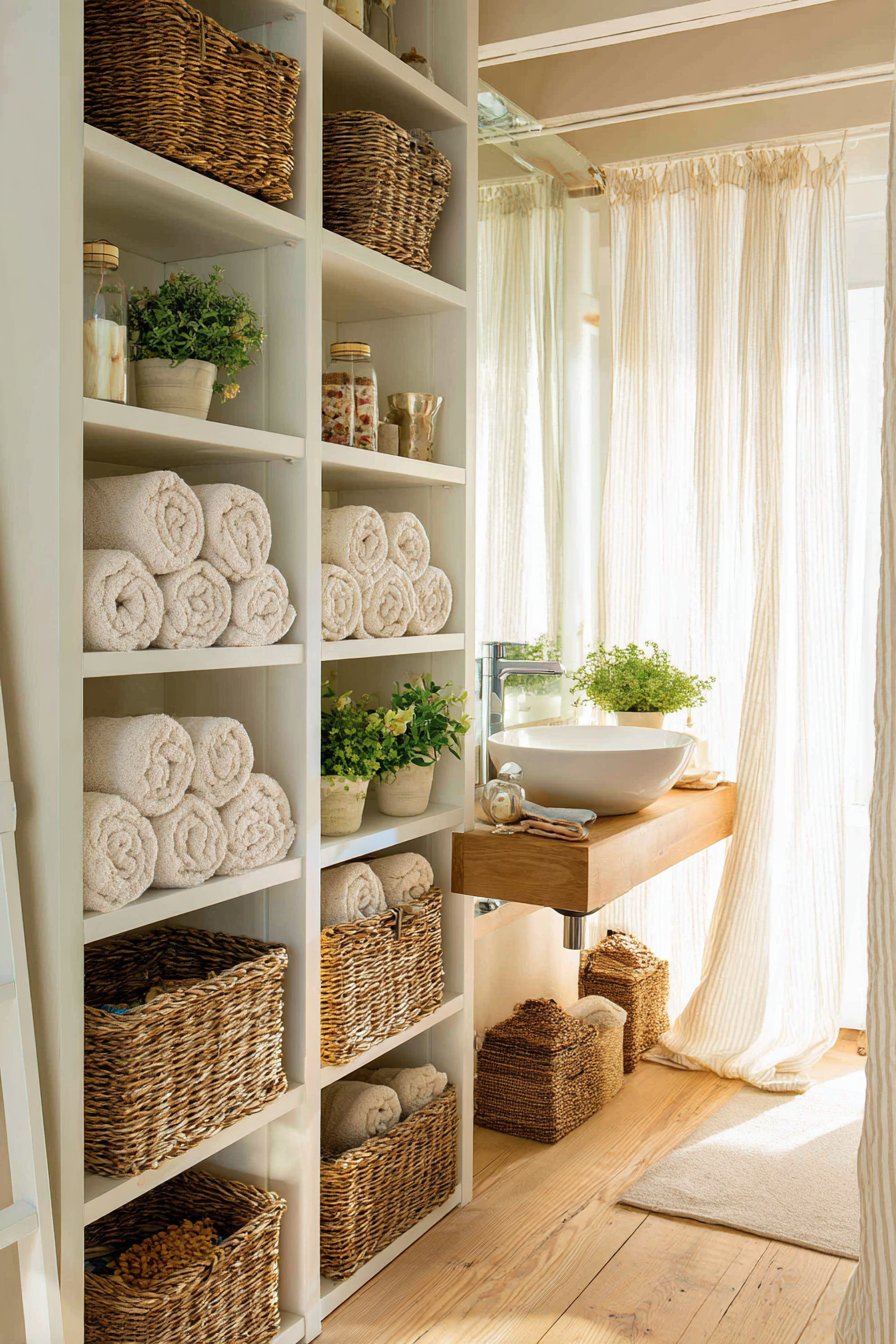
13. Open Shelving Accessibility
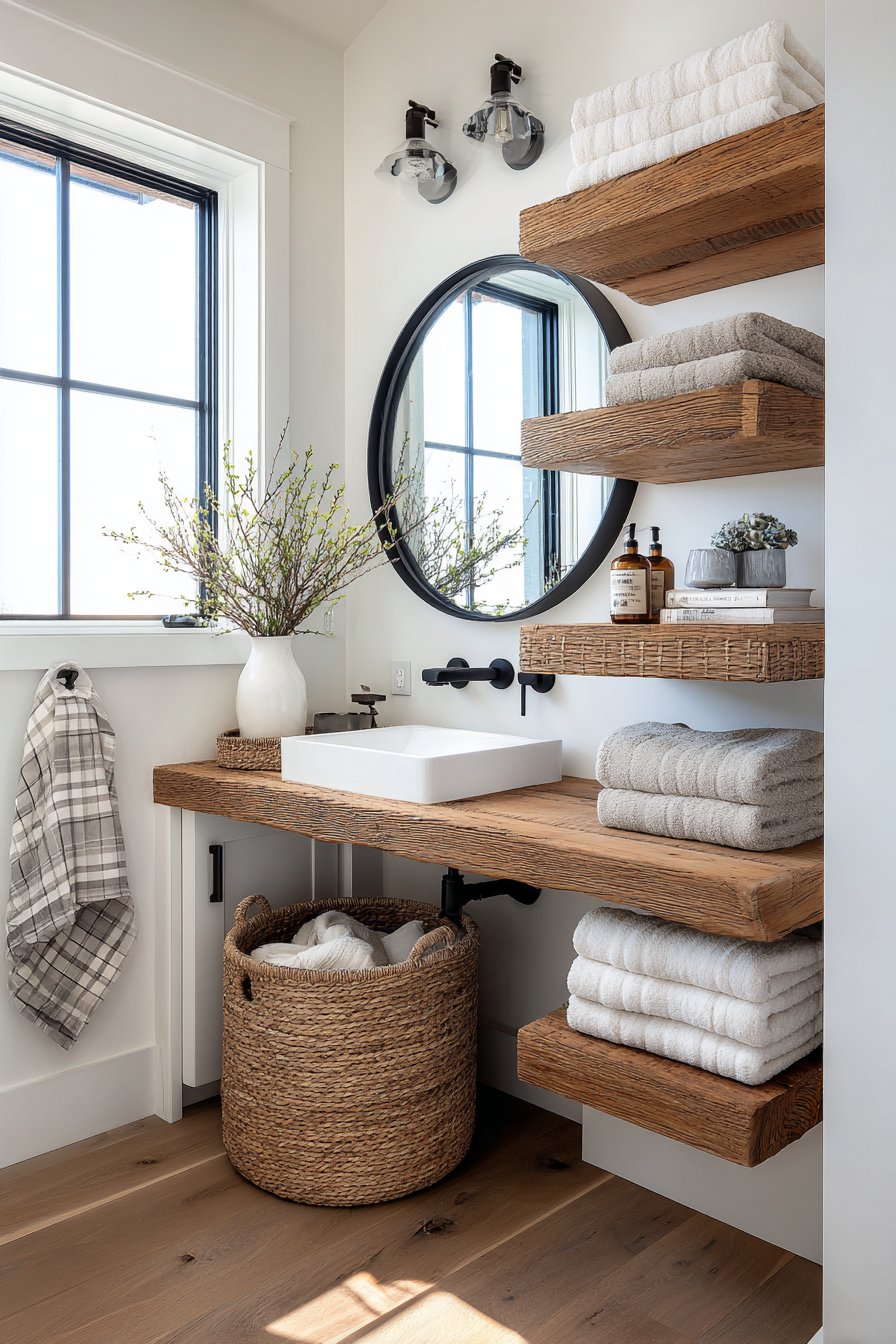
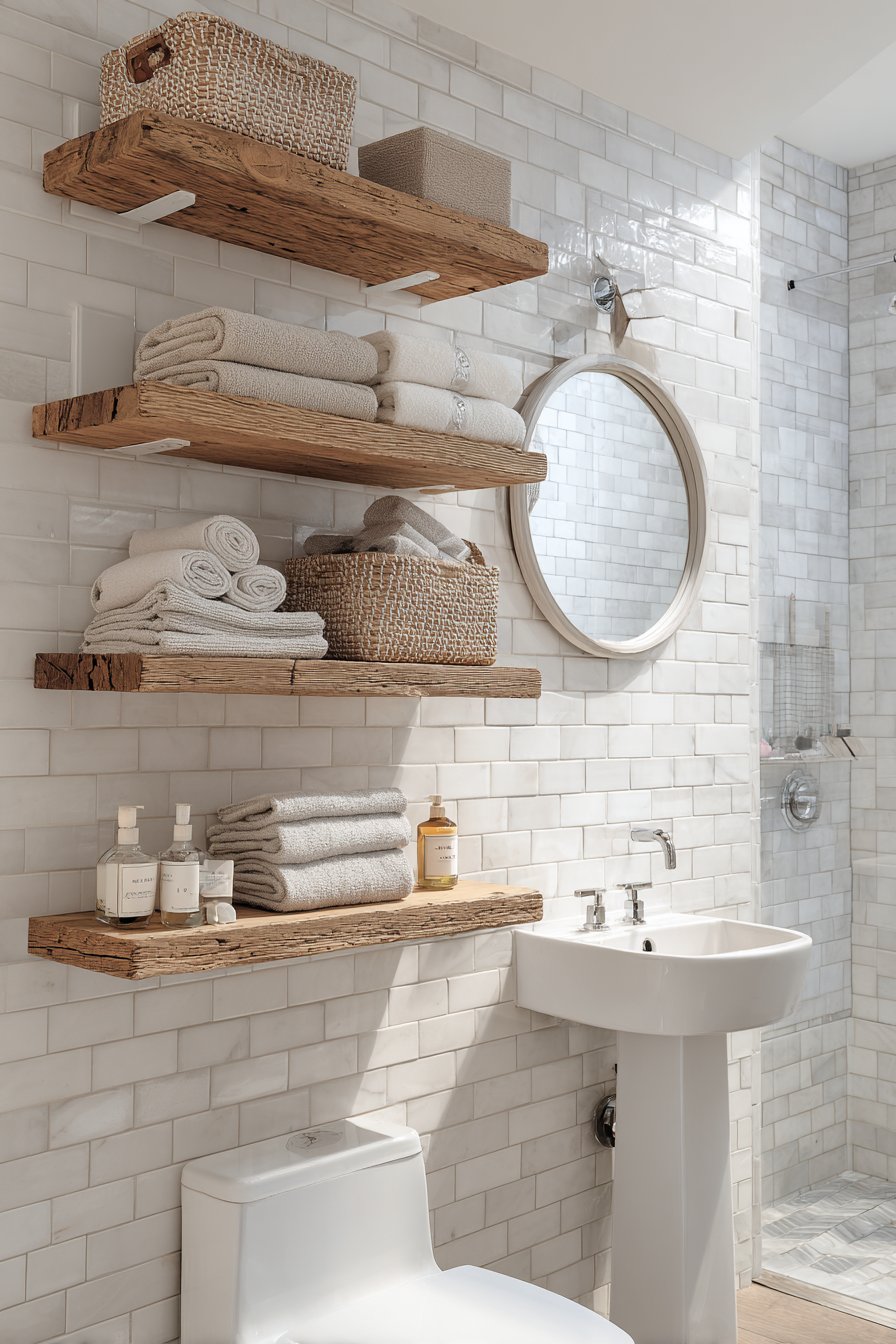
Closed cabinetry in tiny bathrooms can create a boxed-in feeling that makes already-tight spaces feel even more constricted, which makes open shelving an attractive alternative that maintains visual lightness while providing essential storage. Reclaimed wood planks mounted on white brackets create warmth and character in a 35-square-foot powder room, their natural grain and aged patina adding organic texture that contrasts beautifully with the hard, smooth surfaces typical in bathrooms. Woven baskets and folded towels in neutral tones organize essentials while contributing to the room’s aesthetic rather than hiding everything behind cabinet doors.
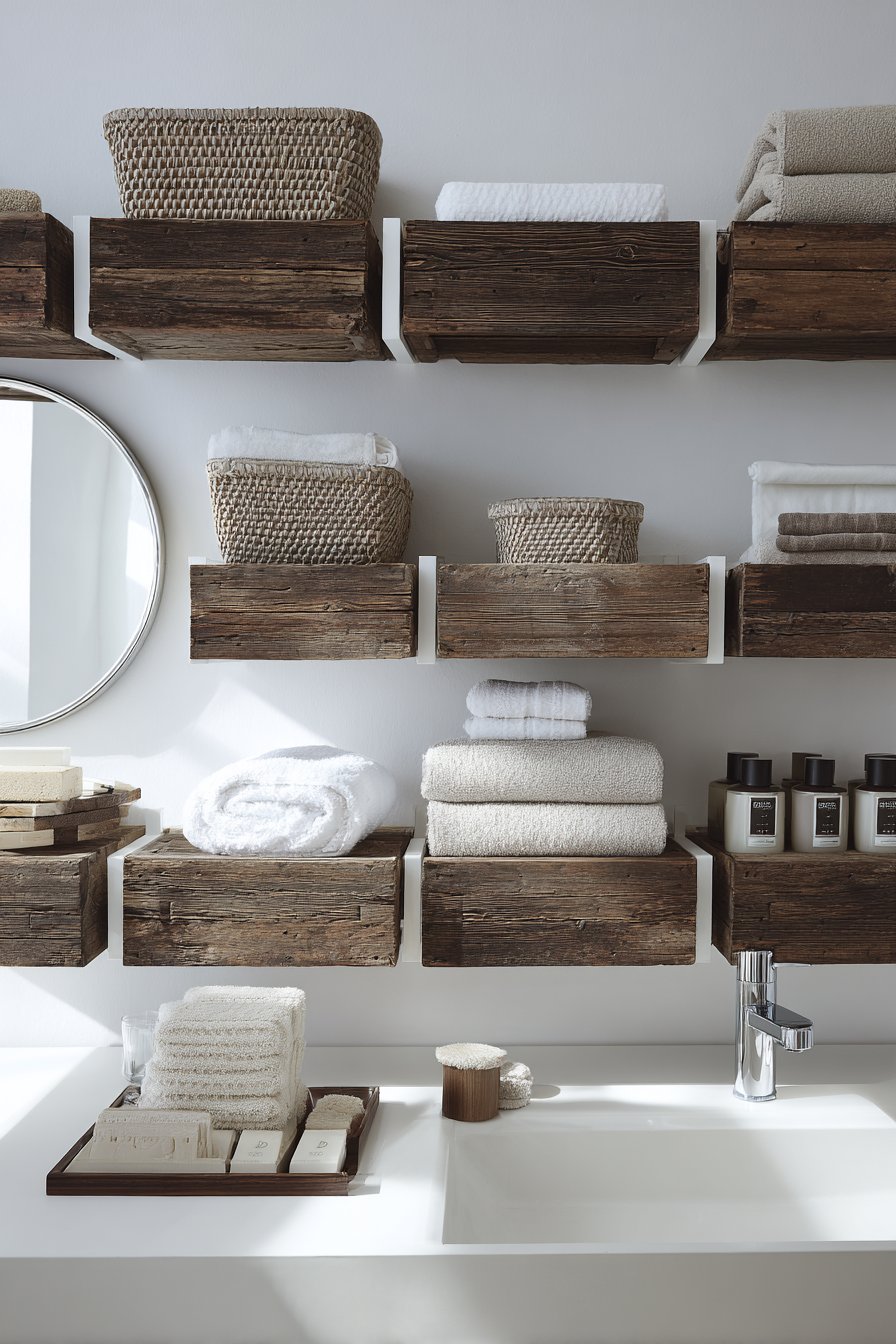
A small round mirror and wall-mounted sink keep the space functional without overwhelming the limited square footage, each element carefully scaled to provide necessary utility without dominating the compact room. Natural light creates warm highlights on the wood grain, emphasizing the material’s texture and bringing out subtle color variations in the reclaimed planks. Professional interior photography with balanced exposure shows the airy open storage concept that defines this approach, demonstrating how thoughtfully arranged open shelving can appear organized and intentional rather than cluttered or temporary.
The psychology of open storage in small spaces deserves consideration—while closed cabinets hide clutter effectively, they can also make tiny bathrooms feel more cramped and cave-like. Open shelving requires more discipline in maintaining organization, but the visual payoff in terms of perceived spaciousness makes this trade-off worthwhile for many homeowners willing to embrace a more curated approach to bathroom storage.
Key Design Tips:
- Install shelving at varying heights to accommodate different item sizes efficiently
- Use uniform containers and baskets to create visual cohesion
- Limit the color palette of displayed items to prevent visual chaos
- Mount shelves securely into wall studs to support weight of wet towels
- Arrange items attractively with taller pieces toward the back and shorter toward the front
- Leave some breathing room between items rather than packing shelves completely full
- Dust and clean open shelving regularly as items are exposed to bathroom humidity
- Choose moisture-resistant wood species or properly seal wood to prevent warping
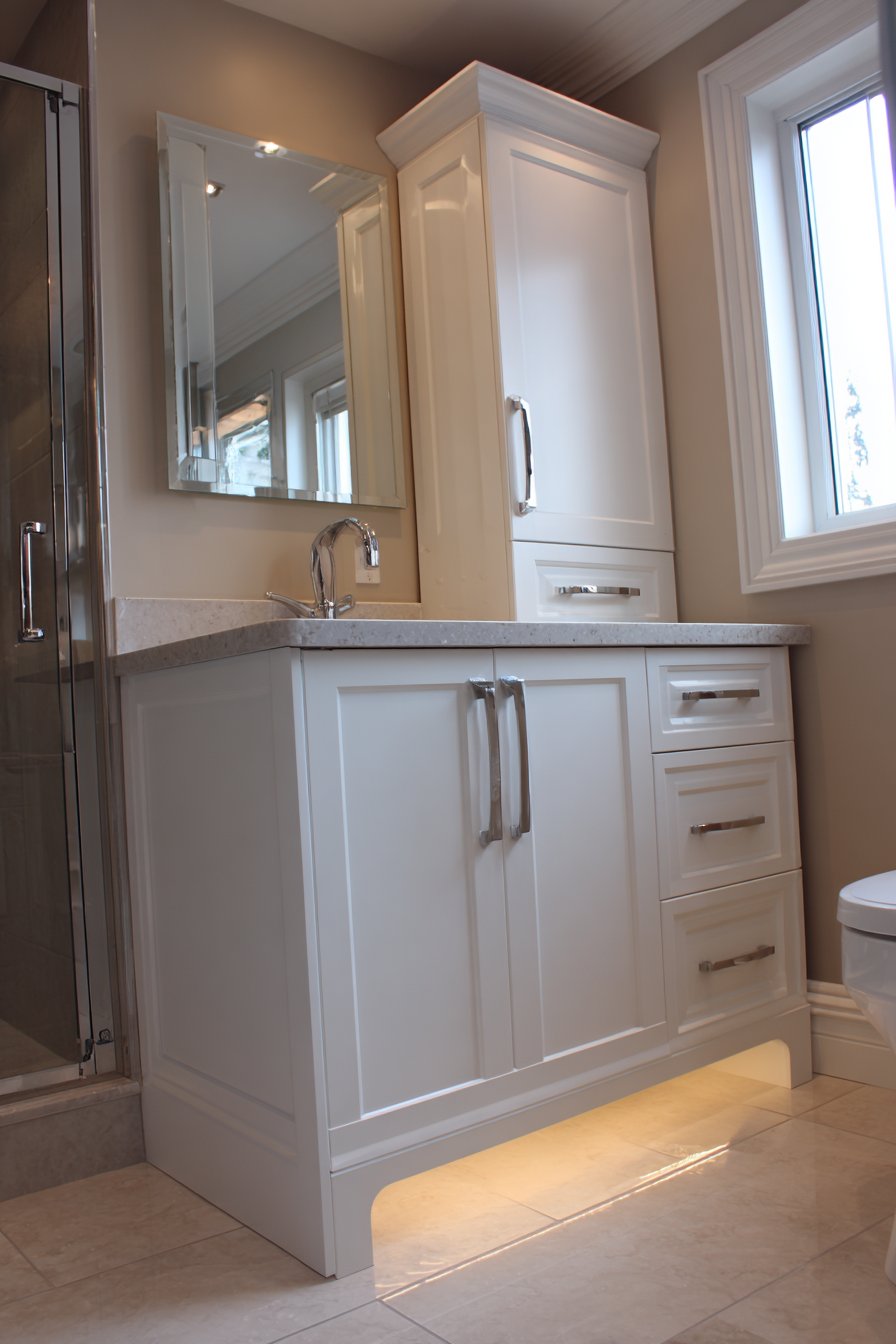
14. Dual-Purpose Vanity Integration
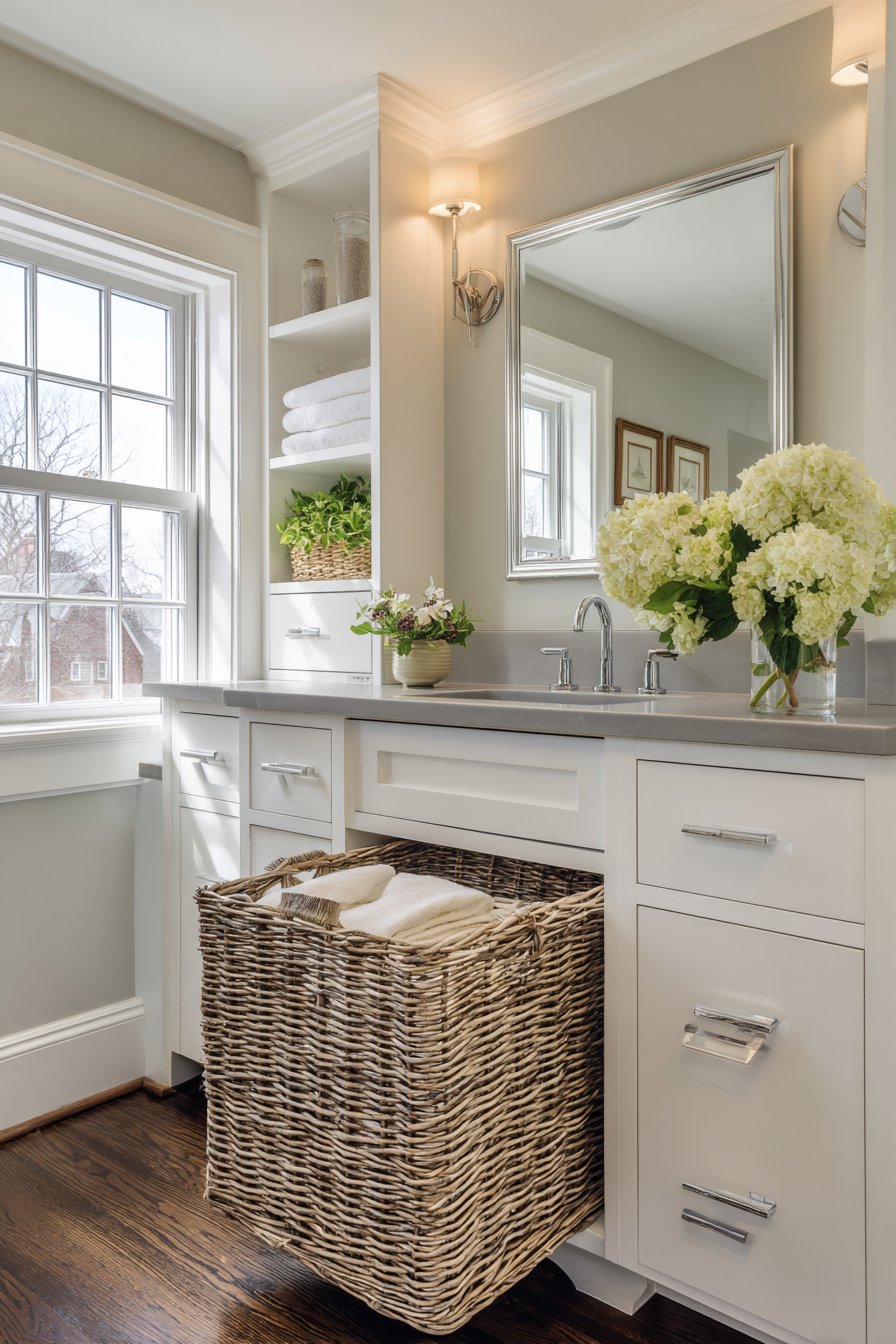
Multi-functional furniture represents one of the most valuable strategies in tiny bathroom design, where dedicating separate space to single-purpose elements quickly becomes unsustainable. A vanity with an integrated hamper combines two essential bathroom functions in one compact unit, saving the floor space that a separate hamper would require in a 4×6 foot bathroom. The 24-inch-wide vanity features a pull-out laundry basket in the lower section, cleverly utilizing space that might otherwise contain only drawers or open shelving.
White shaker-style cabinetry with brushed nickel hardware creates a classic, timeless aesthetic that works in diverse design contexts, from traditional to transitional to cottage-inspired bathrooms. Grey quartz countertop with undermount sink provides a durable, attractive work surface that’s easy to maintain and resistant to the moisture and humidity that challenges bathroom materials. A mirror cabinet above provides additional storage without requiring any floor space, stacking storage vertically to maximize the limited footprint.
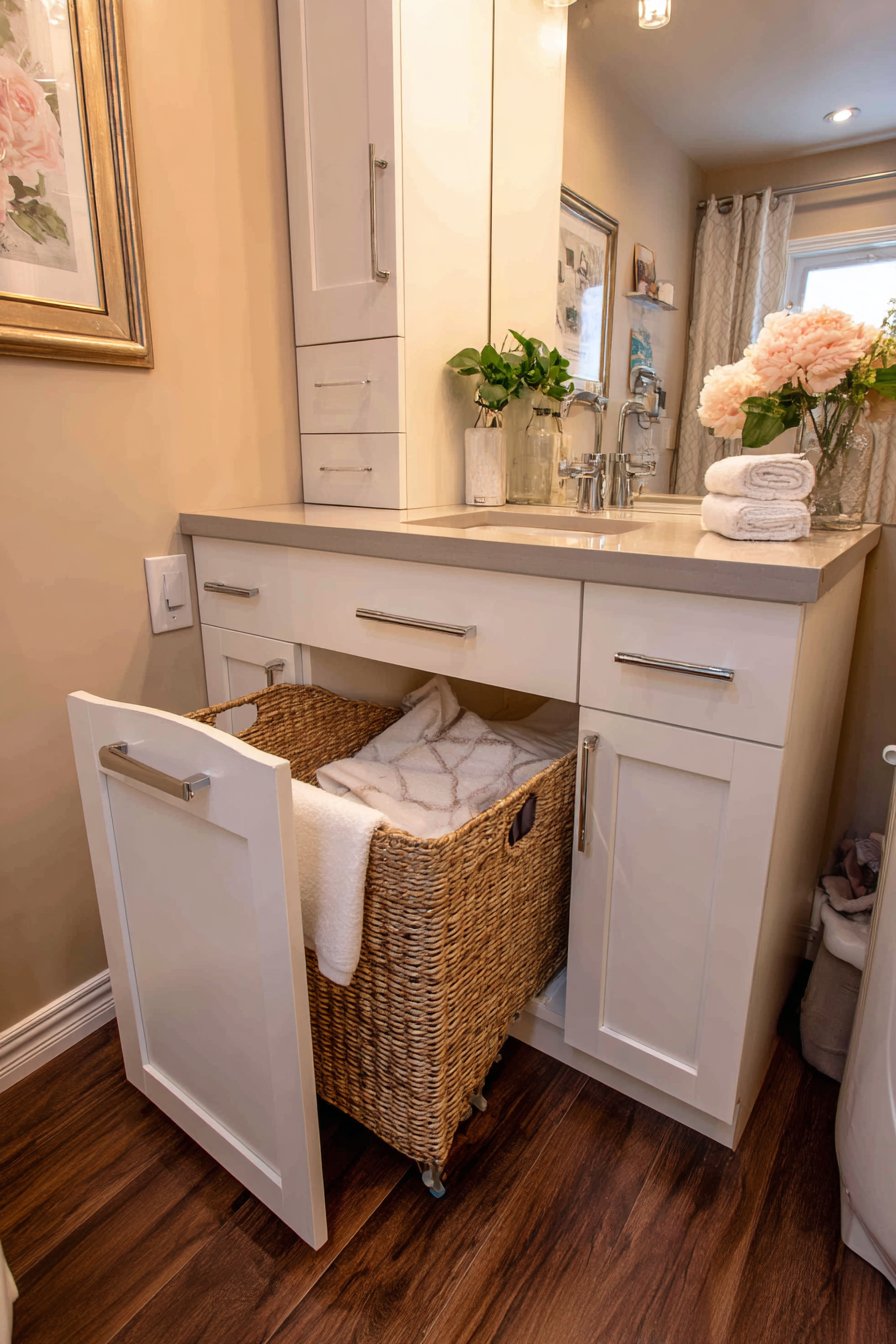
Soft natural lighting supplements recessed LEDs, creating layered illumination that can be adjusted based on time of day and activity. Interior design photography captures the dual-purpose furniture and space-efficient design that characterizes this approach, showing how thoughtful furniture selection can dramatically increase functionality without expanding the bathroom’s physical dimensions. The pull-out hamper mechanism ensures that laundry collection remains concealed until needed, maintaining the clean lines and uncluttered appearance that helps tiny bathrooms feel more spacious.
Key Design Tips:
- Choose vanities with pull-out hamper systems rather than tip-out bins for better accessibility
- Ensure adequate ventilation in the hamper compartment to prevent moisture buildup
- Select hamper materials that can withstand bathroom humidity (plastic or coated metal)
- Plan for easy hamper removal for laundry day without requiring tools
- Consider vanities with multiple storage compartments to organize different bathroom essentials
- Choose soft-close drawer mechanisms to reduce noise and extend hardware life
- Ensure the hamper size accommodates your household’s laundry volume
15. Monochromatic White Strategy
The power of a cohesive color palette in expanding perceived space becomes most apparent in monochromatic designs where varied textures create visual interest without color competition. An all-white bathroom featuring white hexagonal floor tiles, subway tile walls, a white pedestal sink, and white shiplap ceiling demonstrates how texture variations can prevent monotony while maintaining the light-reflecting, space-expanding benefits of a single color scheme. This approach works particularly well in 42-square-foot spaces where introducing multiple colors might create visual fragmentation that makes the room feel smaller and more chaotic.
Chrome fixtures provide subtle contrast without introducing color, their reflective metallic surface catching light and adding sparkle that prevents the all-white scheme from feeling flat or institutional. A small frosted window allows natural light while maintaining privacy, essential in bathrooms where window placement may face neighboring properties or public spaces. Wide-angle interior photography emphasizes how the cohesive white palette and texture variations make the tiny space feel larger and brighter, demonstrating the effectiveness of this design strategy.
The psychological impact of white in small spaces extends beyond simple light reflection—white also creates a sense of cleanliness and freshness that’s particularly appropriate in bathrooms, spaces fundamentally dedicated to hygiene and grooming. The shiplap ceiling adds horizontal lines that can make the space feel slightly wider, while the hexagonal floor tiles create pattern interest at foot level without overwhelming the vertical surfaces.
Key Design Tips:
- Mix matte and glossy white finishes to create subtle variation and prevent flatness
- Incorporate multiple textures (smooth tile, textured shiplap, woven fabrics) for interest
- Use warm white rather than stark white to prevent cold, institutional feeling
- Add greenery or natural wood accents if pure white feels too sterile
- Ensure excellent lighting to prevent shadows that can make white appear dingy
- Choose easy-to-clean white materials to maintain the fresh, bright appearance
- Consider slight off-white variations rather than pure white throughout for added depth
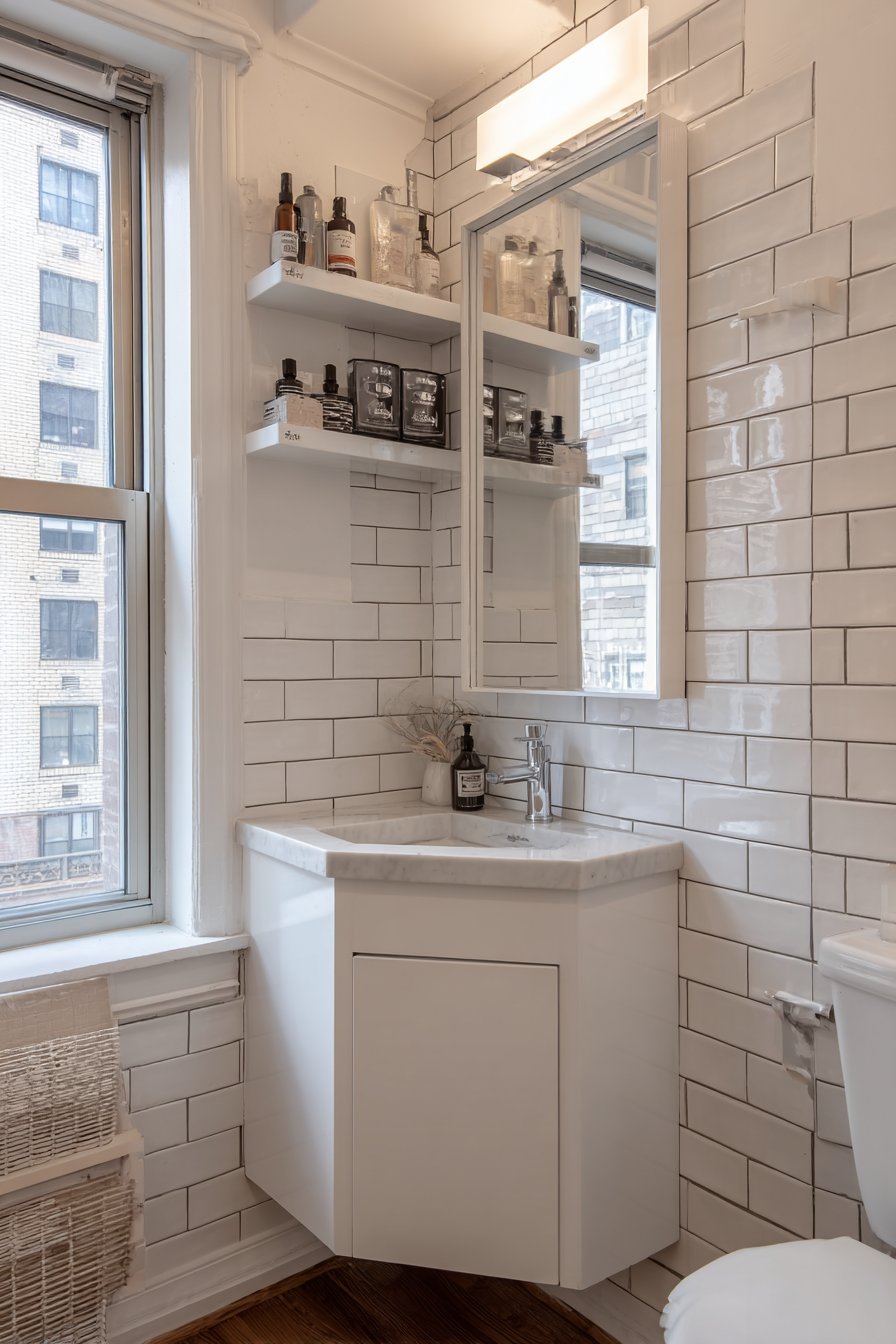
16. Triangular Corner Vanity
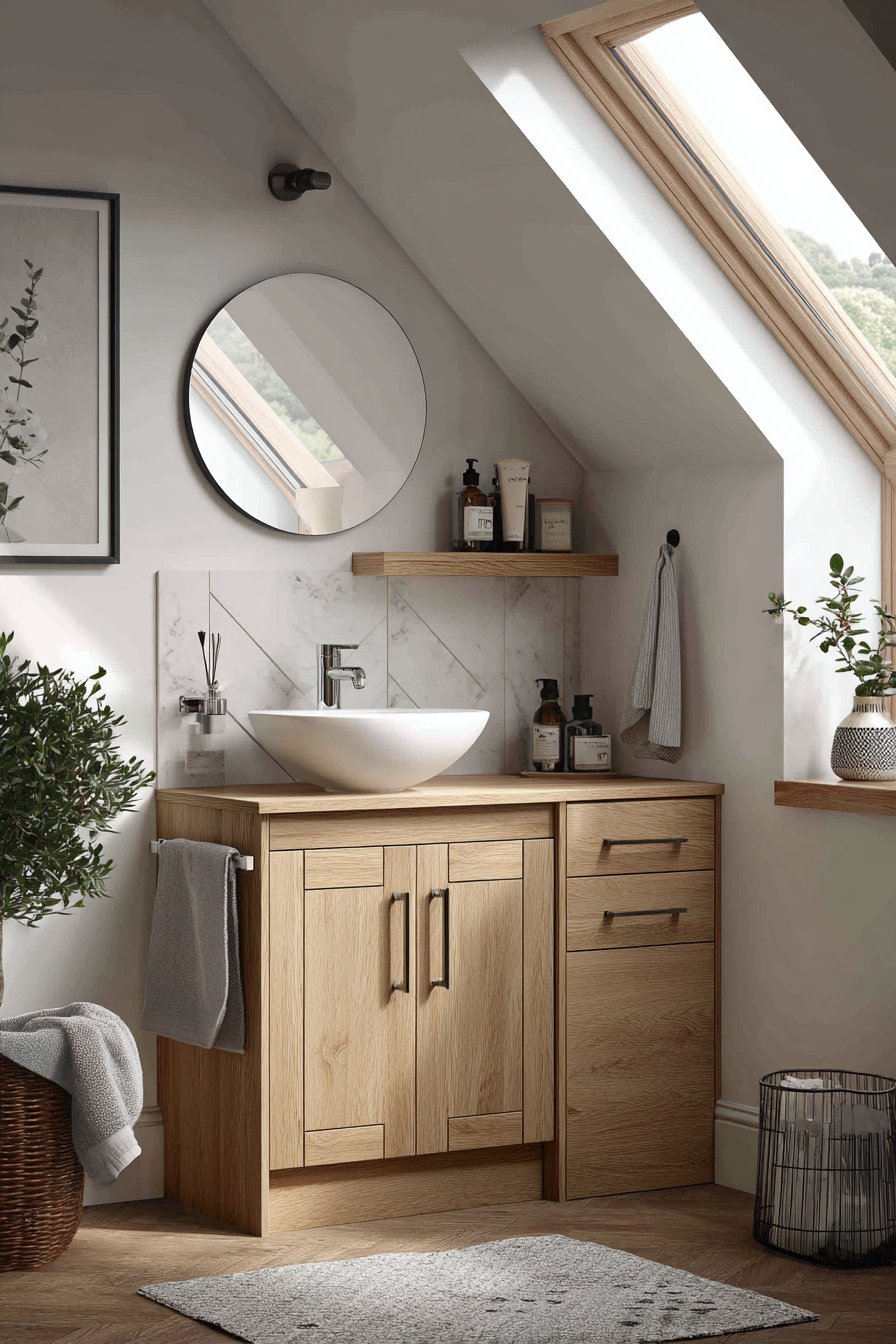
Purpose-built furniture designed specifically for small bathrooms often provides better solutions than standard fixtures adapted to tight spaces, and corner-mounted vanity units represent perfect examples of this principle. A triangular vanity with a small vessel sink and single drawer fits snugly into the corner of a 5×5 foot bathroom, claiming space that might otherwise remain empty or awkwardly configured. Light oak finish adds warmth against white walls, preventing the cold, sterile feeling that purely white or grey bathrooms can sometimes project.

A frameless round mirror hangs above the corner vanity, its circular form complementing the angular vanity and adding softness to a space dominated by hard edges and right angles. Natural light from a skylight creates even illumination throughout the day without consuming any wall space for windows, an ideal solution for interior bathrooms or spaces where wall-mounted windows aren’t feasible. Professional interior photography shows the ingenious corner utilization and compact fixture design that characterizes this approach, demonstrating how purpose-built corner fixtures can transform awkward spaces into functional bathroom areas.
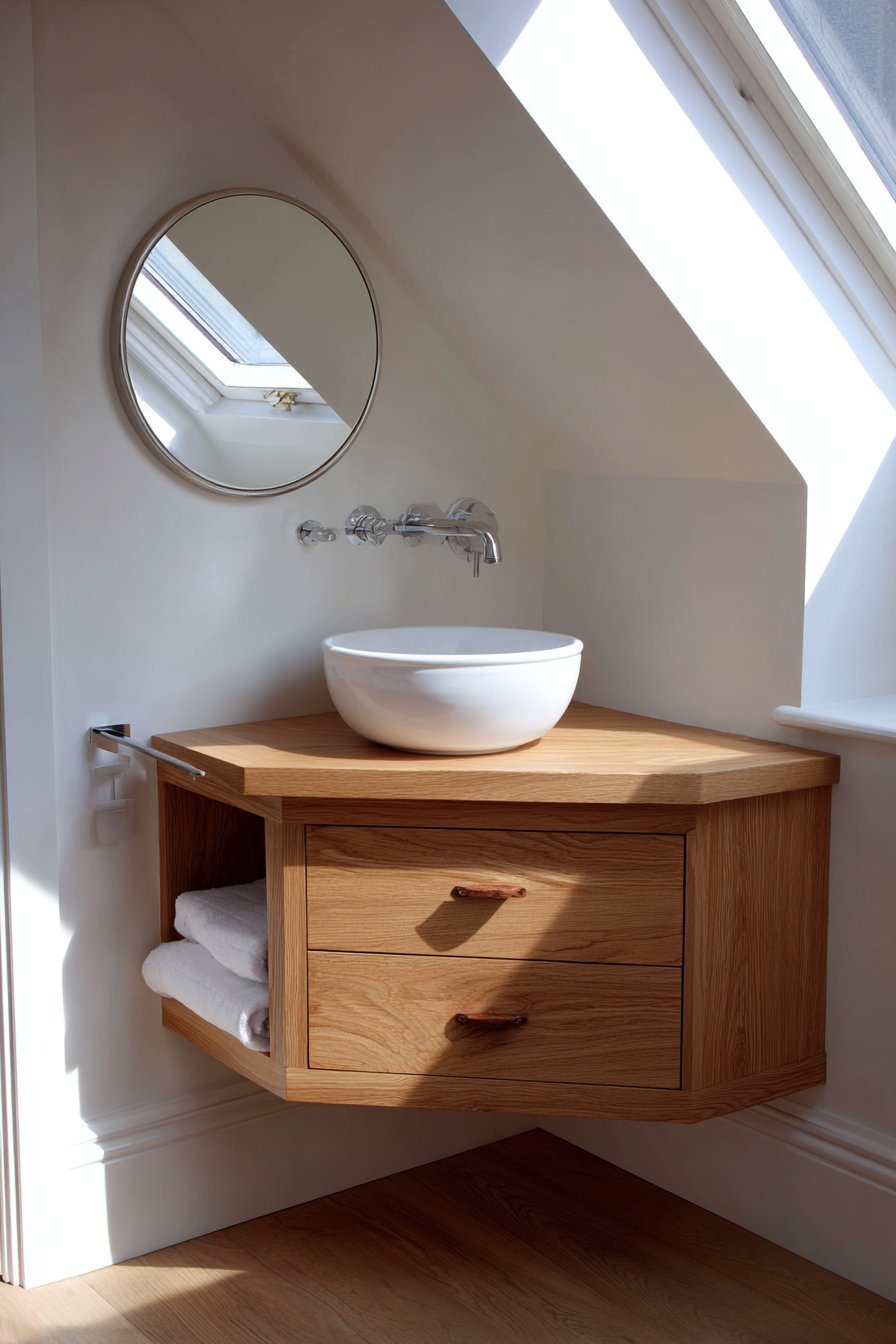
The vessel sink style works particularly well on compact vanities because it requires less counter depth than undermount or drop-in models, allowing the vanity to be smaller while still providing functional washing space. The single drawer provides essential storage for everyday items while keeping the footprint minimal—a crucial consideration when designing for corners where excessive depth would protrude uncomfortably into the room’s circulation space.
Key Design Tips:
- Measure corner angles carefully as many corners aren’t exactly 90 degrees
- Choose vessel sinks with appropriate drain positioning for corner installations
- Ensure adequate clearance from adjacent walls or fixtures for comfortable use
- Select corner vanities with appropriate leg height for comfortable standing use
- Consider floating corner vanities to maintain visible floor space
- Install appropriate lighting above corner vanities where wall placement may create unusual shadows
- Choose materials and finishes that complement adjacent straight-wall fixtures
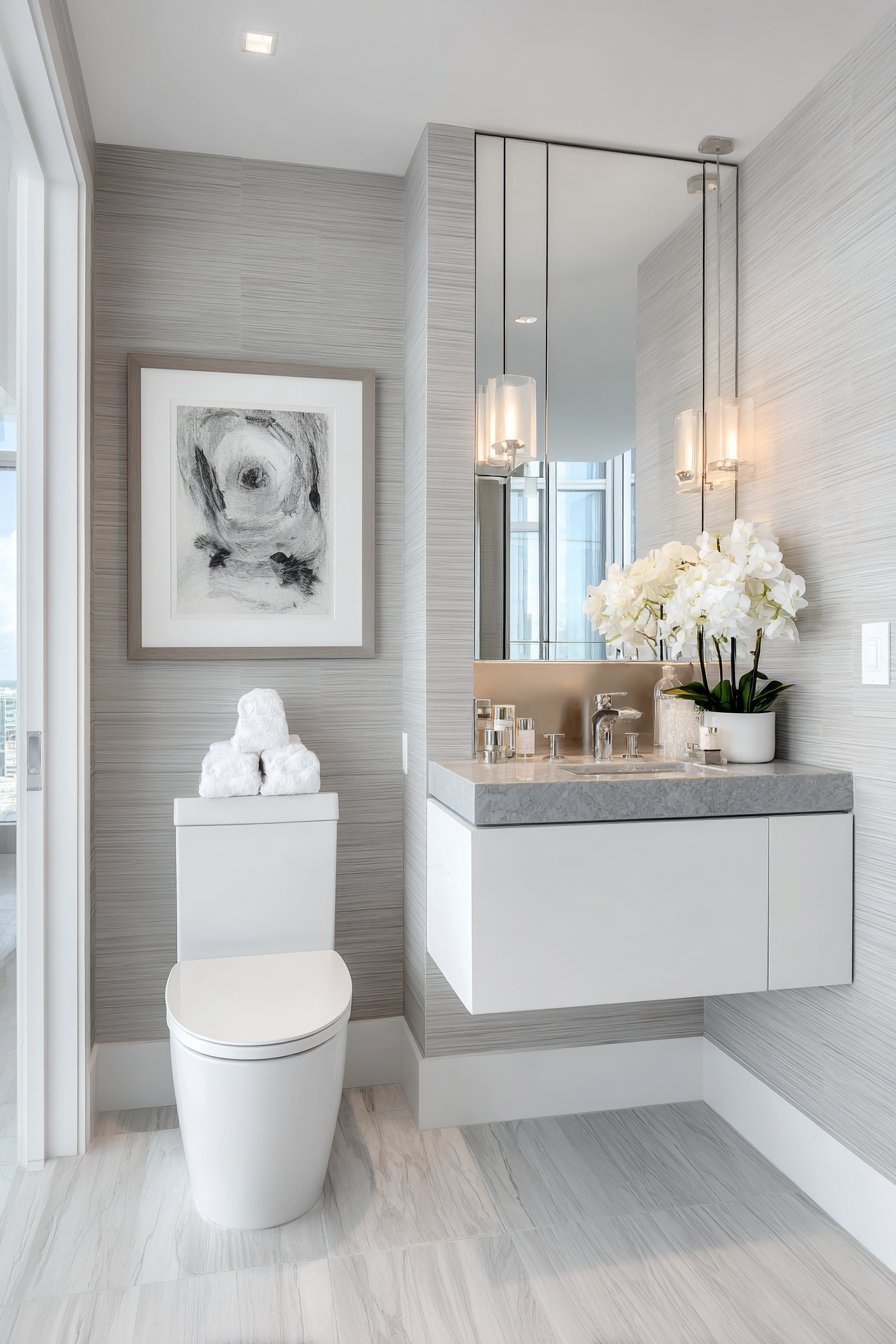
17. Floor-to-Ceiling Mirror Drama
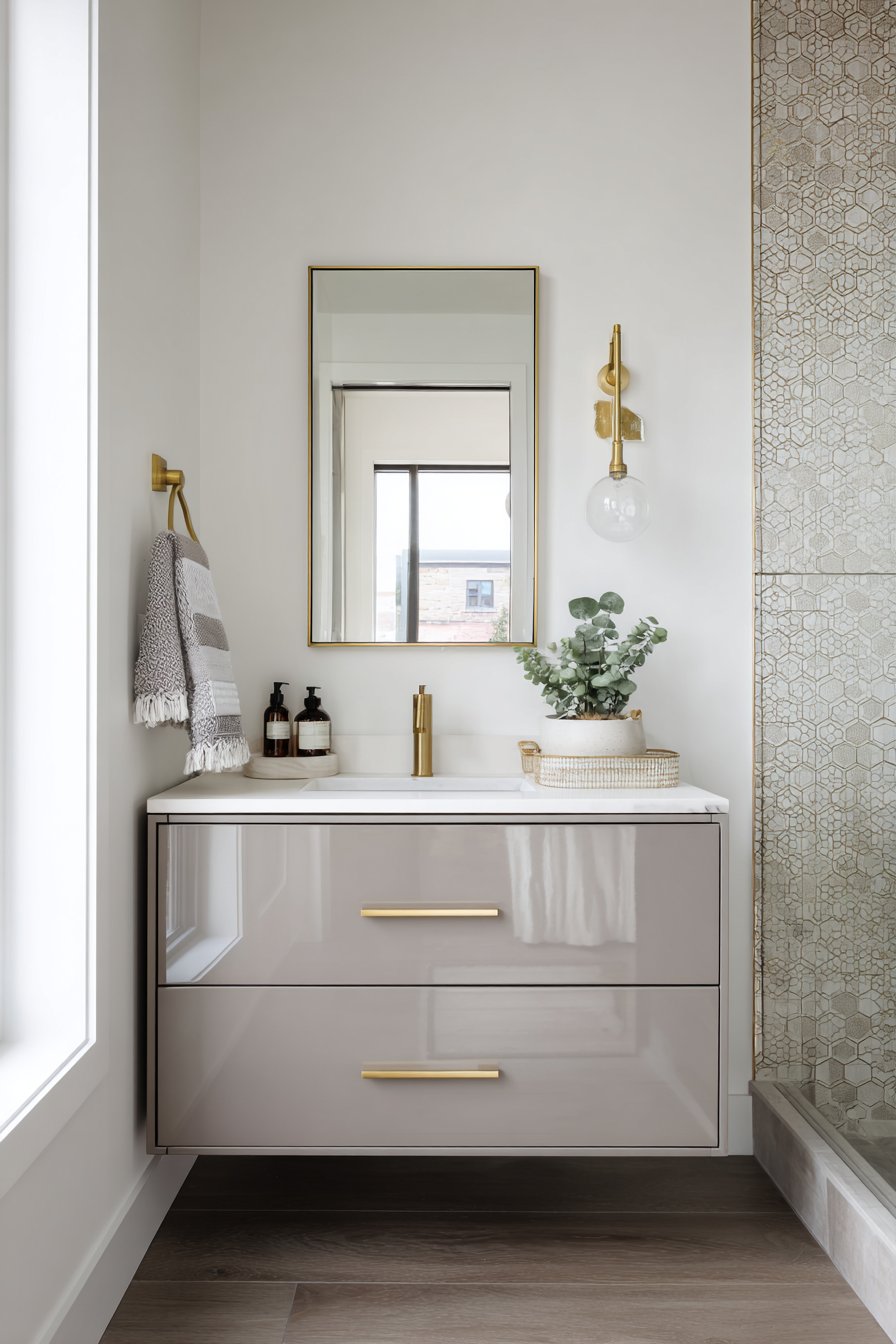
The strategic use of mirrors represents one of the most powerful tools in small bathroom design, and taking mirror installation from counter to ceiling creates dramatic spatial expansion through reflection. A full-height mirror in a narrow 3.5×8 foot bathroom literally doubles the perceived width by reflecting the opposite wall, fundamentally changing how the space feels despite adding no actual square footage. This mirror is paired with a 20-inch floating vanity in dark grey with white countertop, creating visual weight at the base while maintaining the floating effect that preserves floor visibility.
Wall-sconce lighting flanks the mirror for task illumination, positioning light sources at face level for optimal grooming while creating interesting reflections in the expansive mirrored surface. White walls and light grey floor tiles maintain brightness throughout the space, reflecting and amplifying the available light to combat the tunnel-like feeling that narrow bathrooms can project. Interior design photography captures the expansive mirror effect and vertical proportions with particular attention to lighting and reflections, showing how the mirror becomes a transformative element rather than merely functional hardware.
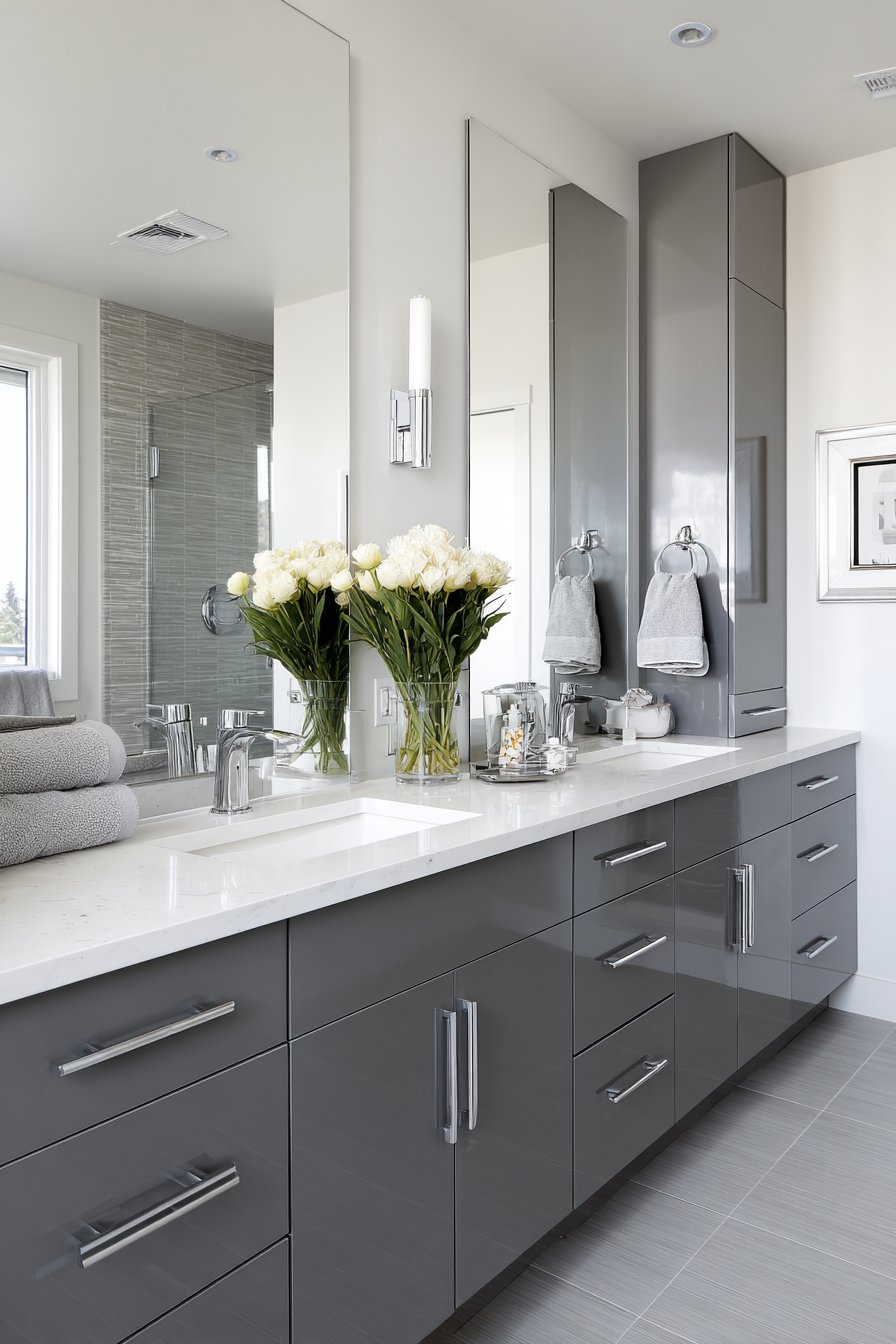
The floating vanity’s dark grey color provides visual anchor at floor level without creating heaviness—the exposed floor beneath the vanity maintains the open feeling that helps narrow bathrooms feel more navigable. The white countertop creates a transitional zone between dark vanity and light walls, preventing stark contrast while maintaining the overall brightness that makes this narrow space work.
Key Design Tips:
- Secure floor-to-ceiling mirrors with appropriate mounting hardware rated for the weight
- Consider mirror tile panels for easier installation than single large sheets
- Install proper lighting on either side of mirrors to reduce facial shadows for grooming
- Clean regularly to maintain clarity and prevent moisture buildup
- Ensure mirrors are installed plumb and level to prevent distorted reflections
- Consider anti-fog treatments or heated mirror pads for mirrors in shower zones
- Use safety backing or tempered glass for large mirror installations
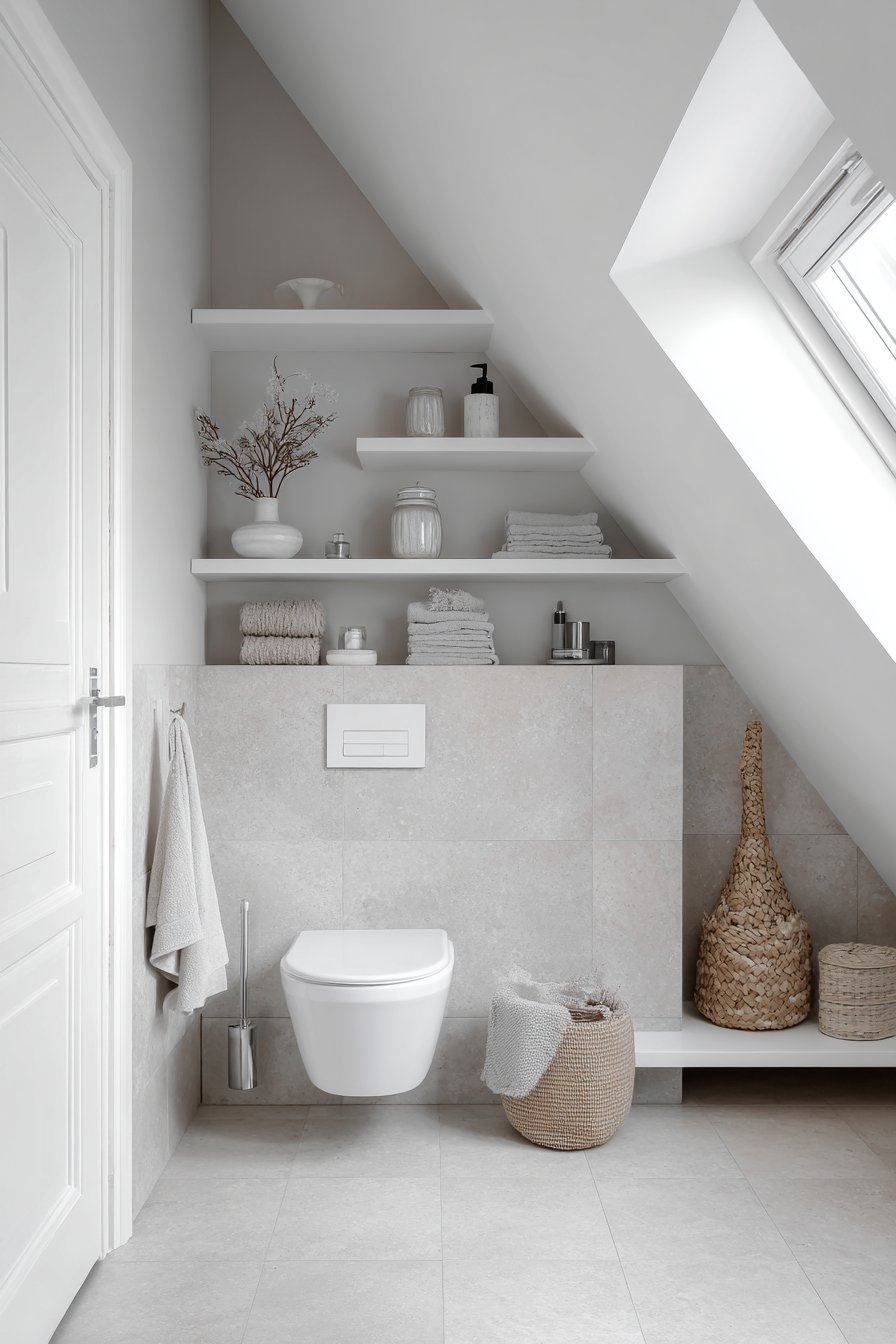
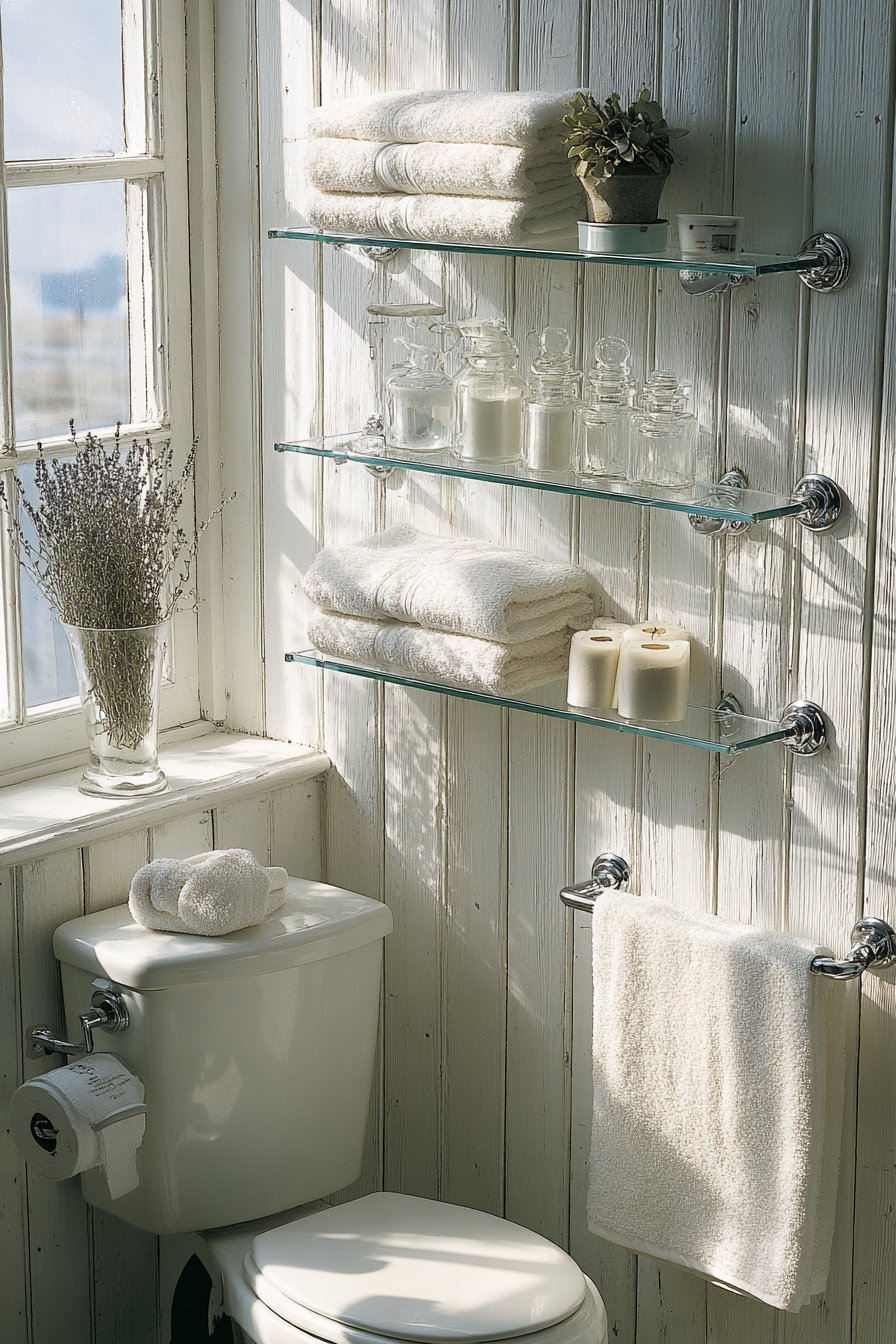
18. Over-Toilet Glass Shelving
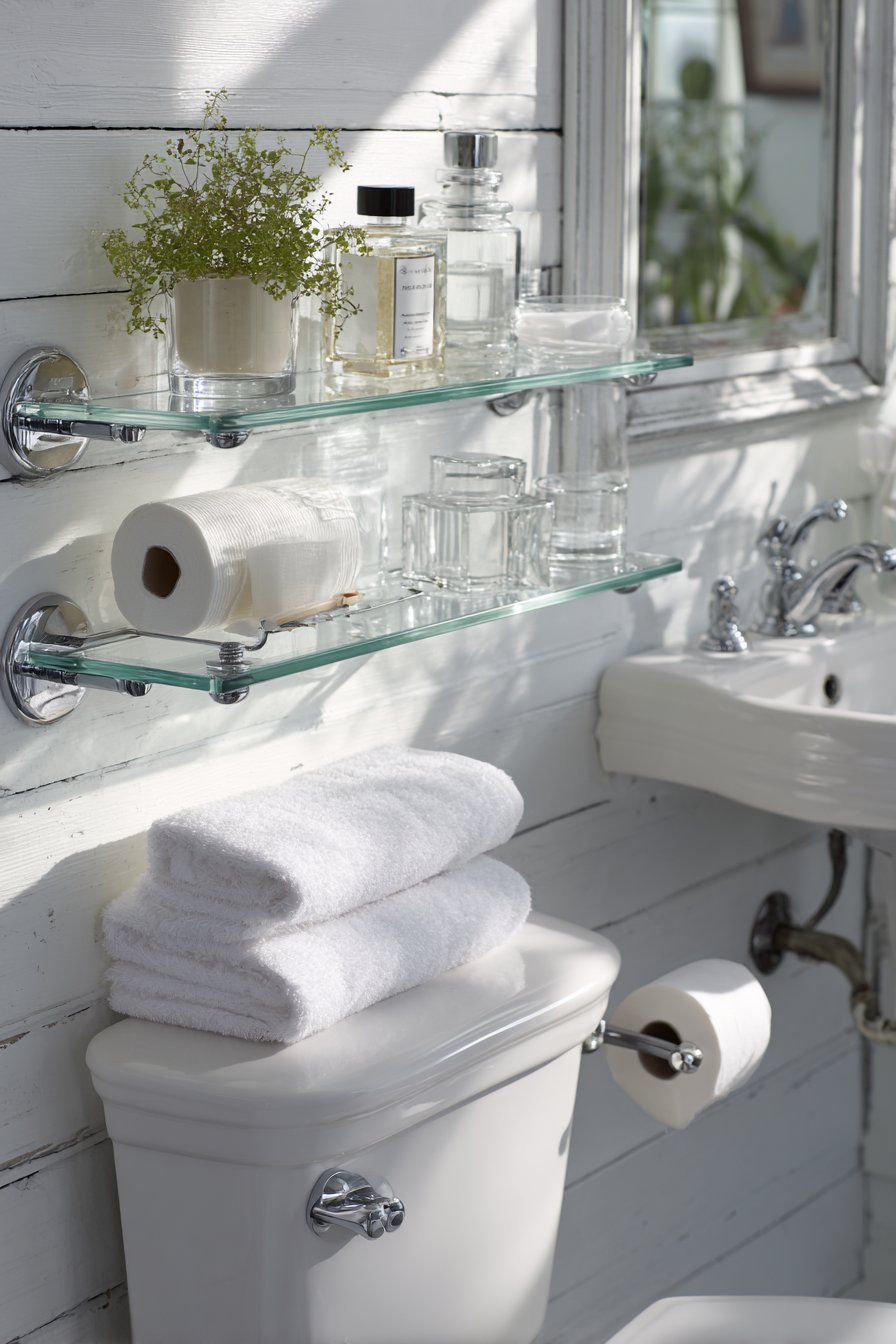
The wall space above toilets represents valuable real estate often left empty or underutilized in tiny bathrooms, making over-toilet storage systems an obvious solution for expanding storage capacity without consuming any floor space. Two clear glass shelves with chrome brackets create functional storage that holds neatly arranged towels and small plants while maintaining visual lightness—unlike solid wood shelving that would block sightlines and create visual weight. White beadboard walls add cottage charm while maintaining brightness, their vertical lines creating subtle upward movement that draws the eye toward the ceiling.
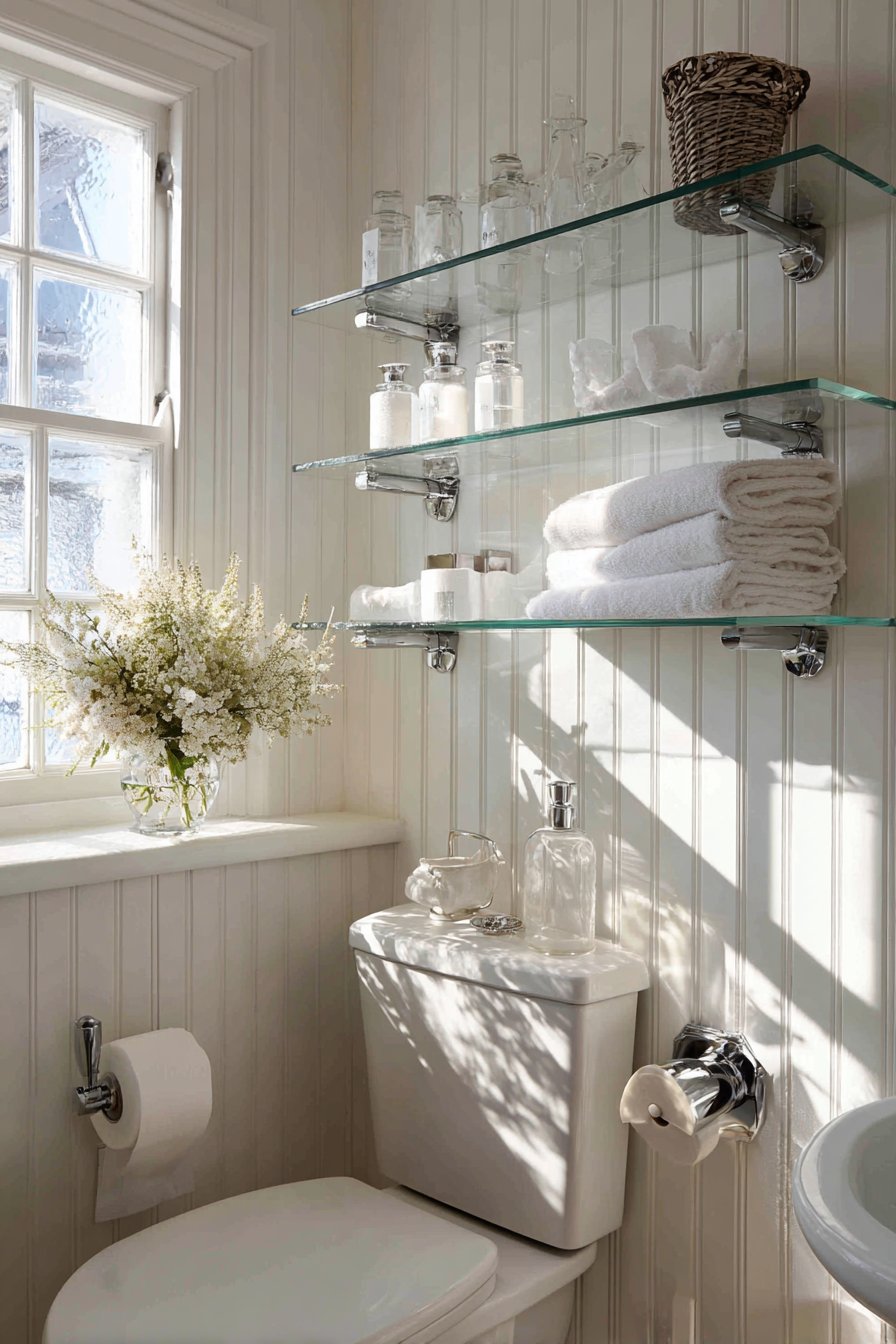
A chrome toilet paper holder and small wall-mounted sink complete the efficient layout, each element carefully scaled and positioned to maximize functionality in the compact space. Soft natural window light creates gentle shadows that add dimension and prevent the flatness that can make small bathrooms feel two-dimensional and uninviting. Interior photography showcases the over-toilet storage solution and cohesive design, demonstrating how transparent materials maintain openness while still providing practical storage capacity.
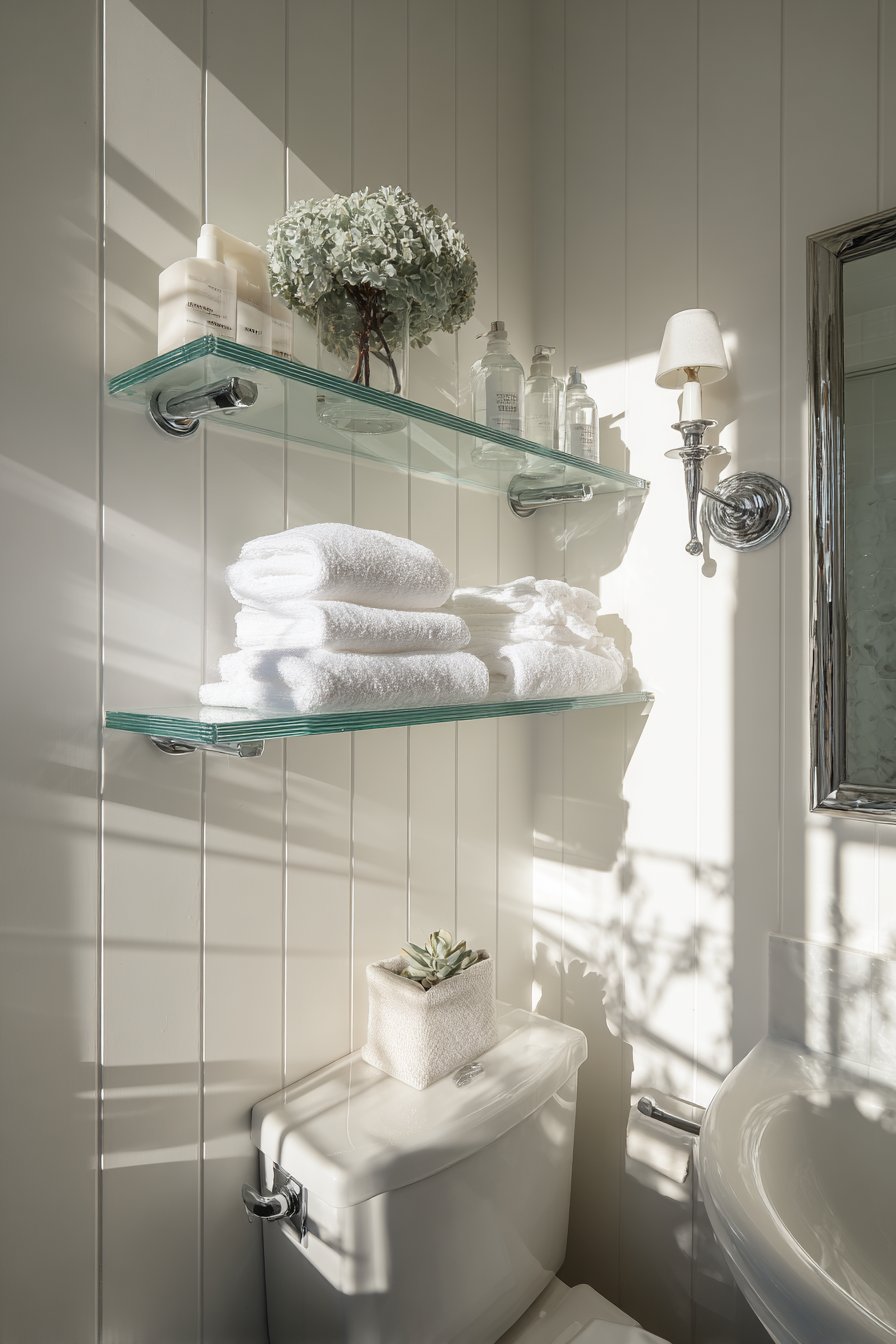
The choice of clear glass rather than solid shelving material proves crucial in tiny bathrooms where every element affects spatial perception—transparent shelving provides the storage function without the visual bulk that solid shelves would introduce. Small plants on the shelves introduce organic forms and living elements that improve air quality while softening the hard edges and smooth surfaces typical in bathrooms.
Key Design Tips:
- Install shelving brackets securely into wall studs to support weight of stored items
- Position shelves high enough to avoid head strikes when using the toilet
- Choose tempered glass shelves rated for bathroom use and humidity exposure
- Space shelves 10-14 inches apart to accommodate folded towels and standard-height items
- Keep shelves shallow (6-8 inches deep) to avoid excessive protrusion over the toilet
- Arrange items attractively with uniform containers and cohesive color palette
- Clean glass shelves regularly to maintain transparency and prevent dust accumulation
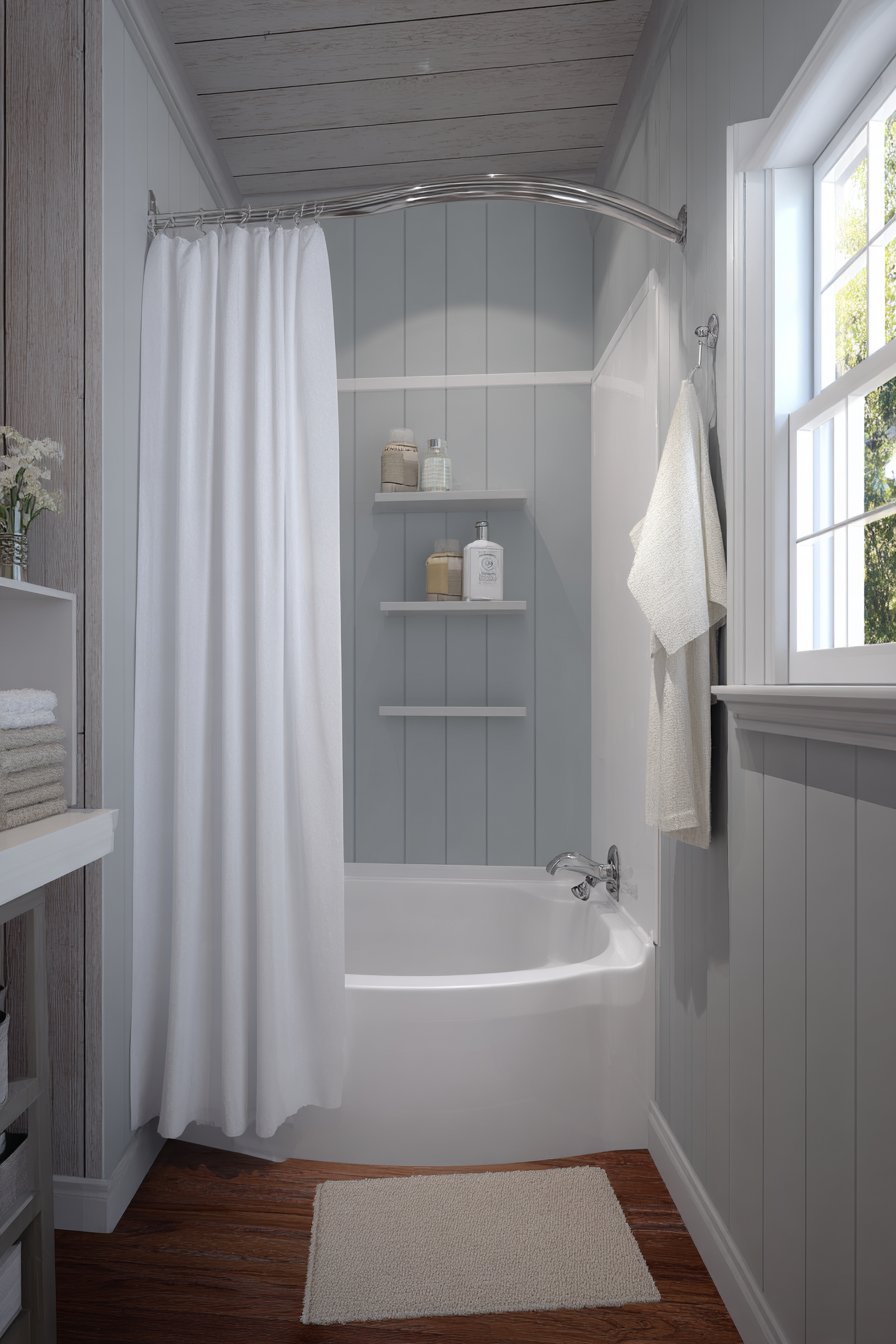
19. Light Neutral Shower Curtain
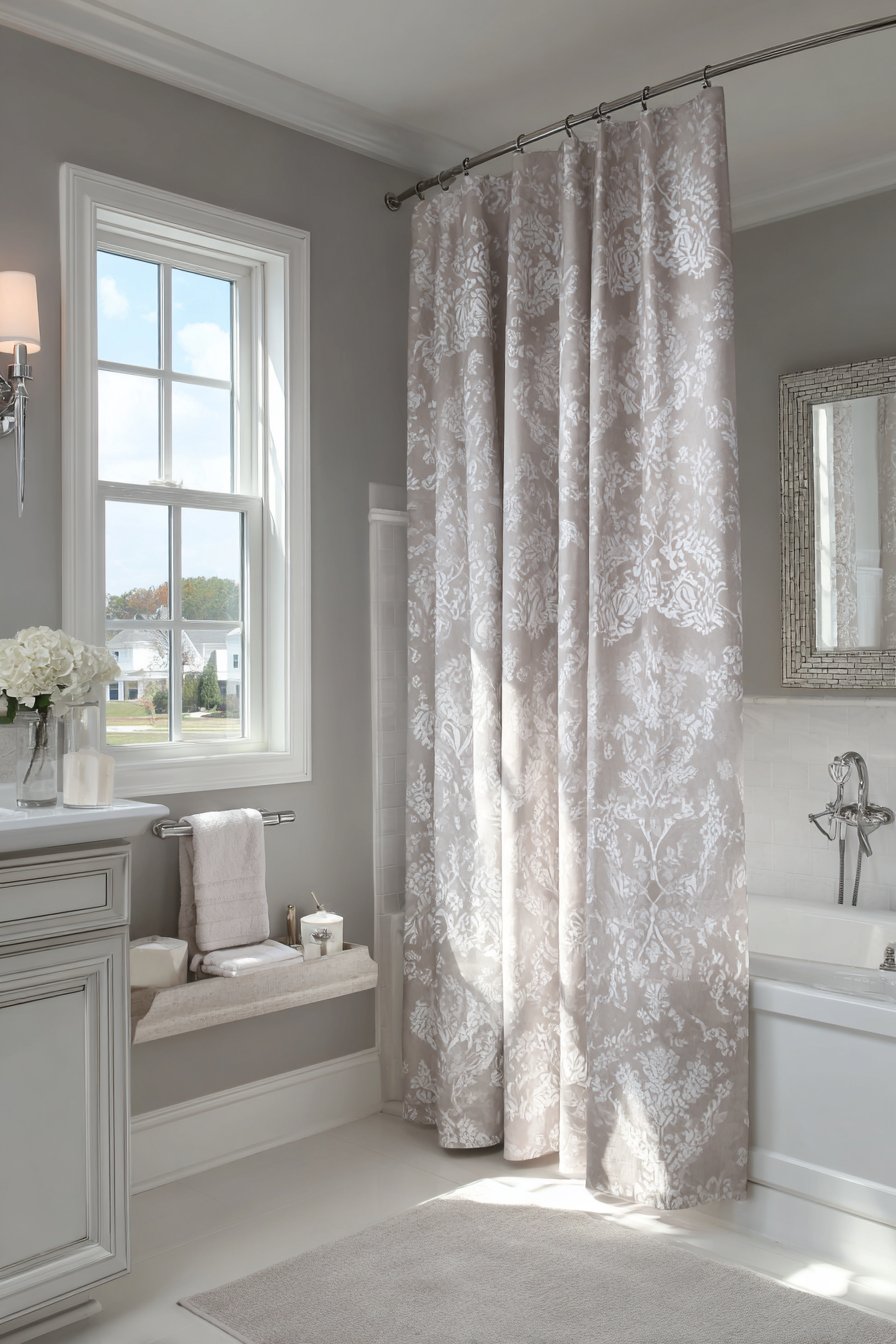
The often-underestimated impact of shower curtain selection in tiny bathrooms deserves more attention, as these large fabric elements consume significant visual space and can either enhance or detract from the sense of openness. A shower curtain in a light neutral pattern provides privacy and water containment without the visual weight that dark or bold patterns would introduce in a 40-square-foot bathroom. The curtain hangs from a curved rod that adds elbow room in the tub-shower combination, bowing outward to create additional showering space without requiring any structural modifications to the tub or walls.
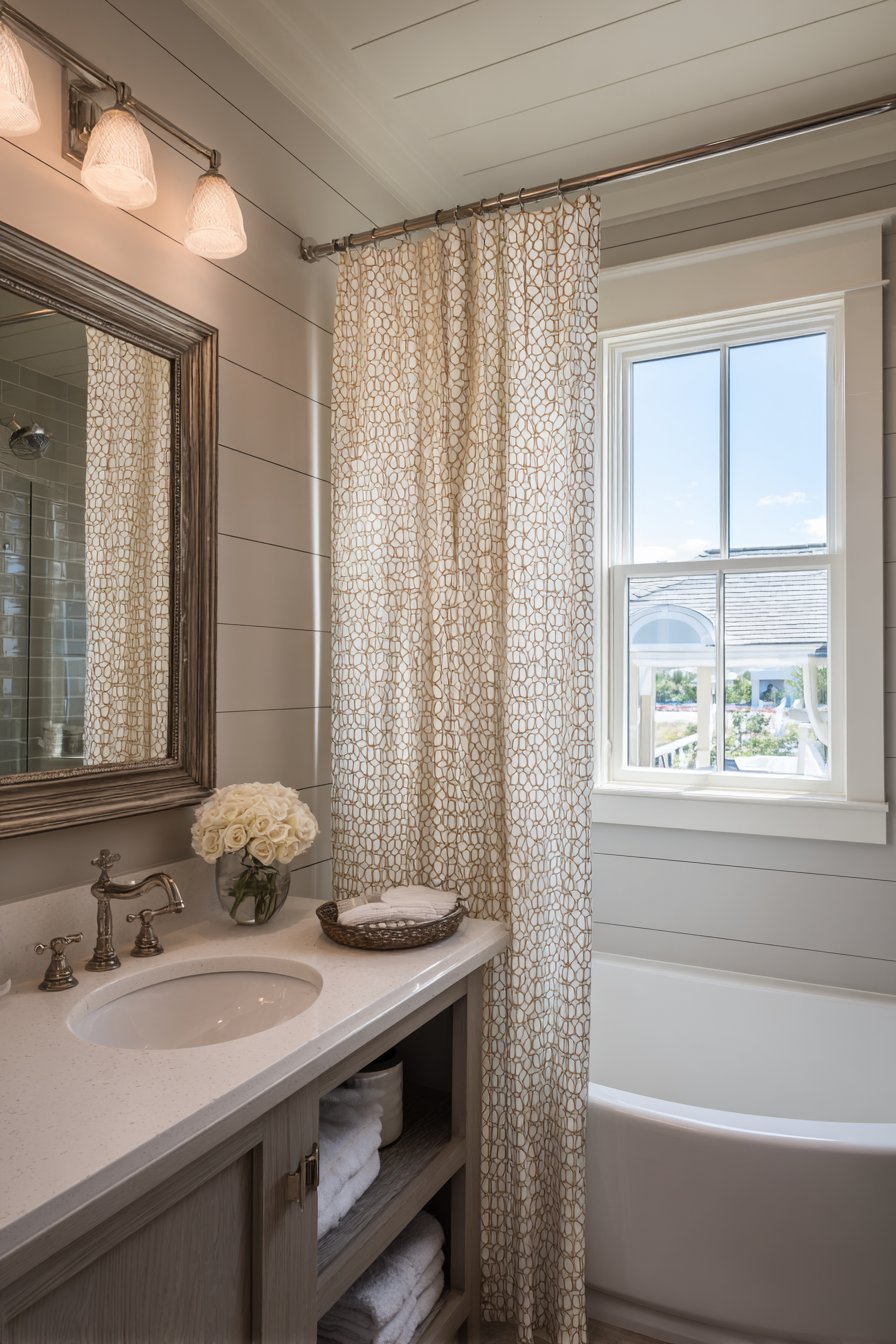
Soft grey walls and white trim keep the space feeling open and airy, their neutral palette allowing the subtle pattern in the shower curtain to register without competing with other design elements. A small floating shelf and wall-mounted mirror optimize the limited wall space, providing essential storage and grooming functionality without cluttering the compact room. Natural lighting through a privacy window supplements any artificial lighting, creating the daylit quality that makes small bathrooms feel more inviting and less cave-like.
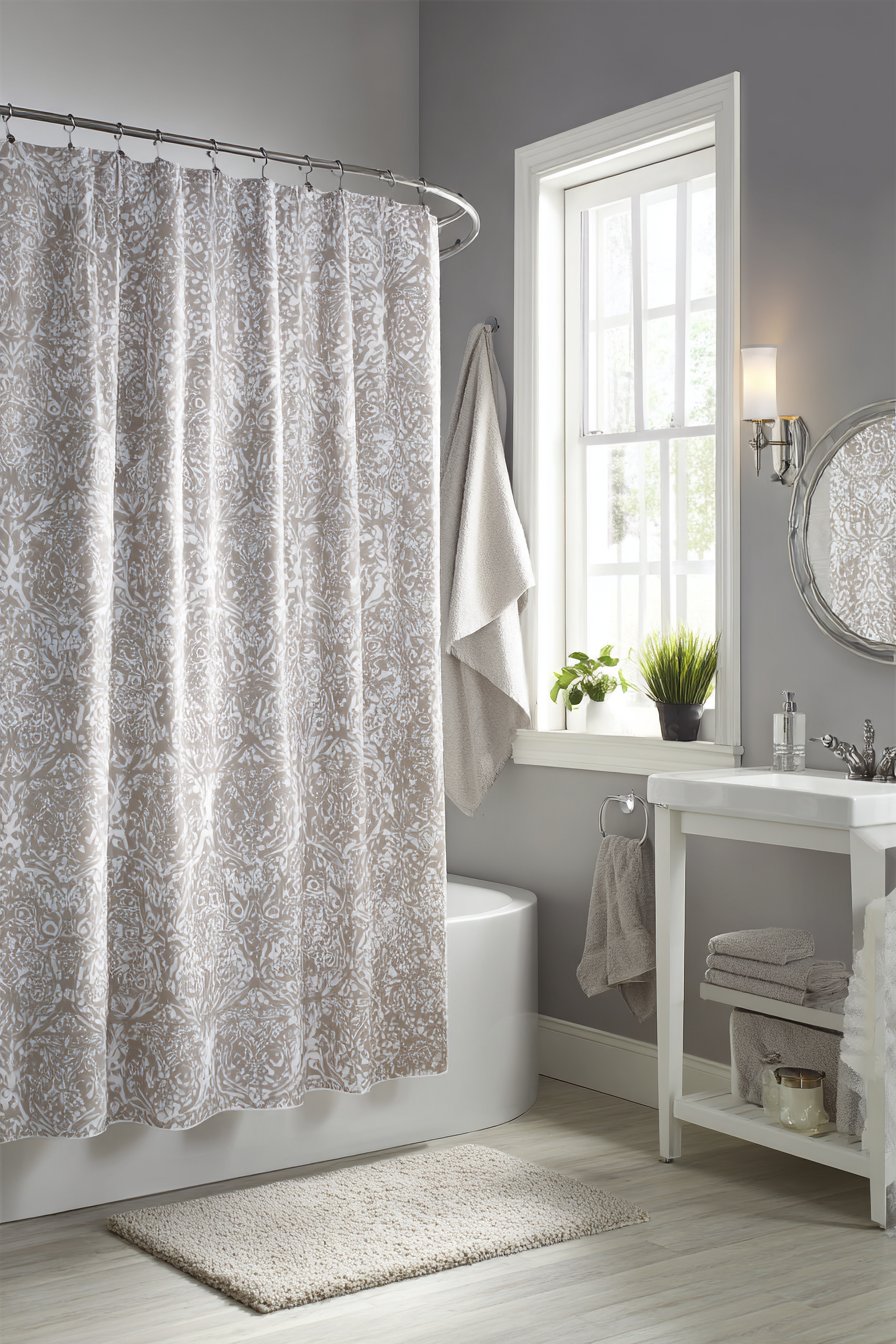
Professional interior photography with balanced exposure shows the curtain’s role in the overall light and airy aesthetic, demonstrating how this often-overlooked element contributes to the bathroom’s spatial quality. The curved shower rod represents a simple, inexpensive modification that significantly improves the showering experience in small tub-shower combinations, providing extra shoulder and elbow room that makes the shower feel less confining.
Key Design Tips:
- Choose light-colored curtains in soft neutrals or whites to maintain brightness
- Select water-resistant fabrics or add plastic liners to prevent water damage and mildew
- Install curved shower rods that extend 6-8 inches beyond the tub edge for added space
- Hang curtains at ceiling height rather than just above the tub for vertical emphasis
- Choose subtle patterns rather than bold prints to avoid overwhelming small spaces
- Wash curtains regularly to prevent mildew and maintain fresh appearance
- Consider hookless curtains for easier removal and washing
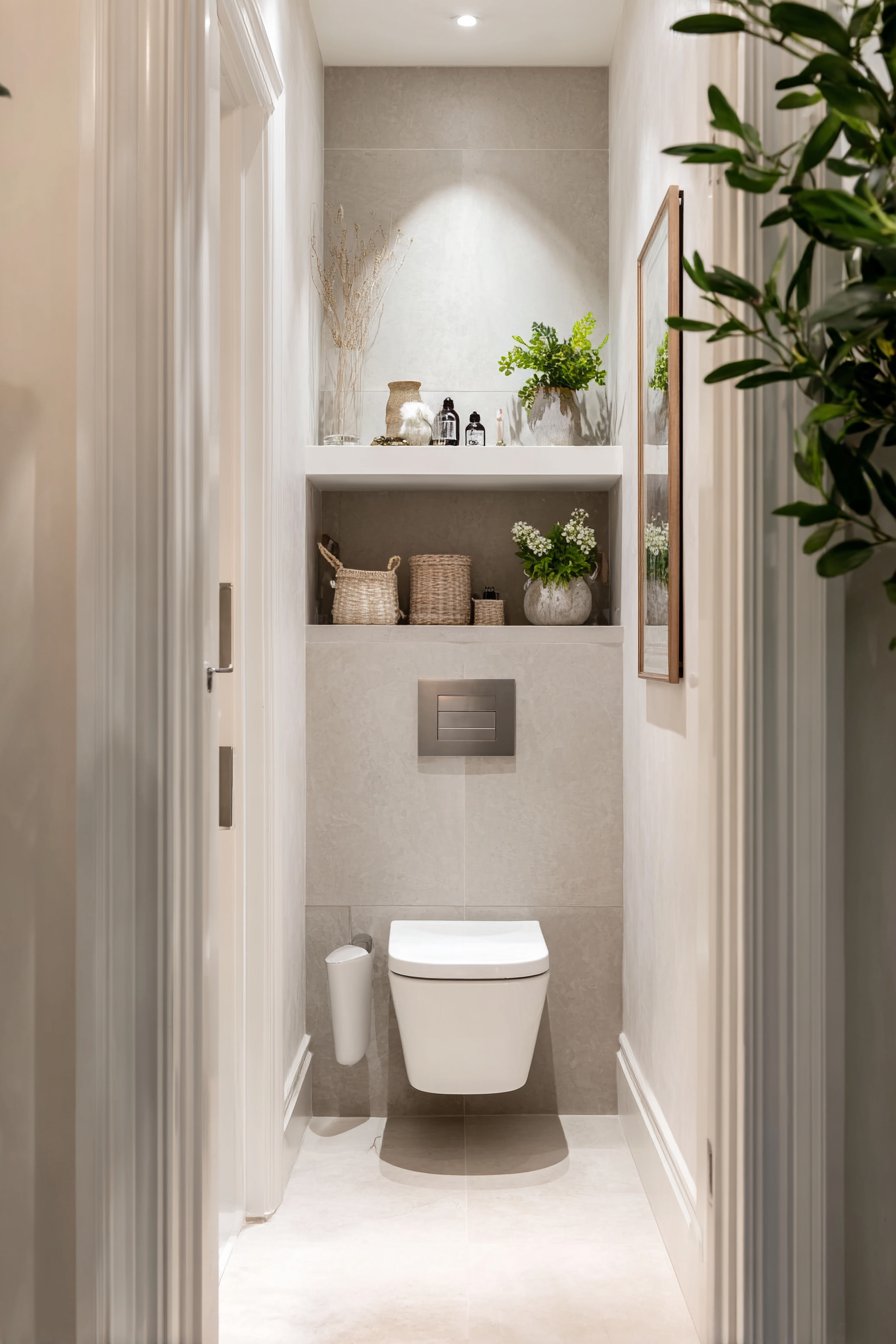
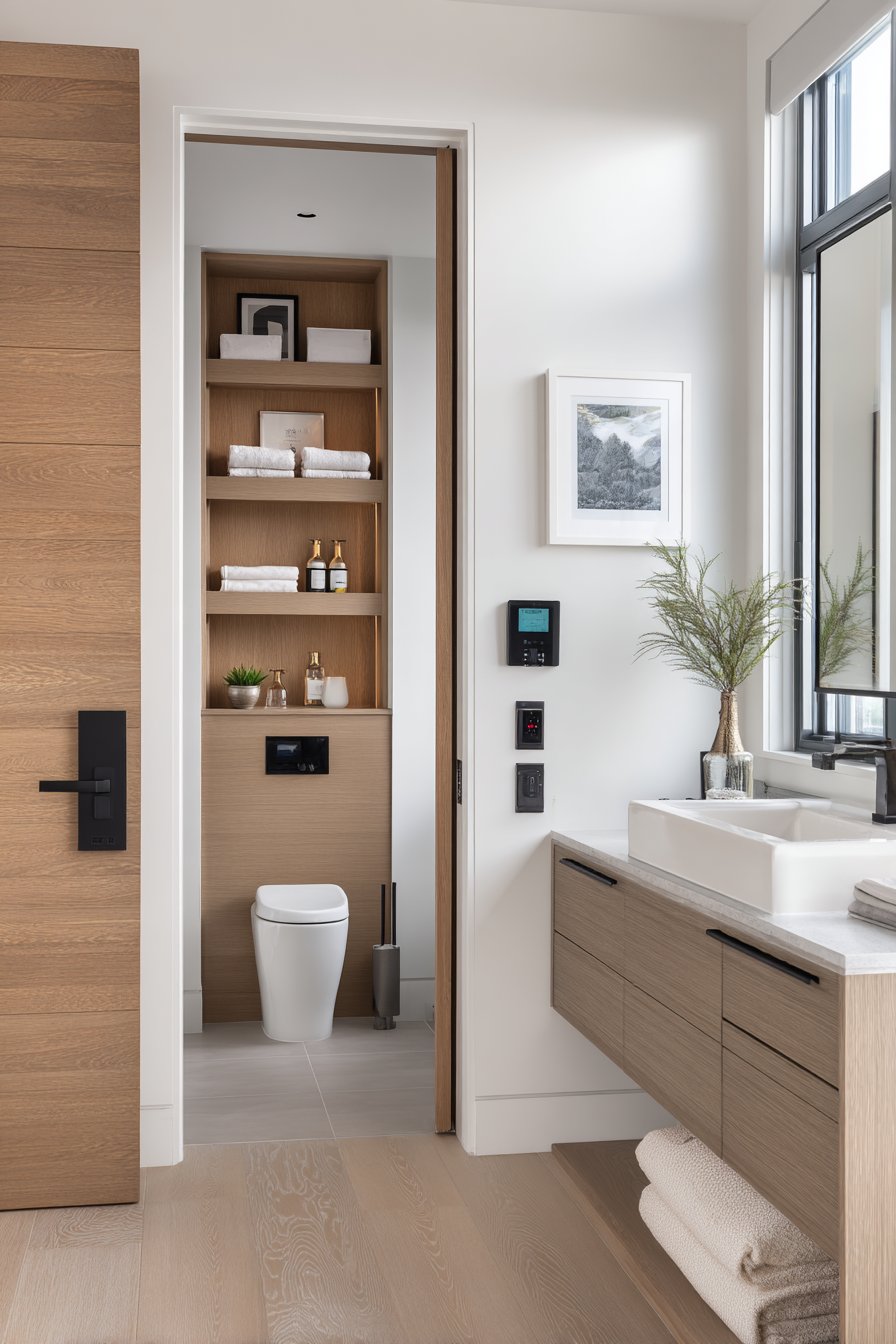
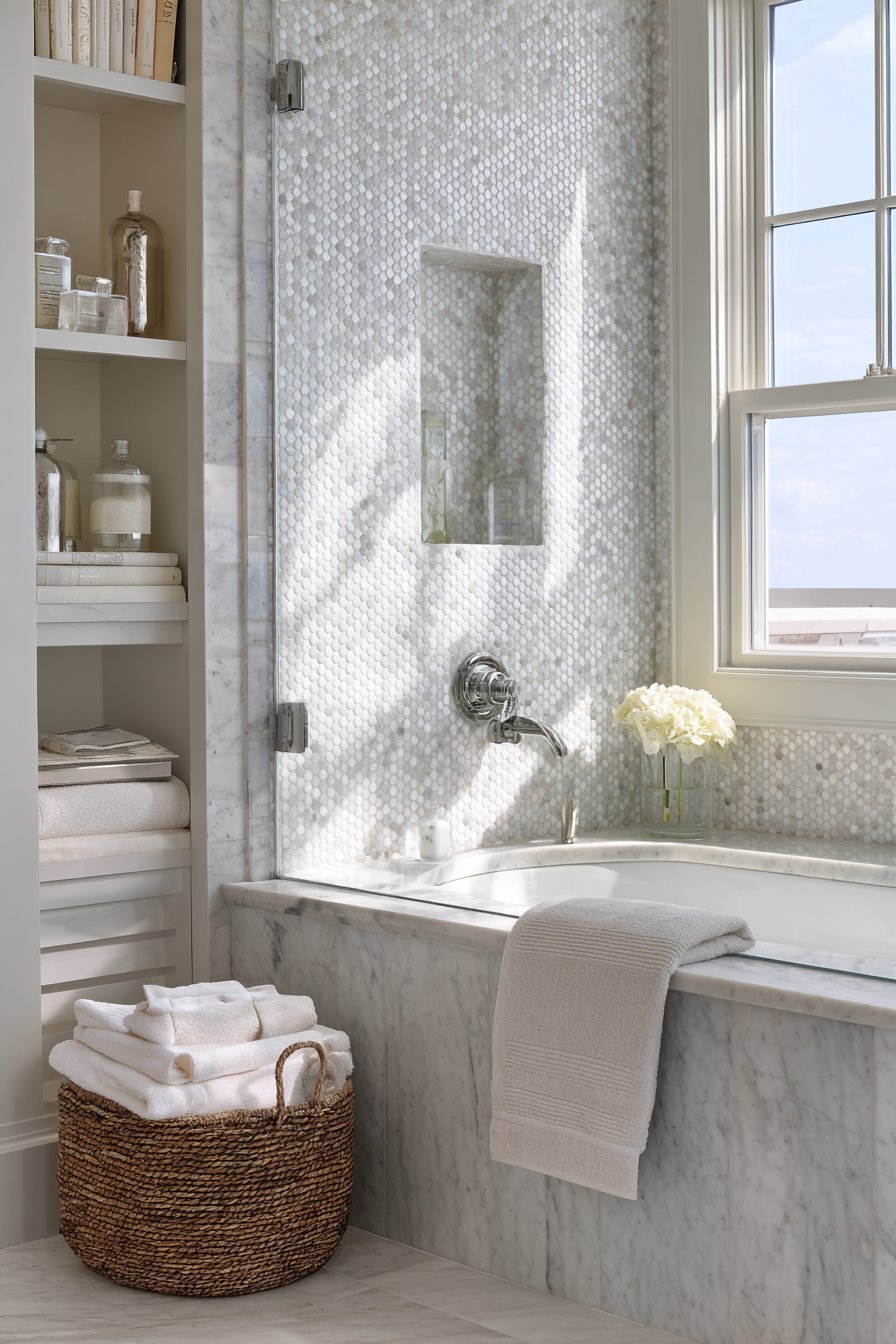
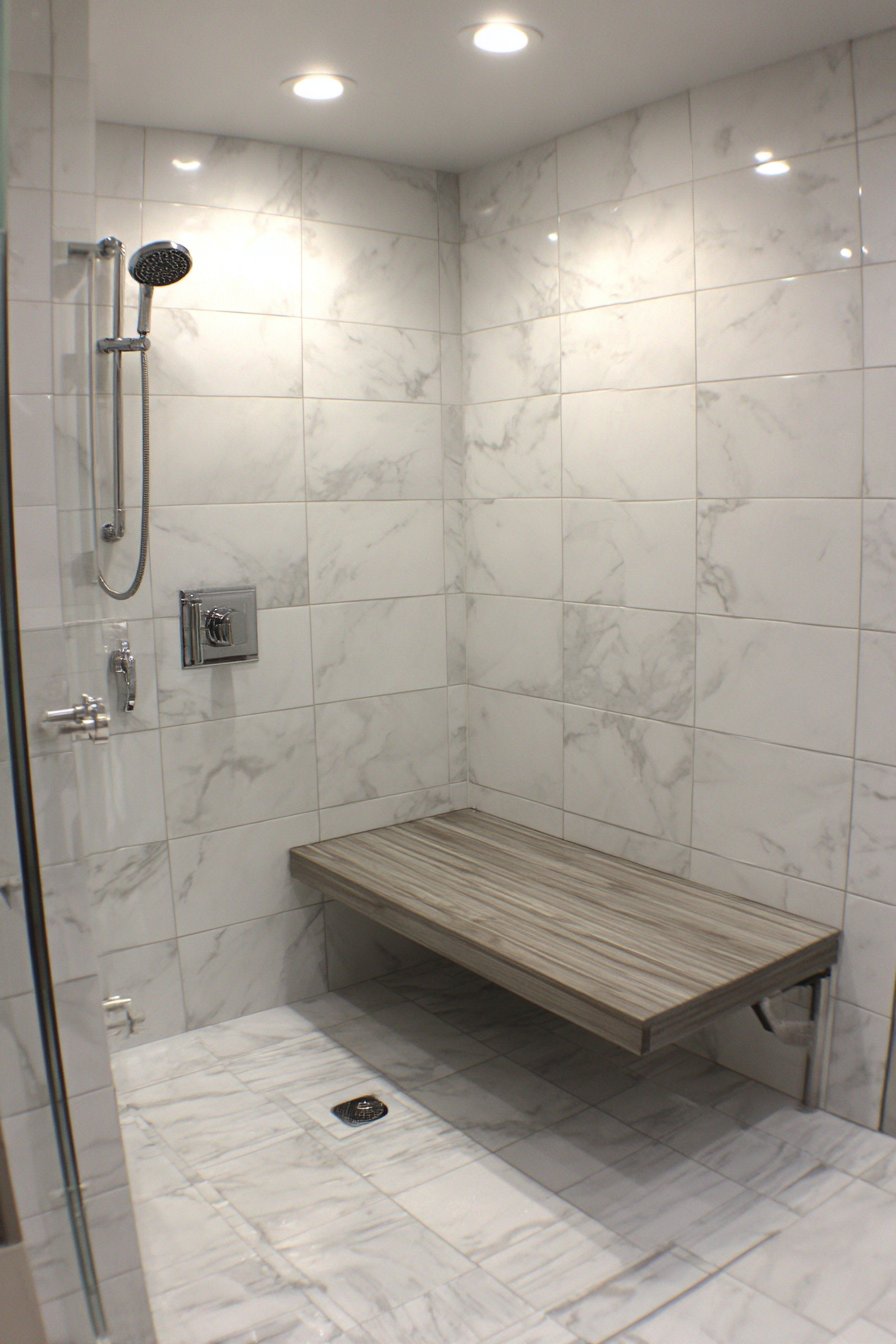
20. Integrated Niche Storage System
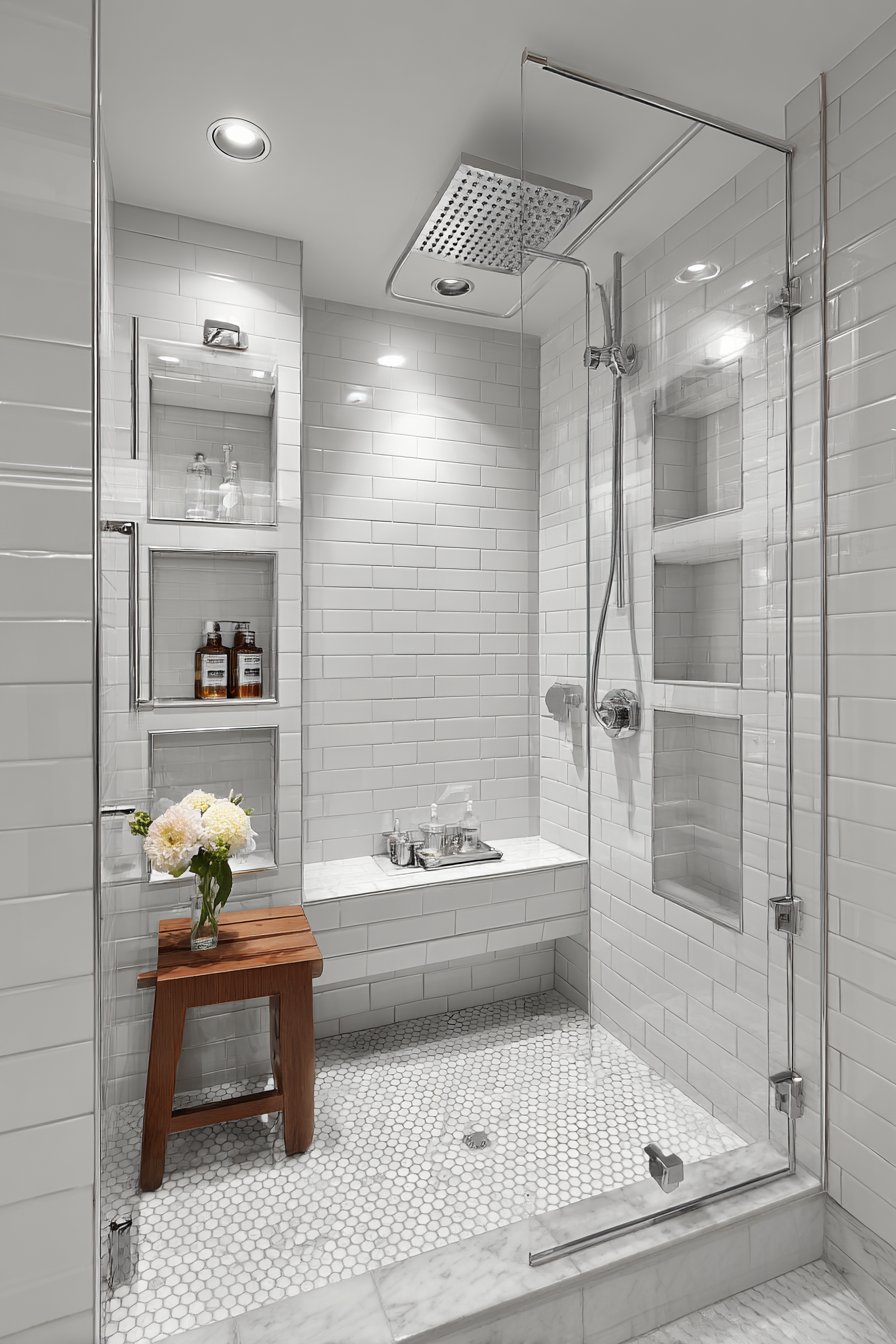
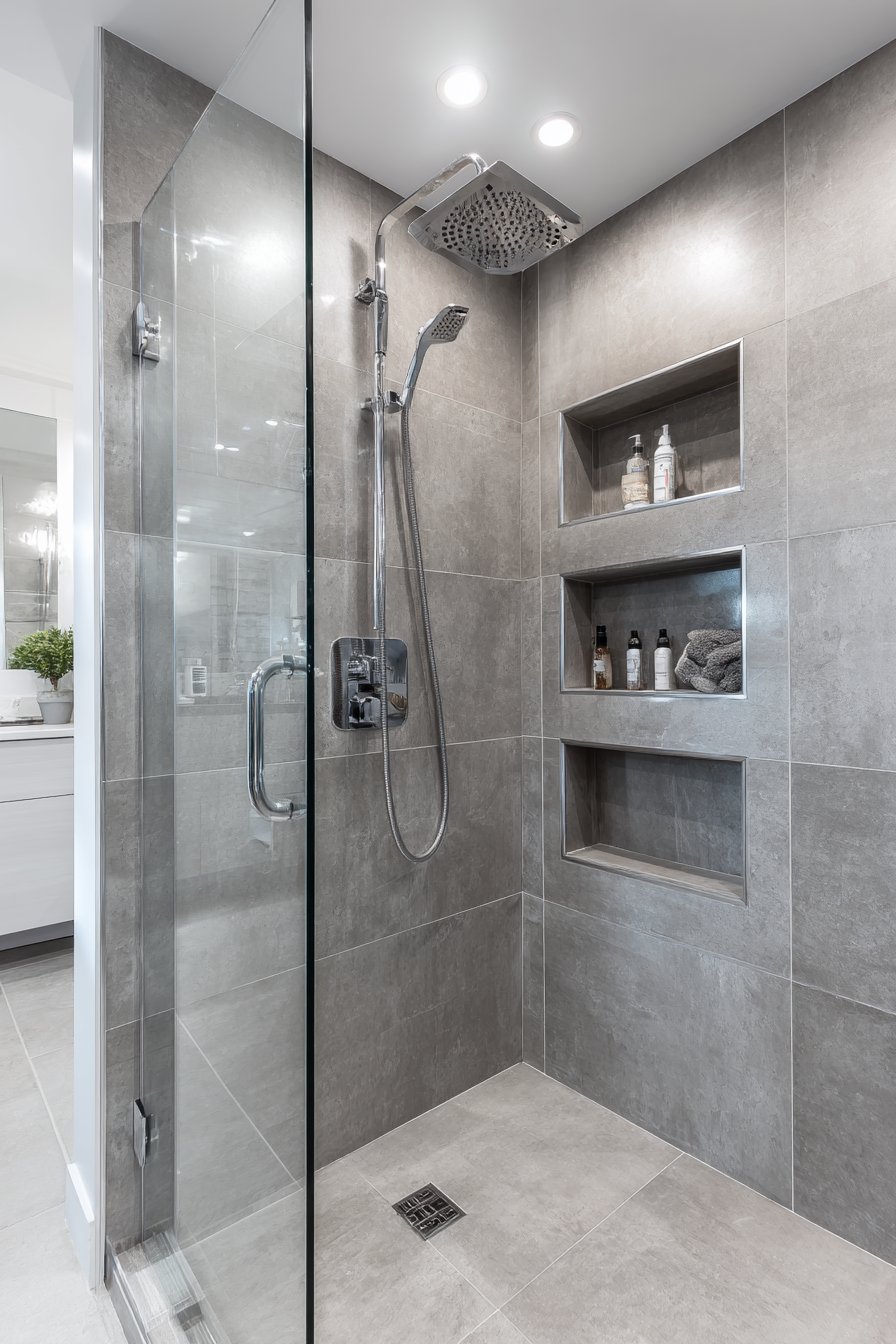
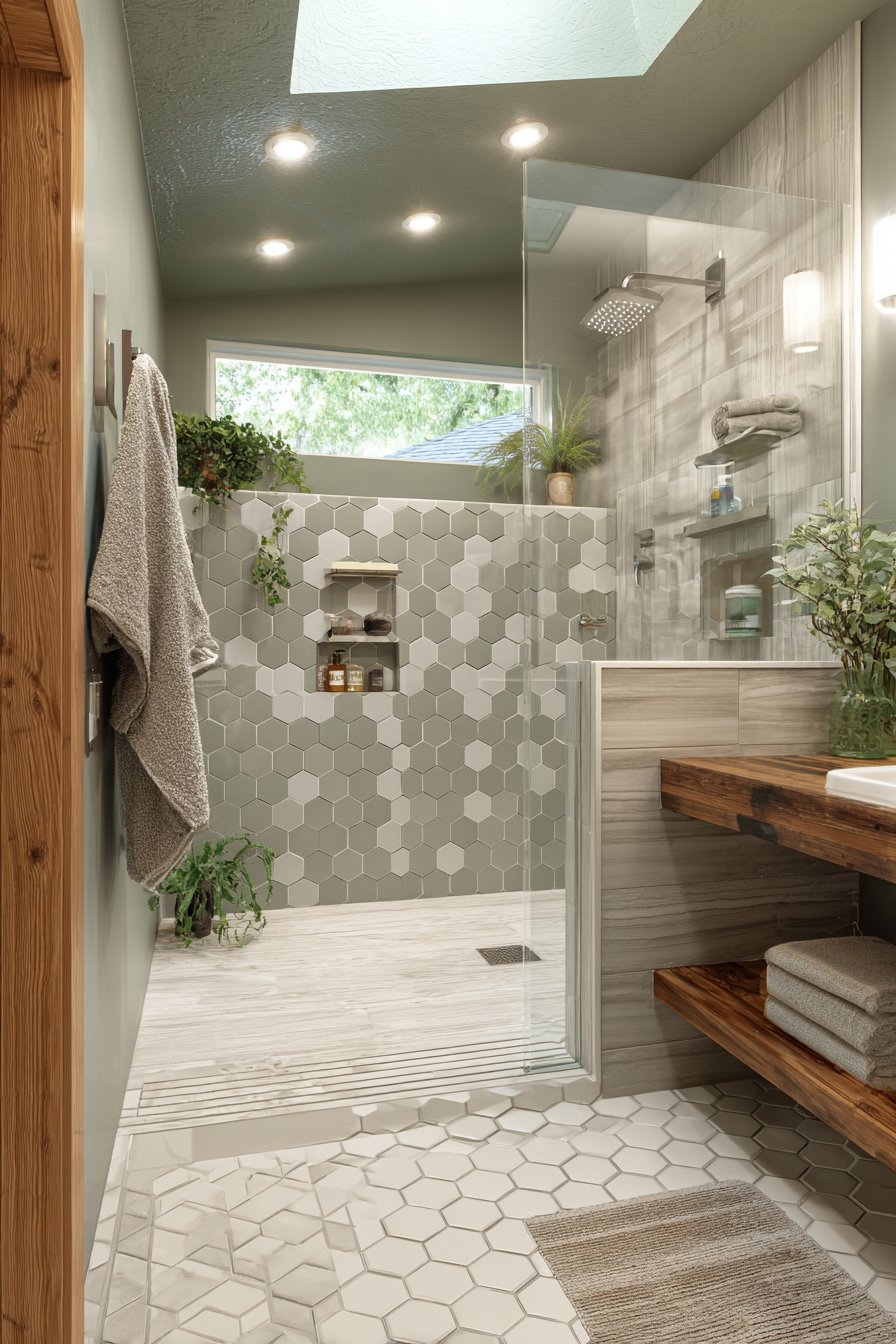
Built-in storage solutions almost always outperform after-market additions in tiny bathrooms, and recessed niches represent the pinnacle of this approach by providing storage without consuming any of the precious interior shower space. Multiple recessed compartments built into a tiled shower wall in a 4×5 foot bathroom create organized zones for shampoo, conditioner, soap, and other shower essentials. The niches feature tile detailing that matches the surrounding white subway tiles with grey grout, creating a cohesive look where the storage elements feel integrated rather than added as afterthoughts.
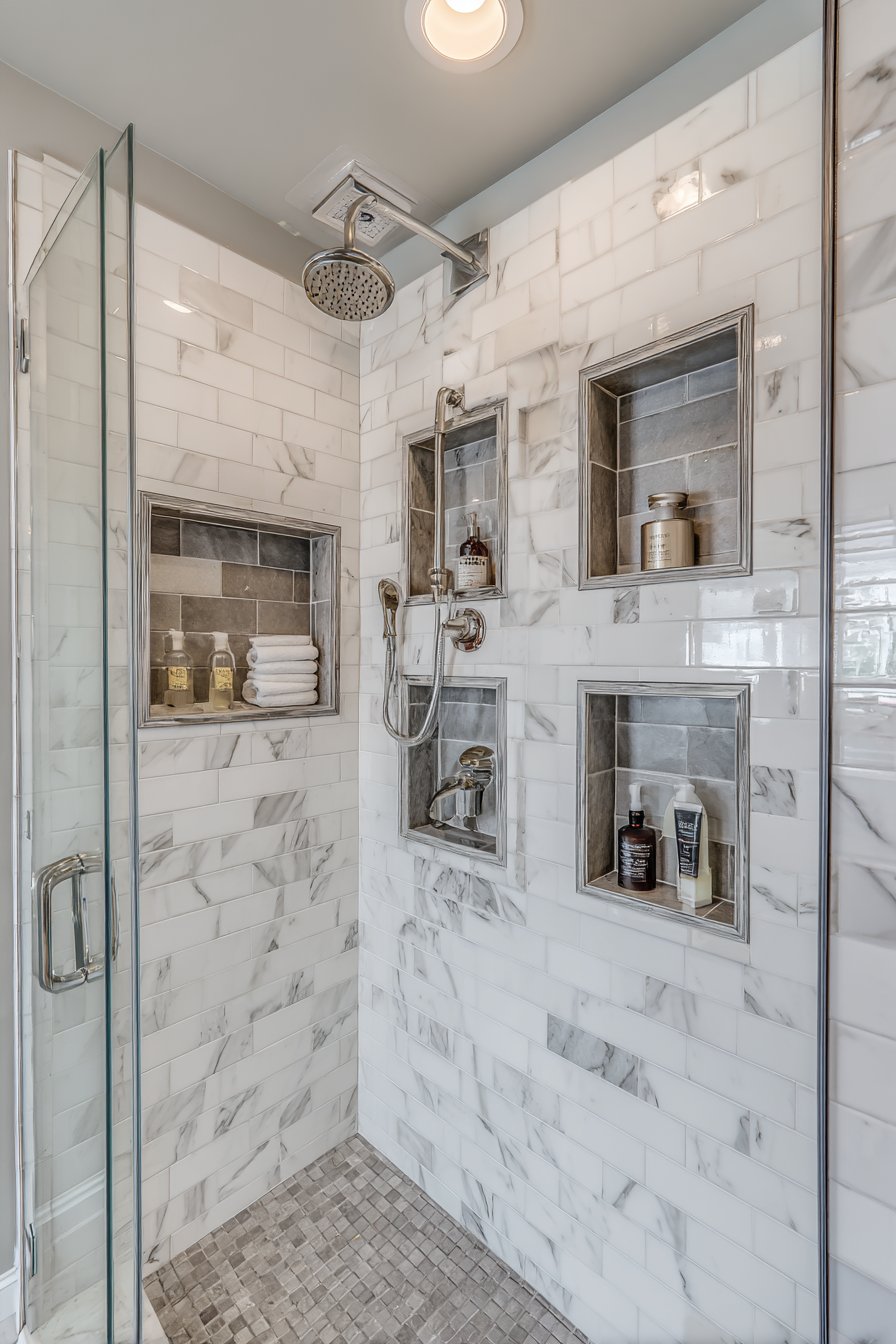
Chrome fixtures and a rain showerhead add modern functionality and luxury touches that elevate the tiny shower beyond purely utilitarian status. A frameless glass panel contains water without creating visual barriers that would make the small shower feel more confined. Recessed lighting highlights the storage niches, creating focal points that add visual interest while providing practical illumination for locating products during showering. Wide-angle interior design photography captures the integrated storage solution and sleek tile work with particular attention to material details and the seamless integration of niches into the overall wall surface.
The planning required for built-in niches during initial construction or renovation pays dividends in tiny showers where corner caddies, suction-cup shelves, and tension poles create clutter and visual chaos. By recessing storage into the wall depth, you eliminate protrusions that make small showers feel more cramped while creating architectural interest through the play of recessed and flush surfaces.

Key Design Tips:
- Plan niche placement during wall framing stage to avoid cutting through studs
- Position niches between studs (typically 16 inches apart) for easier installation
- Size niches appropriately for standard product bottles (typically 12-14 inches wide)
- Install multiple niches at varying heights for different users and product types
- Slope niche bottoms slightly toward the shower to encourage water drainage
- Use matching or contrasting tile to create visual interest in niche interiors
- Consider LED strip lighting in niche tops for dramatic effect and improved visibility
21. Slim Rolling Cart Flexibility
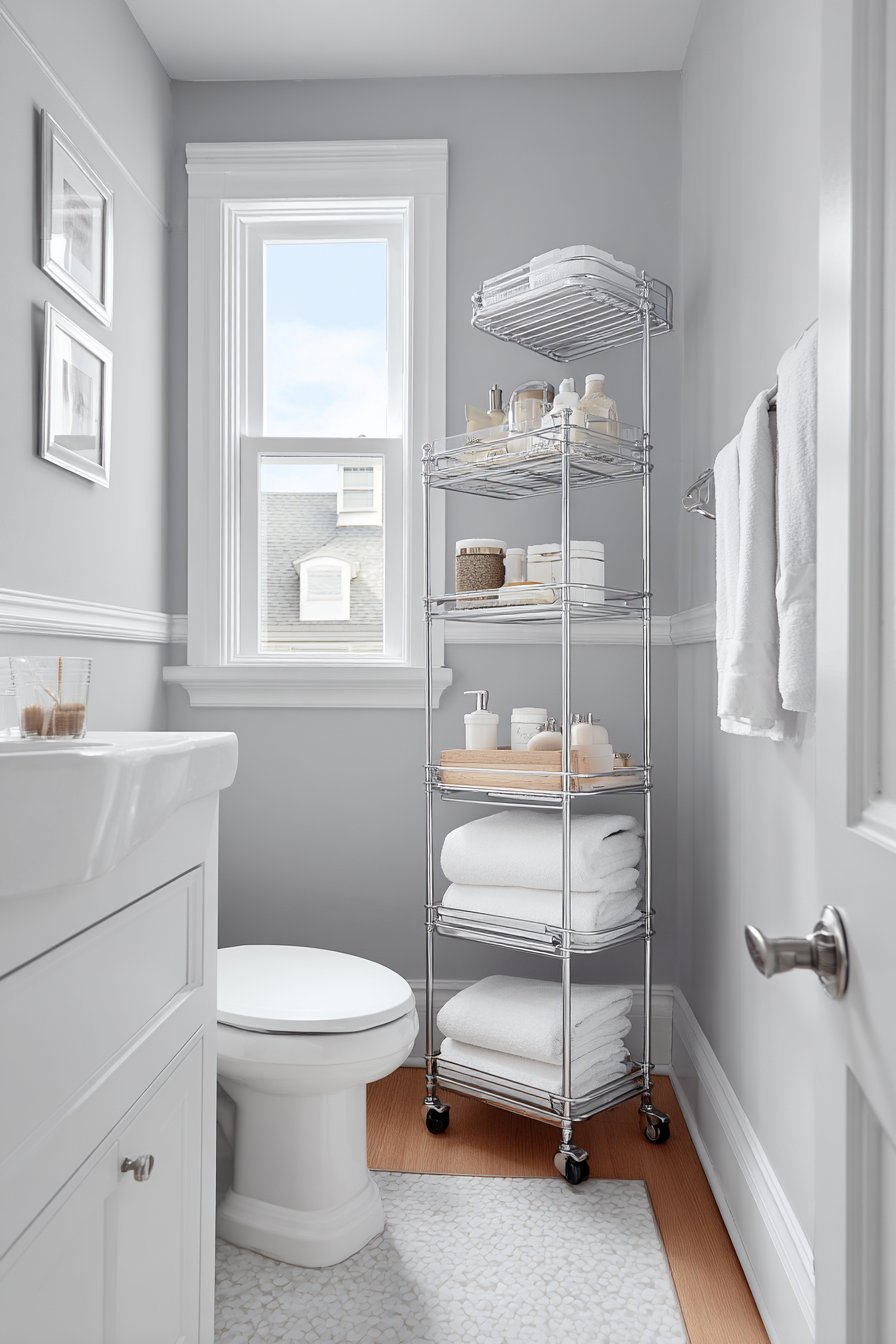
Fixed storage isn’t always the best solution in tiny bathrooms, particularly when spatial needs vary or when homeowners want the flexibility to reconfigure their space. A narrow rolling cart that slides between the toilet and vanity in a 3-foot-wide bathroom provides mobile storage that can be moved aside when not needed, offering flexibility that permanent built-in storage cannot match. The white metal cart holds toiletries, towels, and bathroom essentials on three tiers, maximizing vertical storage while maintaining a footprint slim enough to fit in spaces often left vacant.
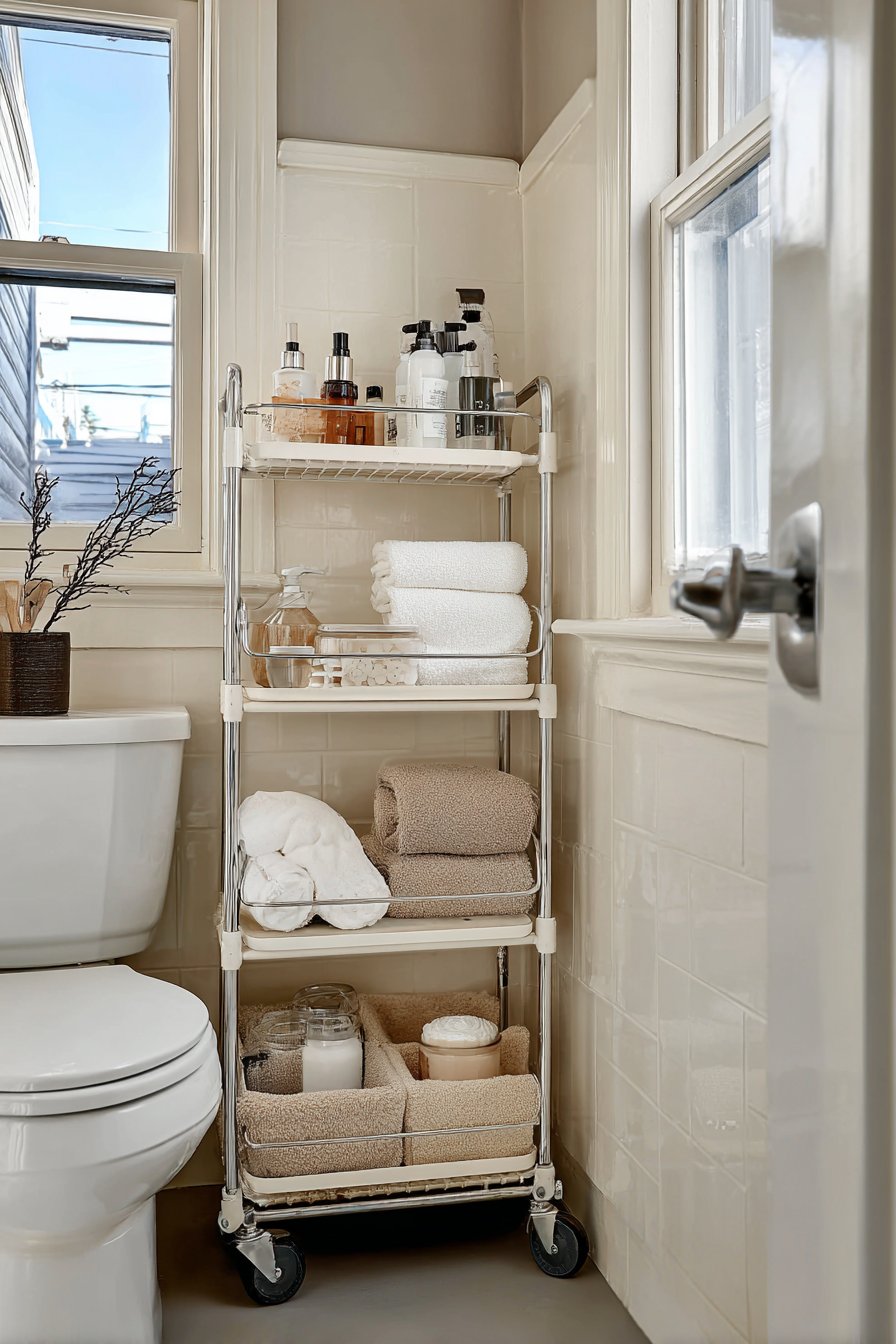
Light grey walls and white fixtures maintain a cohesive look that allows the cart to blend seamlessly rather than standing out as an obvious aftermarket addition. A small window provides natural light that supplements any artificial illumination, creating the bright, airy quality essential in tight bathrooms. Interior photography shows the practical slim-profile storage solution and how it efficiently fills the narrow gap between fixtures, demonstrating that not all bathroom storage needs to be permanently installed to be effective.
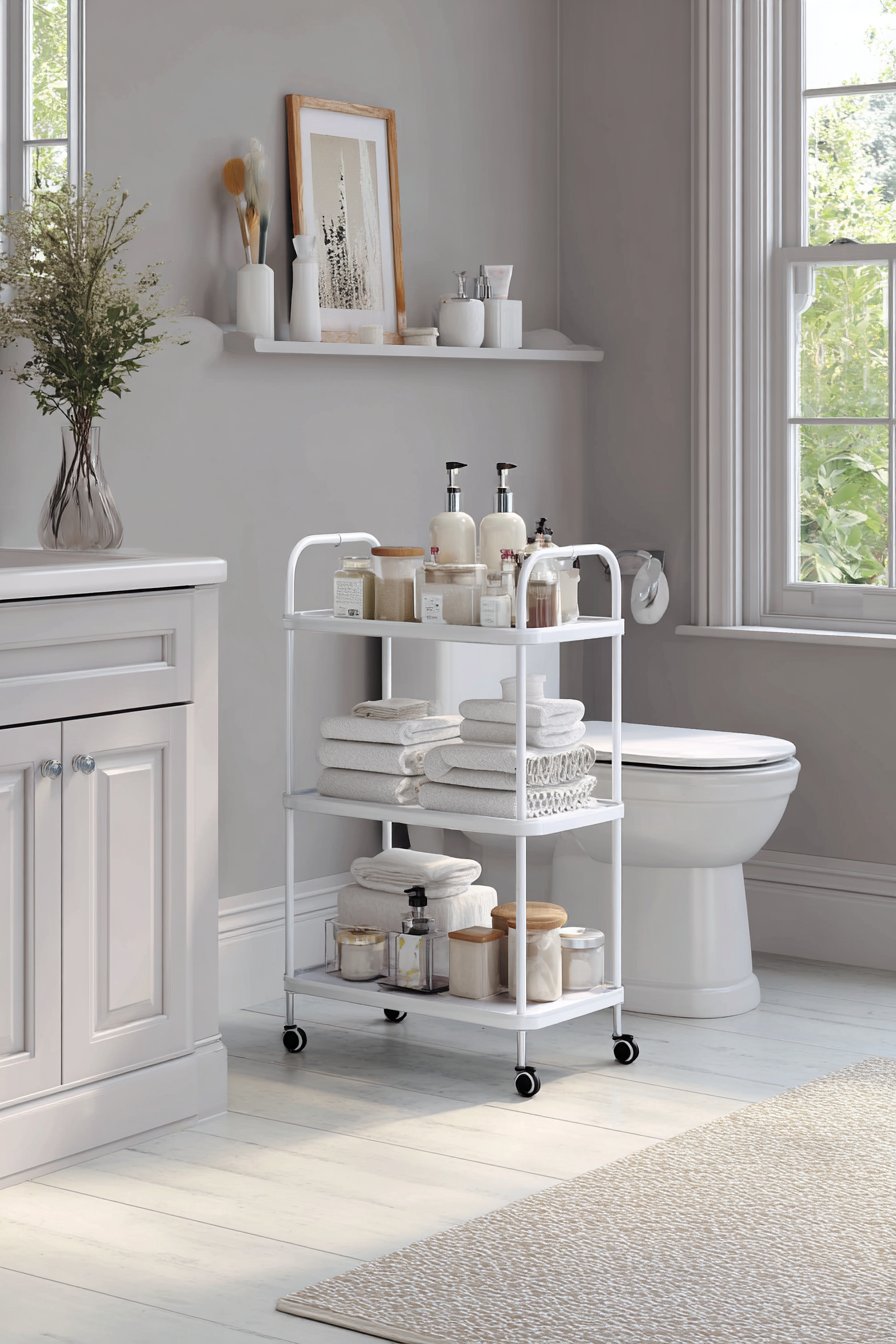
The mobility of rolling carts offers particular advantages in rental situations or for homeowners who prefer design flexibility over permanence. The cart can be rolled out for cleaning, moved aside when hosting guests, or even relocated to a different bathroom if spatial needs change. This adaptability represents a different philosophy than built-in solutions, trading seamless integration for functional flexibility.

Key Design Tips:
- Measure the gap between fixtures carefully to ensure the cart will fit with clearance
- Choose carts with locking wheels if the bathroom floor is sloped or uneven
- Select rust-resistant materials like coated metal or plastic for bathroom humidity
- Organize cart contents in baskets or bins to prevent items from falling during movement
- Consider cart height relative to adjacent fixtures for visual cohesion
- Clean wheels regularly to prevent dirt accumulation and maintain smooth rolling
- Choose light-colored carts that match bathroom fixtures to minimize visual disruption
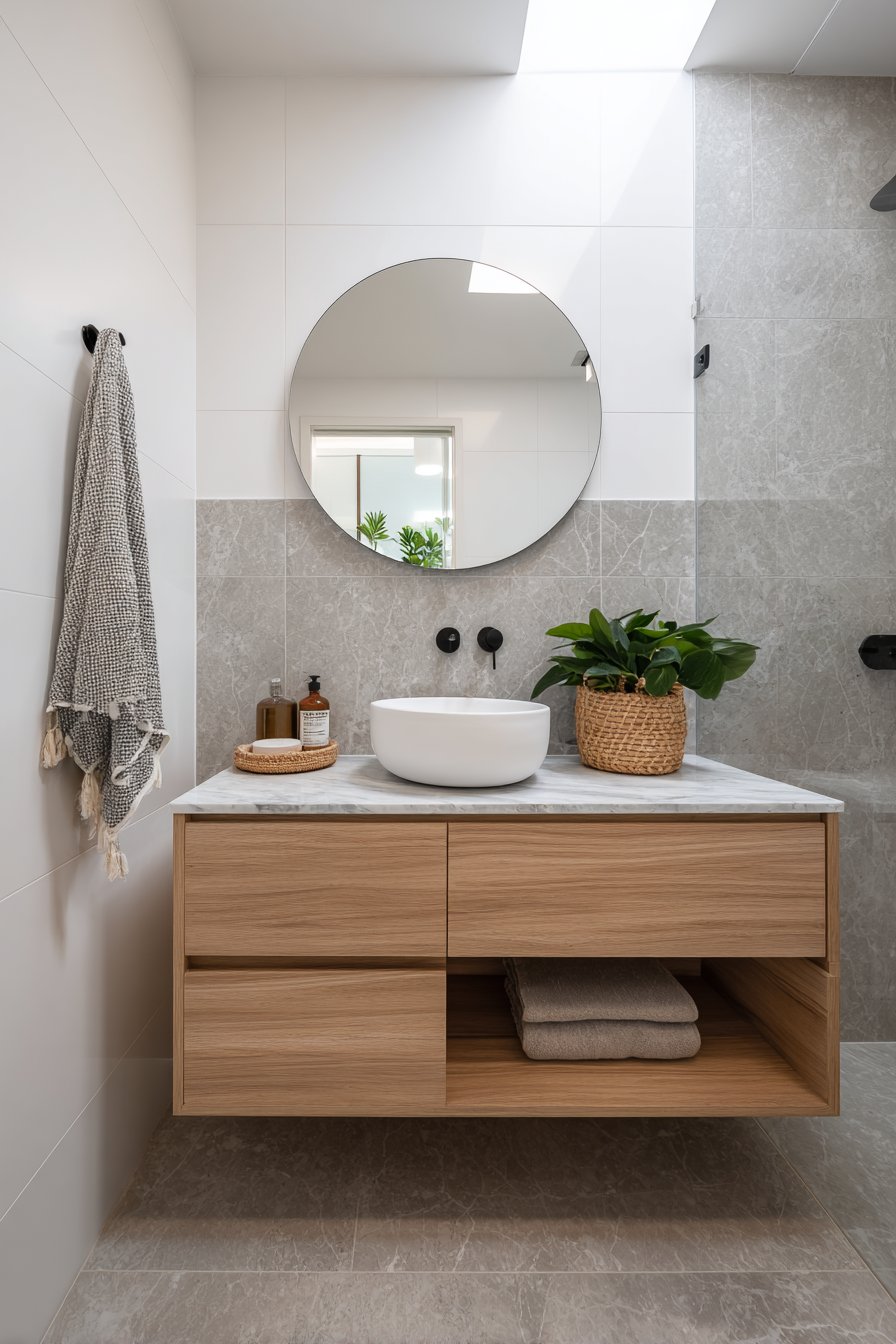
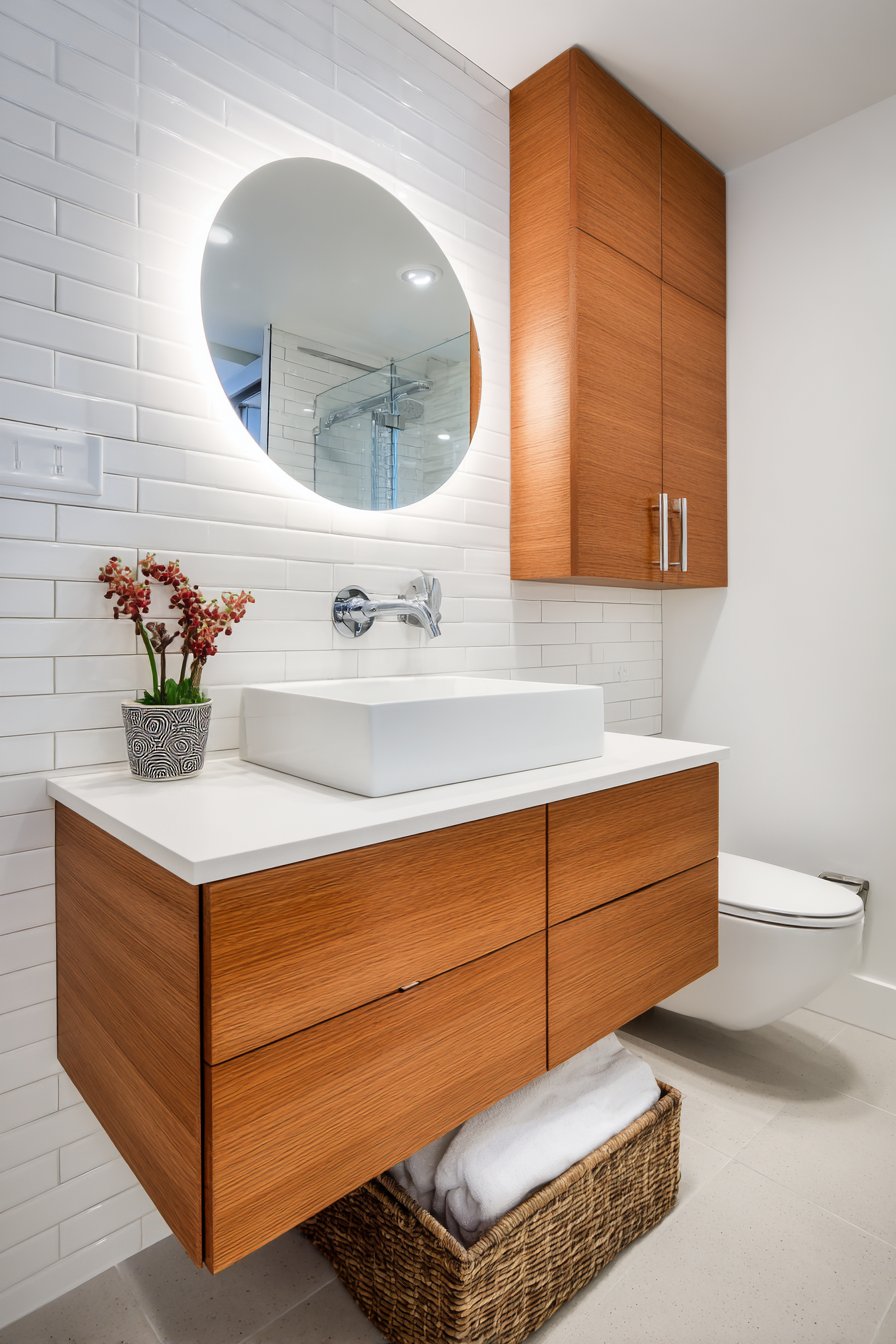
22. Wall-Mounted Faucet Elegance
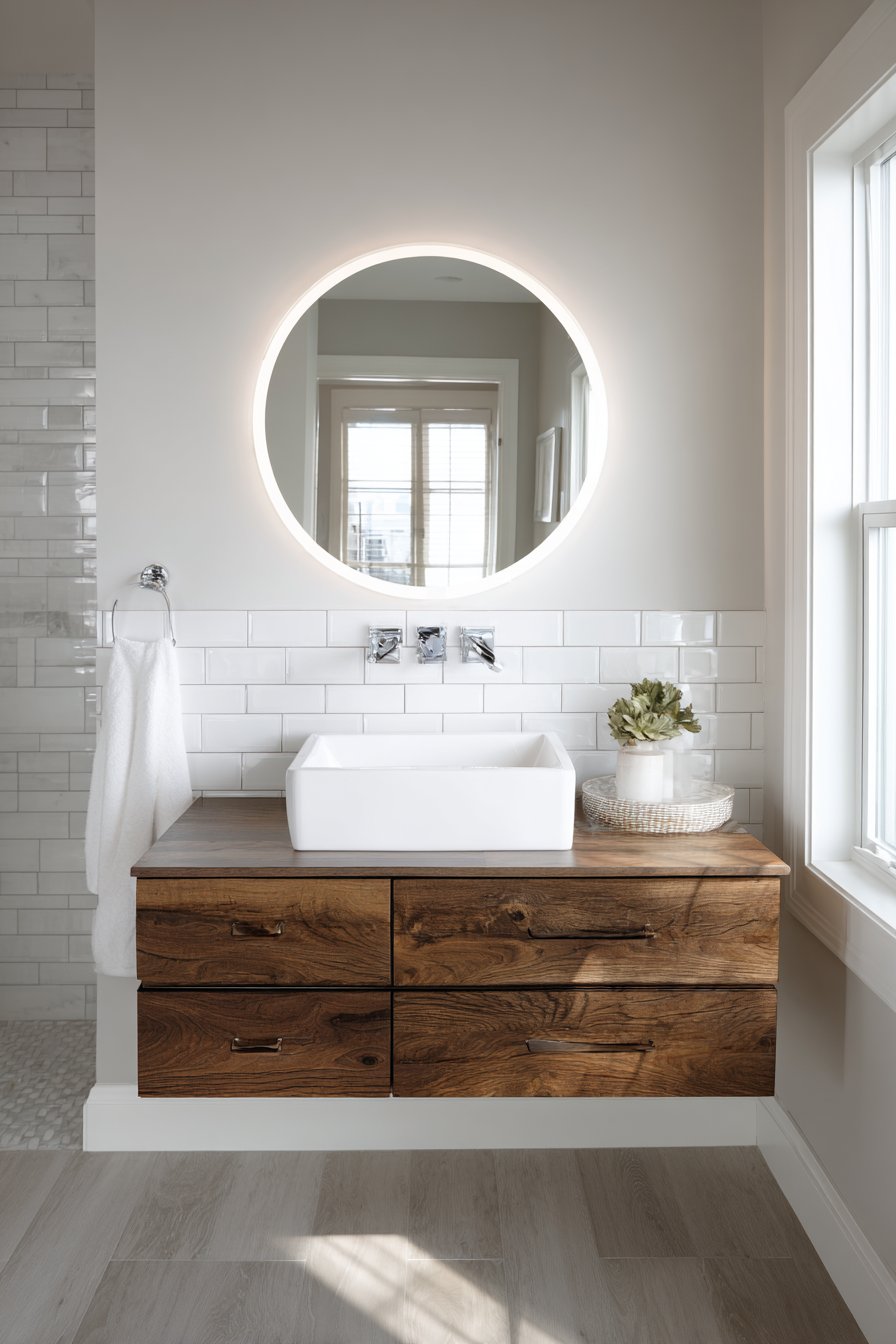
Counter space represents precious real estate in tiny bathrooms, making any strategy that reclaims even a few square inches worthwhile consideration. A wall-mounted faucet eliminates deck-mounted hardware and all the counter space required for installation, creating a clean countertop that’s easier to clean and provides more usable surface area in a 36-square-foot powder room. The chrome faucet extends from a white subway-tiled wall above a small rectangular vessel sink on a floating wood-tone vanity, creating visual separation between the water source and the basin that adds architectural interest.
A round mirror with integrated LED lighting hangs above the sink, providing task illumination without requiring separate light fixtures that would consume wall space or create visual clutter. Natural textures in the wood grain add warmth that prevents the small space from feeling cold or institutional, an important consideration in bathrooms dominated by hard, smooth surfaces. Soft natural lighting creates subtle highlights that emphasize the fixtures and materials, adding dimension and depth to what could otherwise feel like a flat, cramped space.
Professional interior photography emphasizes the wall-mount fixture and clean countertop enabled by this design choice, showing how eliminating deck-mounted hardware fundamentally changes the appearance and functionality of compact vanities. The installation process for wall-mounted faucets requires more planning than standard deck-mounted models, as water supply lines must be positioned within the wall at appropriate heights, but the aesthetic and practical benefits justify this additional complexity in tiny bathrooms where every design decision matters.
Key Design Tips:
- Plan for wall-mounted faucets during construction or renovation when plumbing is accessible
- Ensure water supply lines are positioned at appropriate heights for the chosen faucet
- Consider faucet reach relative to sink size to ensure water falls properly into the basin
- Choose quality wall-mounted fixtures as repairs are more complex than deck-mounted models
- Install proper backing in walls to support faucet weight and user interaction
- Coordinate faucet finish with other bathroom fixtures for cohesive appearance
- Test water pressure and flow before finishing walls to ensure proper operation
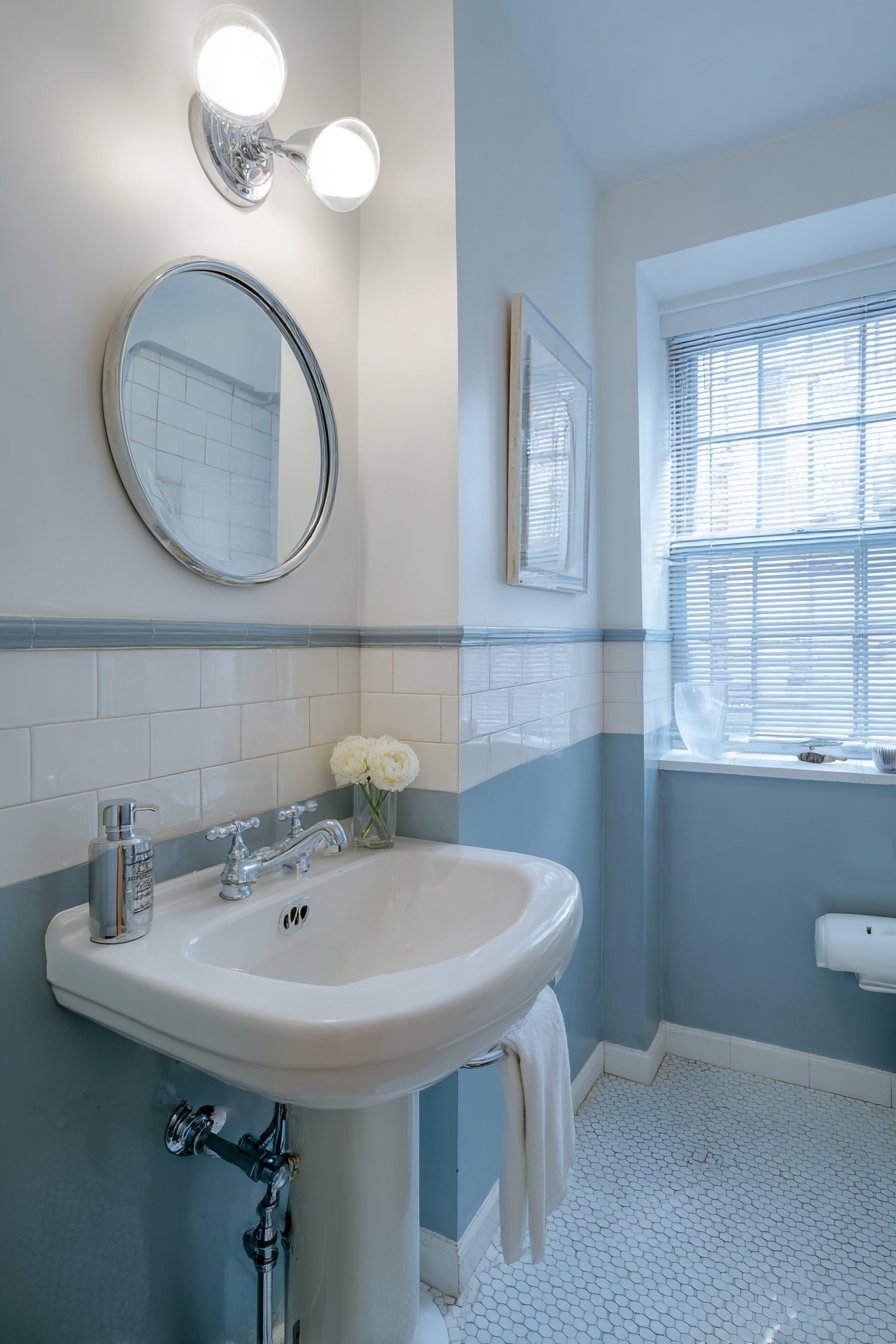
23. Light Color Palette Psychology

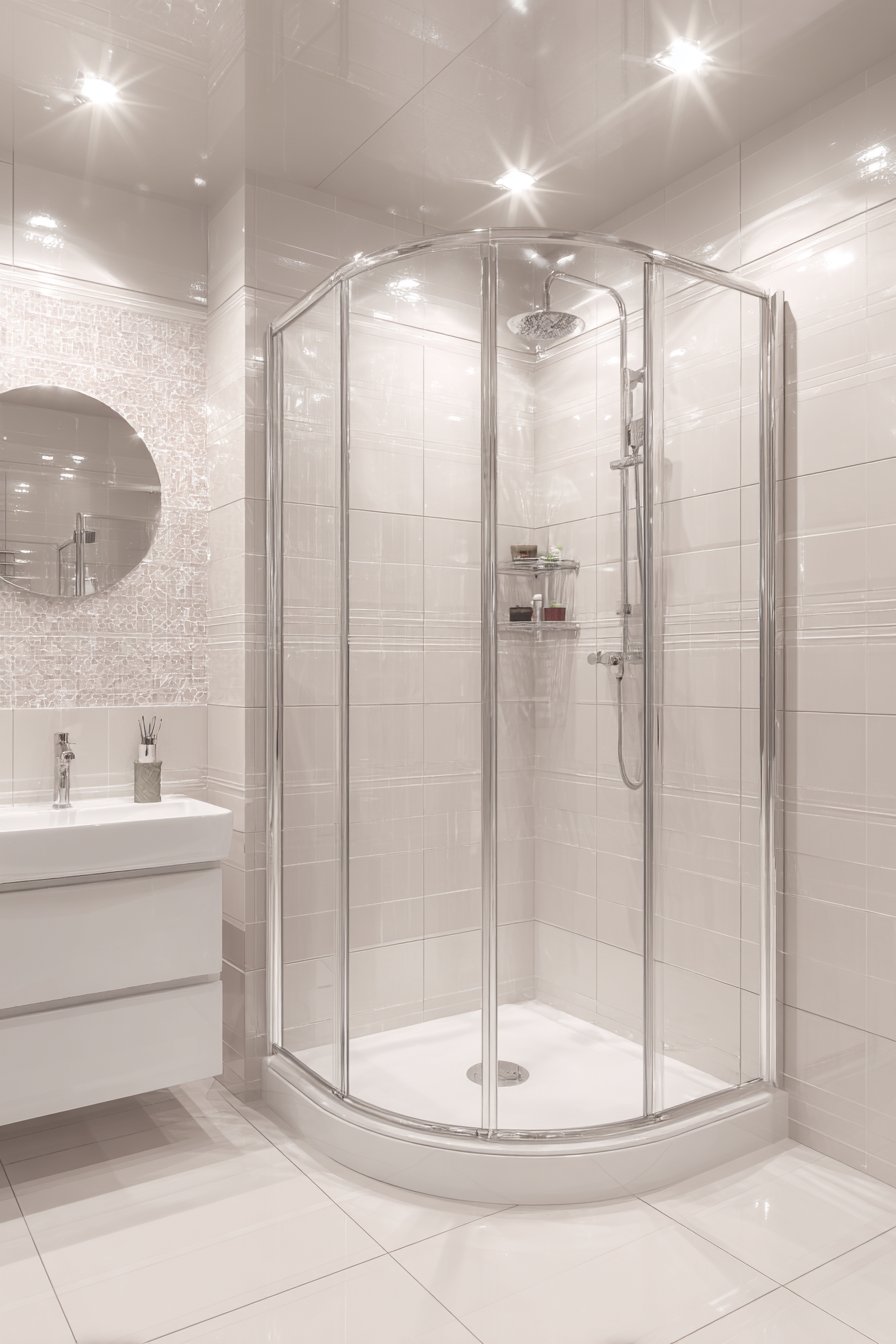
The psychological and practical impacts of color selection in tiny bathrooms cannot be overstated, with light palettes consistently proving most effective at maximizing perceived space. Pale blue-grey walls combined with white fixtures create an airy, spa-like quality in a 38-square-foot bathroom, the soft color adding visual interest without the darkness that would make the compact space feel more confined. A compact corner sink, wall-hung toilet, and small shower stall with clear glass efficiently use every square foot of the limited footprint.
White subway tiles reflect available light throughout the space, their traditional pattern adding subtle texture without busy visual complexity. A single floating shelf provides minimal storage without the bulk of traditional cabinetry, maintaining the open, uncluttered aesthetic essential in tiny bathrooms. Natural light through a small window enhances the airy feeling created by the light color palette, supplementing artificial lighting to create bright, inviting conditions throughout the day.

Interior design photography captures the color strategy and how the light palette expands the sense of space, demonstrating the measurable difference that color selection makes in spatial perception. The pale blue-grey shade chosen strikes a careful balance—light enough to maintain spaciousness but saturated enough to add character and prevent the sterile quality of pure white. This color psychology extends beyond mere aesthetics, influencing how comfortable and relaxed users feel in the space.
Key Design Tips:
- Choose colors with high light reflectance values (LRV) to maximize brightness
- Test paint samples in the actual bathroom lighting conditions before committing
- Consider how tile and fixture colors interact with wall colors for overall cohesion
- Use slightly warmer whites and off-whites to prevent cold, institutional feeling
- Add subtle color through walls while keeping fixtures predominantly white for brightness
- Limit the number of colors to 2-3 maximum to prevent visual fragmentation
- Consider how natural light changes throughout the day and affects color appearance
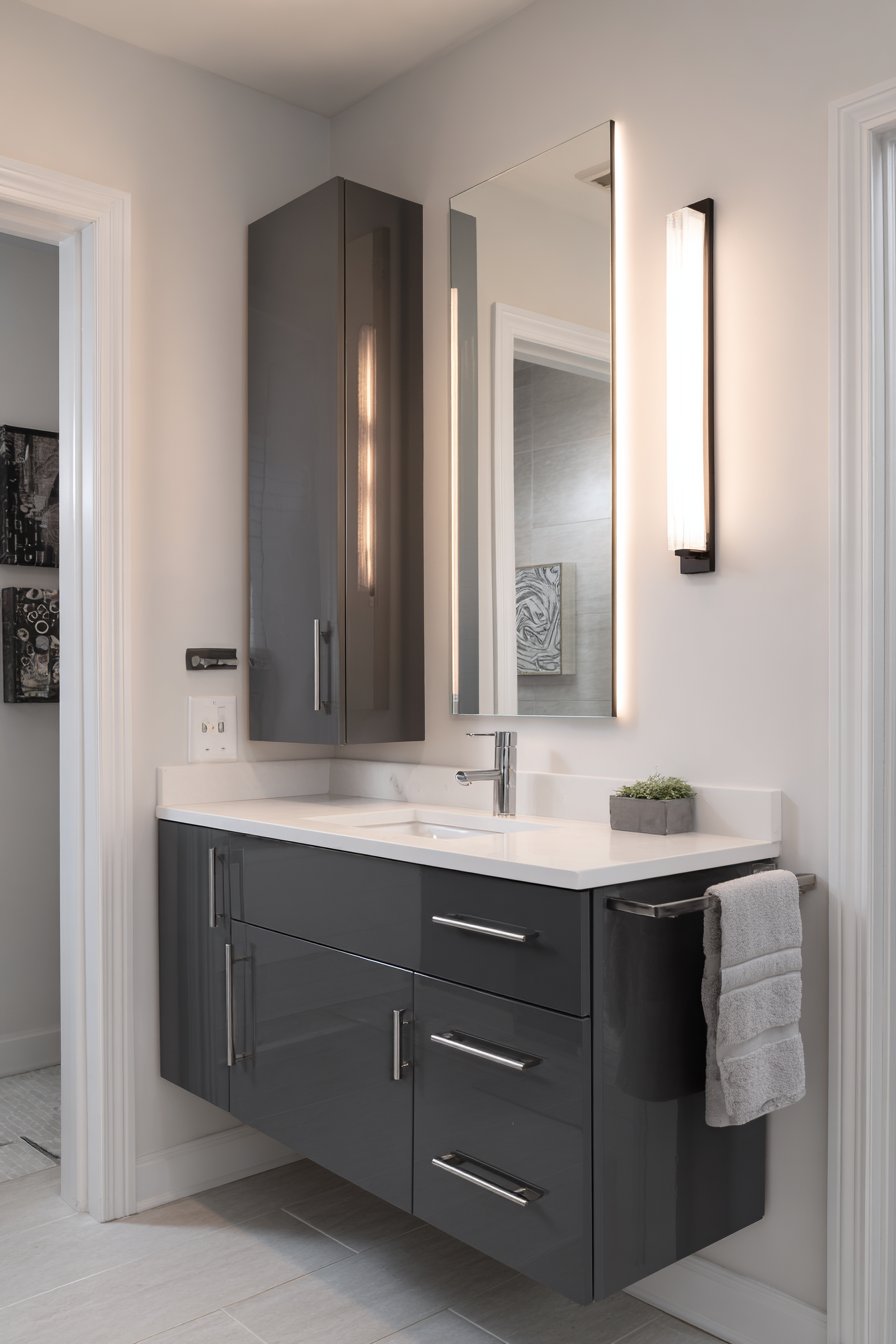
24. Shallow Medicine Cabinet
The difference between 4-inch and 6-inch cabinet depths might seem minimal, but in narrow bathrooms this measurement can determine whether users feel comfortable or constantly brush against protruding fixtures. A combination mirror-cabinet with shallow depth provides concealed storage without significantly protruding into a narrow bathroom, offering a compromise between the storage capacity of traditional medicine cabinets and the flush profile of standard mirrors. The mirrored front maintains visual openness while hiding toiletries and medicines, contributing to the uncluttered appearance essential in tiny bathrooms.
Below the medicine cabinet, a 22-inch white floating vanity with grey countertop completes the space, its compact dimensions carefully chosen to provide functionality without overwhelming the narrow room. Brushed nickel fixtures add subtle elegance without the visual weight of darker finishes like oil-rubbed bronze that can make small spaces feel more enclosed. LED lighting above creates even illumination across the mirror surface, providing adequate light for grooming while consuming minimal space compared to sconce fixtures that would protrude from either side.
Wide-angle interior photography shows the slim-profile storage and reflective surfaces that enhance spaciousness, demonstrating how shallow-depth cabinets can provide surprising storage capacity while maintaining the open feeling crucial in narrow bathrooms. The mirror front serves triple duty—reflecting light, creating depth, and concealing storage—making it one of the most efficient elements in space-challenged bathrooms.
Key Design Tips:
- Choose medicine cabinets with maximum 4-inch depth for truly narrow bathrooms
- Ensure interior cabinet organization maximizes the limited depth with adjustable shelves
- Select mirrored fronts to maintain the reflective surface you’d have with standard mirrors
- Install at appropriate height (typically centered 60-70 inches from floor)
- Consider surface-mounted shallow cabinets if wall depth doesn’t accommodate recessing
- Choose soft-close hinges to prevent slamming in small spaces where sound carries
- Organize cabinet contents regularly to maximize limited storage capacity
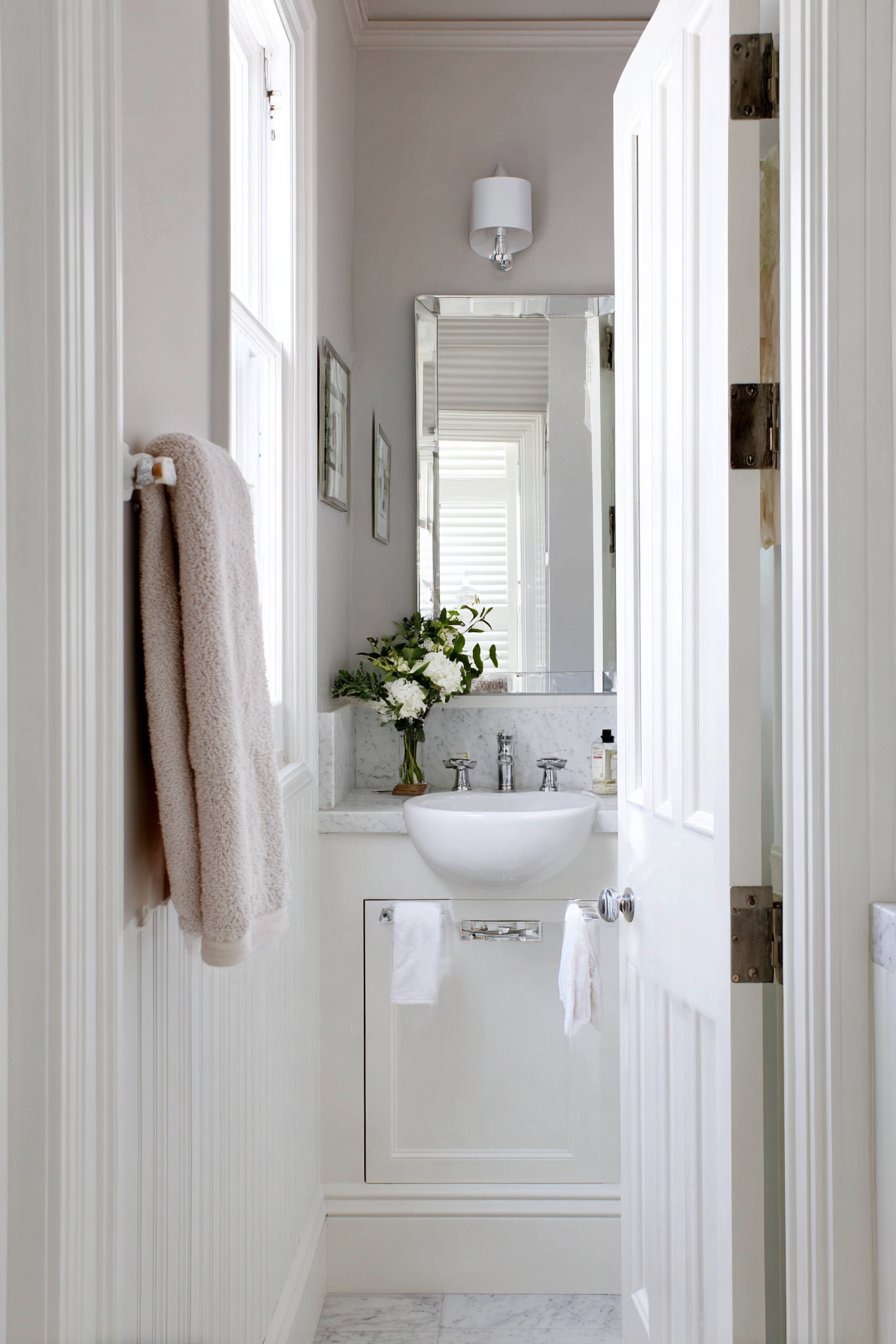
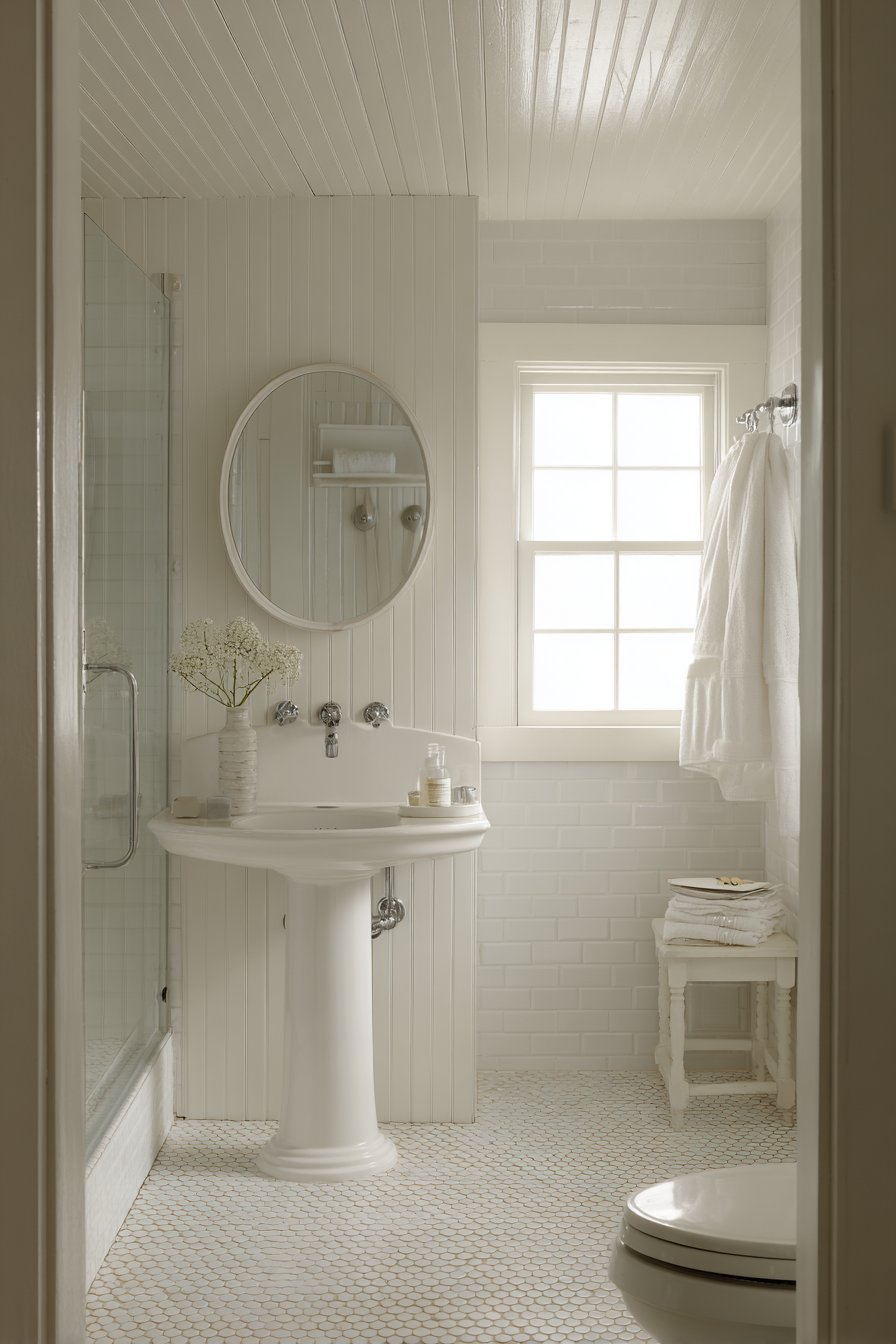
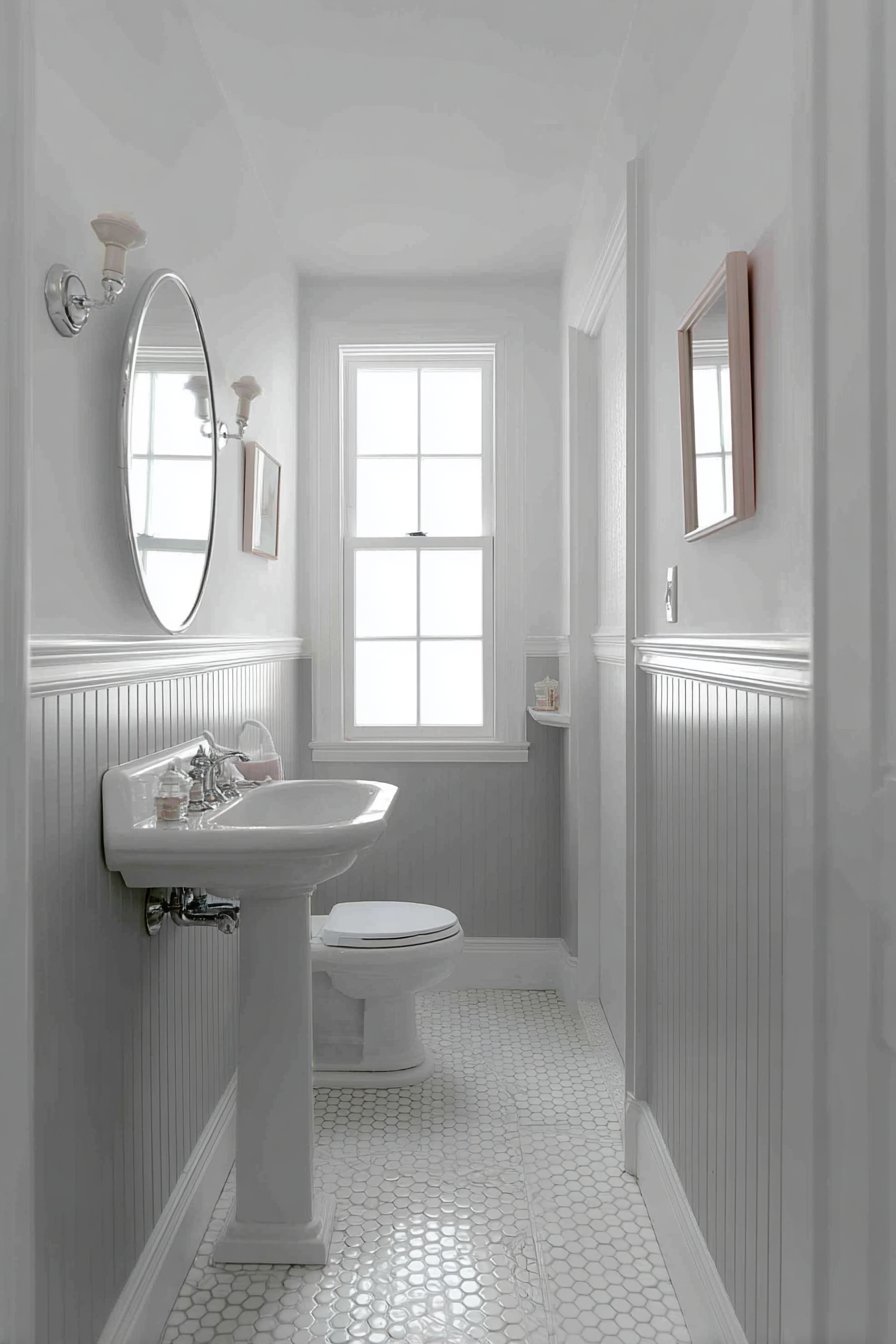
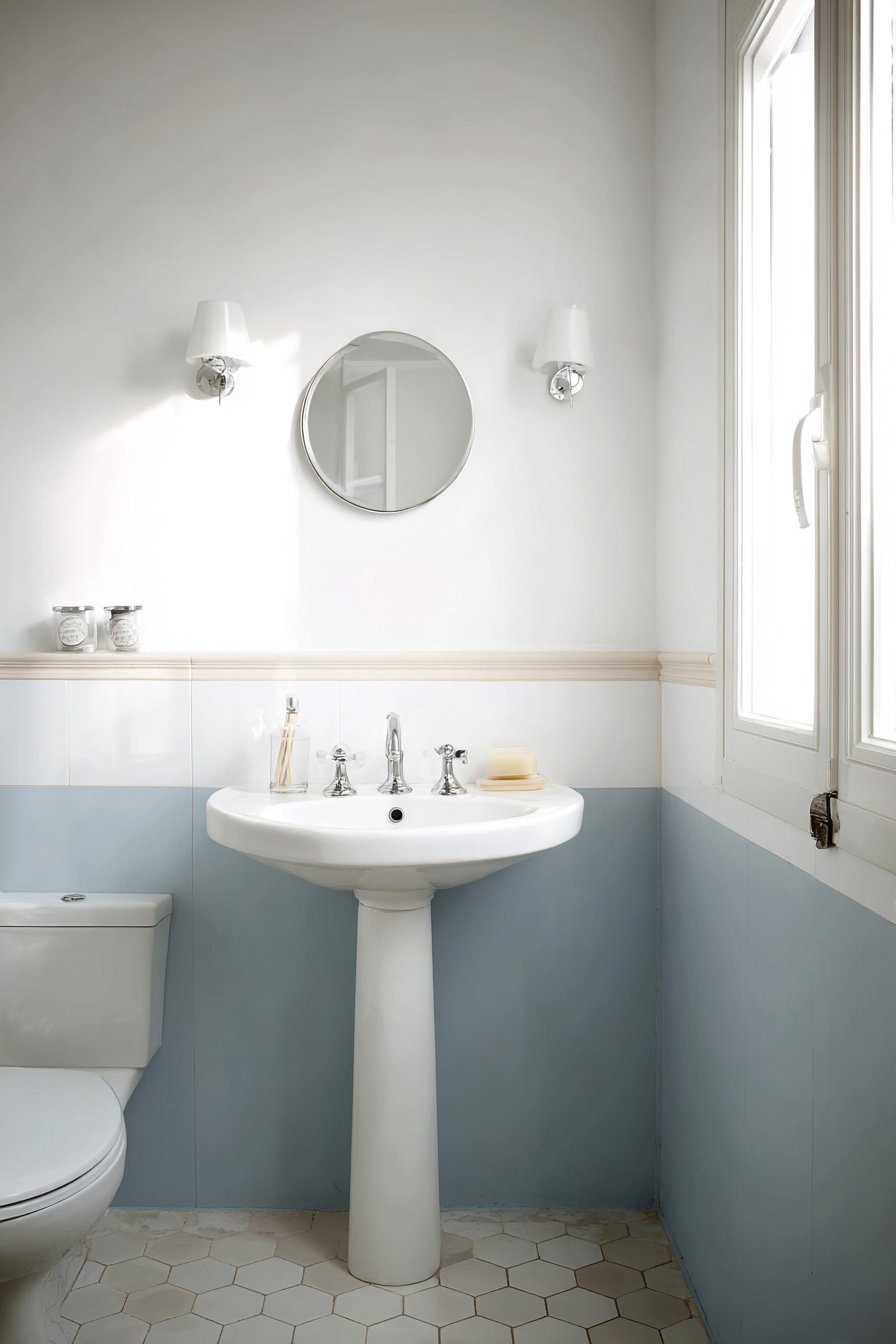
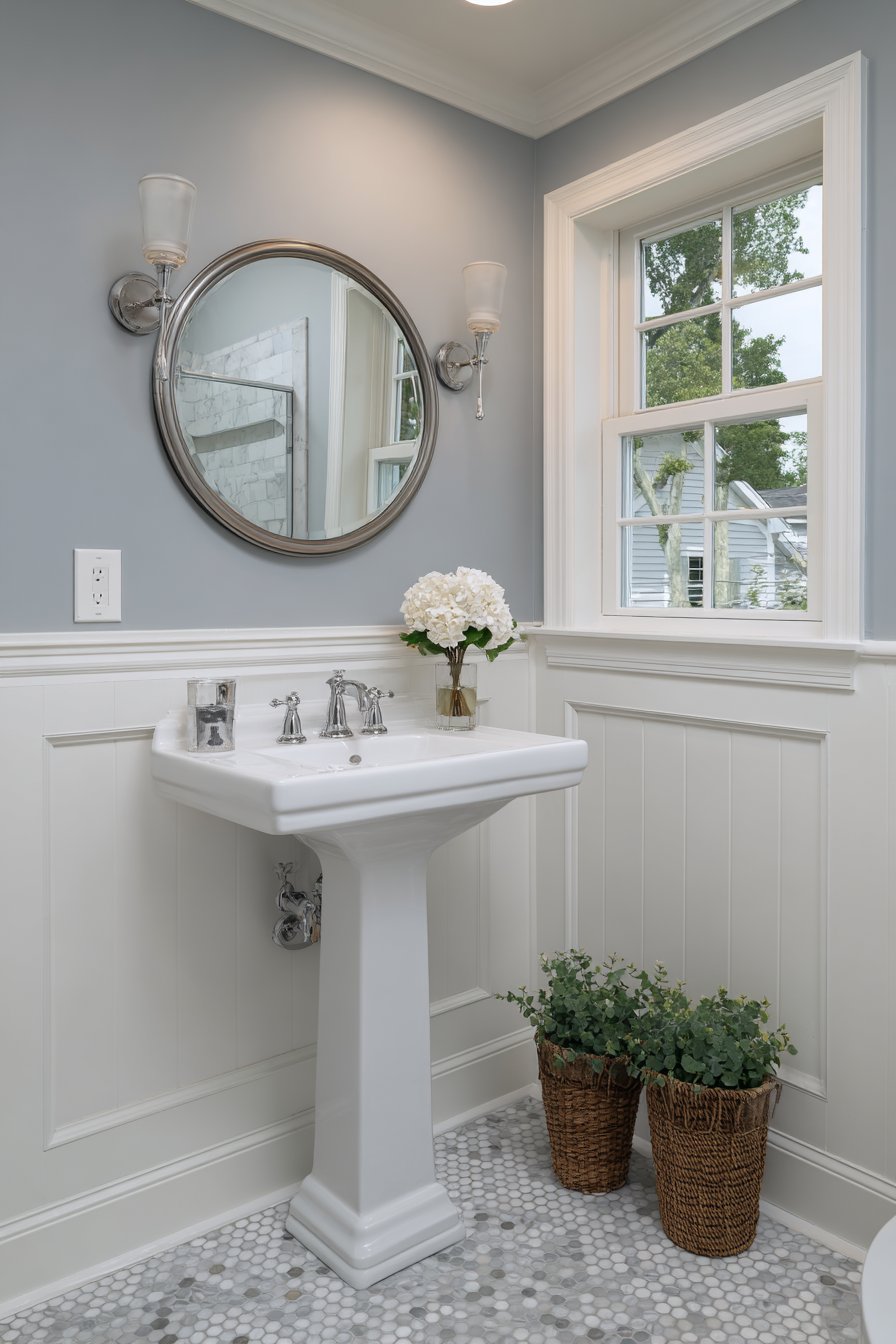
25. Pedestal Sink Classic Appeal
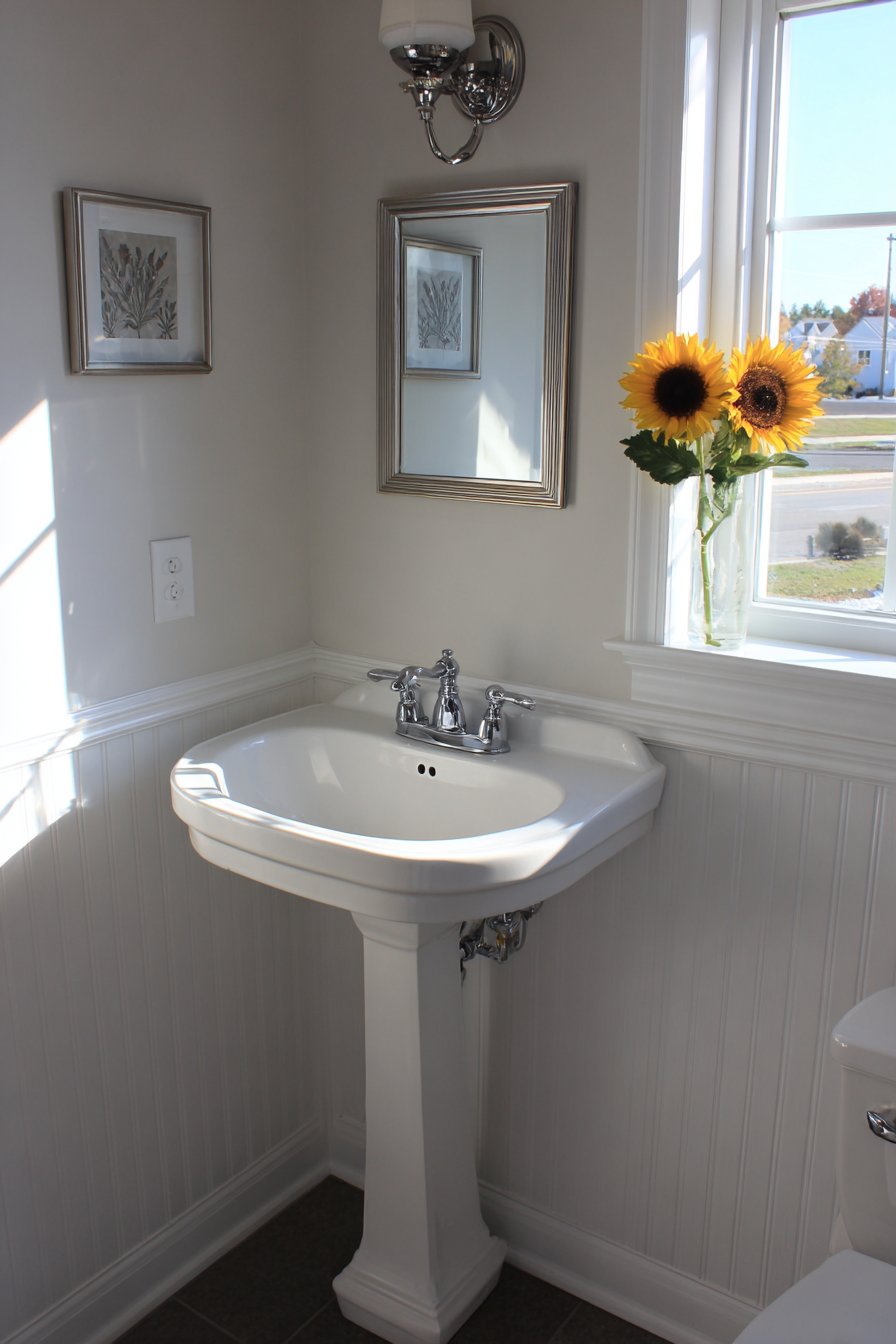
Sometimes the most traditional solutions remain among the most effective, and pedestal sinks exemplify this principle in tiny bathroom design. A classic white porcelain sink with integrated towel bar maximizes function in minimal footprint within a 35-square-foot powder room, the pedestal base supporting the basin while occupying far less space than any vanity cabinet would require. The chrome fixtures complement the white porcelain, their matching finish creating cohesion without adding visual weight through color contrast.
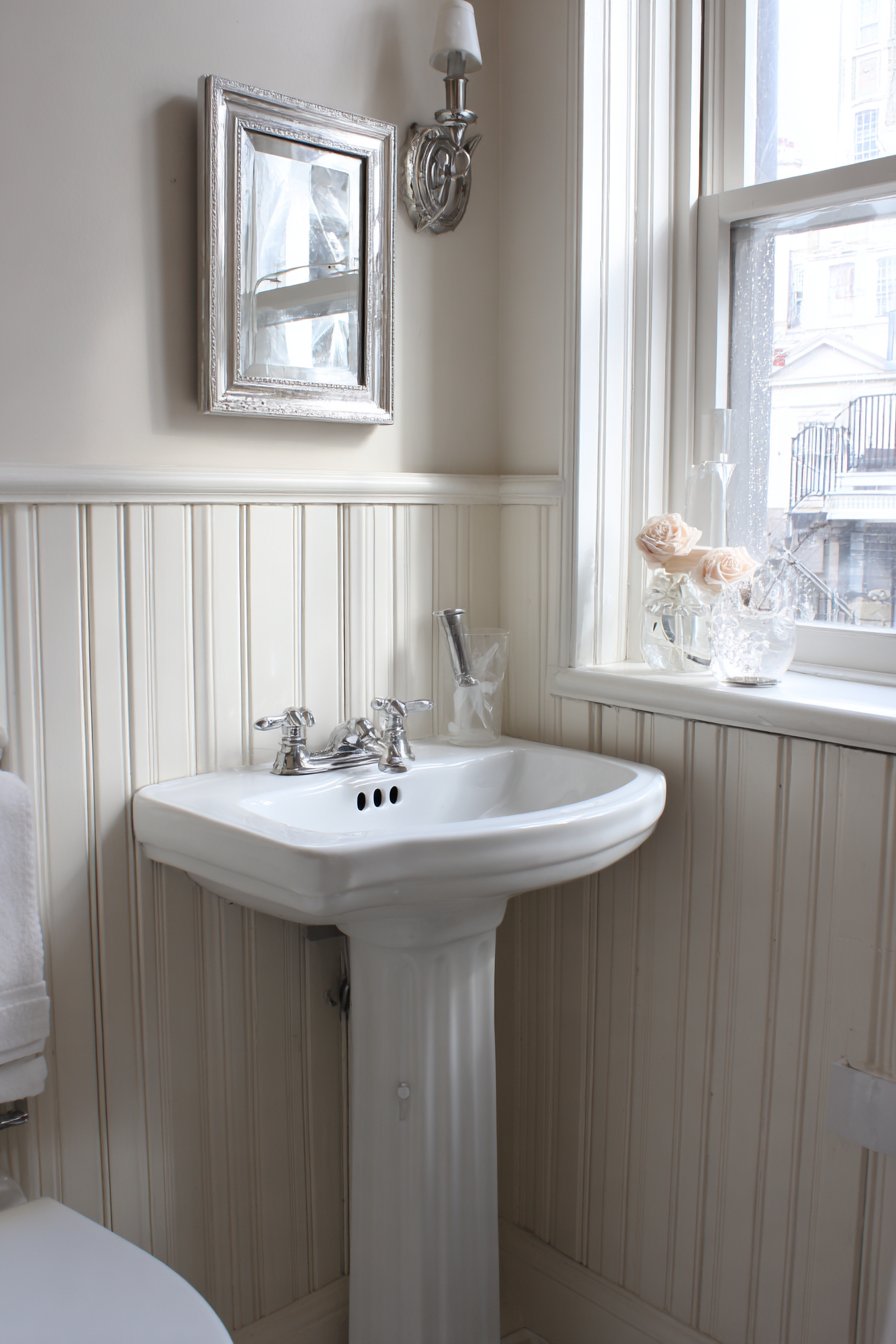
Beadboard wainscoting in white adds texture to the lower walls while pale grey paint above keeps brightness, the two-tone approach creating visual interest without overwhelming the compact space. A small framed mirror hangs above the sink, its modest size appropriately scaled to the petite pedestal sink rather than overwhelming it with excessive mirror area. Natural window light supplements a vintage-style sconce, creating layered illumination that can be adjusted based on time of day and activity from quick hand-washing to detailed makeup application.
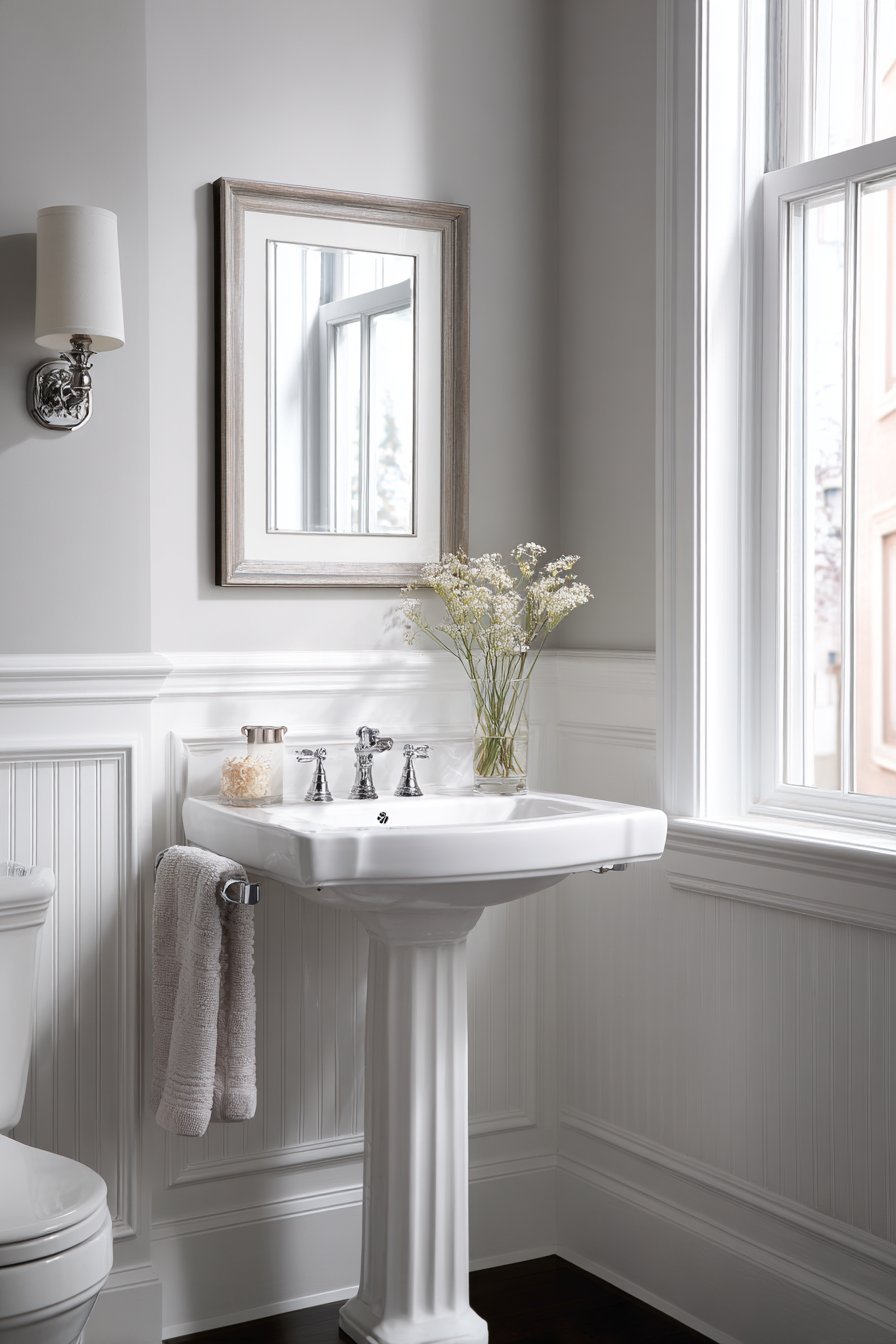
Interior photography captures the space-efficient sink design and cottage-inspired details with soft natural lighting, showing how pedestal sinks can feel elegant and intentional rather than merely economical. The integrated towel bar represents thoughtful design that adds functionality without requiring separate hardware installation, maximizing utility while minimizing visual clutter in the small space.
Key Design Tips:
- Choose pedestal sinks with appropriate bowl size for the users’ needs
- Consider models with integrated towel bars for improved functionality
- Ensure proper wall support for wall-hung portions of pedestal sinks
- Install adequate storage elsewhere in the bathroom as pedestals offer no cabinet space
- Choose classic white porcelain for timeless appeal that works with diverse styles
- Position plumbing lines carefully as the pedestal doesn’t conceal them like vanities do
- Clean regularly around the pedestal base where dust and hair can accumulate
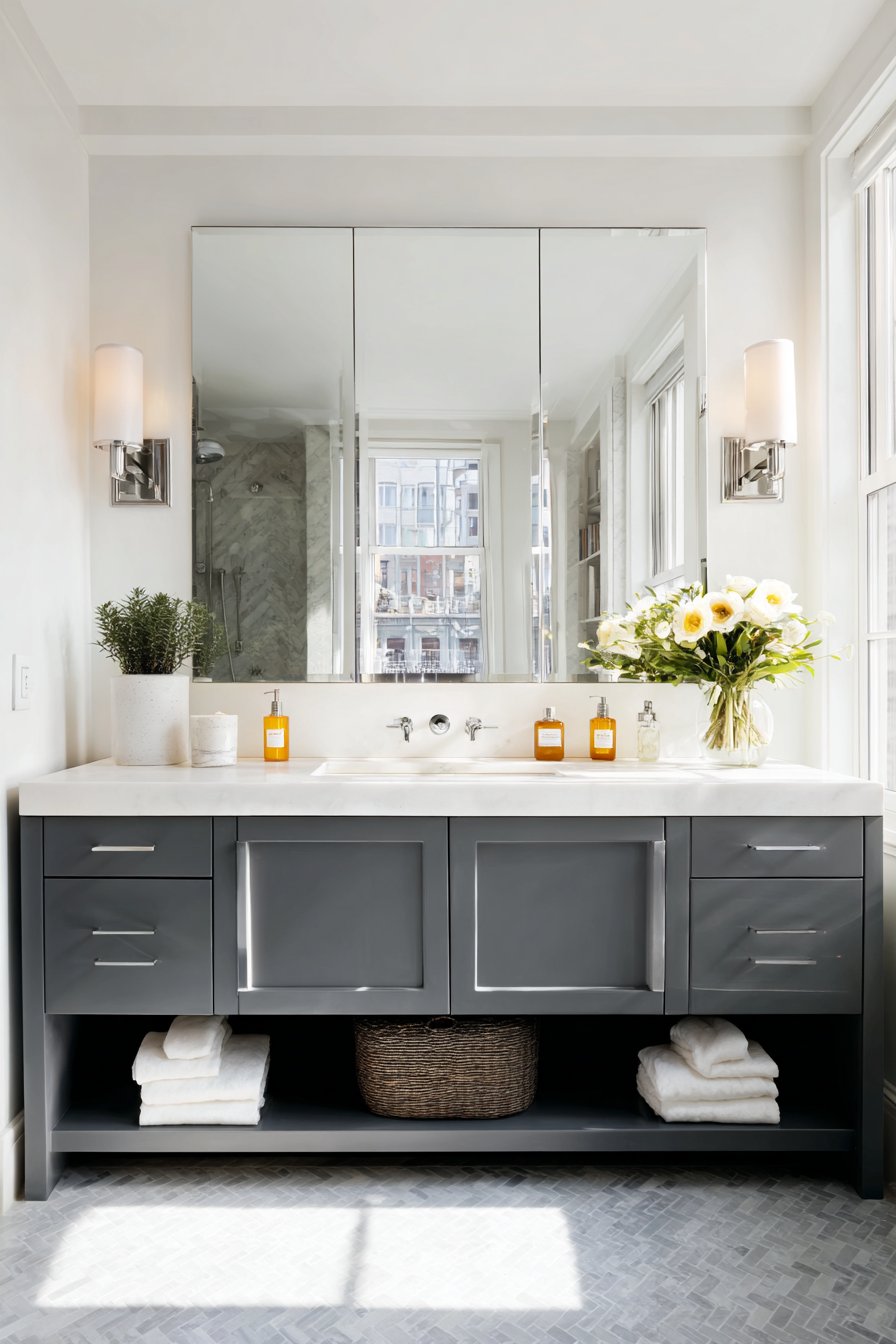
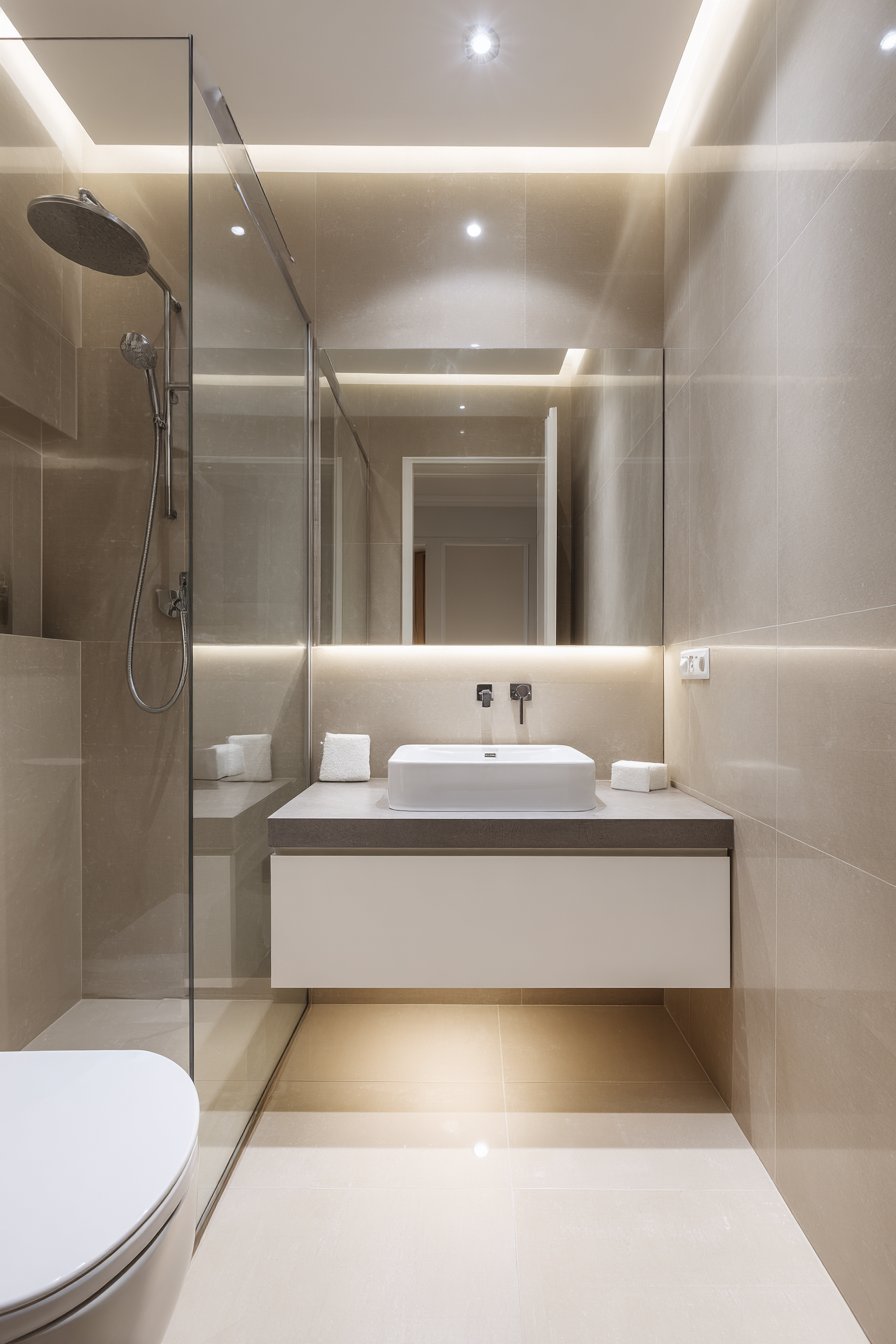
26. Layered Lighting Strategy
Single-source lighting rarely provides adequate illumination in bathrooms, and this limitation becomes more pronounced in tiny spaces where shadows can make already-small rooms feel darker and more cramped. A combination of recessed ceiling lights, a backlit mirror, and under-vanity LED strips creates layered illumination that enhances depth and dimension in a 42-square-foot bathroom. White walls and light grey tiles reflect the multiple light sources, bouncing illumination throughout the space to eliminate dark corners and create even brightness.
A floating white vanity with undermount sink and glass shower enclosure maintain the open feeling that allows the lighting to work most effectively—dark surfaces or visual barriers would absorb light rather than reflecting it throughout the space. Natural light from a frosted window supplements the three artificial sources, creating adaptable illumination levels that work from early morning grooming to relaxing evening baths. Professional interior photography shows how multiple light sources create depth and make the tiny space feel more expansive, demonstrating that lighting strategy deserves as much attention as fixture selection or color choice.
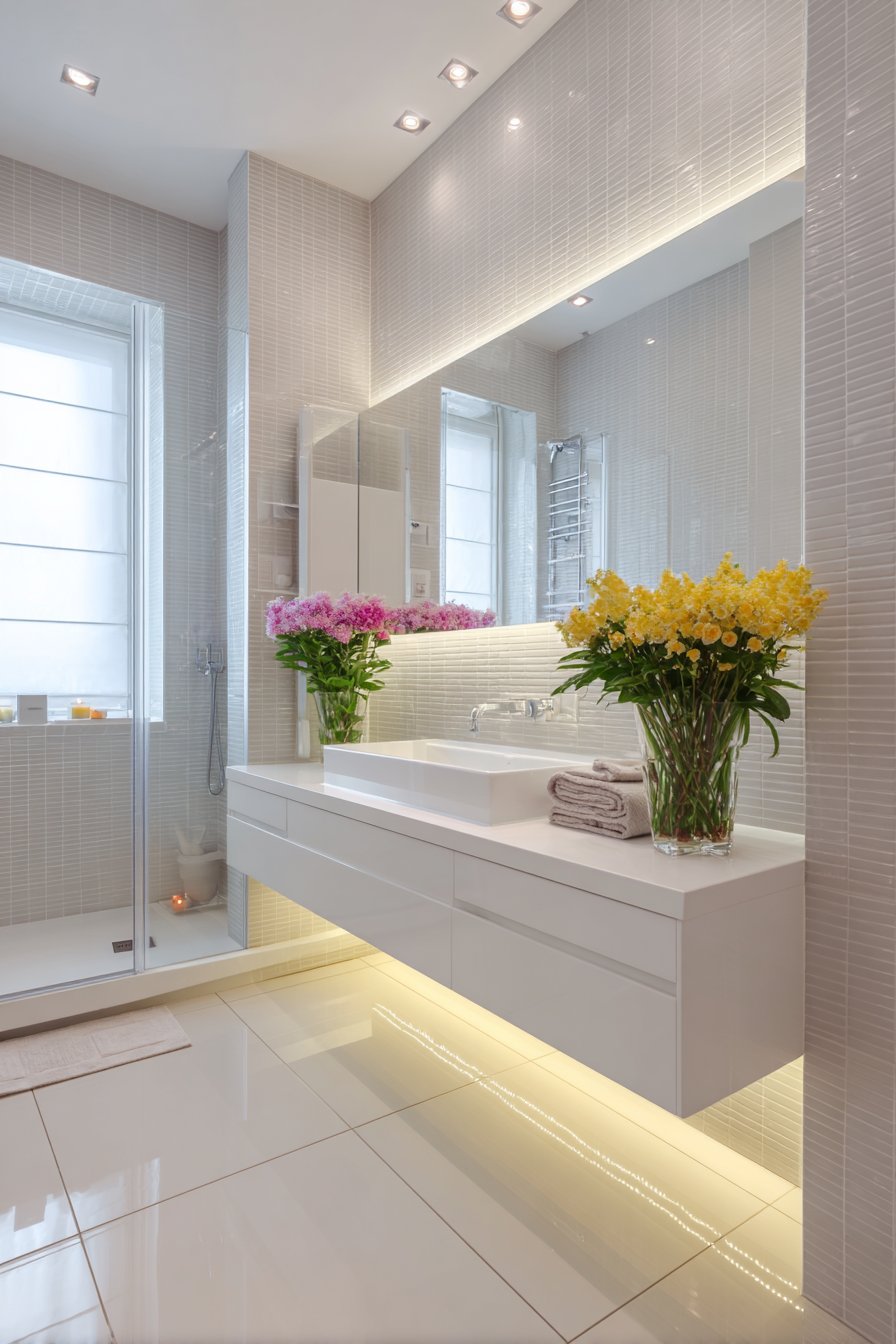
The backlit mirror provides flattering, shadow-free illumination for grooming tasks while creating a focal point that draws attention and adds drama to an otherwise utilitarian space. Under-vanity LED strips create a floating effect while providing subtle ambient lighting that makes nighttime bathroom visits safer without the harsh glare of overhead lights. This layered approach allows users to activate only the needed lighting level, from bright task lighting for makeup application to soft ambient lighting for relaxing baths.

Key Design Tips:
- Install dimmer switches for each lighting layer to control brightness levels
- Choose LED bulbs rated for bathroom humidity and appropriate color temperature (2700-3000K)
- Position recessed lights to avoid creating shadows on faces at the mirror
- Use backlit mirrors or mirror-mounted lights for optimal task lighting
- Install under-cabinet or under-vanity lighting for ambient nighttime illumination
- Consider motion sensors for under-vanity lights to provide automatic nighttime guidance
- Layer different lighting types (task, ambient, accent) for complete coverage and flexibility
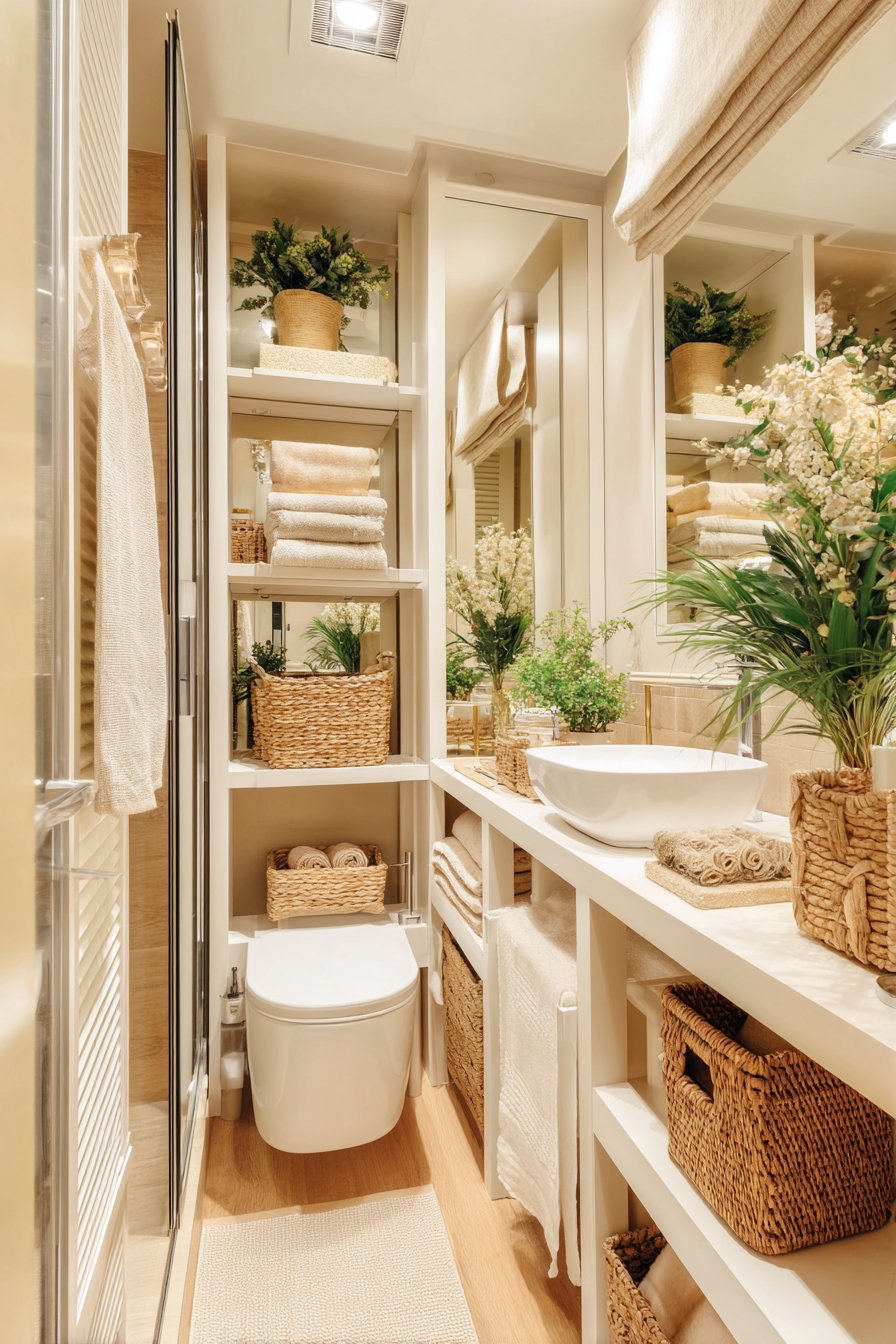
27. European Laundry Integration
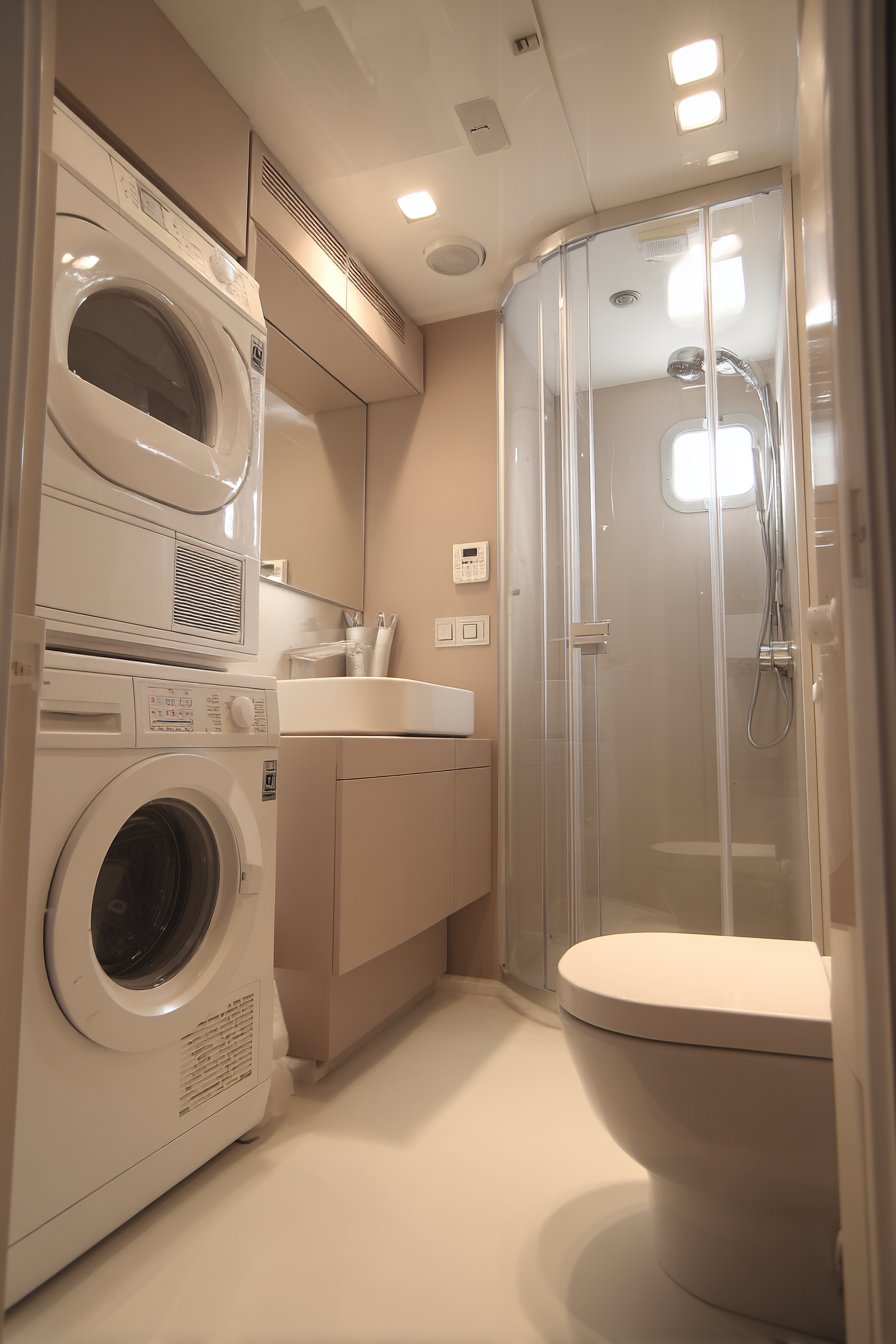
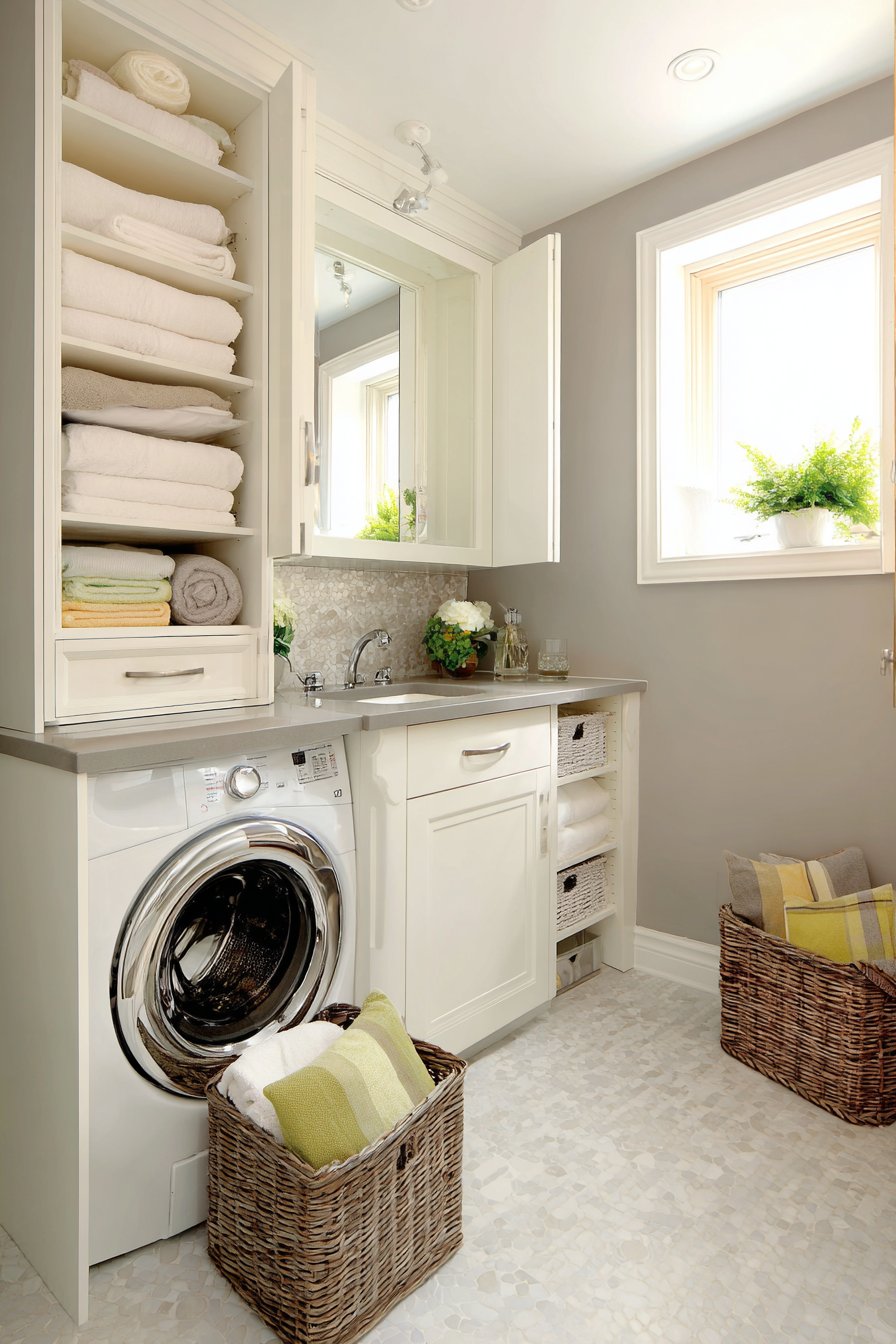
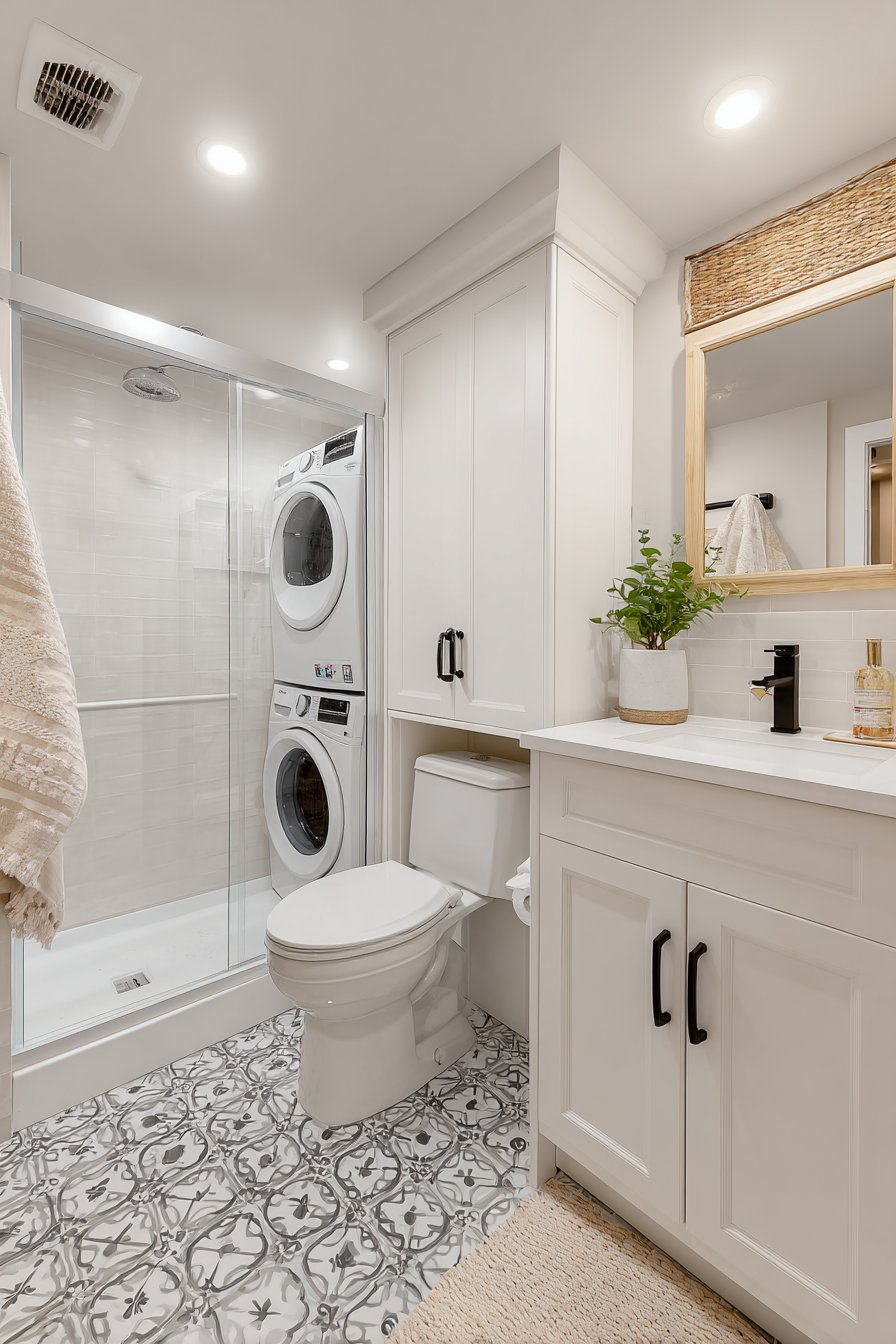
Multi-functional room design reaches its pinnacle when bathrooms incorporate laundry facilities, a common European approach that’s gaining traction in compact American homes where dedicated laundry rooms consume precious square footage. A combination washer-dryer unit integrated into a tall cabinet in a 45-square-foot bathroom creates a surprisingly functional multi-purpose space. The stacked unit sits beside a narrow shower stall with glass door, efficiently utilizing vertical space rather than consuming limited floor area.
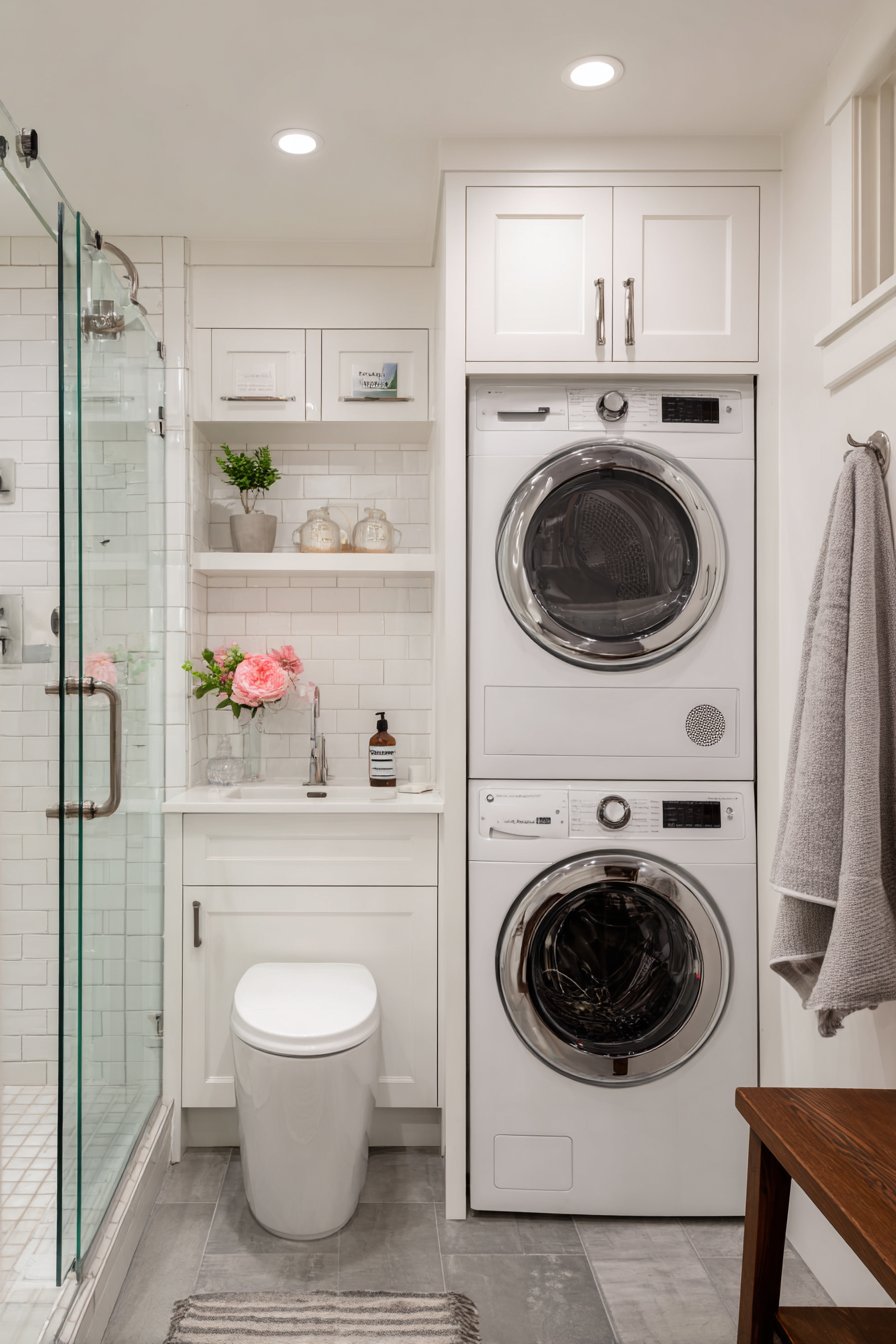
White cabinetry with soft-close doors conceals the appliances when not in use, maintaining the clean, bathroom-focused aesthetic rather than advertising the dual-purpose nature of the space. A small sink and wall-mounted toilet complete the multi-functional layout, each element carefully positioned to provide necessary bathroom functionality while accommodating the laundry equipment. Recessed lighting provides bright illumination for both bathroom and laundry tasks, essential when performing detailed work like treating stains or folding clothes.
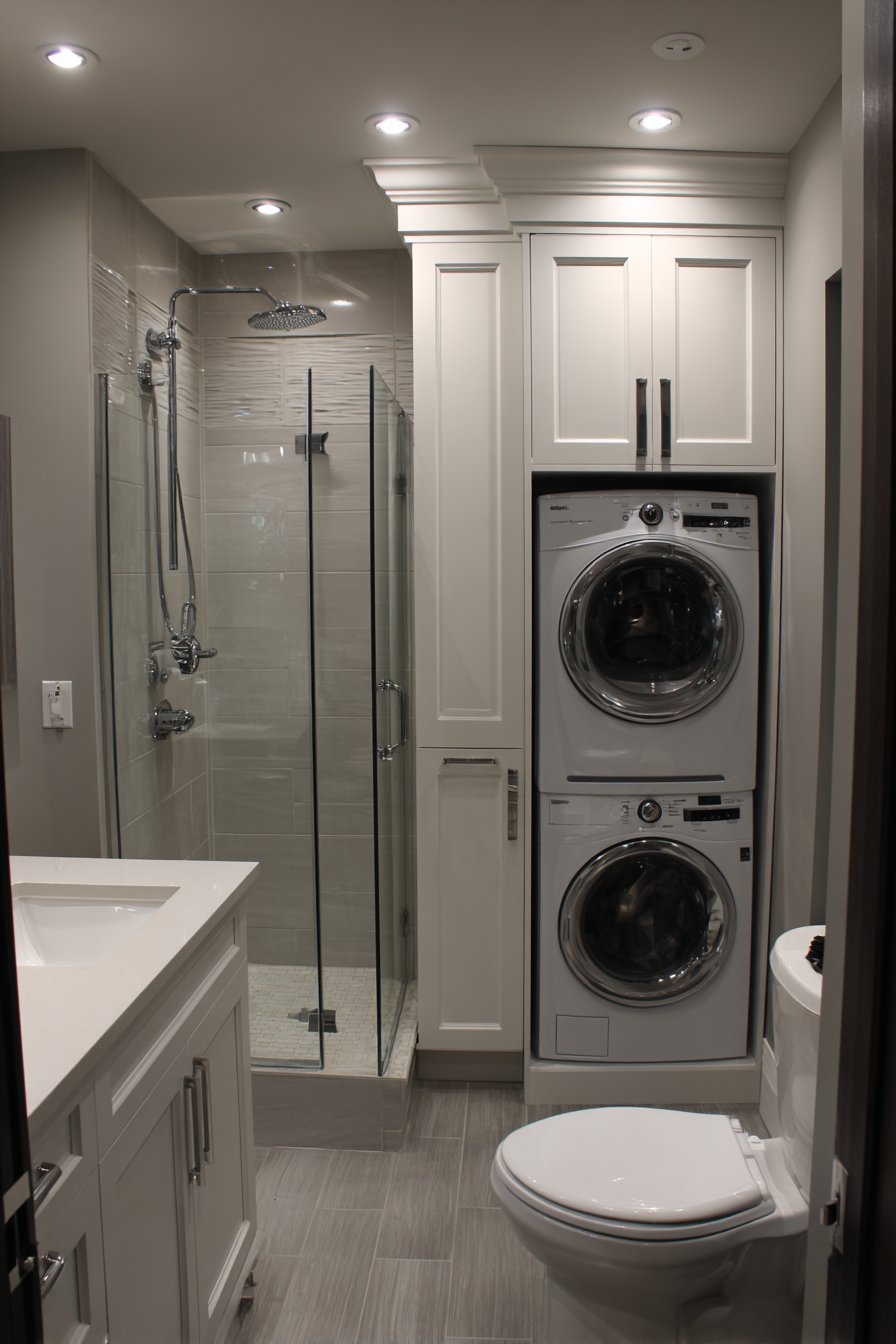
Interior design photography showcases the innovative multi-purpose bathroom design and space-efficient appliance integration, demonstrating how creative thinking can combine functions that traditionally occupy separate rooms. The combination washer-dryer eliminates the need for a separate dryer, saving the significant floor space that side-by-side or stacked separate units would require. This approach particularly suits urban apartments, tiny homes, or any situation where maximizing the utility of each room becomes paramount.
Key Design Tips:
- Choose combination washer-dryer units sized appropriately for the available space
- Ensure adequate electrical service (typically 220V) for the appliance
- Install proper ventilation if using vented dryer models
- Plan for water supply and drain connections near the appliance location
- Consider front-loading models for easier access in tight spaces
- Provide storage nearby for detergent and laundry supplies
- Install moisture-resistant materials near laundry equipment to handle potential spills
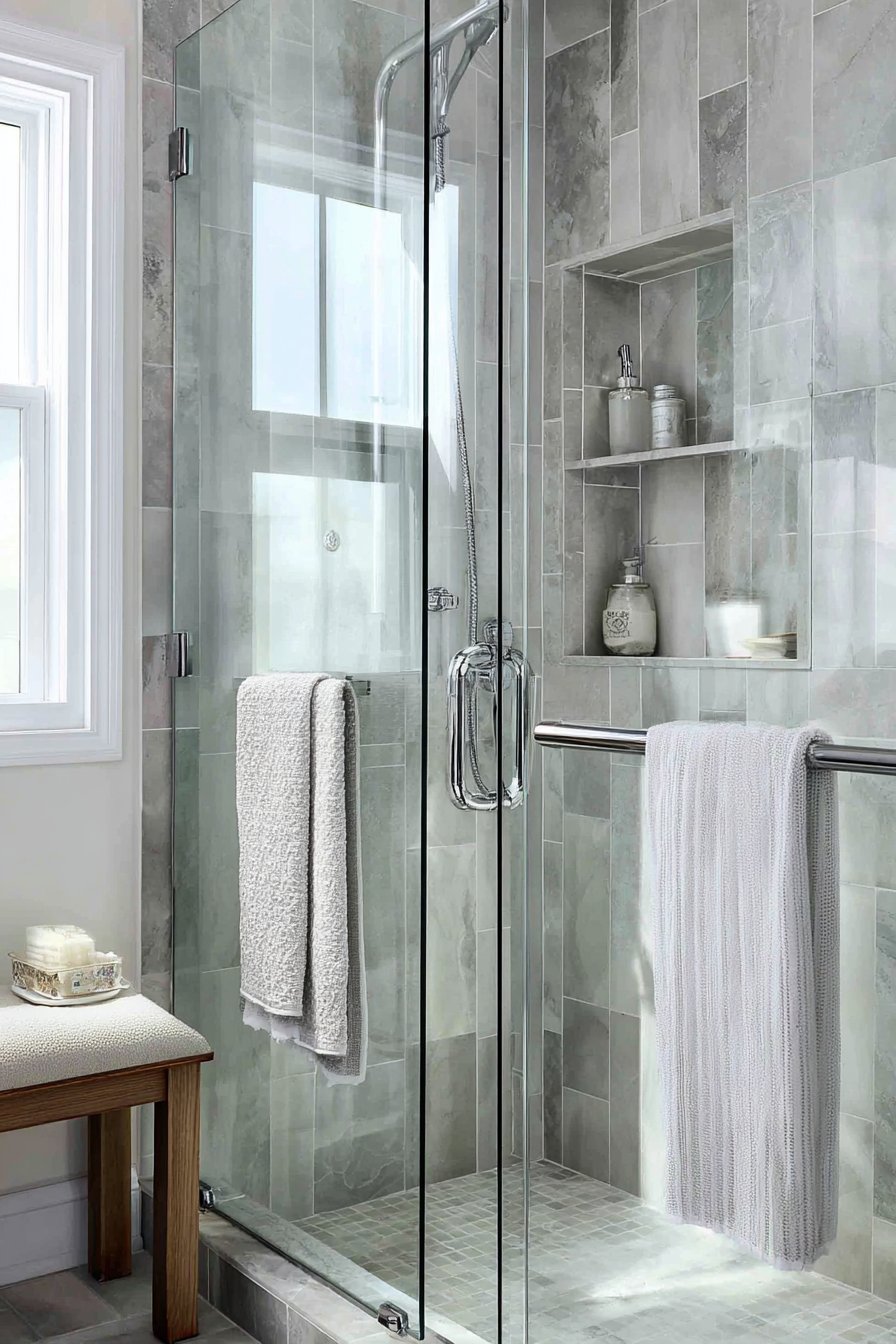
28. Frameless Glass Transparency
The elimination of visual barriers represents one of the most powerful strategies for expanding perceived space in tiny bathrooms, and frameless glass shower enclosures exemplify this principle perfectly. Clear glass panels with minimal chrome hardware create virtually no visual obstruction in a 40-square-foot bathroom, allowing sightlines to extend from the entry door through the shower area to the back wall, making the space feel significantly larger than its actual dimensions. This transparency becomes even more valuable when combined with white subway tiles that reflect light and maintain brightness throughout the entire bathroom.

A compact floating vanity and wall-hung toilet preserve floor space at ground level, working synergistically with the frameless glass to create a bathroom where as much floor area remains visible as possible. Natural light from a window creates bright, airy ambiance that floods through the transparent shower enclosure rather than being blocked by frosted glass or shower curtains. Wide-angle interior photography emphasizes the open sight lines created by the frameless glass and how transparency expands perceived space, demonstrating why this approach has become a standard recommendation for tiny bathroom renovations.
The installation and maintenance considerations for frameless glass deserve mention—these enclosures require precise measurement and professional installation to ensure proper fit and water containment. The glass panels are heavy and fragile during installation but extremely durable once properly mounted. Water spots and soap scum show more readily on clear glass than on frosted or textured surfaces, requiring regular squeegee use and cleaning to maintain the pristine appearance that makes the transparency worthwhile.
Key Design Tips:
- Invest in thick glass (typically 3/8 to 1/2 inch) for frameless installations
- Ensure precise measurements as frameless glass cannot be easily adjusted after fabrication
- Use high-quality water-repellent treatments to minimize water spotting
- Squeegee glass after each shower to prevent hard water buildup
- Choose minimal hardware in finishes that match other bathroom fixtures
- Plan for proper water containment despite the open appearance
- Consider a fixed panel with partial opening rather than fully enclosed if space is very tight
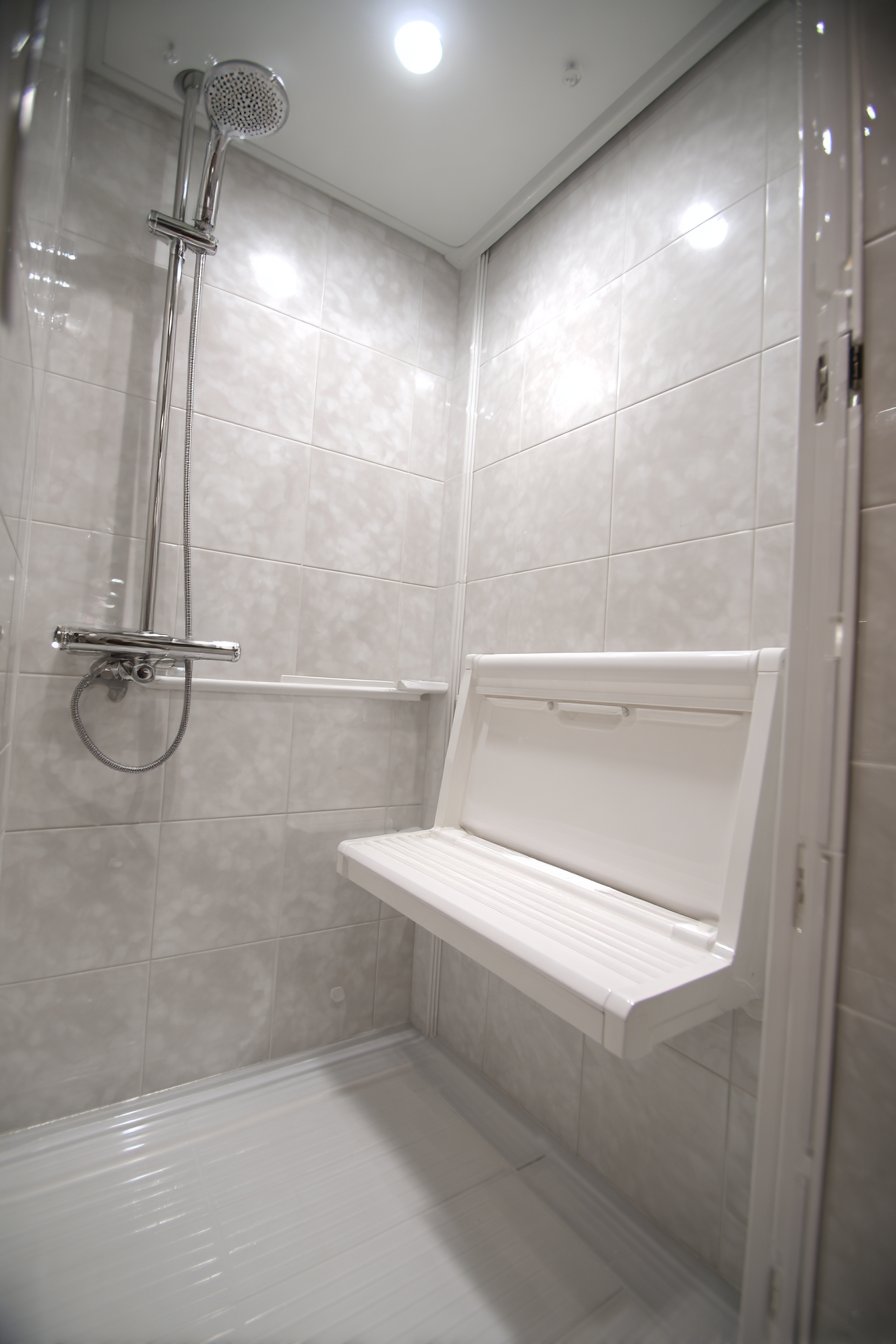
29. Fold-Down Shower Seat
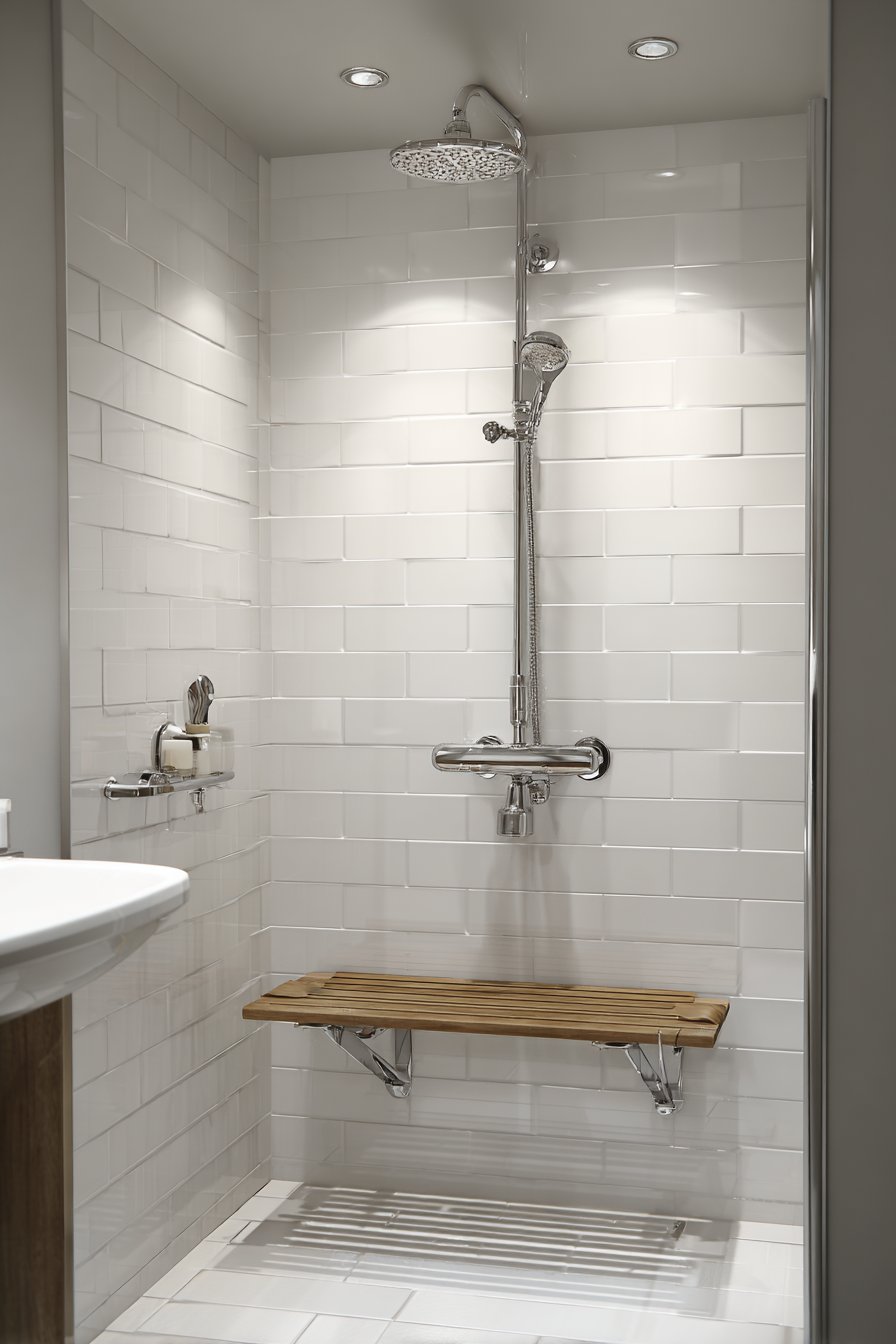
Accessibility features in bathrooms need not announce themselves as medical equipment, and modern fold-down shower seats demonstrate how universal design principles can integrate seamlessly into contemporary aesthetics. A wall-mounted shower seat with white teak wood slats provides seating during showering while folding away when not needed, maintaining the open feeling essential in a 4×4 foot shower. The white teak material matches the modern aesthetic while offering water resistance and the warm organic quality of wood.
Surrounding white large-format tiles with minimal grout lines create continuity across the shower surfaces, their expansive planes preventing the visual fragmentation that numerous small tiles would create in the compact space. Chrome fixtures and a rainfall showerhead add style and luxury touches that elevate the shower beyond purely functional status. Recessed ceiling light provides illumination without protruding into the limited overhead space where a surface-mounted fixture would create visual clutter and potential head-strike hazards.
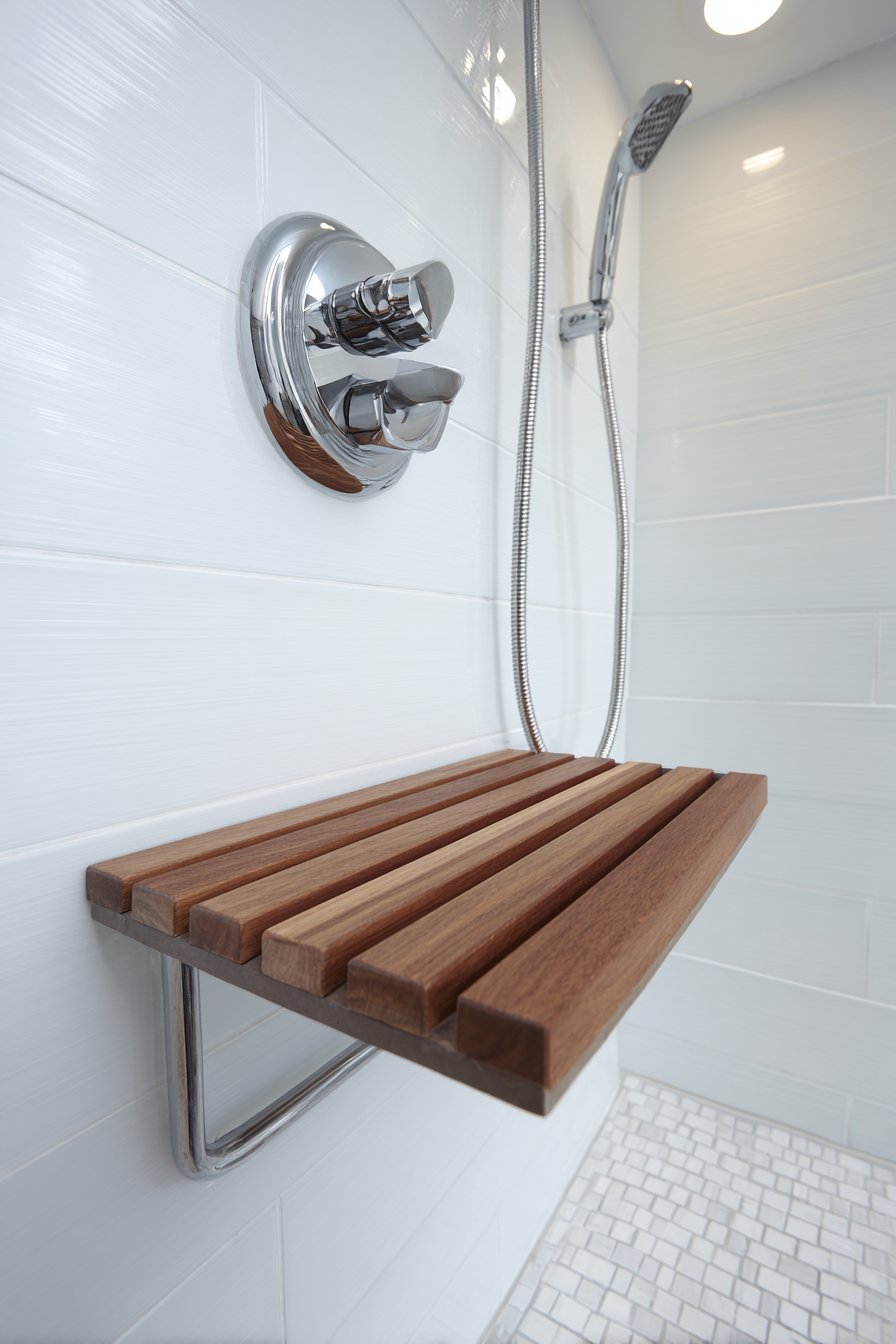
Interior photography captures the clever fold-away seating solution and practical design with attention to hardware details and tile work, showing how the seat mechanism operates smoothly while maintaining a low profile when folded against the wall. The installation requires proper backing within the wall structure to support both the mounting hardware and the weight of users, making this a renovation element best planned during construction or major remodeling when wall interiors are accessible.
Key Design Tips:
- Install proper backing (typically 2×8 or 2×10 boards) between studs for secure mounting
- Position seats 17-19 inches above the shower floor for comfortable sitting height
- Choose seats rated for appropriate weight capacity (typically 250-500 pounds)
- Ensure adequate clearance when folded down for users to sit comfortably
- Select materials appropriate for constant water exposure (teak, plastic, coated metal)
- Test folding mechanism regularly to ensure smooth operation and longevity
- Consider seats with integrated grab bars for additional safety
30. Two-Tone Paint Division
The strategic use of paint to create visual zones can add interest and dimension to tiny bathrooms without requiring any physical construction or fixture modifications. A two-tone paint scheme with white upper walls and soft grey lower walls divided by a subtle chair rail creates visual interest without overwhelming a 38-square-foot bathroom. This approach adds depth through color division while maintaining the overall brightness necessary in compact spaces—the white upper portion keeps the room feeling open while the grey lower section adds grounding weight.
A white pedestal sink, chrome fixtures, and a compact round mirror maintain simplicity, allowing the wall treatment to provide the visual interest rather than competing with elaborate fixtures or multiple design elements. White hexagonal floor tiles add subtle pattern at foot level without overwhelming the vertical surfaces with competing visual information. Natural light through a privacy window enhances the color division, creating subtle variations in how each paint color appears throughout the day as light conditions change.
Professional interior photography with balanced exposure shows how the two-tone approach adds depth while maintaining brightness in the compact space, demonstrating that color strategy deserves careful consideration in tiny bathrooms where every visual element affects spatial perception. The chair rail dividing the two colors doesn’t need to be elaborate or pronounced—a simple horizontal line created with painter’s tape during application can provide sufficient division between the two tones.
Key Design Tips:
- Position the color division at one-third height from floor for visual balance
- Choose colors from the same family (warm whites with warm greys) for cohesion
- Use lighter colors above the division to maintain ceiling height perception
- Consider how tile and fixture colors interact with both wall colors
- Apply the darker color below where moisture and splashing are more likely
- Use semi-gloss or satin finish for easier cleaning in moisture-prone areas
- Test paint samples in actual bathroom lighting before committing to colors
31. Japanese Soaking Tub Concept
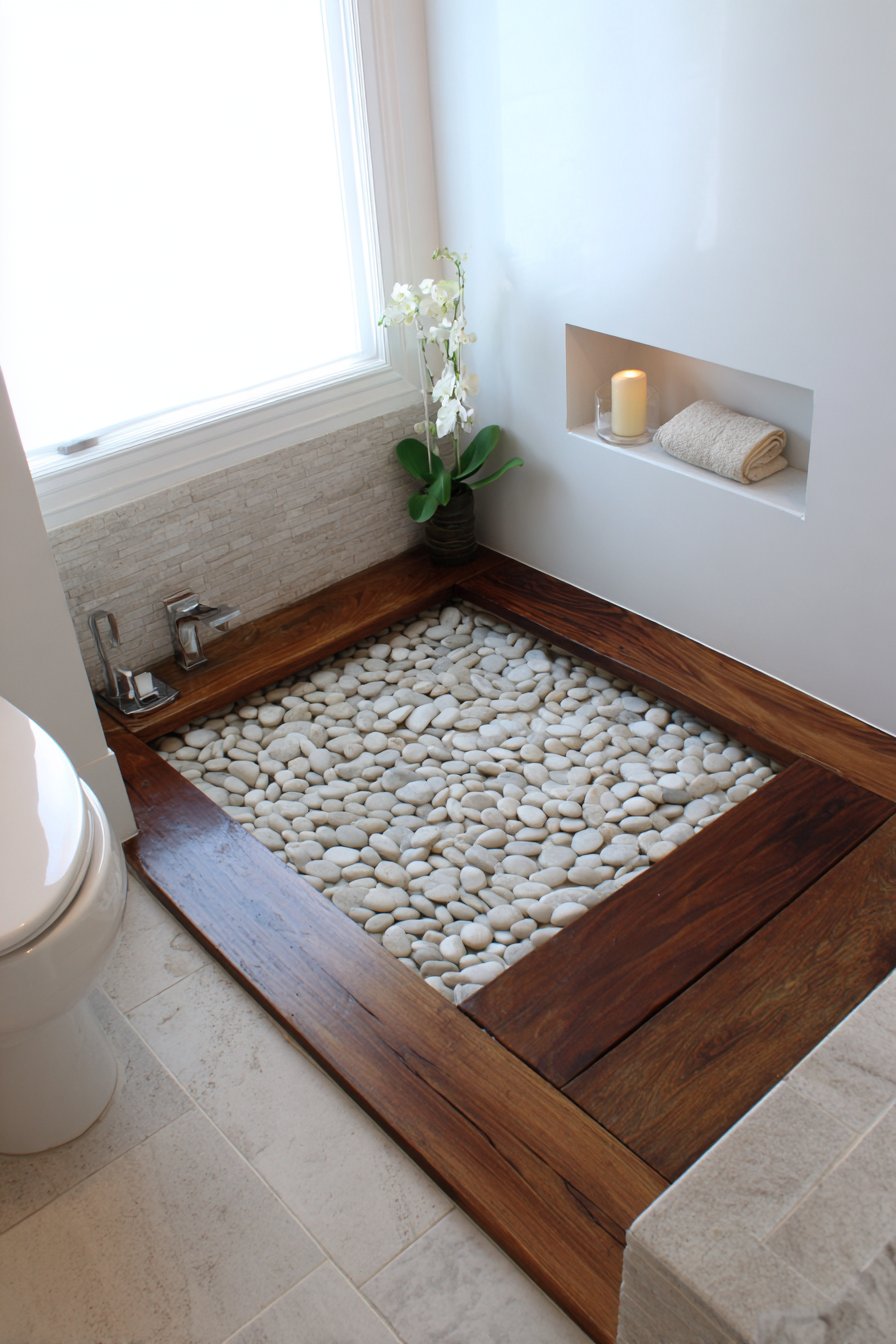
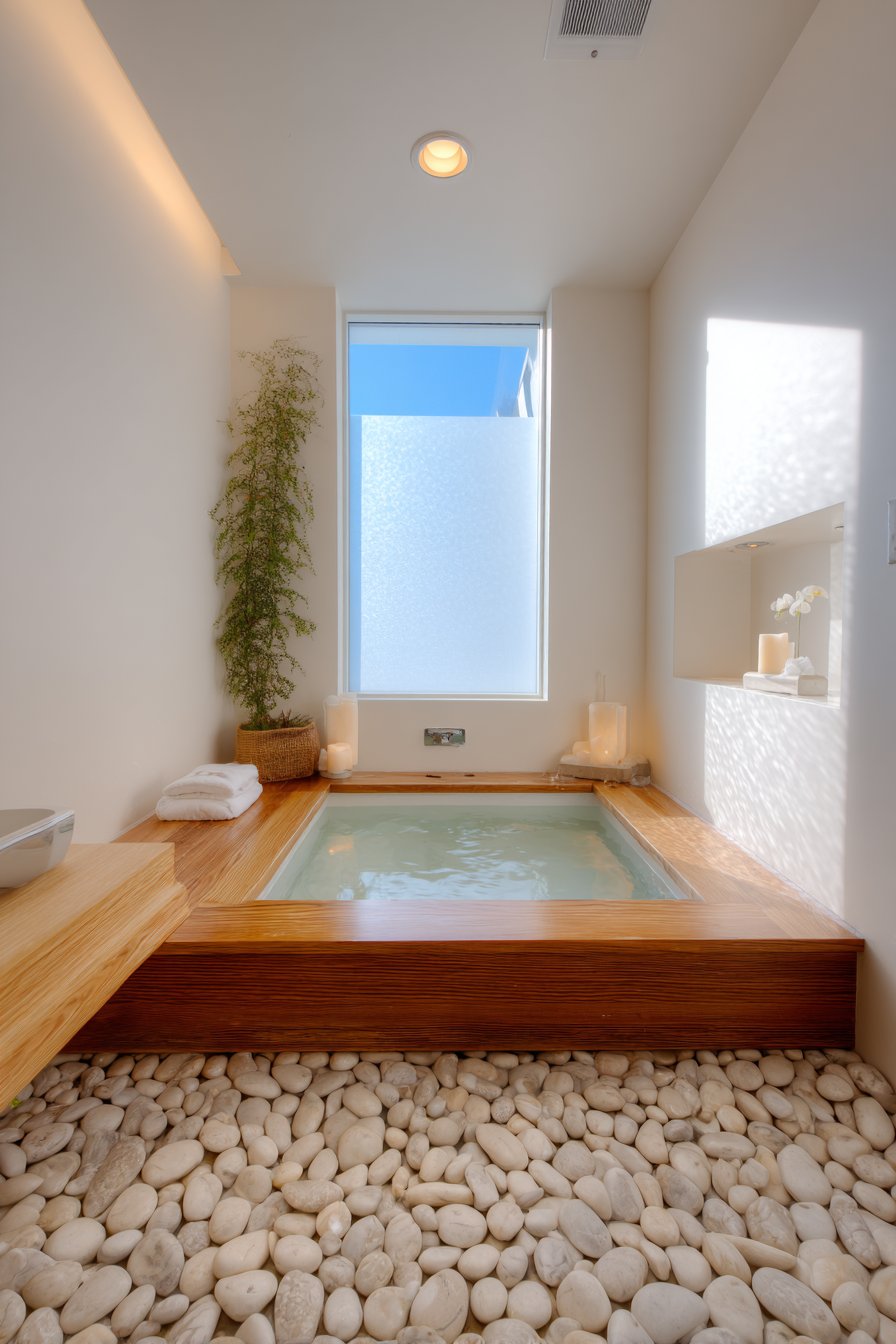
Western bathrooms typically prioritize tub length to accommodate reclining, but Japanese soaking tub design takes a radically different approach—maximizing depth while minimizing floor footprint to create an immersive bathing experience in minimal space. A compact deep square tub only 36 inches wide provides luxurious bathing in a 5×6 foot bathroom, its depth allowing users to sit upright with water covering shoulders rather than reclining in shallow water. Natural wood accents on the tub surround add warmth against white walls, referencing traditional Japanese bathing culture while adapting it to contemporary contexts.
A small shelf niche built into the tile holds bath essentials within easy reach without requiring separate caddies or corner shelves that would intrude into the compact bathing space. Pebble floor tiles create spa-like texture underfoot, their natural forms and varying sizes adding organic interest to the otherwise rectilinear bathroom. Soft natural lighting through a frosted window creates tranquil ambiance that supports the meditative bathing experience that deep soaking tubs facilitate.
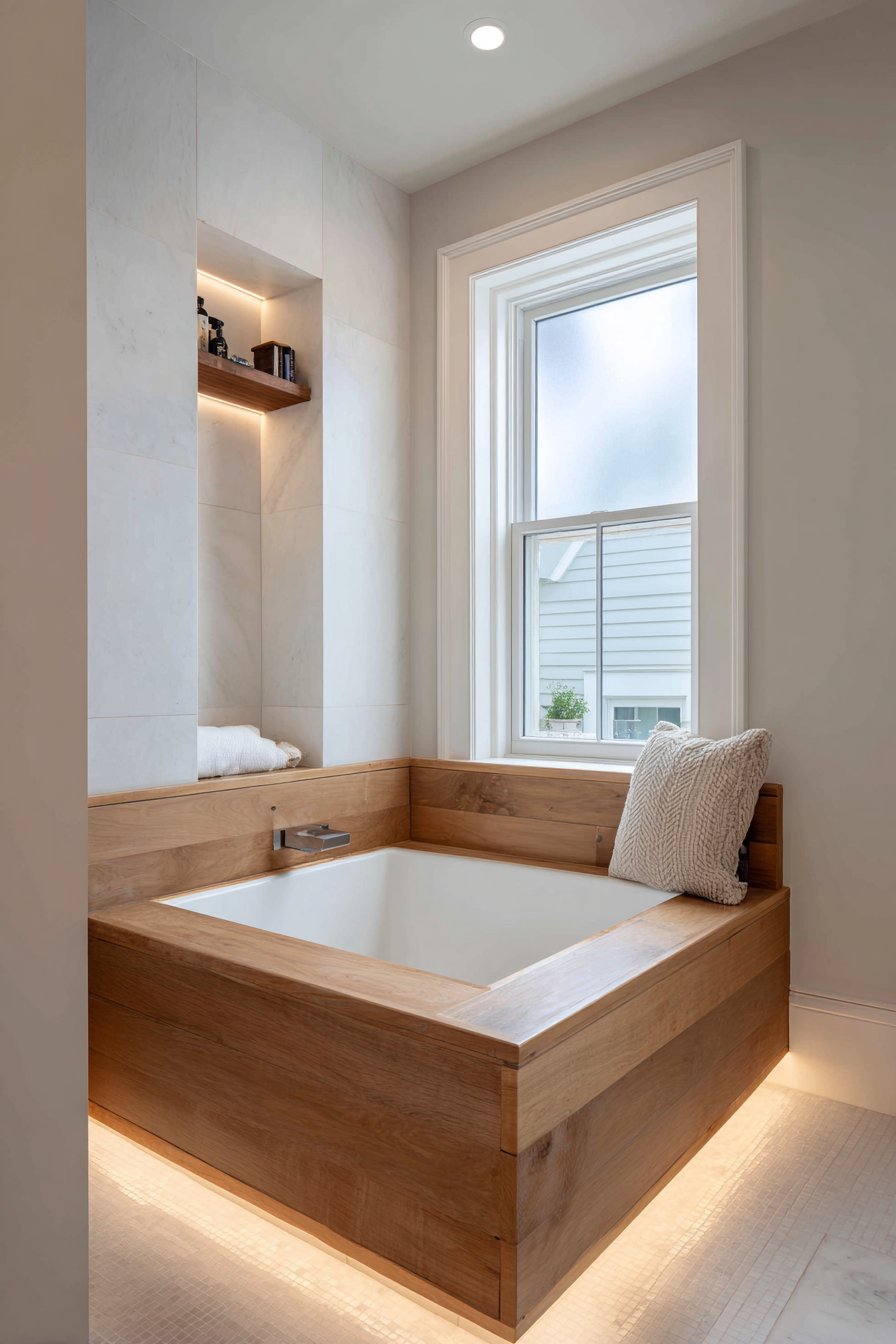
Interior design photography captures the deep compact tub design and zen-inspired material choices with attention to texture details, showing how this alternative bathing concept can transform tiny bathrooms from purely functional spaces into restorative sanctuaries. The installation requires careful attention to structural support, as deep soaking tubs filled with water and a bather can weigh significantly more than standard shallow tubs, potentially requiring floor reinforcement in second-floor bathrooms.
Key Design Tips:
- Choose tubs with depth of at least 22-24 inches for authentic soaking experience
- Ensure proper floor structure to support the increased weight of deep water-filled tubs
- Install grab bars or rails to facilitate safe entry and exit from deep tubs
- Consider built-in seating or steps for easier access
- Use non-slip surfaces inside and around the tub for safety
- Install water heater with adequate capacity to fill deep tubs completely
- Create a dedicated drying and dressing area adjacent to the soaking tub
- Incorporate storage for bath accessories like wooden buckets or loofahs
Why These Tiny Bathroom Ideas Represent the Best Design Solutions
The collection of tiny bathroom ideas presented in this comprehensive guide represents more than just aesthetic choices—they embody fundamental principles of space planning, human psychology, and functional design that separate truly effective small-space solutions from superficial styling. Each approach addresses specific challenges that arise when working within severe spatial constraints, from the purely practical matter of fixture placement to the more subtle considerations of how materials, colors, and lighting affect our perception of space. These designs succeed because they respect both the physical limitations of tiny bathrooms and the psychological needs of users who must find these compact spaces comfortable and inviting despite their size.
The emphasis on visual transparency through frameless glass, strategic mirror placement, and careful color selection reflects our understanding that perceived space matters as much as actual square footage in determining user comfort. When we look at the most successful tiny bathroom designs, we consistently see thoughtful manipulation of sightlines, deliberate use of reflection, and careful control of visual weight through material and color choices. These aren’t accidental aesthetic decisions—they’re informed by decades of design research demonstrating how human perception responds to spatial cues, making rooms feel larger or smaller based on visual information rather than mere measurements.
Functionality receives equal consideration to aesthetics in these designs, recognizing that tiny bathrooms must work harder than their spacious counterparts to justify their existence. Multi-functional furniture like vanities with integrated hampers, space-reclaiming innovations like pocket doors and wall-hung toilets, and clever storage solutions like recessed niches and over-toilet shelving demonstrate how thoughtful design can pack remarkable utility into minimal footprints. The best tiny bathroom ideas don’t ask users to sacrifice comfort or convenience—instead, they solve spatial challenges through intelligent planning and innovative thinking that makes small spaces work as well as or better than larger rooms designed without such constraints.
The variety of styles represented—from sleek modern minimalism to warm cottage charm, from spa-inspired serenity to practical European efficiency—proves that spatial constraints need not dictate aesthetic outcomes. Whether you’re drawn to the clean lines of contemporary design, the warmth of natural materials, or the timeless appeal of classic bathroom fixtures, these ideas demonstrate how personal style can flourish within careful planning and strategic design decisions. The materials, finishes, and fixtures may vary, but the underlying principles of space maximization, visual expansion, and thoughtful functionality remain consistent across all successful tiny bathroom designs.
Lighting strategy emerges as a critical element that separates exceptional tiny bathrooms from merely adequate ones, with the best designs incorporating multiple light sources, natural illumination, and careful attention to how light interacts with materials and surfaces. The layered lighting approaches, strategic window placement, and thoughtful fixture selection visible throughout these examples demonstrate that adequate illumination isn’t just about brightness—it’s about creating depth, eliminating shadows, and enhancing the spatial qualities that make tiny bathrooms feel comfortable rather than cramped. Backlit mirrors, under-vanity lighting, recessed ceiling fixtures, and natural light all work together to create bathrooms that feel open and inviting regardless of their compact dimensions.
Storage solutions receive particular attention in these tiny bathroom ideas because inadequate storage represents one of the primary frustrations users experience in compact bathrooms. The approaches presented—from open shelving and recessed niches to built-in cabinetry and mobile carts—recognize that storage needs vary based on household size, personal habits, and lifestyle requirements. Rather than prescribing a single solution, these designs offer diverse strategies that can be adapted to individual circumstances, whether you’re a minimalist who requires little storage or a family that needs to accommodate numerous products and accessories within limited space.
Material choices throughout these designs reflect careful consideration of how surfaces affect both the functionality and perception of tiny bathrooms. Light-colored tiles that reflect rather than absorb illumination, smooth surfaces that make small spaces easier to clean, durable materials that withstand bathroom humidity, and textured elements that add visual interest without overwhelming compact rooms—each material selection serves specific purposes beyond simple aesthetic preference. The most successful tiny bathrooms demonstrate sophisticated understanding of how materials perform in challenging environments while contributing to the overall design vision.
The integration of European design concepts, particularly regarding multi-functional spaces and compact fixtures, brings decades of small-space expertise to American bathroom design. European bathroom traditions evolved within spatial constraints that forced innovation in fixture design, room layout, and space utilization—lessons that translate directly to tiny bathroom challenges regardless of geography. Compact soaking tubs, combination washer-dryers, wall-hung toilets, and other European-inspired elements demonstrate how cultural differences in space utilization can inform better design solutions for contemporary American small-space challenges.
Accessibility considerations appear throughout these designs, not as afterthoughts or medical necessities, but as thoughtful elements that improve usability for all users. Fold-down shower seats, grab bar locations, curbless showers, and appropriate fixture heights represent universal design principles that make bathrooms safer and more comfortable without announcing themselves as accessibility features. The best tiny bathroom ideas recognize that good design serves diverse users with varying abilities, ages, and physical needs without requiring separate “accessible” and “standard” design approaches.
Color psychology plays a subtle but significant role in making tiny bathrooms feel comfortable and inviting, with successful designs demonstrating sophisticated understanding of how color affects spatial perception and emotional response. The predominance of light, neutral palettes throughout these examples isn’t mere design convention—it reflects demonstrated effectiveness in creating the sense of openness and brightness that makes small bathrooms feel less confining. Yet within these light palettes, designers introduce warmth through wood tones, interest through textural variations, and personality through carefully chosen accent colors that prevent sterile, institutional feelings.
Fixture selection represents another area where tiny bathroom design requires particular discernment, as standard residential fixtures often prove oversized for extremely compact spaces. Wall-mounted sinks, corner vanities, compact toilets, and scaled shower fixtures demonstrate how choosing appropriately-sized elements can dramatically improve tiny bathroom functionality and appearance. The most successful designs avoid the temptation to simply squeeze standard fixtures into inadequate spaces, instead seeking out compact alternatives specifically designed for small-space applications.
The emphasis on professional interior photography throughout these examples acknowledges that documentation and visualization play important roles in understanding and implementing design ideas. Wide-angle perspectives, attention to lighting, focus on material details, and careful composition help convey how these design strategies work in real spaces, providing inspiration and practical guidance for homeowners and designers tackling their own tiny bathroom challenges. Quality photography reveals the nuances and details that make designs successful, from the interplay of light and shadow to the specific ways materials and colors interact in compact spaces.
Ventilation and moisture management, while less visually exciting than fixture selection or color palettes, receive appropriate consideration throughout these designs. Proper ventilation prevents the mold, mildew, and material degradation that can plague bathrooms, particularly compact spaces where moisture has less room to dissipate. Windows, exhaust fans, moisture-resistant materials, and proper surface slopes for water drainage all contribute to bathrooms that remain healthy, fresh, and attractive despite the challenges that humidity presents in enclosed spaces.
The variety of budget levels represented across these tiny bathroom ideas makes them accessible to diverse homeowners, from renters making temporary improvements with rolling carts and new shower curtains to homeowners investing in complete renovations with custom tile work, frameless glass, and high-end fixtures. This spectrum demonstrates that improving tiny bathrooms doesn’t require massive budgets—thoughtful planning, strategic choices, and careful execution can transform compact bathrooms at virtually any price point. Some improvements cost mere dollars and require no special skills, while others demand professional installation and significant investment, giving every reader options appropriate to their circumstances.
The underlying message throughout these 31 tiny bathroom ideas remains consistent: spatial constraints inspire creativity rather than limiting it, and thoughtful design can transform even the most challenging compact bathrooms into spaces that feel comfortable, function effectively, and reflect personal style. Whether you’re working with a 35-square-foot powder room or a 50-square-foot full bath, these principles and strategies provide pathways to success. The specific fixtures, materials, and colors you choose will reflect your preferences and circumstances, but the fundamental approaches to maximizing space, enhancing perception, and improving functionality apply universally to tiny bathroom design.
Conclusion
Designing and decorating tiny bathrooms presents unique challenges that demand creative solutions, thoughtful planning, and strategic decision-making at every turn. As this comprehensive exploration of 31 distinct approaches demonstrates, spatial limitations need not constrain aesthetic possibilities or functional requirements—instead, they inspire innovation and force us to carefully consider each element’s purpose and impact. From corner-mounted fixtures that capitalize on underutilized space to frameless glass that eliminates visual barriers, from wall-hung toilets that create floating effects to layered lighting that enhances depth perception, the strategies presented here offer practical pathways to transforming compact bathrooms into comfortable, attractive spaces.
The most successful tiny bathroom designs share common threads: they prioritize visual openness through transparency and reflection, maximize functionality through multi-purpose elements and thoughtful storage, maintain brightness through light colors and adequate illumination, and create interest through texture and material variation rather than overwhelming pattern or color. These principles apply whether your aesthetic leans toward modern minimalism, rustic warmth, classic elegance, or spa-inspired tranquility. The specific manifestation may vary, but the underlying strategies for conquering spatial challenges remain remarkably consistent.
As you approach your own tiny bathroom project—whether a complete renovation or a simple refresh—remember that every design decision matters in compact spaces where each element significantly impacts the overall experience. Take time to plan carefully, consider how different elements work together, and don’t hesitate to seek inspiration from multiple sources before committing to specific fixtures, colors, or layouts. Measure meticulously, think vertically as well as horizontally, embrace transparency and reflection, and recognize that sometimes the smallest changes—a new mirror, better lighting, or a fresh coat of paint—can dramatically transform how a tiny bathroom feels. Your compact bathroom may never be spacious, but with thoughtful design, it can certainly be comfortable, functional, and beautiful.